
CoyoteCrunch
-
Posts
35 -
Joined
-
Last visited
Content Type
Profiles
Forums
Events
Gallery
Everything posted by CoyoteCrunch
-
Roland Leong's Hawaiian Charger Funny Car 1/16
CoyoteCrunch replied to CoyoteCrunch's topic in WIP: Drag Racing Models
Thanks twokids! Loved this build, gonna start another this winter I believe -
I know if you take a blue sharpie, dab it on a dampened q tip, and wipe the q tip on the header, you can get this result.
-
I know this build!!! looks just as awesome here on this site as well bud - excellent build!!!
-
I myself have got to start building some of these hot rods. Have tons of them in the collection - and you have definitely nailed it for the frist go round - seriously awesome work here - engine is detailed supremely well, the stance is spot on street worthy, very nice work!!
-
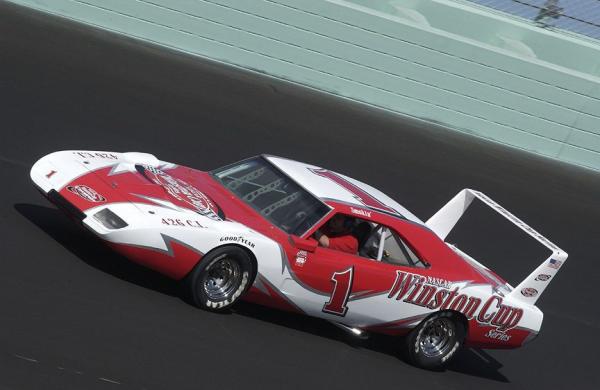
Nascar 1968
CoyoteCrunch replied to satterwhite78's topic in WIP: Stock Cars (NASCAR, Super Stock, Late Model, etc.)
Some really awesome builds here. love that dio you use as well, even seen some tire marks n the wall - now thats an eye for detail!! But the cars, they sure are some nice builds!!! -
Roland Leong's Hawaiian Charger Funny Car 1/16
CoyoteCrunch replied to CoyoteCrunch's topic in WIP: Drag Racing Models
I remember you Hemi - oh yes - I do!! Especially the thong in the sleigh build!!! LOL -
Roland Leong's Hawaiian Charger Funny Car 1/16
CoyoteCrunch replied to CoyoteCrunch's topic in WIP: Drag Racing Models
Thank you Danno and Magic M - was a fun build, I recommend to all. -
I so thank you Old C - and Slusher - most appreciated!!
-
I almsot picked this one up yesterday at Hobby Lobby, the newer release anyways. I may still get it, I like how yours came out. Excellent looking!!!!
-
Very nice work, love that interior!!!
-
Thanks John - such a big site here, almost overwhelming really!
-
Thanks everybody - I do appreciate it!
-
Old build from back in the day. So far back, it was before I even knew about BMF, or flocking, etc.
-
Thank you Speedfreak! And hey there Frank!!! Awesome man, you are here as well!!! Too Cool!!!!!!!
-
Roland Leong's Hawaiian Charger Funny Car 1/16
CoyoteCrunch replied to CoyoteCrunch's topic in WIP: Drag Racing Models
Thanks again everyone - I must say I do like this build. Thinking to do another, but some other paint scheme - Hmmmm..... -
LOL - no sir Shafter44, but that is kind of weird though - Ha!
-
Hey Joel!!!! This is nuts!!! First Paul is here, then DeeCee commented on some pictures I posted, and now you are here as well!! Too cool man, I bet all you guys have been here for years or something, LOL Me, I just found the place from a Google search, Lol. This place is HUGE dude, (I think JC's is way better!! But you should know that! Ha!) But man, talk about huge here, it's almost to huge - if I were to donate here, i would certainly go broke!! HAHAHAHA!!!
-
Roland Leong's Hawaiian Charger Funny Car 1/16
CoyoteCrunch replied to CoyoteCrunch's topic in WIP: Drag Racing Models
Hey - Dale!!! I know you man!! Too cool!! Thanks bud And thank you everyone else. This was a fun build, As far as a tutorial on decals. I will take some pictures of the steps I do when I make another sheet and post them. I just use the regular Testors decals sheets, and decal bonder spray. I Googled some flames pictures, saving the image to the computer. Then I start a document, insert the picture, stretch it and size it to what I want. I do this so I can cut out the decals and lay them against the model to see if they need re-sizing for where I want to place them. The biggest tip I could give would be to test print, several times, using the "draft" option so you do not waste so much ink each test print. Once you have sized everything, and when you are ready, put a piece of decal paper on a page you test printed. The Testors sheets are like 1/2 the size of a regular 8 x 11.5 sheet of paper, and depending on where and how you have your images on the document to print, it may be in a different area on the page. By test printing, you can move your images to get them to all fit within the size of your decal paper. Then I just tape down the decal paper in each corner, print and spray with the decal bonder and walk away for 24 hours or more. What I need to get and see if it helps is this microsol stuff I have heard about, to see if would help these to be more limber, they are pretty stiff decals. Also, it's not like the kit decals you get, or those made with an ALPS printer. There are two types of Testors decal sheets you can buy, one is a white background, and one is a clear background. If you print on white backing paper, you do get the vibrant colors - BUT - you would have to trim right to the flames, and thats nearly impossible. I mostly make my own when I can use clear backing paper, so I can just cut out the decal I want to use close to the image, But, when using clear backing sheets, you are limited to the color you apply them to. As a rule, if my build is white, anything goes, but like this one, the blue flames only showed on the silver really. Which in this case was ok by me, as I wanted them to blend in if you will with the cars blue paint job. This reminds to get to work on your decals Dale I keep forgetting about them! -
Thank you MGL and Slusher - I do appreciate that!
-
Thanks bbowser and towman - I do appreciate that!
-
This is a "Raced version" I built a few years back of Kevin Harvick's Rookie Chevy Monte Carlo
-
Hey there Paul!!!
-
Green flocking for the headliner and carpet. Good old fashioned, rattle can Testors racing green and clear coat. Had to "double lay" the white stripe decals. Also used some PE for the emblems, wired the motor, and I even made a dome light for the interior! I really enjoyed this build, the one thing that did not come out well was the BMF for the chrome trim. Unfortunately, I used an off brand off BMF and it was horrible. It has since been thrown away! Anyways, it came out pretty good I think.
-
Roland Leong's Hawaiian Charger Funny Car 1/16
CoyoteCrunch replied to CoyoteCrunch's topic in WIP: Drag Racing Models
Thanks Harry P - it worked! I do appreciate it!! -
Roland Leong's Hawaiian Charger Funny Car 1/16
CoyoteCrunch replied to CoyoteCrunch's topic in WIP: Drag Racing Models