Ro3bert
-
Posts
84 -
Joined
-
Last visited
Content Type
Profiles
Forums
Events
Gallery
Everything posted by Ro3bert
-
Davey,
-

Model Cars magazine(s)
Ro3bert replied to Ro3bert's topic in General Automotive Talk (Trucks and Cars)
Well Bill, quite a surprise that after all that time I should happen onto the forum related to the magazine. Good to know it is the same magazine and that Gregg is at the helm now. Robert -
I've been beating myself over the head about the head bolts to the extent I've neglected everything else about the model so today I took a step back and looked for other things to do so went through the instructions deciding what colors I wanted things to be. Seems the instructions want mostly glossy black and what really is Ferrari Red and while I like red on a Ferrari not so much on a Jaguar. Haven't decided what color it should be so have been giving it some thought about some sort of "Candy Apple", Blue or Turquoise or possibly BRG (British Racing Green) but that is only a distant possibility. Did get the steering wheel painted (mostly that is), still have a small area to do where the clamp is holding it. Too, the first coat want on the throttle bar. (Images later). So tomorrow I expect to begin shooting parts then assembly after the paint cures a couple of days, if not more that is. Meanwhile I'll keep fighting the engine. I think I've mostly licked the head bolt problem but it is still going to be a messy job. Once that situation is solved the rest will be easy. Thank xxxx for the Unimat 1, makes things easier. Robert
-
While working on my 1:8 Jaguar XK-E I have also been setting up my "shop" in my attic. In the process I went out to our out building I used to do my modeling in to bring the electric cooktop (one heater) and decided to bring up a couple of unfinished kits, a 1:8 1988 Ferrari and a 1:12 MG-TC pf the same time frame. I also found an old Honda F1 I finished long ago. While there I looked over some old model magazines, a how to make models and a manual on my Unimat 1. Ok, now here is the thing, there were a number of magazines about building model cars, so I grabbed a few to bring up to the house. After looking at them I think I have stumbled into a number of old "Model Cars". Someone here can tell me if in fact they are of the same company as the above Model Cars that runs this forum. If so the ones I have brought up so far run from July 2002 to sometime in 2003. The publisher is (or was) Larry Bell and the editor was (or is) Greg Hutchings. If this is the case what a coincidence. Is this what I have? If so there are more still in the "barn" (8X12 foot barn) though not many. It is a pleasing prospect. Robert
-
Welcome, Mike.
-
Ethaniel, . I've traveled extensively in PA but have never been to or thru Lock Haven so have no idea where it is. Robert
-
What kind of car is this
Ro3bert replied to HDDan's topic in General Automotive Talk (Trucks and Cars)
I was there in 1958 and 1959. Traveled over much or Eastern England including London, so probably during the rusting time. Robert -
What kind of car is this
Ro3bert replied to HDDan's topic in General Automotive Talk (Trucks and Cars)
I hope someone recognizes it, I don't think I've ever seen one like it while I was in England. I'ts kind of a pretty car.I know it can't be but the emblem in the center of the grill resembles the Lancia or Maserati mark. On the other hand the piece on the hood (bonnet) is totally unrecognizable. Robert Looks like I'm wrong for the second time in my life. -
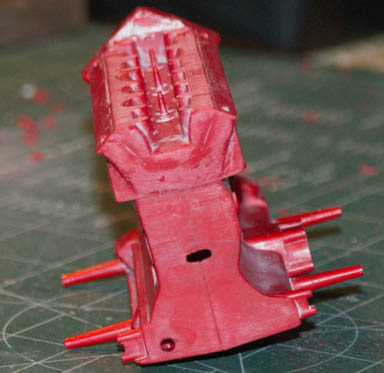
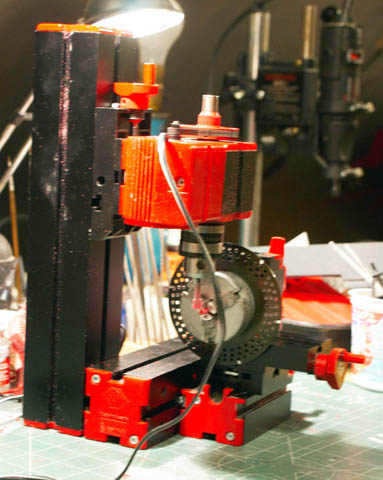
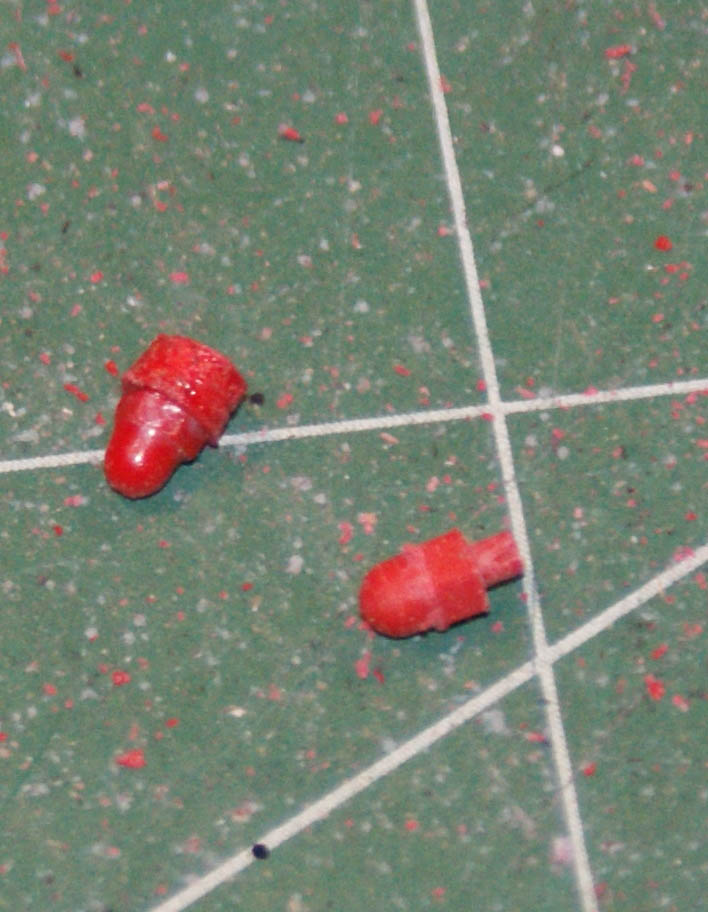
I'm back, finally. I was waiting for some paint bottles to arrive before I continued though I shouldn't have waited. Unfortunately, as someone has said, life gets in the way on occasion. So I'm back at it, just hope I haven't bitten off more than I can chew. I should never compared this model with the Tamyia Carrera 10 as the quality is not up to Tamyia standards of manufacture. Too, I made the mistake of looking at a build of a Ford model T made of brass. It made me want to make some changes in the Jaguar. Also I browsed around the web for images of the E type Jaguar and found many. One in particular showed the top of the head painted (or powder coated) in a yellowish gold color. I decided to to the same along with painting the block black. The rest of the car will be painted in as nearly normal colors as I know how. Those items that are aluminum painted to resemble that metal. Steel will be colored with an iron color, and Chrome probably with Alclad Chrome. To that effect I decided to remove the acorn head nuts to make them chrome. Unfortunately they are extremely small they measure about 0.015” across the flats. I have a Unimat 1 that I set up to mill the acorn head bolts in styrene using a horizontal mill set up. I milled a number of them but found they tapered too much at the length I was trying. I thought I was thinking ahead but found I needed to put much more thought into how I was going to make them. Finally I decided to take them all off at the bottom, add whatever amount needed to get them to the right height. That hasn't worked. So here is where I am now. You can see where I removed one nut (on the opposite side where you can see where I had to fill a hole I drilled in the head). It is hard to see but I used a Gyro saw blade to begin removing the rest of the nuts. It's a pretty ragged cut since I held the Dremel by hand. There was some trouble with melting the plastic since at slow speeds the saw gets bogged down and melts the plastic rather than only cut. Pictures I took of the top of the head after removing all the nuts and part of the head itself haven't come out as clear as I hoped so I'll have to re-do them. (apparently my picture taking skills are not up to snuff). It turns out I have no choice but to make the nuts rather than reinstalling them after the chrome is added. I've already spent a couple of hours milling hex rod lengths using a horizontal mill setup but the plastic is so soft the ends furtherst from the chuck bent down so were larger than they supposed to be. This time I will be using a vertical mill as opposed to horizontal. I've tried it and it seems to work ok. So I have to make 14 head bolts so tiny I can only pick them up with tweezers. Here is an image of the engine after removing all the bolts and incidentally part of the head itself. I used a circular saw in the Unimat but it did as much melting as cutting. It was a mess, had to sand, file and cuss to make a flat surface to add the nuts to. Of course I have to make the nuts before I can go any further. I've set the Unimat up for vertical milling. These are the original nuts I milled. The top one is actually taken off the head then I added a piece to the bottom to later shape to the flats. This didn't work out as I hoped after cutting to the flats. The lower nut is one I originally milled then cut the bottom shaft to fit into a hole I drilled in the head. The problem here is that the nut was too big to fit as it was supposed to. You can see the difference in size between the two. So it's back to square one milling and shaping 14 nuts of the approximately correct size. I am assuming the 1:1 nuts are 9/16' which makes the models .015" across the flats. I don't think the originals were Whitworth measurement (across the points) as some of the older British cars and motorcycles had. More headaches to follow.

-
Welcome Bill.
-
and John!
-
Well other than I don't have solid caps, nothing, in fact, I'd never given it a thought, my bad. I don't paint often, or at least haven't for some time, the lids tend to stick. I don't build often enough to use up a lot of paint.
-
1/12 Tamiya Ferrari 312b
Ro3bert replied to Chris Smith's topic in WIP: Other Racing: Road Racing, Land Speed Racers
Chris Just looked in on your build today, looking good, I'll be following your progress. I'm a huge fan of F1, try to watch all the seasons races. Have favorites of course but am not telling. I've followed F1 for years and have seen so many changes, WOW. Am also a very big fan of sports cars. My first was a "Bug Eyed" Sprite followed by a 356A Porsche then as they say Life got in the way. Oh, and I took driving lessons while I was in England. It was with the 1956-7-8 formula 3 world champion, Jim Russell. Wanted to get my FIA license but was shipped back to the States so never got it. Robert -
Erik Just a thought but I am taking pictures as I go along so I will try to incorporate your advice and method with your OK. I'll pay close attention the the panel gaps and what to do about them. Looking at the model from the beginning I was unaware, as most people must have been, of the delicate nature of the seams. If I can come up with a good fix I'll let the posts know. Robert
-
Ok, Erik I now understand what you meant in the tutorial and will be especially careful when I get to that part. I'm assuming that applies to the hood as well as the rear section. I haven't done much for the past few days; still waiting for the paint bottles to arrive which is scheduled for Tuesday. I'm having a hard time not comparing this model with the Porsche 910 Carrera 10 by Tamiya. Of course they were produced years apart so the techniques are not comparable. After looking at many of the large models I want to drastically alter the modeling method. Unfortunately that may not be in the works for the time being, will just have to muddle along and see what I might change. Robert
-
That is a possibility, don't have any and Micro Mask is very cheap. Thanks for the tip. Robert
-
David, Those were my first thought but had no idea where to get them. I think years ago I had some but have no idea where they might be. Yeah they are the perfect solution. Robert
-
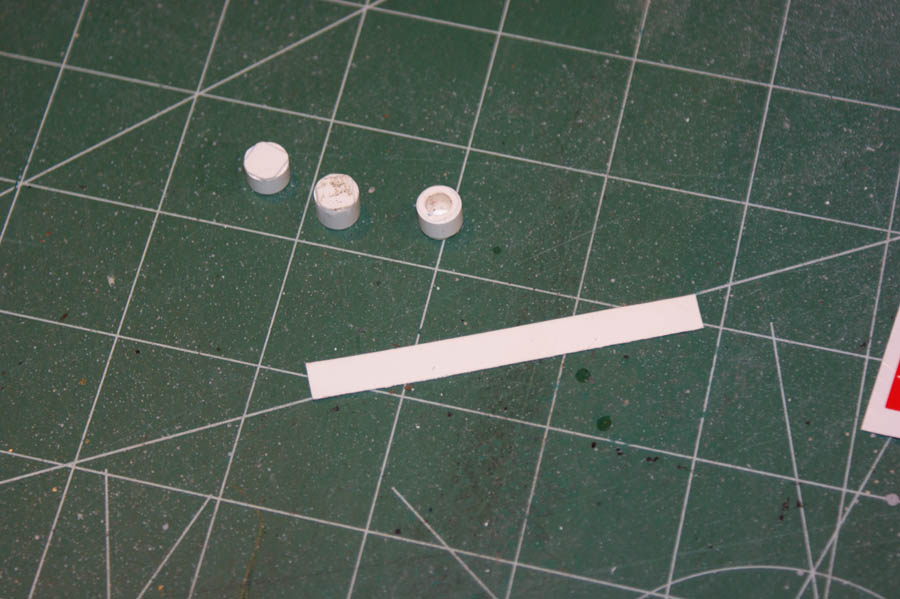
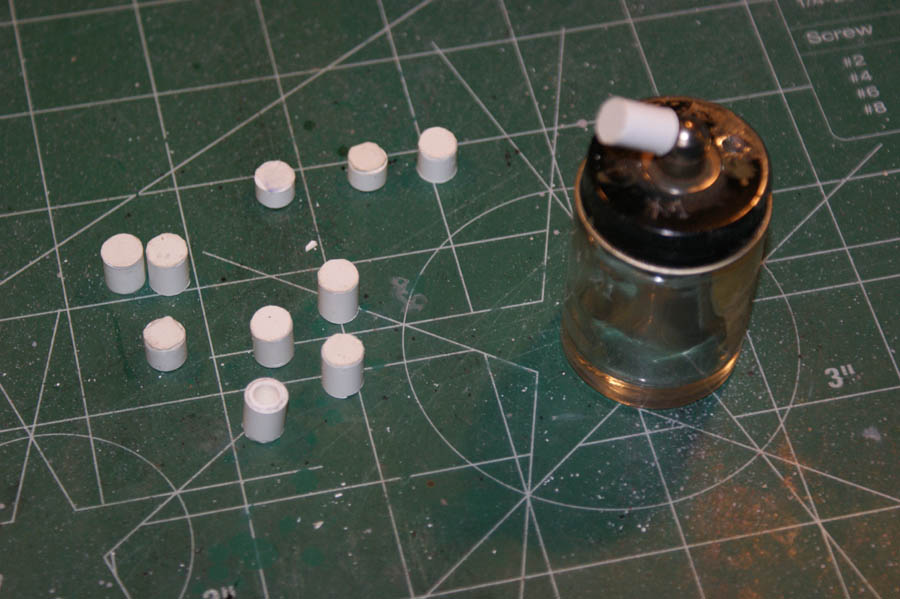
I don't like gravity feed painting. I much prefer siphon feeding. However one of the things that bothered me was the need to decant the paint so another color could be filled. And the cleaning? Arrgh! The solution I came up with is multiple bottles (I'm sure some of you also prefer siphon painting). The problem, if it is in fact a problem, is the possibility of the paint drying out in the bottle since it is open at the top (siphon tube). I wanted to find a way to plug the tube and came up with a number of unworkable solutions (Scotch Tape was one). I finally decided to make some caps for the tube(s) using caulking but couldn't decide a way to cast such a liquid, and I thought of a number of ways all of which would require more time and work than I wanted to put in. The solution was easy and not time consuming. It just so happened I'd gotten some styrene tubing of various sizes and as it turned out there was one just the right size. The images will show the final product. The siphon tube on the caps is approximately 3/16" id. It just so happens that 5/16"od tubing has an id of 3/16" so fits the siphon tube a bit snugly but not so tight it would be hard to remove. These three were the first I made. Cut the tube in 1/4" lengths (actually the next image shows them cut longer) and glue something over one end to close them. I used what I thought was thin sheet styrene but was actually some sort of plastic with a paper backing. It worked fine after I figured out how to make sure they were securely affixed. I've ordered a 10 bottle pack so I can store various colors so I will only have to clean the airbrush between colors. Here are 11 caps (various lengths) 1/4" long to a bit over 5/16". I had a bottle from a long time ago to use as a pattern. BTW the length of the siphon tube is just over 5/16". One is on the bottle. As for the vent hole I tried a dab of Micro Mask. It comes off easily. Overkill, I don't know, maybe I'm a bit paranoid about paint drying. Robert
-
Side feed airbrush - Questions (with images)
Ro3bert replied to Ro3bert's topic in Model Building Questions and Answers
Trevor, There is no problem attaching to the airbrush, the problem is the other end of the hose. I'm sure it is supposed to be used with a pressurized can and the connector is too small to attach to the compressor. I would have to cut the end off that has the gray connector and somehow attach a 1/4" ( I think ) BSP Female connector which could than be attached to the compressor. I'd be happy if that could be done but I am not confident that is even possible. Robert -
Side feed airbrush - Questions (with images)
Ro3bert replied to Ro3bert's topic in Model Building Questions and Answers
David, I have some of those pipettes, will have to get more. They work for anything liquid that needs to be moved from one container to another. -
Skip, Erik, et al I see what you mean now. I'll be looking at that line and I know which one you are talking about. I'm sure I'll be able to somehow eliminate it. I didn't think the poster was as clear as he could have been but I think, now, where in the post the reference was. Thanks for the update, Robert
-
Erik I looked at the post but didn't see anything specific about panel lines or I just missed it, too the image is no longer available so I couldn't see what the problem is. Guess I'll find out when I get to that part of the build. Robert
-
Side feed airbrush - Questions (with images)
Ro3bert replied to Ro3bert's topic in Model Building Questions and Answers
Bubba, As I said above I solved my problem by buying bottles for siphoning. I got them thru TCP Global the same as my paint booth. Hope they come as quickly as the booth; ordered it on Saturday last and received it, believe it or not, on Monday. Fastest delivery I've ever experienced. Anyway as soon as they come I'll fill them with paint and start shooting all over again hopefully with fewer problems than before. -
Side feed airbrush - Questions (with images)
Ro3bert replied to Ro3bert's topic in Model Building Questions and Answers
No offence taken. The problem is not with the cleaning which I may even overdo, it is when filling or emptying the gravity feed cup, again it is probably inexperience causing it. Also the idea of having to empty the cup, cleaning it out and refilling with another color is annoying to me (laziness on my part?). I gave up on the side feed idea and ordered some paint bottles with 60deg spouts. They seem awkward to me but at least I can connect bottles of different colors though, obviously, I'll still have to clean the airbrush between. I have a Badger 150 that requires siphon feed so the bottles should work out. Too, with the Badger I have a braided hose so no problem there. I was just upset that I couldn't connect the off brand airbrush to the compressor. Robert -
I've had it with gravity fed airbrushes. For me they leave paint drops all over and especially on my hands. OK so I should wear gloves. I have a dual action plastic airbrush with the only indication of make is Lifetime Guarantee printed on one side. It is side fed only (see image). Anybody have any idea of the brand? Considering the hose that attaches to it, it must be designed to be used with pressurized air cans. The following two images are of the hose. My question is, is there any way to adapt the large end (cut and splice) to the connector that would normally mate with a Badger (for instance). The threaded connector on the airbrush is far too small for (normal) hose ends. This is the end I want to somehow adapt to my compressor. Or can someone direct me to a hose source that would be compatible with the (normal) compressor fitting. Robert