Josie
-
Posts
46 -
Joined
-
Last visited
Content Type
Profiles
Forums
Events
Gallery
Everything posted by Josie
-
Tamiya McLaren MP4/6 build
Josie replied to Josie's topic in WIP: Other Racing: Road Racing, Land Speed Racers
Thanks Ian. I’m taking a bit of a break but will get back into it soon. I got burned out so I need to get re-motivated. I’ve been busy restoring a 1954 AG6 Maserati at work. -
Tamiya McLaren MP4/6 build
Josie replied to Josie's topic in WIP: Other Racing: Road Racing, Land Speed Racers
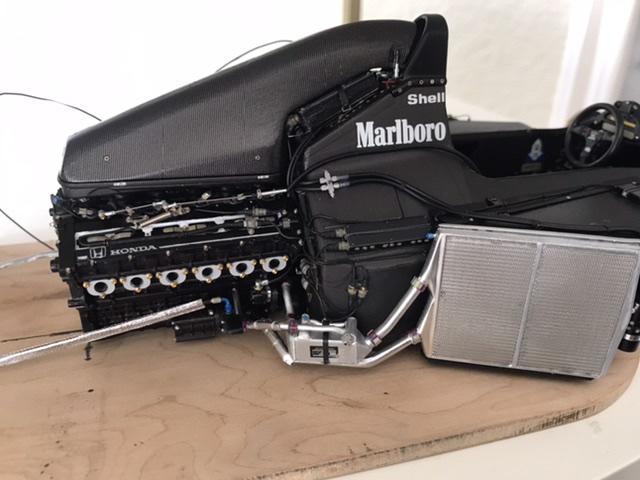
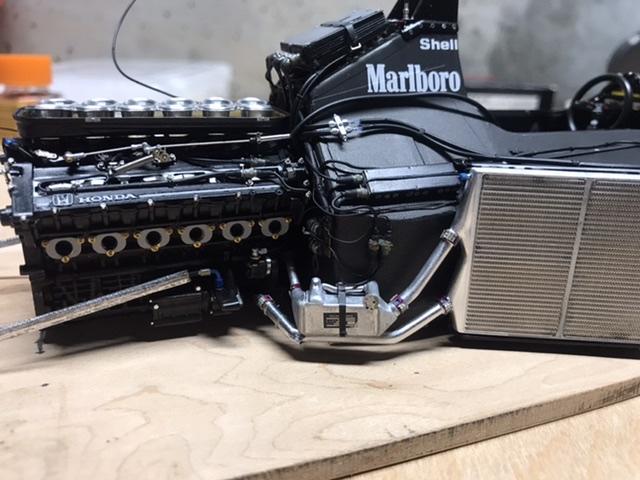
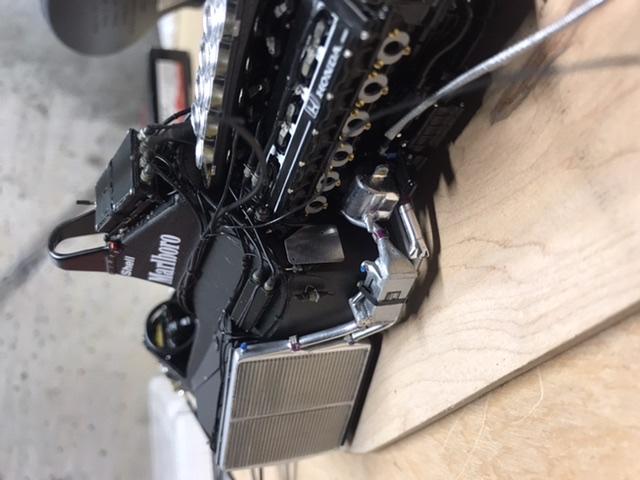
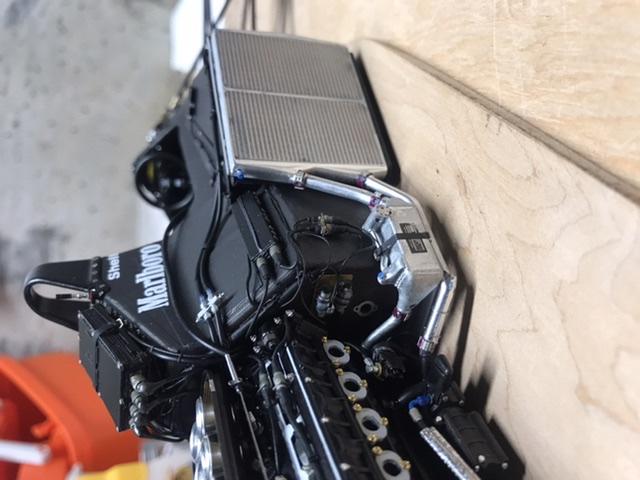
More progress on this build. I glued the gearbox assembly to the back of the engine without any issues. I may do the same to my next build which will be the 1/12 Tamiya Ferrari 641/2. Next step in building up the exhaust, connecting all the oil lines and clutch and brake lines. Also will continue with adding details from the top studio upgrades.
-
Tamiya McLaren MP4/6 build
Josie replied to Josie's topic in WIP: Other Racing: Road Racing, Land Speed Racers
This past week I added more plumbing to the water system and worked on the airbox. If you’re building this model in the future it’s best to glue the AN fittings to both the oil pump and water pump before gluing to the engine. The instructions from Top Studio doesn’t mention this but it’s much much easier to do it when the pumps are off. Also the orientation of the plumbing leading to the engine should be glued after gluing the radiators to the car. It’s not really clear on the instructions from TS what the position on the water tubes should be. Everything else from TS is straightforward and a big improvement in the parts and detail from the standard a Tamiya bits
-
Tamiya McLaren MP4/6 build
Josie replied to Josie's topic in WIP: Other Racing: Road Racing, Land Speed Racers
Thanks Art. Appreciate it. Working on the airbox and hope to have pics soon -
Tamiya McLaren MP4/6 build
Josie replied to Josie's topic in WIP: Other Racing: Road Racing, Land Speed Racers
Added the radiators to the car.
-
Tamiya McLaren MP4/6 build
Josie replied to Josie's topic in WIP: Other Racing: Road Racing, Land Speed Racers
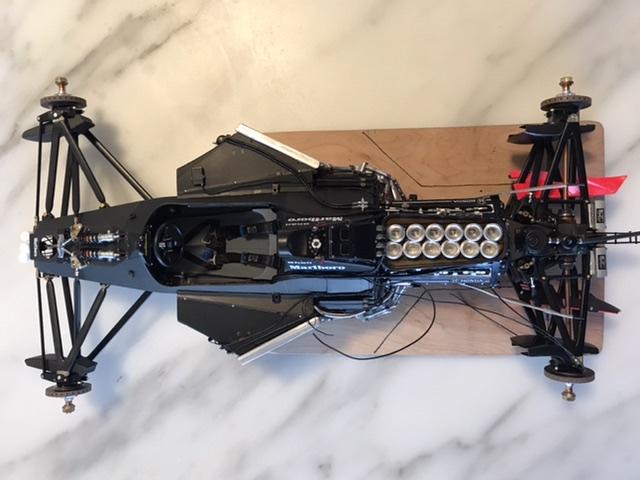
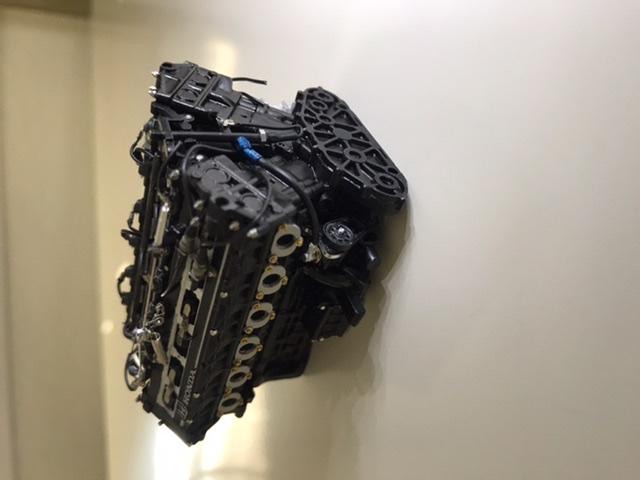
So I bolted the engine to the back of the tub and it was a bit more difficult than was necessary. A piece of advice to those who are building this kit. First don’t add the right side aluminum cover till after you bolt the engine and in fact you may have to modify it to make it fit. Second and most important as I mentioned this before for those who are adding the lower mount shims and valve covers from TS is that it will push the engine back and not allowing you to screw the engine to the floor. The holes will not line up by half a millimeter. Not good so you must file away the mounts which should be done before adding all the bits. I didn’t even bother with the rear bulkhead plate from TS which would make it even worse. Third it’s better to glue the water pump and oil pump assemblies after bolting the engine to the tub because it will make it easier to screw on. The screwdriver Tamiya apply unfortunately Makes you screw the screws at an angle not getting a good fit to those tiny heads of those screws. 4th and last I would enlarge a bit the mounting holes where the screws go through. I found it to be a bit tight. Other than that it should be all good. Here are some pics of the results
-
Tamiya McLaren MP4/6 build
Josie replied to Josie's topic in WIP: Other Racing: Road Racing, Land Speed Racers
Thanks. That was painful but glad it came out nice -
Tamiya McLaren MP4/6 build
Josie replied to Josie's topic in WIP: Other Racing: Road Racing, Land Speed Racers
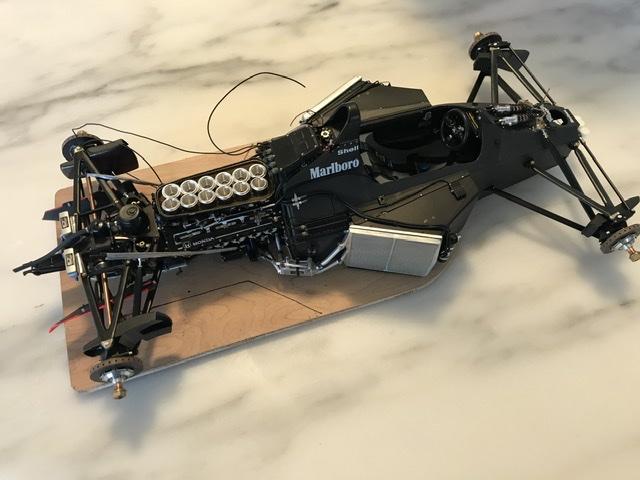
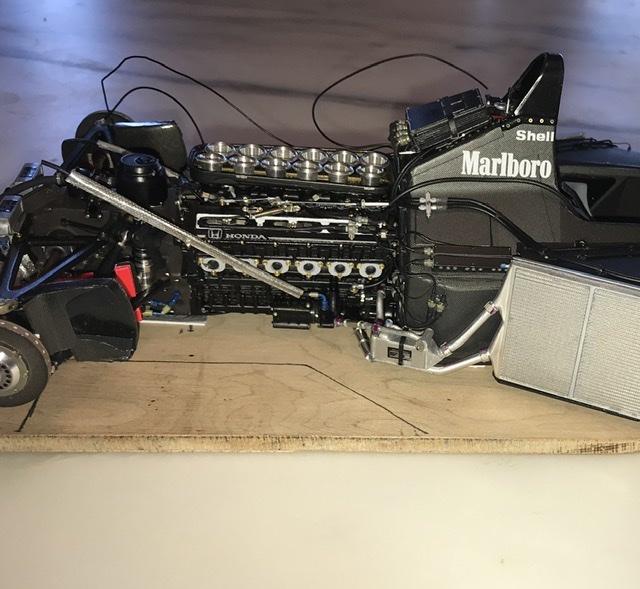
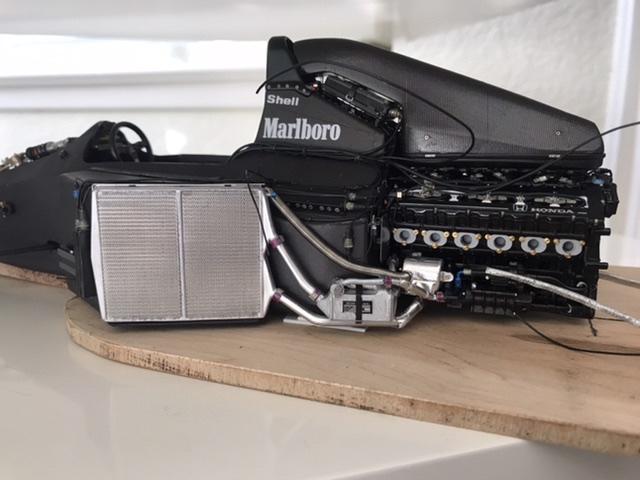
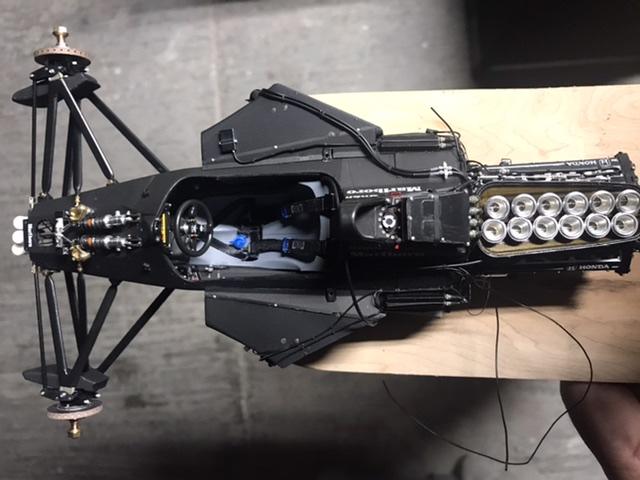
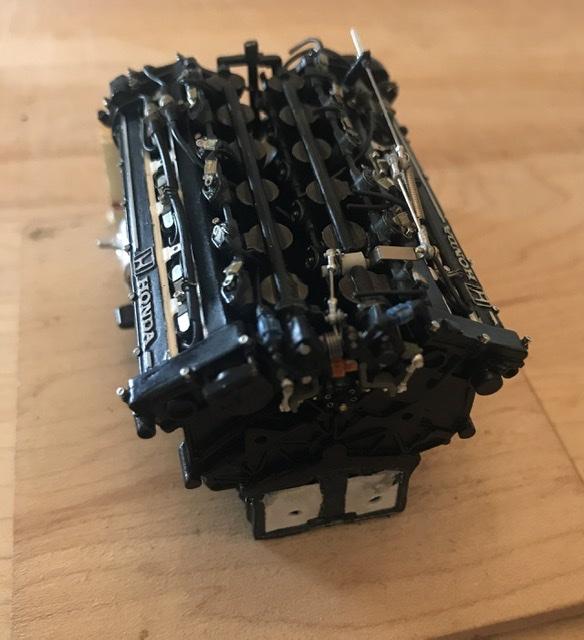
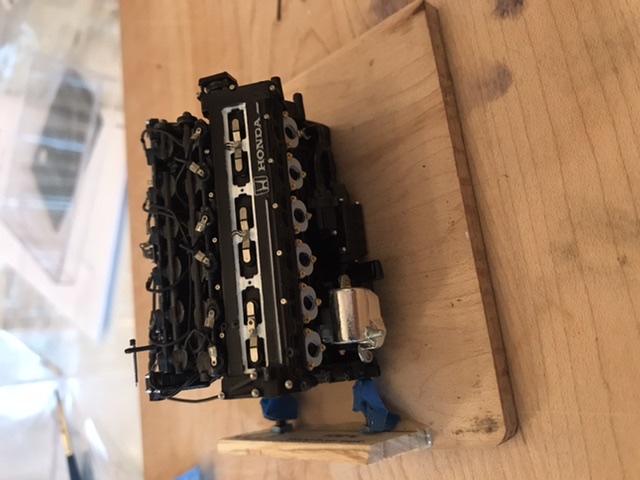
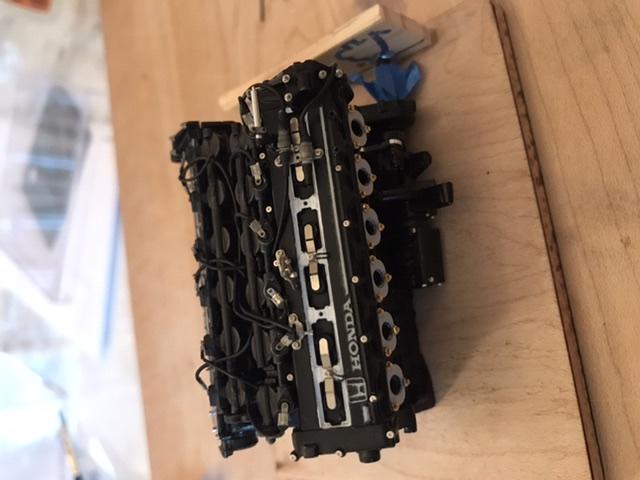
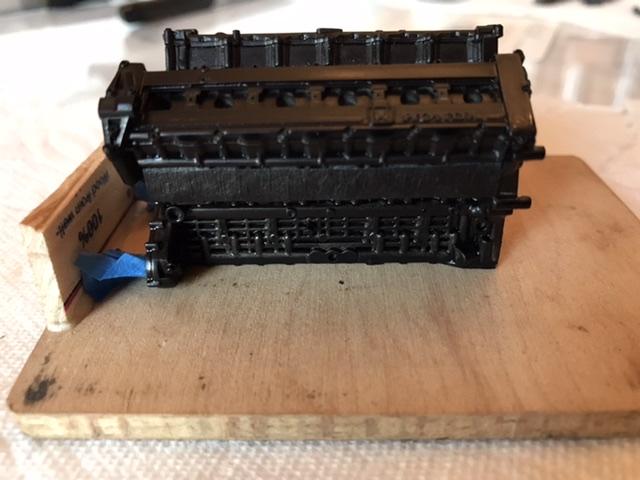
Ok so it’s been a while but I’ve been a bit busy and the finalizing the engine has taken a bit of time. I finished most of the wiring but the engine loom on the head covers are done. I had to wait on some parts to arrive and took a bit longer thanks to Covid. I finished the back end of the engine and scratched some linkages and out a throttle return sting in there as well and the rest was TS stuff. I will add more detail to the engine like more wiring but after I bolt the engine to the chassis and glue the gearbox to engine. I should bolt the engine in a couple of days to the chassis and see what extra details I can add. Here are some pictures. Hope you guys are enjoying the build.
-
Tamiya McLaren MP4/6 build
Josie replied to Josie's topic in WIP: Other Racing: Road Racing, Land Speed Racers
Thanks afx. Appreciate it -
Tamiya McLaren MP4/6 build
Josie replied to Josie's topic in WIP: Other Racing: Road Racing, Land Speed Racers
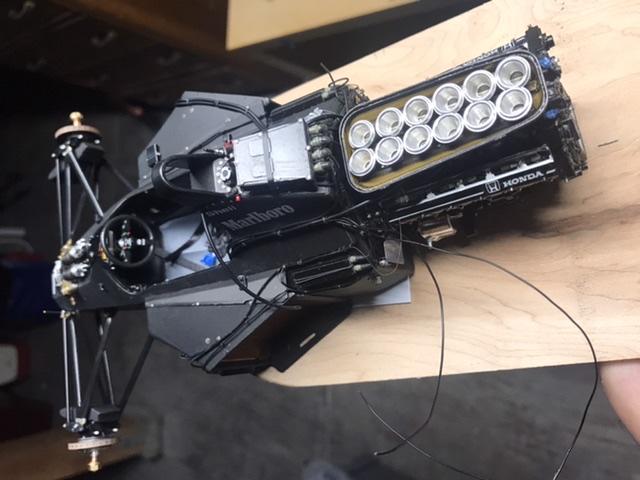
I’ve been waiting on some hardware from RBMotion but there had been delays. I’ve added some additional scratch building detail from reference pictures from the Formula Perfect manual. I added plumbing to the fuel injector rails and sensor. Also added an oil line coming out of the oil pump from the left side to the front fuel rail if that makes any sense. At least that’s how I interpreted from the pictures. Currently I’m working on the TPS sensors st the rear of the engine do hopefully I’ll have pics of that at the end of the week. Hope you guys are enjoying this build.
-
Tamiya McLaren MP4/6 build
Josie replied to Josie's topic in WIP: Other Racing: Road Racing, Land Speed Racers
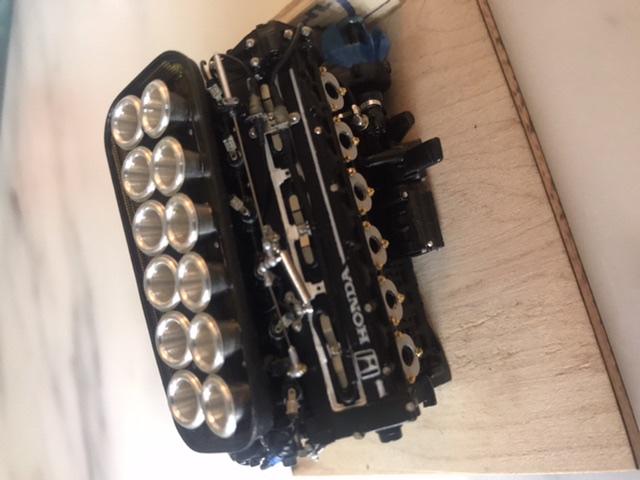
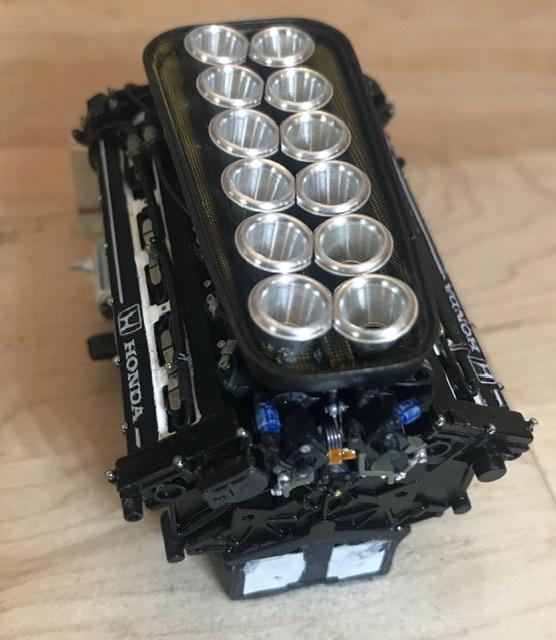
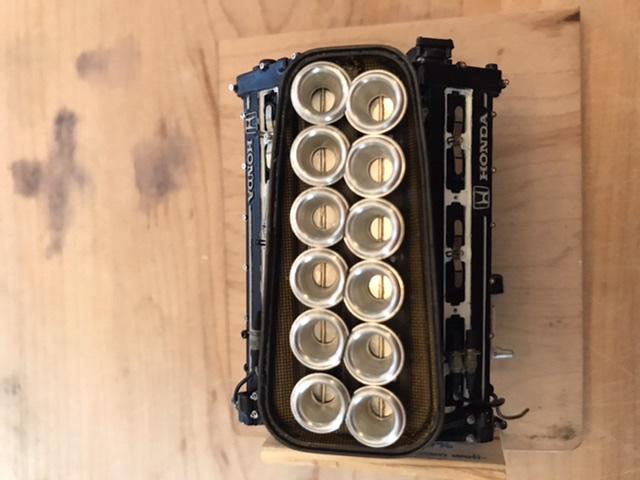
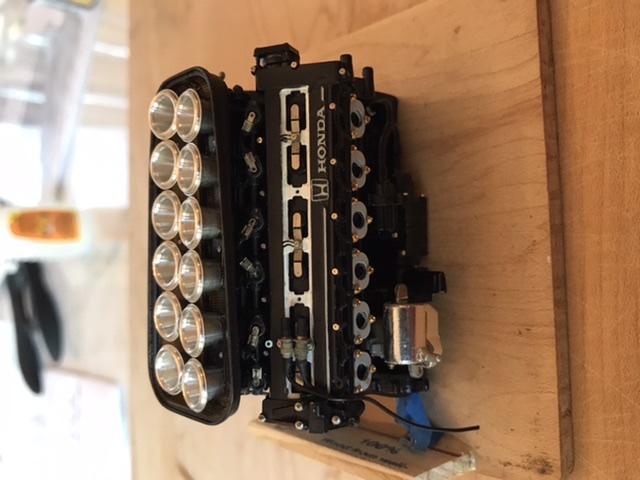
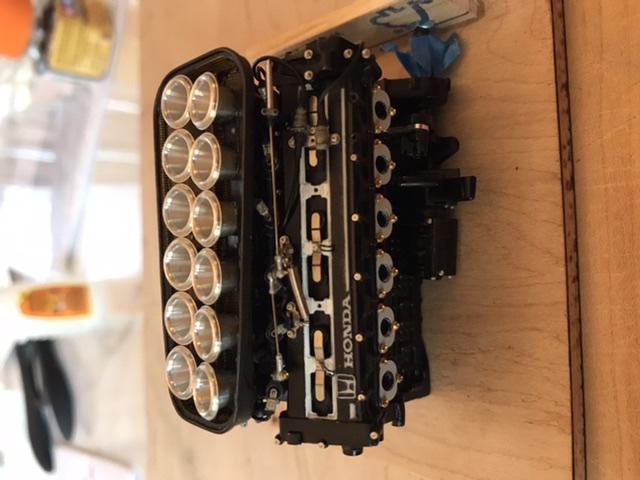
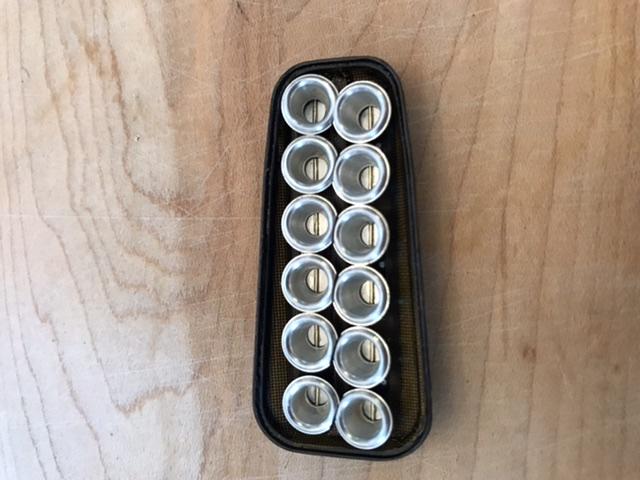
The variable trumpets introduced later in the season had black trumpets and looked quite nice. However most of the pics had the chrome look on them so I stuck with that look. -
Tamiya McLaren MP4/6 build
Josie replied to Josie's topic in WIP: Other Racing: Road Racing, Land Speed Racers
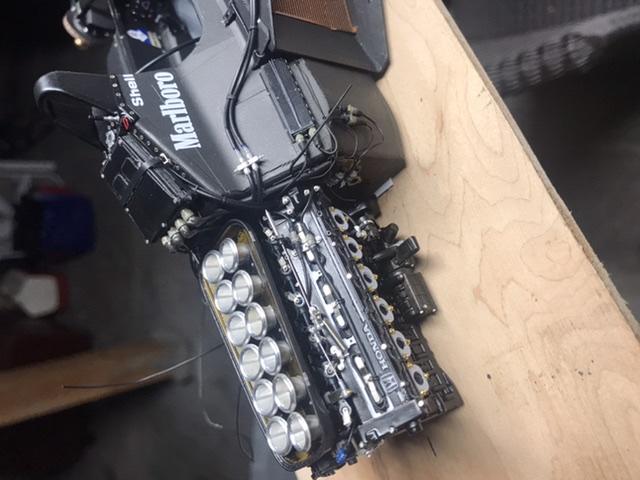
So much for my break. I decided to continue with the engine and concentrated on the throttle linkage on the engine. The linkage really adds to the detail of the engine. This little engine is getting heavier and heavier lol. I put the engine aside and decided to focus on the trumpets and tray. I painted the tray black and CF in two different shades. For the inside I used the Kevlar looking decal and for the outside I used black pewter decal using lots of Microl Sol and heat gun. I then sprayed black smoke all over it just to darken it. I then added a very thin brass rod and glued it on top of the butterflies followed by the trumpets taken care of the rotation alignment so they sit nice next to each other. I was contemplating painting the trumpets black but decided to keep it chrome. I mocked the tray to the engine to see what it looked like. It certainly got more heavier and I still need to add more parts front and rear.
-
Tamiya McLaren MP4/6 build
Josie replied to Josie's topic in WIP: Other Racing: Road Racing, Land Speed Racers
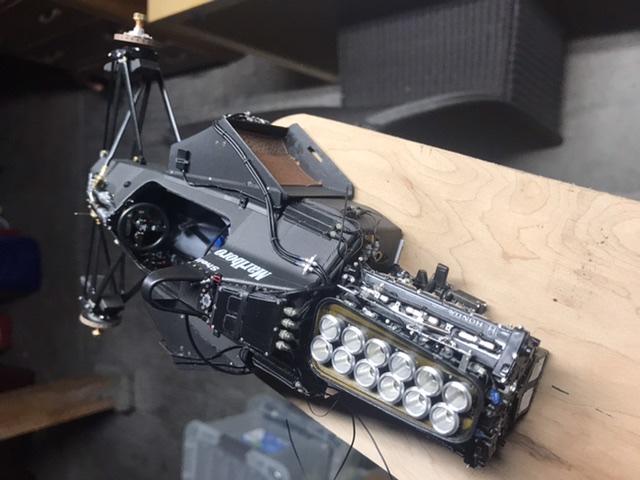
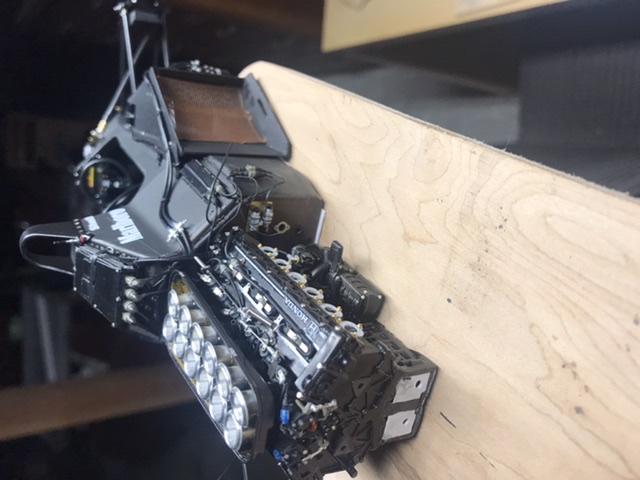
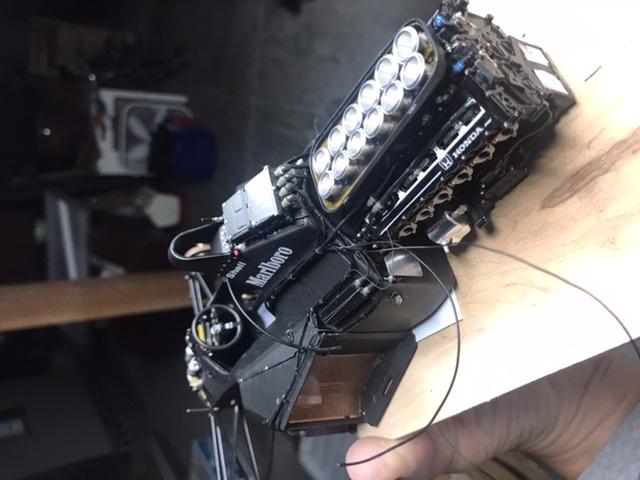
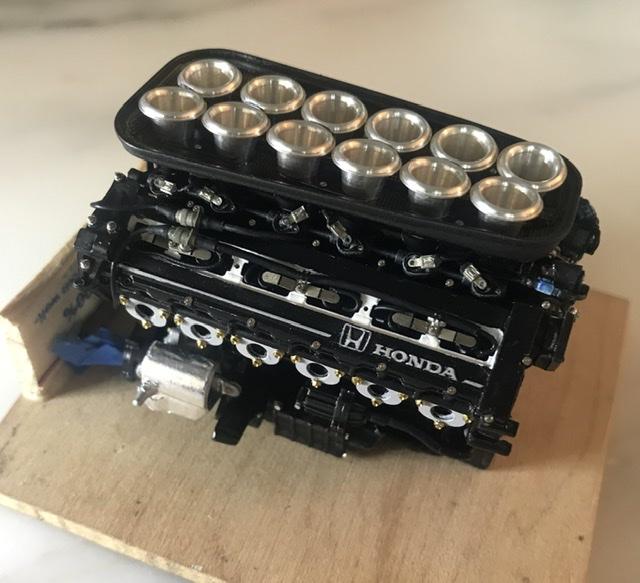
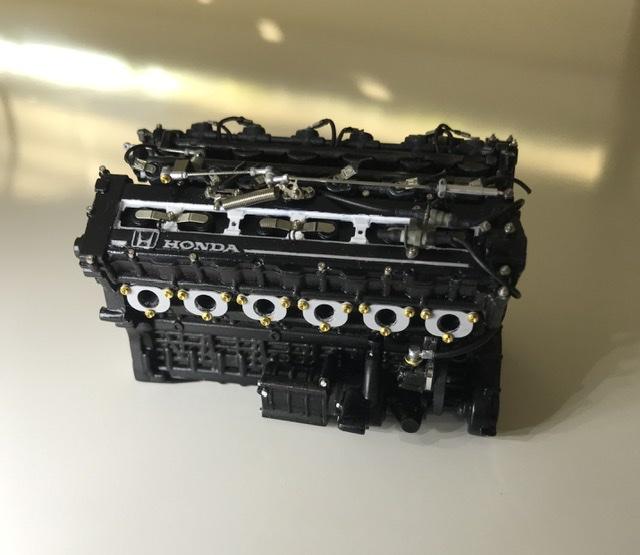
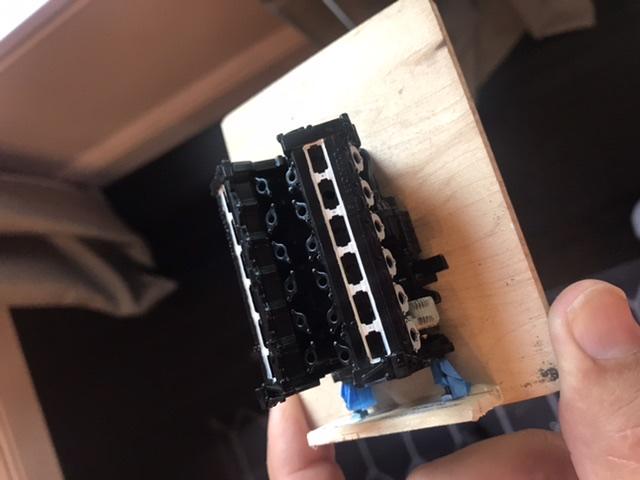
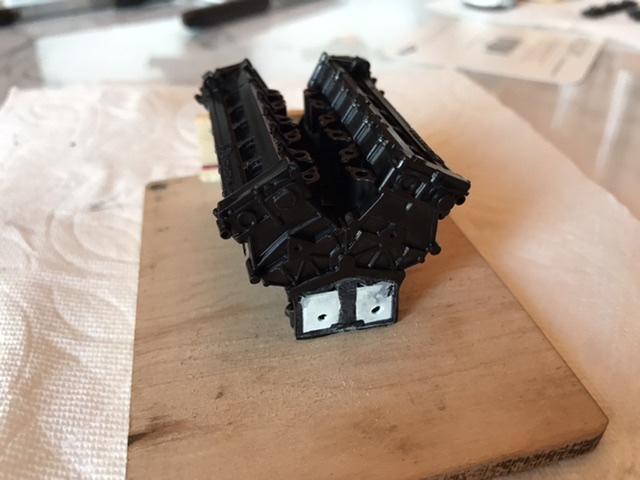
Making progress with this engine. Top Studio has a nice upgrade for the engine and it’s been fun to build but also a bit stressful as well. The main problem is not loosing those tiny rivets. I’m about half way done with it and so far it’s looking nice but it can probably look better. Working with these tiny bits is a handful. The biggest challenge I think will be the wiring loom. I’m taking a break and charge my batteries before I tackle the rest. Here is a couple of pics of the progress so far. I haven’t scratch build anything yet but will do for the second part.
-
Model factory hiro Porsche 917/30
Josie replied to Brudda's topic in WIP: Other Racing: Road Racing, Land Speed Racers
This car was at our worshop back in 2015 or so. Some of my friends were restoring it while I was restoring an F1 Surtees TS-16. I remember the engine being massive. -
Tamiya McLaren MP4/6 build
Josie replied to Josie's topic in WIP: Other Racing: Road Racing, Land Speed Racers
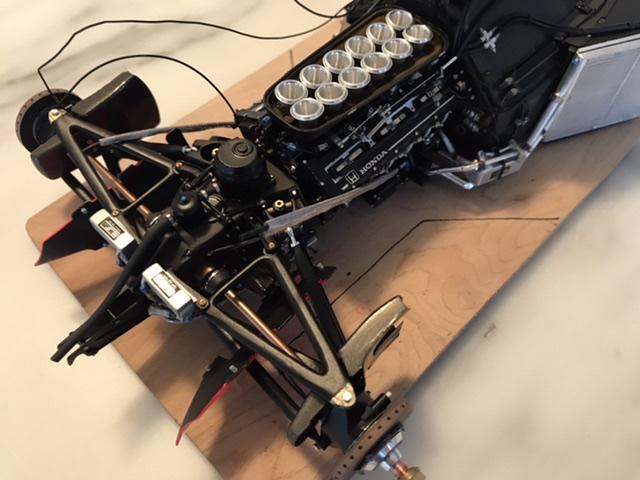
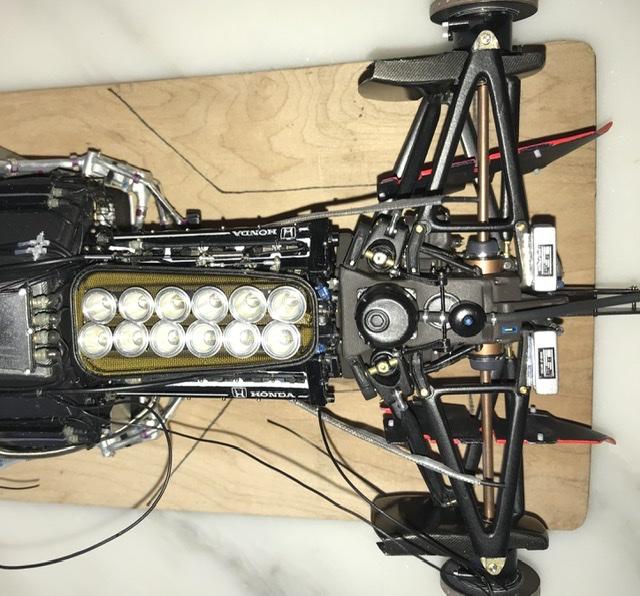
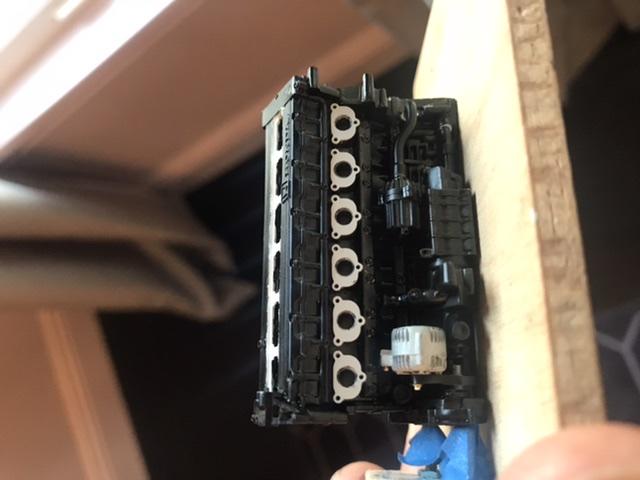
More progress on the engine. Painted the insides of the valve covers flat white. Glued the exhaust flanges to the heads with Tamiya cement instead if using CA glue so that I can manouvre the flanges in place till I got them lined up correctly. I detailed the alternator even though you won’t see it. Also added the water pump on the left side. I will add the oil pump on the right side another time.
-
Tamiya McLaren MP4/6 build
Josie replied to Josie's topic in WIP: Other Racing: Road Racing, Land Speed Racers
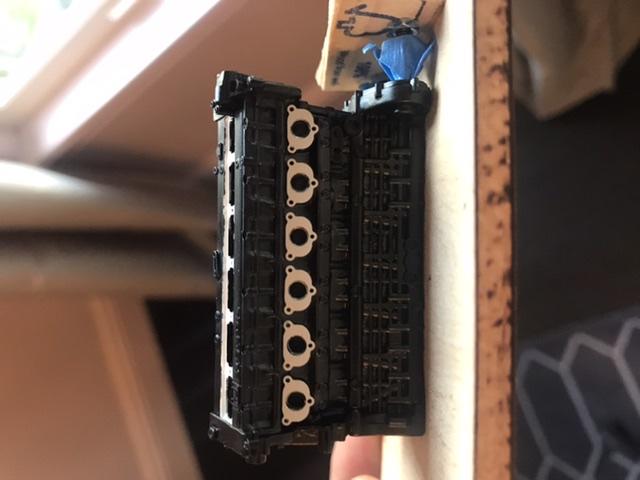
I’ve started on the engine a few days ago and as you all know I split the engine from the gearbox. I started with removing all the mold lines by sanding. I drilled all the holes that will take hardware with a .5mm drill. I test fitted the engine to the chassis to make sure everything is proper and it wasn’t. For some reason Top Studio added PE sheet for the rear bulkhead which I didn’t use however I did use the shims that go thru the mounting screws provided by Top Studio so basically when you mount the engine to the back of the chassis, the screw hole from the floor is not aligned to the screw hole in the engine by I’m guessing .5-.6mm. Don’t know if anyone has had this issue. I sanded off the mounts from the four points in the engine to compensate for the difference. Once I was able to mount the engine and able to screw the engine to the floor I applied primer. I checked for all the sanding marks etc and everything was good for the semi black paint. I use a wooded stand base while I work on the engine so I won’t touch it much when applying bits and hardware to it -
Tamiya McLaren MP4/6 build
Josie replied to Josie's topic in WIP: Other Racing: Road Racing, Land Speed Racers
I’ve started on the engine a few days ago and as you all know I split the engine from the gearbox. I started with removing all the mold lines by sanding. I drilled all the holes that will take hardware with a .5mm drill. I test fitted the engine to the chassis to make sure everything is proper and it wasn’t. For some reason Top Studio added PE sheet for the rear bulkhead which I didn’t use however I did use the shims that go thru the mounting screws provided by Top Studio so basically when you mount the engine to the back of the chassis, the screw hole from the floor is not aligned to the screw hole in the engine by I’m guessing .5-.6mm. Don’t know if anyone has had this issue. I sanded off the mounts from the four points in the engine to compensate for the difference. Once I was able to mount the engine and able to screw the engine to the floor I applied primer. I checked for all the sanding marks etc and everything was good for the semi black paint. I use a wooded stand base while I work on the engine so I won’t touch it much when applying bits and hardware to it
-
Tamiya McLaren MP4/6 build
Josie replied to Josie's topic in WIP: Other Racing: Road Racing, Land Speed Racers
No thoughts on brakeductgate. Just happy there is even F1 going on and glad to Perez is back this weekend -
Tamiya McLaren MP4/6 build
Josie replied to Josie's topic in WIP: Other Racing: Road Racing, Land Speed Racers
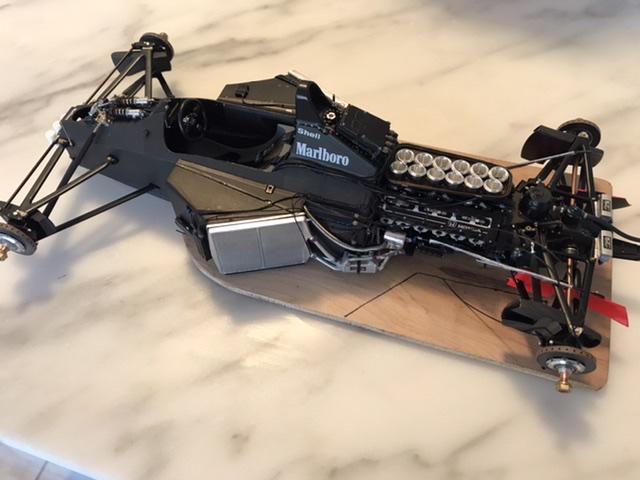
I applied the decals on the bodywork and was happy with the results. I also applied CF on the underside of the bodywork and also added the foil. I will not apply a clear coat but just wax it to a nice buff. I also did the tyres which was pretty simple. I added tyre valves from RB Motion and added wheel weights. I will add the writings on the sidewalk at a later date. Also worked the floor. I decaled it with 1/24 scale CF. I will add the Top Studio upgrades at a later date. I’m holding off on the engine for another week to get some hardware. In the meantime I’ll start on the brake calipers. I’ll have details next week along with pictures.
-
Tamiya McLaren MP4/6 build
Josie replied to Josie's topic in WIP: Other Racing: Road Racing, Land Speed Racers
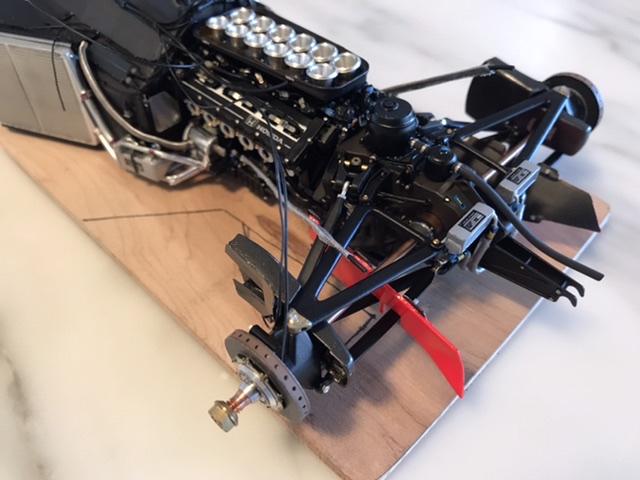
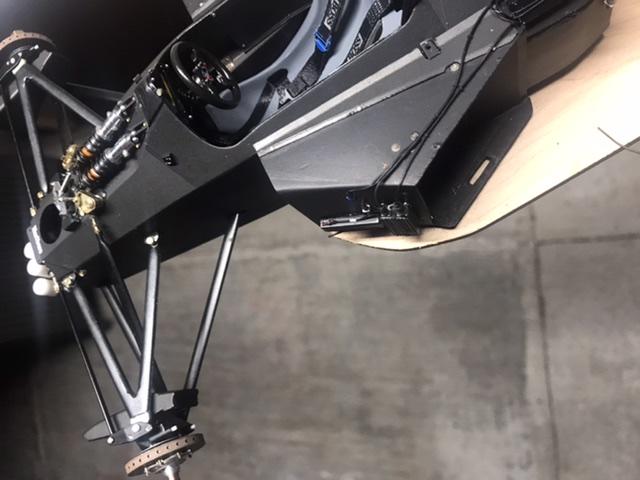
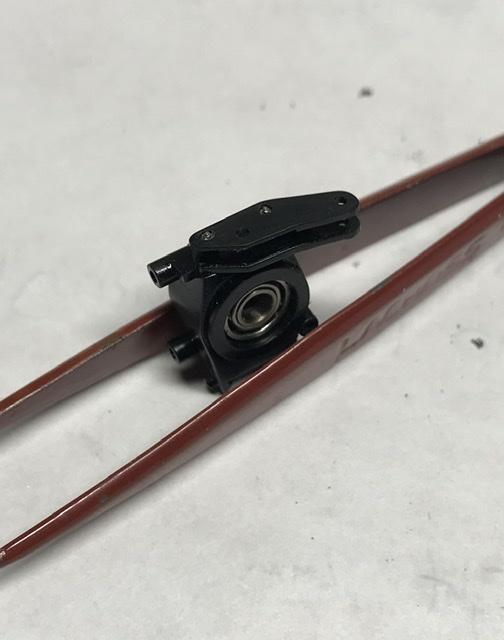
The past week I’ve been working on the front suspension and build up the uprights and brakes ducts. I didn’t use any of the screws supplied by Tamiya except for the bottom screw for the uprights. The rest of the hardware was from RBMotion. The brake discs assembly is from Top Studio. Pretty straightforward with some patience. The Tamiya brake ducts were wrong and Top Studio didn’t have any upgrades so I scratch build them by adding the inner walls that are missing from front and back on the inner bit of the brake ducts. Once that was done I applied CF and sprayed with dulcoat. The rest was straightforward. I added an antenna at the front also from Top Studio. I’m basically done with tub and front suspension so now I will concentrate on the engine.
-
Tamiya McLaren MP4/6 build
Josie replied to Josie's topic in WIP: Other Racing: Road Racing, Land Speed Racers
Thanks for the kind words -
Tamiya McLaren MP4/6 build
Josie replied to Josie's topic in WIP: Other Racing: Road Racing, Land Speed Racers
Thanks cabdriver -
Tamiya McLaren MP4/6 build
Josie replied to Josie's topic in WIP: Other Racing: Road Racing, Land Speed Racers
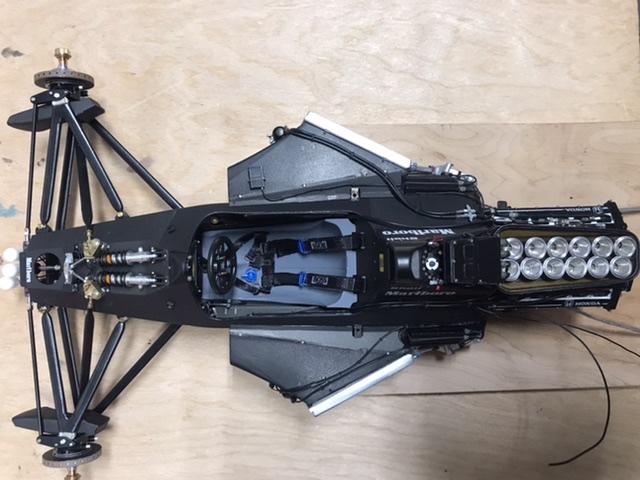
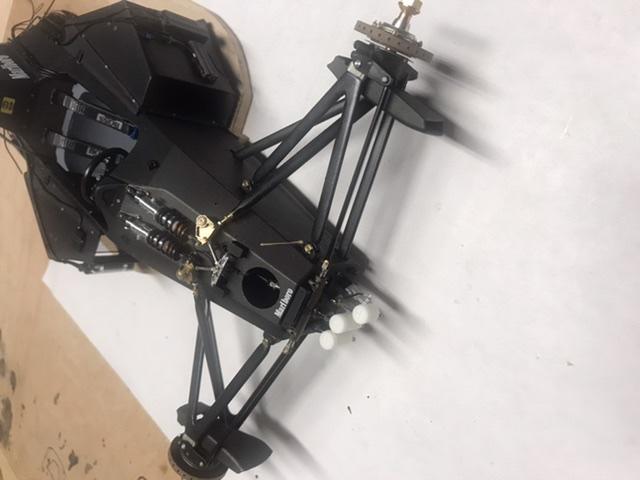
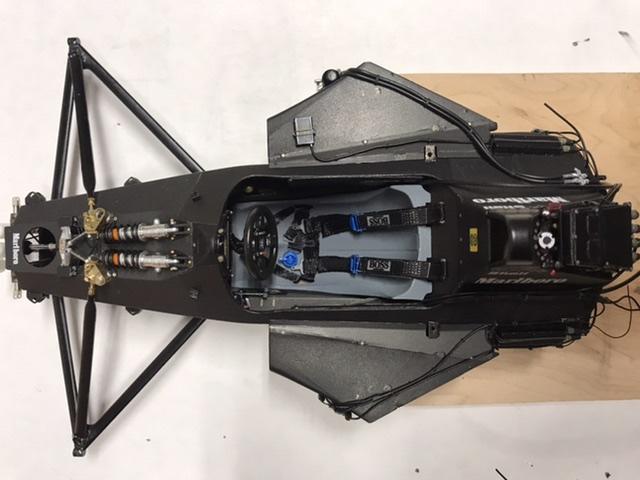
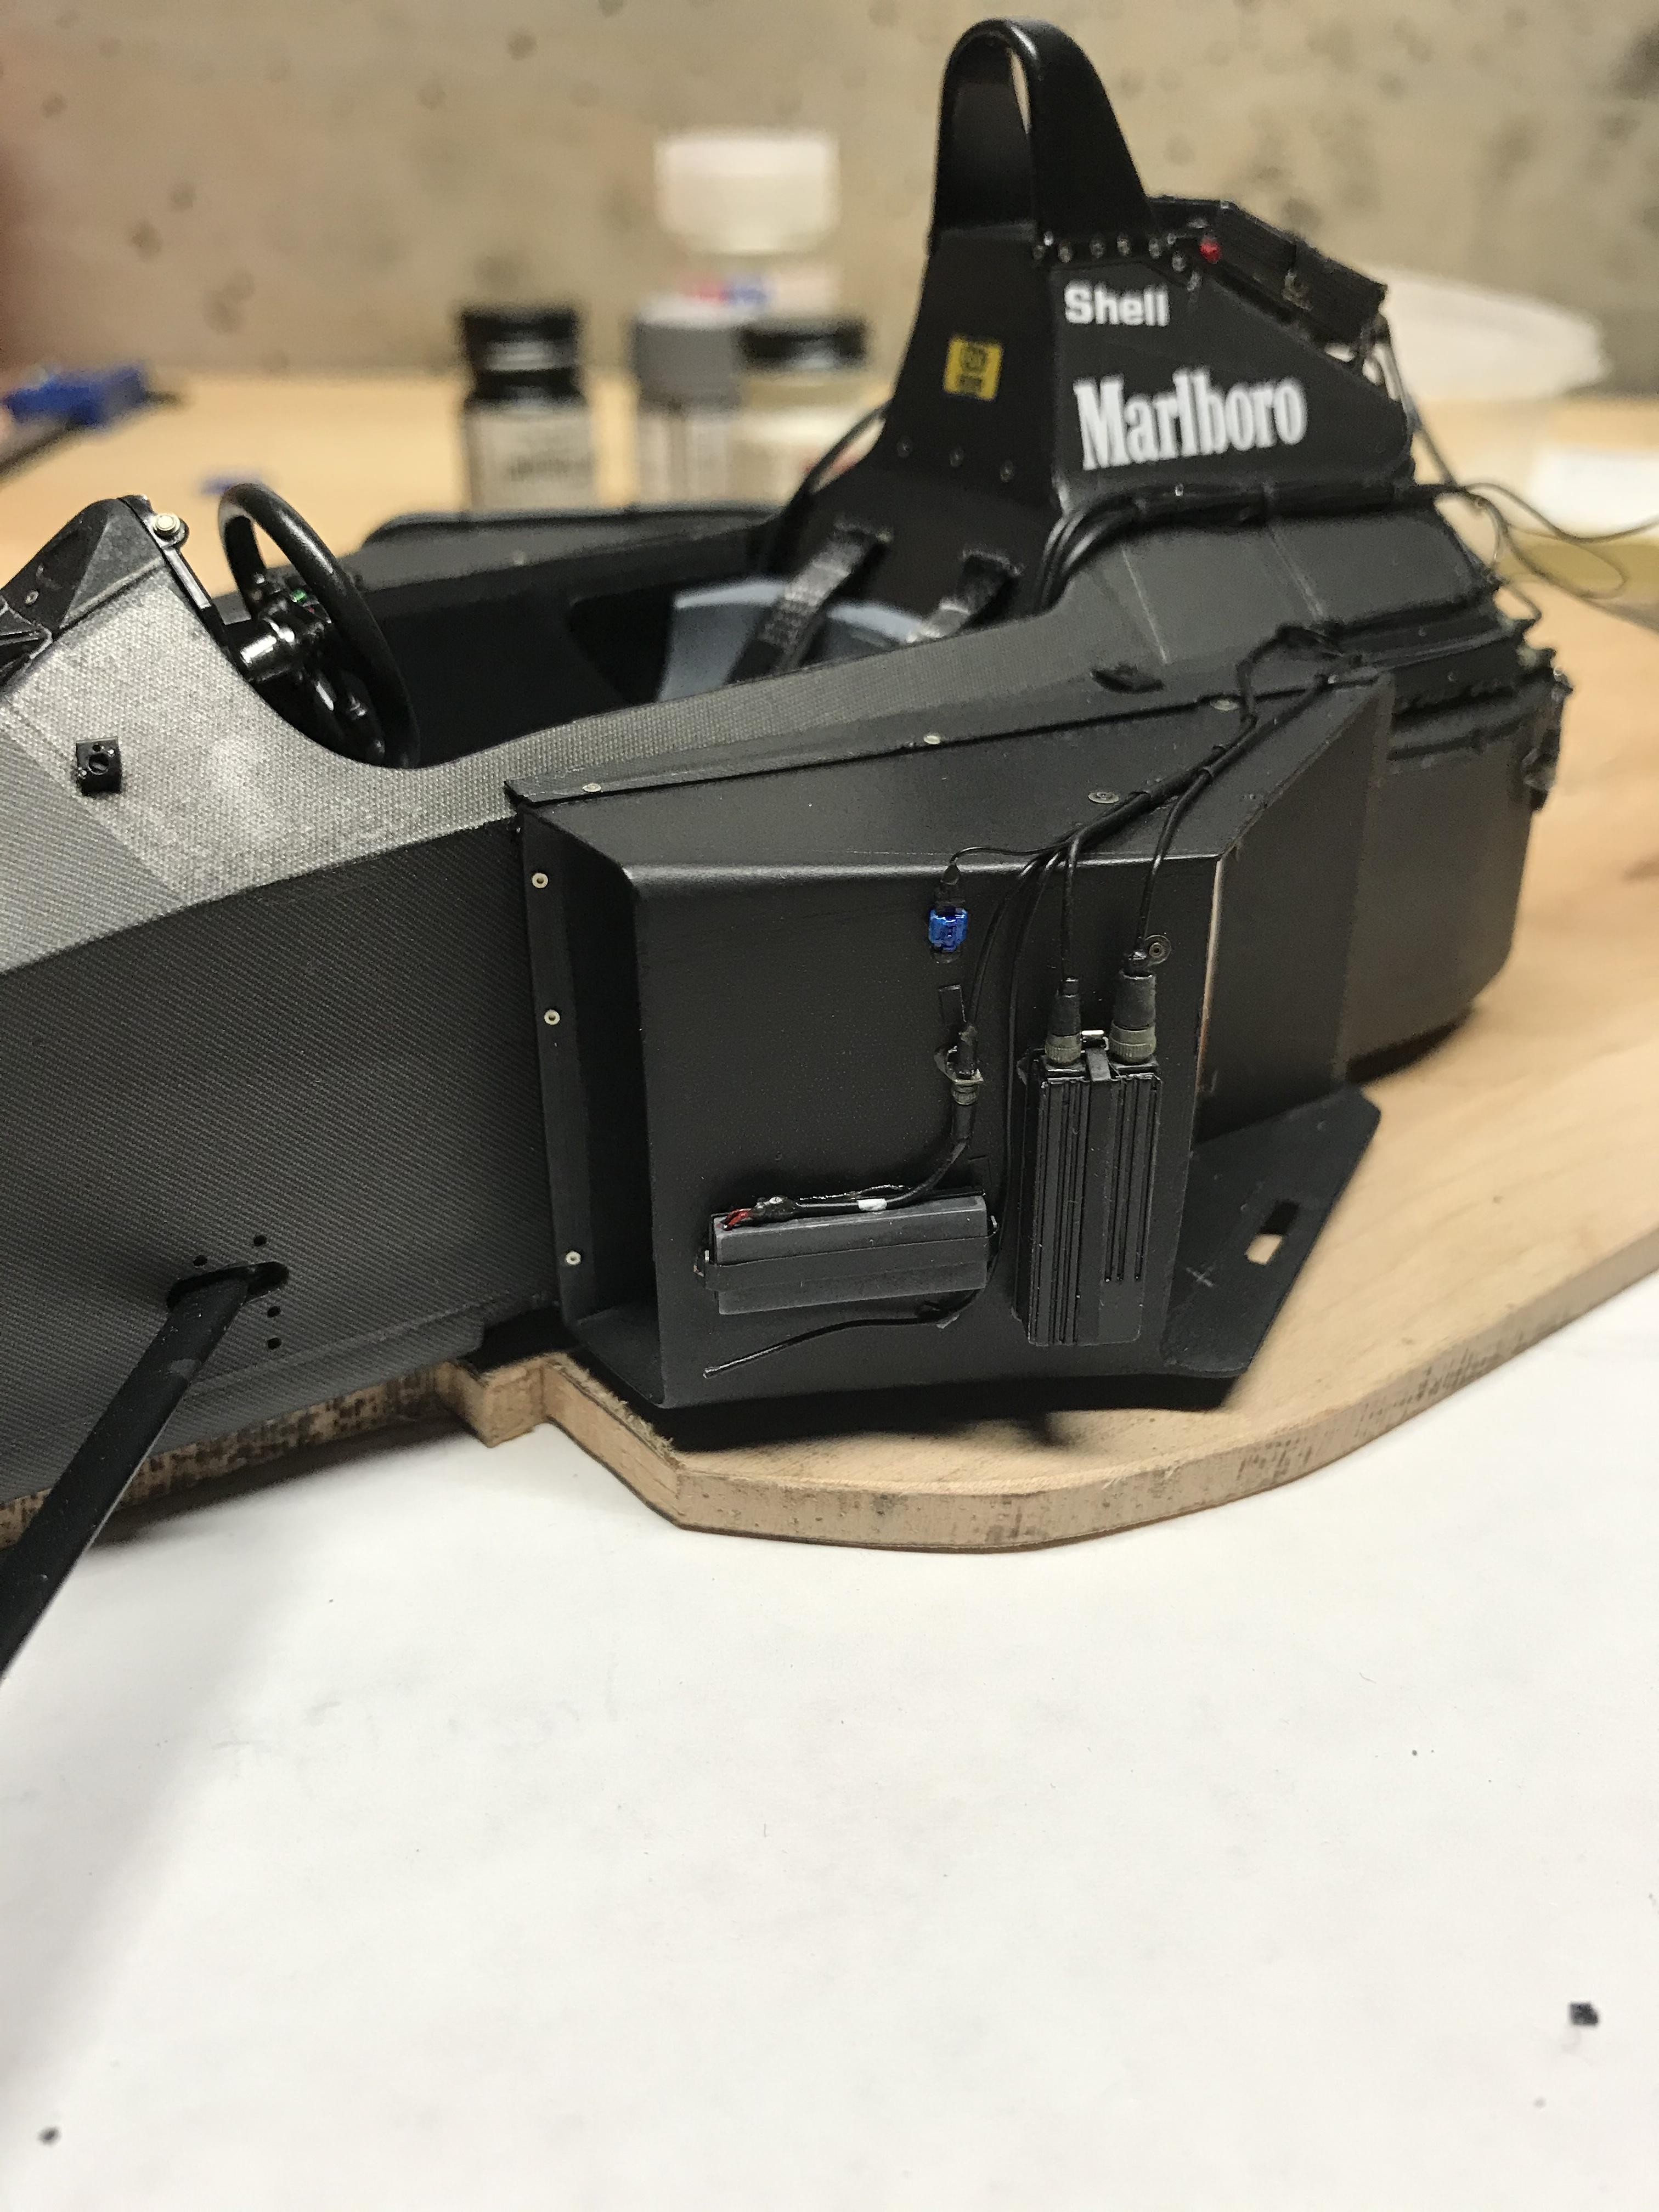
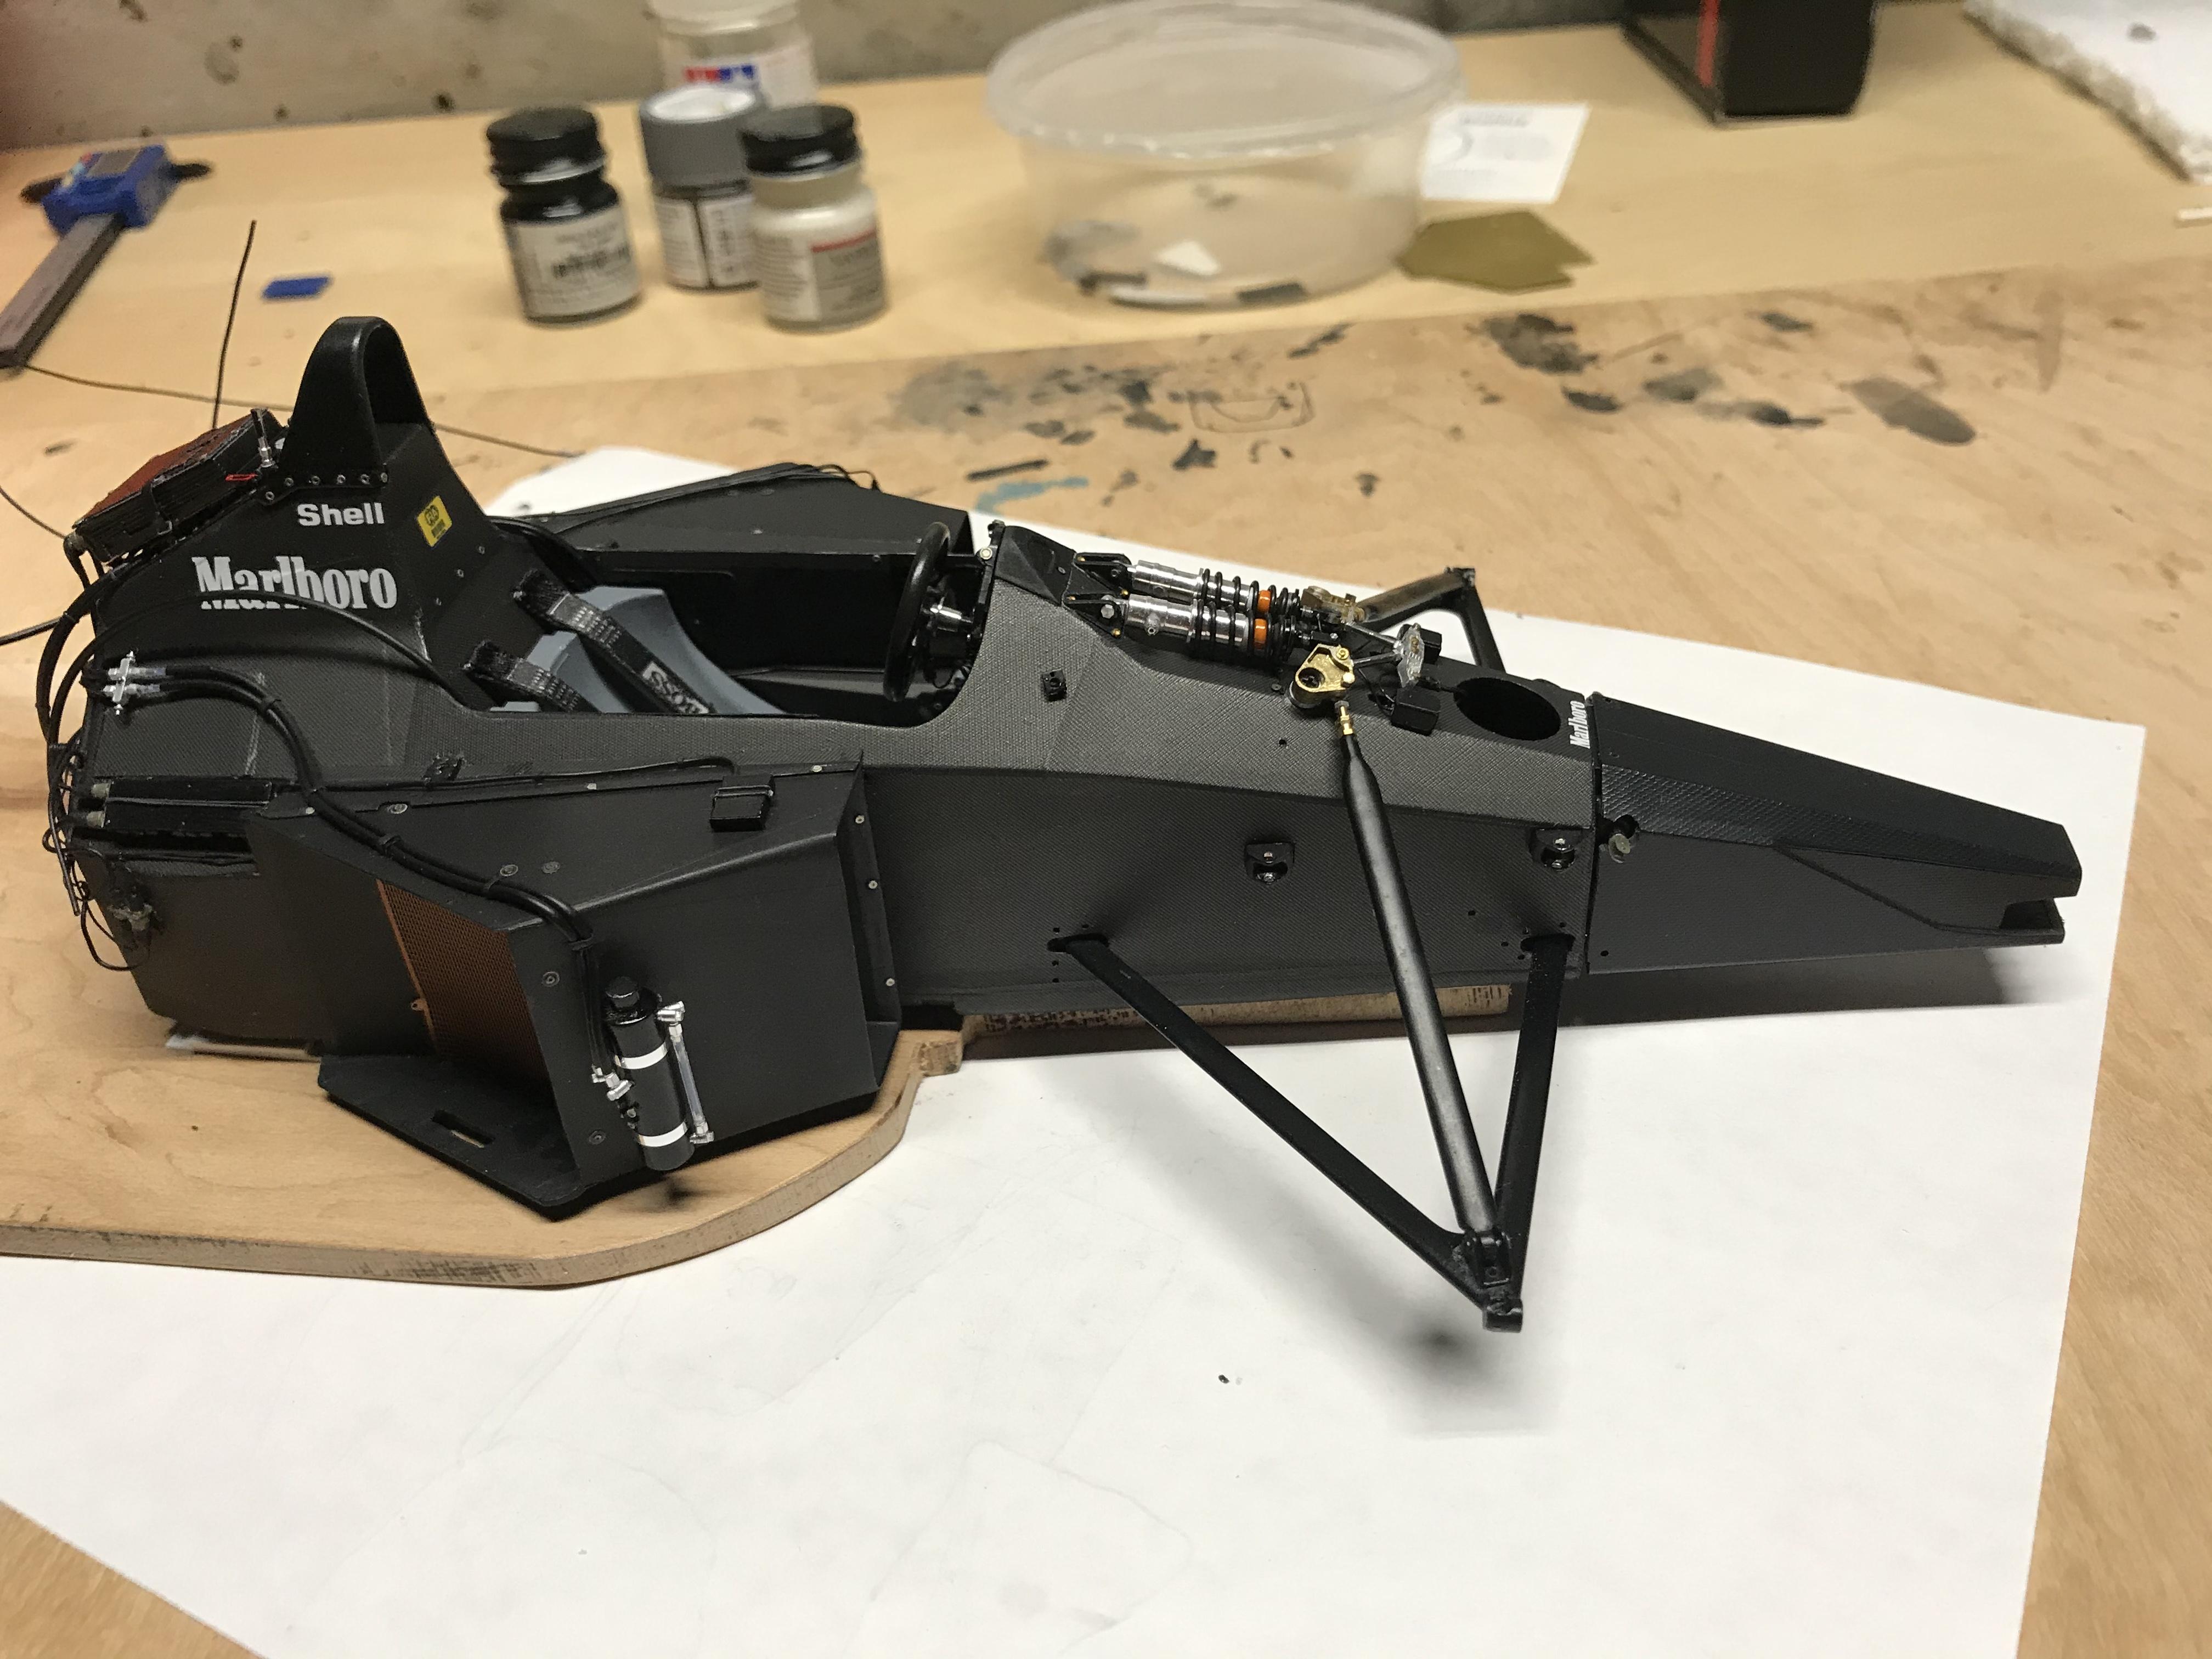
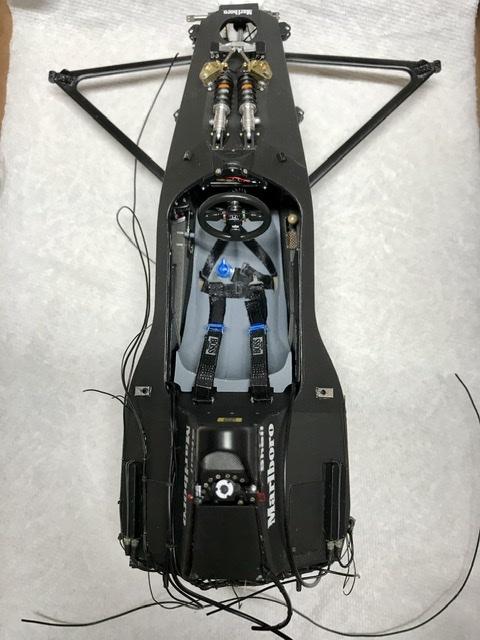
Here are pictures of the progress the past couple of weeks. The tub is almost finished just small details before I get on with the engine. Here as you can see I’m done with the radiator ducts and glued to the tub. All the wiring loom is done apart from a couple of wires. That was the most stressful bit and glad its finished. I was pretty satisfied with the results however my eyes took a beating. Now everyone have different ways to do the radiator ducts. I notices from pictures the ducts had layers on them where it bends do I did mine by layering CF decals cut at the correct angles like the real cars. I then applied the final CF decal to cover the whole duct. I then applied quick brisk coats of smoke paint over the entire duct. The external battery and ignition box won the left side we’re pretty straight forward. I was disappointed Tamiya didn’t offer decals for those parts as well as the shocks. I glued rubber spacers to seperate it from the radiator duct as it should be. I was able to get heat shrink tubing that is very very small and shrinks 2:1. Instead of using the top studio metal tyraps I just cut very thin heat shrink tubing and slipped it over the wiring and glued them in place. The wiring loom at the rear of the tub was secured by very very thin wiring to secure it place. The water header tank on the right side was straightforward. I used clear tubing and wrapped it with black tubing but only at the ends. For the front uprights I drilled two additional holes on the steering plates and added hardware from RB Motion. I also added wheel bearings like the rears and gearbox and spin nice and free not that the car is going anywhere. I took an extra picture of the mock up of the radiator.
-
Tamiya McLaren MP4/6 build
Josie replied to Josie's topic in WIP: Other Racing: Road Racing, Land Speed Racers
More progress with the monocoque having almost finished with it.
-
Tamiya McLaren MP4/6 build
Josie replied to Josie's topic in WIP: Other Racing: Road Racing, Land Speed Racers
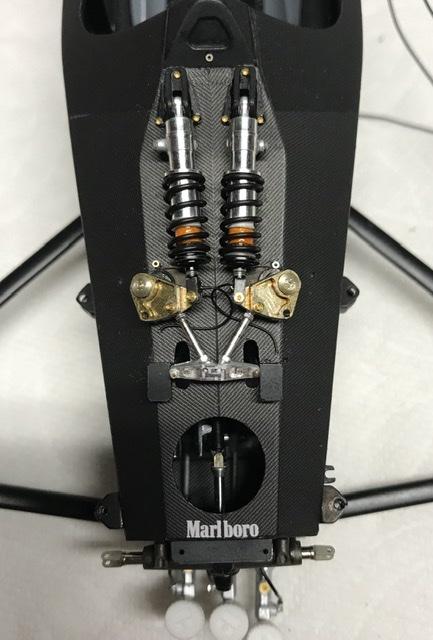
Progress on the shock area of the tub. Used upgrades from Thunder Valley courtesy of Paul. Really adds realism to that part of the tub.