Rade8boy
-
Posts
36 -
Joined
-
Last visited


Rade8boy's Achievements
MCM Regular (3/6)
-
 Sorry for the delay, it's been a busy summer. Plus, I had to experiment with trying to 3D resin print clear parts for the windows and light lens. I did not have much success with 3D printing clear parts, they always came out frosted, I tried 2 brands of resin both stated "HIGH" or "WATER" clear. I am 99% sure it's me or the printer/slicer settings I just never got it dialed in and used up the bottles. I switched to printing the parts in standard resin and then vac u formed them, again a trial-and-error process, I got acceptable results and glued them in, not as clear as I'd like but I build at a 75% is good enough for me rate. The last on the list is figuring out Painting the Dodge emblems on the hood and tailgate and the chains on the tailgate, steady hands are not my strength, and eBay turned up no decals that I think would work, I looked at Ray's kits decals and he may have something that might work. Not perfect and I think the chassis has a bit of a twist or something to it, chalking it up to resin building learning process. I have the files, from the same designer, to print the 2020(?) F-250, 2024 Mustang Dark Horse and 2023 Dodge Ram TRX.
-
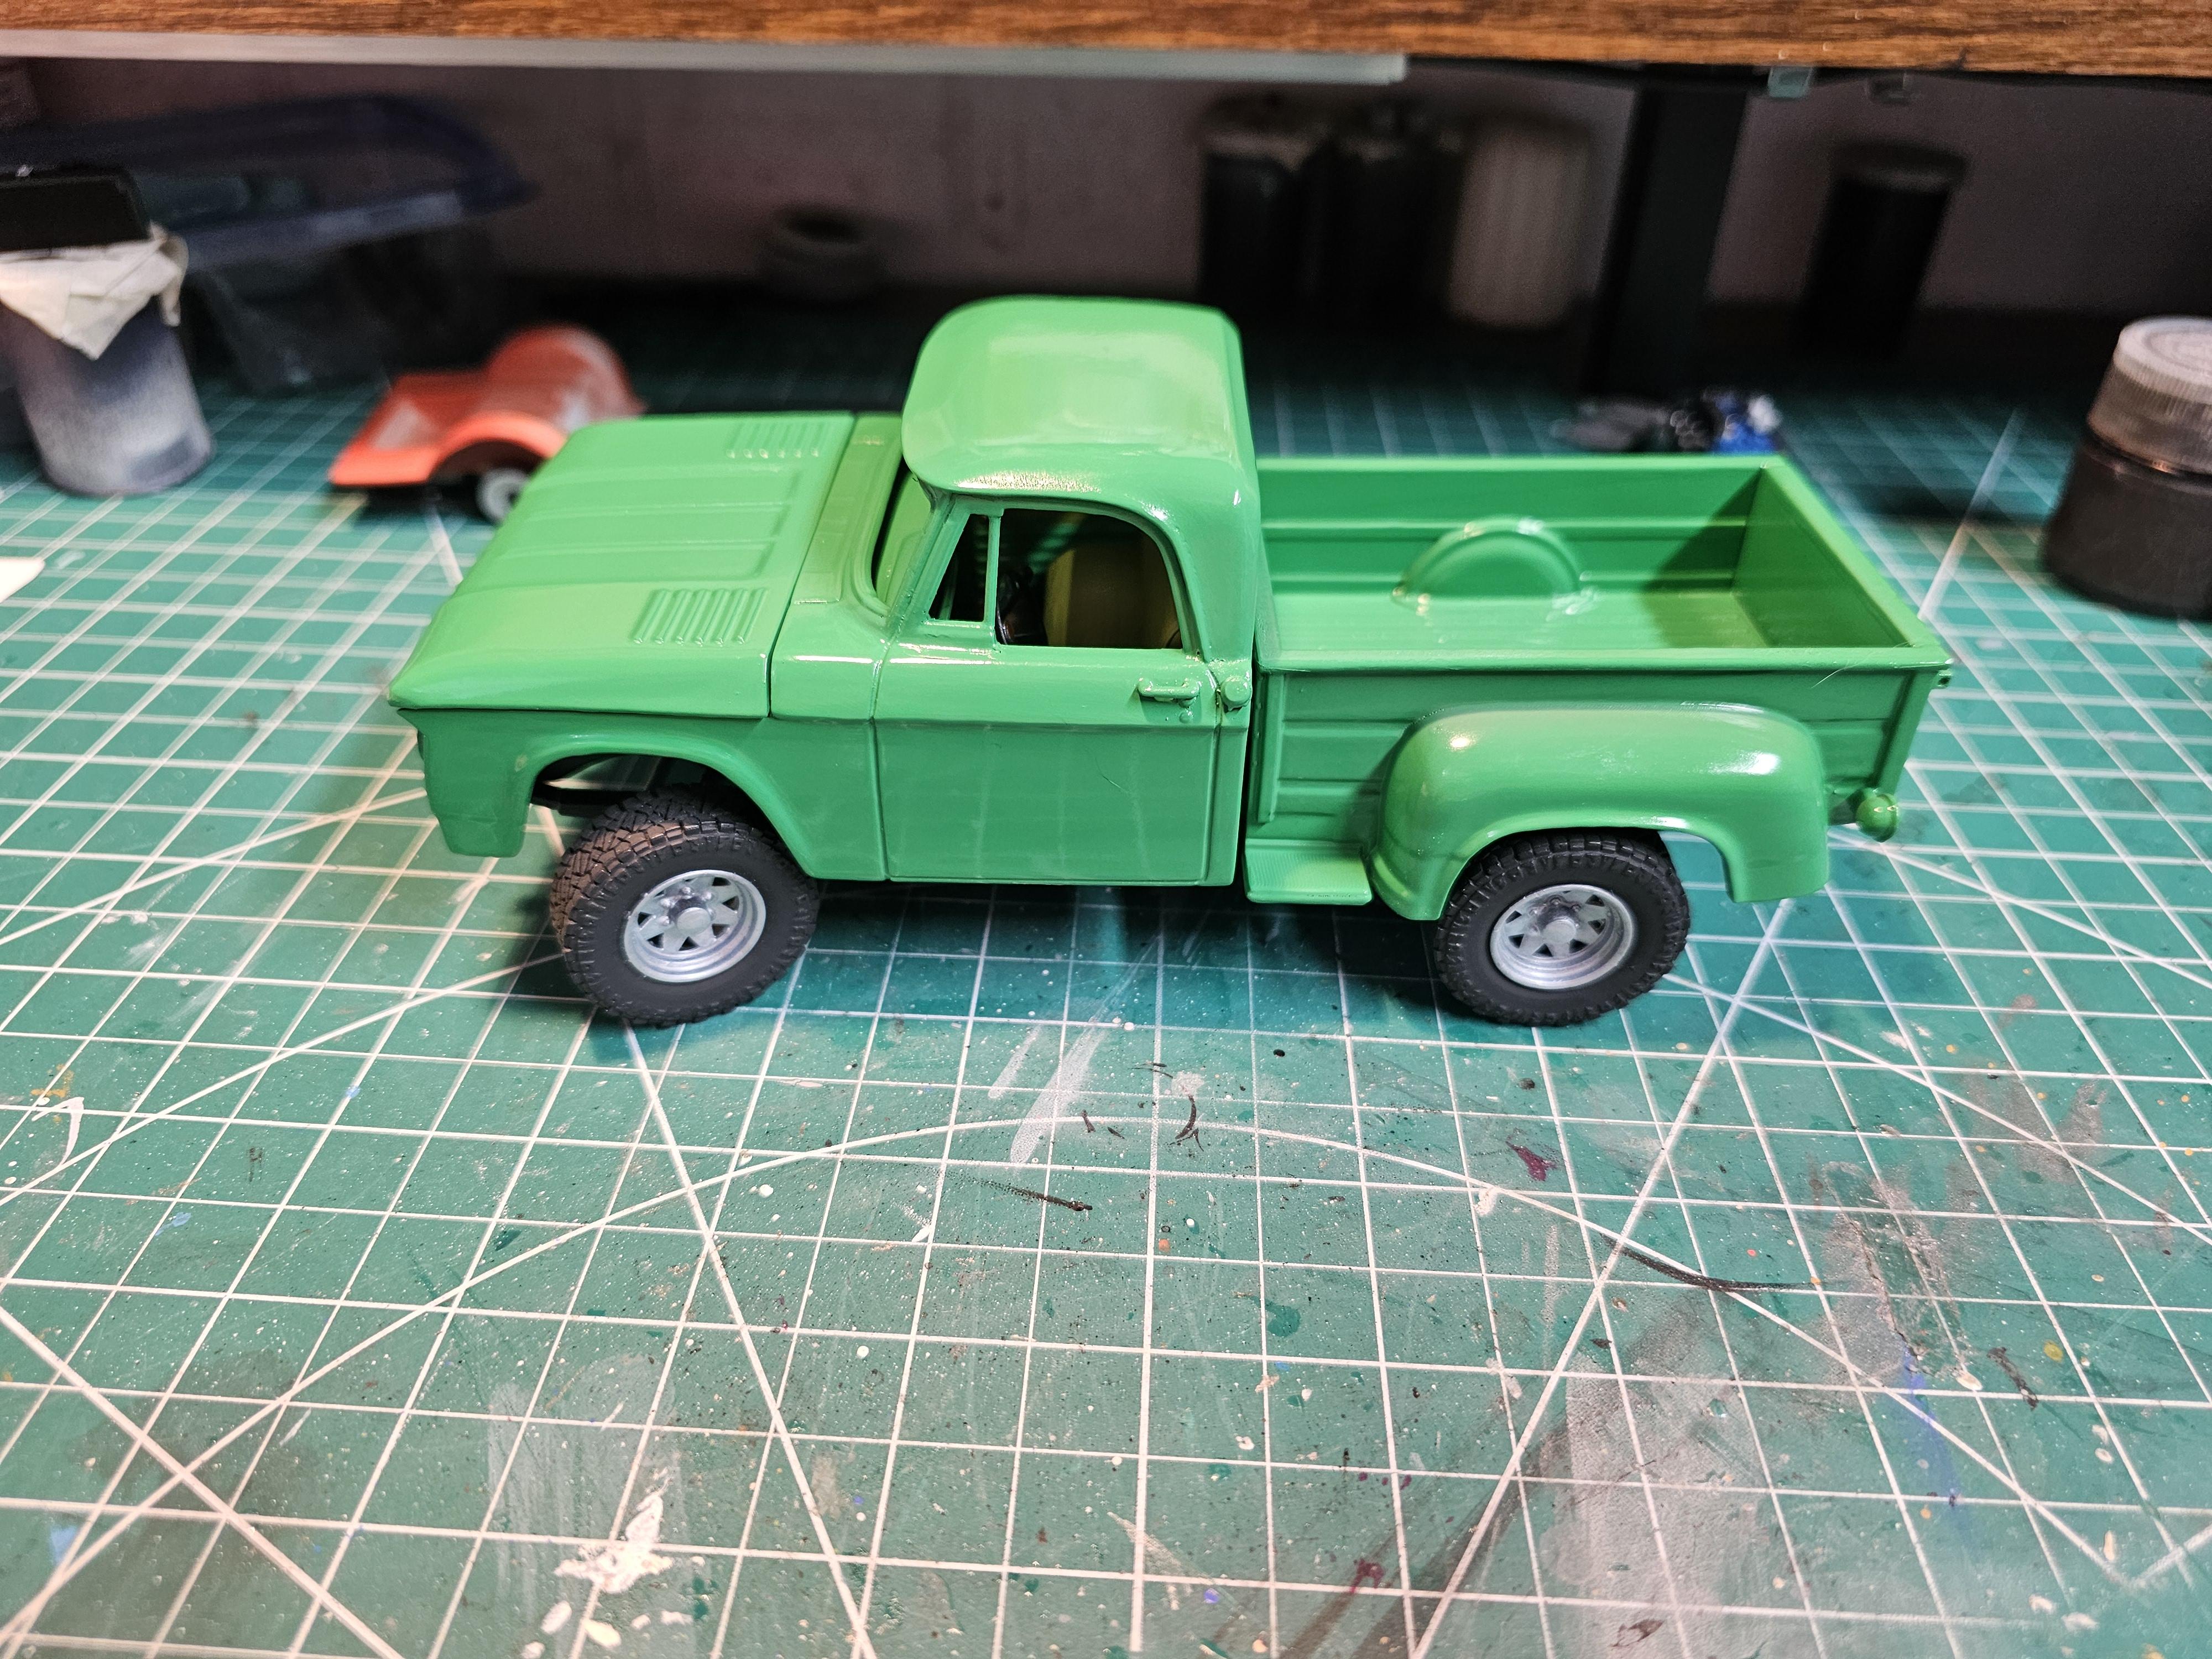
Another quick update, everything in Tamiya rattle can TS-35 Park Green, no clear coat just the paint sprayed from the can. I tried to 3D print the windows in high clear resin, it was not a success they are not clear enough, so I will be printing them in regular resin and then vac u forming them. At least that's the plan.
-
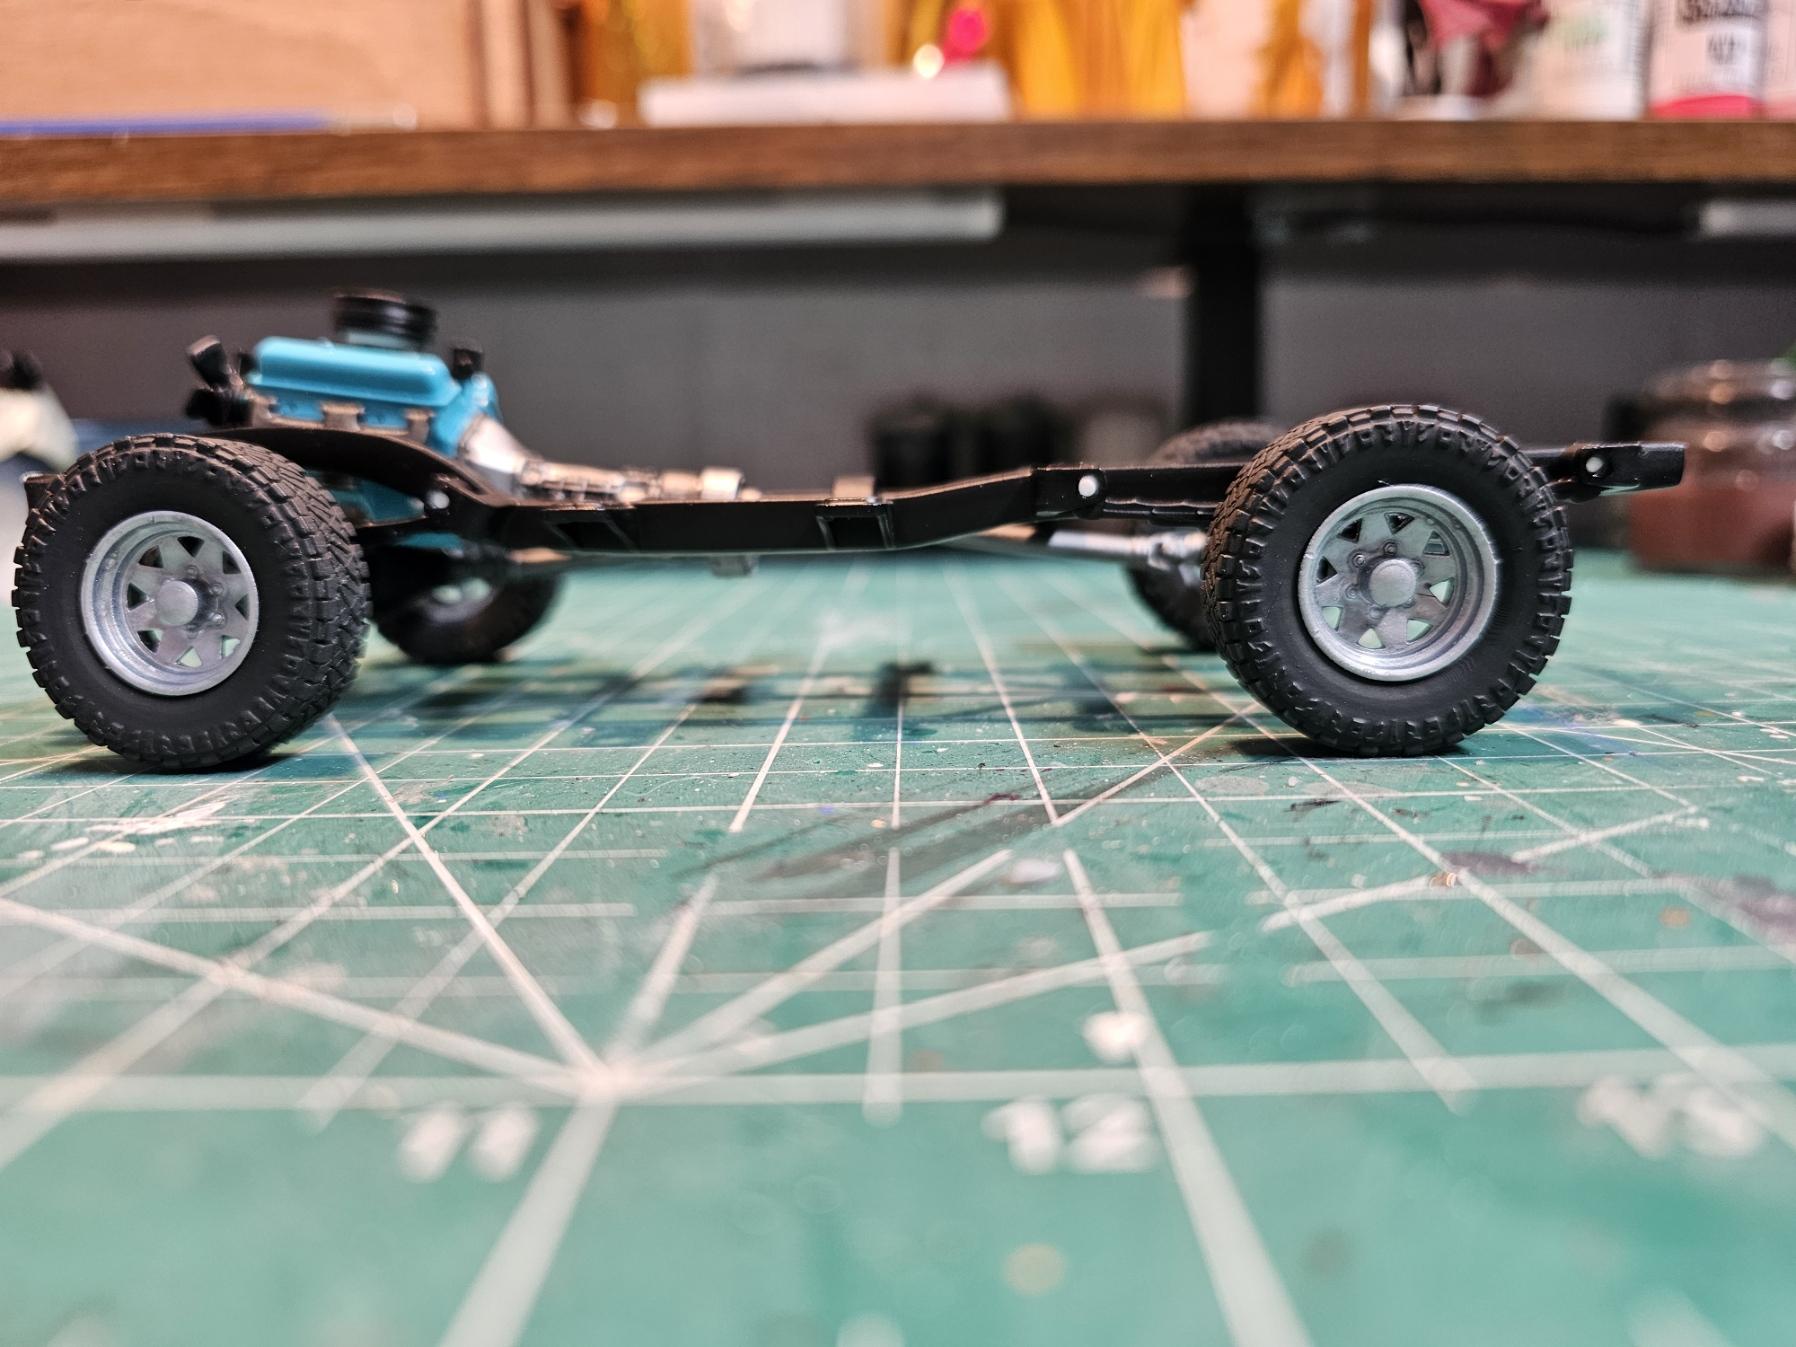
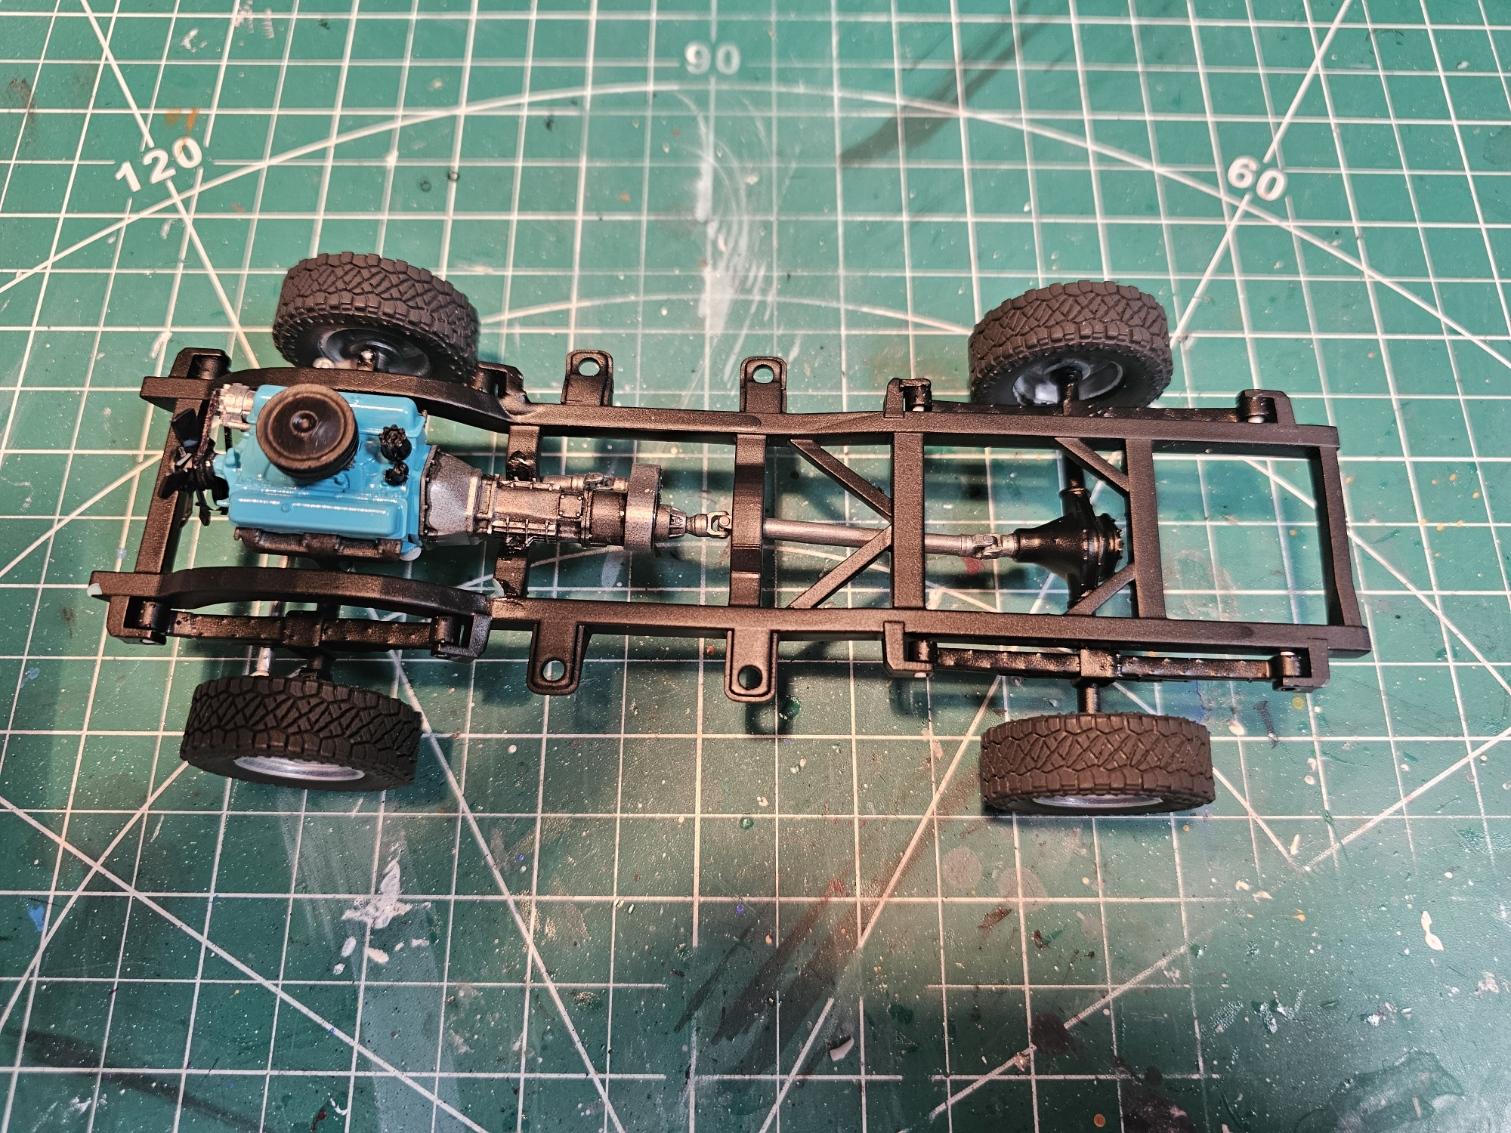
Kenmojr, in regard to resin printing, my best advice is to find a good friend who has a resin printer. ? It can be dangerous if not treated with respect and I print in my garage in a corner on an old table covered in plastic. Also, it generates a lot of dangerous waste products like contaminated gloves and paper towels and alcohol, unless you live in a super dry area I don't recommend water washable resins, I live in SE PA and humidity can be a problem, alcohol evaporates much easier. It's great when you get beautiful parts out of it and a PITA with resin and waste. Oldnslow, the transmission/transfer case only fits above the cross member as it is bowed down to hold it, I looked at the file makers pictures, and it is meant to go on top. I do believe the frame is a bit generic, I also have the 65 GMC pickup and the reframes look almost identical, but I have not printed it yet to compare.
-
A little update, I've reprinted the cab, but I have not done anything to it yet. I have done some work on the interior and chassis. This is what you would call an out of the box build, no wires or other details except for the shifter on the floor.
-
I purchased the Elegoo Saturn 2 8k printer and the washing/curing set. I think for all 3 components it was around $600. It's no longer available but the next modles are better and cheaper. It is nice to have both FDM and SLA printers.
-
A short video 20240514_113240.mp4
-
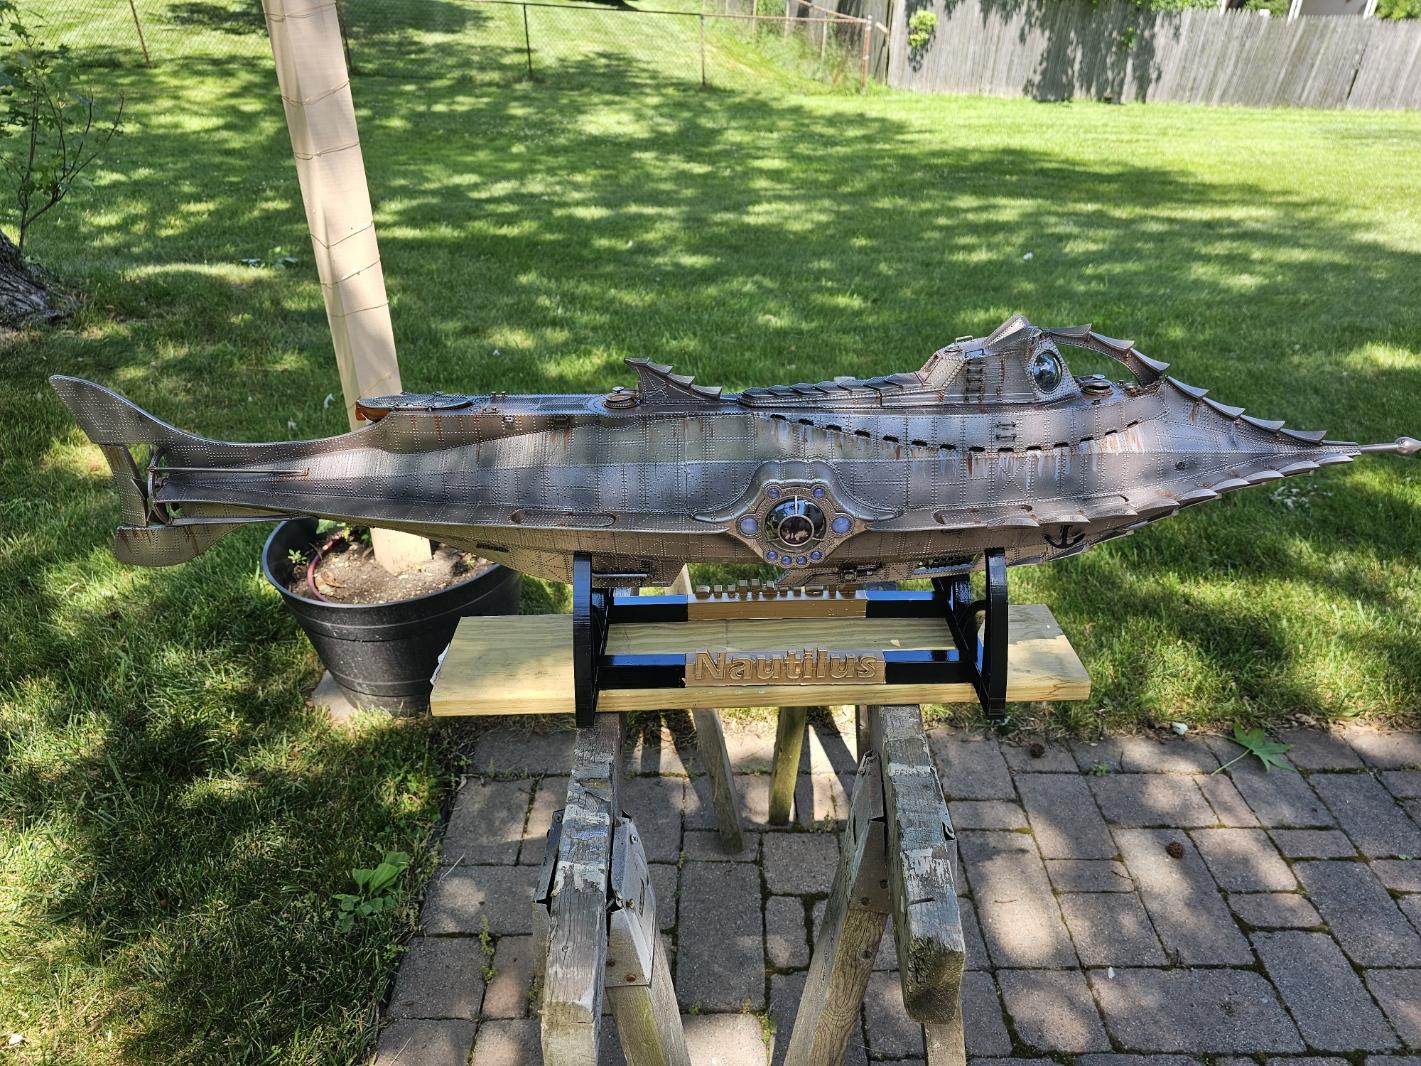
I always liked the Disney version of the Nautilus; the Verne version is a bit bland. This particular set of model files was on sale on CGTrader, actually it goes on sale quite a lot, and this model took me a year plus to complete, from printing to assembly to painting. Not perfect by far, and it tested the limits of my Ender 3 V2 FDM printer, and I had to reduce the printed size down to 72%, which still makes for an almost 4-foot model. First picture is the multiple colors of PLA I used, I had those colors for other items, so I used them up, I think 6 full spools in all. The salon room was printed in PLA, but I could not get the furniture to print in an acceptable quality, I eventually purchased a 3D resin printer and printed the furniture and internal details in resin. The carpets were found online and printed and glued to thin plastic. The salon is lit with 6 SMD LEDs, 4 warm white and 2 white, in hindsight I should have gone with all white, when the salon went in the hull it got much darker. The white LEDs surround the viewing windows as well and the bridge section. While not accurate I added yellow LEDs to the 2 eyes on the super structure and then added a simple circuit to fade them off and on. There is a small motor that turns the prop slowly. The first attempt at printing clear resin windows produced fogged windows, lots of online reading and pondering why. In the end I decided vac-u-form was the way to go, I used the 3D printed windows filled the backside with resin and cured them and used them as the pattern, not perfect but better. Putting this one on the shelf means the next big ship is the USS St Louis from World of Warships it is a free download on the Printables website Printables
-
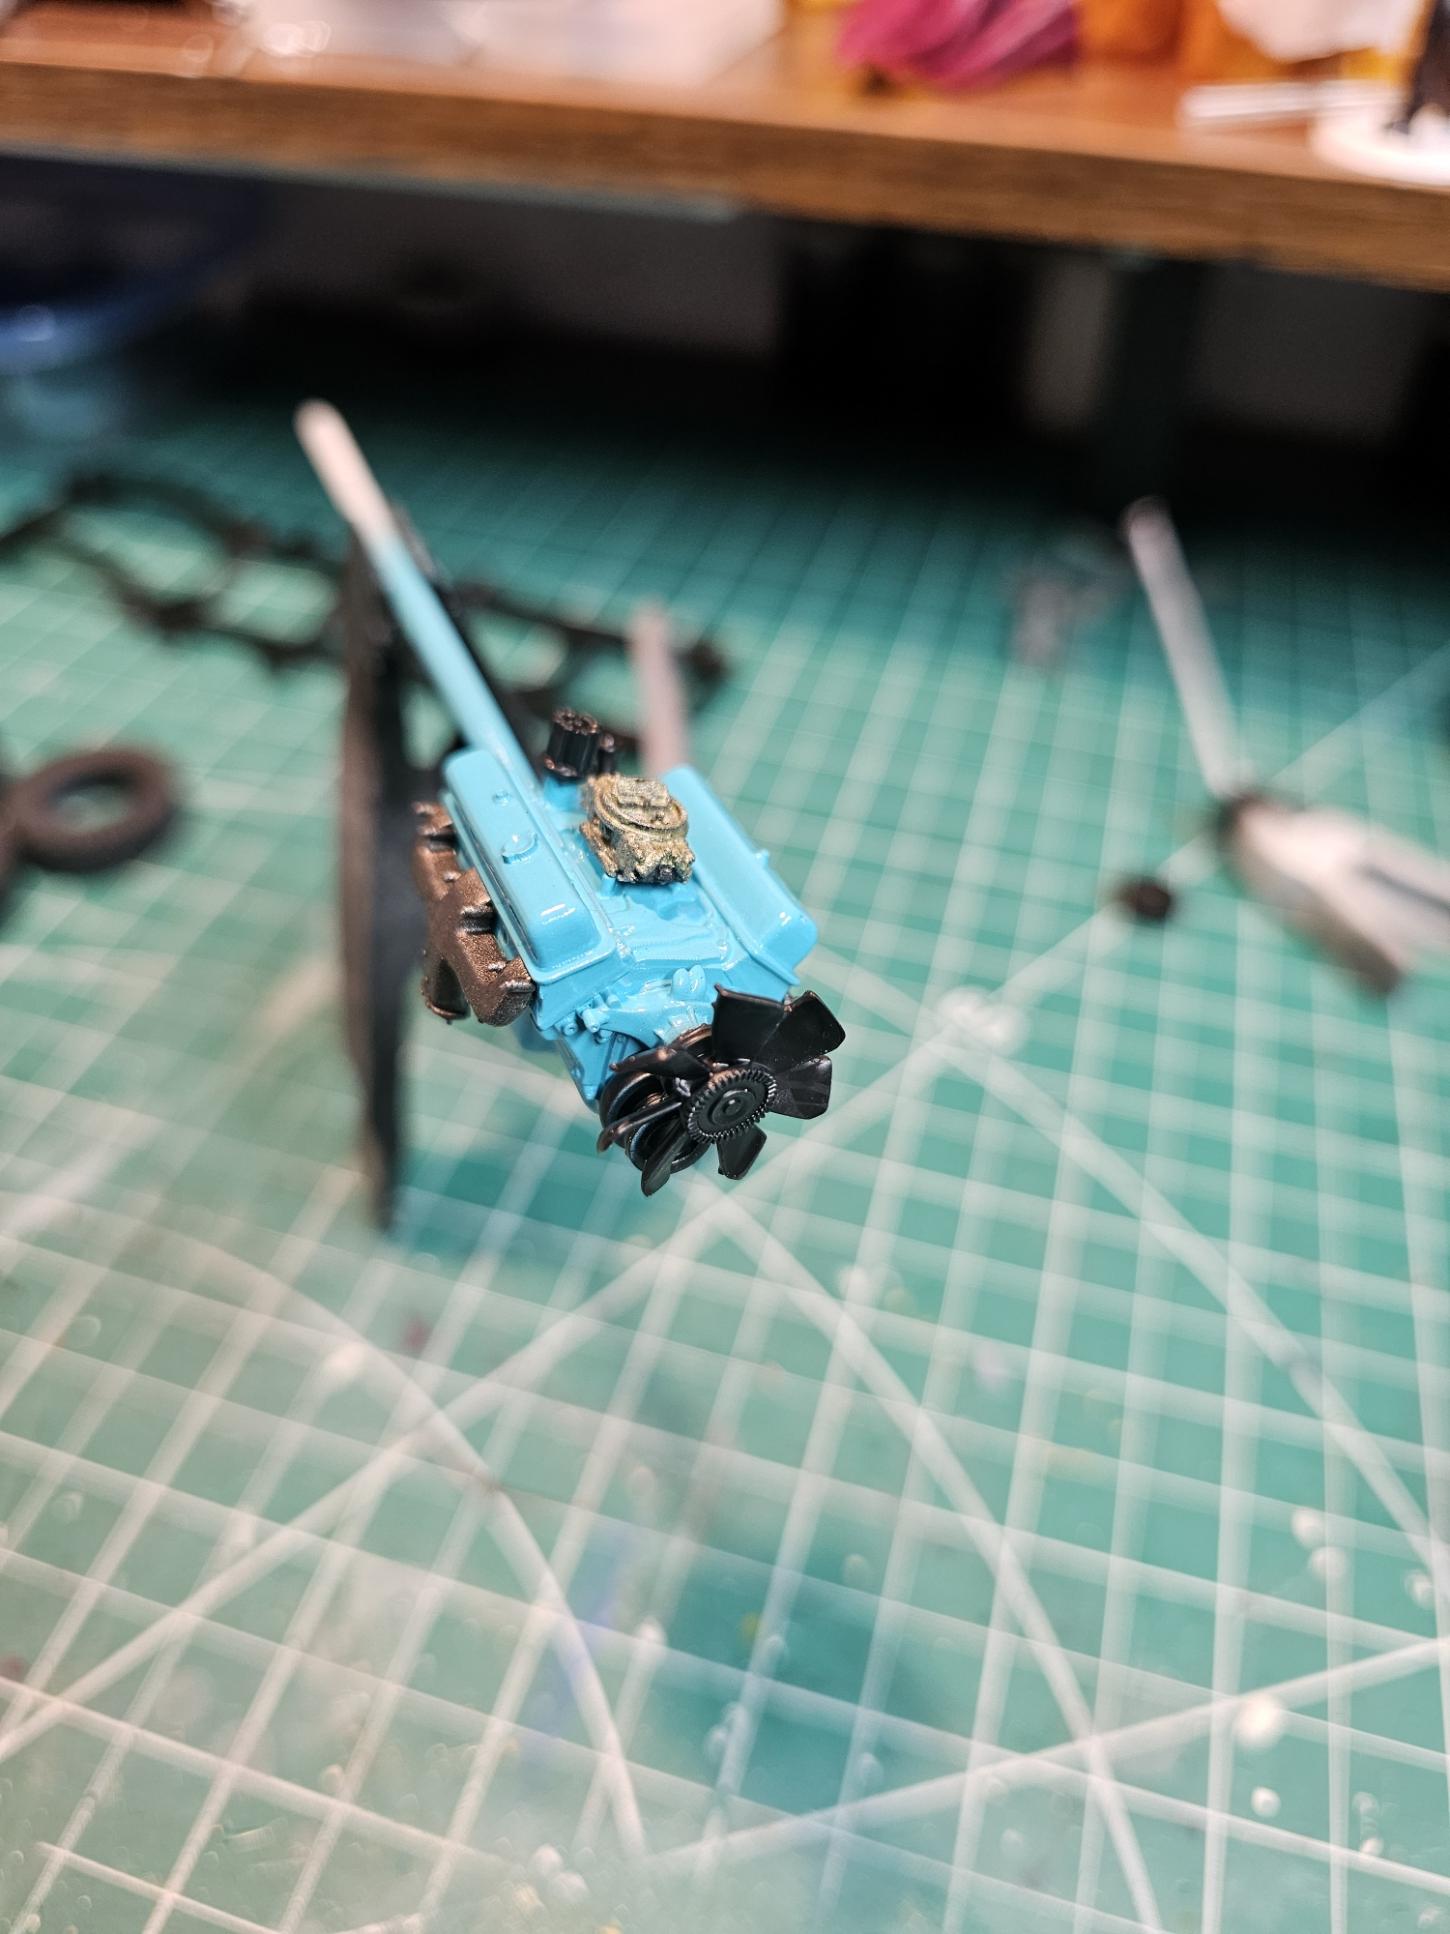
Quick update, I had a minor mishap, while the primer was drying on the cab, I knocked it off the table I use to set drying parts as I was moving another project, resin does not survive a fall in a Tamiya paint stand from 3 feet up onto a tile floor. But I am printing a new one at the 0.2 resolution as suggested by iamsuperdan, thanks for that suggestion. Work has progressed on other parts, here are the wheels (Pro Acryl Silver with Vallejo Metal varnish) and tires (Tamiya Rubber) and motor (Rustoleum Turquoise, sorry purists). Still working on the chassis, I printed 2 engine blocks so the mockup for motor mounts is being done with the second one, and this one should just drop in, as it always does in model building. ?
-
After FDM printing for a long time I jumped over to resin last fall, I purchased the resin printer in the spring and let it sit in the box, as I read up. After a long learning curve and lots of failures I was able to get consistently good prints. I don't design my own models and buy mostly off of CGTrader. There is a gentleman on that sells car model files on there, this 62 Dodge is one of the models that caught my eye. I now have all the parts printed as seen in the picture, and the Dspiae power sander on the way to help knock down all the small support spots. The chassis took 3 tries to get it right the body, bed and interior all made it on the first pass. This particular model has an actual engine in it, most of the others he sells do not. More pictures after sanding and primer. Commentary- Don't jump into resin printing lightly, while the rewards are nice it comes concerns about safety and environment, resin is toxic to wildlife and has to be handled appropriately. I use a corner of my garage but cover it with plastic drop sheets, so I don't turn it into a Super Fund site.
-
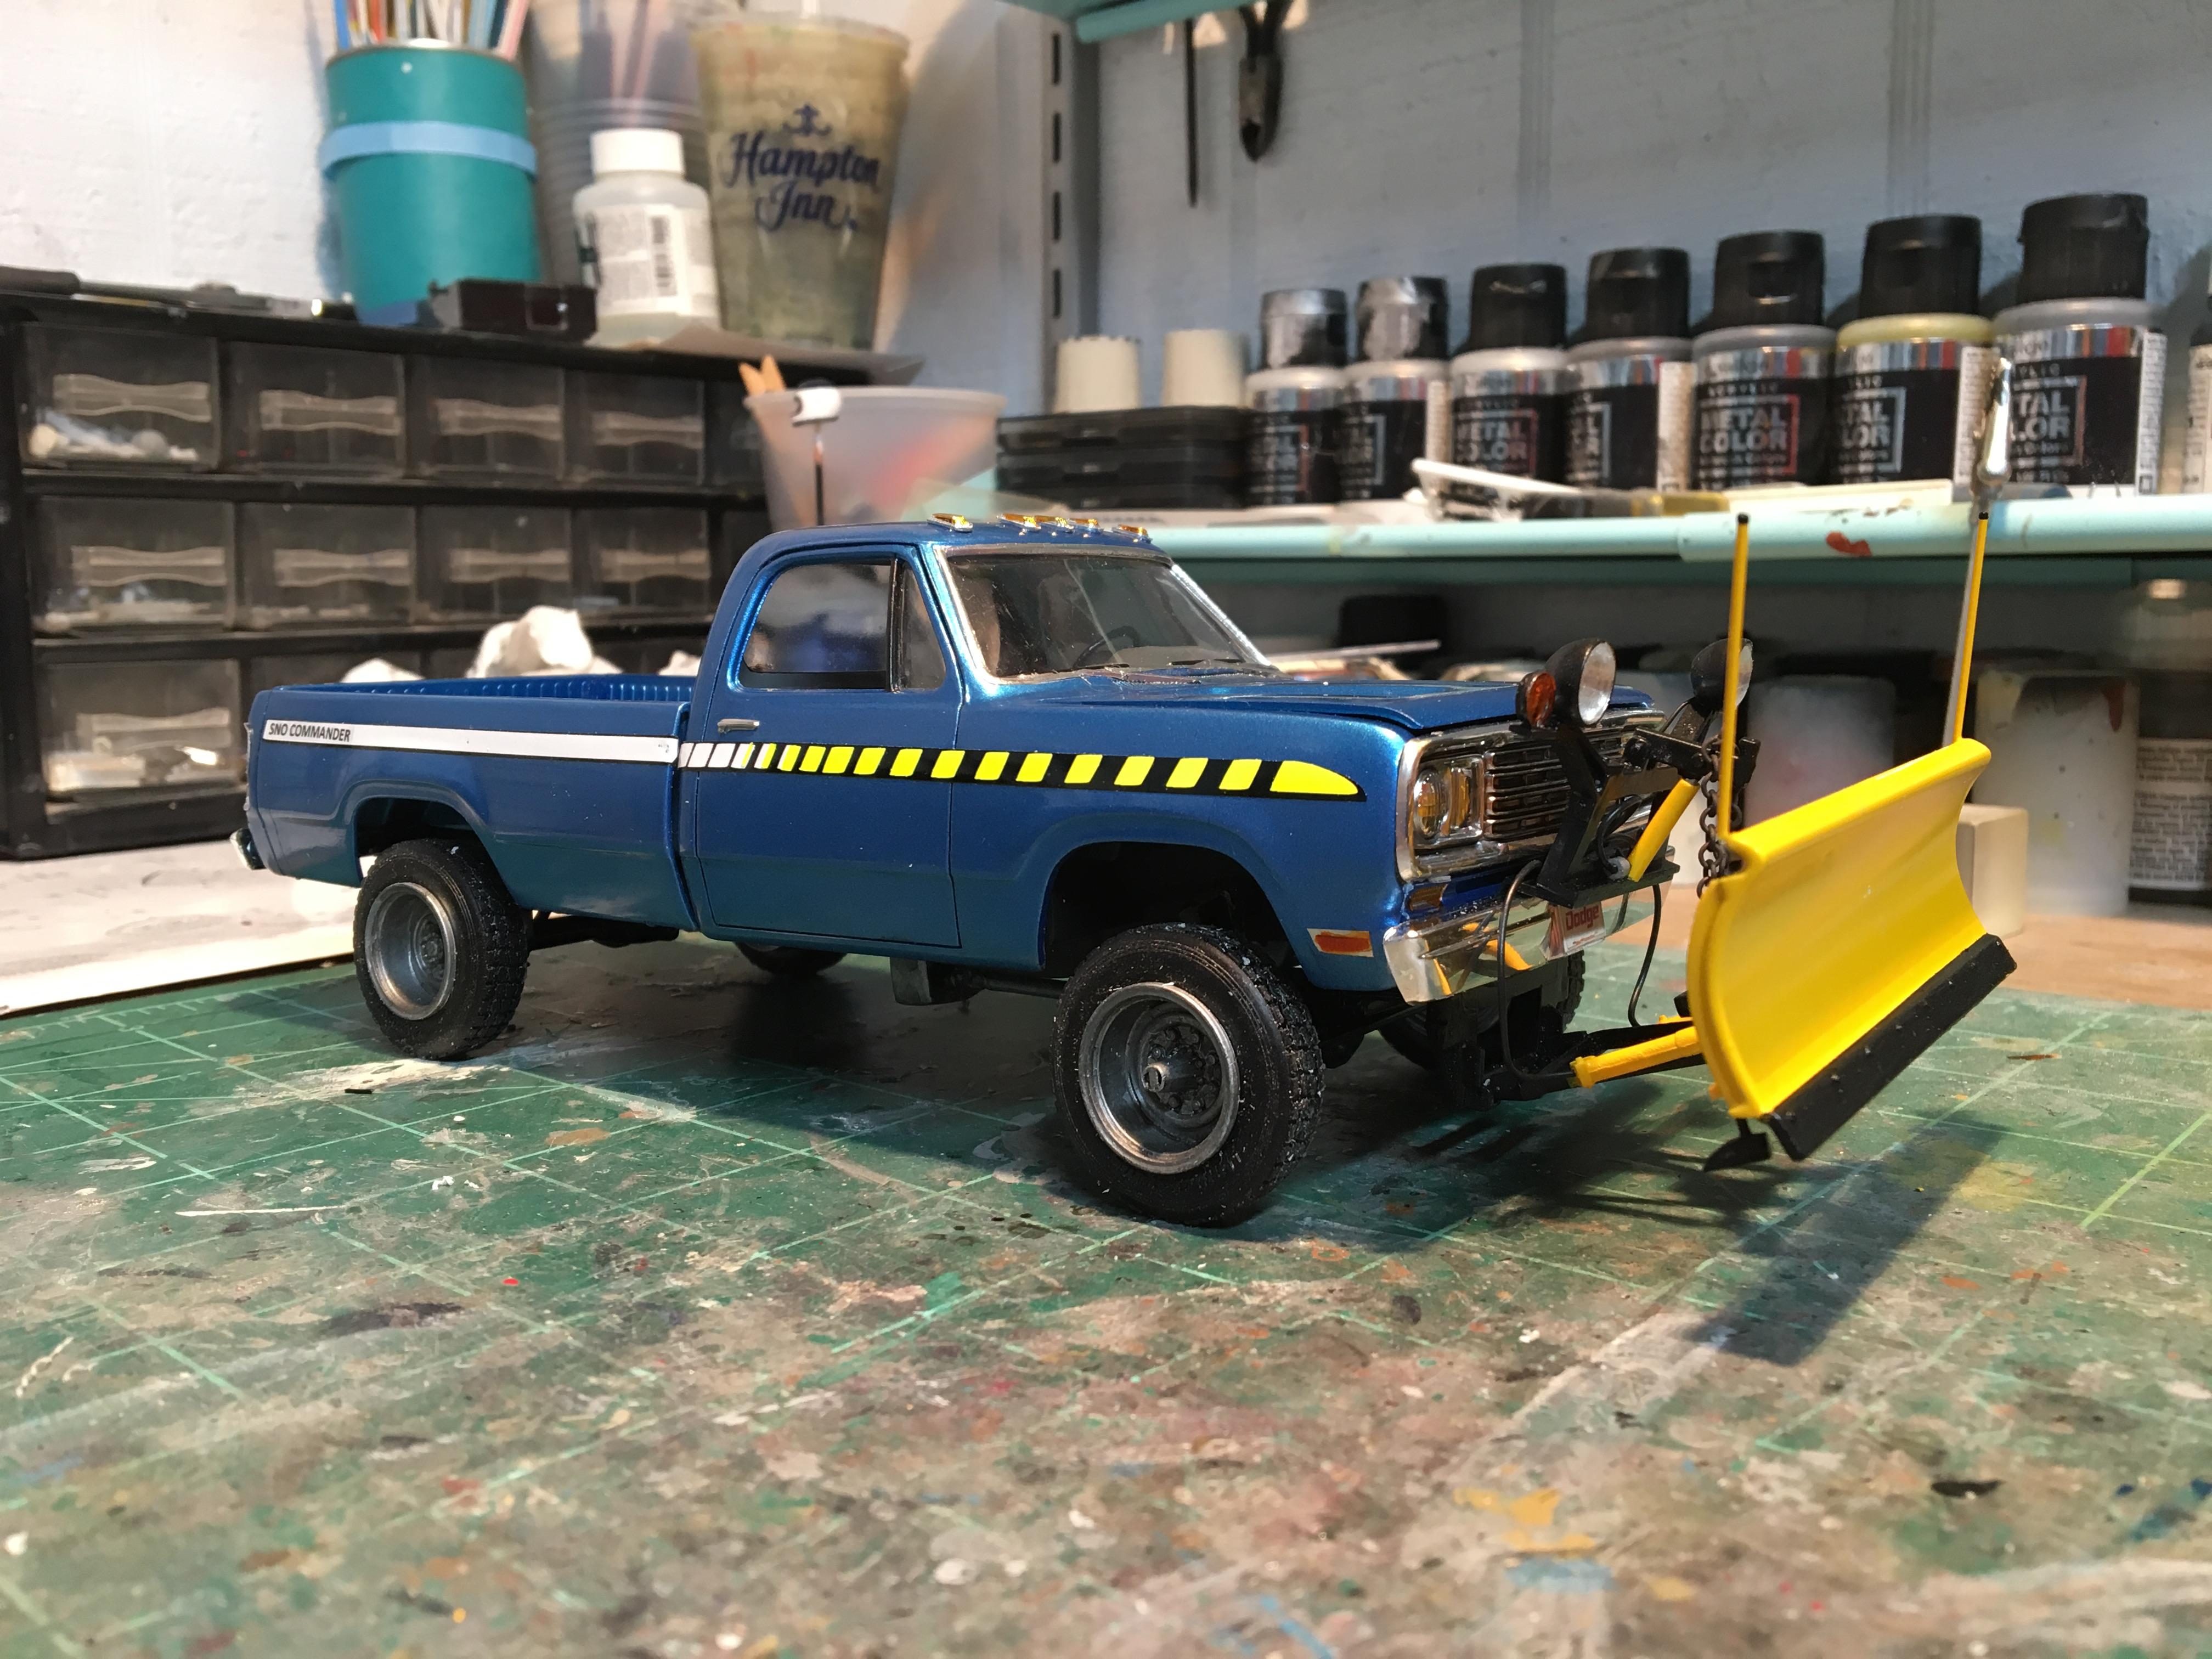
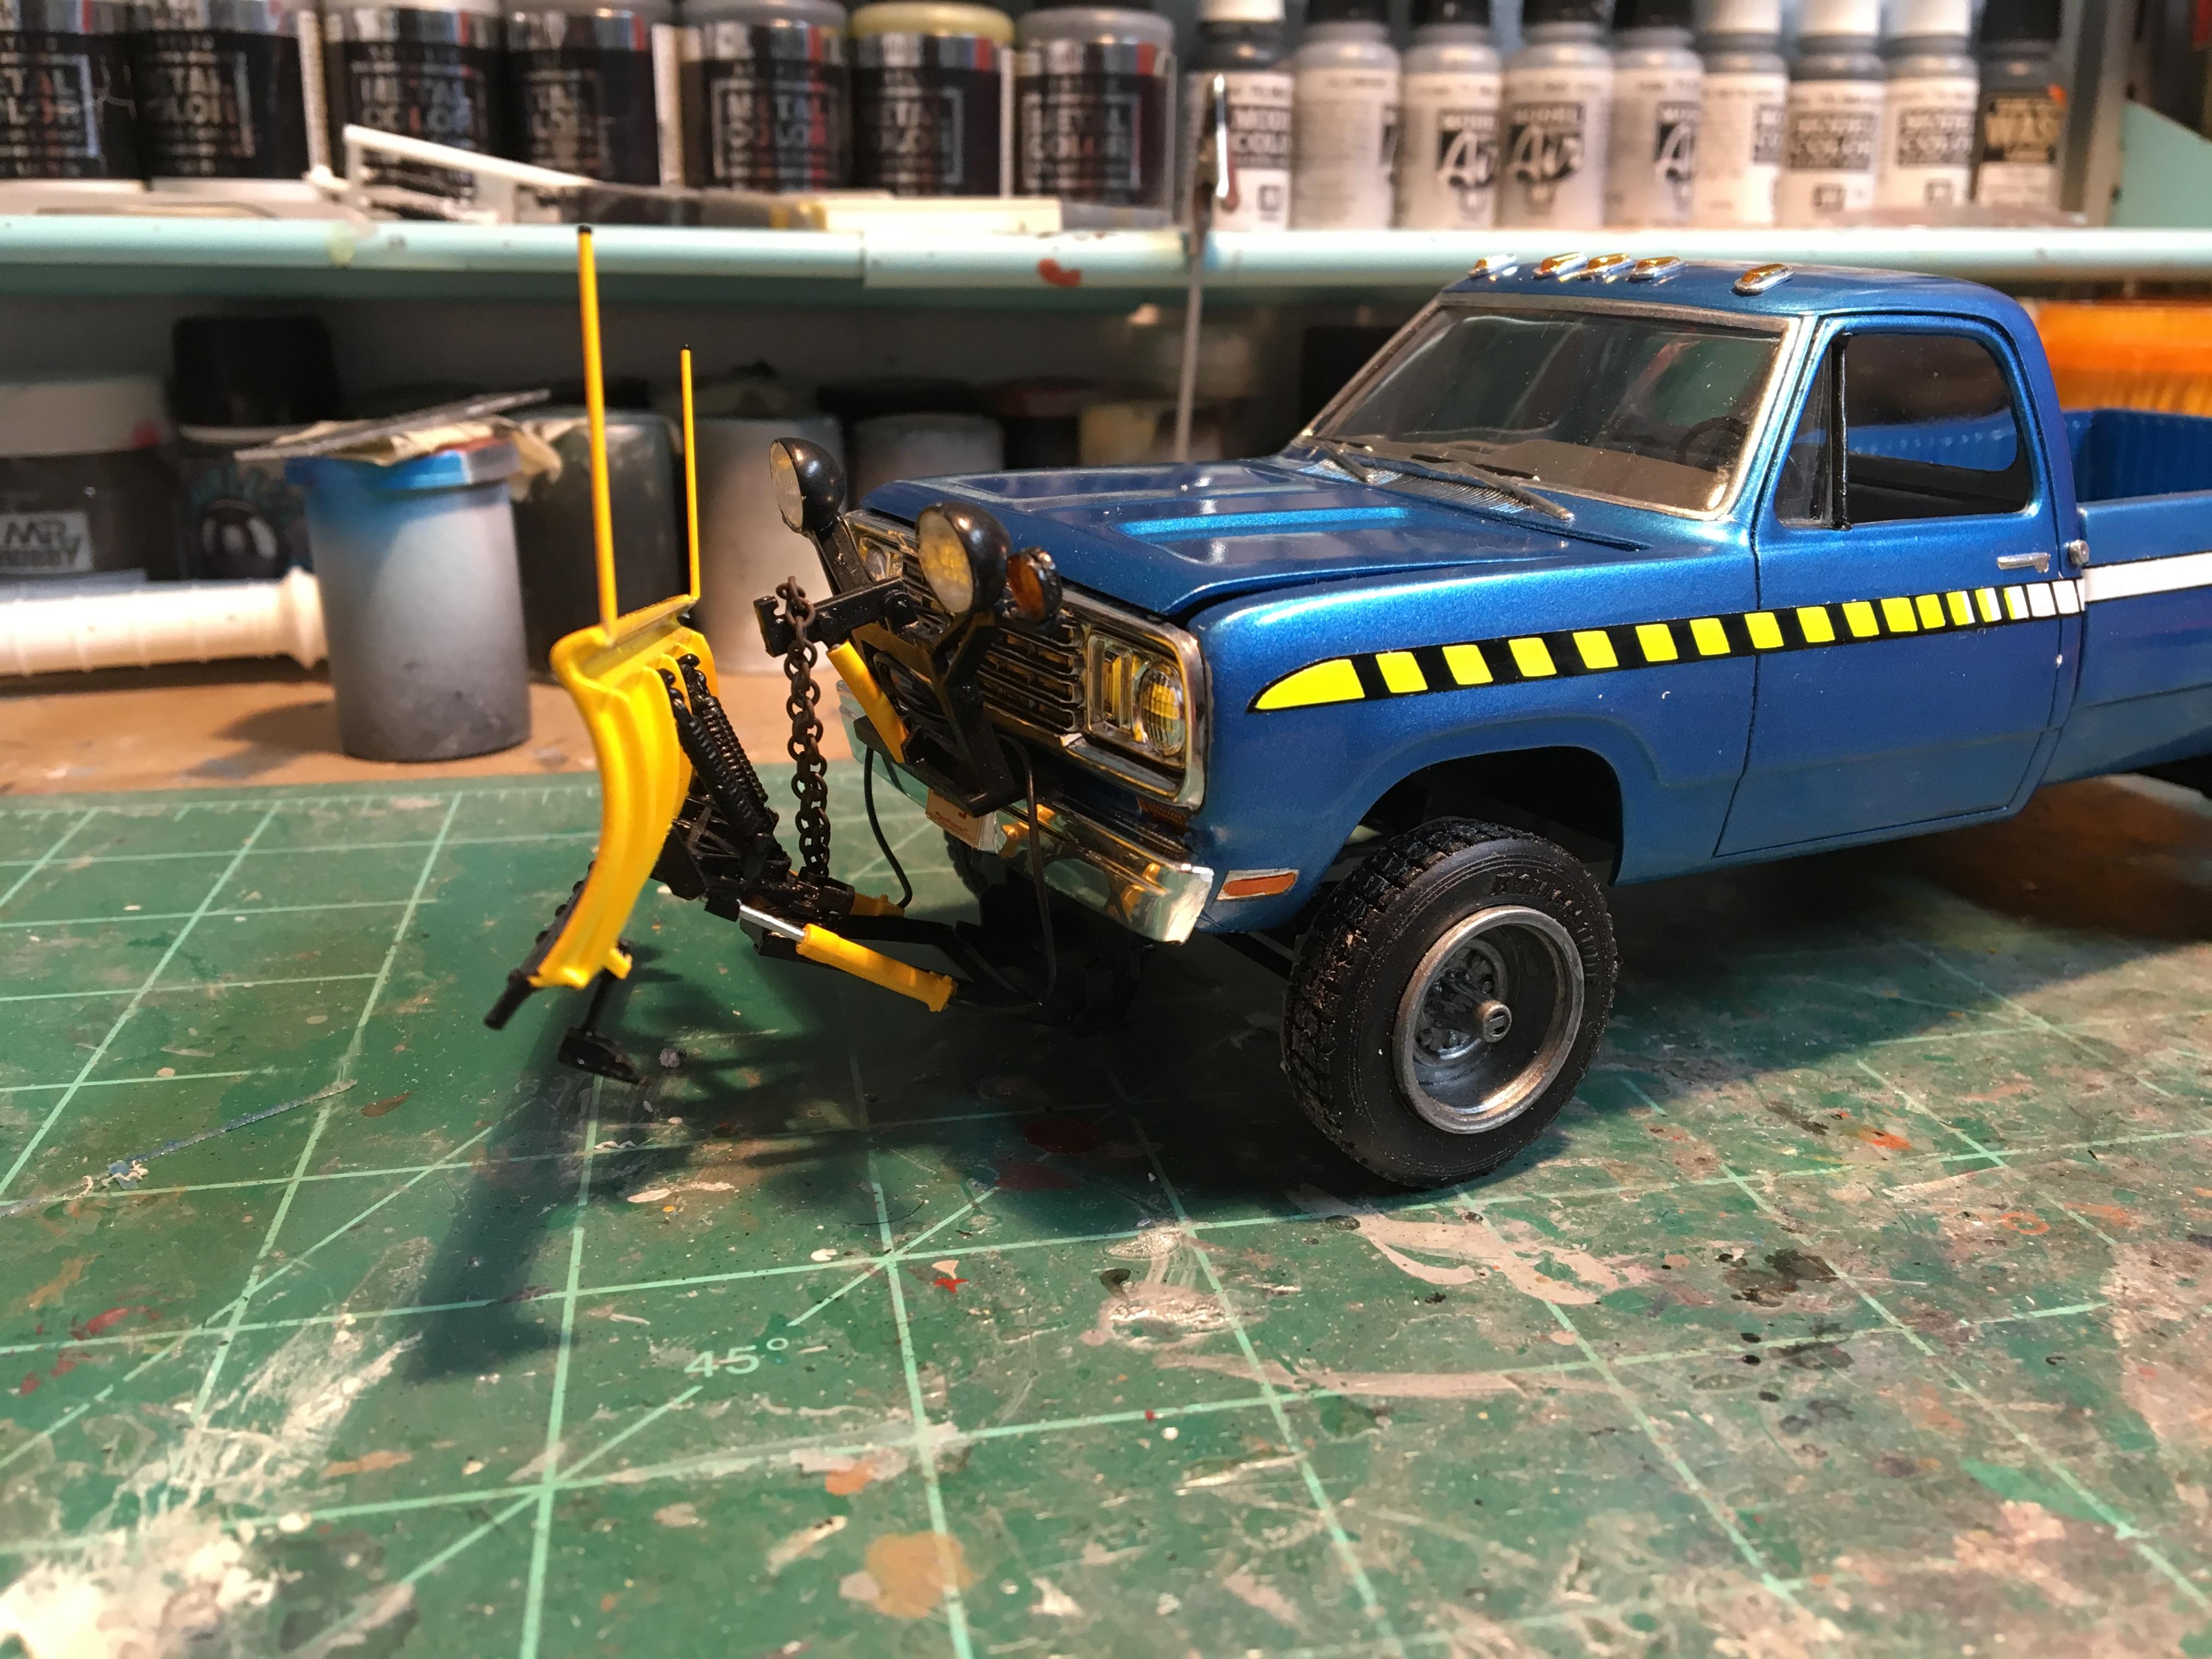
1978 Dodge Sno Commander
Rade8boy replied to Rade8boy's topic in Model Trucks: Pickups, Vans, SUVs, Light Commercial
NCBuckeye67, I'm not 100% sure but I do think they do the same thing but are from different manufacturers. -
MPC 1977/8 Dodge pickup with a snowplow from the Revell GMC truck kit. Been wanting to build this for a long time, this was my grandfather's brand-new truck, and he stuck me in it to snowplow when I was 16yo. After years of trolling model swap meets for a 77-78 Dodge pickup, I found the 77 MPC kit. The real issue was the Sno Commander side stripes, I was able to barter with a coworker who had a Silhouette cutter. I made measurements on the model and found several pictures on the Internet; she was able to make me a really nice set of the stripes. The snowplow was slightly modified, and the square lights were changed out for round ones, that I took from an old thirty something Ford kit and the cab marker lights were in the parts scrap box.
- 10 replies
-
- 11
-

-
The title says it all, looking for decals or stencils for modern trucks, I can build, and paint models all day, but graphic drawing programs elude me. Thanks
-
Here are some updated pictures with the side mirrors added and black foil, BTW, I was not impressed with the black foil, it is a lot thicker than the chrome and did not want to stick well, maybe it was old?? To answer some questions the original car was Light Regatta Blue with a light tan/beige interior and the interior is from the Monogram 87 kits so it is not really correct, see real car picture below. it is not 100% correct the sun roof in missing and the engine is somewhat close, but that is fine with me.
-
Sorry for the long delay, between work and vacation I have not worked on any models in a while. I have the chassis finished and and the KA Models disk brakes and calipers done. The motor is in th chassis and I am now working on getting the bod yready for paint! With the humid weather in the North East I am letting everything dry twice as long after another project suffered paint lift even after 1 week of drying. Hopefully I will have the body done soon
-
After graduating PSU and getting a job in 1985 I bought myself a brand new 85 Ford T-bird turbo coupe, I bought the resin body from All American models and the PE scripts and 10 hole mages from R&M of MD over 20+ years ago!! It is finally ready to put on the shelf, just needs the black windows trim, I ordered some black chrome foil. It may not be 100% correct but it is close enough for me.