
Lobo2me
-
Posts
567 -
Joined
-
Last visited
Content Type
Profiles
Forums
Events
Gallery
Posts posted by Lobo2me
-
-
On 6/2/2025 at 6:55 PM, Lobo2me said:
This one was insipred by a very cool 1:1 '34 seen at a local Cars & Coffee...but I could find the pics taken that morning. My bad!
Another blunder...meant to say, "could NOT find the pics."
-
On 6/5/2025 at 3:33 AM, tim boyd said:
Steve....I saw your post a few days ago and thought that it is a really cool and creative way to use that kit. The very things that make the kit undesirable on its own - primarily the undersized scale and proportions of the body - are instead used to accentuate the treatment and theme of your model. I thought "what a cool idea!". And even if you have what you call a wandering mind, I think the overall treatment of your model lends itself to a very coherent theme and delivery. "Well done" in my book. One question i had looking at your project, the side panel flame graphics, which look very cool here - did you paint those ore was it a very skillful use of kit decals, and if it was kit based, which kit?
Thx for your comments! Cheers...TIM
Hello Tim. Thank you for the kind words and for providing motivation, education, and entertainment through your posts and magazine articles. Your work and play are inspirational! The decals are Cool Flames 1:24 1:25 Gofer Racing Decals 11081 Model Car applied over Tamiya Deep Blue, which was applied over Silver Leaf and under two coats of Clear Blue. Thanks for looking. Have you seen several of my other attempts (posts)? Thanks again!
-
Outstanding! Really clean. Great gray, red accents, and black trim color combinatioin. Underestated, yet classically cool! Well done!!!!
-
1 hour ago, Lobo2me said:
Some very cool and creative rides! I just posted a '34 that I tried to duplicate what was on my mind. I may have tried just a little too hard, but I think it turned out OK.

This one was insipred by a very cool 1:1 '34 seen at a local Cars & Coffee...but I could find the pics taken that morning. My bad!
-
On 5/11/2025 at 7:27 AM, Mothersworry said:
Some very nice models, but it seems this Threads gettin a tad off topic...supposed to be about replicas of real Hot Rods and Customs that actually exist/existed in full scale.
Just sayin...
Good catch! I think some folks, like me, got caught up in all the excitement this general topic can conjur up. After adding to the problem, I realized what I had done....my bad! Yessiree
-
Some very cool and creative rides! I just posted a '34 that I tried to duplicate what was on my mind. I may have tried just a little too hard, but I think it turned out OK.

-
 2
2
-
-
Very cool Tim. Classic, with a twist. Very well done! I just posted a crazy '34 that I got in way over my head on...as I often do because of my wandering mind.
-
5 hours ago, espo said:
Like the modern "sports car" or "high tech" look depending on your definition of all that. The paint colors and settle flame treatment look great. Like the wheel and tire combination.
Thanks, David. It was a temptation, but I tried not to go too "high tech" with carbon fiber and the like.
-
1
-
-
Very cool! I remember Before & After. Good luck on the raffle.
-
Congrats, Bruce, on your IMPS awards. That Cobra is awesome—one of my favorite cars of all time!
Best wishes on the 296 cars. SWEET!
Thank you
-
Very well done. Excellent replica! I can appreciate all of the work you put into creating this masterpiece of rolling art. That was a wild background in the video.
-
 1
1
-
-
Good job! Really like the two-tone paint.
-
1 minute ago, yellowsportwagon said:
It’s automotive water borne basecoat with 2k clear. The color is Chrysler RPE that I added some coarser pearl to.
Exceptional! Looks great. Thanks
-
Really nice! What paint/finish did you use?
-
52 minutes ago, Chris V said:
Amazing model - It may very well be the most impressive result anyone has ever achieved, starting off with that complete mess of a kit as base!
Thank you, Chris. It sure was a handful! I appreciate your kind words.
-
Neat and clean. Great color combo. Very well done!
-
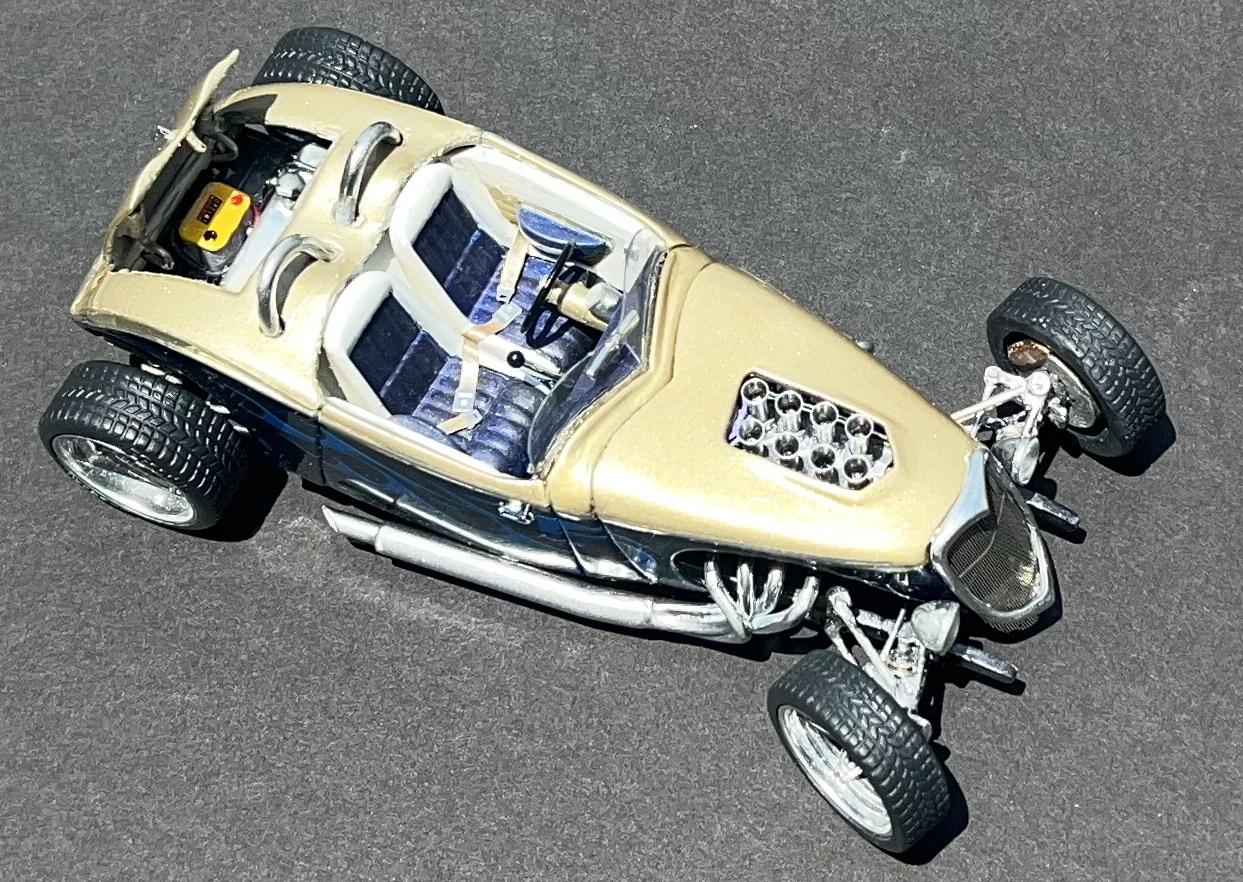
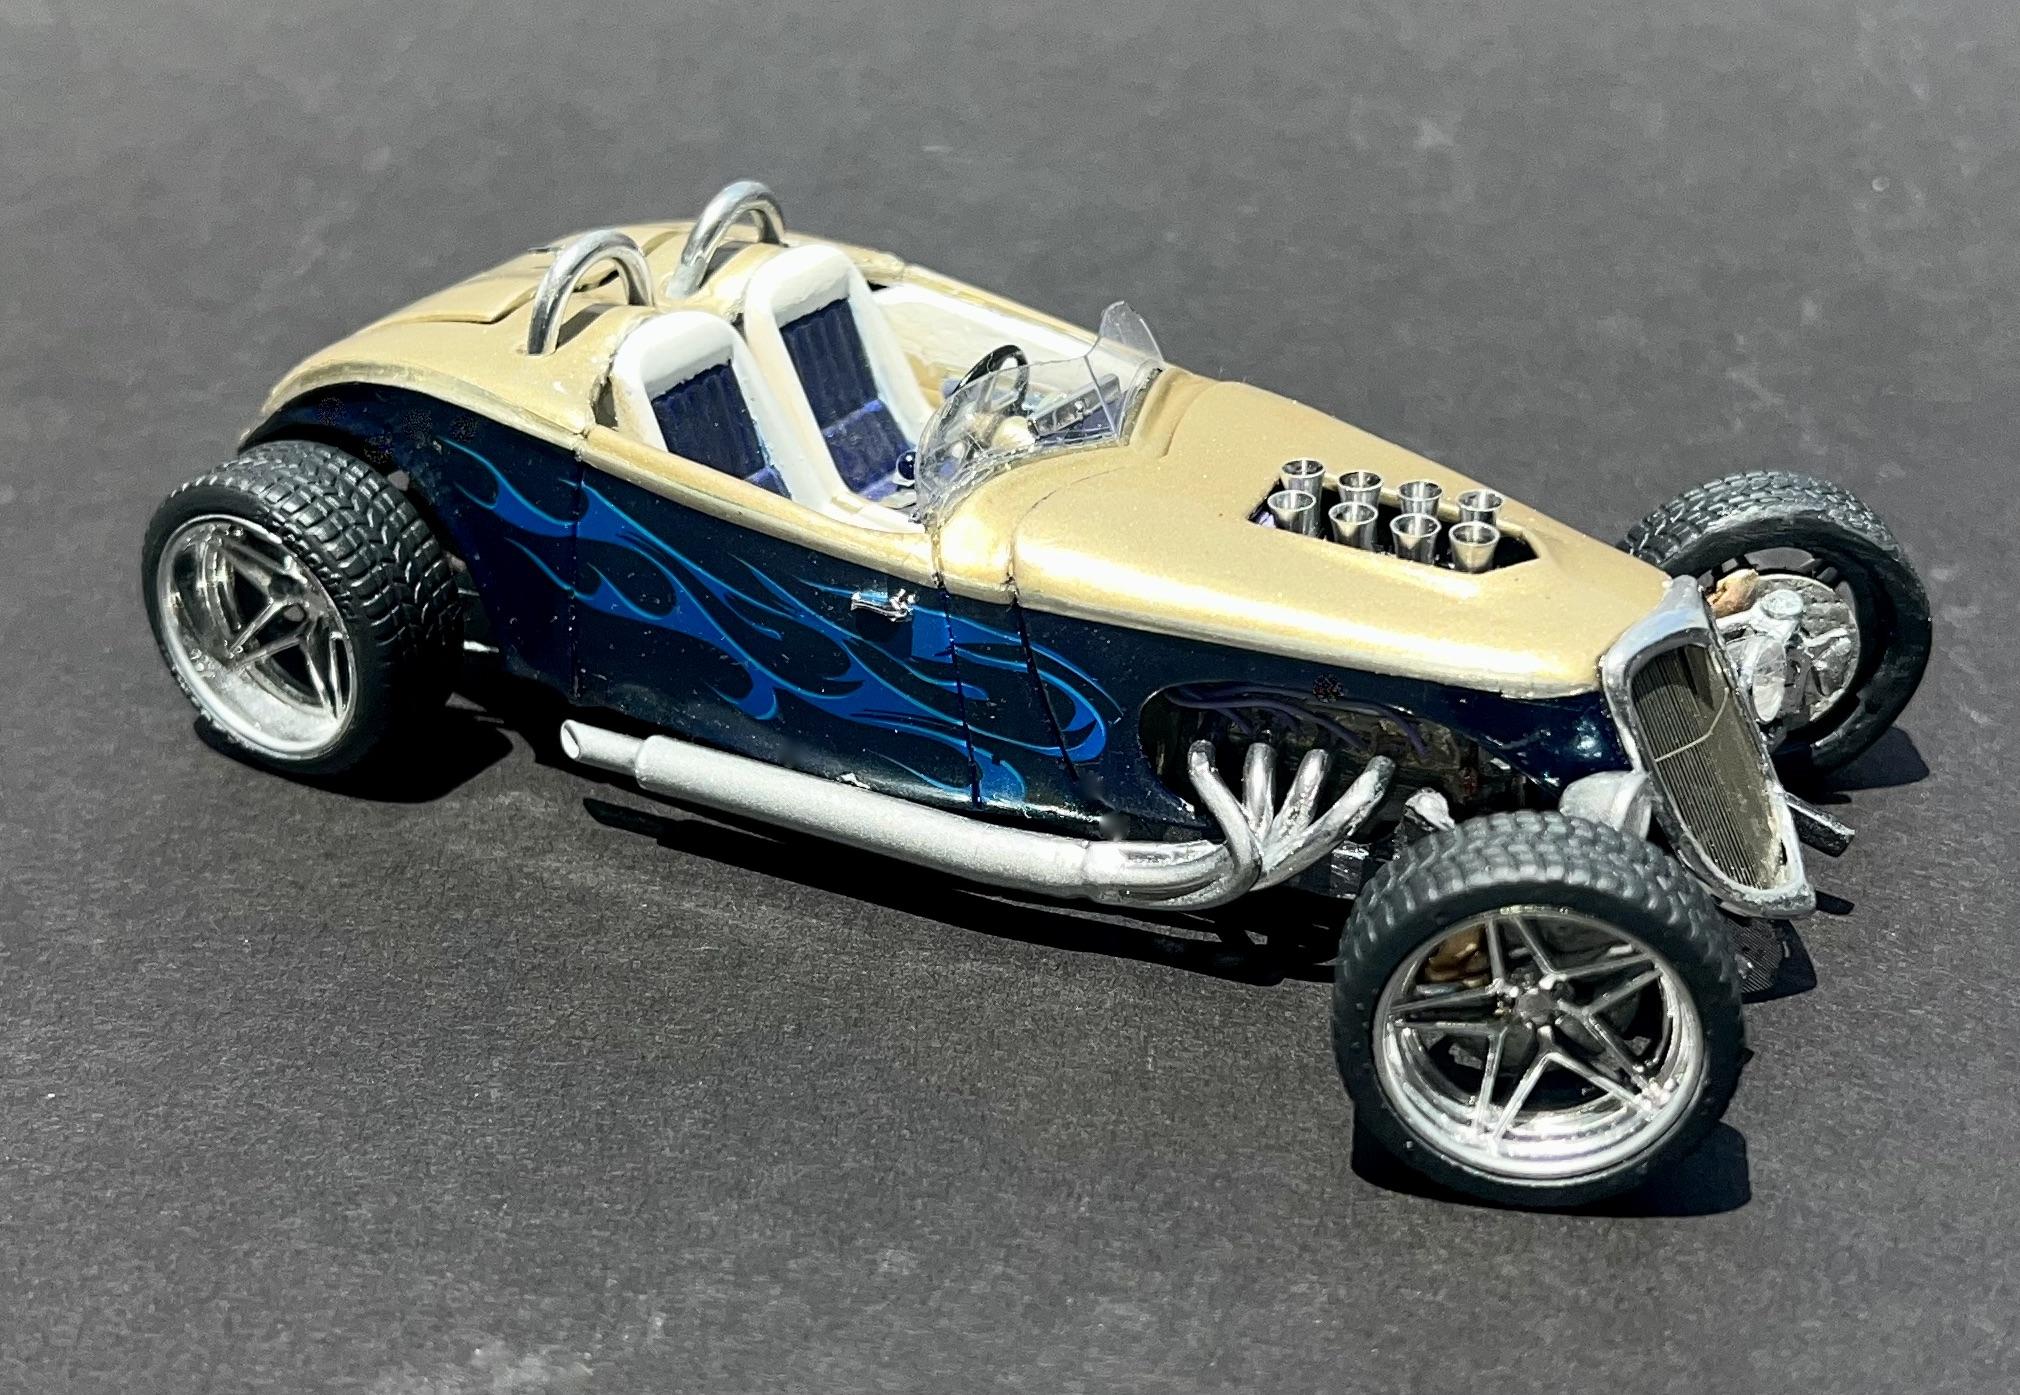
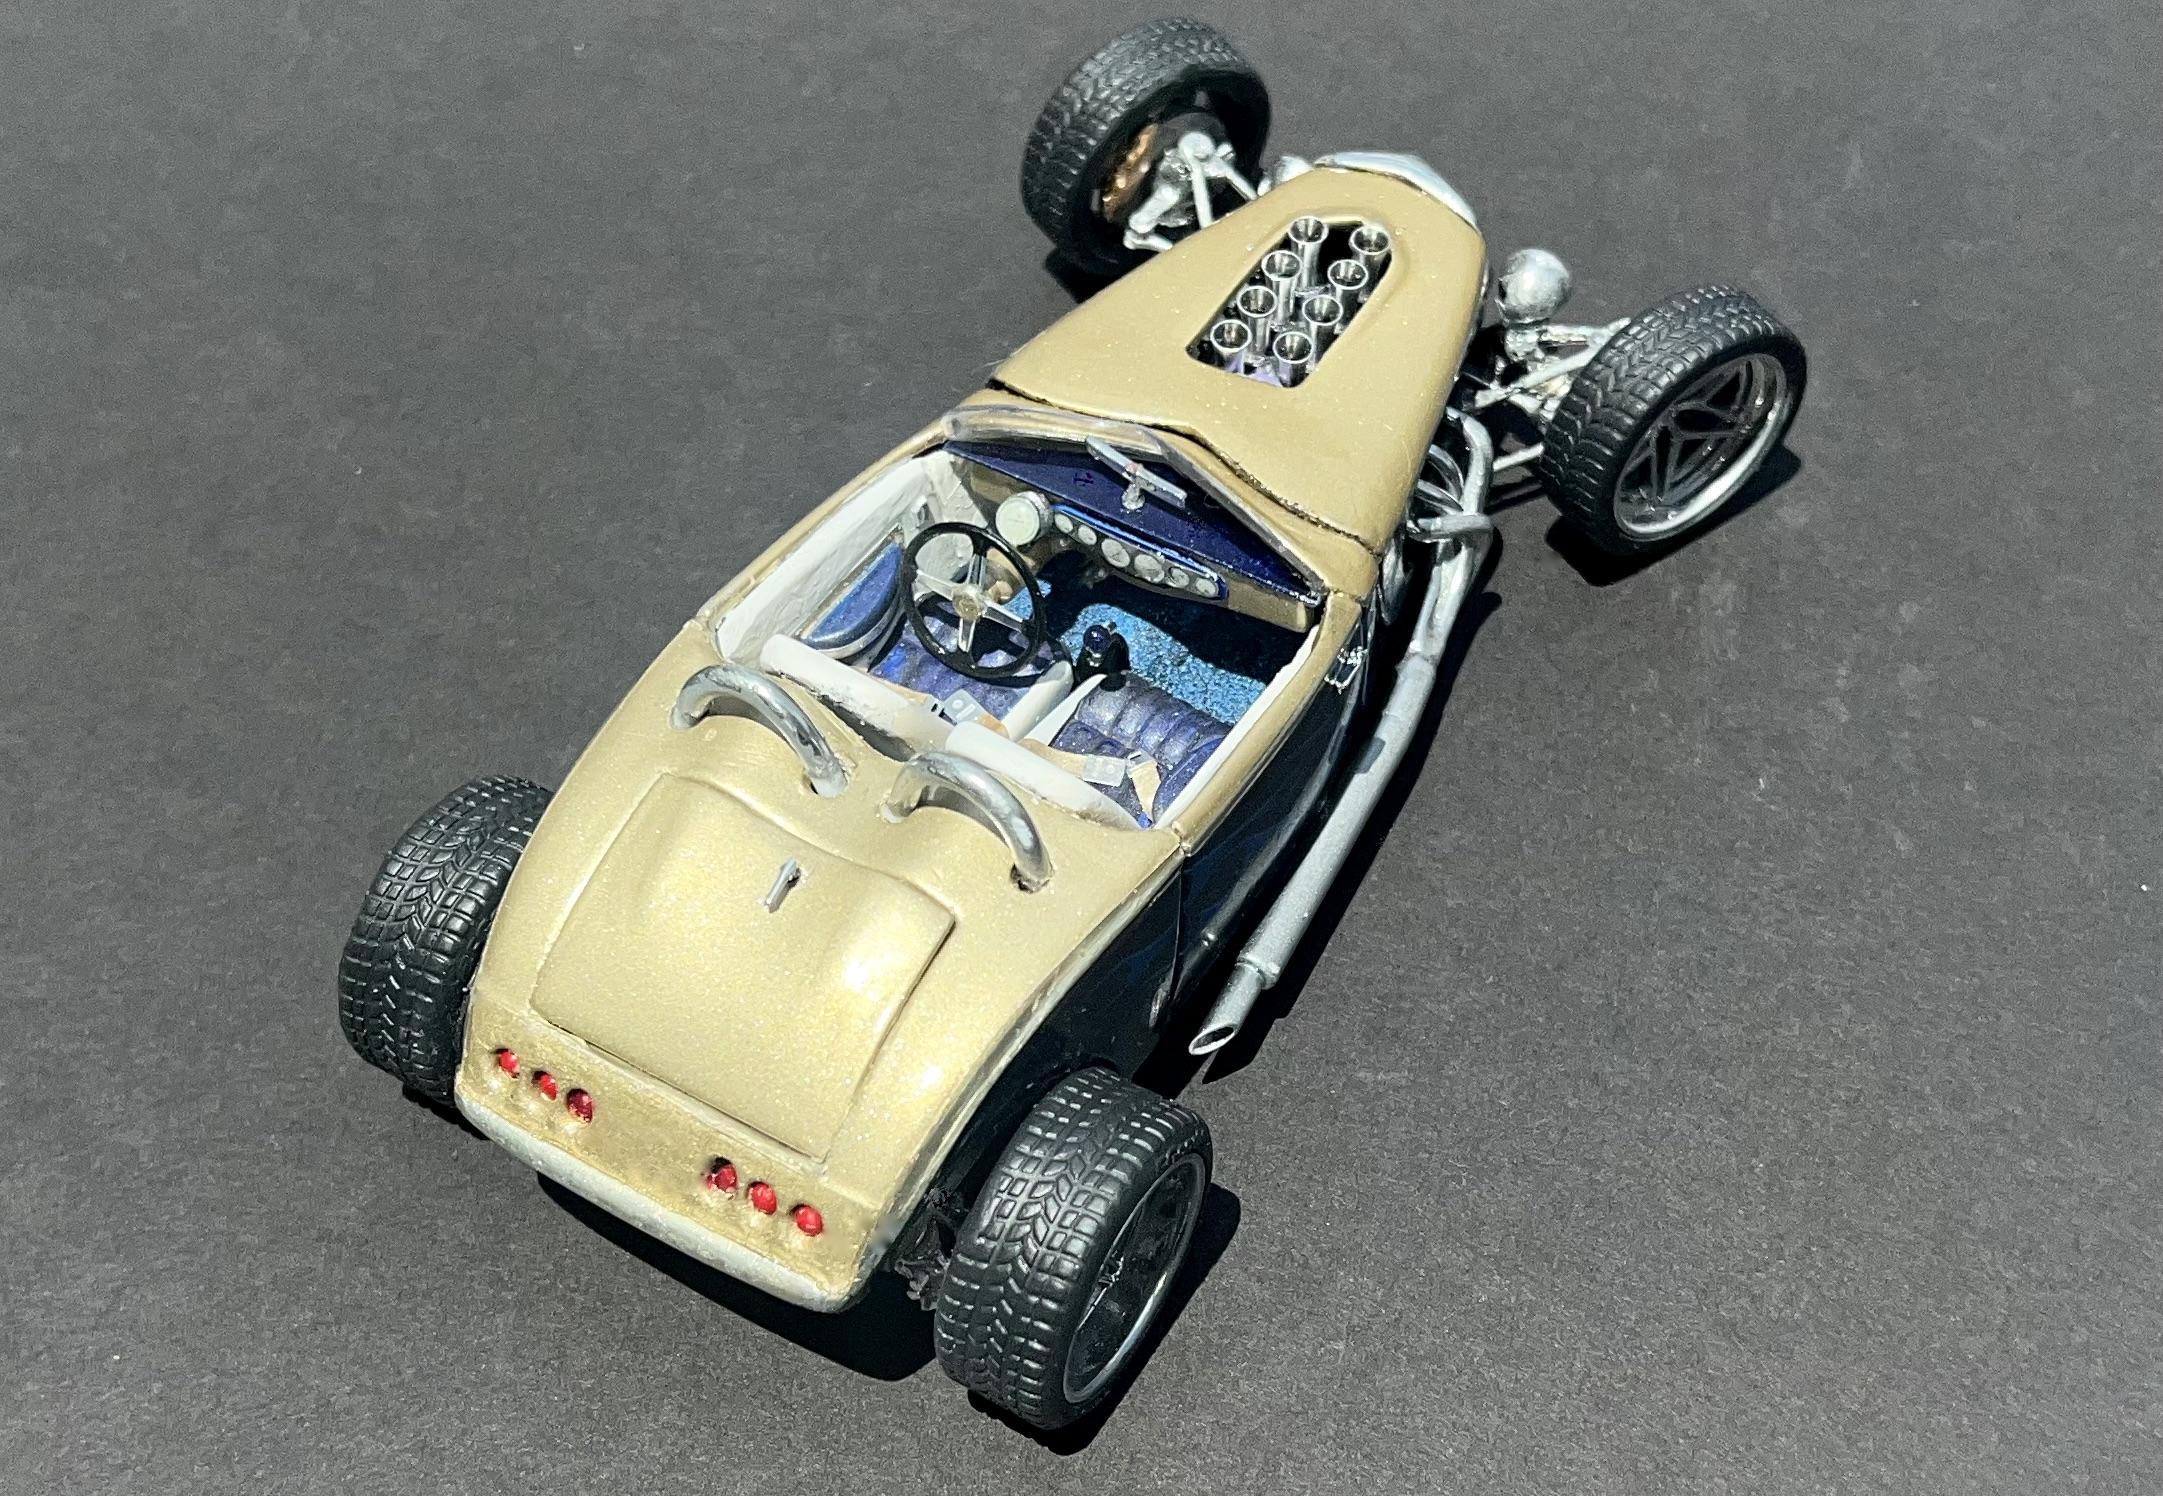
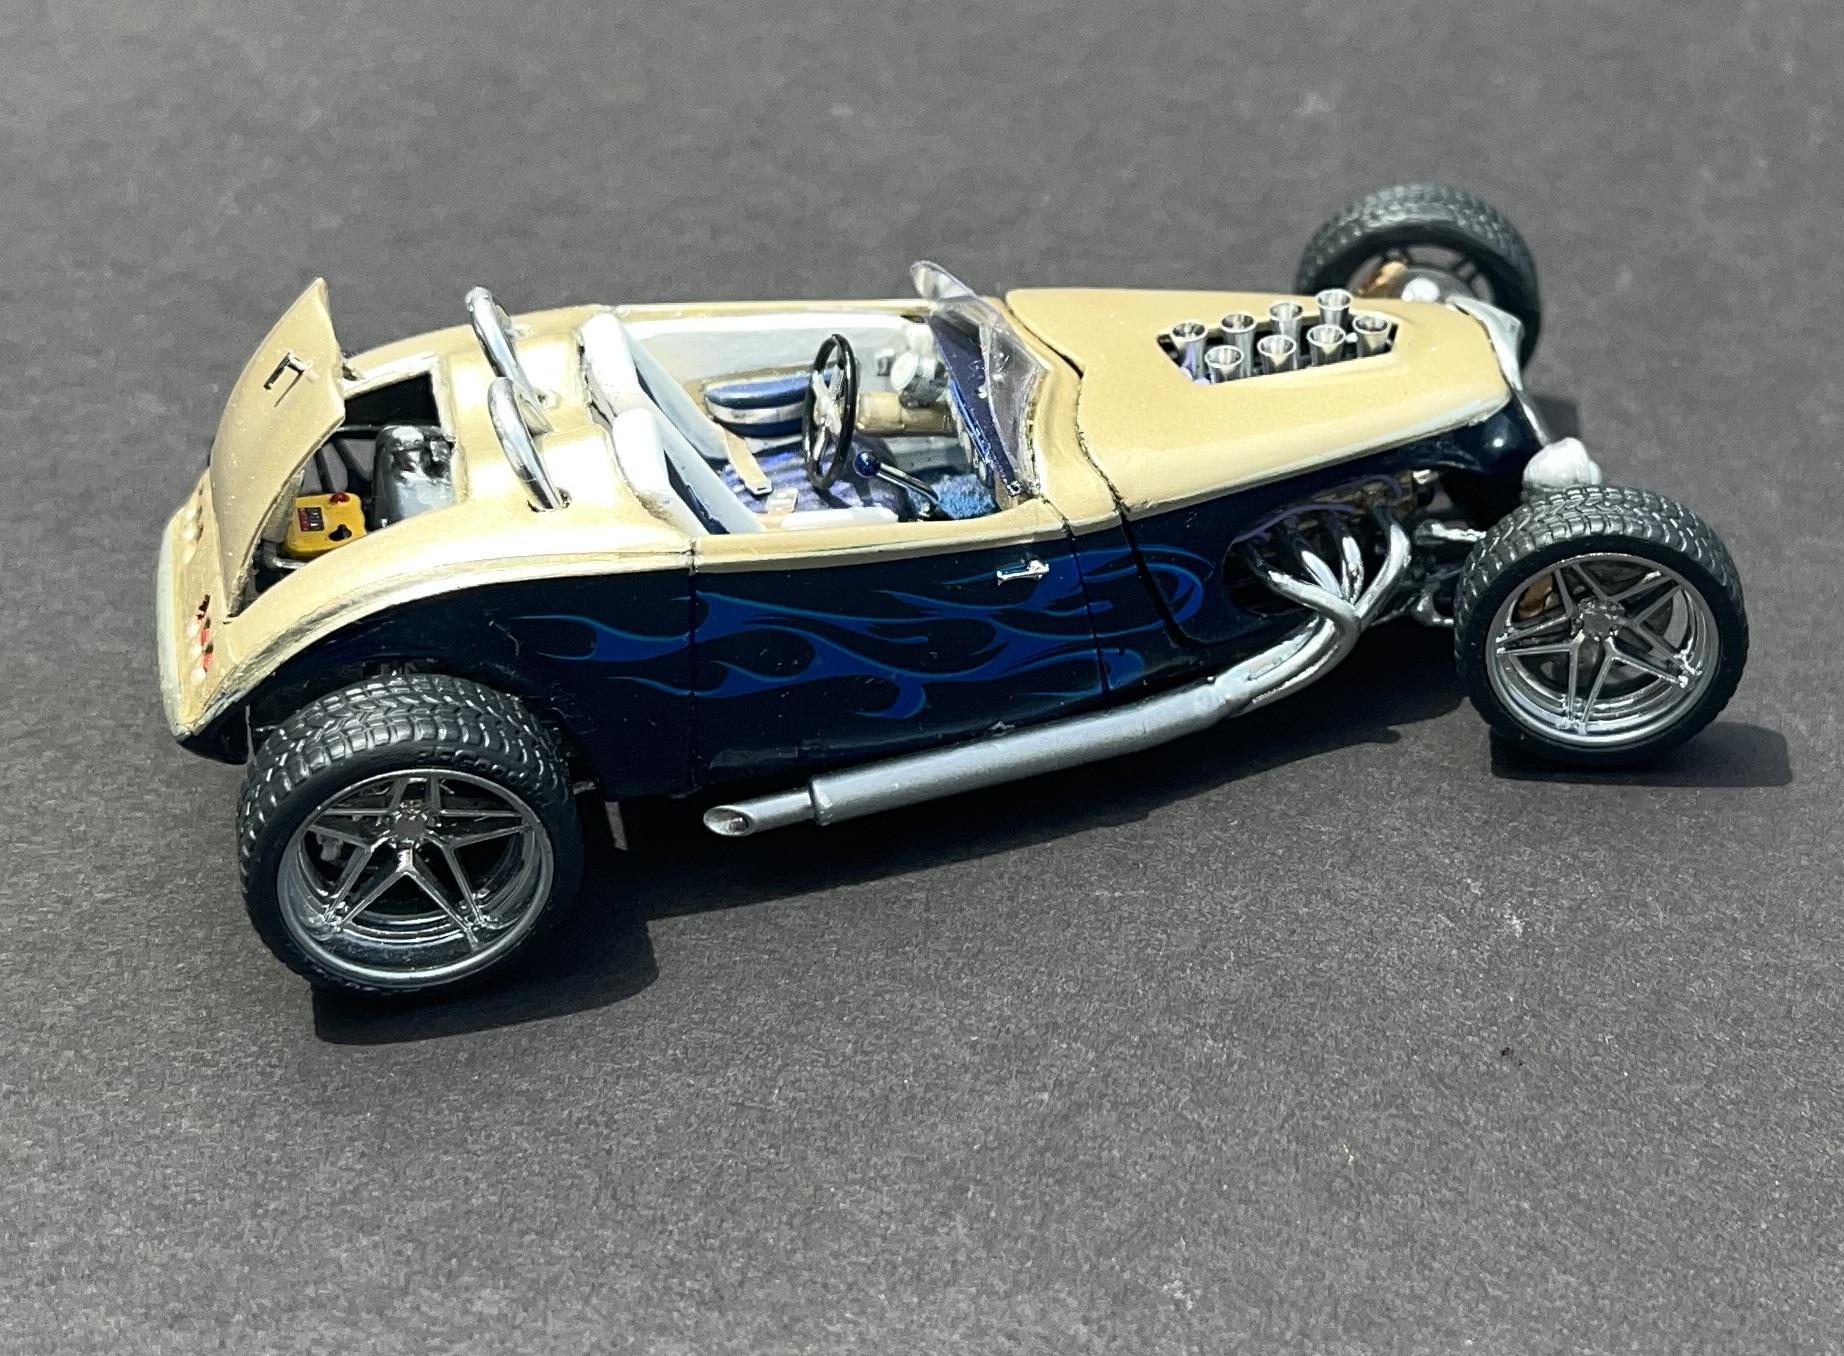
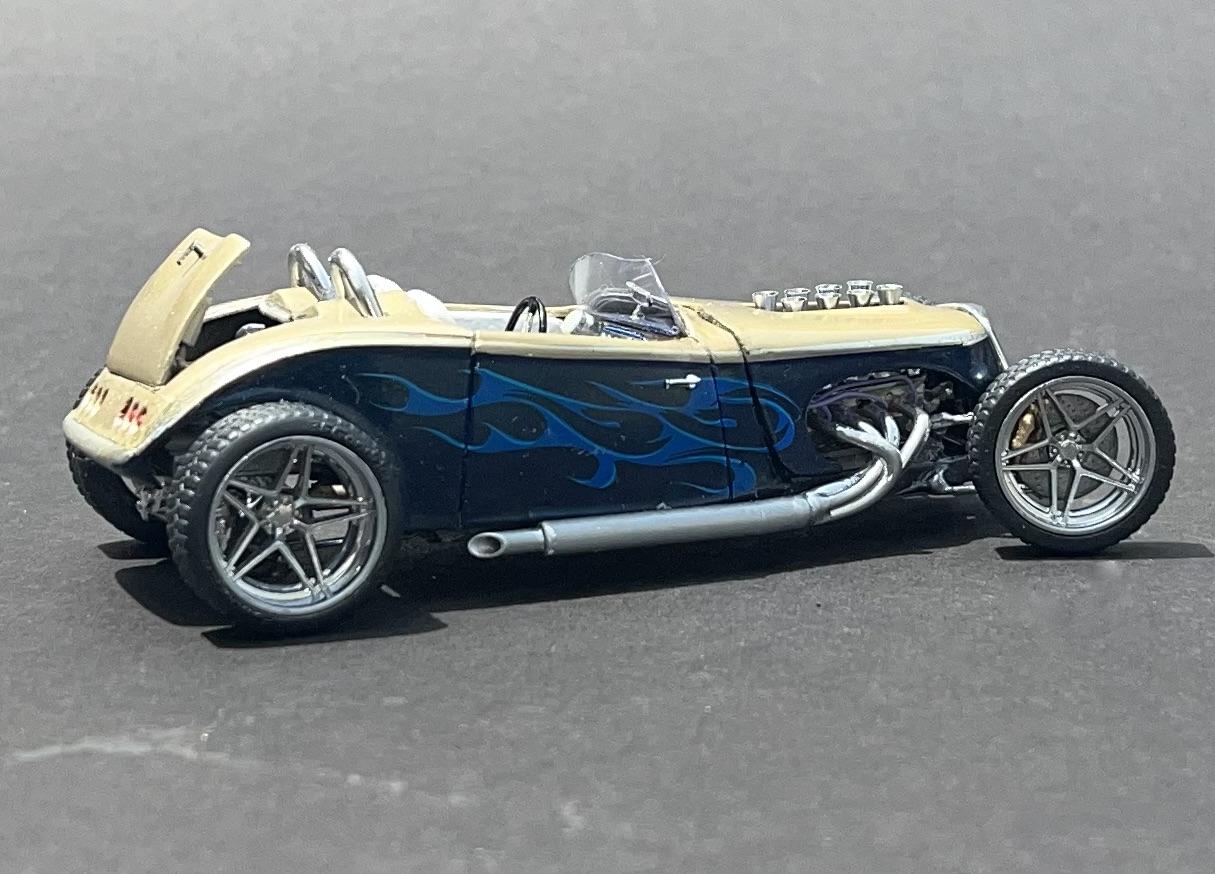
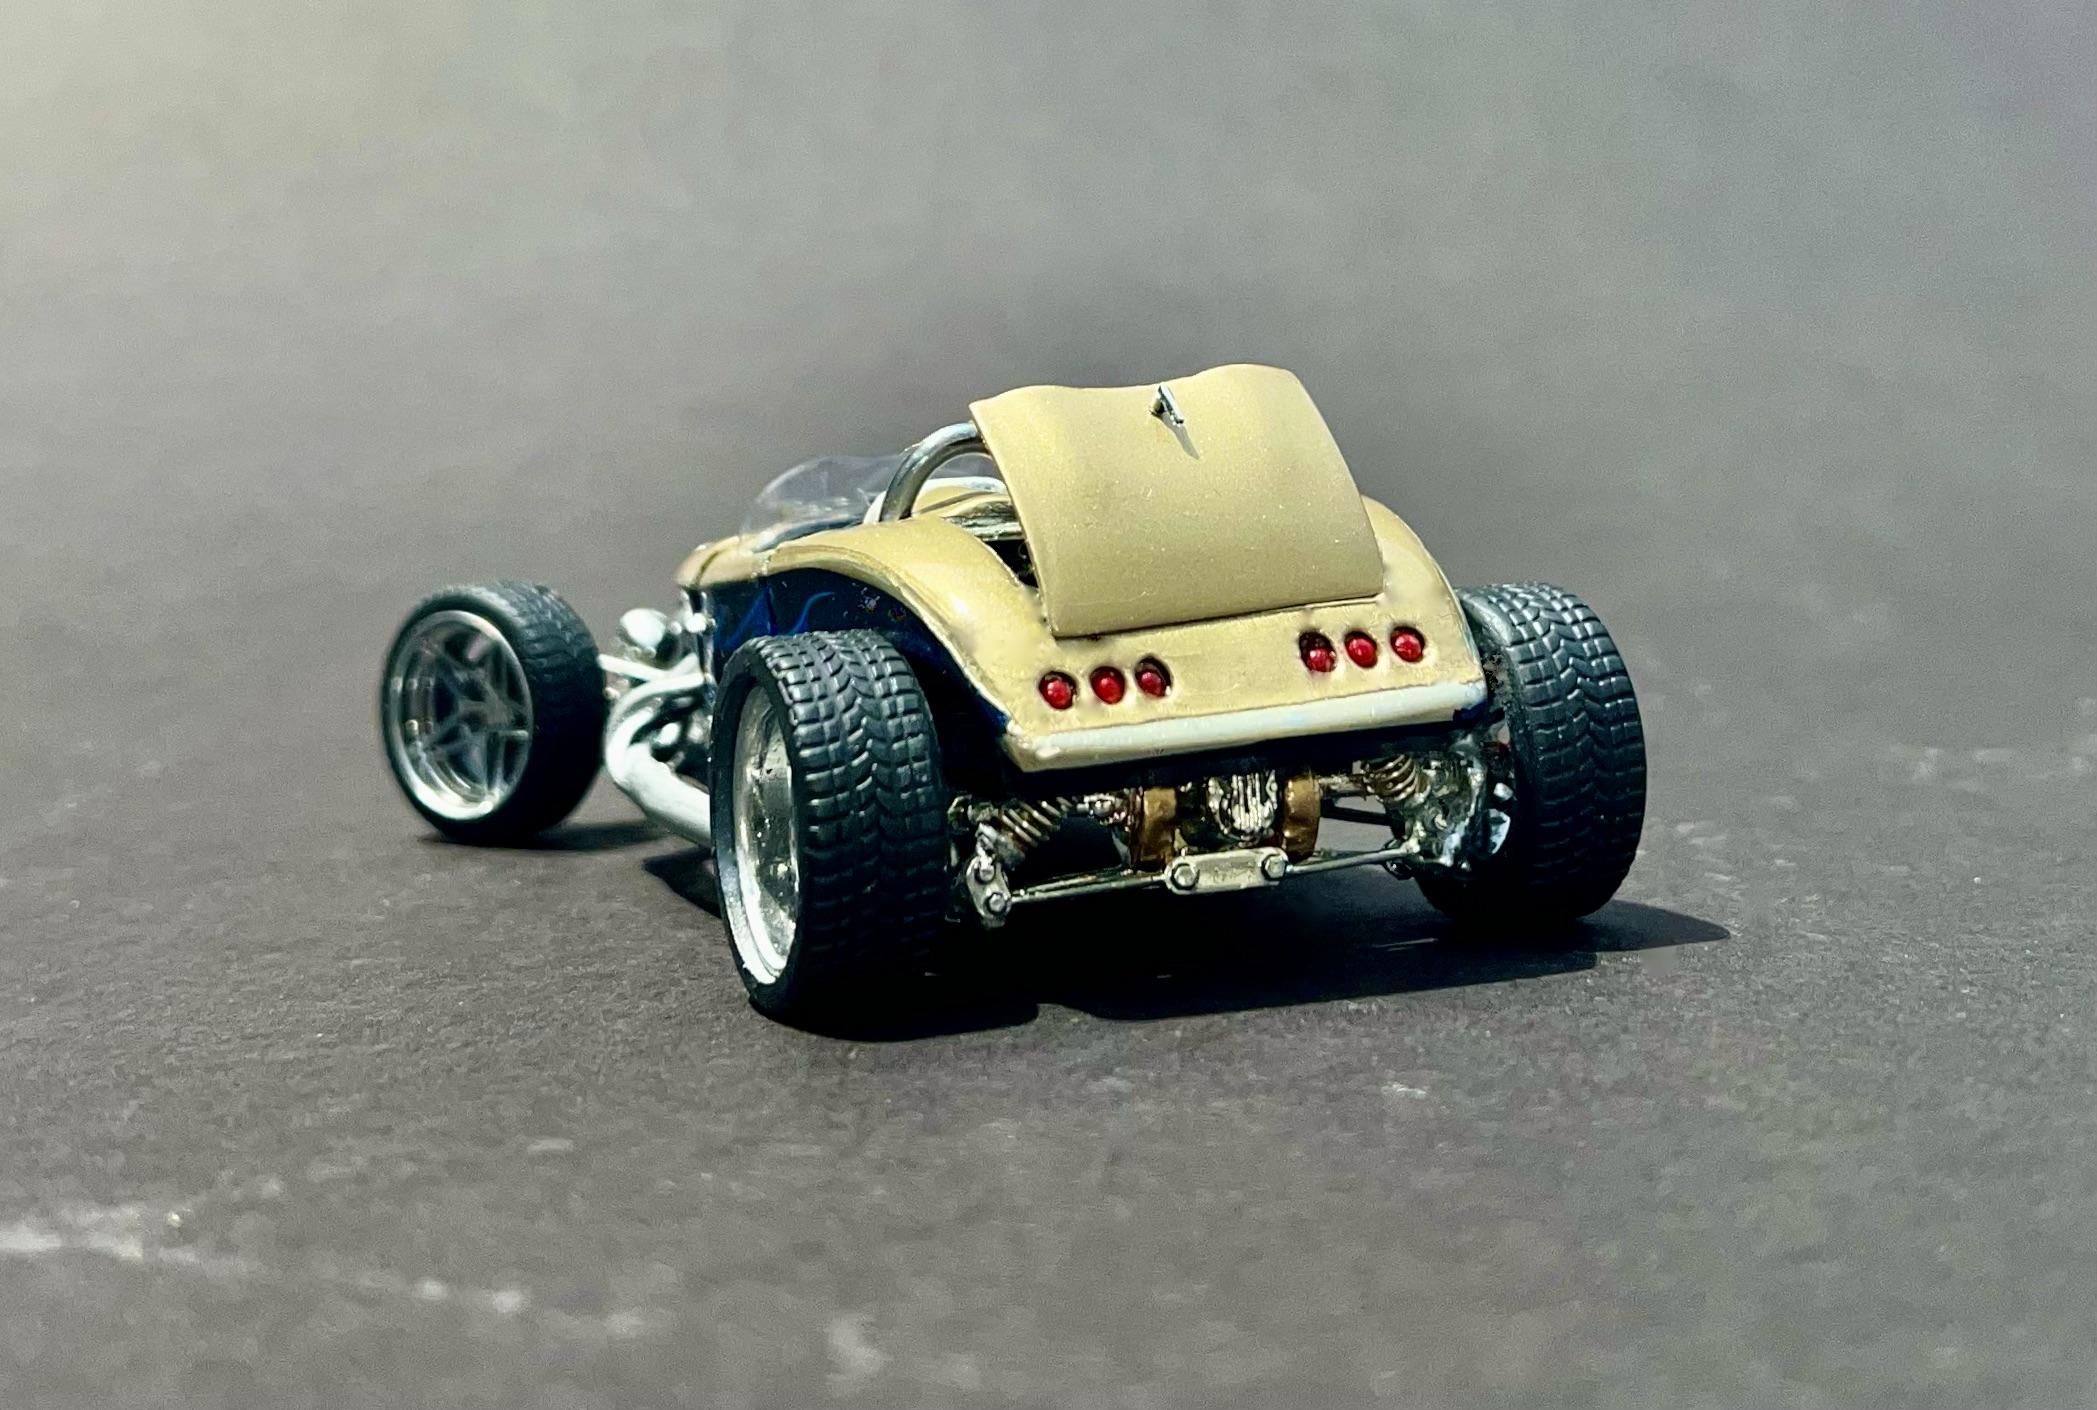
Well, this one didn’t turn out as well as I had hoped. It resisted me nearly every step of the way. I tend to get in way over my head very quickly on some projects. A lot of mistakes were made, and I messed up quite a few things. Then I made them worse the more I tried to fix the obvious. In the end, I gave up.
At least I didn’t smash it against my bedroom wall like I did when I was seven. Another model just wasn’t cooperating. My mom made me pick up the pieces and add some from the parts bin, and I renamed it the “Damn-It-Car.” Funny enough, it became one of my favorites. Don’t look too closely!
Having recently finished a pair of Deuces, I was looking for something else to add to my current collection of hot rods. I’ve always been a fan of 30s Fords. Back in the day, shade-tree mechanics built relatively inexpensive, cool rides or spent a fortune on beautiful, high-powered, and often quite uncomfortable cruisers.
As I approach the completion of a model project, I begin to contemplate the next one. I amuse myself by envisioning something I would like to construct in the real world. If it weren’t for scale models, I would need a lot more space in my garage and would likely have one fewer wife.
Sometimes, I mix various types and styles of vehicles and often try to replicate award-winners, show-stoppers, and wild customs. The challenge of designing and figuring out how to fabricate more complicated projects keeps me motivated.
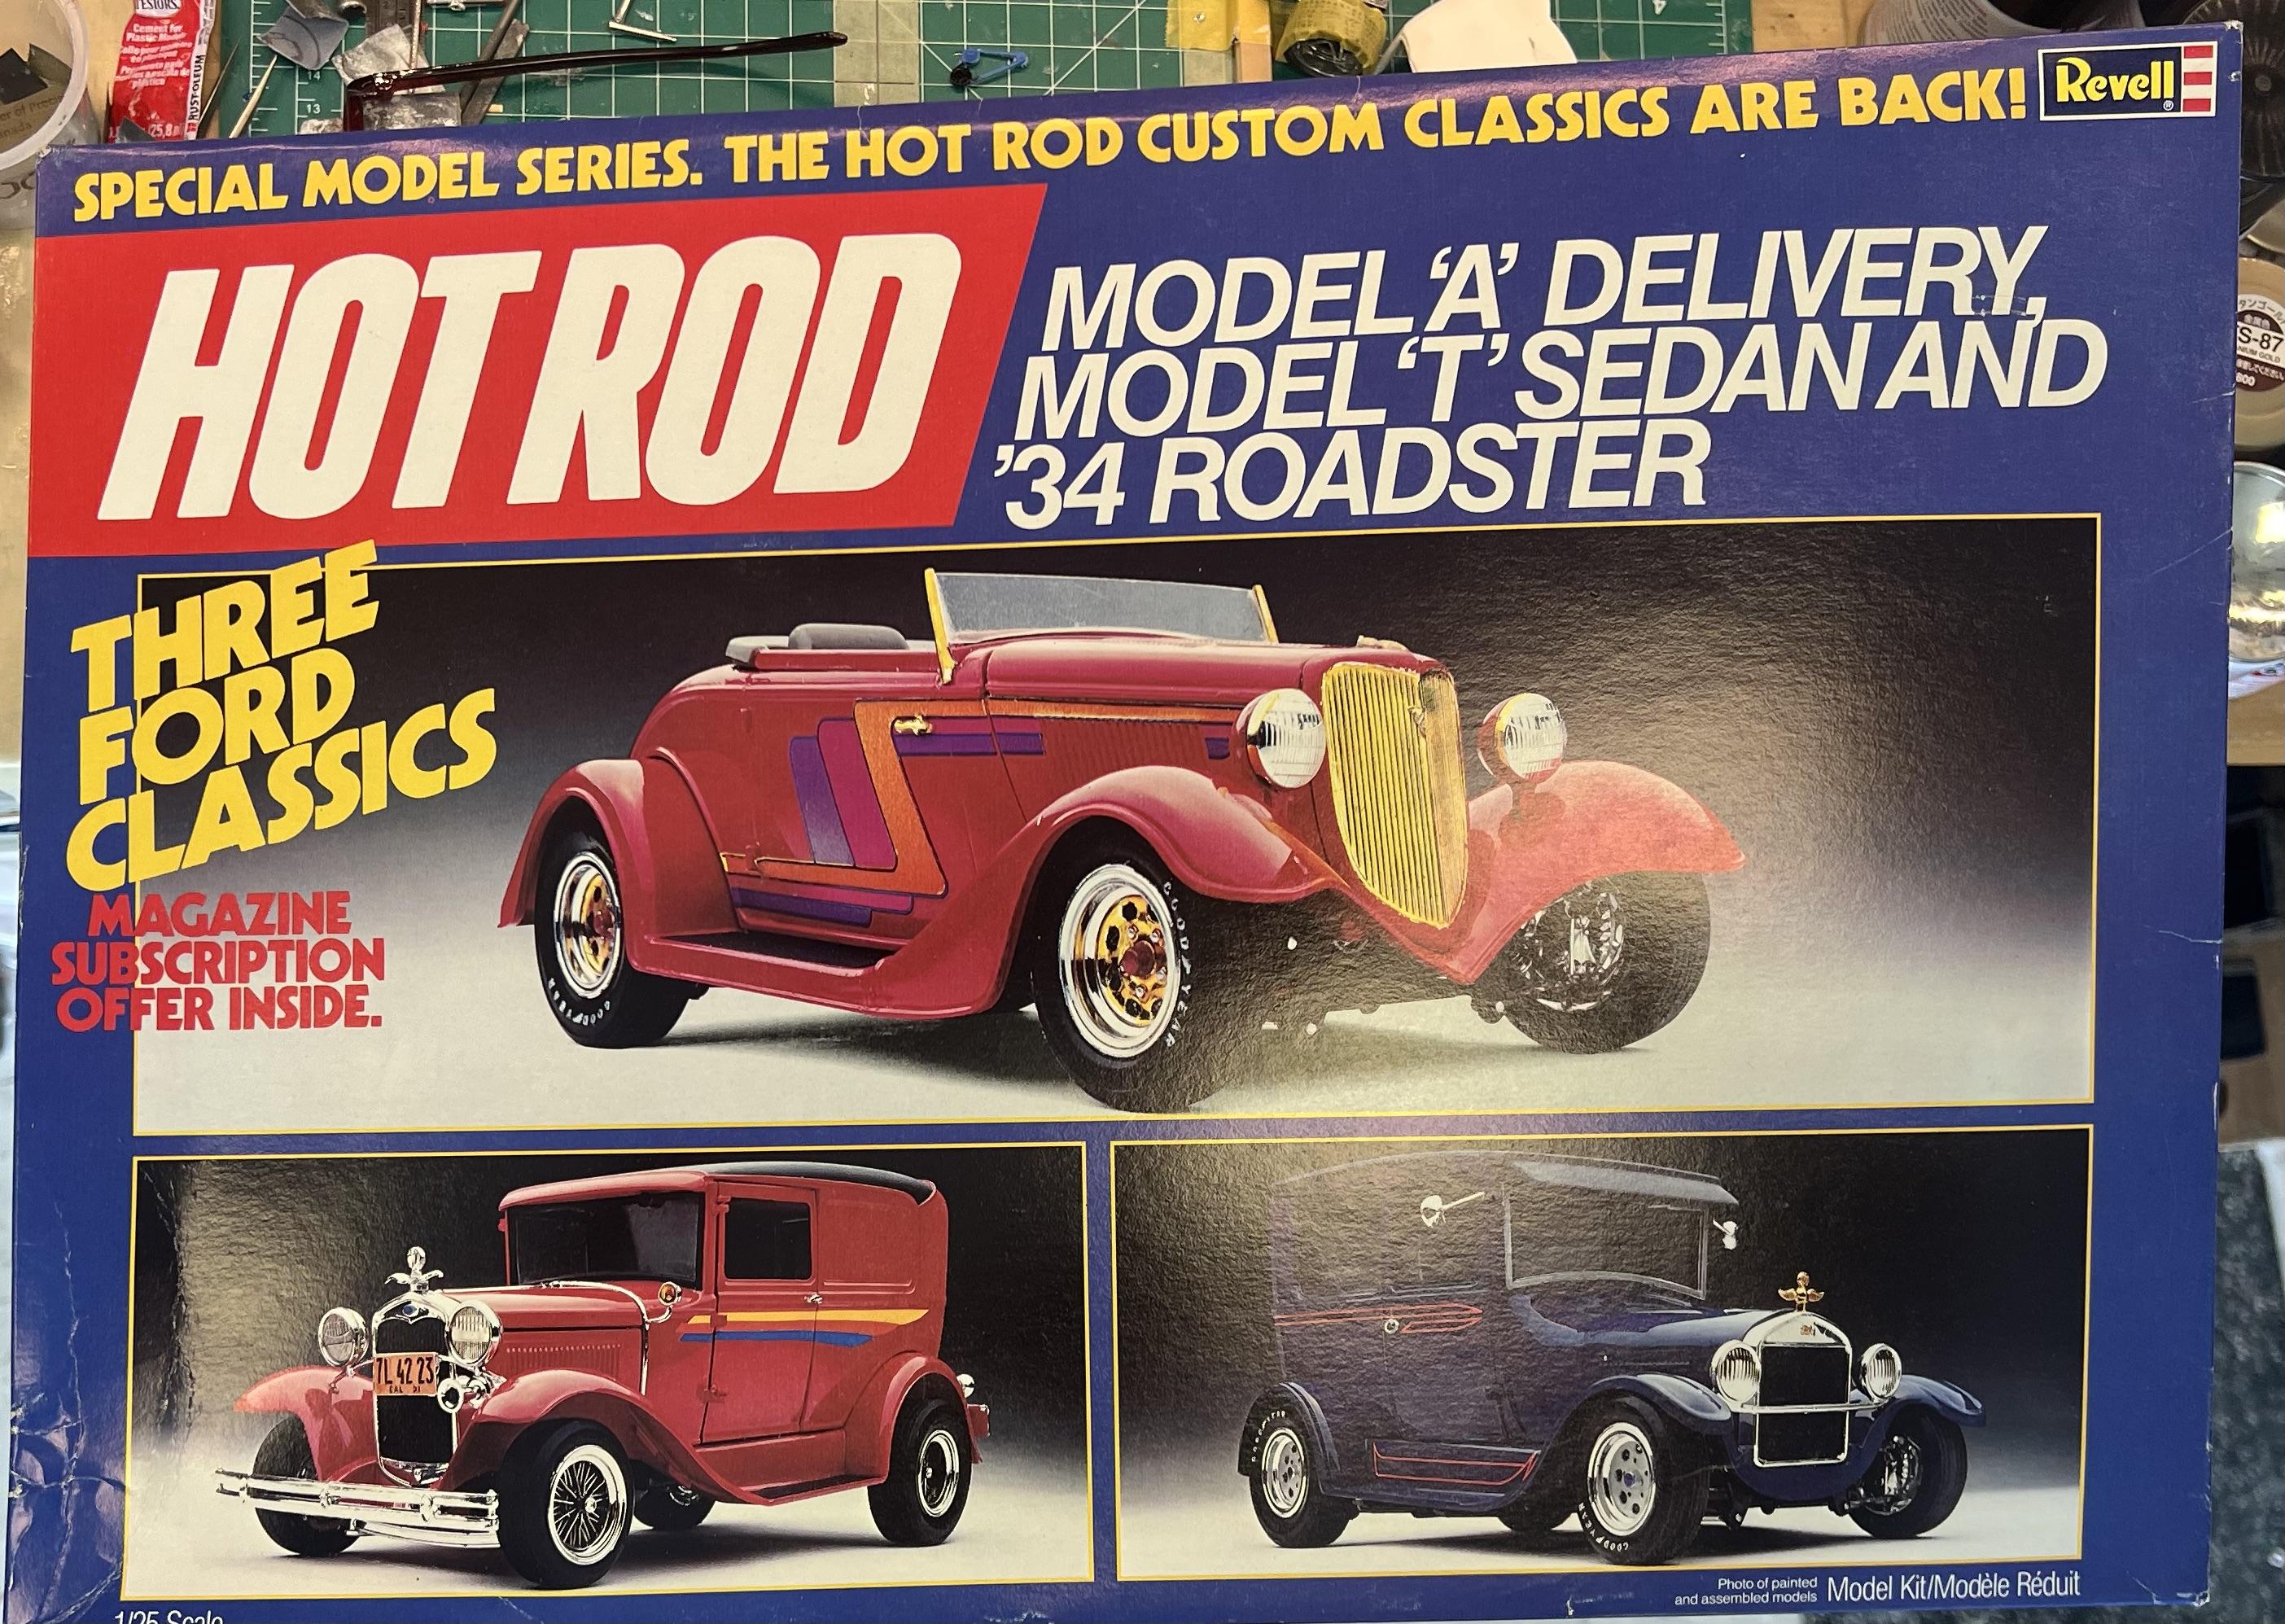
A while back, I picked up Revell’s Hot Rod Three Ford Classics kit online. It’s an older kit that includes a Model A Delivery, a Model T Sedan, and a ’34 Roadster. I was excited to build my version of a ’34 Roadster and plan to save the other two for future rat rod projects.
This three-model package is a kit basher's dream, featuring two Jaguar rear suspensions, a set of front independent coil-overs, and a drop axle suspension. After glancing at the photos on the box, I realized that building it box stock just wasn’t going to cut it. So, after examining the Roadster body and deciding to go fenderless, I got to work.
The front suspension is posable. I found a Big Block Chevy in the parts bin, along with some Hilborn-style velocity stacks and scratch-built side pipes.
Meaty tires and designer wheels were essential, so I ordered 21/20 inch resin 5-Stars. The body was channeled, lowered, and stretched by a foot. Speedster humps and roll bars gave it a sportier look. The trunk lid is hinged at the bottom for accessing the fuel tank and battery. A PE radiator grille was added up front, along with custom taillights in the rear. Then I gave it a two-tone paint job with ghost flames: Tamiya Titanium Gold TS-87 on top, Deep Metallic Blue TS-53 with Clear Blue TS-72 over the flames below a chrome BMF beltline. Then I finished off with Testors Clear spray enamel.
Thanks for looking….but not too closely. Comments please?
-
9
-
1
-
-
Crazy! Well done.
-
Well done! Reminds me of when Ronald Reagan starred in Death Valley Days...the show's sponsor.
-
1
-
-
Outstanding in every detail and excellent photography. One of the nicest examples of good ol US muscle I've seen!
-
1
-
1
-
-
It looks super. I understand about those pesky wheel arches and trying to get BMF to behave. I usually hit them from the underside with the felt-tip end of a Molotow pen. Still, a great job and excellent photography. Well done!
-
4 hours ago, slusher said:
Great pair of builds!
Thanks Slusher. Just something about these '30s Ford coupes!
-
Very cool....and scary! Well done!!!
-
Classic combo, excellent execution, and fantastic detail. Well done!


Show your iconic Custom Car/Hot Rod replicas
in Model Cars
Posted
Really sweet '34. I posted one recently, but I got in over my head on mods and customizing. Yours is much cleaner and smoother. Well done!