gami8630
-
Posts
215 -
Joined
-
Last visited
Content Type
Profiles
Forums
Events
Gallery
Everything posted by gami8630
-
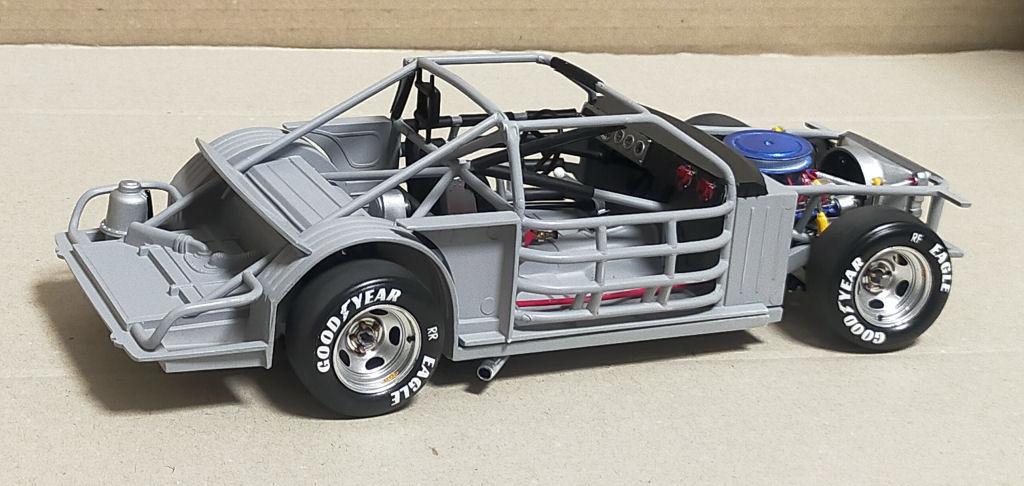
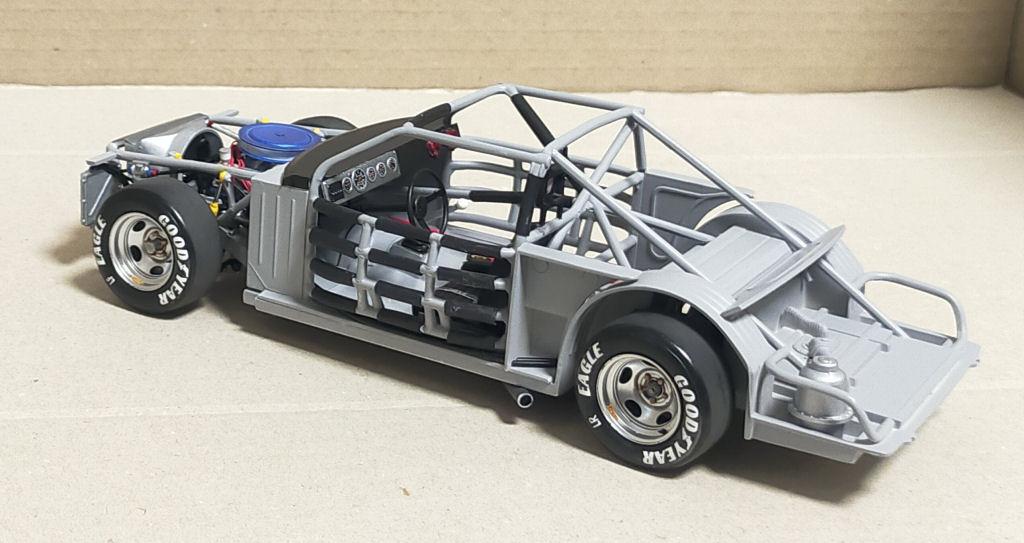
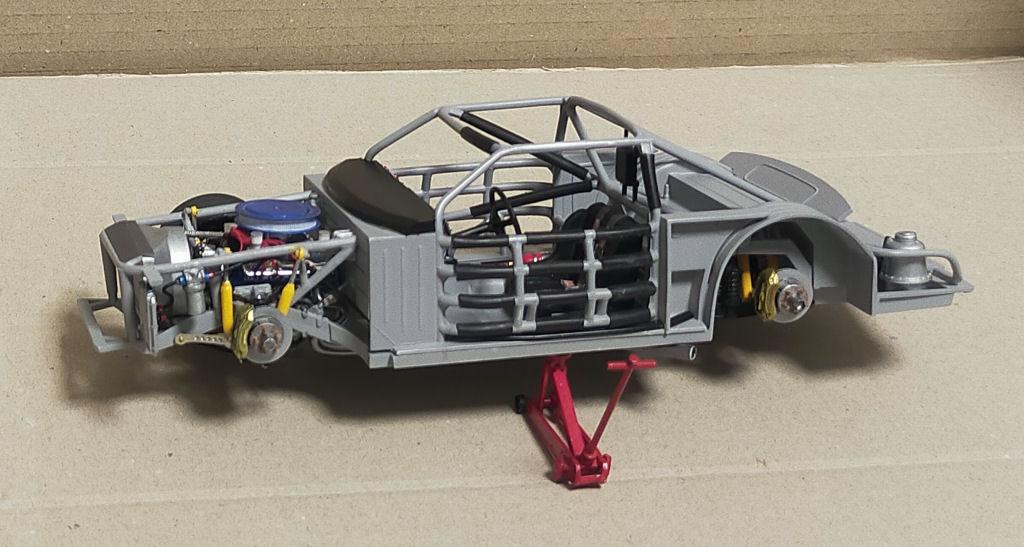
As I mentioned in my message posted on November 14th, the wheels and disc brakes are products from the Polish 3D-printed parts manufacturer “SCO,” purchased directly from their website. They offer a wide range of products suitable for detailing up NASCAR kits. https://scomodels.com/
-
What a wonderful piece of work. I've also seen your WIP on other sites, and it's been very helpful in many ways.
-
14GA cable—the thickness feels just right. This is very helpful. I'd like to try it in my next build.
-
1995 DieHard Chevy Race Truck
gami8630 replied to gami8630's topic in Stock Cars (NASCAR, Super Stock, Late Model, etc.)
Thank you for your kind reply! -
1995 DieHard Chevy Race Truck
gami8630 replied to gami8630's topic in Stock Cars (NASCAR, Super Stock, Late Model, etc.)
Thank you both for your replies. This kit faithfully reproduced the engine accessories and roll bar safety pads, making it an easy-to-build kit requiring almost no additional work. -
1995 DieHard Chevy Race Truck
gami8630 replied to gami8630's topic in Stock Cars (NASCAR, Super Stock, Late Model, etc.)
Thank you both for your replies. I feel like having a background image makes the finished kit look a little more like the real car. -
1995 DieHard Chevy Race Truck
gami8630 replied to gami8630's topic in Stock Cars (NASCAR, Super Stock, Late Model, etc.)
Thank you both for your replies. While it may not be obvious in the images, the actual modifications and detail work are quite rough in many places. -
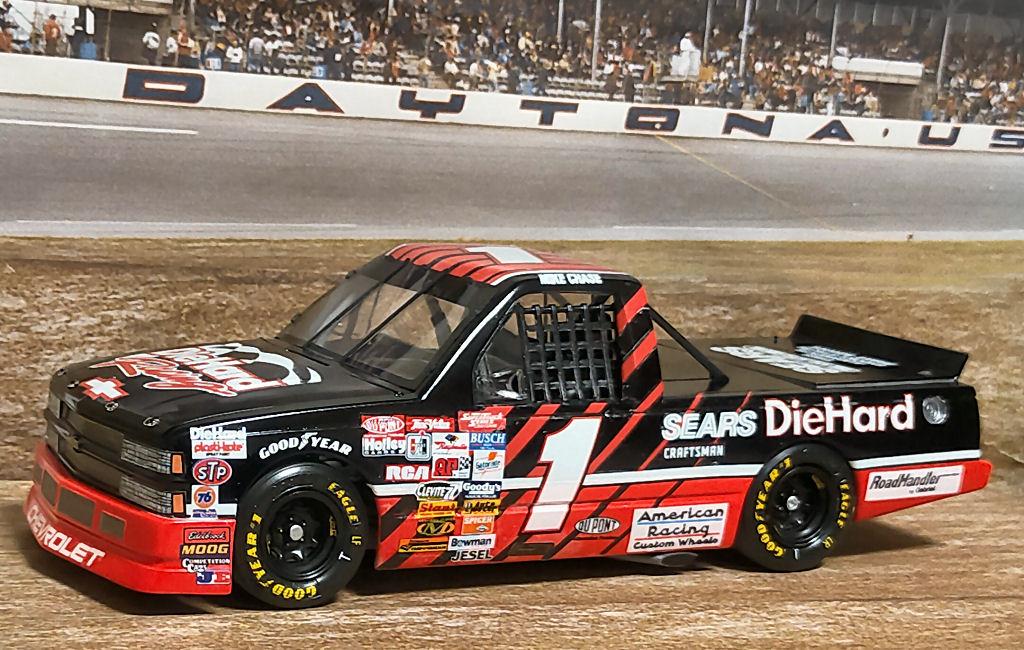
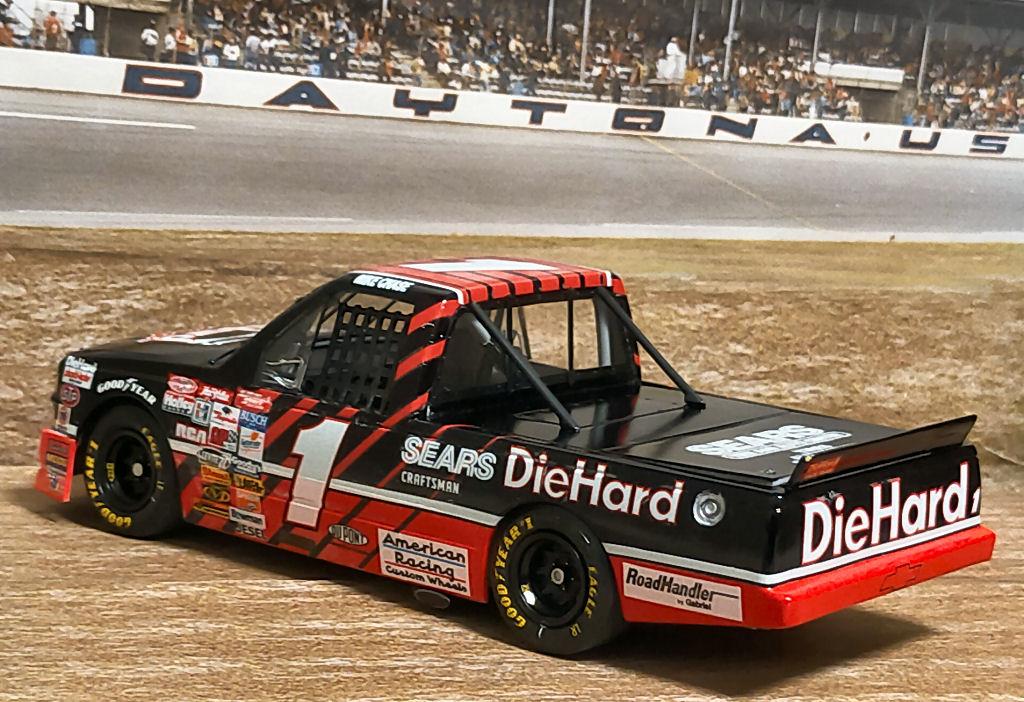
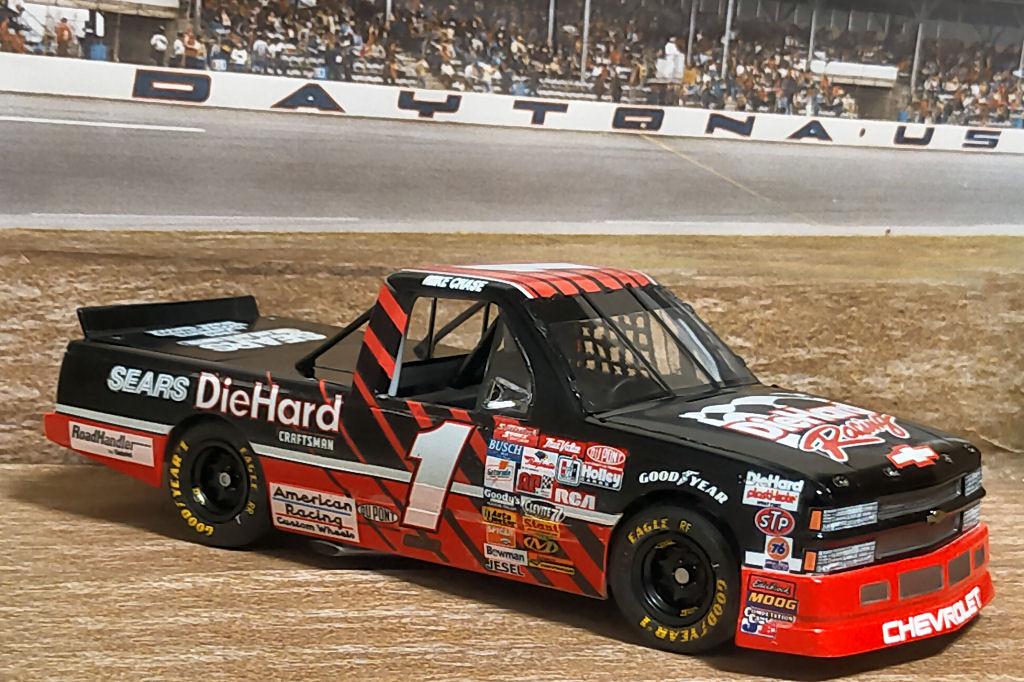
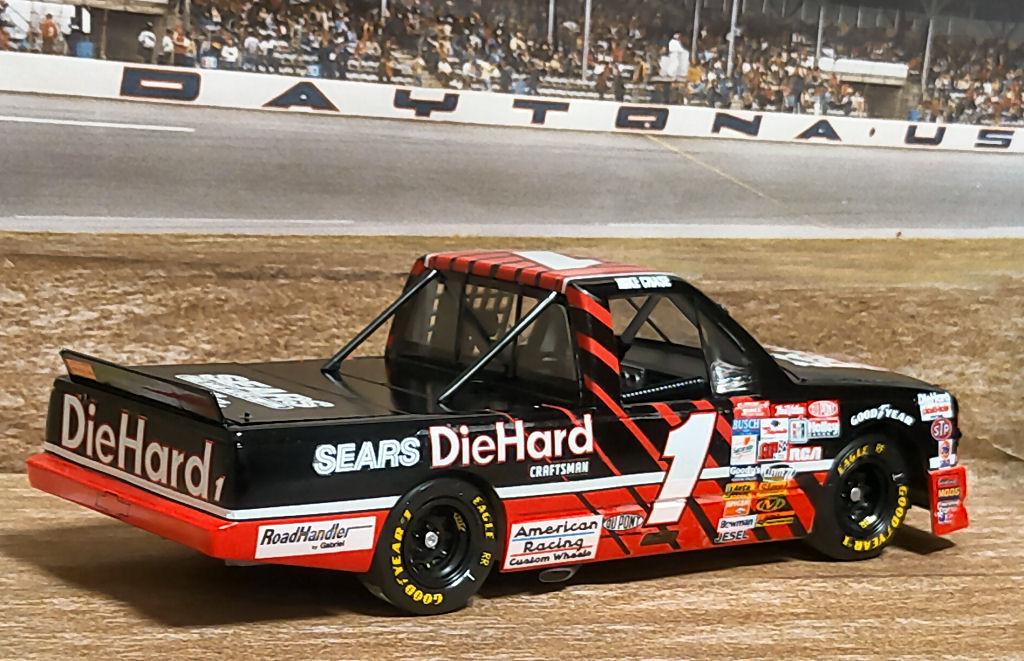
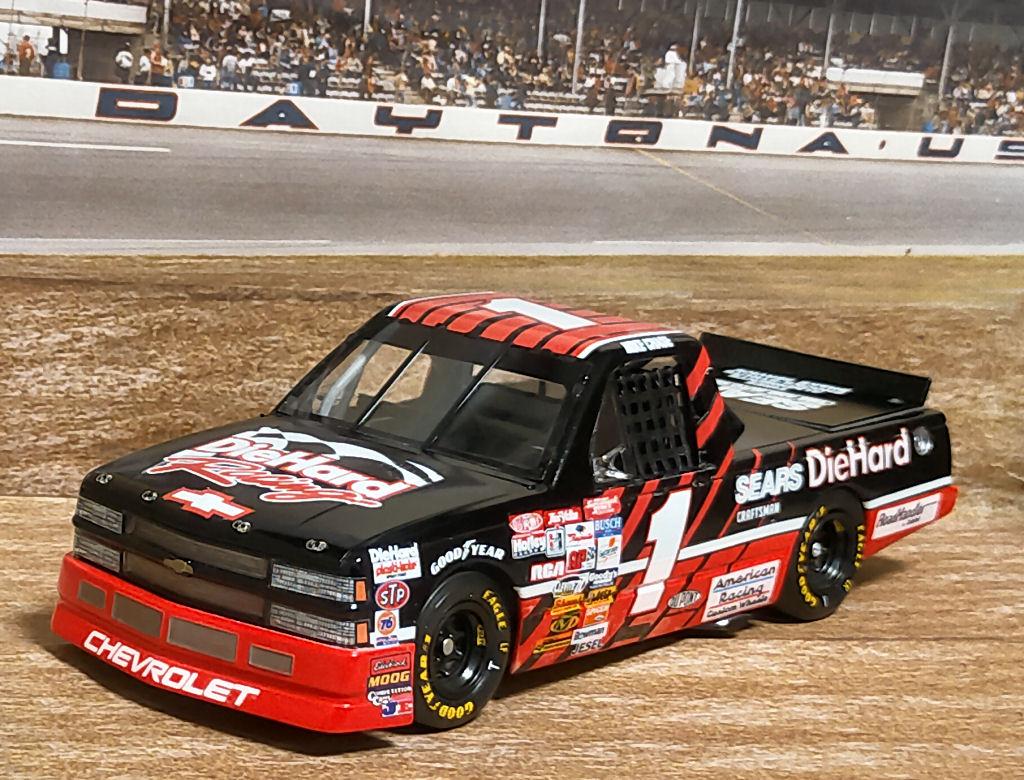
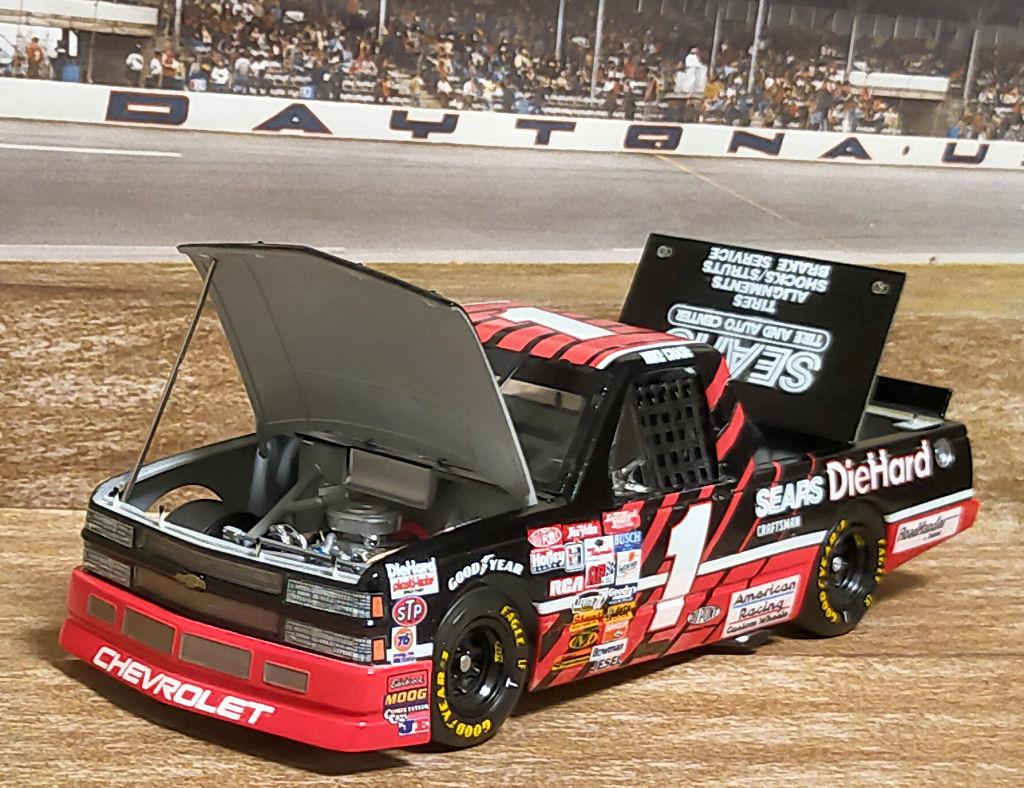
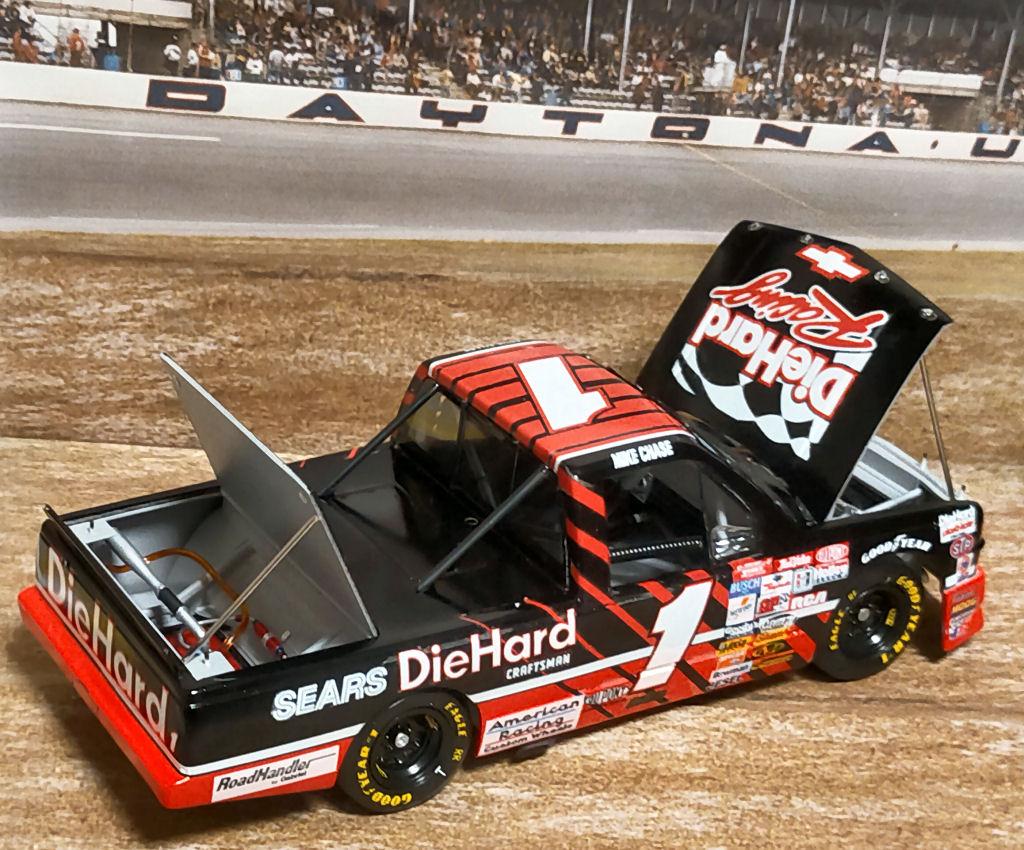
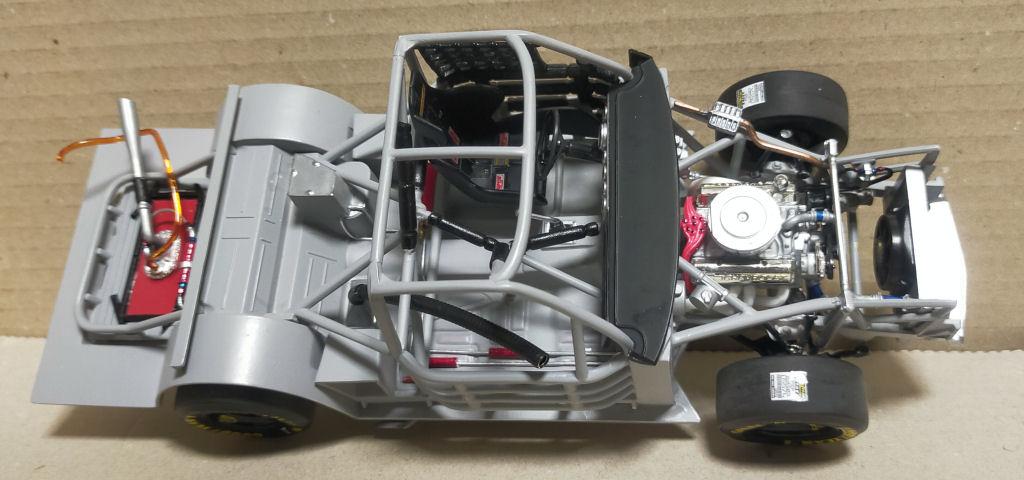
This kit I built is the Chevy Race Truck from the DieHard RACE TEAM that competed in the 1995 CRAFTSMAN TRUCK SERIES. The team owner was Frank “Scoop” Vessels, and the driver was Mike Chase. The base kit is Monogram's “#1 DIEHARD CHEVY RACE TRUCK,” released in 1996. I purchased it at the time of release and stored it until now. This time, I basically assembled the kit almost as-is, only performing the additional work and detail-up shown below. ●Body The rear cargo cover was detached to allow opening and closing, providing a view of the fuel tank area. ●Cockpit Piping from the oil tank to the engine was added. Power Slide decals were applied to each gauge, then enamel clear coat was poured in to represent the lenses. ● Fuel Tank Added a homemade fuel pump made from plastic rod, piping, and fuel/vent hoses salvaged from a junk parts box. The body was primed with Tamiya Super Surfacer (Gray) and Fine Surfacer (White), then sprayed with TS-14 Black and TS-49 Bright Red. The decals had deteriorated due to age since purchase. I managed to apply them, but the finish isn't very clean. Still, the fact that a pickup truck racing series is one of NASCAR's three major categories struck me as a uniquely American trait, reflecting just how deeply pickup trucks are ingrained in everyday life.

-
Thank you for your comment. It took a lot of time due to the many modifications, but building a stock car from this era is enjoyable.
-
The wheels, disc brakes, air valves, and rivets are products from a Polish 3D printing parts manufacturer, purchased from this company's website. They are reasonably priced considering their high quality. https://scomodels.com/
-
Thanks for yours reply!
-
Modifying the AMT racing seat is simple: first, split the racing seat from the center to the left and right sides. Next, glue a 1.5mm-wide strip of plastic sheet between the split sections of the racing seat to widen it.
-
Thank you for always sending me such kind replies.
-
Thank you for your kind words. It's very encouraging!
-
Thank you for your reply. For the roll cage pads, I'm using heat-shrink tubing with a diameter of 1.5mm. I'm thinking of trying a slightly thicker material, such as urethane tubing or silicone tubing with an inner diameter of around 2mm.
-
Thank you for your reply. It's not such a detailed modification or alteration, but I'm glad to hear you feel that way.
-
Everyone, thank you so much for always checking out the kits I build!
-
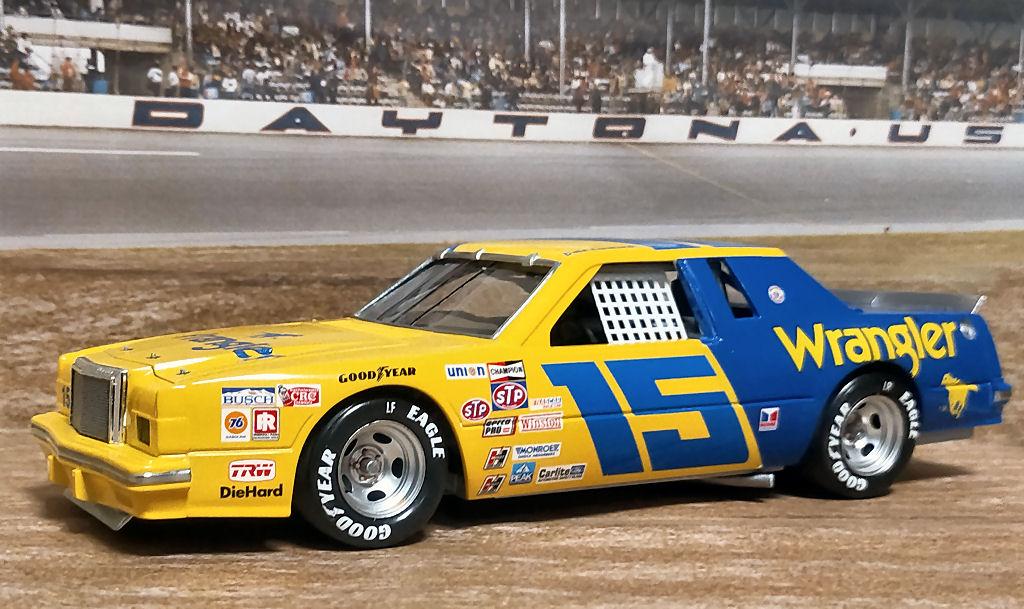
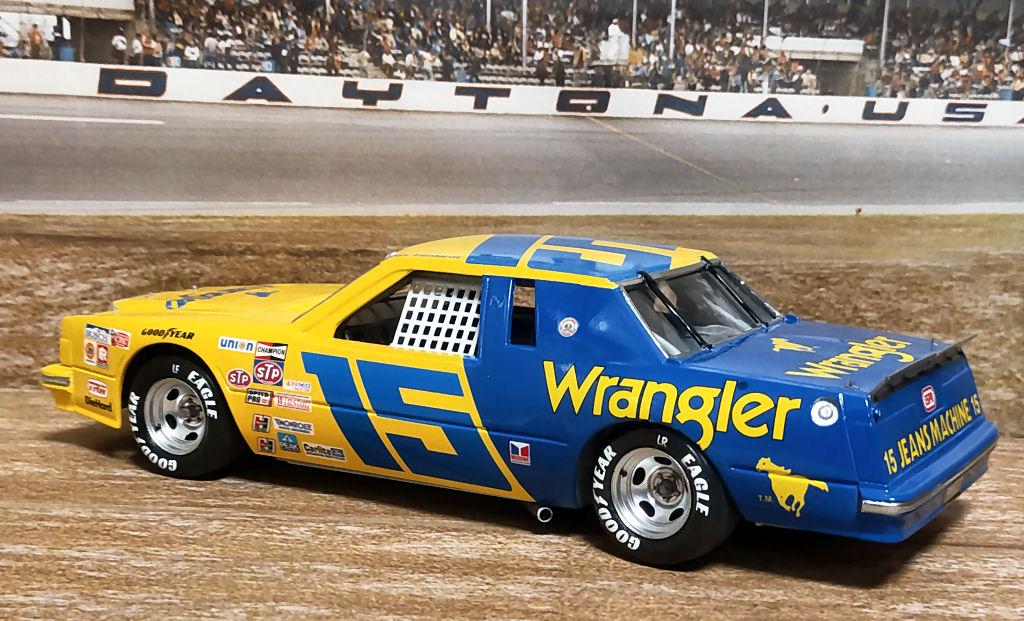
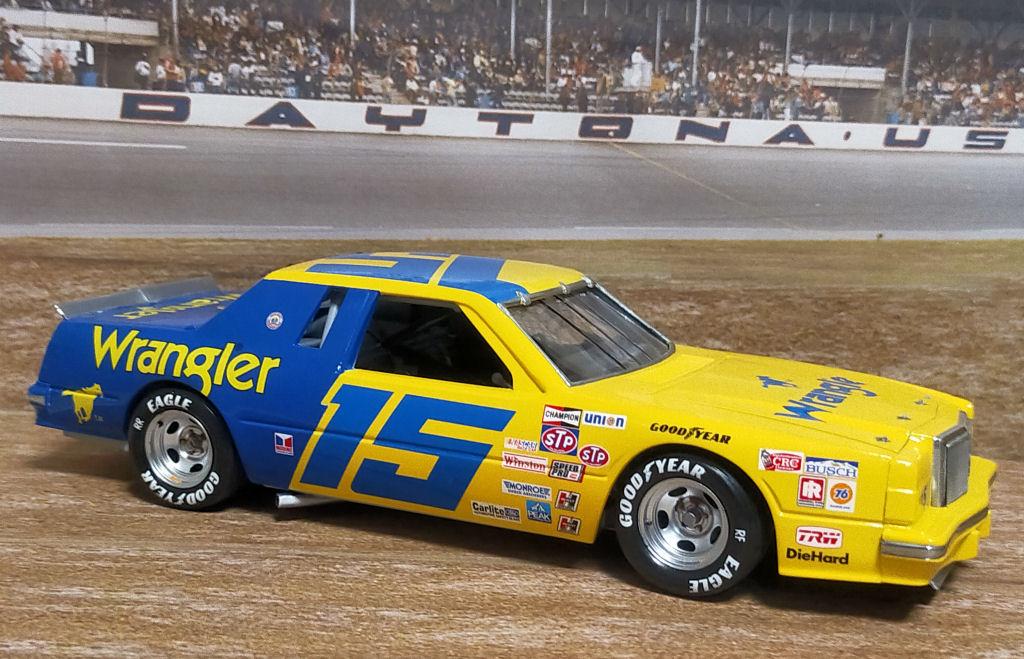
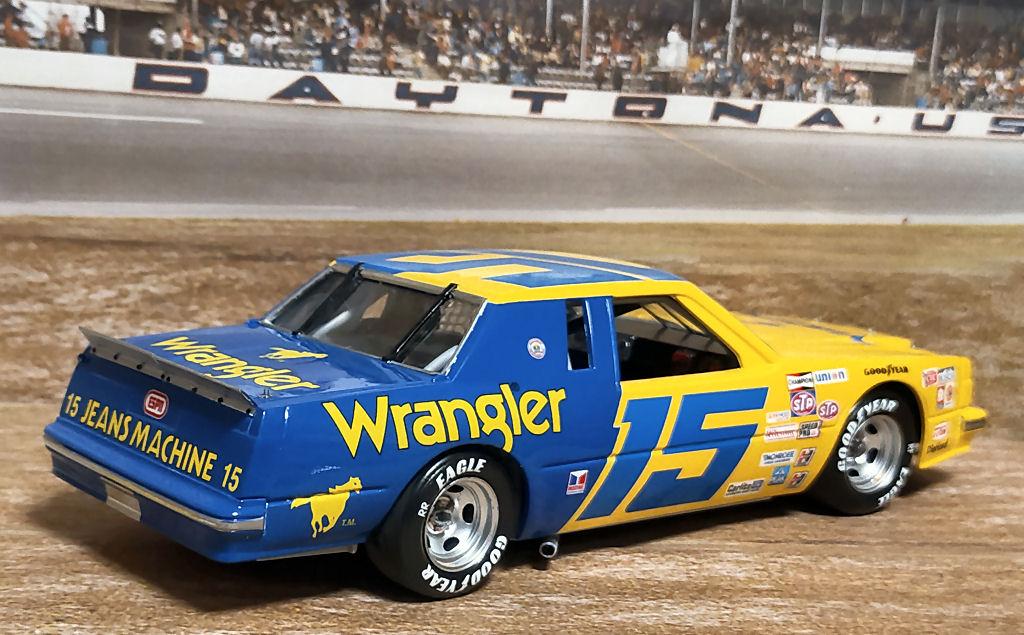
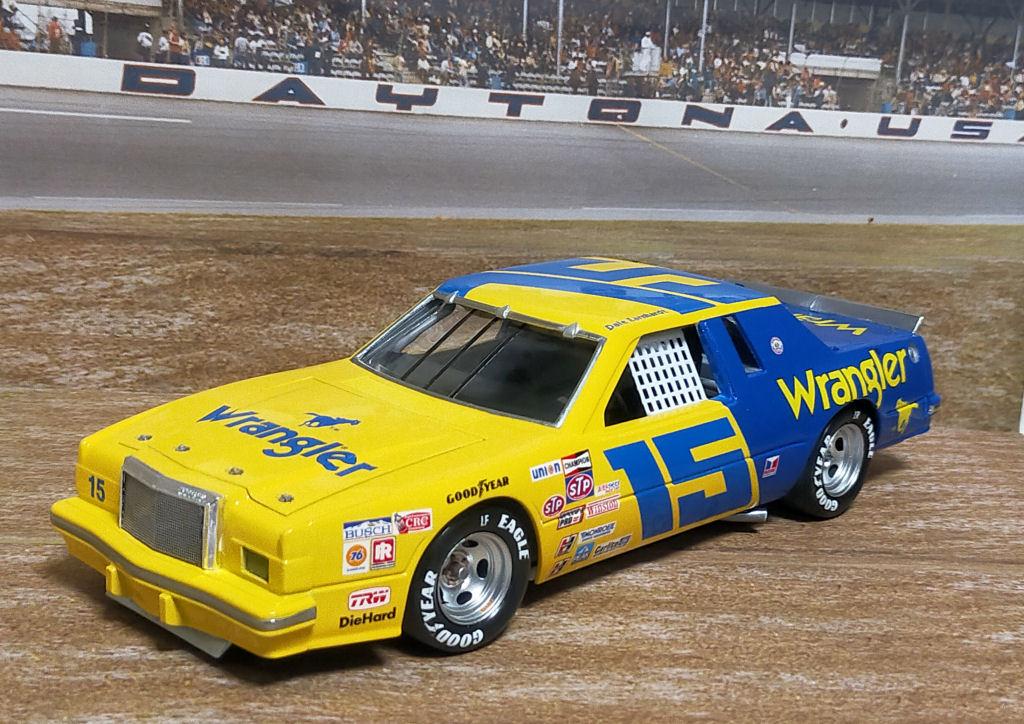
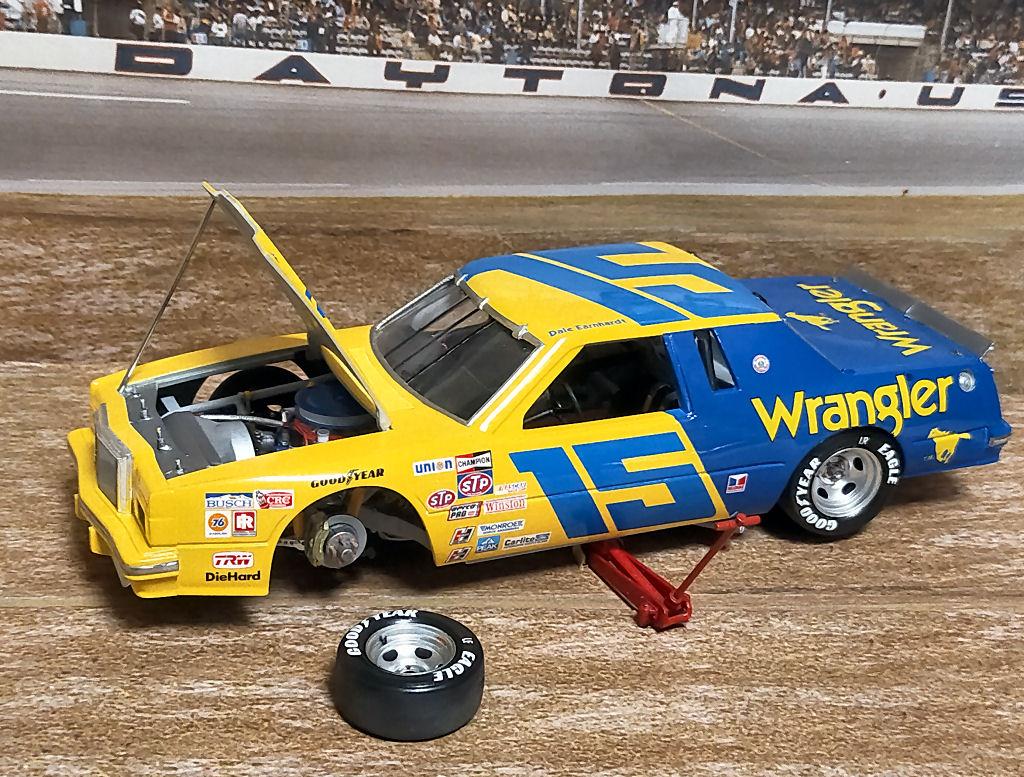
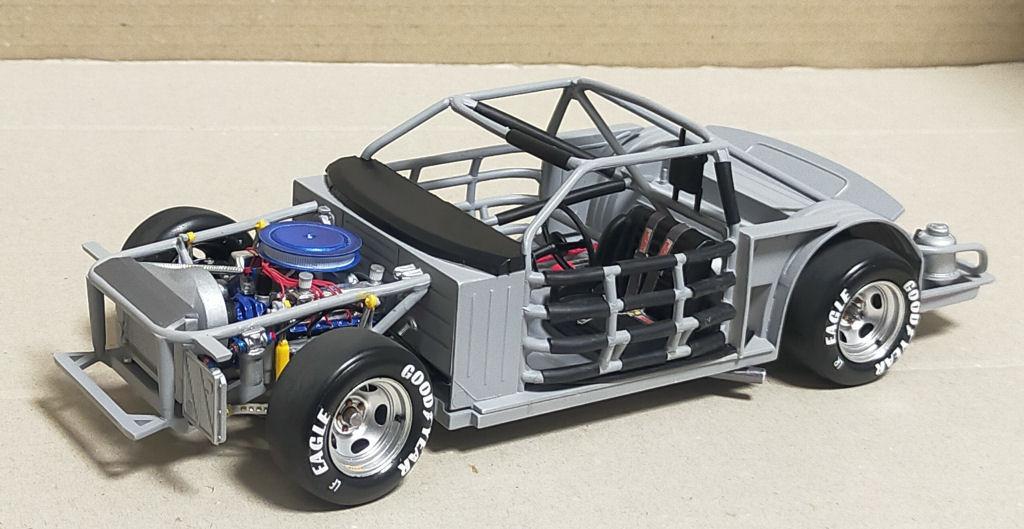
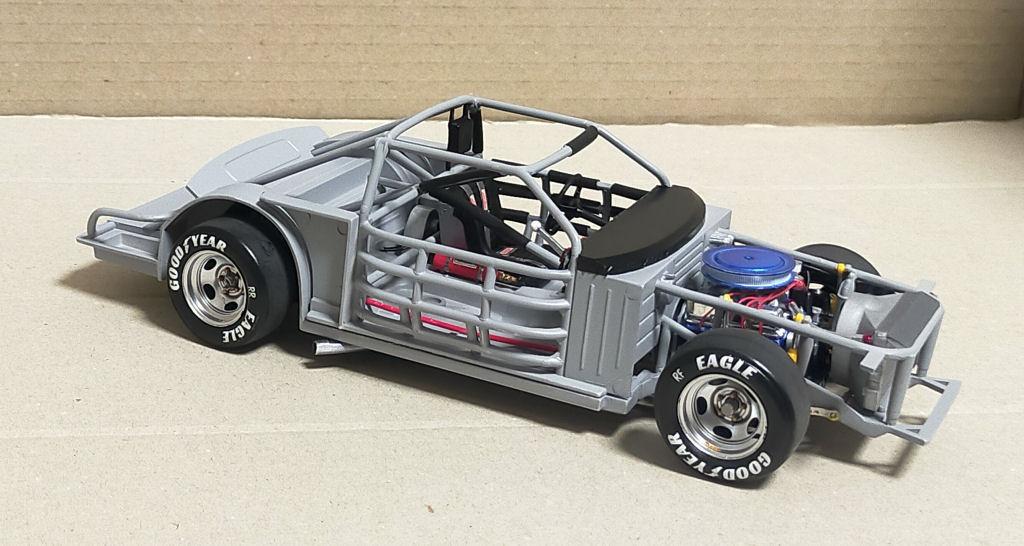
Following my previous post about Dale Earnhardt's Wrangler Jeans colored Chevrolet Monte Carlo Aero Coupe, I've now built the Wrangler Jeans colored Ford Thunderbird he drove during the 1982 season. The base kit is Revell-Monogram's Thunderbird Legends Combo, and the decals are Power Slide's #208 “1982-84 #15 WRANGLER FORD THUNDERBIRD”. For this build, I assembled the kit almost entirely as-is, with the exception of the additional modifications and changes listed below. ●Body Filled door panel seam lines with putty; enlarged left headlamp cover air inlet and added etched mesh; added vent hose outlet pipe to left rear body panel; added trunk lid seam line; installed homemade rear spoiler made from plastic sheet and embedded 3D-printed rivets; relocated and enlarged fuel filler port; added etched mesh to radiator grille ●Chassis Added safety pads and headrests to the roll cage ●Engine & Drivetrain Added spark plug wires, fuel lines, oil filter, and oil lines ●Suspension & Wheels Added 3D-printed 5-spoke wheels, disc brakes, and air valves ●Cockpit Modified the shape of the kit's window net after detaching it The body was sprayed with Tamiya Super Surfacer (Gray) and Fine Surfacer (White), followed by TS-16 Yellow and TS-93 Pure Blue. After an overcoat with TS-13 Clear, decals were applied. Once the decals were fully dry, another overcoat of TS-13 Clear was applied, then finished by polishing with compound. While the above additions and modifications do not faithfully reproduce the actual car Dale Earnhardt drove, like the previous Aero Coupe, I felt it captured the essence of a NASCAR race car from that era reasonably well. Therefore, I have completed its construction.
- 21 replies
-
- 10
-

-
Thank you for your kind words. Your replies are a great encouragement to me.
-
Thanks, Mark W. Images of the NASCAR race cars I currently build can be found abundantly online. While using these images as references to add details and make modifications, I always keep scale and the extent of modifications in mind.
-
Thank you both for your replies. This AMT kit does such a great job of reproducing the real car's body design that converting it to NASCAR spec was a fun project.
-
Thank you both for your replies!
-
There's nothing special about the setup. I just attach it to the roll cage by sticking thin strips of double-sided tape to the top and bottom of the window net. Since it's easy to attach and remove, I've been using this method all the time lately.
-
I'm always happy to receive your replies.
-
Thank you all for your replies. I worked hard to build it while looking at many images online.