oldschool
-
Posts
56 -
Joined
-
Last visited
Content Type
Profiles
Forums
Events
Gallery
Everything posted by oldschool
-
In the beginning there was a Ford 32 B400, but now its more
oldschool replied to oldschool's topic in WIP: Model Cars
Hi Frank I´ll used 1,5 mm plasticard for the windshield frame. First I did a template in cardboard, used this template on a plasticard and carefully sanded down the outer edges to a nice fit, then I used a drill bit to take out the inner areas and just leaving the frame. Carefully sanded to shape. Had to do a lot's of dry fit to check the frame against the window opening. /Larsa -
In the beginning there was a Ford 32 B400, but now its more
oldschool replied to oldschool's topic in WIP: Model Cars
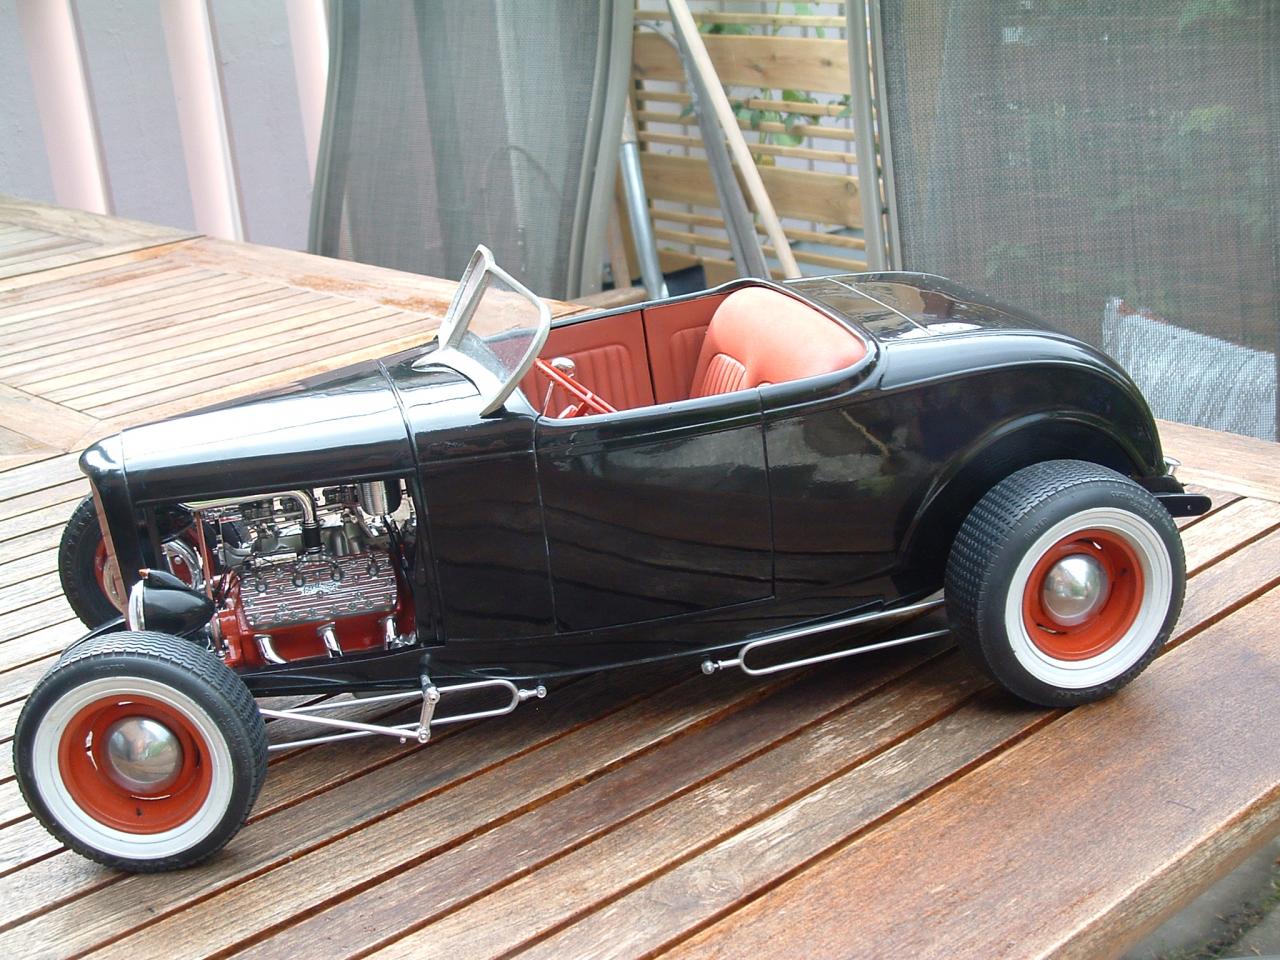
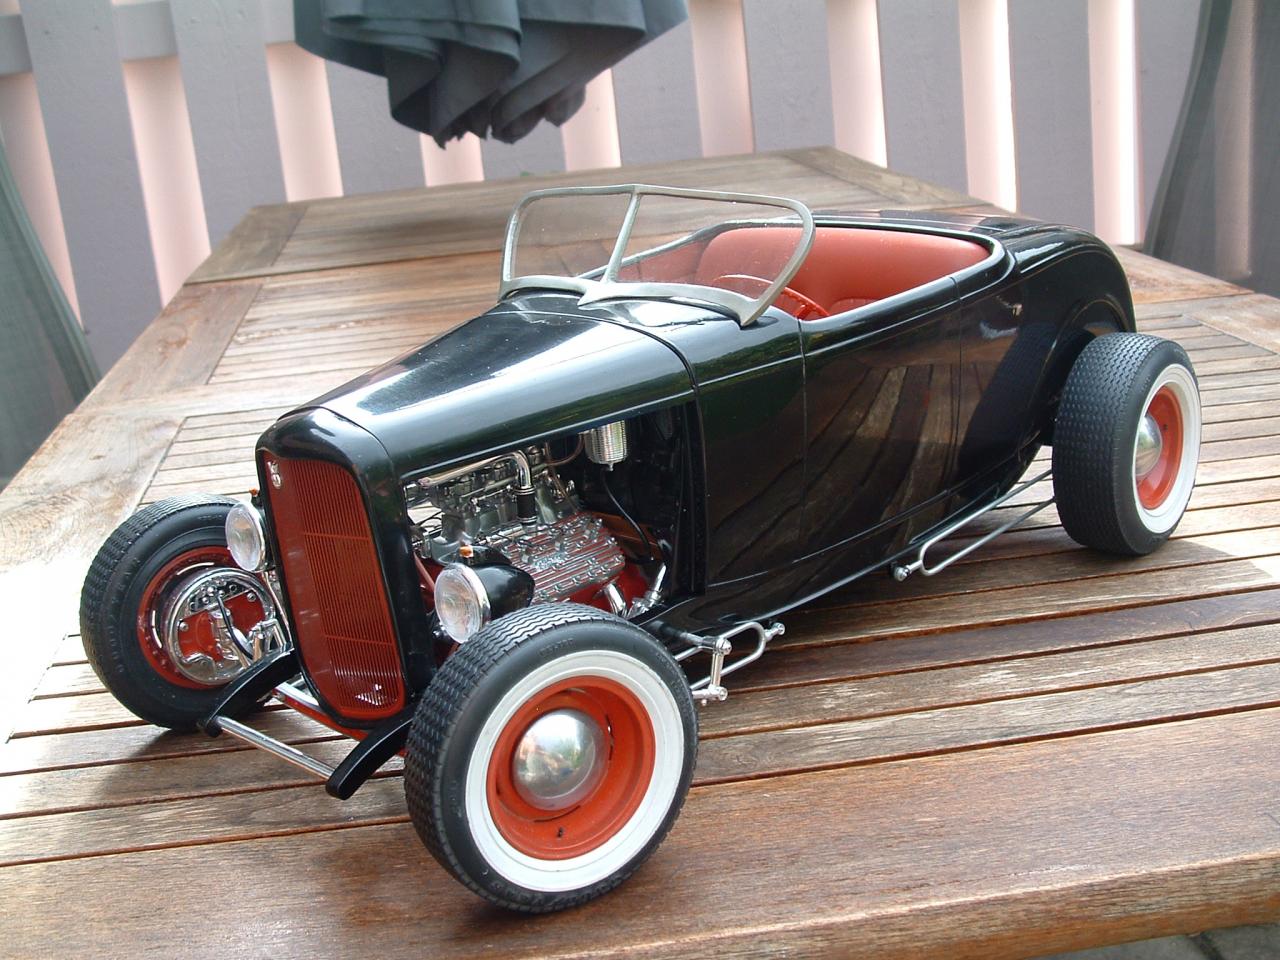
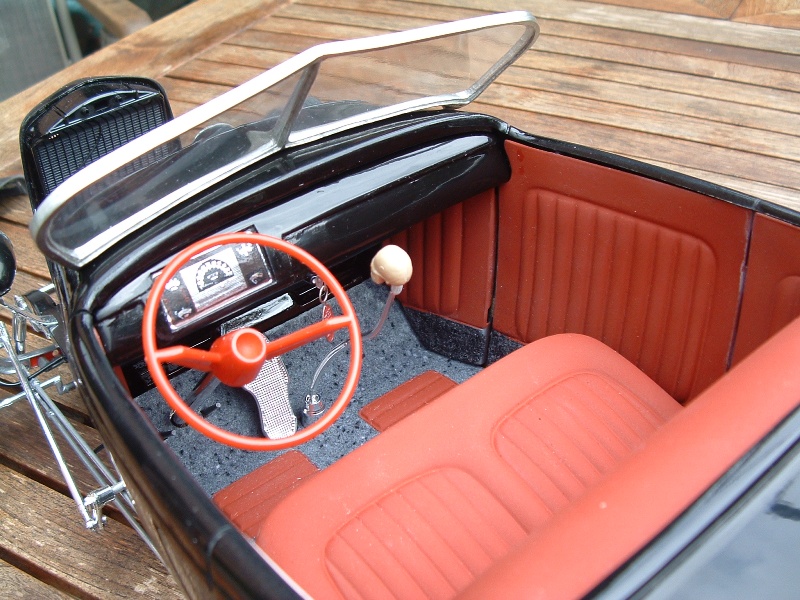
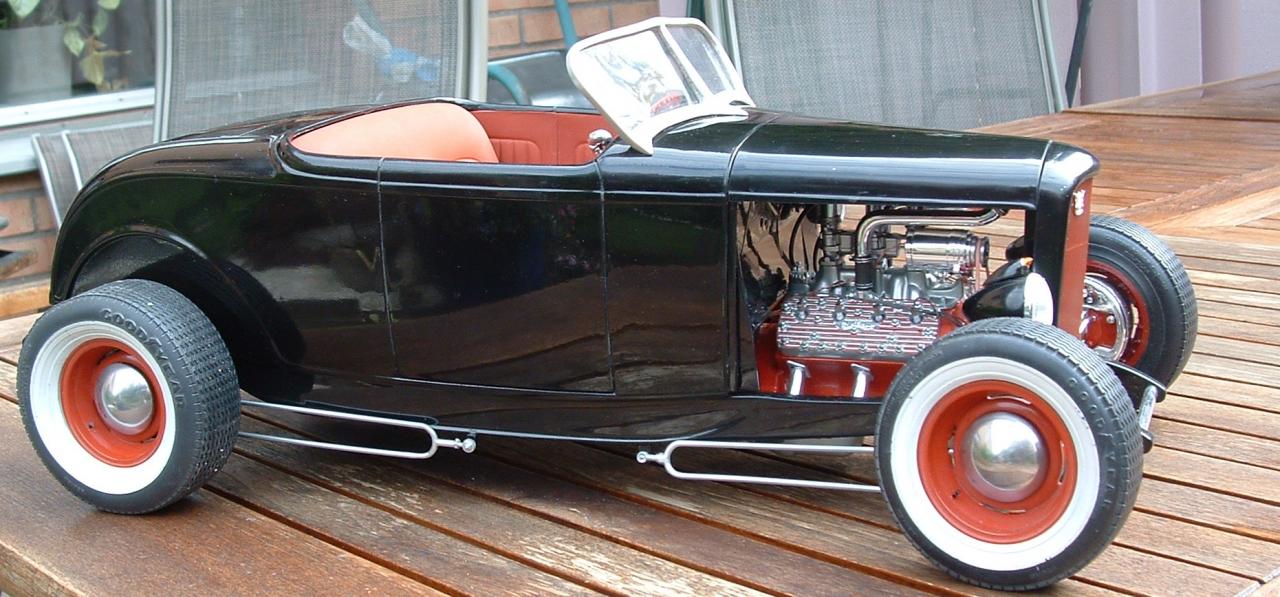
Almost forgot the Roadster I started with it´s started with a 1976 black edition with the new Flattie,Duvall wind shield,New head liugths from Big Jim and the Pontiac tail lights from the Big -T.
-
In the beginning there was a Ford 32 B400, but now its more
oldschool replied to oldschool's topic in WIP: Model Cars
Yep, 32 is my number for the moment Larsa -
In the beginning there was a Ford 32 B400, but now its more
oldschool replied to oldschool's topic in WIP: Model Cars
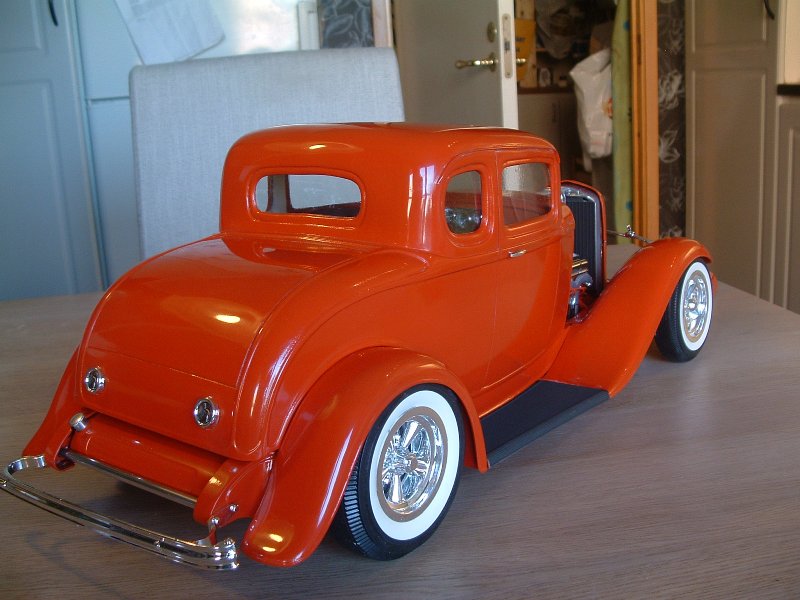
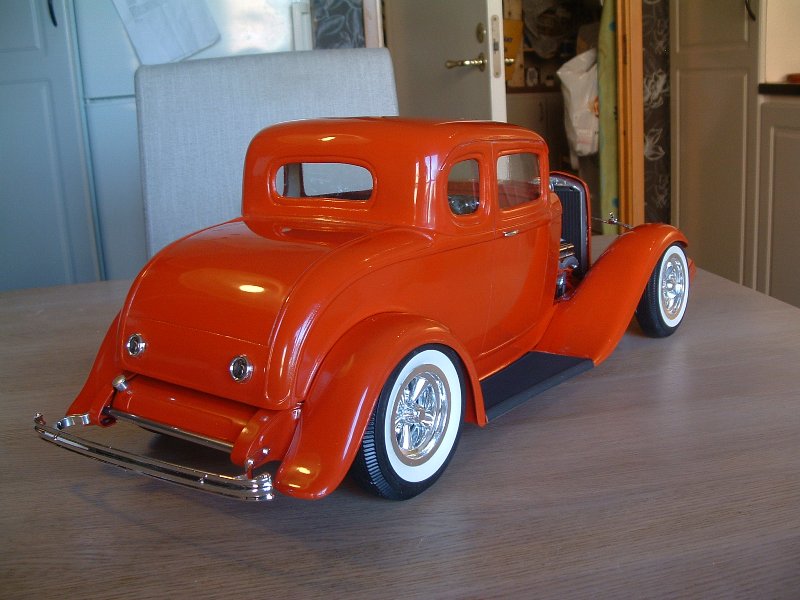
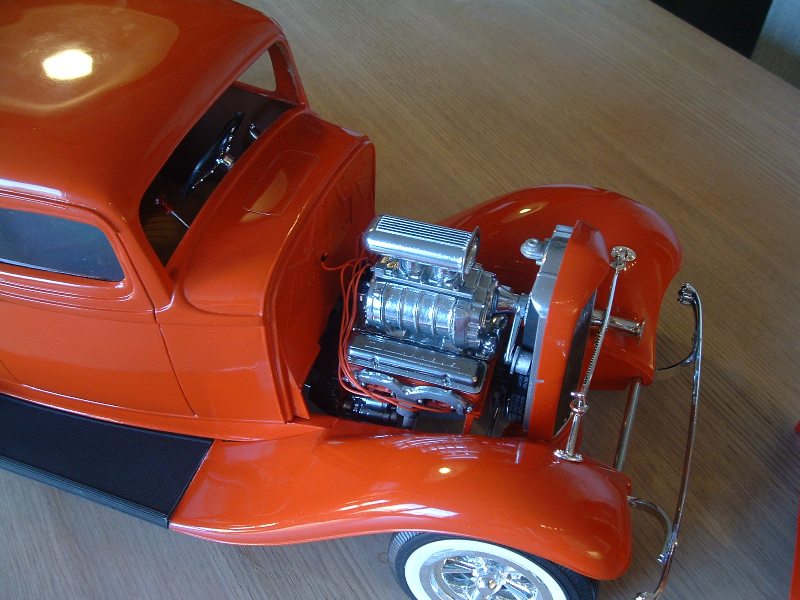
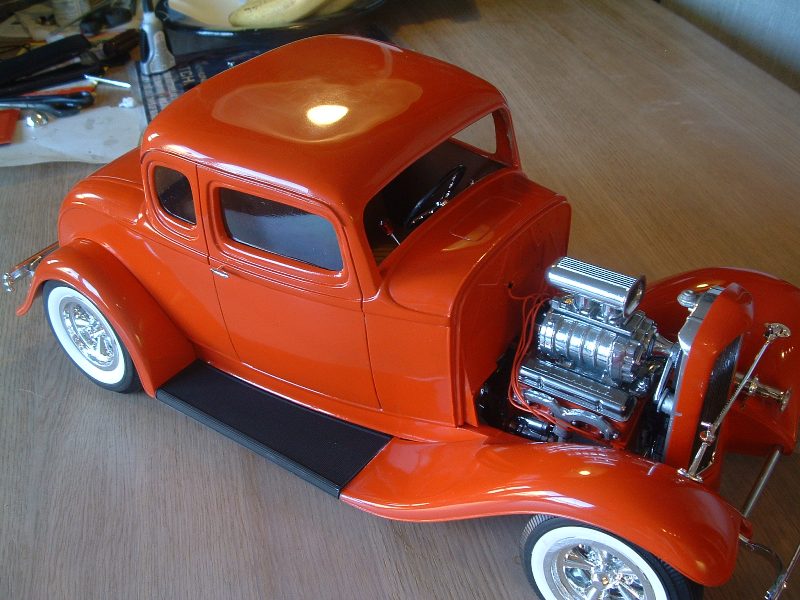
No This started as a five window Coupe from Mike Gradis. I got an second quality casting and had to replace the hole body so I took a roadster and with some (plastic) surgery It was in place, then the top chop was done and I´ll had to section it to get the right to. So would I do it again? yep I´ll do it again but this time with the 3 window Coupe witch is coming my way any day now. Lars
-
In the beginning there was a Ford 32 B400, but now its more
oldschool replied to oldschool's topic in WIP: Model Cars
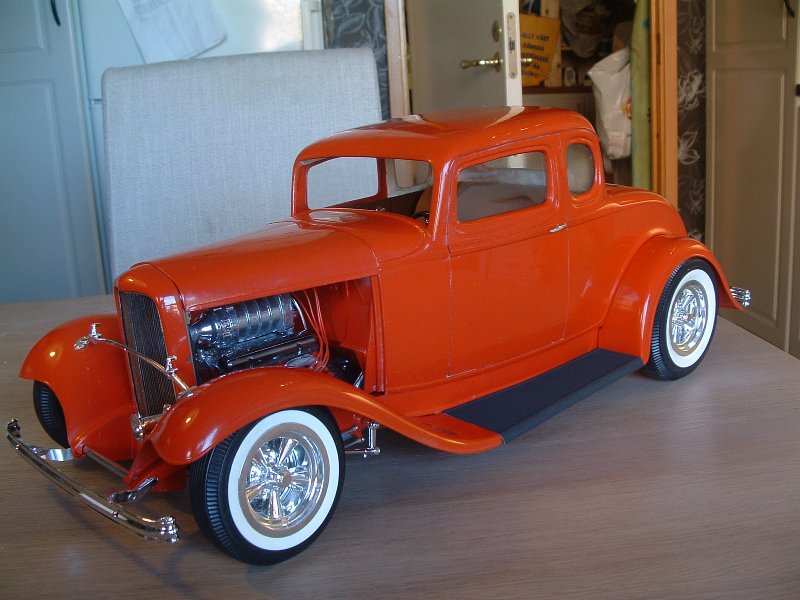
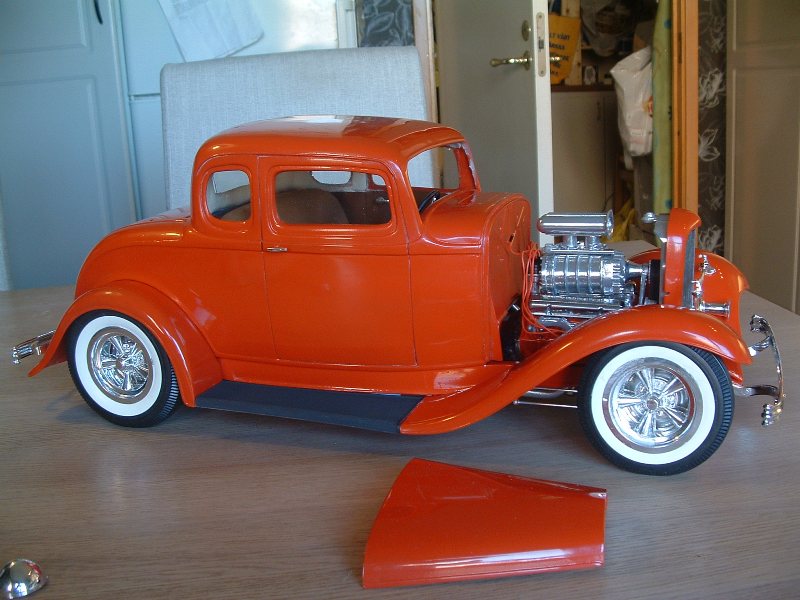
Hi I´m almost done with this Coupe now, so just a few sessions left Before it´s finished. Then I can restart the B400 build again. Hope u like it. Larsa
-
In the beginning there was a Ford 32 B400, but now its more
oldschool replied to oldschool's topic in WIP: Model Cars
The Red Coupe is almost finished and an update with pics coming this way. Regards Larsa -
In the beginning there was a Ford 32 B400, but now its more
oldschool replied to oldschool's topic in WIP: Model Cars
Merry Christmas fellows Not sure that this would be moulded and casted.We are just to few building in the big scale.So this will be just one off. Regards LarsaQ -
In the beginning there was a Ford 32 B400, but now its more
oldschool replied to oldschool's topic in WIP: Model Cars
No problems at all Just got some primer on the body this day and I´m pleased to see that there´s just not to much to fix from this stage so my attention will go to the frame for the moment and let the body rest for some days. Hope u like it. LarsaQ -
In the beginning there was a Ford 32 B400, but now its more
oldschool replied to oldschool's topic in WIP: Model Cars
Hi Yes I know the TDR stuff and I like them a lot. I have some motors from Lindbergs so I just will take one off those. Regards Larsa -
In the beginning there was a Ford 32 B400, but now its more
oldschool replied to oldschool's topic in WIP: Model Cars
Hi I´m not sure yet but thinking the Ford engine from Lindbergs Tall -T with a new intake manifold, four barell. Have to fix the manifold myself, having no idea if there´s one on the market. Regards Larsa -
I really like this build and having the box on the shelf, so this is a good inspiration source. Thnks LarsaQ
-
In the beginning there was a Ford 32 B400, but now its more
oldschool replied to oldschool's topic in WIP: Model Cars
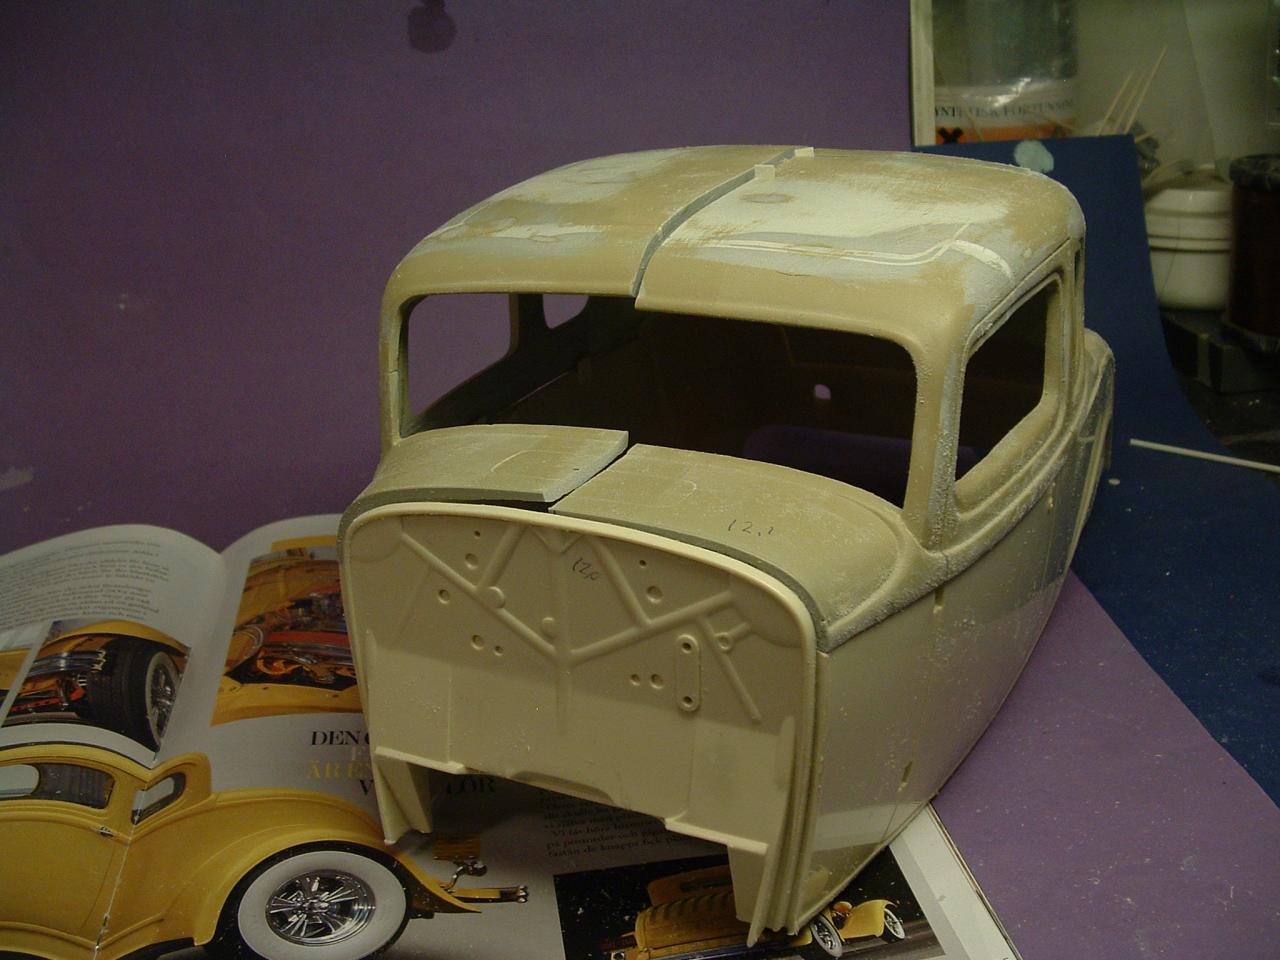
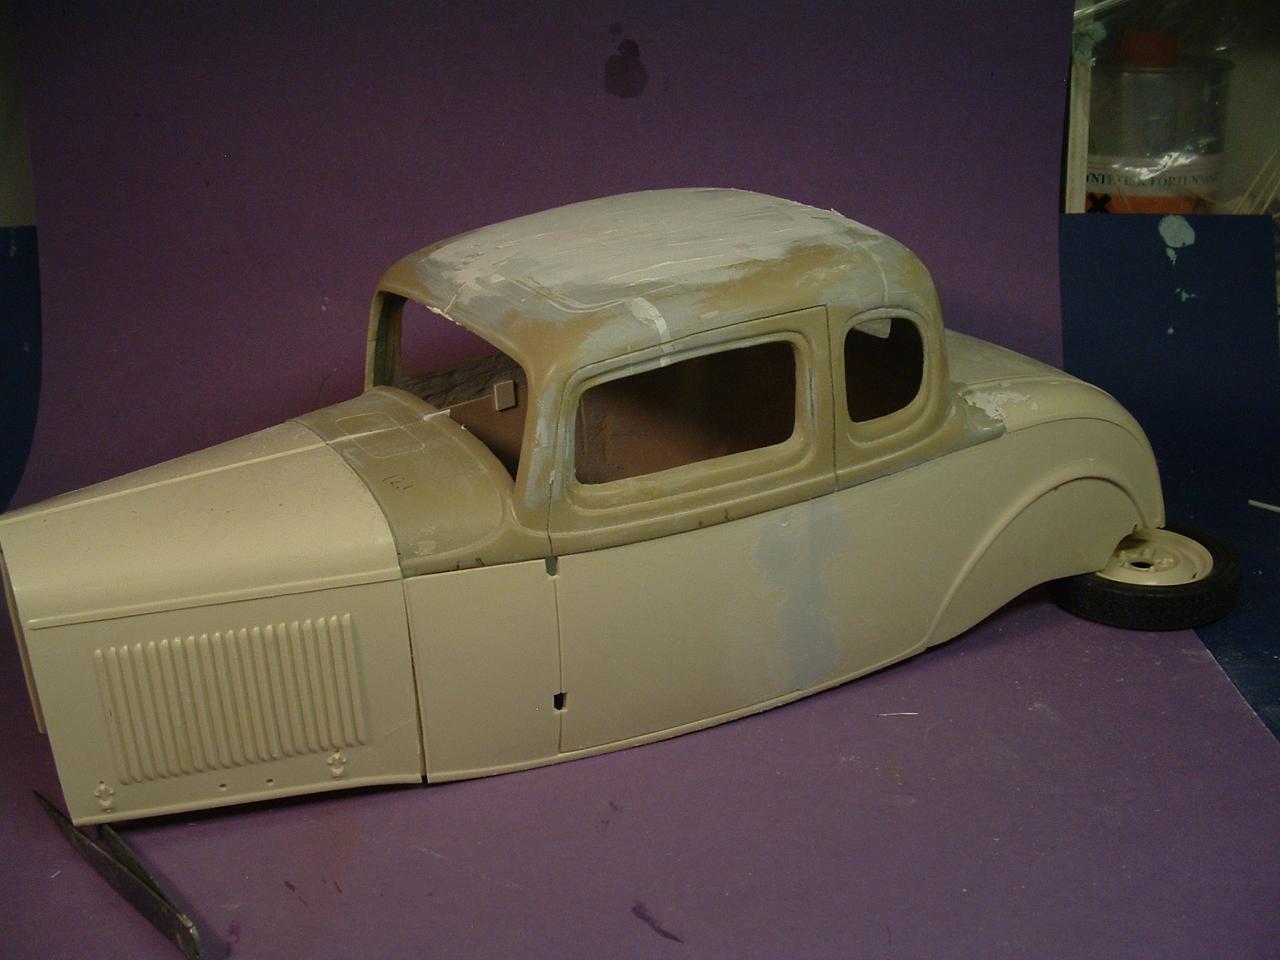
Hi folks Still working on the B400 body and now the roof is almost finish just some detail to fix in the rear end where the body meets the fuel tank. So, next thing will be a thin coat off primer and a windshield frame will be made from plastic card. Regards LarsaQ -
In the beginning there was a Ford 32 B400, but now its more
oldschool replied to oldschool's topic in WIP: Model Cars
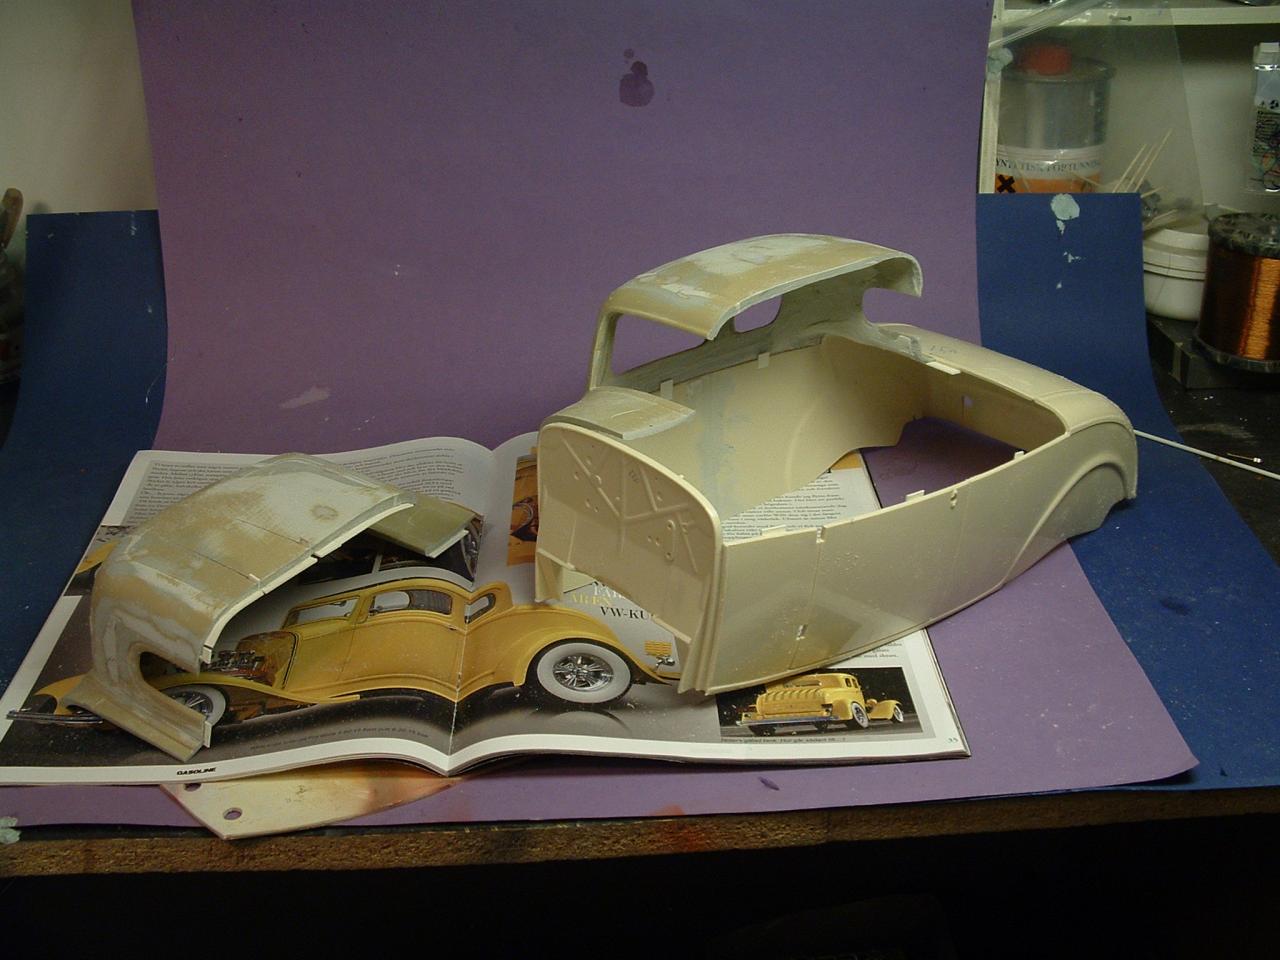
Hi Yep the Flintstone i darn nice and I´ll sell this 25 scale body when I´m done with it. I used a rounded section from the headlights and back from the front of the Jaguar fenders for the curved back quarters. My sample of the Jag was coloured yellow, you can see the back corners off the body in this pic where the primer is sanded off. Here´s what's left off the fender. I did this so I had the same curvature on both corner. LarsaQ -
In the beginning there was a Ford 32 B400, but now its more
oldschool replied to oldschool's topic in WIP: Model Cars
An old Monogram Jag -
In the beginning there was a Ford 32 B400, but now its more
oldschool replied to oldschool's topic in WIP: Model Cars
No sir it´s 1/8 and the start is a Revell build with a home fixed body. Regards LarsaQ -
In the beginning there was a Ford 32 B400, but now its more
oldschool replied to oldschool's topic in WIP: Model Cars
Thank u guys, I will come back with update long the progress.This body style has always give me something more and now I´m in to it I´m planning for a Sport coupe to. Regards LarsaQ -
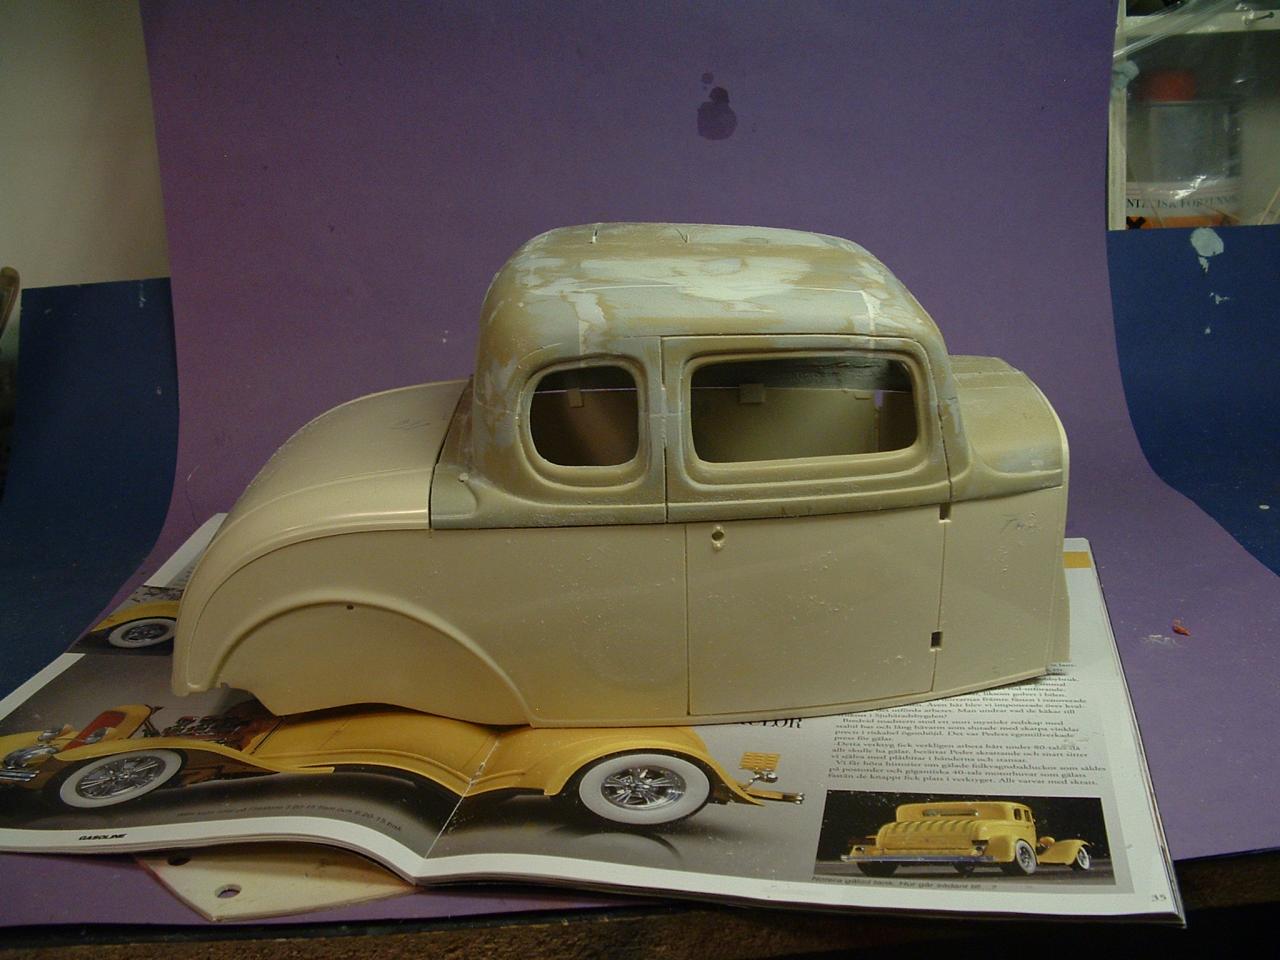
Hi Folks Have not posted anything here for a long time and would like to make a change on that here. I´ll started to work on a B400 early this summer and a spare roadster body was cut down after the door lines. I used plastic card 3mm for new sides and used pieces of a Jaguar front fenders for the curved end off the new body style. Plastic card was used to make the new sides with windows. I sandwished an 2,5 mm and an 3,5 mm. I´ll made the windows smaller on the inner card than the outer card to get that profile around the windows. The ground for this build is a Flintstone 25-scale Hot rod body so I cant go stock with this build but that's fine with me do I´m more off a rodder.. The roof section comes from the new Tub kit and was cut down to fit. And with some plastic card the roof was fixed so for the moment there´s a lots off sanding and checking the angles. hope u like it LarsaQ
-
clean and awesome my friend, u got something very nice there. Keep it up Larsa
-
That ride comes around nicley Old Hemrit and it´s looking mean, just love it. Larsa
-
Nice one, having the kit on the shelf and having similar plans for it,nice job give us more pics of the progress Larsa
-
Mike Gradis who sell the 32 takes the time to open the mailbox and it´s till summer and BBQ´s outside so send him an email again,I did and get the answer and a five window coupe good luck Larsa
-
Hi folks The woodgraining is much simpler then u think,I started with a mix off Humbrols flat sand 63 and leather 62.For the lighter frames I´ll used sand 63 with tiny 104 linnen. When all this was dry,next day a covered the base colors with semi gloss varnish.If u go for gloss varnish the oil will stick but have big troubble to cover the basecolor and u ending upp with really nice grains.Using flat paint for the base and the oil will almost cover the whole base and you will have a very non graining event Even this coat had to dry complete so the following day was the first time to get hold off some oilpaints, white spirits and a good set of brushes. I´ll covered the darker areas with a mix off Burnt Umber and Sienna.I´ll mixed in tiny amount off white spirits so the oil´s got thinner and can dry up much faster I´ll painted one square at the time,because I used semi gloss varnish the oil had some problems to stick on the Humbrol basecolor I just got the brushstroke/woodgrains instant.After fliddling around with the oils for a patern I liked I used a 000 brush mostened in white spirit to clean up the lighter areas in the wood.When the first square´s finished the next one was up until the whole bodie was painted.All in one session so put you mobile on hold for a while Using the mobile phone take some pics off an Plywoodpeice and you will have a very "how to". Using the mixed oil with white spirits give a total flat surface when dryed up so here I just used gloss varnsh again to bring the wood "alive" again.Off course you can mix in some candy orange,yellow if you like the wood. This is very simple way to do it and off course it´s easy for me to say after done it many times, so bring up an bodie from the scrapbox and give it a test. hoping this was something off an answer for your Q about woodgraining. The last tips is searching the web for modelling german ww1 airplane modelling, you will find some good features about the graining there
-
Hi Been working on this for some time now starting with a Revell Speedwagon and sectioned it into a five window woodie,witch I fancied more than the Hitech Speedwagon.The woodgrains are done in oil over humbrolbase. The frame is cutted and fixed so the bodie got closer to the ground a bit.Amt;s 40 ford had to lend the "flattie" and Maryland and Replicas Ardun and S.c.o.t will be the final offer for this one.Hopefully I´ll have to fix a hole in the hood for some airclears.The Ardun and S.c.o.t are in primer in this photo.Will fix that before I do all the wiring and plumbing. The yellow paint witch the camera would find more a brown is an home mix from Humbrols clear yellow and Ivory..The frontrims and wheels from the 29, ratrod Revell and the rear rims from the scrapbox.The will have beauty rings and acentercover later on from the 29 rat rodd kit. Engine,rear axle and rims painted with and home made cande based from a goldbase and claer orange and red.An etched grill is painted in the samr "candy" and will be used Hoping to find Pontiac tailligths for the ride, still don´t where to find them but hopefully u can give some fine tips about that. Hope u like it Larsa
-
Thanks I´ll give Jeff a call about that.Just love your ride,never got the 3-window but I will change that anydayHeHe Larsa
-
Awesome stuff Hermit, how did u fix thoose wonderful louver for the backlid?Having the same idea for alouvered five window. Larsa