
Scale-Master
-
Posts
5,245 -
Joined
-
Last visited
Content Type
Profiles
Forums
Events
Gallery
Posts posted by Scale-Master
-
-
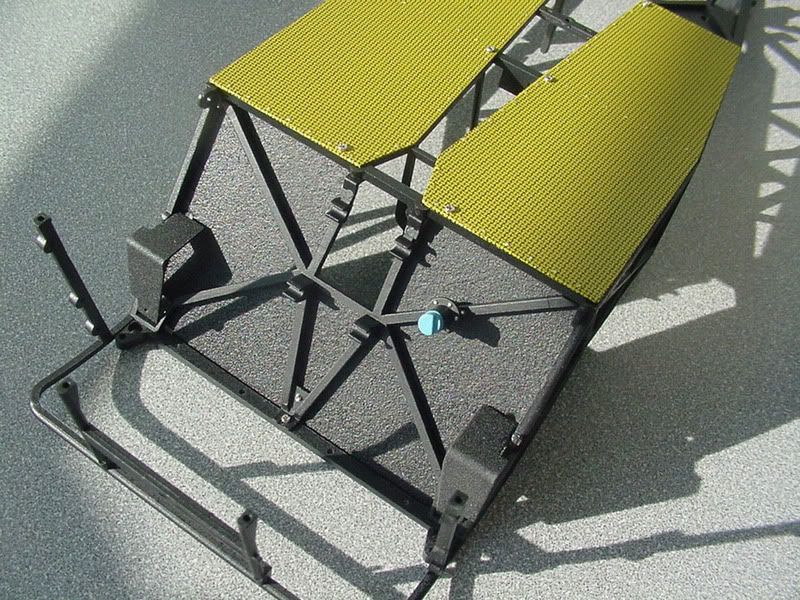
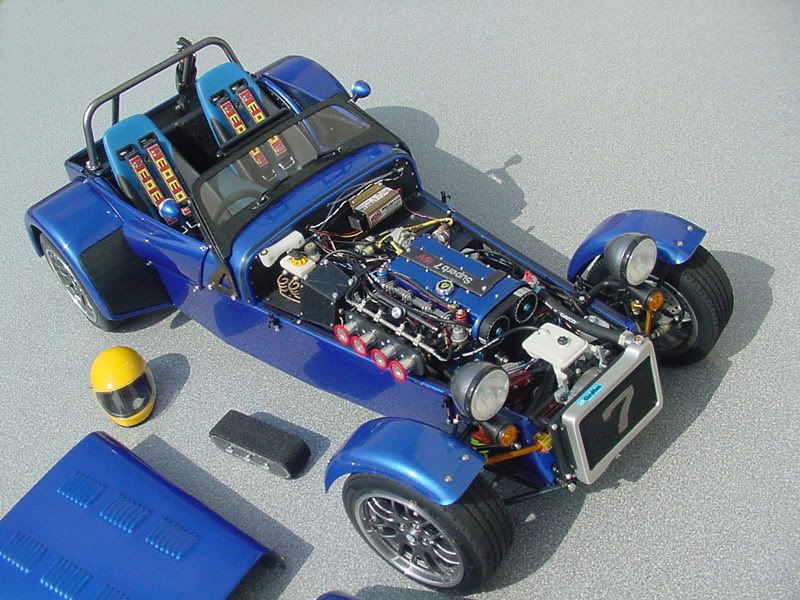
Here the sides are attached and the basics of the front suspension are in place. Care must be taken when putting the side panels on as to not chip the decals applied to either the sides or the floor panels. Only a little extra time and vigilance was needed to get both sides on event free.
This thing is really going together fast. It is amazing how fast one can build when one actually uses the kit's parts!

-
Hmmm, A Big Ruler.... Hmmm....
-
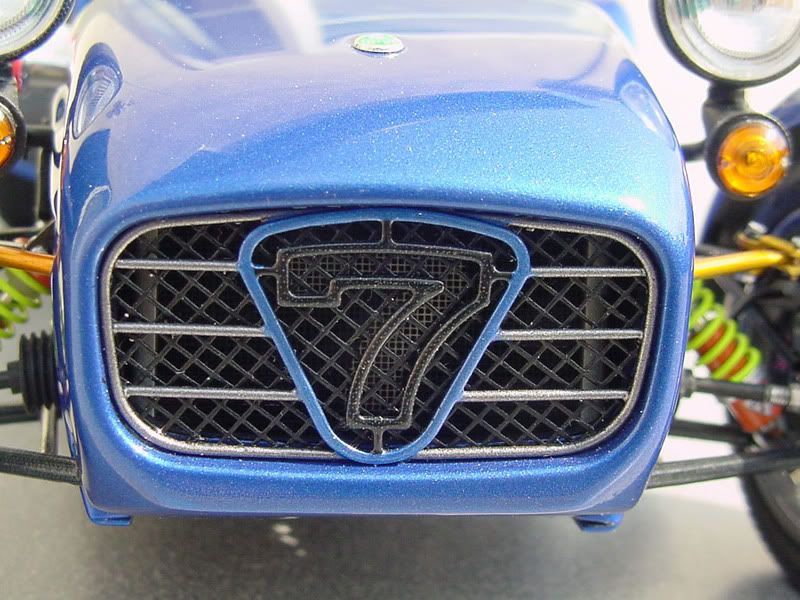
OK, then how about some decal work instead of Faux Fabrix?
The aluminum body side panels were scratched and I wasn't able to polish them up to a level I was happy with. So I went back to an option I had originally considered for this build, carbon fiber. A base coat of semi gloss black was sprayed on to promote decal adhesion.
Scale Motor Sport 1/12 scale Hi Def C/F decal (#1512) was applied in two main parts.
Once FULLY dry, a 50/50 mix of Testors Dullcote and Glosscote was sprayed in a medium light coat and allowed to dry. The same application was repeated about 30 minutes later. The seams of where the decals overlapped were sanded out with 1000 grit wet and another coat of the 50/50 mix was applied to make the sheen uniform.
-
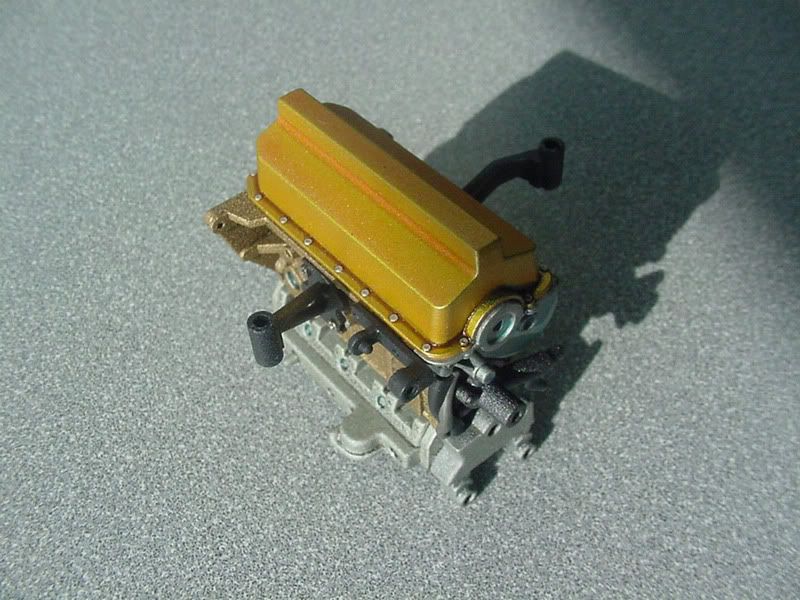
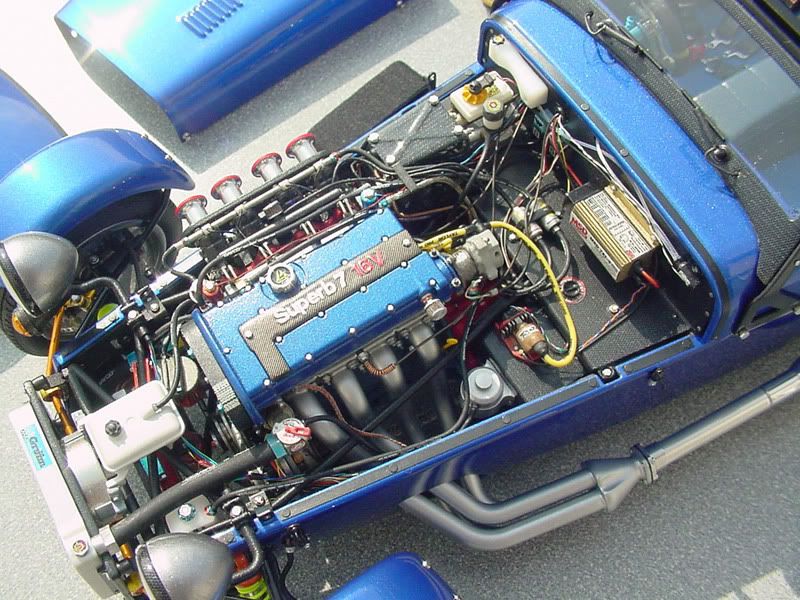
More work accomplished on the engine…
Make some leaky stuff residue like a real Bri'ish auto...
-
They do look "spotty" in the picture, but in person they don't. Flash effect from the camera I suspect. Just to clarify, there is no texturing on the rotors, just the hubs.
But the rotors are nearly invisible when installed behind the wheels so it is nearly a moot point...
-
The brake rotors were sprayed with Tamiya Natural Metal, then sprayed with an even medium coat of TS-71 Smoke, and then again sprayed with a couple light coats of TS-17 Gloss aluminum. Each coat of each color was allowed to dry before putting on the next layer.
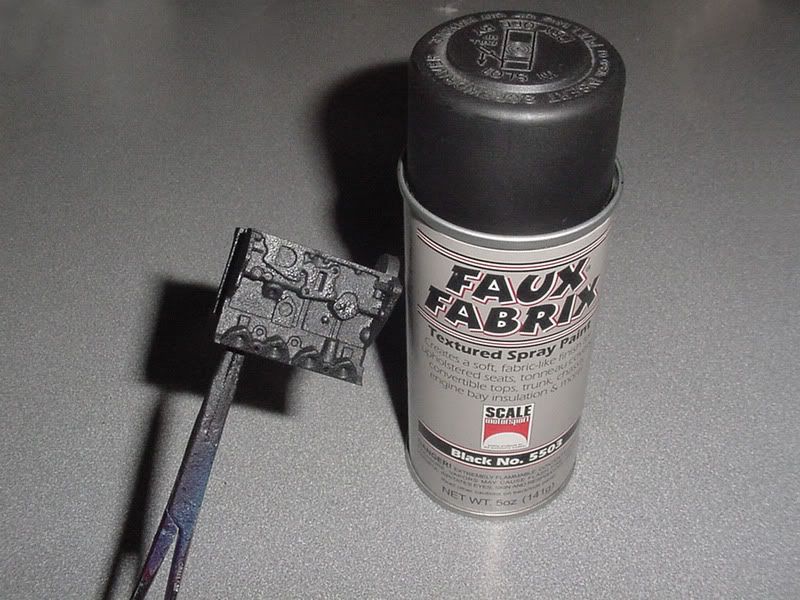
The hubs were textured with, you guessed it, Faux Fabrix.
The rear differential was given a sand cast look with the same method…
-
That just looks so "period correct" to me. Great execution!
-
Here are some more parts I used SMS Faux Fabrix on for texturing. "It's not just for seats anymore!"
The rear bulkhead received several very wet coats, (let dry between coats), to replicate the rubberized spray coating/insulation. (Keeps, stone chips from damaging the C/F too.)
The transmission took a light coating for a fine sand-cast look, and the front of the engine/head got a matching amount as was applied to the block.
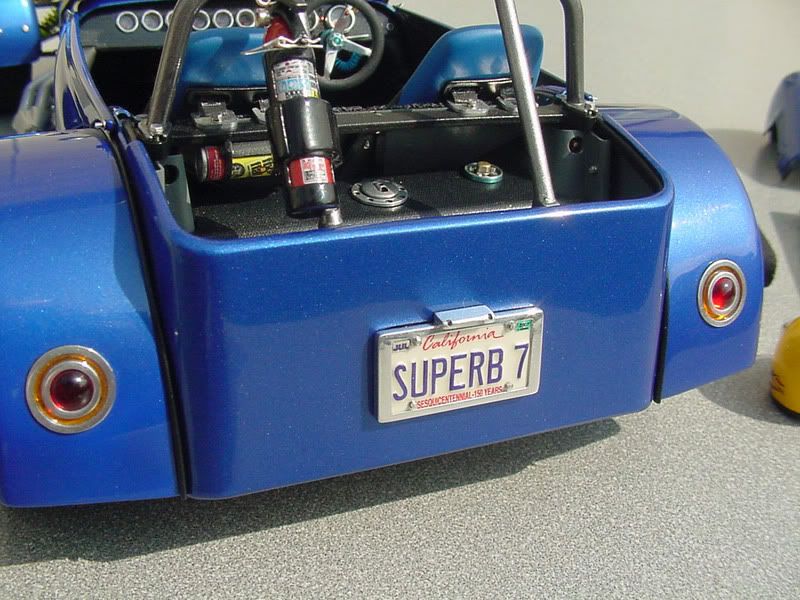
Here’s the finished rear bulkhead installed in the frame.
The rivets are raised on the floor and rear panels. I lightly sanded them to allow the aluminum to show through the decal with some 1000 grit sandpaper.
SMS 1/12 Hi Def C/F on the “interior†side.
Stay tuned...
-
Very Nice. I like the "exploded" side best...
-
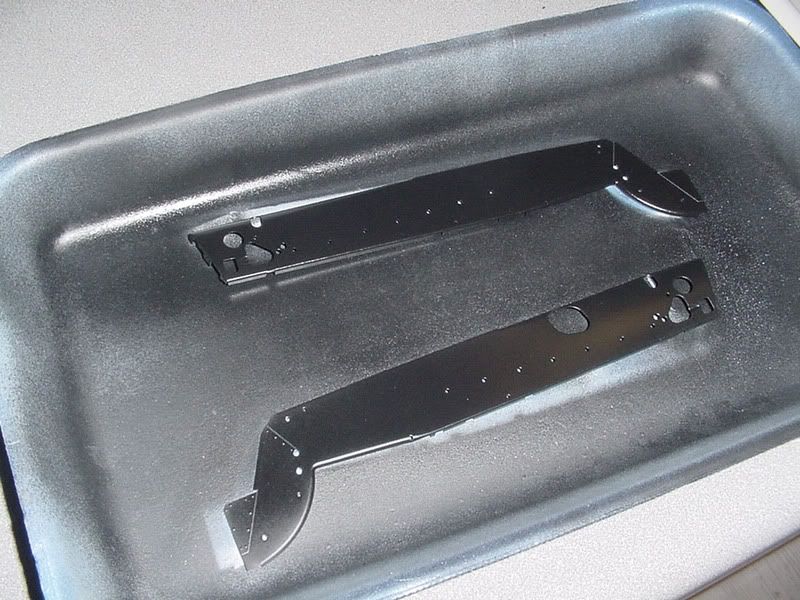
The frame was cleaned up like normal and painted semi flat black. The floor panels are covered with SMS Kevlar #1312 decal.
Really no secret trick to it, just a little patience, and a little decal solvent around the edges and rivets. Let the decal dry for about 20 minutes before working it to conform with solvent. Keeps it from sliding around.
And let each side dry completely when decalling boths sides of something. That's hours, or overnight... Or even a couple days...
The steering rack cross member was textured to look sand cast with the Faux Fabrix...
Gettin' a little louder to go with those seats...
-
Wow! Super neat stuff! I Really like the Road Runner... - Mark
-
Like any new project, the participation level is high at the beginning, that holds true here too…
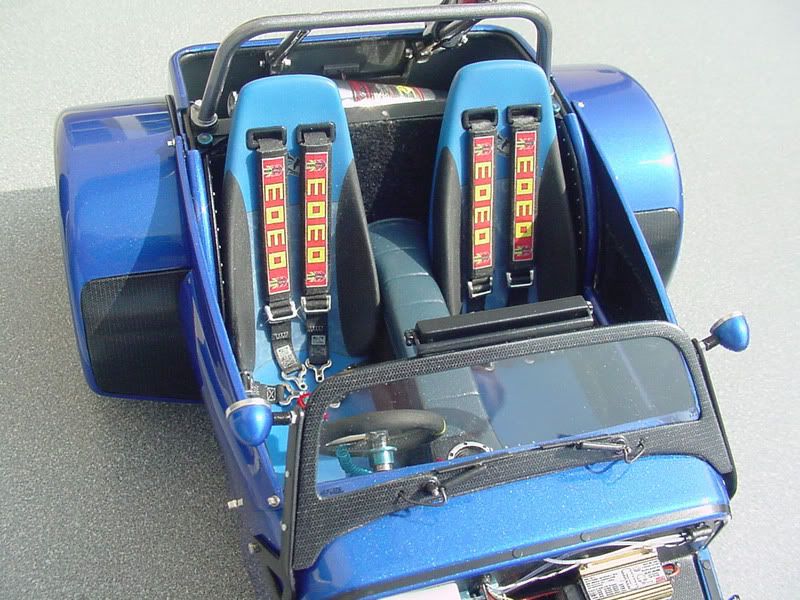
Testors Black Chrome Trim makes a good look for vinyl seat covers. The seat inserts were brush painted with Tamiya acrylic JN Grey, the brush strokes were left intentionally to make the pattern look more like an animal hide.
SMS Giraffe pattern decals were applied. Mr. Mark Softer (decal solvent) and a good decaling brush made it an easy task.
Tamiya Clear Yellow was airbrushed in different random densities and streaks, again to make it look more like a natural animal hide. I used an Iwata airbrush and was pleased the spray pattern was so fine I did not even have to mask off the black.
The seats were finished by spraying them with a 50/50 mix of Testors Glosscote and Dullcote lacquers.
-
I know, I know, I can hear it already.
"Oh come on! Not another one! Aren't you sick of them yet?!"
Well, no I'm not, I hope they still hold some entertainment value for you too.
Yes, I am building another 7, C'mon, are you really surprised? I know I'm not… I will also chronicle this build as I go along.
While it will be much like an out of the box build in many respects, I reserve the right to deviate from what comes in the kit for any reason I choose. It is not meant to “out-do†the Blue Seven. It is to build and enjoy and have fun. (OK, that part is the same as the Blue 7.)
Also, if any of you are building, or have built one of these kits, please note that I am going to be all over the place regarding what I build in what order compared to the way the instruction book has you build it. Nothing wrong with following the instructions, in fact I highly recommend it if you have not built one of these kits before, but I have built enough of these to skip around for my own enjoyment and not become ensnared in any of the possible pitfalls of building out of order.
Kit: Tamiya Caterham Super Seven 1/12 Scale Master’s Coachwork Series
So follow along if you wish, feel free to ask questions, I'll try to be as clear as I can with my answers. And off I go, (again...)
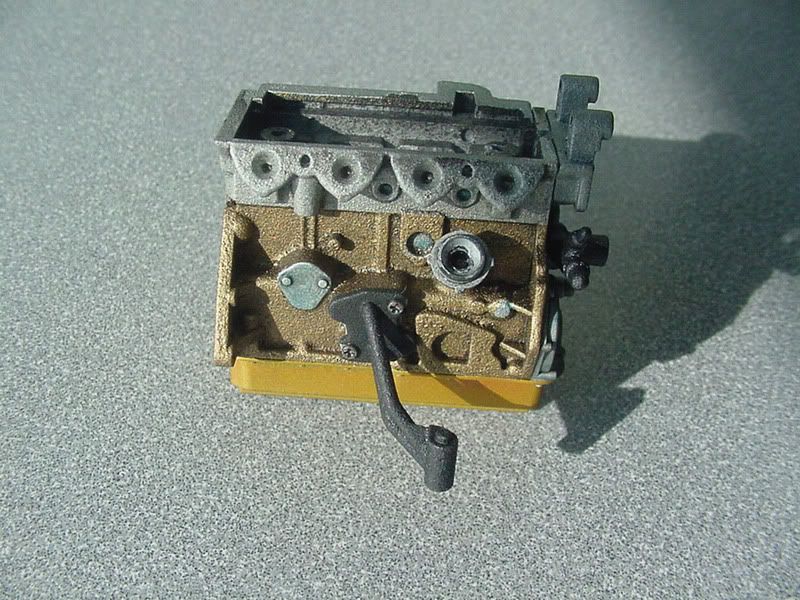
I started with the engine on this one. Scale Motor Sport’s Faux Fabrix was used to simulate the sand cast texture of the engine block.
Tamiya TS-21 Gold was used for the color. The gloss of the gold was toned down with Testors Dullcote.
The head was painted aluminum and the freeze plugs painted a light steel color. The oil pan is Tamiya Clear Orange over silver for an anodized look.
Stay Tuned, comments welcome...
-
I've been using Tamiya TS-36 Fluorescent Red. (It's what they spec for their Marlboro/McLaren cars.)
It needs a white base coat, but dries glossy. A clear coat is nice to really make it shine though.
At least it is glossy enough that you can decal right over it without worries of silvering...
-
Wow! I'm not usually a big green fan, but that is the right color for that truck. Love the chop and stance...
-
"Yes, as crazy as it sounds I'm doing another Seven"
Thank you. That never gets old...
Well, I've said that more than once, and I'm saying it again...
Yes, as crazy as it sounds I'm doing another Seven, seriously, yes, I am. That didn't take long did it!
Stay tuned, I'll share the build with pictures and explanations again too. Number 8 is on the bench...
-
Thanks everyone! I plan to take it to the GSL and IPMS convention. Also display it at the TamiyaCon.
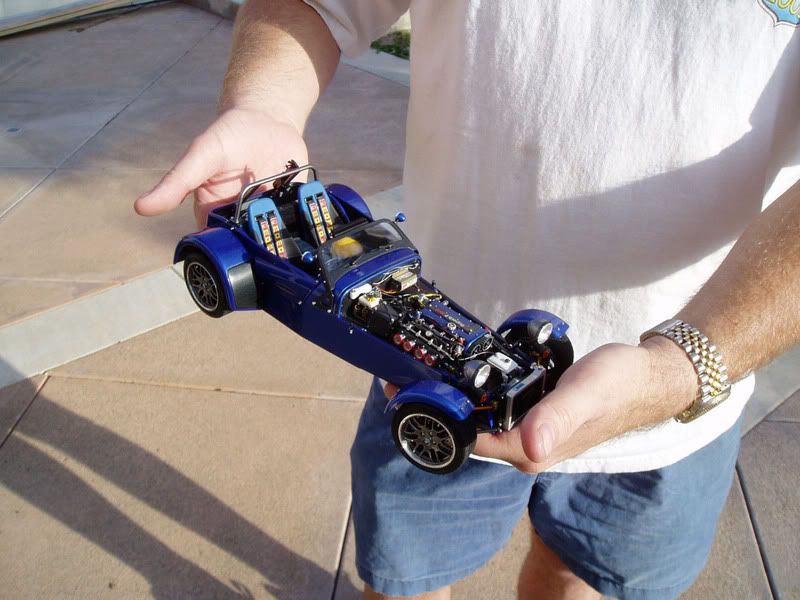
Here's a couple shots without the ruler, but they give a sense of it's size...
-
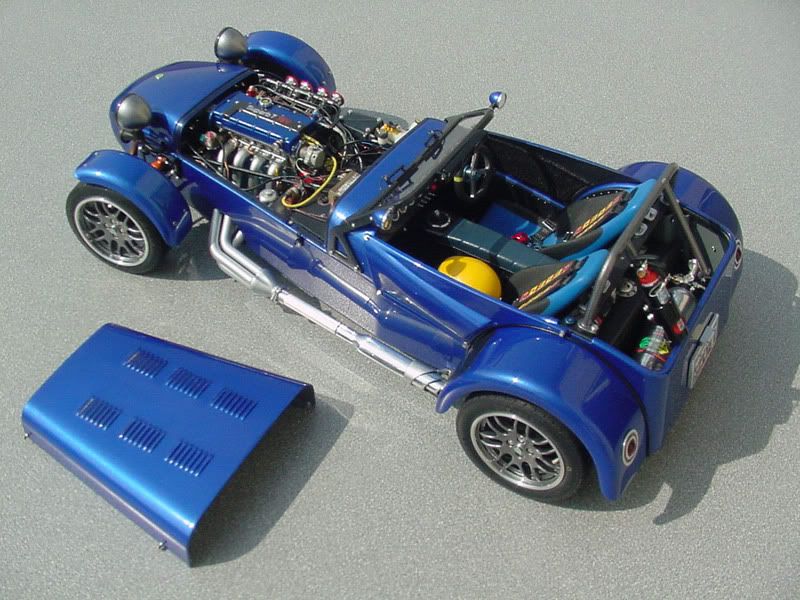
Well, after two years and seven months, it is finally done! Literally thousands of scratchbuilt and machined parts, most of them made of aluminum, but also including brass, stainless steel and various plastics, resin and acrylic materials.
It's quite possible that over the next few weeks I will come up with some small things to add, maybe touch-up or adjust. I see there is a little dusting to be done... But as of now, it appears to be technically finished! This has been a most rewarding and enjoyable build. Seems like all the frustrating times I put myself through have been forgotten now.
Thank you to all who have encouraged me and expressed interest during this long term project...
-
The Cosworth engine is actually de-stroked from 2.3 Liters (Stock displacement for all other Vega's), to 2 Liters.
-
I have a couple of those Monsters, still in boxes, and a couple the Big Bad Vans, and the Jeep CJ... Nice imposing size for those larger vehicles.
The 1/16 Camaro & Firebird came out in '82, and were revamped into an '87 IROC and GTA a few years later. I built most of the box art models of that F-body series back in those days...
-
And with all the al-yu-min-iyum in this I'll especially have to retrain my tongue...
Ok, I guess I'm busted. I took it out this morning. Had it running last night, no leaks.
Fired it up this morning, still had some condensation in the muffler as you can see.
Bat out of hell properly describes it's acceleration.
I need a diaper before I try it on the nitrous...
-
Thanks all!
The round mirrors are completely aluminum.
It is 1/12 scale, a little under 10 inches long.
The steering wheel is on the right side. Correct side? Hmmm, must be the MIRRORS! I crack myself up...
I don't limit myself to the British... Sounds like some Americans might be irked too... Equal opportunity you know.
I have a 5 panel Wink in my real car, never really worked for interior cleavage viewing, but it does work for seeing what's outside, especially when parked and you get the panoramic view of the pretties walking by...
-
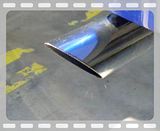
Finally got the mirrors done and mounted. Actually they have been done for a while and just waiting to be mounted. A week ago I accidentally ruined the Wink mirror. Freak paint accident. So I had to rebuild and re-machine some of it and this time I used stainless steel for the panels. Gettin' closer to the end...
-
Wow, that is one clean build! Looks great. Very tasteful. Great balance of metal and paint... - Mark


Buick and F-bodies
in General Automotive Talk (Trucks and Cars)
Posted
Monogram had a turbo V6 3rd generation 20th Anniversary Trans Am in their Hi Performance series. Even came with ignition wires and heater hoses. That one kit could be a good start. Same basic engine as in the Buick GNX from the same series.
I kind of like Hellcat or Firecat, but the latter may be too close to the Pontiac name.