

Doctordarryl
-
Posts
160 -
Joined
-
Last visited
Content Type
Profiles
Forums
Events
Gallery
Posts posted by Doctordarryl
-
-
So tell us about the model-not the paint. How'd you make those perfect front wires??
The front wire wheels were items from Machined Aluminum Specialties. I made the wheel disk (for better roll out through the staging light) by punching a disk from thin aluminum sheet and then punching out the center.
-
Uploader won't work again. Still have not figured out why it works sometimes and not others. Here are links to Fotki pictures.
-
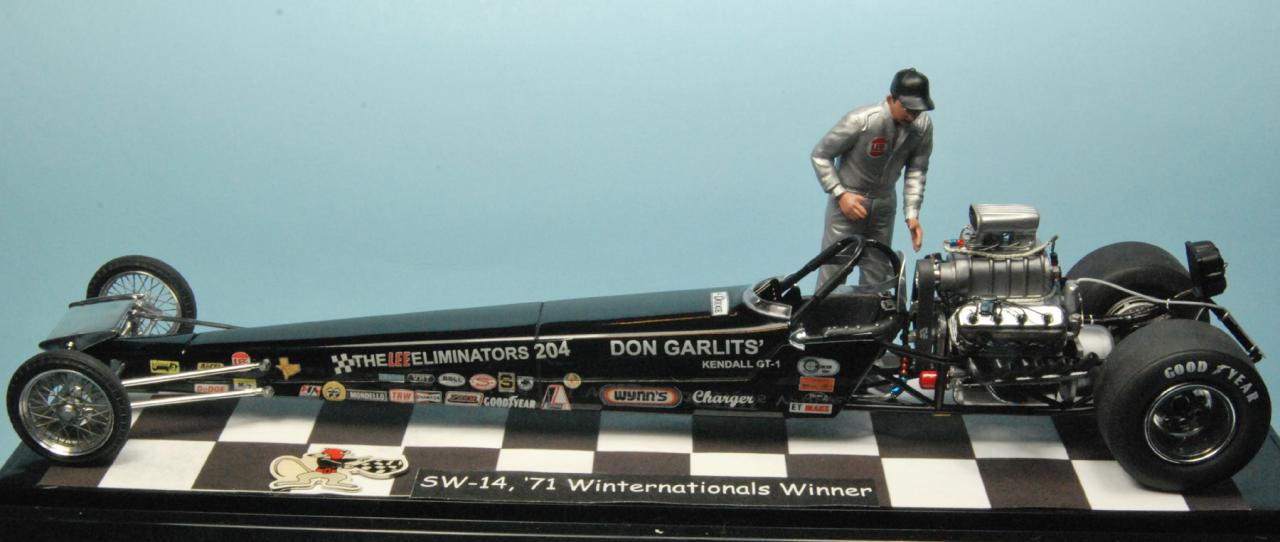
I had been collecting parts to build this model for years. I wanted to build the version that won the '71 Winternationals because I sold Mr. Garlits the paint for the front body work. When he ran it at Loins in Jan. 1971 in preparation fo the Pomona Winternationals, it did not have any bodywork on the front.
The story of my selling him the paint is a long one so I won't bore people who are interested in the model. I have met Mr. Galrits many times since and he still remembers me as the guy who sold him the paint for SW-14.
This was the original MPC release. The decals were from Scale Auto Details. Lots of scratch building, wiring, and plumbing.

-
Here is my version of Arnie Beswick's Passoniate Poncho. I used the Slixx decals except for the hood markings (which uncharacteristically were wrong on the Slixx sheet) which came from the kit. Airbrushed with Tamiya Metallic Blue. Three tone interiior. A very nice kit and one I wanted to build for many years.
-
Ever since the Revell '32 Ford roadster came out I wanted to build a full fendered version. The fenders from the coupe fit with no problems. I used a '55 Cadillac air cleaner (from Scale Auto Details). The model was airbrushed with Tamiya Maroon. The up top was from a Monogram '32 Ford roadster (which was suppoed to be 1/24th scale).
-
Here's a picture of my Corvail-powered Myers Manx. When I lived in Coronado, CA, a few blocks from my house was a Corvair-powered Myers Manx with torq-Thrust wheels. It was also a metalflake green and I always loved that car.
Here's my version in 1/25th scale.
The Corvair engine was from an AMT parts pack. I used the seats from a Revell '41 Willys kit since the kit seats appeared way too small. A fun build.
-
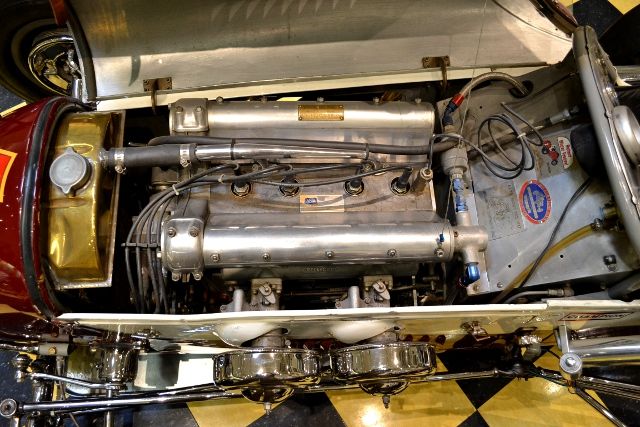
Thanks for the kind words. I don't have much to update today. I was mostly cleaning up mold lines on the body and frame and looking for some reference pictures. I'd like to wire and plumb as much of the car as possible, but I'm totally clueless on where to run some of the lines. If anyone can help me out I'd appreciate it. In the attached picture, there is a braided line coming from the firewall. I'm assuming that is the fuel line from the tank, to a filter, to the pump, to the injectors (correct?). There is a line below that one (zip tied to the rad hose). I have no idea what that is. Next, coming from a gauge looks like oil pressure and pretty straight forward. Next, there are three lines from the gauge panel that disappear. I'm assuming that one is water temp and goes into the block somewhere, but the other two I'm stumped. If anyone wants to share their knowledge, again, it would be much appreciated.
Nice start on the midget. Revell did a great job on that kit. Look in the Under Glass topic to see midgets that i built.
The Offy midgets had three gauges (note that the Revell dash has 4 gauges, which I'll get back to in a minute). The three gauges on an Offy midget were; water temp, fuel pressure, and oil pressure. Scale Auto Details has a resin 3-gauge dash and gauge decals for the Revell Offy midget kit.
The Revell dash was modeled after a V8-60 midget. Those midgets had 4 gauges, two water temp gauges (one for each cylinder bank), fuel pressure, and oil pressure.
I hope that helps.
-
What, Darryl??!!!! It's not a midget!!!!! But it's just as cool as the midgets you build. Good stuff!
Thanks for the compliment. Yea Art, I build things other than midgets (which I love but I do love drag cars a little bit more than midgets).
Awesome build mate..very nice
I built the Filthy last year.. I weathered mine as well...a very cool car
Happy to help with any weathereing questions you've got.
Ive got heaps of reference pics if you need them.
cheers
Ian
Very nice build. I like the weathering. I could use some tips on weathering.
-
Very cool Darryl. Great job on them all. What do you use for those bases?
Thanks for the kind words.
The bases are from Trumpter and I print a checker board pattern on one of my printers. A base with a checker board and a figure are sort of my trademark.
-
When I lived in San Diego in the 70s I built a '49 Olds coupe with a bored 394 Olds engine and a '54 Olds Hydro that I put a B&M shift kit in to. It had a Pontiac rear (the Ford 9 inch on the 60s and 70s) with 54 inch long ladder bars (all built by me in a rented one car garage). It was the most fun 1:1 car I ever built! I will replicate that car from my past in plastic. I did it with one of the old Ertl diecast '50 Olds coupes many years ago. I will likley get 4-5 of these to build some variants.
Many years ago at the IPMS Nationals, Accurate Miniatures was asking for suggestions for new models. They had just started doing cars (the Corvett Grand Sport and McLaren). I put down the '49/50 Olds coupe,'53 Hudson, and '55 Chrysler 300. When asked why those subjects, I indicated they were all pioneers in NASCAR and would be great sellers for that reason alone.The owner said they would never see the light of day. I guess he was wrong?
-
Will you be applying some filth like the real one?
Good question. I have not yet tried weathering but this might be a perfect example to weather. It got its name from being parked in the mud fields at the '62 Indy Nationals (and that was the decal scheme I chose - not the later 63-64 Nationals one with the stripe). I'll have to consult with some of my armor building friends about weathering and get pointers/tips from them. I have wanted to try my hand at weathering and may as well do it on this one.
-
One thing I forgot to mention, when I display this model at shows and contests, it will have SOUND. I have a WAV file that I put together using some recorded gasser sounds and AVS Audio Editor software. I have a small MP3 player and some speakers that currently will be aside of the model but eventually (when I figure it out) will be built into the display. The sond file goes like this;
Gasser starts up, idles, a few revs, idles some more, a few more revs, and shuts down.
I will likely experiment with sound effects (and later lighting) on future builds.
-
The Revell midget kits are fantastic kits. They are very well engineered and offer an opportunity to fill a void for modelers. I started workning on midget decals before Revell announced they were making the V8 60 and Offy midget kits in 1/25th scale. I was going to use the old Etzel Speed Classics curbside midget kits to build a fleet of midgets. Next to drag cars (and Willys gassers in particular) midgets are my close second love. I saw many of these cars run at tracks my father took me to when I was a child.
Scale Auto Detail midget decals have been reviewed in Model Cars Magazine. I am quite satisfied with how they have been selling, now being touted as the "World's Best Selling Midget Decals".
Here are my builds (which have never been posted here). I have built 10 midgets and have several more under the build bench. I have produced 19 different midget decal sets and have several more in planning.
Enjoy.
-
Looks serious, fast and clean. Great choices on everything. Custom built headers? And I'm guessing the TS-4 is an armor color....correct?
The headers were made from solder along with 4 into 1 collectors from Scale Auto Details. The header flanges were cut from aluminum flashing. The Tamiya color (German Grey) TS-4 is either an airplane or tank color. I am not into the military stuff so I am not sure what it was used on.
-
I love the old Willys gassers. I have built 8 Willys (2 customs, 2 prostreet, and 4 gassers). This will be Willys number 9. I used an Altered States resin body. I have been collecting parts for this build for 4 years and finally got started. I airbrushed this model with Tamiya German Grey (TS-4). I used Slixx decals and cleared with Testor's Dullcoat. The model is about 75% completed. I have some work to do on the engine (which was from an AMT parts pack) and wiring/plumbing.
-
It is easy! Don't know why you're having such a hard time. It's just copy and paste. Looks like you have it now.
Thanks. I now have an easy way to post since I can not get the Forum up-loaders to work. There is most likely a conflict with my firewall or antispam software that prevents the uploads. This approach is easy and yields nice size images.
-
I love anything Ardun powered. Where did you get the blown Ardun from? Either way, I love this style of Willys gasser.
The engine came from eBay but there are lots of great Ardun parts out there. I used heads and a S.C.o.T. blower manifold (which I modified) from Replicas and Miniatures Company of Maryland. The blower was from the Willys kit. I scratch built the bracket that holds the fuel pump from sheet styrene. The headers were from the Willys kit.
-
Let's try again. This should be easy not a PITA.
See if that works.
-
Here we go again.
[photo id=sbktgfqqdwbbgbrxbsswwgfrtsbr type=vi style=1 align=no link=photo]
[photo id=sbktgfqftkskstgxbsswwgfrtsbr type=vi style=1 align=no link=photo]
[photo id=sbktgfwsfgsksdfxbsswwgfrtsbr type=vi style=1 align=no link=photo]
See if that works.
In fotki, click on the photo's "Share" link, then click at the bottom where it says "More sharing options," then scroll down and where it says "Code for forums," copy that code and paste it here into your post. Like this:
Did that and all I got was the code - no picture.
-
Here are links which may work better to photos in my Fotki alblum.
http://public.fotki.com/doctordarryl/sadmodelgallery/dsc-5729.html
http://public.fotki.com/doctordarryl/sadmodelgallery/dsc-5730.html
http://public.fotki.com/doctordarryl/sadmodelgallery/dsc-5731.html
-
Sorry but I could not find a way to post larger pictures. Neither of the photo uploaders worked with any of my computers nor either of my browsers. When anyone lets me know how to post larger pictures, I will.
-
Here is my latest build using my latest decal set. The Safe-Way Sandblasting '41 Willys C/GS car won the '65 Winternationals. It beat a fleet of blown SBC entries and was powered by a blown Ardun-headed Ford flathead! I like odd subjects. I airbrushed Tamiya Bright Red (TS-49) over Tamiya White primer. I airbrushed Tamiya Clear (TS-13) over the decals. Lots of scratch built parts (steering, driveshaft hoop, fuel pump, fuel pump bracket, two-pot injector, and roll bar to name a few. I will also have sound when this model is displayed at shows and contests. I recorded several sound files of gassers off of several internet web sites and used AVS Audio Editor software to make a contiguous sound track (WAV file) that is a gasser starting up, idling, a few revs, idling some more, a few more revs, and finally shutting down. I currewntly have an MP3 player and speakers separate from the model but am working on building them into the display.
The decals are available on eBay and also from Scale Auto Details (see http://public.fotki....caleautodetails)
More drag racing decals are coming from Scale Auto Details. Decals for Wally Booth's ProStock Gremlin to go with the recent AMT release should be available in a month. More Willys gasser subjects are in the planing stage along with a few tri-five Chevy gassers.
-
Photobucket is a free site where you can upload and store your pictures. Once your images are on Photobucket, this is where you go for your source for copying and pasting images into forum posts, just about anywhere.
Go to www.photobucket.com and register. When you're registered, you need to click on New Album and name it. Later on, you may need to open your album on that button at the top of the page. You can create multiple albums for different subjects, but let's not go there just yet.
After that, you will see a green button that says Upload, which will show you a window to select an image from your hard drive, folder, desktop, wherever you have the image - (it needs to have been downloaded to your computer, not just on another website). Click on your selected file.
It will pretty much walk you through the process.
When the upload is completed, click on Save and Continue. It will take you to your album page where a copy of the image now resides, shown as a thumbnail.
Put your cursor on top of the thumbnail picture and a menu of fields will open below the picture; click on the bottom IMG field and it will be automatically copied (you'll see the word Copied appear).
You are now ready to paste the image into your post-- go to the line in your forum post window where you are composing and where you want to put the image, then paste it in by holding down your control key and hitting the letter v. You will see the letters and numbers of the link, not the image. Then hit Post under the window.
After you try this, and if there's a problem, go back to the Photobucket tutorial on this site to make sure you're doing it right. Again, you won't see an image in your post until AFTER you have hit the Post button under the window where you are composing your post.
There are shortcuts and other options, but this is pretty basic.
If there's still a problem, send me a PM with your phone number.
I already subscribe to Fotki. Is it possible to upload picture to the forum from Fotki?
-
What photo uploaders? From the site, or elsewhere? When in doubt, use Photobucket.
Remember, you won't see an image until after you hit the Post button.
I tried using the site's photo uploaders and neither worked. It never finishes (waited 1/2 hour for one and it was still "going"). It does not matter which browser I use they all behave the same way - no uploads.
If you review the posting you still do not see pictures?
What is Photobucket? I watched the videos on picture posting but neither helped.


Slick Willys Custom '41 Willys Roadster
in Model Cars
Posted
I also build customs. Here is a custom Willys roadster. The body was from RMR. The tires were from Modelhaus. The wheels were resin items from Scale Auto Details. The Cadillac engine was from the Revell '49 Merc kit. The paint was Bob's Candy Burgandy over Fine Silver. Headlights were from a Revell Mini kit. Tailights were turned aluminum items from Bob Dudek. The chassis was from the Revell '41 Willys street rod and lowered significantly. The body was wedge channeled over the frame to get the right rake. The front grill bar was from an AMT parts pack and was a '60 T-Bird bar that was shortened to fit tthe grill opening.