-
Posts
42 -
Joined
-
Last visited
Content Type
Profiles
Forums
Events
Gallery
Everything posted by wcbrown
-
danny, some serious modification going on here, i like it.
-
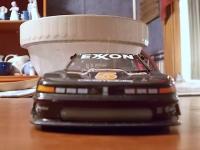
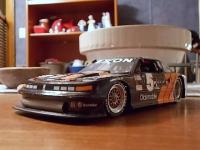
update, since i was last here i have changed a few things still not rolling like i would like to be on this, but it's coming. started the hood louvers last night and this afternoon this will take awhile using .100 half round stock, really works well. i have also re worked the splitter and rear end since my last few photo's . i really don't want to primer until i have everything i want done on this body, i KNOW i'll be using spot putty and i want to wait until then, i am trying to avoid any kind of shrinkage since the plan is for this to be a "master". it makes it kind of difficult to make out a lot of the details, for instance, some of these shots look like gaps in the body, they are not. i used the old superglue baking soda technique on some areas, the body is actually smooth as a baby's.......well, you get the idea. i did pull a bone headed move that i have since rectified, i did NOT allow for the tailights to be countersunk, doh!!! i swear for every step forward.......... i have to re-do it, so what does that amount to? 4 steps backward?? who knows, anyhow now i am getting into the fun part of this build. thanks for looking. haha i keep editing, maybe i should just sit here until everything pops into my head! i am maintaining all the IMSA regs on this thing religiously, 79" max width, 103.5 wheelbase, low and F A T !!! i am really starting to like how this thing is coming, i can't wait until i start on the wing, anybody know where i can get a clear styrene drug testing urine sample vial??? LOL that's what i used on the original, new of course, i cut it in half and then, half again and it gave me a really accurate looking curvature for the plane of that wing. i'm on the look out for some kind of styrene bottle like that.
-
this is going to be fun to watch, yum!
-
-
john.....nice projects...........s l o w, and STEADY!
-

"lumpy" eurosoft filler
wcbrown replied to wcbrown's topic in General Automotive Talk (Trucks and Cars)
it's been sealed for awhile, it's not dried out by any means, never frozen. just inactive. the "lumps" are not that big, i was just hoping maybe someone knew a more efficient way of breaking them down. they WILL blend once they are "crushed" , it's just such a pain to stir this stuff and not have it overflow the can and all over my work table! -
i have some older evercoat eurosoft and though NOT dried out it is a bit lumpy. i bought some plastic honey to thin it and that's working, i do "chop" it up before blending the hardener. i laid some on my IMSA Olds project tonight and found when i started to sand not all the filler had cured. any tips on what i can do in this situation? thanks.
-
john, i usually use a mixture of gold w/a touch of yellow, paint the spokes first, let them sit awhile. then i use a wash of thinned down flat black, and, a piece of tee shirt, dab the excess off the spokes! paint the center nut "steel"
-
i am really bad at getting this photo thing down! and to top it off, i'm in the wrong section!!! geez!
-
one of the "old" IMC 2E Chapparal's i embellished a bit.......... seems my other photos are a bit too large! uh oh i think i am breaking the rules using these size photo's, how do i make these go away? ">http:// ">http:// ">http:// ">http://
-
dave, will do!! his enthusiasm "fired" me back up!
-
good morning all! okay, okay, i'm out of my funk. especially after the email i received last night......some resin caster with the letter "Q" in the name...........
-
very, very nice danny, you have that stance "D O W N "! that is so important with these kits, low and nasty. i take it you have been around the 1:1 cars? it's amazing how really low these cars sit, pictures, tv, whatever can't capture that properly, you sure have here, again,NICE!
-
-
okay, since i last posted i have done quite a bit of work, and i am having extremely mixed emotions about it. the rear end is too high, the front clip/splitter is also a bit too high off the ground that is. i can probably correct that also, i can also correct the rear end, my problem right now is, i am not sure if this really worth pursuing............i compare this to my original and it's not even close. the problem i have there, and foolishly i thought this would be a piece of cake having already done one, the only thing is that was like 15 or 16 years ago!! i cannot believe that it has been that long................wow!! i have enclosed some new photo's of the effort i have put in so far.. i know these are rough, i have TONS of body work YET to do, i also need to replenish my supply of evercoat eurosoft. that would help. just a little burned out tonight...........
-
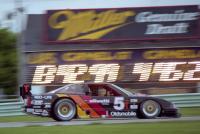
thank you dave,i know what you mean these photos are small??? i'll see what i can do there. i'll be posting more as i go. i made a MAJOR mod last night i cut the top of the hood off, after measuring, making sure to keep that radical downward slant forward. starting about 3/4 of the way above the front wheel wells. ( you can see that in the photo of the 1:1 car. i didn't do this on my original) i attached a "new" hood section from some evergreen 1mm stock after scribing a line and folding it gently to insure the shape would hold. next comes the riser and the vents!!! long night overnight tonight perhaps?!?!?! i forgot how much fun this was!!
-
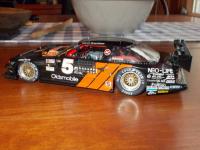
this is almost embarrassing to put up in light of shawns marvelous falcon scratchbuild. i am planning on doing this as a master i've had folks wanting to "cast" the original i did in the mid-late 90's. started with a revell. pro stock olds body and an amt nascar body. i had to widen the body 8 scale inches and the front clip 6 scale inches. also shortened the wheel base per the 1:1 car and to mate with the revell trans-am, imsa, mustang, camaro chassis. also a photo of the "rill dill" cutlass!
-

Scratch Building an Aussie Ford Falcon **New update,15/1/18**
wcbrown replied to ShawnS's topic in WIP: Model Cars
this is an absolute joy to watch unfold, AMAZING work, you sir are an artisan. -
hang in there! i know for a fact this can be frustrating, i included a picture of just such a project i got involved in years ago, NOT to hi-jack you but hopefully inspire you. it took me i know at least 3 years to finally finish it. other than the rear wheel well area (same revell mustang you started with) and the AMT nascar olds roof, the rest IS scratchbuilt. i waited a year and a half to have the decals made! STAY the COURSE it will be worth it, trust me!!! ONWARD!!!!
-
okay i am finishing up a 1988 IMSA Merkur XR4Ti master that looks like it may be picked up by a well known resin caster. my next question, because i am all of a sudden feeling really productive after getting back into this after an 8 year layoff, would there be interest for THIS if it would become available? sort of an unofficial marketing survey................

