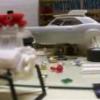
MADmodelDOCTOR Posted March 16, 2008 Posted March 16, 2008 I'll be using the Chevy II AWB chassis plate. The "purple pond". Dechromed parts. Rear spring "shackles" removed. Spring hangers will be moved forward and will use Anglia rear springs Layout of chassis parts. Engine mock-up. Next will be engine and subassemblies and getting body ready for primer. John, the tires are from Altered States Models. evil, I'm not a real doctor, but i have stayed at a Holiday Inn Express, though.
walt francis Posted March 16, 2008 Posted March 16, 2008 Off to a great start, Keep the progress coming
MADmodelDOCTOR Posted March 31, 2008 Author Posted March 31, 2008 Small update here. I'll be doing a more "high dollar" version of this type of car: BB/Altered.
MADmodelDOCTOR Posted March 31, 2008 Author Posted March 31, 2008 I'll be using the tires and rear wheels from the AWB ChevyII, front wheels from 33 Willys. I'll need to set the egine back a bit,1/4". I'll cut and modify the front frame to move the engine mounts back and scratch the front frame braces. Will need to remove "shaded" area (in 1 piece) and move back 1/4". Progress pics and maybe some primer later tonight. Thanks for looking.
MADmodelDOCTOR Posted April 1, 2008 Author Posted April 1, 2008 Engine components squared up, ready for assembly. More dechromed parts.Front wheels, also Hilborn injection and scoop. Still going. More later.
MADmodelDOCTOR Posted April 1, 2008 Author Posted April 1, 2008 Engine and parts ready for primer Wheels and tires. Well it's 59 out, guess i'll go to the garage and paint.
MADmodelDOCTOR Posted April 1, 2008 Author Posted April 1, 2008 Out to the garage for some primer. Back to the bench. Later today will be some engine painting and detailing. For now it's time to saw.
Raul_Perez Posted April 4, 2008 Posted April 4, 2008 Kenny, It looks like you're making pretty good progress! I've got to get my butt in gear on my T-Bolt and get caught up!
MADmodelDOCTOR Posted April 10, 2008 Author Posted April 10, 2008 Well after about 10 days off, i'm back. Here's a small update; The engine ste-back will take about 5 steps. Here's the first: I'm using X-acto saw and no.11 blade to remove firewall/tunnel "mock-up": Will have to trim front of fender a bit. Traction bars will be shortened some. more progress pics later. Thanks for looking.
MADmodelDOCTOR Posted April 10, 2008 Author Posted April 10, 2008 My Fotki went from trial to free.Looks like I lost my prior pics. Finally figured out how to post(different than before).
Raul_Perez Posted April 10, 2008 Posted April 10, 2008 My Fotki went from trial to free.Looks like I lost my prior pics. Finally figured out how to post(different than before). No...they're still there. Until you pay the annual fee, they just turn off the access. Once you pay the fee, the pictures all magically reappear. Been there, done that... Later,
bobcrozier Posted May 16, 2008 Posted May 16, 2008 (edited) How is it going with this one doc? Didja manage to sort out your Fotki? I only ask as being on a bit of a SS/S , A/FX kick at the moment I picked up the Warbucks version of this kit, and as I'm halfway through the Revell Tasca Thunderbolt you cant help noticing the difference in detail between the Revell and the AMT kits. I.e. the Thunderbolt has some. Its a good little SOHC in the AMT kit, and the body is good , but as for the rest(?). I'm thinking it would be a good idea to get a good donor kit for the firewall/inner fender areas and some of the interior at least. And as for the chassis....I know the original Street Freak kit was of its time!! Anyone any suggestions for a suitable '65 Mustang kit with reasonable mechanicals? Bob Oh yes I managed to pick up the Thunderbolt DVD Raul and the "Superstock - Drag racing the Family Sedan@ book too! Muscle Heaven... oh that dosen't sound right does it? Edited May 16, 2008 by bobcrozier
MADmodelDOCTOR Posted May 24, 2008 Author Posted May 24, 2008 Here's an update, will be done on time The next couple of steps off the engine setback: http://public.fotki.com/MADmodelDOCTOR/mus...908002small.jpg http://public.fotki.com/MADmodelDOCTOR/mus...908004small.jpg Here is the firewall/tunnel progress: http://public.fotki.com/MADmodelDOCTOR/mus...008010small.jpg http://public.fotki.com/MADmodelDOCTOR/mus...008016small.jpg I'll cement firewall in place , remove excess when dry. "mockup" http://public.fotki.com/MADmodelDOCTOR/mus...008014small.jpg As with the engine ,i'll be using interior parts from the Willys. More on engine, later. Thanks, Kenny
MADmodelDOCTOR Posted May 24, 2008 Author Posted May 24, 2008 Problem with pics, i guess. All pics in my Fotki. Sorry guys
MADmodelDOCTOR Posted May 26, 2008 Author Posted May 26, 2008 Test: http://public.fotki.com/MADmodelDOCTOR/mustang/051008016small.jpg
Frank Steffens Posted May 28, 2008 Posted May 28, 2008 (edited) Nice work on the Mustang so far! Edited May 28, 2008 by Frank Steffens
Speedster Posted February 6, 2010 Posted February 6, 2010 Any more done on this? Really like the project so far!
Recommended Posts
Create an account or sign in to comment
You need to be a member in order to leave a comment
Create an account
Sign up for a new account in our community. It's easy!
Register a new accountSign in
Already have an account? Sign in here.
Sign In Now