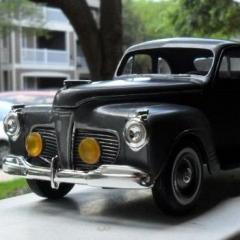
talon63 Posted February 3, 2016 Share Posted February 3, 2016 (edited) Before the end of 2015 I picked three of the Revell Streetburner 70 Challenger kits for less than 10 bucks each. The first was built to match the box art. This one I'm thinking of taking a bit farther, and the first part of that will be a grill cover. The grill work was done using .20 rod approximately 3" (75 mm) long, since I wanted light to pass through, and for the chrome and headlamps to still be visible behind it, the spacing is about .20 as well. Step 1. Building the jig. Starting with a base of tacky putty, I pressed the grill from the clip in far enough to provide the outline. Saved a lot of measuring, and gave me the points to set my corners. Placing each horizontal piece, I then alternated with standard size staples for uniform spacing. I then applied liquid glue to the verticals and placed them on. The mockup above does show the verticals under the horizontals. That was a first run through, and it made more sense to apply the verticals from the top rather than try and cement them underneath. 2. Placement Once the glue had set, I eased out of the jig with #10 blade, since I may want to use the jig again. Her's a shot of the grill laid over the front of the car. I used a marker to mark the ends of the horizontals for trimming to fit inside the setback over the headlamps and grill. That bit of rough texture visible in the picture is some of the tacky stuff that still needed to be removed. and here's a shot after trimming to fit. The top vertical was cut to fit the width of the hood opening. Cleaning and painting. I'm going black on this one. And here's another fitting after painting. Also thinking of carrying the same grill to the lower opening, but haven't decided on black or body color. Your comments are always welcome. Edited February 14, 2016 by talon63 Quote Link to comment Share on other sites More sharing options...
louie Posted February 3, 2016 Share Posted February 3, 2016 Now this is good stuff. Always exellent to see someone taking a step over and above. Talon63 , I really like what you are doing here and I especially like how you walked us though the steps to do it. Please post more when you can. Also, what a good price you paid for the 3 kits. Thanks for sharing this with us. Jeff Quote Link to comment Share on other sites More sharing options...
talon63 Posted February 3, 2016 Author Share Posted February 3, 2016 Thanks. The first kit had a really nice and straight body. The driver's side A pillar on this one has a pronounced bow, and the passenger side has a slight one. Thinking a quick dip of the roof and pillars in some 140 degree water should allow me to ease them back into position rather then hacking them out and remaking them. The shaker hood was also warped, but I had the spare from the first kit to work with. Doing some modification to that one now. Will post pics of the progress. Quote Link to comment Share on other sites More sharing options...
Roadrunner Posted February 4, 2016 Share Posted February 4, 2016 Nice start. Hard to go wrong with a '70 Challenger, at least as far as I'm concerned. Quote Link to comment Share on other sites More sharing options...
talon63 Posted February 11, 2016 Author Share Posted February 11, 2016 Small update . Most of the body is complete, working on final detailing and getting the bumpers on. Interior is progressing as is the chassis in the background, getting the engine wired and plumbed. Quote Link to comment Share on other sites More sharing options...
talon63 Posted February 13, 2016 Author Share Posted February 13, 2016 Last dry fit before final detailing. Didn't fix the front valance body lines, and still need to add the exterior chrome and side mirrors. Clean up a couple of paint errors, and clear coat. The rims are from the parts box and still need a wash to bring out the detail. Raised the back end slightly and replaced the rear tires with a pair of Racemaster slicks from the parts box. Got the side and rear glass tinted using a mix of Pledge Floor Care (Future) and Testors water-based black paint. Came out a nice smoky tint. Hope to have it under glass within the week. Thanks for looking! Quote Link to comment Share on other sites More sharing options...
GTJUNIOR Posted February 13, 2016 Share Posted February 13, 2016 Looks great. Quote Link to comment Share on other sites More sharing options...
talon63 Posted February 14, 2016 Author Share Posted February 14, 2016 Down to a few decals, one or three bits under the hood, and the side mirrors. Then it's under glass for this second of three Challenger kits. Here's a shot of the first. And here are the last few of the current project. As always, thanks for looking and for comments! Quote Link to comment Share on other sites More sharing options...
Roadrunner Posted February 14, 2016 Share Posted February 14, 2016 Here's a shot of the first. And here are the last few of the current project. Nice, real nice. Quote Link to comment Share on other sites More sharing options...
Recommended Posts
Join the conversation
You can post now and register later. If you have an account, sign in now to post with your account.
Note: Your post will require moderator approval before it will be visible.