talon63
-
Posts
269 -
Joined
-
Last visited
Content Type
Profiles
Forums
Events
Gallery
Everything posted by talon63
-
 My last WIP 40 Ford thread. Still a WIP.
 -
Thundershift 500, Need Cars
talon63 replied to fairbro's topic in General Automotive Talk (Trucks and Cars)
I had one of these, as well. Nearly any Matchbox, Hot Wheels, or Johnny Lightning car would work. If memory serves, the all around best car for this track was the Matchbox Mini Cooper. Was the least likely to be propelled off the track if you overpowered the lever. -
I can only say good things about them as well. Ordered a few kits I've been looking for and got them for right at, or just under, the current price for new kits in stores. They arrived in a timely fashion and were exactly as described on the site. Will definitely be placing another order soon, as they have some interesting subjects to add to the stash.
-
Forward opening hoods?
talon63 replied to Jon Haigwood's topic in Model Building Questions and Answers
I've not built one of these, but from the research I did, it looks like maybe two choices. On the left, a metal pin. If there is enough space forward of the grill to secure the pin to the underside of the bonnet/hood, and drill receivers into the fenders, you might be able to go this route. This one would pivot at the installation point, so clearing the headlamps when it swings up will be one of the determining factors for the pin and receiver placement. On the right, a bit of styrene with a curved angle, probably more a "U" shape. If space behind the grill/radiator support and the inner fender wells permits, you might get this method to work. This type of install would push the hood up and out, maybe making it easier to clear the grill. Again, getting it as far forward as possible will be the key to getting it to work. Personally, I'd probably use the one on the right, notching or drilling a hole in the radiator housing, attaching a stop to that end, and then attaching it to the underside of the hood. Really interested to see how you work it. Cheers!
-
Impressively detailed build and dio. Reminds me of where I grew up in SW Virginia.
-
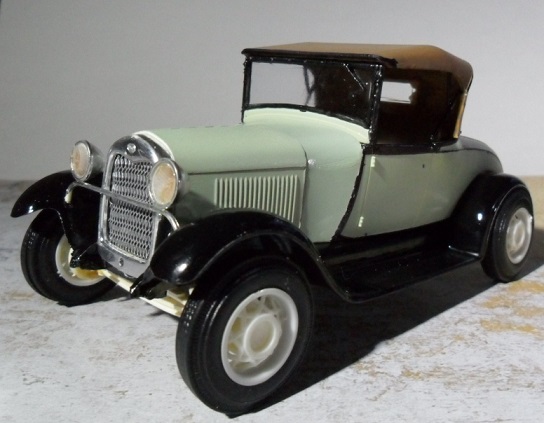
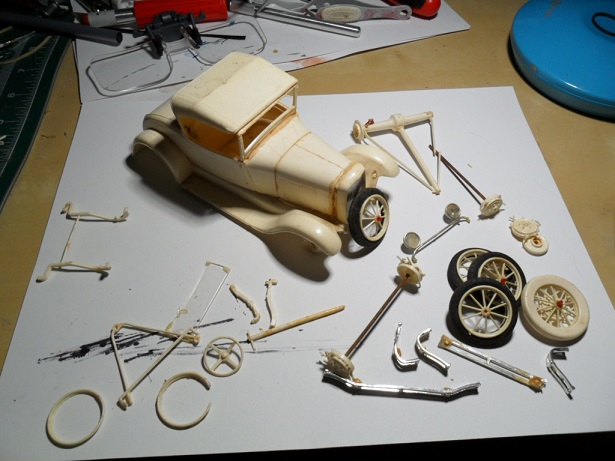
While at a the show in Houston, TX a few weeks back, I picked up a couple of glue bomb 29 Fords in a bag for $10. Kits were nearly complete with some 32 Ford spare parts in the bag. They went up on the shelf until I got bored one day and started surfing pics of 29's on the Interwebz. Found two sources of inspiration. And while not exact replicas of the above pics, I thought I might try and come close, using only things I had on-hand or fabricate myself. Basically, a dual build without spending any more than the $10 for the two cars. So here is a first glance of the WIP for this pair. First step was a quick inventory of what I had to work with. Then break them down, trying to do as little damage as possible, since I only had one other 29 kit on hand to borrow parts from. So, with the exception of breaking the springs on one of the rear ends, I was able to get everything apart except for the fenders on the yellowish one. Both kits were dirty, so that had a bath, then I got to sit down with a very sharp blade and some very small files, and clean up the aged glue. This one will be close to stock. I will be replacing the tires and rims, here it's sitting on some 32 Vicky rims and parts box tires. None of this is glued down yet. All dry-fit. Fabrication on this one will include restoring the front bumper mounts, the "rock guard" radiator cover, the original windscreen was replaced with acetate, and the side glass will be acetate as well. Making the rear view mirror and the horn from bits on-hand. Made the convertible top frame out of flat stock. Will need to fab the real tail light. Get the toght rims and tires on. I'm trying my hand at casting repaired rims, using the new rims to make molds, but using the broken pieces and fresh material to make up the rims I need to complete this build. Door handles are in the parts box, just need to dig them out. The other build, while appearing simpler, was technically harder, and required more scratch building. It's a copy of a more period correct gentleman's racer. Had to trim the fenders off of the floor, keeping the skirting that curves down over the frame. Lots of time with the back side of the 11 blade here, slowly carving those fenders off. Next up was replicating the twin Stromberg 97's (parts box) and the Speed Gems aluminum intake (scratch-built, really more like hand carved styrene). Then re-working the exhaust to something resembling the inspiration vehicle. Note, the exhaust does attach to the exhast, it's not attached to the bottom of the intake manifold. I had to scratch up the exhaust pipe bits, and it's the only support all of that horizontal exhaust has. Note that the cowl cap and the hood ornament are also scratch builds using bits-o-styrene, flat black and alclad II ALC 107 chrome paints. Rather than chop the 29 windscreen, I used a donor 32 dash from the parts box, and it had the right top edge. The front grill and shell are also parts box donors, with the small cross bar added using some very thin styrene rod. The yellow rim bits will be replaced with recasts, like the stock version above. I did try and replicate the duller, brush painted look of the inspiration car, and while it looks brush painted (color coats were sprayed, but the matte coat was brush applied) it's still a little shinier than the 1:1. So again, here they are. Two works in progress. Lots of fiddly bits, fabrication, and detailing left to do. But, as always, your feedback, criticisms, or general comments are always welcome. Happy building!
-
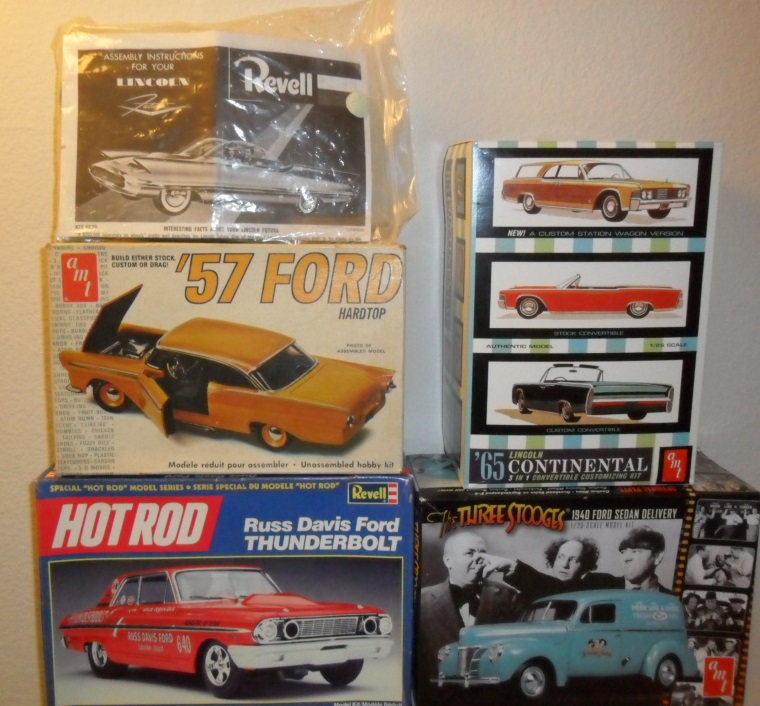
Hit the show in Houston yesterday. Acquired this small addition to the stash for about $9 per body, which I didn't consider too bad for the 57 Ford and the two Futuras I walked away with.
-
Question about aerosol paint cans?
talon63 replied to FordRodnKustom's topic in Model Building Questions and Answers
Looks like lacquer. Apparently cans will fail after a while, based on the "leaky spray can" search I did on Google. "They don't make `em like they used to" seems to be the common response. -
Classic Car model forums?
talon63 replied to Richard Bartrop's topic in General Automotive Talk (Trucks and Cars)
I wouldn't mind having a breakdown either. Just opining here, but, something like: Earliest through the Teens, - for those historical pieces 20's through 1942, - for the pre-war (from a U.S. perpective), birth of the V8, and some really well styled cars 1943 through 1964, - Post-war, the Boomer years, big chrome and tail fins 1965 - ? - The birth of the muscle car through the wretched excesses of the American land yachts and some other arbitrary date ranges to round it out. Of course that might lead to discussions like where to put a 1925 Ford that represents a late 50's hot rod build, and what about cars from outside the U.S.? Do those kind of dates jibe with what was going on automotively around the world? Also have to take into account the overhead involved in setting it up, administering it, policing it, etc. Seems easy from the outside, but I've been a site admin, and a forum admin, before. I started back in the days of the dial-up BBS, and even that took a lot of a time. So, while I might like to see more granularity in the breakdown, I'm also happy to have a forum as good as this one is, that has such knowledgeable and talented members who are more about promoting the hobby than trash-talking. As Dennis Miller used to say, "But, that's just my opinion". -
Newbie glue/bonding broken windshield support ?
talon63 replied to 428street's topic in Model Building Questions and Answers
I'd probably start with cleaning up the repair areas first. Maybe use fine grained sandpaper, or files to clean out all the old glue without tearing up too much of the surface.If the breaks are otherwise clean, and the parts in question are styrene, then I'd glue back together using model cement. Once that is set, then do any filling and sanding, and restoring of body detail, like trim, drip channel, etc. The above assumes the repair is moderately simple. If the repair areas will be hidden in the final build, then you may want to back up the repair with some sheet styrene cut to bridge the break, on the side that will be hidden. If the plastic is thick enough to drill edge on, adding styrene or metal pins would add stability and strength to the repair. As for tools to keep things aligned, alligator clips, clothespins, rubberbands, other types of clamp are all available. One neat way to custom clamp something without over- or under-stressing it is to use a rubber band with a shoelace keeper (a little spring loaded device) you put the band around the body, slide the keeper over the band until it applies enough force to hold the repair without exerting extra force. (Props to the board member who shared that tip!) Again, once you have a solid repair, then you can continue on with the putty/filler, and body line restoration. Oh, and definitely search the forum for repair examples. There are some excellent resources here. Hope this helps. -
Dawn soap (not ultra) for washing brushes, etc.
talon63 replied to GerN's topic in Tips, Tricks, and Tutorials
I've also been using cheap dish soap as a brush cleaner/conditioner for a few decades. Started when I was painting home interiors. I still have some of the original brushes I bought that long ago and the bristles are still clean and in great shape. The cheap stuff is great for water based paints. For the oil based paints, I'd clean them, usually with the "ultra" type first, then again with the cheap stuff. About the only brush maintenance I have to do is trimming off the random stray bristle to reshape them. -
Nice. The 40 I have as WIP is still being worked on. Can't wait to see what you do with yours. T.
-
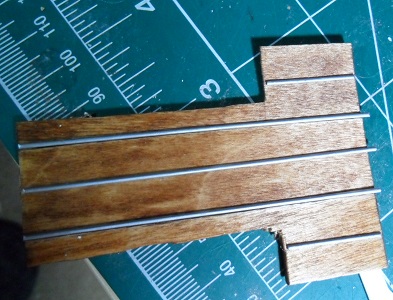
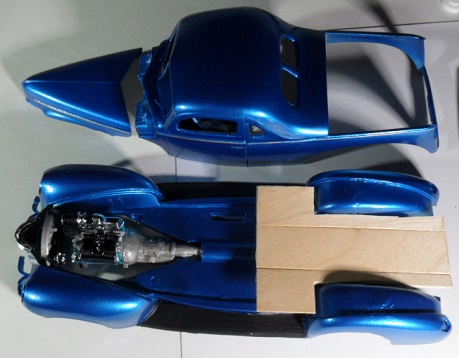
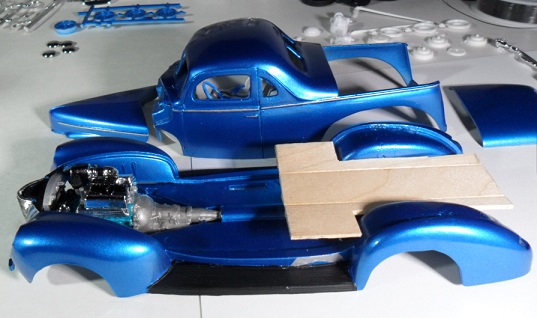
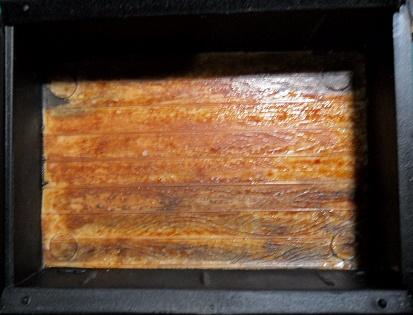
Engine nearly ready for mounting. Last shot is a dry fit, making sure the bonnet clearance is good, and it fits! Bed construction also continues...First shot is the stained and cleared wood, with the trim pieces unfinished, followed by the finished pieces being attached to the deck. And a couple of shots of it dry fit into the body. Need to create a small bit of framework forward of the wheel wells so the deck sits level. thanks for having a look, leaving comments, critiques, or suggestions. Happy Building!
-
Good to know. It did have two Goodyear 200-15 Blue Streaks. So I guess it was only missing the front tires.
-
Incredible amount of excellent work going into this. Sure to be a eye-catcher when compete.
-
small update. Engine is coming together, donor from the speedwagon that gave up the seats. Ready for wiring and plumbing and fixing the floating components. Radiator and electric fan are also the speedwagon kit. Will need to work out the exhaust system under the car as I setup the suspension. First cuts for the wood bed are going in. Will create the individual boards from the three pieces pictured, stained with furniture markers and clear-coated, then lay down some chrome strips made from styrene. Going to try and hide the tailgate hinge under the rear of the bed deck. then I can get the suspension under it and tie in a driveshaft. Still need to get the acetate cut for the glass, finalize the suspension. Hope to have it up on its feet within the next few days. thanks for having a look, leaving comments, critiques, or suggestions. Happy Building!
-
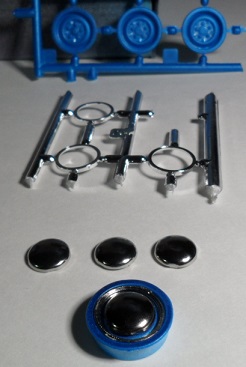
$5 flea market find. Only missing the whitewalls, everything else was still sealed in plastic. I can probably locate some whitewalls around here somewhere. lol
-
Nice repro of the 1:1!
-
Ditto. Looks darn good to me.
-
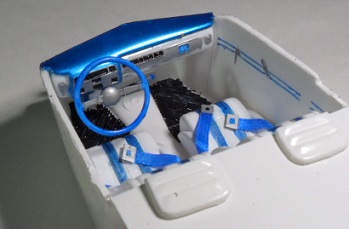
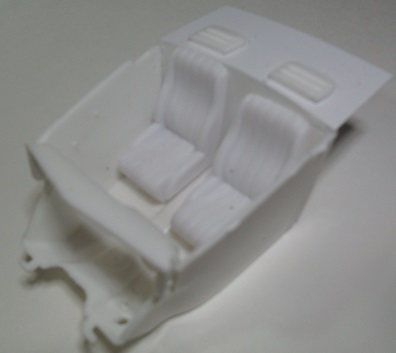
Interior shot with white, accented with body color and Blue Sharpie over Silver Sharpie. Seat belts are 1/8" white ribbon, colored with the Blue Sharpie, and bits of sheet styrene for the buckles. Off to work on the inside of the cab, give it a shot of white and get the acetate windows cut and installed so the interior bucket can be installed. thanks for having a look, leaving comments, critiques, or suggestions. Happy Building!
-
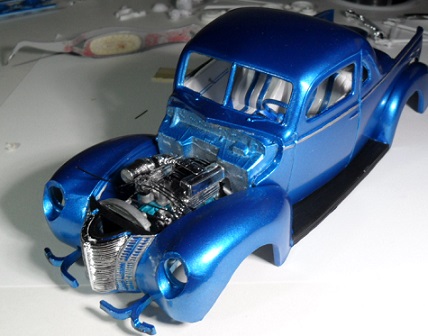
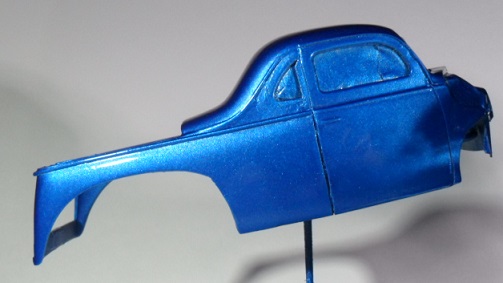
Finally, some color! Duplicolor automotive Bahama Blue Metallic over a base of Testors Silver spray. Hopefully the next set of shots will look better than these. Got those side windows opened back up. new styrene was added on the rear quarters for the chrome trim. Those rear fenders came out better than the photo shows. Actually, they came out better then I expected, considering this may be first time I've ever attempted a fender stretch. Tonneau, dash and bonnet. I ended up adding styrene for the hood chrome down the sides, the casting on the kit was so light it only really provided nice guidelines for placement. Not married to the wheels. May end up with stock dog diishes instead of what is pictured. May just lose the chrome ring. May end up with 5 spokes. As I get the chassis in order I'll see what works better. So, while the color is curing so I can get to the clear coat, off to finish up the interior, and get the mechanicals going. thanks for having a look, leaving comments, critiques, or suggestions. Happy Building!
-
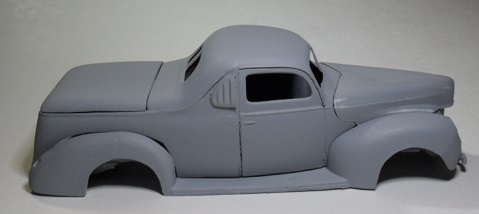
Thanks, Tom. No worries. I do appreciate the feedback. As a matter of fact, the louvers are already gone. As I was sorting out other bits of body work, my eye kept getting to drawn to how heavy they looked and how little they did for the look of the vehicle. So, off they came. Cleaned up the area and got the side trim back on it. Goal for the weekend is to have color on it. Settled on a Bahama Blue Metallic over a silver base coat. Despite the challenges involved in this build, I'm thinking about doing an unchopped flower car as well. I figure it will take two coupes and a delivery to form the coachworks, based on the reference pics., and a healthy frame extension. Maybe just one coupe and a delivery, depends on the delivery's door panels. Anyway, thanks for taking the time to look, and for the critique.
-
While this isn't a steering wheel, I use the same method to create a wood finish on those as well. I lay down a base of tan or other light color, then apply darker color with furniture touch-up markers. There is no clear coat applied to this, it's how the markers dry. This one has been slightly weathered using a dab of flat black and knocking off some of the shine.
-
Another classy and beautiful build, Tulio.
-
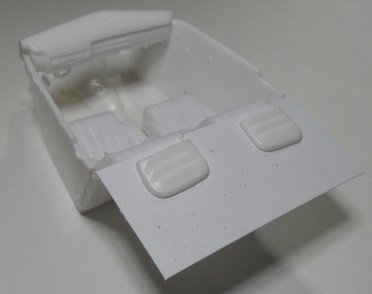
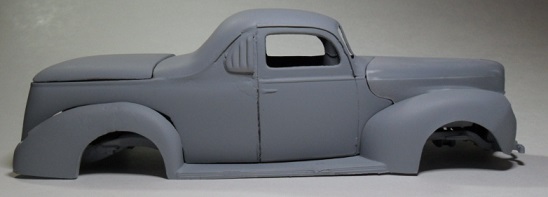
Most of the major body issue addressed now. Added louvers to the side lights. Finally got everything under a primer, some minor tweaking and sanding. Small spot on the rear fender needs a skim and sand, then hope to get a silver base coat on her as decide the final body color. Yellow? Red? Purple? Started the mock-up of the tub.removed a wedge from the bucket, 1" at the floor pan, .75" at the top, and reattached the back panel. Then created a package deck from a piece of sheet styrene. Seats are from the Dan Fink Speedwagon. The bits on the package deck are the pieces left over from trimming down the window louvers for the sidelights. Interior will likely be white, with some details picked out in the body color to tie it together. Not going crazy on the interior detailing since it will be mostly hidden by the coachwork. Got the panels re-scribed on the body, and still need to replace some side trim and minor tweaks to the drip rail. Pretty happy that the seam in the roof cut is approaching invisible now. Tailgate fabrication is under way, and have started bringing together the parts for suspension and drive train. Totally building this one backwards from my normal process, since I usually start with the engine and motor on through through the build like I'm following kit instructions. This time, started with the body and working my way in. Thanks for following along, and for the comments, critiques, and suggestions. Happy Building!