talon63
-
Posts
269 -
Joined
-
Last visited
Content Type
Profiles
Forums
Events
Gallery
Everything posted by talon63
-
Resin Alternatives for Small Molds
talon63 replied to Snake45's topic in Model Building Questions and Answers
Glad I could help. I should probably try to post pics of some of the successes and failures I've had, along with how they were done. May prove useful to some to avoid some of the problems I've run into. -
Interior upholstery pattern decals
talon63 replied to gtx6970's topic in Model Building Questions and Answers
Craft tape, in the scrapbooker section of most big box hobby/craft stores, does pretty good. Lots of patterns and designs. Here is an example: Width off the roll is almost perfect for seats. If it doesn't adhere well enough, any liquid glue will help keep it in place, or a coating of dull coat.
-
Resin Alternatives for Small Molds
talon63 replied to Snake45's topic in Model Building Questions and Answers
How about hot glue? - too flexible, might be good for tires, but as a casting agent, doesn't "cure" hard enough for most applications. Also doesn't detail out well on larger casts, unless you can up the pressure to make it really inject into the mold. What about melting styrene sprue in something like a large spoon and pouring that in? I use a very small BBQ Sauce pot made of stainless steel and a Candle warmer. Candle warmer surface temp breaks 300 degrees f. Melts most plastics beautifully, just don't let it sit too long, it will develop air bubbles. You can reach a pretty liquid consistency and either pour from the pot or inject small amounts with a syringe. Clean up is fairly easy, let the melted material set up again and pops out of the melting pot, and even out of the syringe body with very little effort. For very small amounts of casting material I make a crucible out of tin foil, melt what I need, and toss it when I'm done. I've played with those melting beads that dioramists use to make water. (Woodland Scenics E-Z Water) It melts quickly, dries plenty hard and can be done in very small amounts. Also, it's mostly clear. There's also a plastic medium that you are supposed to put in hot water, when it turns clear you mold it, and let it sit until it turns white again. (UtilePlast) Lower melting point than sprue. I just melt it without the water, using the candle warmer method. Fill the mold and when it turns white, pop it out. Pretty good results with it, not as hard as the "water" beads mentioned above, but harder than hot glue when cured. Finally, I just started playing with a 3Doodler, 3D pen as a mold "injector". First attempts on very small parts are promising and PLA is cheap enough. Largest mold I've attempted so far is a transmission in two halves. Not that pretty, but better than a hot glue gun due to the forced feed of the 3D pen. Emblems come out OK, but may require a bit of trimming depending on heavy handed you are in filling the mold. -
AMT Piranha Super Spy Car -minor update 1/7/17
talon63 replied to talon63's topic in WIP: Model Cars
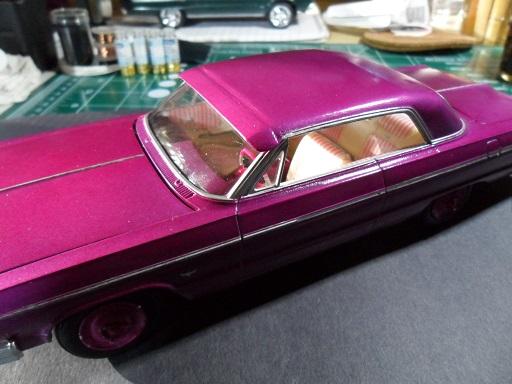
First up, hinging the rear flaps for the countermeasures. Still a bit to do, but hope to have the mechanics sorted soon. Passenger seat hinge. plenty of space to drill and use more material than may have been required, but shimming the front of the seat allows for the very front edge of the seat to be glued to the rod, as seen here. with the rod remaining out of site once everything is set. The slight forward movement of the seat to accommodate the hinge is virtually invisible. another angle of the seat rotated up for access to the compartment behind the seat, where the battery will be installed. Quick and dirty cast of a battery, and here, nearly ready for install. Started work on the engine, getting the improved details added. Created one of the operating bits on the dash, hinging the "glove box" cover. carefully drilled and inserted styrene rod, glued with a gel superglue. Still needs to be painted. here it is open. Once it's painted, it will be invisible based on the dash placement in the car. There is a slight bow to the hinge which allows it to move freely without binding, yet doesn't kick the cover out. Still need to give the woodwork a light sanding and a mild lightening wash, the wood still looks a little dark and a bit too shiny. Next up will be weapons cover/bullet shield hinging.... this one is proving a bit trickier due to the location and somewhat close tolerances, and more work on the dash.
-
3D printing question
talon63 replied to Psychographic's topic in General Automotive Talk (Trucks and Cars)
As someone who is about to add a 3D printer to the bench, this link, https://all3dp.com/best-3d-printing-software-tools/ was useful. One caveat, 3DTin is no longer available. Also, if you don't already have the printer, check the compatibility for the hardware you thinking of acquiring. You may need two pieces of software, one to create 3D models in, and another to be the slicer and print host. -
AMT Piranha Super Spy Car -minor update 1/7/17
talon63 replied to talon63's topic in WIP: Model Cars
I've seen them. Will probably just make my own along with the two pieces that go under the rear bonnet for airflow. Already sketched out in styrene along with the build up for a rear view mirror that hangs below the laser. -
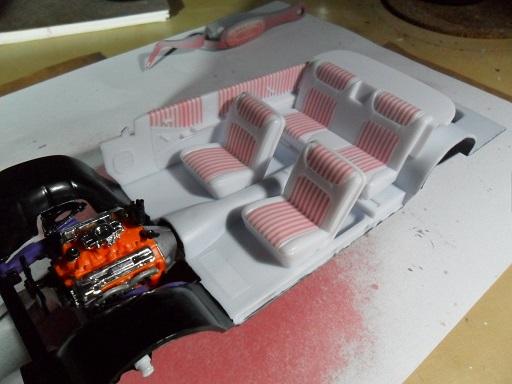
Picked a couple of these on clearance at HL for about third of retail. Was gonna put them on the shelf, but after doing a little research, and locating some useful information, decided to build one of them out as the second iteration of the car. That meant first swapping most of the motor with the one from the AMT 1969 Corvair. This one will end up as the quad-carb version, not putting the turbos in it. The bottom pan will be Silver. The top a medium metallic blue. Note the hole in back of where the passenger seat goes. Also chopped out in the same area in the floor pan/engine bay piece.. The passenger seat will be hinged along it's front edge, and a battery will be inside that space. Here's the first rough out of the dash and steering wheel. Didn't realize just how rough the original surface was until it got some color on it. Will be addressing that to smooth it out somewhat, and finish detailing the steering wheel to better match the one in the second version of the car. Steering wheel is also from the 1969 Corvair kit. My goal with this is to rework the center console piece and the "control panel" cover to both be "functional" by making the center able to rotate to display the communications face and hinging the Control Panel cover. Among other plans for this build: 1. Re-hinging the gull-wings. 2. Making the two panels above the taillights functional. 3. Relocating the parachute to behind the rear license plate space. 4. Making the cover for the weapons storage functional. 5. Maybe attempt to duplicate the headlamps, and make the covers removable. (Need to check my stock on Bic pen caps, lol) 6. Pose-able steering, although that may be a reach. As always, thanks for looking, and happy building!
-
Circut or other scrapbooking tools
talon63 replied to iBorg's topic in General Automotive Talk (Trucks and Cars)
Ditto the above. I also have the Cameo. Used it twice. Found it was faster to lay out and cut the styrene by hand. Given the drop in price on 3D printers, looking to add that to the space where the cameo now sits. -
Welcome, (almost) neighbor! Look forward to seeing some of your projects.
-
Opening a mechanical HDD outside of a dust-free (like seriously clean room dust-free) environment would be the end of the drive. This one of those things where there are truly no user serviceable parts inside. I will say I've had about 50/50 luck with putting an old HDD in a ziplock and sticking it in the freezer overnight. You have to act fast when you take it out, and it's a one-shot deal, but if you can get it slaved and it fires up, it may last long enough to copy everything to another drive. After that, it's toast.
-
Ditto this. I work in IT, and the vast majority of people can't troubleshoot simple computer or network problems, but they can drone on for hours about playing games and frame rates. BTW, I was the kid who disassembled everything, and restored it to working condition, with no spare parts. It's still my first inclination when I acquire new things. Need to know how it works, even if I'm not the one who is going to fix it.
-
Most 1:24/1:25 bodies will fit in an Oxyclean or similar tub. I keep Purple Power in that. Drop in parts, put the lid on and let it sit until the paint/chrome dissolves. I don't know why you are warming it though. Fumes shouldn't be a concern, and parts have been left in it for months with no ill effects. some off brand rattle can paints may take days to finally soak off, but most chrome will dissolve in less than a minute.
-
Your Rarest Built Kit.
talon63 replied to StevenGuthmiller's topic in General Automotive Talk (Trucks and Cars)
This is a stunning example, and the one car I couldn't have enough versions of. My dad owned two 1:1's, one a convertible, the other was a former North Carolina government vehicle with the Interceptor engine. I've been wanting to do a tribute build of them for a long time. -
I stand corrected, I found one on Amazon at a good price. Confused it with the small pile of HL acquisitions in the same week.
-
I've also located these eye-loop pins at hobby/craft stores that make good tie rods and links for drag arms.
-
Hmmm, I just picked one up in a Hobby Lobby less than 10 days ago.
-
Man From Uncle car
talon63 replied to Psychographic's topic in General Automotive Talk (Trucks and Cars)
Odd, works for me. http://www.c-we.com/piranha/index.htm is the root page, also still loads for me. -
Making windows, clear styrene sheet or acetate?
talon63 replied to crowe-t's topic in Tips, Tricks, and Tutorials
It's probably the same device, surface area seems the same. I found it as a candle warmer for less than 10 bucks, and the little stainless pot and bbq brush set was around 7. For really small amounts I've fashioned little cups out of heavy duty tin foil with good results. -
Man From Uncle car
talon63 replied to Psychographic's topic in General Automotive Talk (Trucks and Cars)
The real car was powered by a Corvair engine, the engine in the AMT 69 Corvair kit is a better representation (I have one of these "Piranha Spy Cars" on the bench right now, and am swapping out certain parts to match the second version of the MFU car). The original 1:1 was not turbo, but did have the standard exhaust and a bypass for the exhaust ports located in front of the tail lights on the sides. FWIW, Nick Whitlow has a tutorial on this kit on another board, and this site, http://www.c-we.com/piranha/UNCLEcar.htm, has some pretty good pics of the second iteration. -
Making windows, clear styrene sheet or acetate?
talon63 replied to crowe-t's topic in Tips, Tricks, and Tutorials
I use an electric candle warmer. The surface can get up to 280 f, but it comes in handy for either melting small amounts of styrene (in a little pot I picked up in a BBQ kit) or for softening, I use a frame made from wire, lay the plastic over it suspended a bit above the surface and wait for the sag to start. -
Any good hobby shops in Houston?
talon63 replied to ismaelg's topic in General Automotive Talk (Trucks and Cars)
Randy's Hobbies4.3 (38) · Hobby StoreCompact, well-stocked hobby shop that sells equipment for remote-controlled cars, boats & planes.18706 TX-249(281) 469-7000 And there's a Michael's across from Willowbrook Mall on FM 1960 near the junction of 249. Other wise, not much else in that vicinity that I'm aware of. Very few LHS left in metro-Houston these days. -
Newbie with 1:32 scale question?
talon63 replied to Deuce Coupe's topic in Welcome! Introduce Yourself
Welcome to the Forum. I also have a small fleet of the Lindberg 1:32 scale vehicles like these from earlier posts on the board: Very few of the Lindberg kits are full detail, and I've not had much luck in the aftermarket arena for parts. With a little patience, you might try making your own. I've had some luck sourcing parts from flea market/yard sale finds, or just making parts myself. You might also try looking in the Aftermarket or posting in the Wanted sections of the forum. -
Is it me, or would the 69 Corvair look a little better with a few BMW E9 styling cues?
-
https://youtu.be/pzDz2lu0Z6s not the best quality, but you might catch a glimpse of something useful. Colour film from the 1960 season. The 1960 Daytona race was historic for a few reasons. It was the first ever televised race (CBS). As the link shows, it had possibly the largest ever Nascar crash. It was also marked as the slowest Nascar race. I do wish you luck in finding a color reference for your build.
-
After a frustrating day at the dealership with my 1:1, I stopped by a big box store (initals HL), and picked up 3 AMT Lil' Hot Dogger kits, 2 Piranha Spy Car kits, a "23" T Delivery Wagon and 3 sets of AMT Custom Slicks from the clearance aisle for a mere $70 USD. Now to find time to do something with it all.