talon63
-
Posts
269 -
Joined
-
Last visited
Content Type
Profiles
Forums
Events
Gallery
Everything posted by talon63
-
Challenge Accepted The Nissan Kluje. Not to say its better, but it would blend into the crowd more.
-
The 1962 Starfire Before After Never liked that odd double-fender look, and to me, too much side trim.

-
I opted to go a different route, getting rid of the "fastbast" look, going for a more traditional sedan styling. Also modded the rear quarter wheel opening slightly.
-
Here's a bit more of the cleanup. Someone posted in the OT about the roofline looking mid-90's Caprice. It was actually borrowed from a 2017 Ford. I do agree with other comments, especially regarding the pillars and the skirting. Converting this from pixels to plastic might be fun.
-
Along the same lines, If you want to play with design, and don't want to invest in the full version of PS, which can get pricey for some people, there is an alternative. GIMP is free, open source, software that provides a lot of the same functionality, supports many of the same plug-ins and effects, and reduces the learning curve. I've used both over the years, and since I no longer need to do "professional" illustration, I use GIMP. While I'm nowhere near as skilled as Harry P., I do find that I can often do "down and dirty" modifications in minutes. Blank canvas work does take a bit longer, and I will use a tablet rather than relying just a trackball.
-
I, for one, like the idea of this thread. Be a good place to display some of the ideas I have, and receive advice about corrections before I start cutting real material.
-
 Been away for a bit, doing career stuff and helping out on an Indie film project, but it's time to start building again. Was thinking of doing an update to the look of the `58 T-bird, so here's a rough rendering. Still first stages of concept. Have to re-align the door or the pillar, haven't decided which yet. Hardest part may be the headlamps, of which, only the passenger side have been added at this time. As always, comments are encouraged and welcomed.
-
Compliments on posted models
talon63 replied to Repstock's topic in General Automotive Talk (Trucks and Cars)
As has been stated by many here, I also welcome feedback on my efforts, positive or negative. I know many may not be interested in my subject for a project, but I'm always open to improving technique and overall build quality. I appreciate that I don't need to exist in a bubble, and have found this forum to be extremely useful in improving every aspect of my work, from prep to final display. Sure it's easy to let a comment, or lack thereof, get under the skin, but at the end of the day, I'm mostly building for my own relaxation and enjoyment. If someone likes a particular detail I create, or thinks something just doesn't work, let me know. If I pull off something neat, and you want to know how I did it, I'll be happy to share. I certainly wouldn't hesitate to do the same. It's how we, as a community, grow and improve together. -
INSPIRED THINKING- Cheap Tips for Frugal Modelers
talon63 replied to 62rebel's topic in Tips, Tricks, and Tutorials
As noted in my thread, http://www.modelcarsmag.com/forums/topic/114429-lindberg-1934-roadster-wip/ , I repurpose all sorts of items. The referenced link even shows what you can do with a Bic pen cap. Quick and easy window tinting can be made using a tiny drop of food coloring in a bit of Future (Pledge Floor Care, clear acrylic coating). Even works to tint chrome. A little more food coloring and you can do your lens colors for tail lights, markers, turn signals. The cheap craft paints that dry flat and a bit powdery? I mix with Future as well. I can vary the mix slightly to get a semi- or gloss finish, and it doesn't rub off with a finger. I find it most useful for doing interiors. Adhesive backed moleskin padding (like you would use in your shoe where it rubs) makes pretty good carpeted floor mats, I color them with sharpies, easy to cut to fit. Might even work under the hood. I've used the pantyhose trick, but I got an even better deal from a clearance bin on fabric book covers. I have a few in the parts bin, and one on the bench to experiment with making a ragtop. Based on the fairly good results I got from using paper to make a ragtop for one build, I'm going to try something similar ( using less water) to form and stiffen the fabric into the right shape. I look for potential in almost everything, to see what detail it can add to a project. And while I do support my LHS, there are things they just don't carry. -
Thanks, some of my friends IRL are amazed at some of the things I keep in the parts bins. Old ink pens provide a lot of things that can be something else. The plastic pull tabs from half gallon milk and juice cartons become air cleaners, hub caps, parts of body detail, or even, for those who have seen the thread about 31 Ford Steamer I have on the bench, the top of a boiler. Using heat shrink tubing to fashion rubber coated parts, or drawn out over stiff wire to make more realistic hoses. Sometimes, even mistakes get a second life. A poorly cast engine wasn't thrown out. Painted it up, then added the appropriate grunge, cut wires, hoses and tubing, and it will sit in a garage dio project I'm working on as the "pulled" engine and transmission for a resto scene. I know there have been conversations on this forum about some of things that we use in our hobby, and I'm always happy to share some of the little things I use. I guess I just have an eye for seeing the potential in unrelated items, and just enough skill to convert them into something useful.
-
Another Pledge with Future Question
talon63 replied to StevenGuthmiller's topic in General Automotive Talk (Trucks and Cars)
Sears Hardware Store, and most of the big box hardware chains will also stock it. I picked mine up at Sears Hardware and it wasn't that expensive, as I recall. I also agree with the airbrush application issue. I've never used cotton balls to apply it, but I have used 1" or larger sponge brushes, and even large, natural bristle craft brushes. I also use the paper towel for wicking away excess. It also makes a good sealer for "glass" and chrome parts to cut down on fingerprints. -
This showed up in my mailbox this week. My dad ran across it, NIB, at a discount store on the east coast, and picked it up for less than $12. It had been on my wish list, and Amazon currently has them for $55+. The customization possibilities are endless, and I'm really looking forward to getting into this kit.
-
Great work. I like this a lot. Look forward to seeing more progress.
-
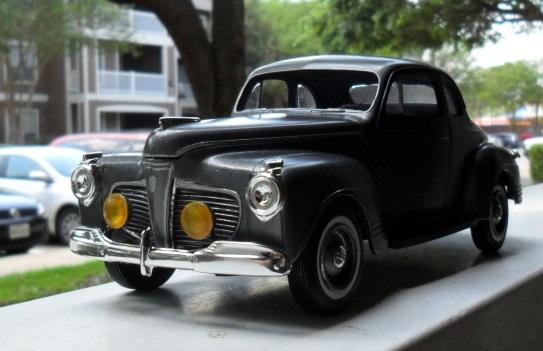
This is the Lindberg 1934 Roadster Pickup kit, with the Jim Stein builds on the box. I'm making a few changes to it. Above are some parts from the parts bin, to make a few modifications to this kit. And, yes, those are Bic pen caps along the top edge. More about those later. Swapped out the kit firewall for a larger one, since I set the body a bit farther back on the frame, and lowered it slightly. Firewall got covered in foil, and will have additional detail added as the build progresses. The engine, just sitting in place for the pics, has quite a few modifications, including making pulleys, and using a small black rubber band for the belt. Also added the door handles to the body. The finish is Duplicolor Universal Black Metallic BUN0900. I like it because the metallic aspect is very fine, That's capped with Pledge Floor Care, giving it a good gloss. The tires are from the parts box, and the rims are from the Lindberg 34 Ford Pickup 3n1 kit. This pic was taken before the matte coat was applied to the tires to make them less shiny. Interior will stay white, with some foil details. The tailgate is also a donor part from the 34 3n1 kit, with the molded chains carefully removed. Here I've installed real chain as close to scale as I could find at the big box store. Still working out the design of the tail lights for this one. And now, about those pen caps. The kit headlamps were the OK standard bowl shape, but I felt like this build deserved a bit more. Enter the BIC pen cap. The size of the lens and chrome trim ring dictated where i needed to cut the cap, and the extra length appears to work out nicely. Probably have a couple of more weeks on this one, with the wiring and plumbing, finishing the firewall detail, scrath-building the customer windscreen and frame, taillights, and maybe one or two more details. As always, your comments are welcome and appreciated. Keep on building!
-
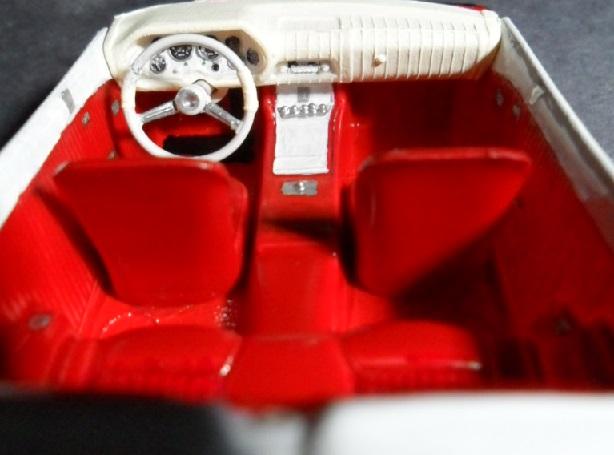
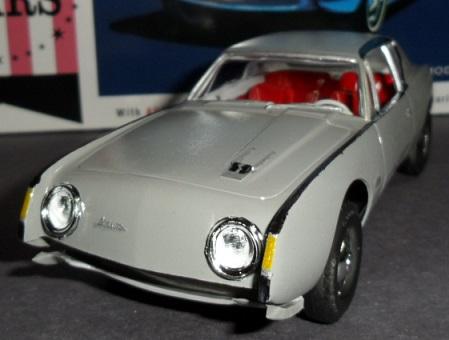
Thanks for the comments. Mine was also a clearance item from HL, The kit itself was in good shape. A bit more flash than I'd hoped for, but easy to clean up and knock down the mold lines. Other than the console missing the shifter, a good chance of demolishing the front turn signals while cleaning up the body, and rear light lenses, the kit itself isn't that bad. It even come with a spare front valance panel on the sprue. Good thing back up lights were an option in 1963, since this one doesn't have them without some re-work, and the rear lights don't seem to match up with any reference photo I've found. I'm on the hunt now for the larger scale versions. As a kid, this was one of my favorite car designs. Kind of like a kids drawing of the Aston Martin DB5, and more attainable. While it may be an odd looking car, I remember the Avanti badge being brought back in the 80's. Same basic car, with all the 80's dreck, and the design held up well for being nearly 25 years old, especially when held up next to what was being churned out by the big auto manufacturers. I've always waned to put that Avanti front end on an 87/88 Mustang convertible. It's a shame that Studebaker was on it's last legs when this car came out, with the last Avanti being built in November 63 and badged as a 64. Look forward to seeing what you do with yours when you get it built.
-
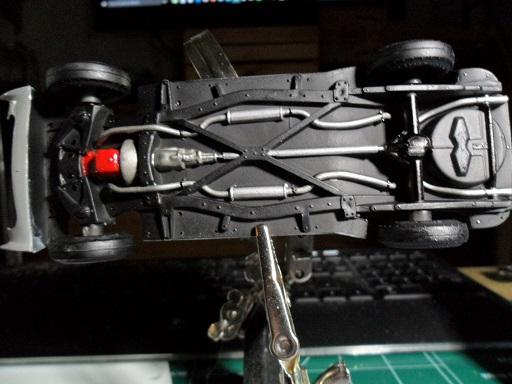
While this progresses, I took a little breather to start the fifth of six 1:32 kits I picked up. This time it's the Studebaker Avanti Sports Coupe. Just few pics of the work in progress. Still a few details to sort out, and exterior chrome to get fitted. As always, comments welcome, and thanks for looking!
-
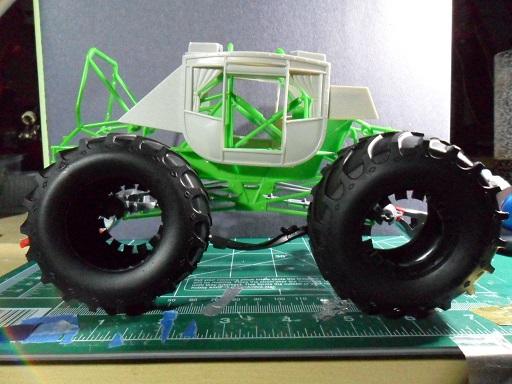
The Wild West Express
talon63 replied to talon63's topic in WIP: Model Trucks: Pickups, Vans, SUVs, Light Commercial
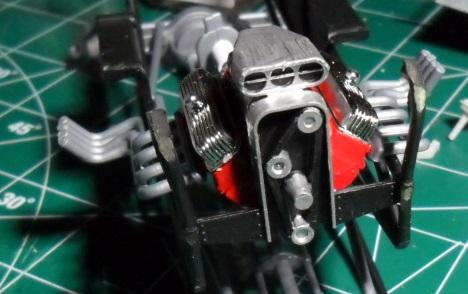
Small update. Drive train coming together. ready for plumbing and wiring. And the first pass at the body finish. Still have a lot of tube frame to complete, and the interior, roof, cockpit and a scratch built trunk to hide the gas tank for the back. Thanks for looking.
-
How did we manage to survive?
talon63 replied to Harry P.'s topic in General Automotive Talk (Trucks and Cars)
Ditto and Ditto. When I hit driving age, I wasn't allowed to begin operating a car until I could perform basic roadside repairs. My solution? First car came out of a junk yard, and in the months leading up to my age to get a learners, I turned a 60 Bel Air into a road worthy machine. Power steering, no power brakes. No seat belts, they were still an option in 1960. No AC. Big STEEL, unpadded dash with all sorts of equally hard or sharp bits sticking out. 283 with a two-speed. Then I learned to drive in it. Every kind of weather, day and night. Over the years I've owned mostly manual shift convertibles. I like cars that make you interact with the actual driving. I was fortunate enough to have an instructor that didn't teach me how to drive. He taught me how control an automobile, and how to regain control when it all goes sideways. It has paid off several times, when those learned skills kicked in during situations that could have resulted in serious damage to the car or even myself. Very little beats the feeling of being one with the machine. A fully automatic, climate-controlled, entertainment center on wheels provides too much distraction to today's attention deficit driver. Make it self-driving, and may as well just be forced into using mass transit. -
Nice builds, really like the subjects!
-
The Wild West Express
talon63 replied to talon63's topic in WIP: Model Trucks: Pickups, Vans, SUVs, Light Commercial
Rough Sketch of the direction this should be heading in. And the chopping has begun. I see a future full of styrene rod, tubing, and sheet cutting to complete the chassis and modify the coachworks into the vision. Still deciding on color schemes and the power plant for this beast. Back to work now.
-
So I picked up a Raider's Coach kit on the cheap, because I wanted the Pontiac Big blocks and the GTO grill for a couple of other projects. I'm turning the the rest of the drive unit into a two-seater concept. But, what to do with the rest of the kit. I did some searching and found the kit had been used to build a couple of other things, mostly rail dragsters. After thinking it over for a bit, it came to me. Stage coaches were off-road vehicles, why not use the body, and a monster truck chassis. I lucked into a monster truck kit for under $10, and the vision gelled. So here is the first pic, just to give an idea of where this will be going, after a lot of modification and scratch building to make the tube frame workable and come up over the drivers' seat, which will still be up front on the coach. And now, off to do some drawings of the tube frame to see if the one I have will work with mods, or if I need to start cutting tubes for the scratch build and decide on a fitting finish for The Wild West Express. Thanks for looking, and as always, comments are encouraged.
-
as I see it, looks they simulated or used the first 6-8 inches of the front fenders with a filler piece in the center to create the radiator surround.
-
Ah, that looks like the mid-60's Ford Coppertone colour my dad had on his Comet. Emberglow Poly might be the shade. It's bit copper-y and orange-y.
-
Can you look up the actual braided hose you are looking to replicate? It's much easier to scale it from actual dimensions. My cursory search didn't turn up much, but there is another one that is detailed like that on this board. As for plug boots, I make mine from 1/16 or 3/32 heat shrink tube. I have a pieces of piano wire in various diameters to match plugs, pull the heat shrink over the wire, apply heat, and draw out until you have a pretty good length of hollow tubing. Then cut off little pieces to make the boots. One 4 inch piece of shrink tube will give you dozens of boots. They come in packs of 8 at big box hardware stores for a couple of bucks.
-
These DO look like carnival bumper cars


.jpg.657225533835ef2389c2656db68f9f19.jpg)
.jpg.a7dce977cc76ca29c0ac29b5261006db.jpg)