talon63
-
Posts
269 -
Joined
-
Last visited
Content Type
Profiles
Forums
Events
Gallery
Everything posted by talon63
-
What do you get when take the frame and front suspension from the AMT L'il Hot Dogger, the engine block/trans, intake maniold, carb and rear end from the Raiders Coach, the AMT 23 T Racing body, rims from the Monogram 31 Ford A, some parts bin tires, a can of Rustoleum Gloss Seaside paint, and a couple of plastic spoons? Well, here's the first dry mockup. Haven't picked any of the interior components yet, or most of the engine detail, but I do see a couple surf boards getting involved in this one. Thanks for looking!

-
A lot of recent network TV shows that have featured vehicles to great degree have always been about "placement". They work in a description of some gadgetry or feature while driving. NCIS, for sure had some placement spots.
-
Jim Rockford's 78 Firebird Beverly Hillbilly's Reo truck - @ gtx6970, I was typing the list when you posted @ Snake, Fred Sanfords' truck was a 51 Ford F150 Perry Mason's 1958 Ford Fairlane 500 Skyliner convertible. Jaguar Mk2, Inspector Morse 1968 Pontiac GTO from The Republic of Doyle AMT Piranha from The Man from U.N.C.L.E. 1953 Ford Crestline Sunliner from Happy Days Ralph's 29 Ford Roadster/Pickup from Happy Days 64 Peugot convertible from Columbo
-
Another Ebay Comedy
talon63 replied to StevenGuthmiller's topic in General Automotive Talk (Trucks and Cars)
Iguana? -
Testors Turn Signal Amber, Stop Light Red. Sharpies in Red Yellow and Orange, I use the various blues and greens on dashboards. Food Coloring mixed into Pledge with Floor Care (Future Floor Wax) also works. Even used it for tinting windows. Elmer's Clear with food coloring also works.
-
Guitar color question.
talon63 replied to oldscool's topic in General Automotive Talk (Trucks and Cars)
Yeah, the link breaks down which years and MFGs were using which colors when and also give you the paint codes Fender's Original Custom ColorsColorPaint TypeOrg. Dupont NumberOrg. Ditzler/ PPG NumberReplacement Dupont#Fender YearsCar YearsCar MakeLake Placid Blue metallicLucite2876-L11711882-91242L60-7358CadillacDaphne BlueDuco280412742246-9199960-6558CadillacShoreline Gold metallicLucite2935-L21722882-92654L60-6559-60Pontiac #WA2553Olympic WhiteLucite2818-L8144886-92227L60-8058-62CadillacBurgundy Mist metallicLucite2936-L50536882-92697L60-6559OldsmobileInca Silver metallicLucite2436-L31425882-56303L60-6557-59Chevy Corvette #WA2608Fiesta RedDuco2219-H70618246-59548H 93-59548Z60-6956Ford Tbird #M0530Dakota RedDuco2590-H70757246-90723H60-6958CadillacBlue Ice metallicLucite4692L12164181-9754765-6965-66Ford #M1269Firemist Silver metallicLucite4576L12883 65-7164Cadillac #WA3263Firemist Gold metallicLucite4579L22422 65-7164-65Cadillac #WA3264Charcoal Frost metallicLucite4618L32390181-9733465-6965-66Lincoln #M1744Ocean Turquoise metallicLucite4607L12893181-9732365-7165Mercury #M1731Teal Green metallicLucite4297L11921882-83482L 181-1700865-6965-68Lincoln #M1070BlackDuco17119000 60-84all yrsall makesSonic BlueDuco229511475246-5959360-7256CadillacShell PinkDuco23712110893-59842 246-5984260-6356DesotoFoam GreenDuco225341940246-5923460-6956BuickSurf GreenDuco24614206893-9014760-6557ChevySherwood Green metallicDuco2526-H42038202-90844H 181-1517060-6557Mercury #M0760Candy Apple Redn/anonenonenone63-73n/an/aColorPaint TypeOrg. Dupont NumberOrg. Ditzler/ PPG NumberReplacement Dupont#Fender YearsCar YearsCar Make -
Guitar color question.
talon63 replied to oldscool's topic in General Automotive Talk (Trucks and Cars)
http://www.guitarhq.com/fenderc.html Should help explain it. Fender colors are based on car colors. To understand Fender custom colors you have to know what the colors are based on. The answer, of course, is automobiles. Cars in the United States had more social influence than just about anything at the time (even more than Elvis). Fender's only in-house paint mixes during the 50's and 60's were Sunburst and Blond (and Candy Apple Red to a point: more on this color later). All other colors originated directly from the cars of the time, and most of these colors were from General Motor's cars. -
It does indeed look like a locomotive supercharger.
-
AMT Piranha Super Spy Car -minor update 1/7/17
talon63 replied to talon63's topic in WIP: Model Cars
Thanks, Carl. I passed it up several times, but Hobby Lobby put them on clearance in December for around 10 bucks, so I picked up two of them. As soon as I started looking at reference pics and looked over the assembly instructions, I grabbed a pen and started doodling in mods and making notes. Still need to make a rear glass piece, since the kit doesn't come with one. [Edit: Research has confirmed that the original car did not have rear glass, it was open to the elements. Only the bullet guard/weapons area cover provided any coverage for the rear glass area.] Back to the bench!
-
AMT Piranha Super Spy Car -minor update 1/7/17
talon63 replied to talon63's topic in WIP: Model Cars
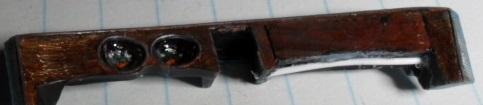
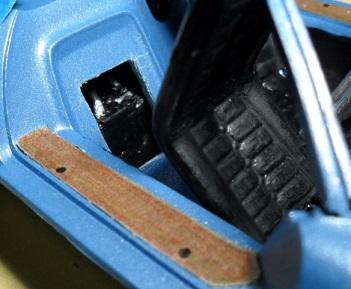
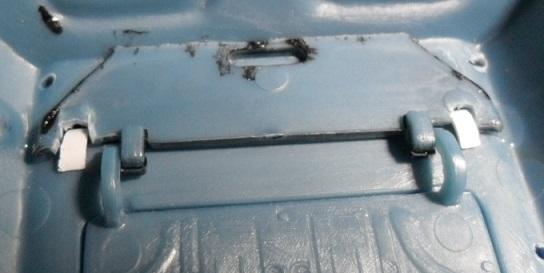
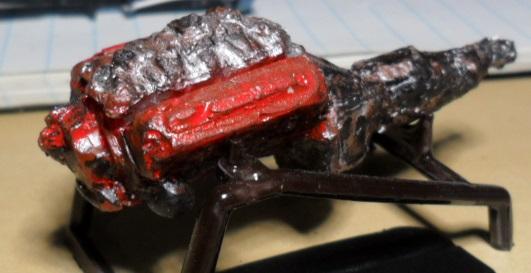
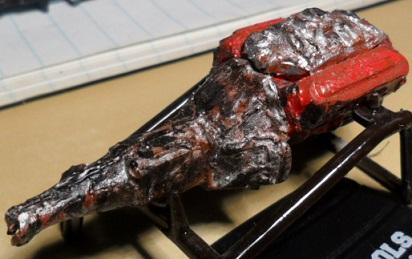
Thanks, Curt. It's been fun figuring out how to make the mods on this one. Not a lot of room to play with, much like the 1:1. The door sill panels are printed on paper, lightly coated with Elmer's clear glue and allowed to dry. I applied them to the car with contact cement. The latch holes are just dots from a Sharpie right now, but I may drill them out. Front suspension is coming along, it is currently poseable, with rack and pinion in place. Need to scratch build the tie rod, as the kit one is insufficient. Will also need to add some pins to the spindles to mount the tie rod to. I just realized that, outside of all the hinging mods and the engine assembly, I've only glued 4 pieces of this kit into their final position so far. -
AMT Piranha Super Spy Car -minor update 1/7/17
talon63 replied to talon63's topic in WIP: Model Cars
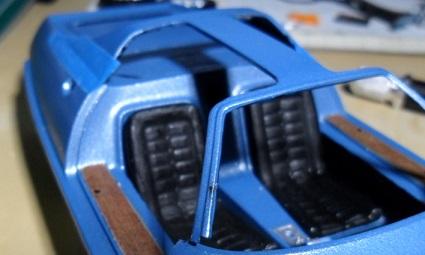
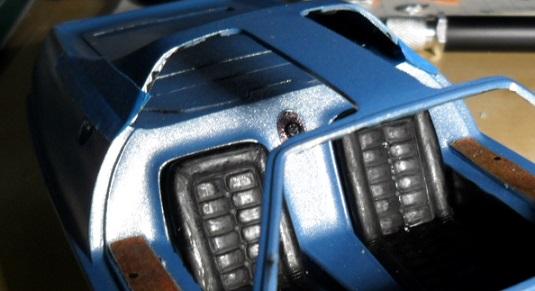
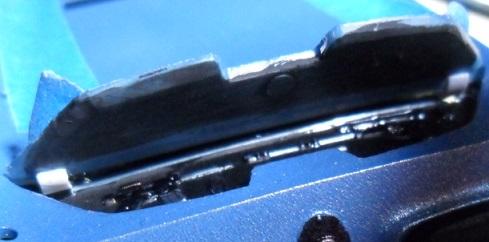
Finally started the hinges for the bullet shield and added the wood grain inlays in the door frames. More updates on the way as time permits. As always, thanks for taking a look and your comments are always welcome.
-
That is a neat collection. Some great cars in there. Photo forensics is another hobby of mine, based on a bunch of skills I picked up over the decades. It's kind of fun trying to geolocate where some of these were shot. I'd say at least a quarter of them were taken outside the US. France, one definitely in England, some of the others I can pin down a US state either by the plates, or by the architecture, types of trees, or other regional clues, like the MG shot taken in what looks like Southern California, most likely the L.A. area. Also noted the duplicated car shot somewhere in the midwest at what looks like a yard for keeping auto-transport trailers. One with woman driver and dog outside the vehicle, the other they are in it.
-
AMT Piranha Super Spy Car -minor update 1/7/17
talon63 replied to talon63's topic in WIP: Model Cars
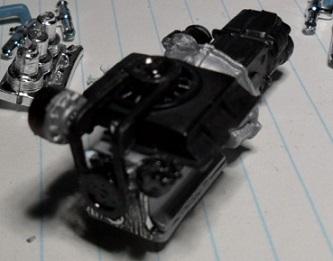
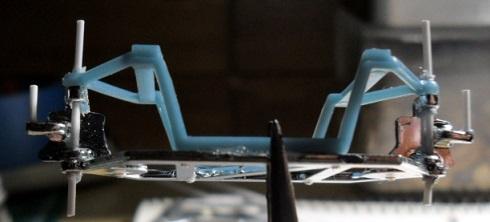
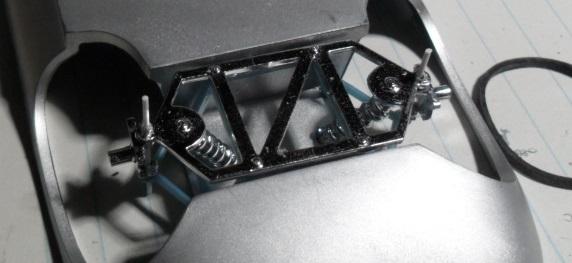
Starting work on the poseable front wheels. Using most of the kit parts, although I may yet swap out the coil-overs and scratch build a couple. First thing I did was carefully drill out the A-frames, cut the tiny nibs off of the spindles, and drill them for pin insertion. Next up will be cutting off the actual spindles and making new ones, as the kit ones are too short, and don't allow for rolling (I know, but that's another topic elsewhere ; )), as well as increasing the length of the mounting points for the rack and pinion. A couple of shots of the work in progress. Painting and such to be completed before final assembly. And finally a dry fit in the chassis during the work. More updates on the way as time permits. As always, thanks for taking a look and your comments are always welcome.
-
1959 Ford Sunliner questions
talon63 replied to gtx6970's topic in Model Building Questions and Answers
It generally matches the predominate interior color. https://i0.wp.com/blog.stevenatale.net/wp-content/uploads/2016/09/1959-Ford-Convertible-Steve-Natale-Photography-86.jpg?fit=3318%2C2212 http://topclassiccarsforsale.com/uploads/photoalbum/1959-ford-galaxie-fairlane-500-sunliner-convertible-352-v8-restored-georgous-1.jpg http://topclassiccarsforsale.com/uploads/photoalbum/1959-ford-fairlane-galaxie-500-convertible-new-soft-top-and-much-more-1.jpg However, even then it was possible to have it accent the body color. http://www.kitfoster.com/images/2007-12-12_59FordCvWeb-Large.jpg -
Resin Alternatives for Small Molds
talon63 replied to Snake45's topic in Model Building Questions and Answers
BTW, I did pick up a little thing called the 3Doodler Start. It's one of the 3D pen devices. Simple to use, but the coolest thing I've done with it so far is use it to make molds of emblems on 1:24/1:25 kits. Shoot it on, press it down with a finger (the output isn't that hot, it uses biodegradable polyester instead of PLA) let it set for about a minute and pop it off the part. I should have some pics posted soon of the molds and the output. -
There's been some discussion about this topic on the boards before. "Easy to use" and "not that expensive" are kind of relative terms. There are some right around $300US 3D printers that would be considered "inexpensive" but to me they have small build areas. You could do engines, seats, other smallish parts, but very little in the way of an entire body, or a frame more than 5.5 inches long. For a little over $300 I can get one with a nearly 9 inch build plate and an aluminum frame, not plexi, which can mean a lot of vibration in your printer, leading to some poor output. Metal frame means less vibration, hopefully better (smoother) layering. That makes full frames and even some bodies doable. Then you need to compare the resolution of the output. Printing the curve of a fender smoothly means a pretty small number and most of the "around $300" printers usually do Layer Resolution:0.1mm-0.4mm. Getting one that does 0.0xmm raises the price again. But the smaller that number gets, the finer the detail and smoother a vertically curved surface will be. But then we get into "easy to use". I've done some CAD and 3D modeling before, and it's a chore because I don't keep those particular skills up. I'm looking into a scanner solution to assist in the creation of the 3D models, but now I'm adding more $ to the situation. If you are good with CAD or 3D rendering, I'd say go for it. This link, https://all3dp.com/best-3d-printing-software-tools/ was useful for me. One caveat, 3DTin is no longer available. Also, if you don't already have the printer, check the compatibility for the hardware you are thinking of acquiring against what is listed on this site..The major free ones are there, so you can download and play with them. You may need two pieces of software, one to create 3D models in, and another to be the slicer and print host. Anyway, I hope this helps. BTW, I did pick up a little thing called the 3Doodler Start. It's one of the 3D pen devices. Simple to use, but the coolest thing I've done with it so far is use it to make molds of emblems on 1:24/1:25 kits. Shoot it on, press it down with a finger (the output isn't that hot, it uses biodegradable polyester instead of PLA) let it set for about a minute and pop it off the part. I should have some pics posted soon under the topic of http://www.modelcarsmag.com/forums/topic/119303-resin-alternatives-for-small-molds/
-
Resin Alternatives for Small Molds
talon63 replied to Snake45's topic in Model Building Questions and Answers
How long was it allowed to cure? -
Resin Alternatives for Small Molds
talon63 replied to Snake45's topic in Model Building Questions and Answers
You may have to apply what seems like a lot of silicone to have enough "body" to allow easy peel off when it sets. Most of my silicon molds are between 1/4" to 1/2" thick, even more for larger pieces. That gives enough strength to remove with out damaging the mold, and working slowly, should peel off the source material with minimal work. -
Resin Alternatives for Small Molds
talon63 replied to Snake45's topic in Model Building Questions and Answers
I think even the "craft" guns get above 117-120 degrees, which is enough to damage styrene. The one I tested was a craft type gun, about 5 bucks. -
Resin Alternatives for Small Molds
talon63 replied to Snake45's topic in Model Building Questions and Answers
Biggest concern there, as stated previously, is that when the hot glue sets, it's pretty flexible. It really would make a better tire than it would body panels. for the emblems themselves it might work, but so far my best results have come from the 3Doodler pen, the UtilePlast, and Woodland Scenics E-Z Water. I have used hot glue to make a one-shot mold, but the original was metal. I'd be leary of using it on styrene to make a mold, since the heat may be enough to damage the original. Also, the waxiness of the hot glue, even after curing, makes it harder to attach to other things without more specialized adhesives. Here's an example of casting with hot glue, straight from the el cheapo glue gun. Huge loss of detail because the flow is horrible. The mold was made with Air Dry clay, which captures the details well, but I can't really suggest it for mold making. Drying time is long, although shrinkage isn't bad, but you may only get one cast from it, and depending on what you cast in it, it may bond and require a lot of cleanup of the copy. This one is actually made up of several parts and, when finished, is going into a diorama as part of a junker. It has a few more layers of grunge to go, and a few parts to add.
-
Nicest 4 banger; your thoughts.
talon63 replied to aurfalien's topic in General Automotive Talk (Trucks and Cars)
I had a 71 Carona, with the 18RC, and that was another great old school four. 1.8L, iirc, and the owners manual for the car stated the "cruising" speed for the car was 112 mph. I put it to the test more than once. Bought it about 11 years old with about 50k on it ( it seriously belonged to a little old school teacher) and when I sold it, it was well over 200k. -
To ROLL or not ?
talon63 replied to D. Battista's topic in General Automotive Talk (Trucks and Cars)
Nearly all of the ones I've built in the last couple of years do roll, but they are almost all in individual display units and inside a cabinet. If they go into longer term storage (space reasons, small apartment) I try to use the original boxes, with some "U" slots cut at a good height from the bottom to put three rubber bands across the box and stapled in place, two spaced and set high enough to keep the wheels off the bottom of the box, and the third set higher to run across the top of the car. Acid free paper goes between the rubber bands and the car. Keeps everything in the center of the box, on its own little shock mount. I like mine to roll, not so I can make engine noises, but for other projects, like some film work. Easier for me to shoot the model than it is to do the CGI. I can add the engine noises in post. -
I use a 6X10 inch box about 1 3/4 tall, with the plastic tray that held whatever was originally in the box. Clips are attached to varying lengths of wire that utility marking flags are attached to (A bundle of them costs almost nothing, and the flags get repurposed as parts for cars since the ones I got are a lightly textured vinyl). Some of the wires are bent into frames that can be inserted into bodies to hold them in place. Wire is then stabbed down through top of box and through plastic. Works to hold it upright, and it turns easily enough.
-
Resin Alternatives for Small Molds
talon63 replied to Snake45's topic in Model Building Questions and Answers
The hot glue gun I have on hand is about the cheapest one you could get. Temp isn't really adjustable, however, using the candle warmer and a small tinfoil cup, you might get it to the a pourable consistency, probably not like water, but at least more honey like than what you get from a cheap hot glue gun. That liquid epoxy might be useful, may even be the same as stuff marketed as floor leveler. It will flow almost as well as water, closer to warm syrup, but it is self leveling, and dries clear or with a slight yellowish tinge. Biggest draw back is still going to be dry time. Like the OP, I was trying for more immediate use results than something that will take a quarter hour to 2 days to be useful. Even if my idea is a flop, I'd rather know pretty quickly than wait for a long to find out I have to start over. I use siliconized acrylic and 100% pure silicon caulk to make small molds, like car batteries and various other bits and bobs. I've even cast painted pieces (rattle can painted and brush painted), and with a little care, you can demold an object without damaging it or the mold if you work slowly to release it. Even the paint remained unharmed in my tests. (Your mileage may vary, and while I've not experienced any interactions with the paints already on the pieces, I haven't tested against that many brands or types of paint and no lacquers. I haven't tried it on things with a lot of angular complexity, like over/under hangs, deep recesses or the like. The detail on a battery top is well defined. Again, the biggest issue is dry time, but it's usually not too bad for small pieces. I'd say as long as your original is clean, you shouldn't have an issue getting the silicon off, it should almost peel away with minimal work, based on my experience thus far. -
AMT Piranha Super Spy Car -minor update 1/7/17
talon63 replied to talon63's topic in WIP: Model Cars
Added a small update to the previous one. Also, I need to get a close up the gauges. I tried something new to give them some depth, which is hard to see in these pics. I did the face and numbers, let it dry, then put a large drop of Elmer's Clear in each gauge, enough to fill the cavity about half way. Let it dry, it may take a while, but it will dry very clear and shrink quite a bit. Then I add the needles, let dry and another drop of the Elmer's Clear, almost filling the cavity. Allow to dry and by the time it shrinks back down, it's basically right where the "glass" would be and the needle does appear to sit above the face of speedo or tach.