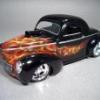
JayVee Posted August 4, 2006 Posted August 4, 2006 Here's a stylized flame paint job I just did with my new toy (Badger double action). This thing is fun to work with:
crispy Posted August 4, 2006 Posted August 4, 2006 That looks good jayvee! What tip did you use and what badger number?? Chris
JayVee Posted August 4, 2006 Author Posted August 4, 2006 It's a 100-LGM. It has the medium tip and the large gravity feed cup. I'm thinking about getting a fine tip, too, but I don't know how it will work with acrylic lacquers like Tamiya. I got the medium tip because that's what Badger had listed for lacquers.
crispy Posted August 4, 2006 Posted August 4, 2006 That's cool. Did you freehand those then? Or did you mask them? Sorry for allt he questions. I'm impressed at teh work you did. I've not tried to do anything like that with my Badger 175. I've been thinking of adding an Iwata gravity feed to my arsenal for projects just like youve shown. Chris
purvissp Posted August 5, 2006 Posted August 5, 2006 Wow, that looks good. I got one of the Badger double action some time back and could never get the hang of it. Plus it was a lot harder to ckean than my old Badger 350 single. You are off to a super start.
JayVee Posted August 5, 2006 Author Posted August 5, 2006 Those patterns were masked using Pactra thin pinstripe tape. I'm getting ready to try some freehand stuff next, but I think I want to get the fine tip for that. I also need to order Mike Lavallee's true fire video tutorial video. The main reason I bought this airbrush was to learn to paint true fire style paintjobs.
crispy Posted August 5, 2006 Posted August 5, 2006 Thanks Jay Vee. Good luck with the video tutorial, I had a hard time swallowing the $160 price tag for the set. The video alon is I believe $60. Anyway, I didn't buy it. Look forward to some more of your stuff! Chris
JayVee Posted August 5, 2006 Author Posted August 5, 2006 Just wanted to mention that I tried a lot of freehand painting today, and I just ordered the fine tip version because I can't get this medium tip to paint the fine spray pattern to do details the way I'd like. Part of it could be the rookie user, but I think the fine tip will be a better way to go.
JayVee Posted August 12, 2006 Author Posted August 12, 2006 Here's my first attempt at some freehand shading. The base is gunmetal, and the flames are bright aqua with purple pearl shading. My camera makes the purple highlights look like they're just a darker blue, but they really are purple! This was done with the medium tip. I now have the fine tip version which I'm practicing with, and I'm slowly getting the hang of finer detail shading. Next up is a '57 Chevy two tone with a much smaller tribal flame pattern.
crispy Posted August 12, 2006 Posted August 12, 2006 All I can say is WOW. How much practice are you doing? Are you artistically inclined? Excellent work. I guess I need more faith in my abilities. Chris
Stingray69 Posted August 12, 2006 Posted August 12, 2006 Those are some cool flame jobs! I've only attemped a few with fair results, this kind of inspires me more 8)
JayVee Posted August 12, 2006 Author Posted August 12, 2006 Thanks for the encouragement guys. The template I used on the side is a Jimmy Flintstone design from Testors, and the hood is made from parts of the same pattern pieced together. I've been practicing with the airbrush a little each day over the past week or so. Still a long way to go, but I'm enjoying the ride.
JayVee Posted August 14, 2006 Author Posted August 14, 2006 Here's an early attempt at "true fire" (my first attempts looked more like "spew fire"). The hood in the top part of this pic has a decal I made for reference, and the hood on the bottom is painted. I need to make a smaller template and denser flames on my next try, but at least it looks like it will work:
Wildrice Posted August 14, 2006 Posted August 14, 2006 Looks good for your first try. Keep at it. I'm sure you will have it mastered in no time.
Jairus Posted August 14, 2006 Posted August 14, 2006 Looks like you are doing the best your brush may be able to attain. What PSI are you shooting at? I usually shoot 30 with my Badger 150 and I have not been able to do any better than what you show on the lower hood. However, you can use a lot lower PSI and more detail if you have a nice gravity feed airbrush! 15 PSI is perfect for free handing true flames at 1/24th scale! I'd show you but I ruined the tip on my Tamiya gravity feed.... :cry: (I am sooo bummed) Nice work on the flames and keep at it. With the 150, maybe lower the pressure to 25 psi and really thin out the paint. Then work slowly and build up the effect of flames freehand. (Clean the tip of the needle periodically as it acquires build up) You can also cut some generic templates for the "trough" and "tips" of the flames just for variety. Oh,… and work dark to light. Good Luck! 8)
Mj-Styro Posted August 14, 2006 Posted August 14, 2006 Here's an early attempt at "true fire" (my first attempts looked more like "spew fire"). The hood in the top part of this pic has a decal I made for reference, and the hood on the bottom is painted. I need to make a smaller template and denser flames on my next try, but at least it looks like it will work: i like this set of pics!!!! I would really like to try my hand at those true flames!! i love that look!!!!!! Awesome!!!
JayVee Posted August 15, 2006 Author Posted August 15, 2006 Thanks for the feedback guys. I'm shooting at 15 PSI, and I'm using a Badger 100-LG gravity feed internal mix airbrush with the fine tip. I'll keep at it and the shape and size of the licks should improve. I think this would be easier on a larger scale so I'm going to work on some larger flames until I get the hang of it. The walls of my office could use a brush-up...
Stingray69 Posted August 20, 2006 Posted August 20, 2006 I love the "true fire" look :twisted: Do you use a template of some sort to do it... I have always wanted to give it a shot.
JayVee Posted August 20, 2006 Author Posted August 20, 2006 Yes, I made one out of some sheet styrene. I just cut some different shaped curves along the edge. There are airbrush templates you can buy for this, but it was easy to make one.
James Flowers Posted August 26, 2006 Posted August 26, 2006 how do i open your x on your site to see pictures? everytime i try one like yours i can not open it. please tell me if you know the problem.
JayVee Posted August 26, 2006 Author Posted August 26, 2006 Not sure what the problem could be, but I use Comcast as a web host. I know that I have to allow cookies (medium high setting in Internet Explorer) to access their site so maybe that's it.
cepwin Posted August 27, 2006 Posted August 27, 2006 JayVee that looks great!! Very professional!! Keep at it!!
Recommended Posts
Create an account or sign in to comment
You need to be a member in order to leave a comment
Create an account
Sign up for a new account in our community. It's easy!
Register a new accountSign in
Already have an account? Sign in here.
Sign In Now