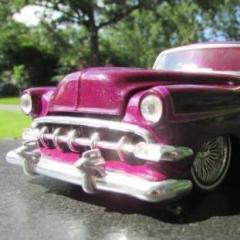
FenderMender Posted July 2, 2020 Posted July 2, 2020 A little background first.... Gowland & Gowland (England) was one of the early plastic scale modeling companies. Gowland & Gowland designed 30 kits which Revell issued as the Highway Pioneers series from 1951 thru 1953. Highway Pioneers Series Two, 1/32 scale, featured these five cars molded in ( ): 1910 Cadillac Limousine (light blue)- 2 copies 1915 Model "T" Ford Center Door Sedan (black) 1908 Buick "10" Rumble (red) 1914 Stutz Bearcat (yellow) 1910 Studebaker Electric Coupe (green) These models had been built in the late 50s and put away in the hot attic in 1961. They remained there until 2007. All those years(46!) in the attic had totally warped and deformed the models. The Studebaker's smaller parts had literally crumbled into powder, and its mangled body shed countless slivers of decayed plastic. The Studebaker's so-called "body" might be a subject of a future diorama as it is absolute junk, with no possibility of ever restoring. After completing the redo of one of the two 1910 Cadillac Limousines recently, I opted to finish working on this 1915 Model "T" Ford Center Door Sedan. Seven clamps were used for about two months to attempt to get the two main body parts aligned; seven clamps were also used for the same time period as well to possibly straighten up the chassis/fenders part. The two main body parts were Gorilla glued together requiring seven clamps. Then the now single unit main body needed further straightening under heat to match up correctly with the chassis/fenders part in an assembly process. This work took six clamps and four or five heating sessions. To join the chassis/fenders to the main body was a royal pain as various clamps were needed to finally bring the parts snugly together utilizing Gorilla Glue Clear. The glue is quite strong, fills gaps and is paintable. But it takes 24 hours to reach its full strength. I wait at least 36 to 48 to be sure, as parts under stress possibly separating when the clamps are removed would necessitate starting the job all over again, which indeed, happened. The second attempt bore fruit as the glue held completely tight under the stress when the clamps were removed and the joint fit snugly. Luckily, all the remaining smaller parts, two side lanterns, wheels, seats and the front radiator/axle unit were all intact and complete and only needed proper coloring. These parts were not deformed in any way. Finally, it all came together out of the "fog" looking like this:
caapa Posted July 3, 2020 Posted July 3, 2020 Hi Bob, you made a fantastic job with a half unfroze model !!! And you gave me a great lot of inspiration/encouragement to repair my Chevrolet Astrovette with half shrunk front. But first I shall end the Lamborghini Miura "schratch" built.
Recommended Posts
Create an account or sign in to comment
You need to be a member in order to leave a comment
Create an account
Sign up for a new account in our community. It's easy!
Register a new accountSign in
Already have an account? Sign in here.
Sign In Now