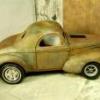
RyanSilva Posted December 24, 2008 Posted December 24, 2008 (edited) Well she is done! You will see a few non existing items..such as steering box,battery and a windshield. Windshield would not conform to the shape, I used various plastics and even .10 clear window material, no go! So that was left off, I didn't wanna risk breaking items. No battery due to none I liked. I will add a resin battery box in the future. I'm just glad to complete it, I was getting burned out.. I got some weathering powders in the mail, so Ill add them to it when they arrive. Thank you Don for the stacks! They fit perfectly. (the whitewalls cracked, so i had to remove them from the rear tires, i had no solvent! ------ Details are- Buick nailhead from tommy Ivo kit. Torqueflight transmission from a revell 1941 street rod. Seat is from AMT 1941 Ford woody-(back seat) Rear wheels are from Revell Merc. Body is a cut down 1953 Ford from AMT. Front caps are generic smoothie moons from AMT with Revell 1941 Chevy hubcap decals applied. Hosted on Fotki Hosted on Fotki Hosted on Fotki Hosted on Fotki Hosted on Fotki Hosted on Fotki more photos here http://public.fotki.com/73OldsOmega/newly-...f100-truckster/ Edited December 29, 2008 by RyanSilva
MikeMc Posted December 24, 2008 Posted December 24, 2008 WHAT A RAT!!!!!!!!!! You can paint those rear sidewalls...use flat white acryllic....like I did on this '31
Biker Bob Posted December 25, 2008 Posted December 25, 2008 That is the coolest thing EVER!!!! great job.
RodBurNeR Posted December 25, 2008 Posted December 25, 2008 this is the pickup you were building? it came out really cool! nice overall weathering, looks pretty realistic!
RyanSilva Posted December 26, 2008 Author Posted December 26, 2008 Thanks guys! It was pretty fun, I did take a break..I get burned out easily..
RodneyBad Posted December 26, 2008 Posted December 26, 2008 Awesome. Ya don't need a windshield, that's what goggles are for. Could use a floor board of sorts. Miss the Brakes and break a foot. Really great weathering and pallet in the bed..
RyanSilva Posted December 26, 2008 Author Posted December 26, 2008 No worries Ken, I got thick skin, and criticism is good I didnt overlook the chrome wheels in the rear, The way i replicated it was, to capture the look of scrounged parts from many sources to create a tire shredding hot rod. One thing you wouldn't skimp out on would be good slicks and wheels, thus the slightly new "fresh" look to the back. Even many "rusty" hot rods and such now a days that carry great patina wouldnt skimp on the tires and wheels, well...maybe wheels but rarely tires. That's just my view, one thing I like about weathered models is, no one is ever wrong, mother nature and the human opinion combined create endless views!
Dennis Lacy Posted December 26, 2008 Posted December 26, 2008 The finished product looks awesome, Ryan! Lots of neat and inovative ideas. One of my favorite parts is still the wood pallet bed floor. And, while it looked cool with the Flatty, the injected nail head looks even cooler. The retro-fitted '48 dash looks right at home in there too. I wasn't aware that the '41 Chevy truck kit uses decals for the hubcaps - I was wondering how the hell you painted them so well, haha. What Ivo kit is the engine from and is the kit hard / expensive to come by?
RyanSilva Posted December 26, 2008 Author Posted December 26, 2008 The finished product looks awesome, Ryan! Lots of neat and inovative ideas. One of my favorite parts is still the wood pallet bed floor. And, while it looked cool with the Flatty, the injected nail head looks even cooler. The retro-fitted '48 dash looks right at home in there too. I wasn't aware that the '41 Chevy truck kit uses decals for the hubcaps - I was wondering how the hell you painted them so well, haha. What Ivo kit is the engine from and is the kit hard / expensive to come by? Thanks Dennis! I was so close to painting the hubcaps, but noticed the decals, so I used them on generic baby moons, worked well! I should clarify a bit on the nail head. It uses parts from the Tony Nancy 22jr double dragster kit from revell, and Revell Tommy Ivo "showboat" 4 engine dragster. I used the Tommy ivo-engine block,heads, intake and valve covers (weiand) Tony nancy -oil pan, and headers. The timing cover and water pump was taken from a studebaker 289 engine from the 1953 starliner kit. I had to sand the back down some, but it fit. I used the pulley and alternator from Revell 283 chevy engine, from the 1964 chevy SWB truck. The tommy ivo kit, has 4 nail heads! But the base pans are canted diagonally
Raul_Perez Posted December 26, 2008 Posted December 26, 2008 Too cool!! I really like the old signs used for the interior door panels and the Fred Flintstone floorboard!! Thanks for sharing,
Recommended Posts
Create an account or sign in to comment
You need to be a member in order to leave a comment
Create an account
Sign up for a new account in our community. It's easy!
Register a new accountSign in
Already have an account? Sign in here.
Sign In Now