kelson Posted September 4, 2024 Posted September 4, 2024 New build in the works,since my 65'malibu build is fighting me,Revells 1981 Z28 convertible,motivation for this build comes from an old 1980 Charlies Angels episode called 'To see an Angel die'where cheryl Ladd's character is in Hawaii driving a 1979 Z28 convertible and is kidnapped.When Revell released the 81'coupe with different decal colors last year i decided it's a good time to build this kit. My color choice. The wheels and tires in the kit are horrible!,so i grabbed a extra set of 86/87'Monte Carlo wheels from my parts box. The engine block has incorrect valve covers,so i cut them off and added correct valve covers from AMT's 1990 release 70.5 Z28 The steering wheel on the left is incorrect,the correct steering wheel can be found in AMT's 72'nova or MPC's 75'Vette. 1
kelson Posted September 4, 2024 Author Posted September 4, 2024 Part.2,the interior is painted Testors Sand and the convertible boot is painted Testors Wood. Masked the body and painted the engine Chevy engine blue Interior is complete,kit doesn't have armrests,so i made resin copies from Monograms 78'Z28 2
kelson Posted September 4, 2024 Author Posted September 4, 2024 (edited) Part.3,so i attempted to weather the chassis,but i'm gonna need some more practice!!? Decided to add sparkplug wires. I wanted to improve other areas,so the headlight and front lights and the taillights were scribed out and will make resin copies,i also had to scribe the lines on the spoiler as their were none. Lastly the body is painted,couple small flaws that will need sanding out. Edited September 4, 2024 by kelson wrong picture. 8
NitroMarty Posted September 4, 2024 Posted September 4, 2024 Very cool.... Love seeing this overlooked kit getting a bit of love. I built a modified version of the companion Formula Firebird kit, for a snap kit build-off, over on the Spotlight message board, several years ago..... 3
kelson Posted September 5, 2024 Author Posted September 5, 2024 23 hours ago, NitroMarty said: Very cool.... Love seeing this overlooked kit getting a bit of love. I built a modified version of the companion Formula Firebird kit, for a snap kit build-off, over on the Spotlight message board, several years ago..... I've seen it over there a couple times very nice build?,i have a couple in my stash as well,just not sure how i want to build them.
kelson Posted September 5, 2024 Author Posted September 5, 2024 On 9/4/2024 at 3:26 PM, stavanzer said: Wow, Great Work. Very Clean! Thank you!.?
Rod666 Posted September 6, 2024 Posted September 6, 2024 It's good to see, how do you collect the required part. I love your work. 1
kelson Posted September 7, 2024 Author Posted September 7, 2024 6 hours ago, Rod666 said: It's good to see, how do you collect the required part. I love your work. Thanks!...Usually just google the car and look at multiple engine pics and interior/exterior pictures as i can,luckily i also have a fairly deep parts box.? 1
slusher Posted September 7, 2024 Posted September 7, 2024 Real nice work Curtis I have been off for a little while I alway enjoy your builds. 1
CA Whitecloud Posted September 8, 2024 Posted September 8, 2024 On 9/6/2024 at 6:26 PM, kelson said: Thanks!...Usually just google the car and look at multiple engine pics and interior/exterior pictures as i can,luckily i also have a fairly deep parts box.? How do you approach the brackets holding the plug wires? Did you make those yourself?
kelson Posted September 8, 2024 Author Posted September 8, 2024 2 hours ago, CA Whitecloud said: How do you approach the brackets holding the plug wires? Did you make those yourself? I have a book that shows the firing order for various engines,then i usually will pull the correct wires to each half of the distributor and then insert them into the bracket.I don't have the skills to make the brackets,i use a Detail Master P/E set.
kelson Posted September 18, 2024 Author Posted September 18, 2024 Okay, i have a small update decals applied and body clearcoated,next is to mask off the body to paint the trim. 2
kelson Posted September 30, 2024 Author Posted September 30, 2024 Okay back with some updates:i painted the wheels the same color as the body and used testors silver for the outer area.I sanded down the lettering on the polyglas tires and used an old Shabo dry transfer sheet for the lettering,then applied a coat of Satin varnish to seal the decals. The kit comes with smoked glass,which i didn't want to use so i grabbed the glass from the coupe and airbrushed some Tamiya clear blue on the windshield. I used the headlights from the 69'Z28 and the marker lights were made from some clear sprue i painted clear orange and then added cigarette foil for the backing. Trim is all added and engine compartment painted. These are the resin casted taillights painted,still need to do some touchups on them,and then final assembly can begin. 5
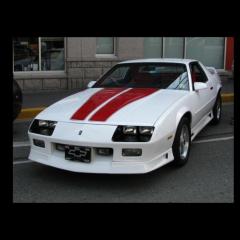
kelson Posted October 8, 2024 Author Posted October 8, 2024 She's all finished and posted Under Glass,once again thank you to everyone for a like ,view or comment it's appreciated.?
Recommended Posts
Create an account or sign in to comment
You need to be a member in order to leave a comment
Create an account
Sign up for a new account in our community. It's easy!
Register a new accountSign in
Already have an account? Sign in here.
Sign In Now