airlessride Posted October 16, 2010 Posted October 16, 2010 Finally got some spare time to start workin on this 351 ive been wanting to build for quite some time so, Later yesterday evening i decided to start this. ive got the hood narrowed, fenders im still shaping and many more details to go but just thought id post up some progress pic's not finished but getting close. enjoy ~Blake
Scott S Posted October 16, 2010 Posted October 16, 2010 Very nice, cant wait to see finished truck, gonna be a nice one. if ya need any visual cues heres our 65 351 Scott
airlessride Posted October 16, 2010 Author Posted October 16, 2010 Very nice, cant wait to see finished truck, gonna be a nice one. if ya need any visual cues heres our 65 351 Scott Hey Thanks a bunch Scott, Lovely looking pete you got there. Pic's would be great!!!! you dont happen to have a few pic's of the fender area would ya? Between the fender and the hood to get some visual points. Definetly haveing fun with this. If i can get it looking pretty good/close i may cast this but im no pro lol.... we'll see. ~Blake
clayton Posted October 16, 2010 Posted October 16, 2010 I been won't too do the same thing for some time now.maybe one day. Look great.
Scott S Posted October 16, 2010 Posted October 16, 2010 Blake, im sure i do. i'll look thru my pic's if not give me a few days and i'll get to the shop and take some for ya.. just a note ours is a butterfly hood. if theres any other pic's you need let me know. Mines a 270 /13 spd, alum frame, has over a million miles. i have all the original parts for it to, tanks, boxes, small bumper. Scott
airlessride Posted October 16, 2010 Author Posted October 16, 2010 Blake, im sure i do. i'll look thru my pic's if not give me a few days and i'll get to the shop and take some for ya.. just a note ours is a butterfly hood. if theres any other pic's you need let me know. Mines a 270 /13 spd, alum frame, has over a million miles. i have all the original parts for it to, tanks, boxes, small bumper. Scott Oh WOW! That be awesome scott, Perfect cause once i have the hood to the shape i like it i had planned on makeing this a butterfly hood also. i think mainly the pic's of the fender area and the grille near the frame should be great or anyother pic's youve got would be very helpful. wow what a time piece, to bad here in hawaii you rarely see these 351's or 350's and if you do people want big money for them. beautiful truck btw. Thanks ~Blake
clayton Posted October 17, 2010 Posted October 17, 2010 did you look on the 1:1 page? I was looking last week I think there's a photos that give you some idea of the fenders. Makeing the hood and grill is not all that hard it's the fenders that are give me a hard time.
airlessride Posted October 17, 2010 Author Posted October 17, 2010 (edited) Little work done tonight, still need to do more work to the grille *shutters* and the hood and then some light filler. Edited October 17, 2010 by airlessride
Scott S Posted October 17, 2010 Posted October 17, 2010 Blake, i'm on road all week, next sat. morn. i'm going to shop, i'll take detailed pic's of fenders,grille, lite mounts, and hood pic's for you.and anything eles you can think of that'll help ya, let me know..Yours looks great so far keep up nice work. . Scott
clayton Posted October 18, 2010 Posted October 18, 2010 (edited) That would be great,if you can get some photos from under the fenders as well.If you can hope I'm not asking too much. Edited October 18, 2010 by clayton
mackinac359 Posted October 18, 2010 Posted October 18, 2010 You're mixing 358 and 351. 358 is a tilt hood and has the round inner fenders. 351 is a butterfly hood and the inner fenders angle downward to allow for the hood to swing out. If you are going for the 351, you will need to sand off the raised rib and row of rivets on the sides of the hood along with the rivet detail on the hood sides that is angled. Also, fill in the oil-fill check door on the right side of the hood. 351 will have the headlamps mounted slightly behind the grille/radiator. 358 would have them mounted on the radiator surround (like a 359 and the kit). You will also need to remove the triangle shaped step on the back of the fenders. 351 didn't have this. 351's steps were in the corner between the fender and the hood skirt (the lower hood panel)- which on 351 extends under the cab to cover the cab mounts. This part is called the "step board skirt." The skirt is shaped similarly to the kit lower cab panel just longer. On the page below I have pics comparing 351 and 358 which should help you out. Pre 1980 Peterbilts Tim
airlessride Posted October 18, 2010 Author Posted October 18, 2010 (edited) Blake, i'm on road all week, next sat. morn. i'm going to shop, i'll take detailed pic's of fenders,grille, lite mounts, and hood pic's for you.and anything eles you can think of that'll help ya, let me know..Yours looks great so far keep up nice work. . Scott Hey Scott, when ever you got some time bud this will be a big help thank you kindly those pic's would put my mind to ease lol... Thanks for the kind words. On the page below I have pics comparing 351 and 358 which should help you out. Pre 1980 Peterbilts Tim Hey tim thanks for that link, and yes its a 351 im going for. i no the 358 as theres one at the service station near my house i have a bunch of pic's on that truck lol... Tonight i got a little more work done to the hood and fenders, oil fill door shaved, side hood panels finished as well as the air clear cowling. Fenders just a little more tweaking added the fender "step board skirt" as Tim mentioned. Grille/radiator i still need to finish the shutters Then its time for the cab i have some realy thin brass i may use for the upper cab drip rail and then the back window will get attention. This is my first attempt for a 351 so bare with me.... i started this on friday and i havent been able to put it down since lol... Thanks for all the help guys and more info. ~Blake Edited October 18, 2010 by airlessride
clayton Posted October 18, 2010 Posted October 18, 2010 If you look on the 1:1 page under the Pete lovers and Loggers there is a photo of the fenders. Looks too me they are mounted to the frame rite.
mackinac359 Posted October 19, 2010 Posted October 19, 2010 Blake, You're doing a great job as it is! You don't have to back-date the cab with the drip rail - that cab is the pre '61 cab. Here's an unrestored 351 that Robby Gaines photographed. You can see the angled fenders better. And yes, the fenders do mount to the frame (similar to the Autocar kits). You can leave the grille as mesh as that was an option. The shutter-only look was the older trucks or bare-bones models. Tim
Jim B Posted October 19, 2010 Posted October 19, 2010 Did the 351/358 use the same cab as the AMT 359? Do you need the "little window" kit?
mackinac359 Posted October 19, 2010 Posted October 19, 2010 351/358 used the same cab as T500 - the little window until the end of '72, then they both were available with the 1100 series cab (same as T501). Most 351's after '72 were flat-fendered SBFA "Autocar Fighters." Tim Did the 351/358 use the same cab as the AMT 359? Do you need the "little window" kit?
airlessride Posted October 20, 2010 Author Posted October 20, 2010 (edited) Not to much done today but i did get a little time into it. Got the roof drip rails made of thin copper wire instead of the brass but it worked out pretty well slight adjusting and i'll be happy got the rear early style window complete just need to install it onto the cab. Fenders im still working with as i made up another set on the side. ~Blake Edited October 20, 2010 by airlessride
airlessride Posted October 21, 2010 Author Posted October 21, 2010 Takin a little shape shutters in just need to putty up the joint also got the rad cap going. Anyone no a good place to get scale size rivets?
Jim B Posted October 21, 2010 Posted October 21, 2010 Try Tichy Train Group. That's looking really nice. Great details.
Scott S Posted October 23, 2010 Posted October 23, 2010 Hey Blake, heres a link to my photobucket acct. http://s912.photobucket.com/albums/ac329/proram/65%20351%20pics/ There a ton of pics of fenders, hood, grille,shutters, headlite mounts, side flaps, hindges from our 65 351. cab interior shots, and rear frame shots (alum. frame) one thing i noticed is your panels between need more angle towards frame, the bottom of the hood flaps are flush with the tops of the frame rails. love the truck, not picking, just pointing out, hope this helps some. Scott
Guest Johnny Posted October 23, 2010 Posted October 23, 2010 Sweet looking Pete Scott! Hey blake! How did you make your shutters?
airlessride Posted October 23, 2010 Author Posted October 23, 2010 Hey Blake, heres a link to my photobucket acct. http://s912.photobucket.com/albums/ac329/proram/65%20351%20pics/ There a ton of pics of fenders, hood, grille,shutters, headlite mounts, side flaps, hindges from our 65 351. cab interior shots, and rear frame shots (alum. frame) one thing i noticed is your panels between need more angle towards frame, the bottom of the hood flaps are flush with the tops of the frame rails. love the truck, not picking, just pointing out, hope this helps some. Scott Hey Scott I cant thank you enough for all the pic's you've taken thats realy gonna help me out for the little details. yeah i see that now that you've mentioned it. i still need to cut the angle at the lower edges of the grille, and trim the inner fender area. i hope when i do the front will sit a little lower. Thanks for the pic's Scott Sweet looking Pete Scott! Hey blake! How did you make your shutters? Hey Johnny, i took the original grille fron the california hauler Trimmed the tops and sides and cut to size to fit into my radiator shell. Still need to putty the joints but works out pretty well. ~Blake
airlessride Posted October 24, 2010 Author Posted October 24, 2010 More than happy to help. Scott my little inspiration
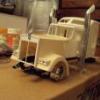
airlessride Posted November 6, 2010 Author Posted November 6, 2010 (edited) Well ive taken a little break from building since ive been pretty busy with work and such also cause i was getting a little jerked about certain things on the truck wasnt turning out to how i had wanted but, Im back and with a fresh mind to start again . I primed the hood once to see what more i needed to do, i plan to skim coat the hood 1 last time to get everything straight and crisp then i'll resribe the hood lines and add some round evergreen to define the center of the hood. The grille is a mess around i wanted to give it the open shutter which still needs work if it doesnt pan out i'll go back to my first look i had planned Fenders i added half round evergreen to the edges but i left the fenders a little short up front but i think i can live with that. i finished the inner fender step just need to mount it on. The cab i manage to get the drip rail and rear window to the shape i want now its time for filler. Its no where near perfect like the work you guys do although i am pretty pleased of how its turning out. I do Believe now i no what to expect and how to go about when i build my next few 351's Have a great weekend ~Blake Edited November 6, 2010 by airlessride
Recommended Posts
Create an account or sign in to comment
You need to be a member in order to leave a comment
Create an account
Sign up for a new account in our community. It's easy!
Register a new accountSign in
Already have an account? Sign in here.
Sign In Now