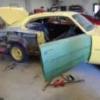
sak Posted April 23, 2011 Posted April 23, 2011 My next prodject. !966 Fairlane, made by AMT I believe. So far not much done. Still waiting for the warmth to do airbrushing. The front sway bars and strut rods were molded into one big chunk of plastic on the frame so I carved it out and made new bars. Also I was bored so I made my own shock absorbers and added a few details to the leaf springs. My plan is to paint the body black and interior will be tamiya deck tan. Jeff
Erik Smith Posted April 23, 2011 Posted April 23, 2011 Nice modifications so far. I like little things like that - things only a few modelers and probably zero of the general audience will ever notice - but you know they're there. Nice pulleys on the engine too.
Custom Mike Posted April 23, 2011 Posted April 23, 2011 (edited) Jeff, you'll love this kit, it goes together nicely with just a few minor flaws. One is the front spindles, the ride height will be nose-high if you don't modify them somehow. The other is getting the body to sit right over the front end, I still haven't figured out a good fix, but I think on my next one I'll trim the inner fenders, radiator support and firewall a bit to see if that helps. Great work on the engine and front suspension so far, I can't wait to see some more of this baby! Edited April 23, 2011 by Custom Mike
sak Posted May 8, 2011 Author Posted May 8, 2011 Some small update. Chassis was started and some other things.
sak Posted May 9, 2011 Author Posted May 9, 2011 (edited) Bah !!! A new problem. Is is just me or this engine seems to sit far too low and raising it will raise the tramsmission as well. Not right for the camshaft pulley to sit at the bottom of the radiator. No way the heads and manifolds will have room to fit as well. I suppose that explains why I had to carve out the sway bar to make the oilpan fit. Edited May 9, 2011 by sak
Space Cowboy Posted May 9, 2011 Posted May 9, 2011 Great job so far and some very nice detail......................
RodneyBad Posted May 9, 2011 Posted May 9, 2011 Engine and front suspension is looking really good. The Engine does look like it sits low but I wouldn't know since I haven't built one yet. But I sure do like the looks of them.
Ron a.k.a. Grouchy Pants Posted May 9, 2011 Posted May 9, 2011 Hey Jeff looking great buddy... youd be suprised how low an engine can look without everything in place in the older cars. They were always very roomy engine bays, unlike today where everythings sitting pretty high and you only have maybe an inch between intakes and hoods. I'd try and throw your carb and airfilter on top of your intake and see how it looks from there. And if it still looks low it looks like you do have a little wiggle room for your tranny to raise up some. Either way you go your gonna have some cussing going on with the header fitment cause of the way the suspension is on those things. Your inner fenderwells are boxed al the way up. Does any of that make sense? It makes sense in my head but...
sak Posted June 14, 2011 Author Posted June 14, 2011 Small update. After seeing the work of Randy D and John Tersi, I have lost motivation to even bother. Theyre work is a whole new level. But I know my limitations and I can never achieve what they can but I am still happy with my work I suppose.
hemi Posted June 14, 2011 Posted June 14, 2011 Well your doing a pretty good job on it if you ask me,the details you are adding are really making the difference,Great work man
diymirage Posted June 14, 2011 Posted June 14, 2011 why is there a colostomy bag attached to the firewall great looking detail, i like it
Reeves Racing Posted June 14, 2011 Posted June 14, 2011 why is there a colostomy bag attached to the firewall great looking detail, i like it That was FoMoCo's answer to a cheap windshield washer fluid reservoir. I have a sweet spot for these cars. I love this build. I am currently building a nostalgia themed drag car in 1:1 out of a 65 Comet. You think the headers are difficult to fit on the model... try installing them on the real thing.
XJ6 Posted June 14, 2011 Posted June 14, 2011 Sure wish my Model of the 66' Fairlane looked like that That's looks Super Nice...Really like the Detail..Clean Great Job Sak..
sak Posted June 14, 2011 Author Posted June 14, 2011 i just built a drag version of this kit and it was fun. i really like the extra details you are adding in and the paint detailing. what do you have in mind for the upper shock mounts on the shock/spring towers? AMT kind of left that detail out Thanks for the kind words. Yeah, Those parts are missing. But if I make anything it wont be anything complex. Don't know what I would use to make those three pronged supports. So it won't look stock. There isnt alot of space there either so it will have to pretty low profile so the hood closes. Just for note, they did not include side mirrors either not even a single drivers side.
DiscoSpud Posted June 14, 2011 Posted June 14, 2011 Keep at it mate, this is going to be a really nice clean build. I find that the best way to model is to never compare yourself to another, but to learn from your experiences and build on them. I'm proud of every model i have made, even though my paint almost always looks shocking, hence why i mostly build rat rods I'll be watching this thread
Guest Posted June 14, 2011 Posted June 14, 2011 It's looking real nice so far Jeff. I've built a couple of these myself and there is an issue with the inner fenders and firewall fitment. I think it might be better to glue the firewall and inner fenders to the body rather than the chassis. IIRC, the main issue is with the firewall. I used the shock tower pieces from the AMT '66 Nova on one of mine. Not correct,but better than nothing. I never have understood why this kit didn't come with any type of mirrors,not even a rearview.
sak Posted June 29, 2011 Author Posted June 29, 2011 Small update. Slowly but surely getting er done. Also a pic of one of my many side projects. !956 chevy
Brokentail58 Posted June 29, 2011 Posted June 29, 2011 Nice work. I have that kit too. Not sure what I am going to do with mine yet.
XJ6 Posted June 29, 2011 Posted June 29, 2011 I have an idea....Want to trade your "66 Fairlane for my "66 Fairlane...I like yours better..
sak Posted July 11, 2011 Author Posted July 11, 2011 Made some progress. Painted a base coat of plastickote black. I will try the technique of applying clearcoat directly to black primer. Not sure who invented this so I not trying to take credit for it. I bought a can of the dupont stuff Mr. Cranky uses. Always affraid to black colors so I expect some imperfections. Interior will now be krylon ivory. Any ideas for the carpet color. Black is probably what was used but I would like to use a light browny color. Perhaps the tamiya deck tan color that I was going to paint the vinyl interior.
Custom Mike Posted July 12, 2011 Posted July 12, 2011 (edited) Great work on the chrome trim around the seats Jeff, what did you use for that? I did mine with Detail Master Krome Foil, and still ended up with a few wrinkles at the corners, yours are beautifully smooth! And as far as the Black Primer with Clear, I used that myself years ago before I figured out how to get a good black paint job, and it worked out great. I don't know who came up with it either, but I did mine back in2001, so it's been around a long time! Edited August 31, 2011 by Custom Mike
sak Posted July 12, 2011 Author Posted July 12, 2011 Great work on the chrome trim around the seats Jeff, what did you use for that? I did mine with Detail Master Krome Foil, and still ended up with a few wrinkles at the corners, your are beautifully smooth! And as far as the Black Primer with Clear, I used that myself years ago before I figured out how to get a good black paint job, and it worked out great. I don't know who came up with it either, but I did mine back in2001, so it's been around a long time! Thank you. I am surprised how well it turned out. I used alunimum foil for that. Three pieces, one for the top and sides are different pieces. The trick it to go slow. I first stick the foil to the top of the seat and slowly wrap it around the top corners with my fingers. But you have to make cuts in the corners on the excess part of the foil where it starts to fold. Then just take a toothpick and rub it into the edges gently and then cut all the excess foil off.
Tonioseven Posted July 12, 2011 Posted July 12, 2011 This is turning out great so far!! The detailing is clean and realistic-looking. I dig it.
Recommended Posts
Create an account or sign in to comment
You need to be a member in order to leave a comment
Create an account
Sign up for a new account in our community. It's easy!
Register a new accountSign in
Already have an account? Sign in here.
Sign In Now