RJL Posted August 19, 2011 Posted August 19, 2011 You nailed the front fender damage; I had a '63 Impala Sport Coupe back in the day and that is exactly where it was rotted out, down in that bottom corner. Looking good!
LAV25 Posted August 24, 2011 Author Posted August 24, 2011 A short update before I get seriously to work on this. I'd like to thank the person that originally posted this suggestion, I just can't find the thread anywhere. My kit has these big ugly posts that support the rear trailing arm. It never occurred to me that those were where the coil springs were supposed to be until I saw someone else's kit, so I'd painted them rust. However, I've got some 1mm solder. 1mm=1 inch, so it isn't for the hardcore purists, but I'm new to this. I painted the posts flat black (on top of the rust I'd already done). I took the solder (takes about 3-4 inches per side!) and brush painted it Tamiya Flat Red XF-7. It was hot yesterday, and I deliberately didn't let it dry properly. I painted the one piece, put it down, painted the second, put it down, cleaned my brush, and wrapped each piece around its post, then adjusted the coil with my thumbnail. Not letting it dry (I think) gives the paint some flexibility as it's being bent. As you can see, I need to touch things up a bit, but overall, I don't think it looks too bad, much better than just posts. Opinions and suggestions are always welcome!
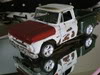
LAV25 Posted February 19, 2012 Author Posted February 19, 2012 Necroposting my own project. I got tired of this little car, so I boxed it up and stuffed it in the closet for, well, five months or so. Took it back out a couple of weeks ago and decided to start again, then I remembered why I got tired of it. I just don't like this kit, there are a lot of parts that don't seem to fit the way they should, and some of the directions, IMHO, need to be reordered. Attach the chassis to the floorpan, then try and thread the driveshaft in. Didn't bore out the hole in the transmission? Too bad, so sad. I did play around with some Bare Metal Foil equivalent (Hasegawa? I forget, lost the package) with mixed results. I think I'll be using it more in the future, but I've got to study up on the best ways to get it to do what I want. Anyway, after going through some careful frustration, tonight I decided that I was going to just finish it. Get it done. It could have come out better with more time, I admit, but it was getting to be a chore rather than fun, and taking up too much of the hobby bench that I share with my wife, so here it is: Lost one of the lenses somewhere even before I could start to assemble it: to be continued below:
LAV25 Posted February 19, 2012 Author Posted February 19, 2012 continuing: Anyway, that's pretty much it. I'll try and get some better lit pics in a day or so and post them up "Under Glass," but I'm kind of glad to see the end of this thing. More research before I buy another kit, see what works, have a clearer plan, all that. Thanks for looking! -val
Recommended Posts
Create an account or sign in to comment
You need to be a member in order to leave a comment
Create an account
Sign up for a new account in our community. It's easy!
Register a new accountSign in
Already have an account? Sign in here.
Sign In Now