graveturtle Posted November 2, 2011 Share Posted November 2, 2011 So I've started a new base recently and I thought I'd post some progress pictures here. I've only been modeling for about a year, so helpful tips are always appreciated. I started with some plywood, primed it and then carved out some Styrofoam boulders. I added some spray foam insulation so the ground wouldn't quite be so flat. This picture was taken right after I added the foam-stuff. It expanded a bit more after it dried. After the foam stuff dried, I carved away most of it since I just wanted a bit of texture to the ground. I then covered everything in plaster cloth. These pictures are of the smaller base in the photo above. Quote Link to comment Share on other sites More sharing options...
randx0 Posted November 2, 2011 Share Posted November 2, 2011 Welcome Rachael, so far what you have there looks pretty good. I don't have anything to offer specifcally just some general pointers. first off the railroad section of your local hobby store is an excellent source for landscaping materials but I suspect you know that already.You should check out some of the dioramas that have been done by Ken Hamilton he is probably one of the best and he has documented quite a bit of his work. another name that comes to mind is Shepard Paine. That is about all I have for you right now perhaps it will be helpful. good luck and I look forward to seeing this diorama progress. Quote Link to comment Share on other sites More sharing options...
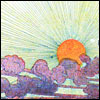
Dr. Cranky Posted November 2, 2011 Share Posted November 2, 2011 Cool, it looks like the setting for a futuristic vehicle or a post apocalypse build! Nice! Quote Link to comment Share on other sites More sharing options...
GTMust Posted November 2, 2011 Share Posted November 2, 2011 A very innovative and interesting start Rachael. It's already looking like a rock crawling or similar dio foundation. I can't wait to see where it's heading and what you have in mind.... then we may be able to throw some suggestions to you if you need advice. Tony Quote Link to comment Share on other sites More sharing options...
graveturtle Posted November 3, 2011 Author Share Posted November 3, 2011 (edited) I actually have a book by Shepard Paine, it's been really helpful. I've mostly been combining stuff from that book and things I learned in my museum classes. I'll definitely look up Ken Hamilton. Today I covered everything in a thin layer of plaster, then did an earthy paint as an undercoat. While the paint was still wet I dusted it with some Real Dirt from the backyard and shook off the excess. The dirt actually got really good coverage. I did all this outside, so please forgive the ever changing lighting in the pictures. Added some highlights and lowlights with a mix of railroad scenery earth stuff. Four different colors of turf, terrain and shrubs added and logs. The chewed up pieces of wood were old toys from my chinchilla's cage. He thinks a bundle of sticks is the most exciting thing in the world. I thought that his destruction of them gives the wood a natural look since the the trees are victims of Terrible Forces of Evil. The glue is still drying in the picture, so ignore the little white globs. Still need to add people, vehicles and the Terrible Forces of Evil. Not quite sure how to transition the edges of the diorama into the base though. Edited November 3, 2011 by graveturtle Quote Link to comment Share on other sites More sharing options...
Mercman Posted November 4, 2011 Share Posted November 4, 2011 (edited) You can transition the edges with paint. Either use the colors on the top in a combination, or like most do they use a darker color. Your colors on the rocks look real good, and the landscaping is coming along fine, nicely done. Will be interesting to see what you mount on it to display. Here's a tip for you and anyone else. When using real dirt, if it's to granular, I put iit on a old baking sheet, then pulverize it with a rolling pin. After that I run it through a flour sifter to get the bigger grains out, and put the finished product in separate containers. For storage I use plastic condiment bottle like those for catsup, and mustard. Sorry for the small pic. Also one more tip, you should bake the dirt, sand, or what ever you use first to get/kill any nasty things that might be hiding on it. All of the above supplies can be found at the dollar store if you have one in your town, ot at one of the others for reasonable price. I think my rolling pin was only $4.00. Edited November 4, 2011 by Mercman Quote Link to comment Share on other sites More sharing options...
graveturtle Posted November 4, 2011 Author Share Posted November 4, 2011 Thanks for the tips on using dirt! I didn't even think of baking it >_< Quote Link to comment Share on other sites More sharing options...
graveturtle Posted November 6, 2011 Author Share Posted November 6, 2011 Just messing around with the incomplete base since the vehicles that go with this base aren't complete yet. Here's a nice shiny 1/16 Stutz. The driver seems to have gone off to make sure the Terrible Forces of Evil aren't nearby, but he really shouldn't have done that. The evil flat green Zaku tries to put a dent in the shiny Stutz out of jealousy (it wants to be shiny too). Ok... back to working on the real scene... Quote Link to comment Share on other sites More sharing options...
Jim B Posted November 6, 2011 Share Posted November 6, 2011 Looks like Zaku is trying to kick a field goal! Quote Link to comment Share on other sites More sharing options...
Swifster Posted December 6, 2011 Share Posted December 6, 2011 Zaku - "I keeck a touchdown..." I like this. In many ways this would work in a urban dio for an alley way. Quote Link to comment Share on other sites More sharing options...
Recommended Posts
Join the conversation
You can post now and register later. If you have an account, sign in now to post with your account.
Note: Your post will require moderator approval before it will be visible.