Chas SCR Posted October 3, 2012 Author Posted October 3, 2012 When the real "Runt" is driving away from you this is all you see as a badge on the car. So this is the same lettering and Font that they used. Here is a sheet of just R's lay'ed out and I will post a pic on how they go on to the body Runt. All them R's has a circle around it and has the +. They are done to exact 1/24th scale of this art work.
Chas SCR Posted October 4, 2012 Author Posted October 4, 2012 Thank you very much Art! I hope every one enjoys it as much as I do building it and showing the stuff to people.
Chas SCR Posted October 5, 2012 Author Posted October 5, 2012 The badging done on "Runt" only took 5 of them till I was able to cut it out and not cut into the R or take of the top of the T at all. This is only .050 tall and .100 long.
Chas SCR Posted October 5, 2012 Author Posted October 5, 2012 Putting the R's all in there spots. .030 sure looks big once you get them away from each other.
bryan_m Posted October 5, 2012 Posted October 5, 2012 oh man! that looks so cool! very nice work on the engine bay, im diggin it. cheers bryan
Chas SCR Posted October 10, 2012 Author Posted October 10, 2012 Pic 1 Here is the air breather box for "Runt" this will have a two into one hose line hooking up the valve covers so the motor can breath. Pic 2 I had to get a 0/40 squarls tail brush today so I could do the out line of the black. This helps bring out the panels more but Curtis from RPM and I both agree it made it look a little off with the black. Pic 3 The only spot on the body its self that has a black paint other then the window trim, or in the engine bay area. Helps brake up the red and bronz so the spoiler can be seen from above.
Chas SCR Posted October 11, 2012 Author Posted October 11, 2012 Getting closer to having the clear coat put on. 1 to 2 more days of little fine detail work on the body and he will be heading in to get the greatest part of the painting done.
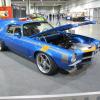
dimebolt Posted October 11, 2012 Posted October 11, 2012 Awesome lookin Chevy II man. Just right. Corey
simonr Posted October 11, 2012 Posted October 11, 2012 Hey Chas, great job so far..I hope to see this one finished very soon! Simón P. Rivera Torres
Chas SCR Posted October 12, 2012 Author Posted October 12, 2012 Thanks guys, But this will not be done in time for Indy at the end of the month. To much little detail to do it it still.
Chas SCR Posted October 12, 2012 Author Posted October 12, 2012 1st pic This part here goes in between the frame rails and hold the cross member and also exhaust in place. You can see the exhaust clamps bolted in and there is 2 per a side plus 2 bolts each. There will be two more per a side put on the rear crossmember. 2nd pic Showing the top of the crossmember as it has 4 3/4 bolts with washers in place. Plus there is 2 more at the end of the long drive shaft cover that bolts to the rear crossmember.
dimebolt Posted October 12, 2012 Posted October 12, 2012 Killer concepts man. Lookin really good. Great scratchbuilding. Corey
Chas SCR Posted October 12, 2012 Author Posted October 12, 2012 First look at "Runt" in clear coat! This will be ready to wet sand on monday as the Du Pont 7900 drys.
Chas SCR Posted October 12, 2012 Author Posted October 12, 2012 2nd pic The rear crossmember exhaust clamps are now bolted in place. 3rd pic Full shot of the chassis with all the bolts put in and ready to start the last little details before going all together.
crazyrichard Posted October 13, 2012 Posted October 13, 2012 whow those colors work so great , awsome stuff also love the engine bay idea's , cool to watch !!
Chas SCR Posted October 16, 2012 Author Posted October 16, 2012 1st pic This is how bright it gets with a flash, Also now it is done for the first of the wet sanding and tomorrow I will put the black and rubber parts on the body to be clear coated 2 more times. 2nd pic Here is a pic with out a flash and this was what I was hoping for, The Rap in side the fenders was right with the shading of the body that will be seen more normal then with the flash of a camera.
Chas SCR Posted October 17, 2012 Author Posted October 17, 2012 (edited) put the black rubber around the rear and front windows. Also put down tape on the door to give it a diffrent textur to make it dull black. This all little detail will set the body off even more when it all comes together. Edited October 17, 2012 by Chas SCR
Chas SCR Posted October 18, 2012 Author Posted October 18, 2012 Pic 1 Rear seat being fitted in and having the center consel put in also. Pic 2 With the rear seat in, I put the roll bars in to hook up the fire extinguisher and connect that to the rollbars. Pic 3 The hood has been wet sanded and now i'm adding the gard to the front of the hood, yes this is normal tape as it gives off the same textur as what the gard does and this will have the chevy bow tie in it when i'm done.
Recommended Posts
Create an account or sign in to comment
You need to be a member in order to leave a comment
Create an account
Sign up for a new account in our community. It's easy!
Register a new accountSign in
Already have an account? Sign in here.
Sign In Now