Chas SCR Posted November 28, 2012 Author Posted November 28, 2012 Thank you Rick, I just wish I could have made the front struts work is all. Other then that it's coming together real nice and i'm ready to get the interior done now.
Chas SCR Posted November 28, 2012 Author Posted November 28, 2012 Able to do all this work goes to learning from people on here and the great guys like Hollywood Jim, Mark D Jones, Bob Wix and Tom Nungester and others from the GSL show. I'm not sure if I would be able to do this or even be pushed to do stuff like this if it was not for there input and help. Thank you all.
Chas SCR Posted November 30, 2012 Author Posted November 30, 2012 Adding the rear window padding in. The roll bar goes inside it to the panel. Dash is done, Gagues in and also the DVD player, This also has a screan made out of negitive film strip. Checking to see how the dash fits with the steering shaft and interior sides on now.
Chas SCR Posted November 30, 2012 Author Posted November 30, 2012 Thank you Jerry, Ran into a little problem yesterday and working on getting that fixed next week on this project.
Geno Posted December 1, 2012 Posted December 1, 2012 Wow, this bad boy rocks. Simply incredible. Definitely two thumbs up.
Chas SCR Posted December 2, 2012 Author Posted December 2, 2012 Scratch built the steering wheel for "Runt" today. I will have it all in paint by tomorrow night. Showing the head rest on the seats now and ready to be painted and put back in. They do work up and down.
Chas SCR Posted December 4, 2012 Author Posted December 4, 2012 Door decal is now done and it is also made with a magnet so it will be able to be display with it on or off. Every thing fitted in with the rear window. The windows are all vacum fourm and also there will be the rear quarter windows put in.
Chas SCR Posted December 12, 2012 Author Posted December 12, 2012 Still waiting on the front window to get here, I was able to get the steering wheel done complete, This is all scratch built other then the outter ring.
Chas SCR Posted December 13, 2012 Author Posted December 13, 2012 Showing the full interior done. The speakers are now in and the steering wheel is done. The head rest are the last things to get done and then it's time to go into the body machine the gas cap to fit and painted it mid black.
Chas SCR Posted December 25, 2012 Author Posted December 25, 2012 Christmas eve and we are still working on stuff for "Runt" little detail stuff as we head into the count down to 16 weeks till GSL 24. Rear qaurter windows being made, They are out of .003 clear with a film over them so I can lay them out and cut to the right size.
rustybill1960 Posted December 28, 2012 Posted December 28, 2012 I just came from your Brute Camaro post Chas . . . . . WOW!! Am I in for a real treat here! This build is "fantastic" Man!! Again, I Thank You for sharing here!! Another one for me to watch!! Later Russ
Chas SCR Posted January 8, 2013 Author Posted January 8, 2013 "Runt" is now have the windows polish and clear, The side 1/4 rear windows are now in with the window slider put in also. The last photo is showing how every thing is together with the interior and line up to the door jam.
Chas SCR Posted January 8, 2013 Author Posted January 8, 2013 Interior is now done! The head rest is in place and yes they do move up and down on the driver one only.
rustybill1960 Posted January 10, 2013 Posted January 10, 2013 Friggin' awesome Man!! Thank You for sharing Later Russ
Chas SCR Posted January 15, 2013 Author Posted January 15, 2013 Hood hings are now put in, The breather box is now done and has the air filter on it. And the last look of the motor as the belts are now put on the pullys and ready to go into the chassis.
rustybill1960 Posted January 16, 2013 Posted January 16, 2013 (edited) It doesn't hurt missing the Camaro build with this build going on still!! I really admire Your skills Chas!! Thank You for sharing Later Russ Edited January 25, 2013 by rustybill1960
Chas SCR Posted January 23, 2013 Author Posted January 23, 2013 The motor is now in 'Runt" all hooked up with fuel lines and ac lines ran to the firewall, Top and bottom water hose on and last the vavle cover breather box in place with the lines ran. Also you can see the new vavle covers I put on that are smooth on top and put in the acorn nuts in the top of them. The AC and fuel lines are hard line sold that I ran a file over it and then painted dull black and then use a black marker over the braided line so some of the silver will show through with the black wash look. Once I put the intake tube on you will not see a lot of the hoses as this part covers up the top half of the left side.
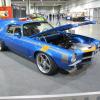
Chas SCR Posted January 25, 2013 Author Posted January 25, 2013 Here you can see the clutch and brake resevior, Then we start to see up the frame in the front. With every thing in the front tied down just put the front wheels on to see how the stance is before doing the rear end.
rustybill1960 Posted January 25, 2013 Posted January 25, 2013 Very very nice! Your build looks smooth as silk! Thank You for sharing Later Russ
Recommended Posts
Create an account or sign in to comment
You need to be a member in order to leave a comment
Create an account
Sign up for a new account in our community. It's easy!
Register a new accountSign in
Already have an account? Sign in here.
Sign In Now