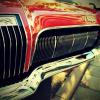
Clemi Posted March 20, 2013 Posted March 20, 2013 Hi guys, today I start to show you how I build my Chevrolet Caprice as a police car. I want to install lighting like the original has. The interior: I have modified the grille so that led-flashers can shine from behind. Here is the third brake light Finished the interior Please forgive me if i make mistakes in writing. I'm from germany and I learned english just in school and by watching american films and by reading american magazines. Show me my mistakes so that I learn it right
Clemi Posted March 20, 2013 Author Posted March 20, 2013 (edited) Here is the lightbar with red and blue smd-leds. I will etch a pcb to drive the leds to simulate the rotating like at the original. (Sorry for the bad quality of the last 4 pics, anyhow the camera had a fail...) This is the actual stand, at the moment I don't have much time. Also I are waiting for a lot of tools and paints I ordered and next week I would build a new spray booth and I can't spray the paints before the spray booth is finished. I hope that you are interested Edited March 20, 2013 by Clemi
hvymtl Posted March 20, 2013 Posted March 20, 2013 Looks good to me and as for your english it is very good. hope you can post a video of the lights rotating . Michael
scalemodelworld Posted March 20, 2013 Posted March 20, 2013 I wish my German was as good as your English! The build is looking fantastic. Great detail in the interior and the lights look fantastic. I'd be interested to see a step-by-step with product details on how you are doing the lights. I did head lights and tail lights for my "Christine" Plymouth Fury just using 4 LEDs, and it was a nightmare.
Clemi Posted March 20, 2013 Author Posted March 20, 2013 Thanks for your comments I'd be interested to see a step-by-step with product details on how you are doing the lights. I did head lights and tail lights for my "Christine" Plymouth Fury just using 4 LEDs, and it was a nightmare. Sure, I will do it. In the last time I'm experimenting with etching and I do photos of every step. I will show them if I have good results.
Davewilly Posted March 20, 2013 Posted March 20, 2013 Looking very cool....I like the grill and how your doing lights that work. Keep posting!
English Jules Posted March 26, 2013 Posted March 26, 2013 super arbiet und eine schoen und sauber auto :-)
mikemopar70 Posted March 26, 2013 Posted March 26, 2013 Wow, cool project! These Caprices were very popular police cars at the time!! Nice job on it, keep it going! Mike..
mikemodeler Posted March 26, 2013 Posted March 26, 2013 Great job so far and keep the pictures coming! Your English and spelling is better than many here who were taught it as a first language in our schools!
Clemi Posted April 28, 2013 Author Posted April 28, 2013 Hello, today I painted the car. First spraying white, then masking, then spraying black. I used Gunze Mr. Color with Mr. Color Leveling Thinner. I know, it is not the best result but I'm very happy, it's the best result I ever get. The next step is clearcoating, then I apply Decals and then clearcoating again, then polish and wax.
Christopher J Posted April 29, 2013 Posted April 29, 2013 Looking good so far. I'm thinking that if you wet sand your paint job a bit you can get the grainyness out and have a nice smooth surface for decals and clear coat.
mind-9 Posted April 30, 2013 Posted April 30, 2013 Clemens, Nice you make it a black and white and the paint job , it's like what Christopher said "wet sand and some polish will do the trick. Like to see the lightsworking on a video. Maybe a little tut how you made the lights ? will follow this one. Und in Holland wir sagen Auf Wiedersehen (in Holland we say see you) by the way your English is ferry good . Gr Dirk
Recommended Posts
Create an account or sign in to comment
You need to be a member in order to leave a comment
Create an account
Sign up for a new account in our community. It's easy!
Register a new accountSign in
Already have an account? Sign in here.
Sign In Now