comp1839 Posted September 7, 2013 Author Posted September 7, 2013 thanks joe. it's a ton of extra work to make them that way. i think it will make for a better end product.
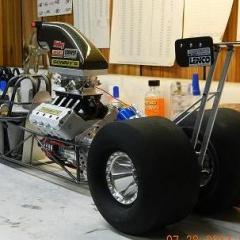
comp1839 Posted September 10, 2013 Author Posted September 10, 2013 finally got started on the rear 4 link. the car has a jerry bickel adjustable 4 link so i made up the main arm. i'll get started on the brakets next. it won't be a functional system so no slots. the holes i did pic are the correct positions in the car.
Magic Photos Posted September 11, 2013 Posted September 11, 2013 Dave so glad you are back at this build. Your work is FANTASIC great detail, and most of all thanks for sharing you work and answering all are question. You are a great help to all.
ScrappyJ Posted September 11, 2013 Posted September 11, 2013 (edited) Outstanding! I look at the junk I do and wonder why even try, JK! In all seriousness, you motivate and inspire me, Sherm. You've heard me say it before, but to me it is worth repeating as many times as I get the opportunity to: you are a heck of an engineer/fabricator/machinist! Edited September 11, 2013 by ScrappyJ
futurattraction Posted September 11, 2013 Posted September 11, 2013 I've run out of adjectives, Dave... lol Keep up the super-fantabulous work!
comp1839 Posted September 11, 2013 Author Posted September 11, 2013 mike, dirk, and scott, many thanks guys!!! i appreciate the kind words. i try to give up-to-date, accurate and real (not imagined or pretend) info. there is just way too much bogus info. out there.
vintagedragfan Posted September 14, 2013 Posted September 14, 2013 that is a gorgeous piece of machining Dave, looking forward to more bro
comp1839 Posted September 14, 2013 Author Posted September 14, 2013 (edited) thanks, bill. here is the rest of the chassis 4 link system. the side plates can be rotated, flipped put in different holes to achive an almost infinite range of instant centers. Edited September 14, 2013 by comp1839
Prostreet Posted September 15, 2013 Posted September 15, 2013 Awesome stuff Dave, can't wait to see the chassis.
Ognib Posted September 17, 2013 Posted September 17, 2013 I really like your anodized finishes! Is the gold a spray on like the red that you told me about?
comp1839 Posted September 17, 2013 Author Posted September 17, 2013 thanks scott and ray. the gold material is brass. i machined the brackets from 1/8 brass flat bar. they are brass because they will be soldered directly to the chassis.
Red rocket 10 Posted September 17, 2013 Posted September 17, 2013 Dave you never stop short of amazing me, absolutly beautiful work ! Keep up the fantastic work buddy............... Leonard
comp1839 Posted September 19, 2013 Author Posted September 19, 2013 (edited) hey leonard, thanks a bunch man!!! been a while. how you doin'? got started on the chassis finally. Edited September 19, 2013 by comp1839
Prostreet Posted September 20, 2013 Posted September 20, 2013 Oh yeah, Part i have been waiting for. Great start Dave, Question for you, Any particular reason you start at the back like that? Or just personal preference?
Mooneyzs Posted September 20, 2013 Posted September 20, 2013 Dave... You are always impressing me and your updates never disappoint me. I love seeing your progress on your builds. I am going to be taking lots of note on this . The chassis is off to a great start and looks killer. Keep up the great work.
Dyno Davo Posted September 20, 2013 Posted September 20, 2013 This is amazing work, will be watching with interest
tyrone Posted September 20, 2013 Posted September 20, 2013 Looking great Dave... glad to see the chassis getting started....
futurattraction Posted September 20, 2013 Posted September 20, 2013 Great to see you start on this part of the project Dave. What are the dimensions (OD and wall thickness) for your frame rail tubing? I'm looking forward to seeing this go together...!
comp1839 Posted September 20, 2013 Author Posted September 20, 2013 thanks for the nice thoughts, guys. i'm glad to be getting to this part too. i means i can stop making all those little parts for a while!! hehe. scott, i use standard mostly 3/16, 5/32, and 1/8 brass tubing for the chassis. when it come to the all of the mounts (i.e. body, dash, chutes, battery etc.) i 'll use smaller stuff.
comp1839 Posted September 21, 2013 Author Posted September 21, 2013 to do the job "correctly". each piece of tubing must be properly filed and fitted before soldering. simply laying a piece of tubing on top of another piece of tubing won't do.
Magic Photos Posted September 21, 2013 Posted September 21, 2013 Dave great work as always. Thank you so much for the detail pics and all the help you give us modelers.
tyrone Posted September 21, 2013 Posted September 21, 2013 Looking great Dave... looks just like the real thing,....
comp1839 Posted September 21, 2013 Author Posted September 21, 2013 thanks mike. always happy to help when i can. thanks, tyrone. "looks just like the real thing"............. probably the best compliment that can be given. thank you.
vintagedragfan Posted September 22, 2013 Posted September 22, 2013 beautiful start on the chassis Dave, I agree, all of the joints look look and work much better with fish mouth, great progress bro!
futurattraction Posted September 23, 2013 Posted September 23, 2013 (edited) Looks super so far, Dave. As Tyrone already said, it looks like a 1:1 build... Edited September 23, 2013 by futurattraction
Recommended Posts
Create an account or sign in to comment
You need to be a member in order to leave a comment
Create an account
Sign up for a new account in our community. It's easy!
Register a new accountSign in
Already have an account? Sign in here.
Sign In Now