comp1839 Posted January 31, 2014 Author Posted January 31, 2014 henry, thanks and http://www.mcmaster.com/#o-rings/=qhv1rl chris, thanks buddy. ira, thank you and anytime.
midengineaddict Posted February 1, 2014 Posted February 1, 2014 (edited) As usual, it looks better then the real thing. Edited February 1, 2014 by midengineaddict
Magic Photos Posted February 1, 2014 Posted February 1, 2014 As always FANTASTIC work Dave, the attention to detail is second to none. BEAUTIFUL
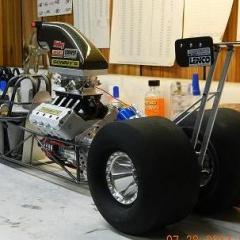
comp1839 Posted February 9, 2014 Author Posted February 9, 2014 (edited) with all of the parts needed, to actually hold the car up, completed. i stuck the wheels and tires on to check if all of the calculating and effort are paying off. here the car is on it's own 4 wheels. keep in mind that the front tires are only temporary units (they are R.C. pieces). the front tires scale out to around 22 inches in diameter. the correct front tires, which i have yet to make, will be 25 inches in diameter. so the front end is about 3/16" too low. the new, proper diameter front tires will correct the ride height dimension. FINALLY, sitting on it's own. here you can see i have a 3/8" piece of rect. tubing as a gauge. the front height is low by the diameter of the frame rail. which is 3/16". so all is good! this pic shows all the front end pieces in place. track width is correct. geometry is correct. you'll note the front wheel/ brake relationship is correct. the front brakes DO NOT hang out from the front wheel as in many factory version models. Edited February 9, 2014 by comp1839
comp1839 Posted February 9, 2014 Author Posted February 9, 2014 moving to the rear. tires have plenty of inboard (frame) and outboard (body) clearance.
comp1839 Posted February 9, 2014 Author Posted February 9, 2014 (edited) here are some random body shots. roughly 3" scale inches of ground clearance in the rear. front wheel opening. just a reminder: the front tire is too small in diameter. rear wheel opening. Edited February 9, 2014 by comp1839
blackbeard Posted February 9, 2014 Posted February 9, 2014 love how the body sits on the chassis and the updates are very helpful
AZ Boy Posted February 9, 2014 Posted February 9, 2014 Very, VERY nice, Dave! Measure twice..cut once, right?
Red rocket 10 Posted February 9, 2014 Posted February 9, 2014 Wow ! I can smell the fuel Dave ...... Outstanding ! Leonard
Magic Photos Posted February 9, 2014 Posted February 9, 2014 OUT OF THIS WORLD Dave. Thanks so much for sharing.
Mooneyzs Posted February 10, 2014 Posted February 10, 2014 Dave... This is one fantastic update. Also it's awesome to see this sitting on all four's. I know it's a great feeling getting it into a roller. I admire you and your work. This thing is gorgeous.
jasoncamaro Posted February 10, 2014 Posted February 10, 2014 I'm pretty sure you work in a chassis shop and just Photoshop pics of what your building to look a 1/8 scale model On a more serious note it looks awesome Dave
futurattraction Posted February 10, 2014 Posted February 10, 2014 Fantastic update, Dave! It's great to see it as a roller. Looking forward to the next update already...
comp1839 Posted February 10, 2014 Author Posted February 10, 2014 henry and tom, thanks! appreciate the thoughts. aaron, while the saying is old, it's never been more true! LOL! thanks. mike, always glad to help!!! chris, thanks bud. it is such a milestone getting this to be on all four wheels. not many would GET it..... i know you do!!! jason, that's quite the compliment. thank you. scott, thanks so much. were getting to the point where i'll be getting to install some "chassis accessories" !!!! hehe.
comp1839 Posted February 11, 2014 Author Posted February 11, 2014 got to work on the dry sump system a little over the week end too. made 3 pumps before i came up with what i wanted. here's the pump. return manifold. mocked in place.
futurattraction Posted February 13, 2014 Posted February 13, 2014 (edited) I can't wait to see how the "accessories" look and work out for you when installed. Would you mind if I borrow your nice, close up view of your dry sump pump to use as a model for a 1/25th scale version? If so, what is the overall length of it? I like how you've painted the inset portions of it. That really adds a lot to the character of it. Keep on truckin' my friend! Edited February 13, 2014 by futurattraction
Mooneyzs Posted February 13, 2014 Posted February 13, 2014 Dave... fantastic work my friend. That oil pump is gorgeous. I sure love the last pic, the angle that its taken at with the tires and block..... lookin' Sweet!
Interceptor Posted February 13, 2014 Posted February 13, 2014 Pure magic Dave. Just pure magic. Fantastic craftmanship you're displaying here. Mark
GoatGuy Posted February 14, 2014 Posted February 14, 2014 I agree with Henry that these are very helpful updates. Thank you for showing us all the details.
comp1839 Posted February 14, 2014 Author Posted February 14, 2014 henry, thanks! scott, sure, you can use it if you want. it's probably 10" or so in 1:1. if you want more accuracy. i run a different style dry sump system in my 1:1 cars. i can give you on the money dimensions for the entire system if you want. chris, always a pleasure to read your comments!!! mark, thanks so much! dave, thanks and anything you need just yell. hehe.
Recommended Posts
Create an account or sign in to comment
You need to be a member in order to leave a comment
Create an account
Sign up for a new account in our community. It's easy!
Register a new accountSign in
Already have an account? Sign in here.
Sign In Now