sak Posted February 2, 2014 Posted February 2, 2014 Just wondering how hard it is to dissasemble promo kits. Are the parts glued together or is everything screwed together. Would like to build a 67 eldorado and this looks like the only possible way. Thanks
Ramfins59 Posted February 2, 2014 Posted February 2, 2014 Usually you just have to remove either the chassis screws or "plastic nails" to get the chassis off. Then you can pop out the grille, bumpers and headlights and taillights if they are separate pieces. To get the interior bucket and glass out you'll usually have to cut the mounting tabs off with your sprue cutter, or grind them down with your dremel. When you're all done with repainting or whatever just use CA glue to reinstall the glass (after polishung it if needed) at the mounting points, again along with the interior bucket. If you are disassembling the interior for painting and detailing you may have to use an XActo saw to get the dashboard off, depending on how well it is glued in. Just take your time when taking it all apart so you don't break any of the pieces. When it's all repainted, cleared, polished and Foiled you'll have a really cool looking car. Don't forget to add interior and exterior mirrors. Good luck with your Eldorado.
disabled modeler Posted February 2, 2014 Posted February 2, 2014 Jeff... Rich is right and very very few promos had anything glued in them...I love restoring promos myself getting them back to what they should be like or were...heavily damaged ones I turn into models if there not repairable as is.
Erik Smith Posted February 2, 2014 Posted February 2, 2014 I have used a large drill bit to remove the mushroomed plastic holding windows/tubs in - just go slow and it should take the plastic off the top of the tab and leave the remaining peg intact. Same with some grills and bumpers - just use a bit slightly larger that the mounting peg and remove the melted top. I find it easier to access some areas with a drill vs a knife or chisel.
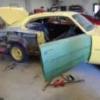
von Zipper Posted February 3, 2014 Posted February 3, 2014 I agree with everyone above but had a few thoughts to share. I'm pretty sure the 1967 Eldorado promo you have was made by Johan. Some of those Johan promos had a pressed nail type fastener like the one on the left instead of a slotted screw there's not much of a head to grab onto and it's a spiral twist thread, so I used a pencil soldering pen to heat the "nail" in the center of the head, after a few minutes I took a pair of needle nose pliers and pulled it out , then replaced them with small sheet metal screws from the hardware store. Once you get the chassis apart from the body and if you want to take the wheels and axles off, be mind full they are also pressed on with a thick spline so you can't twist them apart, they have to be pulled apart I used a pair of wire side cutters as a type of small pickle fork like used on 1;1 ball joints and tie rods to drive the wheel from the axle spline. Here's the '65 Rambler American I'm working on-before- as it sits right now-
Tom Geiger Posted February 3, 2014 Posted February 3, 2014 Newer promos can be different. For instance the Geo Storm promo is heat fused together and a real pain in the tail to get apart. You need to grind down the fused points until the parts are released.
Fabrux Posted March 13, 2014 Posted March 13, 2014 I recently picked up four promos that I'm looking to build up; they're all in really good shape no restoration needed, really. The two Chevy duallys are as Tom described with heat fused interiors but the two older MPC promos (1980 Monte Carlo and 1980 El Camino) seem to have glue holding things in?
Recommended Posts
Create an account or sign in to comment
You need to be a member in order to leave a comment
Create an account
Sign up for a new account in our community. It's easy!
Register a new accountSign in
Already have an account? Sign in here.
Sign In Now