Kennyboy Posted February 10, 2015 Author Posted February 10, 2015 Thank you Walid and Tom! Tom, I can't wait to do the racing livery myself. Going to try to section-in a racing interior/cage from a Tamiya 911 GT3 car.
72 Charger Posted February 10, 2015 Posted February 10, 2015 Im sorry but I think that you would spoil it with race decals on it ....! Just my 2 cents. Fantastic paint well done
Kennyboy Posted February 10, 2015 Author Posted February 10, 2015 Im sorry but I think that you would spoil it with race decals on it ....! Just my 2 cents. Fantastic paint well done Oh no Dave, I only plan on having a few small sponsor decals here and there.......I wouldn't dream of putting a lot of stuff over this......
72 Charger Posted February 10, 2015 Posted February 10, 2015 That's cool Ken . I think that I would do it on something with a bit more body work and a bit less glass though . Something like a 50's or 60's Caddi maybe ?
Intmd8r Posted February 11, 2015 Posted February 11, 2015 Excellent job-something tells me that this is not your first time with the air brush! You should be proud.
426hemiman Posted February 11, 2015 Posted February 11, 2015 Great flames. Ken paint looks great. We will have to mix some new colors next time.
Kennyboy Posted February 11, 2015 Author Posted February 11, 2015 (edited) Great flames. Ken paint looks great. We will have to mix some new colors next time. Thank you Bob! BIG thanks for the great service on the Kandy's!! "Bob's Paint" rocks!! I am definitely interested in playing with new paint colors!! Working on the engine/suspension for this beast guys! Also, working on fitting the MASSIVE gold BBS wheels........Pics when I get further. Edited February 11, 2015 by Kennyboy
Kennyboy Posted February 11, 2015 Author Posted February 11, 2015 Excellent job-something tells me that this is not your first time with the air brush! You should be proud. Thank you Steve! Been airbrushing now for around 21 years.
426hemiman Posted February 14, 2015 Posted February 14, 2015 Kenny what tip and how much air pressure did you use. you going to teach us how to do it next fri.
slusher Posted February 14, 2015 Posted February 14, 2015 Amazing paint and flames Ken, I started drooling. I have always wanted to build that kit. Now I am even more inspired....
Kennyboy Posted February 14, 2015 Author Posted February 14, 2015 Kenny what tip and how much air pressure did you use. you going to teach us how to do it next fri. Hey Bob, I shot this with my Iwata HP-BCS with just the standard tip that comes in it at 18 psi.......and I could probably bring the templates and airbrush to mess around with on something.
Kennyboy Posted February 14, 2015 Author Posted February 14, 2015 Amazing paint and flames Ken, I started drooling. I have always wanted to build that kit. Now I am even more inspired.... Thank you Carl! I myself was really surprised at the quality of the molding and detail for such an old kit........just throw away the wheels and tires from the kit, they are completely useless. whouw !! Thanks Richard!
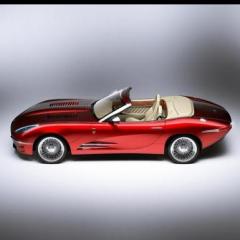
Kennyboy Posted February 22, 2015 Author Posted February 22, 2015 (edited) Well guys, I am finally going to post up some pics of where I am on this........ALMOST DONE!! The wheels were not easy (at all) to get into the wheelwells due to the size of the original kit wheels, but finally got them to fit. The engine detailing is almost non-existent on the kit, so I spent a LOT of time in there trying to make a reasonable representation of the proper engine room. Replaced the kit seats with a pair from a Skyline GTR (not pictured yet) to fit the proper race theme of the build. The kit taillights are molded completely in transparent red (which is very incorrect) this had me painting the amber and silver sections on the front of the lens which is quite difficult! They turned quite nice though, and will be easy to see when I get the final pics in after assembly/decal work is done. Threw in a couple shots of it in the sun to show the contrast between ambient light and artificial........enjoy! Got the windows to glue in and put the two halves together.....then to find some Jaguar race decals for tasteful installation. BTW......in this photo \/ the gauges were done with colored pencil.....there are no decals for this in the kit. Edited February 22, 2015 by Kennyboy
72 Charger Posted February 22, 2015 Posted February 22, 2015 Those wheels are SO much better than the originals . Nice job Ken
Speedfreak Posted February 22, 2015 Posted February 22, 2015 Beatiful work Ken, what does the paint job look like 1:1? Even better than it does on here? Does it have much depth?
Kennyboy Posted February 22, 2015 Author Posted February 22, 2015 Those wheels are SO much better than the originals . Nice job Ken Thank you Dave. I just couldn't see it with those tiny things from the kit.
Kennyboy Posted February 22, 2015 Author Posted February 22, 2015 Beatiful work Ken, what does the paint job look like 1:1? Even better than it does on here? Does it have much depth? Thanks Gene. The paint is two colors of Kandy over black so it is pretty darn deep......The camera does not do it justice no matter what angle I have tried.
Speedfreak Posted February 22, 2015 Posted February 22, 2015 Should be awsome as a race car, can't wait to see it. What type/class car will it be?
Kennyboy Posted February 22, 2015 Author Posted February 22, 2015 Should be awsome as a race car, can't wait to see it. What type/class car will it be? If I can find the decals, I would like to do it as a Super Touring style. Looking for the decals with the outline Jaguar head for the sides and white Jaguar scripts with a small amount of sponsors.
Recommended Posts
Create an account or sign in to comment
You need to be a member in order to leave a comment
Create an account
Sign up for a new account in our community. It's easy!
Register a new accountSign in
Already have an account? Sign in here.
Sign In Now