rottin1 Posted March 1, 2007 Share Posted March 1, 2007 I picked another one of these kits up, because I think there fun little kits and have a bunch of possiblities. I'm going to make this one a day cab. I've gone ahead already and cut the sleeper away from the cab. I then cut the back out of and old AMT Pete to put on the Revell cab. I did this so I would'nt have to try and make my own window opening. http://i159.photobucket.com/albums/t121/ro...ab/MVC-055F.jpg http://i159.photobucket.com/albums/t121/ro...ab/MVC-056F.jpg http://i159.photobucket.com/albums/t121/ro...ab/MVC-057F.jpg http://i159.photobucket.com/albums/t121/ro...ab/MVC-058F.jpg Quote Link to comment Share on other sites More sharing options...
Jim B Posted March 1, 2007 Share Posted March 1, 2007 Very nice. Are you going to shorten the frame? Dumb question, what did you use to chop off the sleeper? Quote Link to comment Share on other sites More sharing options...
rottin1 Posted March 1, 2007 Author Share Posted March 1, 2007 Jim, I am not going to shorten the frame at all. I am a long wheelbase kind of guy. I love the trucks with the stretched out frames!!!!! I will not be touching the frame at all. As for how I cut the sleeper away: I worked from the inside out on that. I took a scribing tool (dentist tool) and slowly scribed lines between the bunk and the cab. I slowly worked a deep enough line. then finished it with an exacto blade. I then ground down the edge that was left with my sanding tool on my drill press. I did the same thing when I cut back out of the old AMT truck. I've yet to decide what color I am going to paint it. I'm thinking White with a Red frame and Red fenders. Thanks for looking!! Quote Link to comment Share on other sites More sharing options...
mackinac359 Posted March 1, 2007 Share Posted March 1, 2007 Nice. The little Revell kit is cheap enough to do all sorts of modifications to and then build another in a different configuration. Tim Quote Link to comment Share on other sites More sharing options...
halfpint33 Posted March 4, 2007 Share Posted March 4, 2007 Lookin good.I'll be keeping an eye on this one. Quote Link to comment Share on other sites More sharing options...
rottin1 Posted March 5, 2007 Author Share Posted March 5, 2007 I worked at a steady pace this weekend on this ride. I painted the the frame and the suspension Red. Painted the airbags Black and the shocks Yellow. The motors all finished up and glued in. I'm debating on whether or not to use the fenders that are mocked up in the picture. The only drawback on these snap kits are the tires, rims and how they go together. The outside tire wall doesn't like to grab the rim. I am thinking I might try (carefully) to run a smalll bead of glue along the rim edge and work the bead onto the glue. Unless some one else knows different, do tell. Hope you guys like what I've done so far. http://i159.photobucket.com/albums/t121/ro...ab/MVC-006F.jpg http://i159.photobucket.com/albums/t121/ro...ab/MVC-005F.jpg http://i159.photobucket.com/albums/t121/ro...ab/MVC-004F.jpg http://i159.photobucket.com/albums/t121/ro...ab/MVC-003F.jpg http://i159.photobucket.com/albums/t121/ro...ab/MVC-002F.jpg http://i159.photobucket.com/albums/t121/ro...ab/MVC-001F.jpg http://i159.photobucket.com/albums/t121/ro...ab/MVC-013F.jpg Quote Link to comment Share on other sites More sharing options...
pete359driver Posted March 5, 2007 Share Posted March 5, 2007 the rear fenders are beautiful as is the rest of the truck,i was planning on making similar fenders for my truck. p.s.,the other truck turned out beautiful as well Quote Link to comment Share on other sites More sharing options...
rottin1 Posted March 5, 2007 Author Share Posted March 5, 2007 Greg: Thanks for the compliments. As far as the fenders go their aftermarket. The ones on the other Pete are Griffen resin fenders I think. I also have a friend who makes resin full fenders for 1/24 - 1/25 scale big trucks. There excellent as well. I made the ones on my Kenworth, but there just wrapped around aluminum. I'll be concentrating on the back of the cab these next few nights trying to get it ready for paint. Quote Link to comment Share on other sites More sharing options...
Old Albion Posted March 6, 2007 Share Posted March 6, 2007 This little Revell kit seems very popular. I bought one myself recently. It was so cheap compared to other models. With the aftermarket parts available the options for this build are numerous. Great little kit. Have fun! Quote Link to comment Share on other sites More sharing options...
SpreadAxle Posted March 8, 2007 Share Posted March 8, 2007 I just picked one up Friday. I cant wait to get started. your truck is looking good Quote Link to comment Share on other sites More sharing options...
CFnutcase Posted March 11, 2007 Share Posted March 11, 2007 I have eight of these kits, I have done 3 of them so far and they have a vast ammount of possiblilities, I did one very close to what you are doing here, I made mine a day cab and did it with red frame and white cab. It came out very nice looking I thought. jim Quote Link to comment Share on other sites More sharing options...
rottin1 Posted March 18, 2007 Author Share Posted March 18, 2007 I did a little more work on this this weekend. I changed things up abit. I went with the bumper that comes with the kit. I am going to save the Texas bumper for another truck. I also went ahead and took of the double headlights and put single ones on. I want to give it a different look. I went with the Germany 359 half fenders also. I painted the air breather Red with chrome straps. The lubrifiner I left Chrome with Red staps. I'm also using the Germany 359 fuel tanks which have already been stripped of the chrome and I'm in the process now of filling in the seams and primering.There going to be Red with aluminum straps. Thanks for looking! http://i159.photobucket.com/albums/t121/ro...ab/MVC-030F.jpg http://i159.photobucket.com/albums/t121/ro...ab/MVC-029F.jpg http://i159.photobucket.com/albums/t121/ro...ab/MVC-027F.jpg http://i159.photobucket.com/albums/t121/ro...ab/MVC-026F.jpg Quote Link to comment Share on other sites More sharing options...
pete359driver Posted March 18, 2007 Share Posted March 18, 2007 B E A utiful!!! Quote Link to comment Share on other sites More sharing options...
mackinac359 Posted March 18, 2007 Share Posted March 18, 2007 VERY nice daycab! Tim Quote Link to comment Share on other sites More sharing options...
Old Albion Posted March 19, 2007 Share Posted March 19, 2007 Johnny, That paint scheme looks superb. Love the single headlights. Great Work! Quote Link to comment Share on other sites More sharing options...
SpreadAxle Posted March 25, 2007 Share Posted March 25, 2007 Looking good Quote Link to comment Share on other sites More sharing options...
rottin1 Posted March 25, 2007 Author Share Posted March 25, 2007 I managed a little more work on her this weekend! All the exhaust work is complete. I run the air lines out the back of the frame for under the trailer coupling. I added deckplate from front to back. I've hung mudflaps off the battery boxes and off the front of the half fenders. I have the light bars for the back of the truck fabbed up, I just have to drill the holes for the lights and get them on. I took a headache rack of the Germany 259 and cut it down to make a 2 door tool box for the back. I'm going to add to the depth of it by adding some styrene and covering with chrome tape. This tractor is eventually going to hooked up to the Italieri Curtainside trailer, which I'm going to alter form a tri axle to a spead axle and put some american touches on it. The tanks have been puttied,primed and the first coat of Red. http://i159.photobucket.com/albums/t121/ro.../MVC-027F-1.jpg http://i159.photobucket.com/albums/t121/ro...ab/MVC-028F.jpg http://i159.photobucket.com/albums/t121/ro.../MVC-029F-1.jpg http://i159.photobucket.com/albums/t121/ro.../MVC-030F-1.jpg http://i159.photobucket.com/albums/t121/ro...ab/MVC-031F.jpg Quote Link to comment Share on other sites More sharing options...
SpreadAxle Posted March 25, 2007 Share Posted March 25, 2007 Sweet. Nice Largecar! Quote Link to comment Share on other sites More sharing options...
Old Albion Posted March 25, 2007 Share Posted March 25, 2007 Johnny, That looks superb! Great Truck. Quote Link to comment Share on other sites More sharing options...
mackinac359 Posted March 25, 2007 Share Posted March 25, 2007 The bigger Revell fuel tanks look MUCH better than the tiny kit tanks. Tim Quote Link to comment Share on other sites More sharing options...
SpreadAxle Posted March 28, 2007 Share Posted March 28, 2007 sweet Quote Link to comment Share on other sites More sharing options...
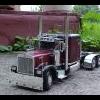
rottin1 Posted April 4, 2007 Author Share Posted April 4, 2007 I finally finished my fuel tanks and mounted them. I reversed them around, because I didn't like the idea of the fuel caps being so close to the straight pipes. Don't need a fire at the fuel pumps! Actually, I had a brain fade and didn't realize I did it until I was snapping pics. I couldn't bring myself to snapping them off after the glue had dried to change them back. I thought I'd be better off leaving them alone! I finished up my work box on the back and finished my light bars for the rear. I have several little touch ups left and she'll be finished. I have to add the stack straps and touch up with BMF on the fuel tank steps, where the part was joined to the tree. Lost a little chrome there! Another fun build for me. Next on the bench is 2 trailers for my last 2 tractors that I have built. I have already started on the curtainside for this one. Then I have a Revell tanker to go behind my Revell Pete previous to this build. Comments welcome both good and bad. Thanks for looking! http://i159.photobucket.com/albums/t121/ro.../MVC-001F-1.jpg http://i159.photobucket.com/albums/t121/ro.../MVC-002F-1.jpg http://i159.photobucket.com/albums/t121/ro.../MVC-005F-1.jpg http://i159.photobucket.com/albums/t121/ro.../MVC-006F-1.jpg http://i159.photobucket.com/albums/t121/ro...ab/MVC-007F.jpg http://i159.photobucket.com/albums/t121/ro.../MVC-008F-1.jpg Quote Link to comment Share on other sites More sharing options...
Old Albion Posted April 4, 2007 Share Posted April 4, 2007 Johnny, This is superb. Colour scheme quality of build excellent. Quote Link to comment Share on other sites More sharing options...
mackinac359 Posted April 4, 2007 Share Posted April 4, 2007 Very nice ! Tim Quote Link to comment Share on other sites More sharing options...
SpreadAxle Posted April 5, 2007 Share Posted April 5, 2007 you did good on this one. Quote Link to comment Share on other sites More sharing options...
Recommended Posts
Join the conversation
You can post now and register later. If you have an account, sign in now to post with your account.
Note: Your post will require moderator approval before it will be visible.