
surfjunke
-
Posts
839 -
Joined
-
Last visited
Content Type
Profiles
Forums
Events
Gallery
Everything posted by surfjunke
-
 Very cool idea. I like what you have done so far. You might be better off scratch building the wrecker part of your conversion.
 -
Thank you for the comments. Tameo's SLK or "Silver" range, are all well detailed F1 Kits. Some of their TMK range from the 60's & 70's that had exposed engines, trans & suspensions are very detailed. Their "Super" kits are in their WTC range, World Champ kits.
-
1/18 Lowenbrau Porsche 962, Miami Winner, 1985, Finished
surfjunke replied to surfjunke's topic in Model Cars
Thank you for the comments. It is a rebuilt die cast. I did a short wip on it in the workbench. -
WOW!!! A lot of really great pics & fine builds! Beautiful work & very creative ideas. Thank you for sharing, everyone. I just threw this in because it was such a great kit & I like the way it turned out. Historic Racing Miniatures Cobra. This one is a 1/43 Mercedes custom I have been tinkering with off & on for a while. It is from a few junk parts from an old white metal kit.
-
I finally got the chance to try one of Tameo's 1/43rd "super kits". This was my first attempt & it was quite a challenge & fun build. The kit has over 250 pieces! Mostly photo etch stainless steel, beautifully cast metal & lots on tiny turned aluminum parts. I built this kit box stock except for some wiring, plumbing & replacing the under size rear springs. This is the interior that was made up of many photo etch parts that were folded up & slotted together & the parts "clicked" together for an incredibly fine fit. I soldered a few of the joints & the interior was ready for the front suspension, interior & other tiny bits. Here is the engine,trans & rear suspension. Mostly from white metal parts. The new springs were fine brass wire wrapped around an appropriate size drill bit. The wire was from Detail Master. The paint used was Tamiya acrylics & some Alclad. Here is the finished kit with the body panels on. Finish was Tamiya acrylics & Dupont 2 part clear. Tameo always supplies 2 sets of decals with their kits & I am always thankful for that. The front & rear wings were cast metal parts that were sanding smooth & polished. The Ferrari with the body panels removed. This was the most incredible kit I have ever had the chance to build! Every thing fit & I had no assembly problems with the kit at all! A major challenge to build, but also a lot of fun (I know, I said that already). I would like to try a few more of these Tameo kits. Thank you for looking & enjoy.
-
The final paint did need to be color sanded & polished. Final assembly went very well with no problems. It was quite a fun project & I am very happy with the way it turned out. It was an interesting build for I am not use to building something this big! Painting parts this big was a real challenge. Thank you for looking & enjoy. I do have a long tail in the works & another short tail in Coke markings.
-
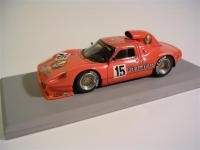
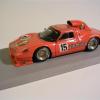
This project started out as a 1/18 Paul's Model Art/Minichamps die cast. The die cast was for the Le Mans winning Rothsmans car. The Rothsmans markings were all covered up with "Racing" decals. I was asked if I could convert this European spec long tail, twin turbo car to a short tail, single turbo IMSA spec car. This was to be built as a curb side. I was happy I did not have to do all the engine bay mods. The first order was to disassemble the car. The whole in the rear deck is for another long tail IMSA Lowenbrau 962 I am working on. Next up was making a template from oak tag & marking the cut lines on the rear deck. The surgery was done with a fiberglass cut off wheel on my Black & Decker Wizard. I did later remove the wing end plates for the short tail version. There was a Naca duct in the middle of the rear deck that was also carefully removed. The whole was filled with 40 thou Evergreen plastic. It will be saved for later use. I new rear deck was cut fro 30 thou plastic. The engine inlet scoop was drawn up & laid out on more oak tag & then transferred to some 30 thou plastic. A hole was cut into the top piece for that Naca duct that was removed earlier. The 3 plastic pieces were first glue together with Solva Set liquid plastic cement. When dry I made a nice smooth clean fillet on the inside joints with baking soda. This then has thin CA glue applied. BE WARNED, the chemical reaction between these is EXTREMELY BAD! I wear a respirator when doing this. Then I can file, sand & shape the nice round corners needed for the outside shape. I have heard that baby power is not near as toxic & I will give it a try. The underside of the rear deck needed to be built. Again, Evergreen plastic sheet & shapes were used. Here is the rear deck ready for primer. The new rear wing end plates were drawn out, transferred to oak tag & then to 30 thou plastic. The main body only needed to have the turbo inlet holes filled on both sides. The last mod to do was the chassis pan. The chassis on the left is the modified piece. The right is the stock die cast piece. Next was the primer, putty & sand phase. Paint was Tamiya acrylic white. Followed by the decals from Pattos Place & the Dupont 2 part clear. The wheels used were resin pieces I bought online from Legende Miniature from France, beautiful castings. Sorry I did not take more pics, but the car is now finished. You can see the finished car in the Under glass section.
-
Beautiful build! Great finish!
-
Beautiful OOB build! Very clean work & really like the color.
-
Really nice clean build, Anthony! You did very well. Just take care of those mold seams & injector pin marks on your next build.
-
Looks great! Very nice clean build! Very cool & rare car. Looks really nice as a street car.
-
Very nice build, Steve! Like your color choice & love the stance!
-
WOW!!! Beautiful build! Very clean! Really like the kit.
-
Customized '53 Studebaker Starliner "Studillac" Hardtop
surfjunke replied to Bernard Kron's topic in Model Cars
beautiful build, Bernard! Great color combo! -
Beautiful build, Darryl! Very cool show car & you really made it look great!
-
Came out really nice, Erik. We all run into kits that do want to go together or are just poor kits. You did very well to finish it & it turned out cool.
-
Beautiful work, Carl! Very cleanly done.
-
Very nice clean build! Great color choice.
-
Beautiful build! Very clean. Zero paint is really nice to work with.
-
Beautiful, Andy! The best build I have seen of this kit! Love the finish, wheels & that stance.
-
Beautiful race car & build! Great decal & finish work.
-
Very nice clean builds, Rudy!
-
WOW! Beautiful build! The chop it just right, nicely done. The engine bay is awesome! Love the grill, too.
-
Beautiful work! Very clean!
-
Very nice clean work. Love the finish.