Search the Community
Showing results for tags 'distributor'.
Found 4 results
-
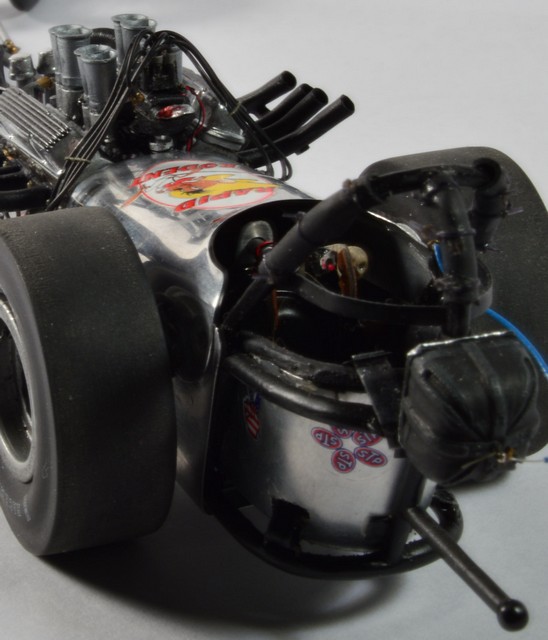
 Here are jpegs of a tutorial I did about four years ago. It's a subject that comes up frequently, so it bears a re-post, this time with tags. Everybody has their favorite way of accomplishing this task. There are some very nice aftermarket items out there, to be sure. I think that, back in the early-mid '70's, I built a couple of pieces with nine wires stuffed into a single hole drilled in the cap, before I decided that just wasn't acceptable, for me. Next, I began drilling nine holes (or five, or seven...) that's what's called a "painus in the anus"! Some time around 1985, Don Fahrni obtained some dental casting resin. We sought out a supply house from which to buy Dow RTV silicone rubber to make molds, and began making parts, mostly for fuel cars. One day Don noticed that he could fit "Bell wire" insulation into the nubs of a distributor cap mold. He added the dental resin, and, for us, at least, the rest was history. Neither of us ever used anything else for distributor/mag caps, again. These materials are relatively inexpensive, and once you've acquired them, you'll find many uses for them. Just the other day, I made a two-piece mold from it, so that I could make a set of knock-offs for my supermodified. I only had a single copy. Within an hour and a half, I had a set of four that simply need to be cleaned up. These are the kind of supplies it's always helpful to have around! I think everything is pretty clearly explained. If you have any questions, ask away!
-
I`m sure there are many topics about it but i would like to know what you poeple recomend. I dont have any i_phone chargers to butcher for wire,and have to buy aftermarket. So far i only have one product i like (wich i have forgot the name on). The others like Scale Repro Plus and Hobby Design are way to stiff. To put it easy,is there any wire that are more soft and easy to bend?
-
I'm loving the quality of parts in the Monogram 48 Ford Woody kit. But I'm real hesitant to start drilling the "crab style" distributor. Any tips on how to wire this up? Thanks!
-
The first step in scratch building is usually to break down a complex shape into simple geometric shapes. Take for example a distributor. This is a fairly simple shape consisting of three progressively larger cylinders. The top and largest cylinder is surrounded with equally spaced 1/2 round cylinders. Step two is to reduce the dimensions to something reasonably close in scale. In most of my modeling, this is 1:25 or 1:24 scale. The difference between these two scales is merely 1/2" in a foot, so I don't worry too much and generally will use the same scale conversion for either. After doing this exercise numerous times, you get to know some of the common measurements. For example, 1/8" rod is about 3" in scale, 1/16" is about half that, or 1 1/2". Another common measurement is 1" which is about .040" in scale. Therefore, .030" should equate to 3/4" These measurements should be about all we need to build the distributor. Start with some 1/8" styrene rod for the cap and .030" half round styrene to surround it. The most difficult task in building a distributor is to keep the 1/2 round equally spaced around the cap. I start by drawing vertical and horizontal lines on the end of the rod as accurately as possible. Find a stable platform to hold the rod and glue some 1/2 round along the length of the rod in-line with one of the marks.Once this dries, roll the rod 180º and glue another strip on the opposite side. After the second strip dries, the rod can be rotated 90º. At this point, my first two strips help the rod sit nicely in my impromptu fixture with the guide line perfectly vertical. Glue another 1/2 round strip in this position and once dry, rotate another 180º and add the fourth strip. At this point, you should have four 1/2 round strips glued on the rod at 90º increments. Hopefully, they look equally spaced and run straight down the length of the 1/8" rod. Four additional 1/2 round strips are now glued between the first four. We no longer need the marks on the end as it is easier at this point to position each 1/2 round strip evenly spaced between two of the existing strips. Glue on all four and you should end up with something like this. I make a point of being generous with the liquid qlue. Correctly applied, the plastic will fuse together and eliminate any sign of a gap. A coat of primer should reveal the quality of you work so far. The folded edge of some 400 grit sand paper can be run up and down through the grooves to clean things up if necessary. At this stage, I liken the part to an extrusion. It's far longer than needed for one distributor. When you need to build one, just cut off a slice and continue with the final steps.