Steve Osbourne Posted February 18, 2018 Author Share Posted February 18, 2018 I forgot to mention the spark plug wire separators made from .040 sheet. Quote Link to comment Share on other sites More sharing options...
Steve Osbourne Posted February 18, 2018 Author Share Posted February 18, 2018 Finally, I finished assembling the universals on the driveshaft. Quote Link to comment Share on other sites More sharing options...
bobthehobbyguy Posted February 19, 2018 Share Posted February 19, 2018 Amazing work. The detail is amazing. Quote Link to comment Share on other sites More sharing options...
Steve Osbourne Posted February 22, 2018 Author Share Posted February 22, 2018 I stayed up late watching the Olympics so I was able to drill out the Strombergs. Even though I was trying to keep it simple and basic I still ended up drilling 21 holes per carb. I sprayed them with silver leaf and did another test mock-up on the engine. My plans are to get this thing done and on the road by the weekend. Quote Link to comment Share on other sites More sharing options...
Steve Osbourne Posted February 22, 2018 Author Share Posted February 22, 2018 (edited) carbs Edited February 22, 2018 by Steve Osbourne new photos Quote Link to comment Share on other sites More sharing options...
Steve Osbourne Posted February 22, 2018 Author Share Posted February 22, 2018 (edited) o Edited February 22, 2018 by Steve Osbourne already posted these photos Quote Link to comment Share on other sites More sharing options...
Steve Osbourne Posted February 22, 2018 Author Share Posted February 22, 2018 Quote Link to comment Share on other sites More sharing options...
Steve Osbourne Posted February 23, 2018 Author Share Posted February 23, 2018 I finished adding the hardware to the carbs. I pretty much used what I had so some screws may be out of scale and others might be incorrect. Next up is to spiff up the kit linkages. They will mount on the shaft with the removable acorn nut. Quote Link to comment Share on other sites More sharing options...
Steve Osbourne Posted February 28, 2018 Author Share Posted February 28, 2018 Things seem to be moving slower as I near the finish line. The spark plug wires now have boots and should be connected to the plugs today. The carbs are ready to mount next with a minor modification to the kit linkages. I want to finish this so I can devote more time to my next project, the '82 Monogram Corvette. I'm doing it as a mild custom with wheel and engine upgrades. Here she is with the first working primer coat, posing with window glass and wheels. Note hood modification to fit the hi-rise manifold and Holley carb from one of the Monogram T's. Quote Link to comment Share on other sites More sharing options...
Steve Osbourne Posted February 28, 2018 Author Share Posted February 28, 2018 (edited) Here are the distributor boots. Just slightly larger wire insulation. I used that Bob Smith black CA for the first time and it works great. Edited March 1, 2018 by Steve Osbourne Bob Smith is glue. Bob Evans is restaurant. Quote Link to comment Share on other sites More sharing options...
Steve Osbourne Posted March 1, 2018 Author Share Posted March 1, 2018 Finished wiring the spark plugs. Quote Link to comment Share on other sites More sharing options...
disabled modeler Posted March 1, 2018 Share Posted March 1, 2018 I am simply stunned at this build....awesome work..! Quote Link to comment Share on other sites More sharing options...
Steve Osbourne Posted March 2, 2018 Author Share Posted March 2, 2018 Thanks Mark. Thanks for hanging in there. I finally installed the 6 Stromberg 97's. I also re-did the radiator hoses (with hose clamps) and found a better rubber band to use as a fan belt. This means I am officially ready for final assembly. Watch this space... Quote Link to comment Share on other sites More sharing options...
Steve Osbourne Posted March 2, 2018 Author Share Posted March 2, 2018 I wanted to show a picture of the plumbed carbs before I covered everything with the scoop. I went ahead and installed the radiator and headlights. That's it for tonight. Quote Link to comment Share on other sites More sharing options...
Steve Osbourne Posted March 2, 2018 Author Share Posted March 2, 2018 I'm able now to show how the body mounts to the frame during final assembly. Scratch-built brackets on frame, screws through the floor and hidden by a false floor covered in black felt. Quote Link to comment Share on other sites More sharing options...
Steve Osbourne Posted March 2, 2018 Author Share Posted March 2, 2018 Engine mounted Quote Link to comment Share on other sites More sharing options...
Steve Osbourne Posted March 2, 2018 Author Share Posted March 2, 2018 Engine mounted Quote Link to comment Share on other sites More sharing options...
Steve Osbourne Posted March 2, 2018 Author Share Posted March 2, 2018 Assembly complete Quote Link to comment Share on other sites More sharing options...
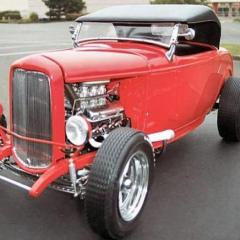
Steve Osbourne Posted March 2, 2018 Author Share Posted March 2, 2018 I'm going to take her out on the road tomorrow and get some outdoor shots. Thanks again for all the comments and suggestions. It has been a fun build. Quote Link to comment Share on other sites More sharing options...
bobthehobbyguy Posted March 2, 2018 Share Posted March 2, 2018 Very impressive. Looks its a full size car. Quote Link to comment Share on other sites More sharing options...
Steve Osbourne Posted March 3, 2018 Author Share Posted March 3, 2018 Hey, thanks Bob. I got a late start on my road trip today and it was really too hot and bright to shoot pictures. I did get a few close-ups of the engine and other parts. You can see a lot more detail in natural light. I apologize if some of the photos seem redundant. I'll try another road trip tomorrow morning. Quote Link to comment Share on other sites More sharing options...
nascar03 Posted March 3, 2018 Share Posted March 3, 2018 Golly Gee, Bucket Tee...! Steve....that is amazing. thank you so much for sharing your build. time well spent sir. graham Quote Link to comment Share on other sites More sharing options...
dino246gt Posted March 6, 2018 Share Posted March 6, 2018 Wow, that looks pretty much like the real thing! Awesome work! Quote Link to comment Share on other sites More sharing options...
abelaxe Posted March 8, 2018 Share Posted March 8, 2018 This is an absolute work of art! Quote Link to comment Share on other sites More sharing options...
disabled modeler Posted March 8, 2018 Share Posted March 8, 2018 Awesome work..stunning Steve..! I still have not found a realistic looking 671 blower set up with the butter fly injection scoop for my Tall T yet but hopeful. I just hope mine comes out at least half as nice as yours and Ill be happy..LOL.. Quote Link to comment Share on other sites More sharing options...
Recommended Posts
Join the conversation
You can post now and register later. If you have an account, sign in now to post with your account.
Note: Your post will require moderator approval before it will be visible.