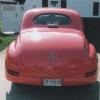
JustBill Posted January 28, 2011 Share Posted January 28, 2011 Working on '99 Chevy Custom. Lowering suspension, adding rear air bags. Sectioning body. Chopping roof. Upon doing this I've found that the wheels I chose are extremely big. I like the wheels so I don't want to change them. I wanted to lower the body over the frame but can't do that, so that idea is scraped. I've ran into a problem, {or what I think} with the camber. I've done some research and found that real trucks do have this amount of camber. However, I'm not sure I like it. So the options I have so far are these; -1. Bring the wheels in more, (I have already brought them in a good amount) I'm thinking by bringing them in more the front wheels will be too close together. They look pretty close together now, especially when compared to the rear. -2. Bring the fenders out allowing the wheels to sit flat. In other words I'd have to cut the fenders out and fab new ones and give it a bulge. It would also mean having to do it to the rear. Not sure if I want to do this cause I wanted to try and keep the factory body lines while also performing these mods. -3. Leave it as it is and fly with it hoping it will grow on me and not look ridiculous. Here's the pics and please leave any feedback that you got.even if its another option! Thanks for looking! First mock up OOB with chosen wheels. What I'm going for and the camber issue. Few other progress pics. Cut open the bed and c-notched the frame. Will do away with the frame altogether and make one for air bags. Also going to cut rest of bed floor out to lower it and make some kind of flooring for it. Cut out inner fenders and will fab a whole new engine bay. Half-assed mock up. Still need to section bed body. Quote Link to comment Share on other sites More sharing options...
Mike Kucaba Posted January 28, 2011 Share Posted January 28, 2011 Adventurous looking project. Why not use some narrower wheels & tires up front? Only other suggestion would be narrow the frame in the front,or clip it and use something else that's narrower. Quote Link to comment Share on other sites More sharing options...
MikeMc Posted January 28, 2011 Share Posted January 28, 2011 Those look like Pegasis T's "23"...if they are go to a set of "19"s....in the front.....that will give you more room, but a Big n Little combo... Quote Link to comment Share on other sites More sharing options...
Kanedge Posted January 28, 2011 Share Posted January 28, 2011 Ambitious! You could just cut down the front tyres and make them narrower. Quote Link to comment Share on other sites More sharing options...
Tumbler75 Posted January 28, 2011 Share Posted January 28, 2011 Ambitious! You could just cut down the front tyres and make them narrower. This was gonna be my suggestion. I've had a 99 Silvo LoCustom in the works now since this kit first came out way back when. You have taken on an ambitious project and it's lookin' good so far. I lowered mine myself from what I had and that was a project in itself. Great work! I Like it. This is where mine stands: Quote Link to comment Share on other sites More sharing options...
Guest Markus355 Posted January 28, 2011 Share Posted January 28, 2011 as for your camber... most 1:1 trucks that are that low have similar camber. theres no way around it. its just one of the curses of being that low. at raised ride hieght the camber is correct, but layed out the tires will lean in. I wouldnt worry about it. looks great dude. Quote Link to comment Share on other sites More sharing options...
diymirage Posted January 28, 2011 Share Posted January 28, 2011 looks like your off to the right start as far as the camber goes, i think it looks ridiculous and if it were my build i would set the wheels down normal having said that, its not my build its yours i know that often acuracy is our goal, but its only plastic and easthetics are just as important so in the end, those are you choices Quote Link to comment Share on other sites More sharing options...
Jared Roach Posted January 28, 2011 Share Posted January 28, 2011 (edited) I also think the camber is fine. Almost every truck that is bagged has camber until the bags are aired up, it's no problem. I really want to see what this thing will look like with a sectioning and chop. Leave the camber alone, it's not much compared to some 1:1's! Edited January 28, 2011 by Jared Roach Quote Link to comment Share on other sites More sharing options...
whale392 Posted January 28, 2011 Share Posted January 28, 2011 As stated earlier; in the 1:1 slammed world, when a truck with that radical of a drop is laid-out, it will sit with silly negative camber (most have WAY more camber than yours shows now). When they raise up to roll out, the camber corrects itself back to a more livable angle. Unfortunately, unless you have an engineering degree and access to more tools than Chip Foose, this is just the nature of the game. Yours is actually exibiting less camber than a similar 1:1 slam. Quote Link to comment Share on other sites More sharing options...
BHarrison Posted January 29, 2011 Share Posted January 29, 2011 Naw man those wheels aren't too big at all.......like the project so far! Quote Link to comment Share on other sites More sharing options...
LAone Posted January 29, 2011 Share Posted January 29, 2011 hey bud. interesting build. i agree with all about the camber. it's going to be there. as for the wheels, i would recommend getting a hold of some tires from the aoshima or fujimi wheel sets. thos are about 1/8" narrow. i can show you an example later tonight. for clearance on the body, you should thin out the plastic on the inside of the fenders. your already doing a body chop, so a body drop wouldnt help to make it lower. i know plenty of guys in the air bag world. most of the fabricators. i ask them a lot of questions so if you have any questions, i can try my best to help you out. if not, i can always ask them. Quote Link to comment Share on other sites More sharing options...
ewaskew Posted January 29, 2011 Share Posted January 29, 2011 It is looking good. However,I would make those tires sit flat,it takes some frame work to do it like others have said. And the main thing is build it your way. I had the same issue with a 69 Chevelle so after 230 pieces to make the parts,to get the look I wanted and 260 hrs I was happy. And yes I kept records of every piece and hours involved just to see what it took. Scratch building fun Quote Link to comment Share on other sites More sharing options...
JustBill Posted January 29, 2011 Author Share Posted January 29, 2011 I want to thank those of you who shared your advice, experience's, and builds. That finished truck looks beautiful BHarrison! Like the flame work! I see what you mean Tumbler75. In fact, I was able to trim and shape and trim and shape the wheels and lower A arms to get the wheels laid down better. Still a little camber but nothing like it was. LAone I am still going to thin the fenders and I believe that should take care of it. I do agree with what everyone has said referring to the 1:1 trucks having drastic camber. I don't believe my model will be sitting low enough for the camber to look right. Alot of those trucks are sitting on the ground when air bags are deflated. Anyway, like I said, I got the wheels to lay better. Will post pics in a couple days or so. Many years ago I had the original issue of this kit as a kid. This is the one kit I always kicked myself in the rear for getting rid of. Once I saw the re-issue I had to have it. This has always been my original idea with the kit so I'm having a blast with it so far. Always wanted to do these mods on this truck cause its newer and you don't see people doing these mods much anymore. Again thanks for everything. Quote Link to comment Share on other sites More sharing options...
JustBill Posted January 30, 2011 Author Share Posted January 30, 2011 Small update, this weekend has been busy and I didn't get as much done as I wanted but hey, thats life! Started working on the bed. Got the sides cut off and ready to go back on. Cut down the floor out of the bed and removed the inner sides to lower it. Started making new inner skins to smoothen everything out. Quote Link to comment Share on other sites More sharing options...
bagit Posted February 1, 2011 Share Posted February 1, 2011 WOW,I cant wait to see more,looks great keep it up Quote Link to comment Share on other sites More sharing options...
JustBill Posted February 9, 2011 Author Share Posted February 9, 2011 Plugging away at it. Trimmed the inner skins on the bed. Attached the sides. I have an idea of what I want to do with the rear just not sure how to execute it yet. Did some more work to the front and thinned out the inner fenders. Wheels sitting nice now. Chopped the top. Didn't have to make as many cuts to the roof as I thought. Its been a pretty smooth process so far. Next I'm gona focus on the rear suspension and get the air bag setup going so I can finalize the rear ride height and get the bed settled on the frame. Thanks for looking and more to come. Quote Link to comment Share on other sites More sharing options...
tooltas Posted February 9, 2011 Share Posted February 9, 2011 i did one two yrs go slam it i use the revell donk wheel set from the chevell there 6 spoke thay look better mine sits on a pennys and u can't move it,and it cut the body that all but it been apart 2 times firts time it was cut to lay out on 26'' wheels next time i cut more out more an set it on same wheels but use some wider tires on back , so mine rears are scale 26by 10. Quote Link to comment Share on other sites More sharing options...
Skydime Posted February 9, 2011 Share Posted February 9, 2011 What I'm going for and the camber issue. What camber issue? A lot of bagged trucks have major negative camber in the front. Quote Link to comment Share on other sites More sharing options...
Dragline Posted February 9, 2011 Share Posted February 9, 2011 Looking VERY good Bill. Looks like you are off to a grand start. The camber seems OK to me considering the nature of the beast. Perhaps a slight spindle adjustment is in order to bring the inner wheel closer to the ground but that's it. I'll be watching this for a color. Ambitious body mods. See you at the store. Bob Quote Link to comment Share on other sites More sharing options...
Dr. Cranky Posted February 9, 2011 Share Posted February 9, 2011 You are doing lots of wonderful changes to this one. Keep it going. It's going to be a good one. Quote Link to comment Share on other sites More sharing options...
JustBill Posted January 19, 2012 Author Share Posted January 19, 2012 I just picked this on up from storage last night. Its been awhile and with the F-150 coming to a close I started the sanding, scribing, molding, re-shaping, making a hell of a mess process. I'm having a bunch of fun sanding down styrene again and letting the dust fly! Its all over everything, even in my drink! Am I gona drink it use ask.... of course! How else do you keep the styrene flowing in the blood! Quote Link to comment Share on other sites More sharing options...
RodneyBad Posted January 19, 2012 Share Posted January 19, 2012 Great Looking Chop Top.. Build is looking good.. Quote Link to comment Share on other sites More sharing options...
Ira Posted January 19, 2012 Share Posted January 19, 2012 Nice Slicing! Quote Link to comment Share on other sites More sharing options...
tooltas Posted January 19, 2012 Share Posted January 19, 2012 man that going to be low Quote Link to comment Share on other sites More sharing options...
TexasFinest Posted January 20, 2012 Share Posted January 20, 2012 It looks awesome! Looks like a magazine cover truck in progress. Quote Link to comment Share on other sites More sharing options...
Recommended Posts
Join the conversation
You can post now and register later. If you have an account, sign in now to post with your account.
Note: Your post will require moderator approval before it will be visible.