BMX Addicts Posted April 27, 2013 Posted April 27, 2013 Just finished with a Revell 1/24 1968 Dodge Charger R/T (Hemified) and took on this new project, it will be my build # 6 and even though the kit is marked as skill 4 is the one I have been peeking mostly lately. Thank you for reading.
martinfan5 Posted April 27, 2013 Posted April 27, 2013 Good luck, I like DTM and keep meaning to get me some DTM kits to build, but never do, one day, going to watch
BMX Addicts Posted April 27, 2013 Author Posted April 27, 2013 (edited) Thank you Jonathan, this car sure looks like something worth building. Usually like to start by the body, but will try to stick to the instruction booklet this time... It took me all afternoon to complete the first page Edited April 27, 2013 by BMX Addicts
BMX Addicts Posted April 27, 2013 Author Posted April 27, 2013 (edited) Thanks bud. Took some other photos this morning (Now that is dry), but my trusty old camera finally decided to give up... Telephone pics from now on. The hand painted stuff still looks a bit crooked... Gotta work on that. The headers are a two part, gluing them together to make them fit correctly was "definitively" skill 4 Edited April 27, 2013 by BMX Addicts
BMX Addicts Posted April 27, 2013 Author Posted April 27, 2013 (edited) Really need to stop buying model kits or paint and get me a new camera Edited April 27, 2013 by BMX Addicts
maltsr Posted April 27, 2013 Posted April 27, 2013 (edited) That's a great start Juan. Don't worry about the skill level 4 rating, I built the white Tom Kristensen version and it simply fell together . Even those complicated looking rear arches weren't a problem. Just take your time, it's not a race LOL. One tip if I may, you might want to remove the visible mold lines before painting a part, such as on the headers. I usually apply a thin coat of primer to reveal these. They can then be smoothed with sandpaper or a sanding stick before applying colour to the part. Edited April 27, 2013 by maltsr
BMX Addicts Posted April 27, 2013 Author Posted April 27, 2013 Thanks Paul, you are absolutely right about the molding (moulding?) lines... Is something that I need to start doing. Thanks Jonathan. I've got one more photo to be posted today (I'll probably do so after the race )
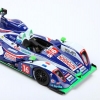
BMX Addicts Posted April 27, 2013 Author Posted April 27, 2013 (edited) And the true colors come out.... Couldn't contain myself Edited April 27, 2013 by BMX Addicts
Nacho Z Posted April 28, 2013 Posted April 28, 2013 Hey Juan, I think you and I have the same taste in models. I have this kit and will be watching your build progress. Good luck!
BMX Addicts Posted April 28, 2013 Author Posted April 28, 2013 Thanks John... Gotta love road cars!!!, I honestly feel they require a lot more work (As far as decals and detailing) but they look really vivid no?... Really need to work on my hand brushing skills(More than everything else), but really happy with the progress.
jrherald420 Posted April 28, 2013 Posted April 28, 2013 (edited) When hand brushing paints I never dip a dry brush into the paint. I will always dip the brush into clean thinner first, this helps to thin the paint just enough to stop brush lines from forming. Also if i'm painting something like a pair of seats i will clean my brush twice each seat, once for the front and once for the back. This helps to keep drying paint from forming on your brush and causing drag marks. Also once you've painted and area do not brush it again since the paint has already started to dry, wait till its fully dry before touching up the paint. Also the type and size of brushes you use are a huge factor in the finish of the paint. I use mainly a hair type brush. Also if painting a wide or big part i use the widest brush i have to fit the job at hand. I think a rough count in brushes i have around 15. These are just suggestions, in no way, shape or form am i telling you how to paint!!! Edited April 28, 2013 by jrherald420
Nacho Z Posted April 28, 2013 Posted April 28, 2013 I am in 100% agreement with James. I do the same thing. The smaller the area, I mean really small like lettering tires, the more I tend to clean the brush. With the drop or two of paint on the brush it seems to dry on the brush faster. Having the thinner on the brush helps to keep it "liquid" longer.
BMX Addicts Posted April 28, 2013 Author Posted April 28, 2013 Thanks James & John... I truly appreciate the pointers and I would sure try following them. Funny thing is I barely use the brushes (Even though I have got the really good ones in all sizes), so used to masking and spraying "everything" that the hand brush skill is pretty much non existent. The other thing I noticed is the Thinner (Tamiya X-20A acrylic) creates a cloth on the surface of the paints (No matter how well you keep shaking it) and the "other" thinner (SunnySide lacquer), just kills the Tamiya paints... Probably because is meant for lacquer (Duh! ). There is also a lot of caffeine and nicotine in my system (You may be able to tell from previous threads), but if something is certain in life is the fact that I could not trace a line using a ruler and get it straight. Finished the mechanical rear end, had to use quite a bit of glue to get it to seat straight on the chassi (Not sure if the paints are too hot for this kind of plastic, but is the same issue I had with the Charger). I also painted the body, but is gong to have to be re-done... I applied the Silver first just doing a general area masking, now that the Red is on, you can really see the silver lines underneath On top of things, I spent all the Red paint.
jrherald420 Posted April 28, 2013 Posted April 28, 2013 Spray paint is nice and easy but its very costly to keep doing it that way.
BMX Addicts Posted April 29, 2013 Author Posted April 29, 2013 (edited) Wheels are in, tried the thinner "dipping thing" and I was able to get a perfect circle on the nuts (Still need to remove some excess of gold though). Edited April 29, 2013 by BMX Addicts
maltsr Posted April 29, 2013 Posted April 29, 2013 (edited) The chassis looks great Juan. Don't worry about hiding all that detail - if you follow the instructions you'll be able to lift off the finished body/interior to admire the chassis in all its glory. The body doesn't look too bad in the photos, but if you're like me, the faults will draw your eye to them. I use Tamiya spraycans on nearly all my builds, the red is quite translucent, but the silver will cover anything. If you decide you have to repaint, spray the whole body red, then carefully mask the roof. I use Tamiya masking tape at the colour separation line, and light-tack 3m (blue) for the rest. Apply a light coat of clear to seal the edges of the masking tape, then apply the silver. This will stop any silver bleeding through on to the red. Good luck and keep going . My almost finished build from a while back: Edited April 29, 2013 by maltsr
BMX Addicts Posted April 29, 2013 Author Posted April 29, 2013 Thanks Paul, your Audi looks awesome!!!... Is hard to see in the photos, but there is a very dark line under the red right where I marked it with the green arrow. I will try the clear over the tape (That is the tip of the day for me).
jrherald420 Posted April 29, 2013 Posted April 29, 2013 I would decant some of the silver and just tape off the red and use a good brush to touch up the silver then clear over it all. Might not look as good as a repaint but with the clear over it it wont look half bad.
BMX Addicts Posted April 29, 2013 Author Posted April 29, 2013 I would decant some of the silver and just tape off the red and use a good brush to touch up the silver then clear over it all. Might not look as good as a repaint but with the clear over it it wont look half bad. Thanks James, I just don't have the color red to match it, but I'm positive it wont go away... I realized the lines were visible while spraying it and went through the whole can in just the body. No biggie, have an extra body here, I will paint the Red first (As soon as I can go get it) and then do the Silver over
BMX Addicts Posted April 29, 2013 Author Posted April 29, 2013 Nose bleed Monday... Shanked the left light a little
BMX Addicts Posted April 30, 2013 Author Posted April 30, 2013 Got the Red paint... Rear fenders done And primed the body for round 2
BMX Addicts Posted April 30, 2013 Author Posted April 30, 2013 (edited) Well.... Another Rookie mistake Primed the new body with the regular Tamiya Grey base because I ran out of the usual Tamiya White Fine Surface Primer... Never even occurred to me that the light gray was going to make such a difference in the final color looks lime someone is on a trip down to the Purple thing road Installed the fenders though Edited April 30, 2013 by BMX Addicts
Recommended Posts
Create an account or sign in to comment
You need to be a member in order to leave a comment
Create an account
Sign up for a new account in our community. It's easy!
Register a new accountSign in
Already have an account? Sign in here.
Sign In Now