

Peter Lombardo
-
Posts
2,393 -
Joined
-
Last visited
Content Type
Profiles
Forums
Events
Gallery
Posts posted by Peter Lombardo
-
-
I love building Hot Rods, Customs, Concepts and Pavement Pounding Street cars, but I have always really enjoyed the Tamiya 1/20 scale F1 kits as much. I have every one of the Tamiya 1/20 scale (not all built yet) F1 series and the two kits that Modelers produced, which are the equal of Tamiya’s best efforts.
Recently Hasegawa and Fujimi have jumped in to fill the void that Tamiya has created by cutting back on their F1 offerings. And to that all I can say is “Bravo!â€
The kits that Hasegawa and Fujimi have put out there are every bit as good as Tamiya’s best.
In many ways Tamiya had always disappointed me with the obvious “holes†in their lineup of cars. They produced an excellent version of the McLaren M23 Texaco Ford, and even a version of the ( great color scheme, in my opinion) Yardley Ford McLaren with the beautifully curved flowing air intake scoop in 1/12 scale and never did a 1/20 scale version. They did the Lotus 78, Tyrrell P34 and Wolf in both scales but neglected the McLaren’s, Brabham BT44 and 312T Ferrari 1/20 scale. I have always been annoyed at Tamiya for the Ferrari omission. That is my favorite F1 car of all time followed closely by the World Champion Williams FW 14B….both cars Tamiya produced in 1/12 scale but never in 1/20 scale. Hasegawa made up, somewhat, for the Williams FW 14B by producing a very accurate version in 1.24 scale which built up to a beautiful car, especially with the addition of those evil Camel logos.
And while I am at it, complaining about the kit omissions, when are they (and you know who “they†are) going to grow up and drop that idiot sophomoric non-sense about banning tobacco advertising on race cars and therefore race car models??? What, when youngsters go into the 7-11 store to get a Slurpee they don’t see the cigarettes at the counter? They don’t see the Playboy magazine behind the register? Grow up. I pay $60.00 for a kit of an F1 car and now I have to pay someone else from $12.00 to $15.00 dollars to get the missing Tobacco logos so I can build a complete replica of a famous race car! You that is bull and completely unnecessary. I fully understand paying extra for a photo-etch set for a car. You can still build a very convincing model without the photo-etched parts, even though they lend immensely to the overall realism. But to omit the sponsor logos because they are a Tobacco company is just plain ridicules.
Sorry about that, I feel better having said that…..now, back to the cars, Tamiya built a metal, completely built 1/20 scale version of the Williams FW14B back in the day, it was a limited edition and sold for far too much money to justify its existence, in my opinion. I am sure it was a total flop (at least I hope it was) for Tamiya. Look, If I want to spend two to three hundred dollars on 1/20 scale F1 kits I can pickup any one of the many beautiful Model Factory Hiro engineless kits. But that is the point of Tamiya’s kits….they are priced so the majority of builders can afford them. When they feel it is more important to produce expensive limited edition pre built cars, Tamiya and I part company. I also could never understand why Tamiya did not produce a model of the Brabham BT 46B, the now famous, or is that infamous, Fan car. Tamiya offered the McLaren MP 4/4, MP4/5, MP4/7 and MP4/8….so why omit the MP4/6? They did it in 1/12 scale, so it is not like they didn’t have the design and blueprints. Why leave a hole in the lineup? I don’t understand some the reasoning here. I was also disappointed by Tamiya’s obvious “cheap†build of the 1977 Tyrrell P34 by going with the short cowl version and not doing the full cowl version that ran the majority of the 1977 season. Actually, I am not that upset by that, as it opened the door for me to vacuum form the full cowl version of this car which will be done in the next few weeks.
That leads me to the point of this posting, slash rant. Fortunately, Hasegawa and Fujimi have stepped up and have begun to fill the voids that the Tamiya has left behind. It seems to me that Tamiya is far more interested in Military, Naval Ships, aircraft and R/C kits to be worried about sports cars and 1/20 F1 kits. They created the whole segment of 1/12 and 1/20 scale F1 kits and now, with the exception of a precious few offerings they have abandoned it. I can’t remember the last new 1/24 kit, other then a few extreme high end cars, that had an engine in it. Call me a model snob, but I want my builds to come complete with engines.
Fujimi jumped in first with the Ferrari 126 C2 and 126 CK from the early 1980’s, in a few versions, both great additions to the 1/20 scale field and both Ferrari turbo cars, driven by the immortal Gilles Villeneuve. Then Fujimi offered up the Ferrari 248F1, piloted by Michael Schumacher or Felipe Massa from 2006. Then Hasegawa jumped in with great versions of the Ferrari 312T2 and then the 312T. Both kits offered with very nice and affordable photo-etched parts that include turned air funnels and mesh covers, and yes Curt, both of mine have all 12 pieces, and seat belt hardware and cloth material. I am so happy to have my grail kit in 1/20 scale along with the 312T2. So I will have the 312T, 312T2 and Tamiya 312T3 all sitting side by side.
Then Fujimi stepped up and produced a great new McLaren MP4/6
 to fill the void, once again by Tamiya so that I can complete the run of Senna driven McLaren Marlboro (Ah, Oh, I said an evil word…..Marlboro) cars.
 And now, as if that is not enough, Fujimi just produced and I just received the brand new Williams FW16….the infamous car that Ayrton Senna was driving on that fateful day in 1994 when he lost his life at Imola driving this very car.
Ayrton Senna was expected to dominate the F1 world driving this car. The best current driver, driving for a team that was at the height of its power in a car that was all but unbeatable, but it was never meant to be. On May 1st, 1994 Senna, on lap 6 failed to negotiate the sweeping turn named Tamburello at the San Marino Grand Prix in Imola Italy and crashed head first into a concrete retaining wall at 186 MPH. In an instant, he was dead. It was a tragic weekend in F1 to be sure.
On the previous day, Roland Ratzenberger, an Austrian rookie driving for the much lesser known Simtek team flew off the track at nearly 200 MPH during qualifying and lost his life. His being the first death in F1 in 12 years and setting up an ominous mood for Sunday’s race. Senna called his girlfriend the night before the race telling her he had a bad feeling about this race and he even told her that he did not want to drive the next day….he was so upset by the previous days events. The interesting thing to me about this race, aside from the deaths, was that Senna, by his death, opened up the door for Michael Schumacher to rise to the pinnacle of the elite Formula and it deprived us of what I would expect to have been many memorable confrontations between Senna and Michael. We got to see some epic duals between Michael and Villeneuve in the Williams, but I think Schumacher/Senna would have been a clash of the titans, much like Senna/Prost from the years before.
I thought I would post pictures of the Williams and a brief review of the kit. There is a beautiful rendering of the car, nose first on the box top, all done in Williams blue of the day.
There is the outline of the parts trees which has become the norm for Fujimi and F1 kits. As you open the box you realize that if you did not know it, you would swear you were looking at a Tamiya F1 release. The plastic bags that each tree is packaged in, has the same little staple holding it closed, just like Tamiya does. Just look at the exquisite detail molded into the side of the rear wing…it is perfect! If I have one criticism of the kit, I wish the main body tub was one piece, but that is easy to correct and not uncommon for even Tamiya on the F1 kits.
Notice how very Tamiya looking the suspension pieces are.
The parts are extremely crisply molded and the trees are laid out exactly like Tamiya would have done it.
Obviously there is not a speck of flash to be found anywhere. Everything and every part is as clean and sterile as if it were in an Operating Room.
The directions are very clear and simple to follow.
If you have build one Tamiya F1 kit, you know the sequence to these steps is almost always identical to each other. The same kind of painting codes are used as in other kits, so no surprises there. The tires use the sometimes difficult, but standard, reverse dry transfer method for the manufacturer markings. And, the actual tires look great. Molded in hard rubber they are nice and smooth with almost no seam down the middle….very nicely done and I am sure they will look great completed with the wheels and markings.
The decal sheet is a bit small but complete and is missing the obvious, but none the less annoying, Tobacco sponsorship decals.
I know someone, most likely a few, will produce these markings so I will have to lay out more money for them. I am also sure someone, also most likely many again, will do some photo-etched pieces for this kit…I will also have to get them. As you may be able to see in the pictures, they give you material for the seatbelts in red with the “cut lines†drawn on the other side. There is a small photo-etch fret for the seatbelt along with die-cut seatbelt manufacturer’s logos for Sabelt. I will include the driver figure of Senna in mine so I will see how these parts work with a driver figure. Back in the day, I grabbed a bunch of Tamiya Driver and Technician kits for $3.00 each on closeout, so I have enough to do the Senna figure for all of the McLaren’s and Villeneuve for the Ferrari kits.
Indirectly, they include what looks like a paint mask for the stripe. It is all in Japanese, sorry, my Japanese is rather rusty, since it is nonexistent! The mask is not die-cut so I am not sure now it is intended to be used, but I will attempt to find out. I find it strange since the decal sheet is complete, at least as far as the striping is concerned.
All and all, this is a beautifully designed kit, of an infamous car. I am glad to have it and want to build it up to how it looked on the grid just before 2:00pm on May 1, 1994 with a nervous but determined Ayrton Senna sitting on pole for the 3rd round of the 1994 Formula One season.
-
I was not planning on posting this until it was finished, but I had some time this morning so I thought I would throw a few pictures up here and through in a little rant while I was at it. This is the Revell 1970 Baldwin Motion Chevelle.
As I have mentioned before, I tend to breakdown my builds into three categories. This was originally expected to be a rather simple build, but the painting got a little crazy so it has morphed into a slightly more complex build. To start, I opened up and hinged the doors and then decided to add a two tone paint scheme which was where I expected things to end. In this case, the top color is straight up Duplicolor Black and the bottom color is Duplicolor Cayman Green, a rather green looking turquoise color. I cut a thin vinyl light green stripe to separate the two and I thought the paint would end there. But no, after seeing how the two colors were rather dark, I thought it needed something brighter to give the car some pop. I have never cared much for the Baldwin Motion style striping so that was not an option for me.
I have always loved the look of the true fire flames but have not been satisfied with the results that I was getting with my rather expensive Paasche VL double action air brush. No matter what I did, the paint would come out with splats and spits. It would work fine on the “testâ€, next to the car, but when I switched to the actual car, it would either spit or not spray at all. I can’t tell you how disgusted I was getting. I has to wipeout so many paint jobs and start over more times than I care to recall. I wanted to send the two year old gun back to Paasche with a nasty letter telling them exactly where on their collective anatomy they could shove the thing, and I wanted to make sure it was going in sideways. The gun was ok for larger spray patterns and even though I have a smallest needle and tip installed, it would still get garbage results. I tried House of Kolor Lacquers, thinned way down or thicker and every way in between…..I tried Tamiya paint the same way, no matter what I do it fights me all the way……I tried high pressure and low pressure all failing to get the job done.
Then in the depth of my frustration, just for the Heck of it, I took out my old Aztec air brush. The one I use for larger jobs….the one that I figured couldn’t possible do smaller detail painting. Even though it is not perfect and still gave me issues with the “fineness†of the spray pattern, it was still far better that the vaulted Paasche gun.
My Aztec has the general purpose nozzle…not even the fine tip and it was out performing the “better†air brush. Go figure.Well, I finally put down a multi-layer flame job that has promise. This is all Tamiya paints run through the Aztec gun.
I am not 100% happy with it, but at least I can now work on refining the technique to make the flames smaller, tighter and cleaner rather than spend all of my time fighting the stinking air brush. Hey, if any of the Paasche guys are seeing this, I just want you to know it would not be a good idea to contact me for a testimonial on your product.
I should have spent the extra $40 bucks and bought a Iwata gun…..it would have been worth it.
Anyway, back to the car…..I lowered the stance and installed a set of American Mag’s with Firestone wide ovals tires that came from an old MRC tire and wheel set I picked about 10 or 12 years ago…..
I finally found a use for them. The engine is pretty straight up with the addition of sparkplug wires, heater hoses and fuel lines. I chose the “standard†style air cleaner rather than the more correct flat open top unit that Baldwin Motion cars had simply because I prefer the look of the “old school†unit. The electronic ignition box on the inner wheel well will get wires later too. I have to add the hood pins to the hood and the striker plate around the pin openings too. I still need to fit the struts to the hood to hold it open. The interior is pretty straight up to with flat black vinyl seats, no console and bare metal foil details.The body has been clear coated with the final coat over the bare metal foil trim. I have to sand out a couple of very sight “dust†imperfections on the top and truck and buff it up once the clear is completely dry in a week or so....it has been very rainy around here with a lot of humidity in the air.
Thanks for looking and thanks for listening to my rant.
-
Bill, great job on that interior.....I really like the look of the dashboard. That looks very convincing. Boy, you can really see the difference between the old "stock" body on the AMT, gee, that has to be over 46 years old....older than most guys on the forum, and the new Revell kit. The Revell kit just looks so crisp and with the chopped top, so much more "hip". But you are sure doing the "old boy" justice. Oh, yeah, good to see you back up and running again.
-
Dean, this is a common problem with many kits as the bodies are wider in the middle but get much more narrow at the bottom. Consequently most builds require prying the body open a bit in order to receive the chassis. Some times you can "slide" the chassis in either from the front or the back and then slowly work the rest of the chassis into the body.
No matter how you attempt this, Bill's advice is true, always test fit the chassis and have a "plan" for repeating the procedure once the paint is complete. More then a few times I have cursed the kit designers, but in the end the build looks better for the "tight fitting" chassis.
Remember, the two keys to success are, one, test fit and have a plan, and two, be VERY careful and work slowly.
Good luck, you'll see, the designers knew what they were doing.
-
Bob, this is sure looking great. I have a few of these kits and you are right, it is one of AMT's best. I love the paint on yours....very deep and smooth. This car will always have a place in my heart...my very first new car was a 1973 (same body) Camaro Rally Sport with a 350. I was such a great car, I wish I still owned her today. Anyway, yours is looking terrific, the colors suit it perfectly.
-
Wow, that is nice. Very subtle and tasteful. I really like the vinyl roof on this...this is a very real looking build. I know I have seen that car on the road many times back in the day.
-
I like to do a fair amount of scratch building so I always have my eyes open for parts and components that can be used to replicate detail parts on builds.
My son is into Sci-fi modeling so he spends a fair amount of time perusing the Japanese web sites where Sci-fi model building is really big. My son turned me on to these items and I thought some of you guys may be interested.
I just received in the mail yesterday a few “springs†and “mesh tubing†that has multiple uses in car modeling. I am enclosing the links to the items on the Hobby Link Japan site where you can order these and many other items.
Here is a General Link:
http://www.hlj.com/hljlist2/?rel=nav&GenreCode=Sci&MacroType=OptKit
Here are specific item links.
http://www.hlj.com/product/WAVOP-011)
http://www.hlj.com/product/WAVOP-016
http://www.hlj.com/product/WAVOP-012
http://www.hlj.com/product/WAVOP-017
http://www.hlj.com/product/WAVOP-013
http://www.hlj.com/product/WAVOP-014
Actually, the prices are very reasonable and I can tell you that the quality is first rate.
I ordered the springs in 1.0, 1.5 and 2.0 mm. These are amazing, you can cut them to the length you need and bend them without there being any “gap†in the spring. They will be great for water or oil hoses. The bigger ones are perfect for air ducts to cool front brakes and they are easily flexible so it the front wheels steer, they move with the wheel….it is so cool.
The mesh tubing is great for hoses and can be painted any color.
http://www.hlj.com/product/HQPSPR24
http://www.hlj.com/product/HQPSPR29
http://www.hlj.com/product/HQPMTSL
http://www.hlj.com/product/HQPMTSLL
http://www.hlj.com/product/HQPMTSML
Spend some time on the HLJ site, there are rivets, hex nuts, camera lens, the list of detail parts is almost endless.
-
Well it is different! Not my thing, but if you had fun with it, that is all that matters. I mean, it is well done, for what it is. "Build quality" is build quality regardless of the subject. Well done.
-
Not positive, but I think that was supposed to be a putty applicator. The original had a front end extension that for some reason is still MIA. They opened some gates on the chrome tree portion of the tool, but evidently neglected the other part
Yes, back in the day the AMT Stylize Kits came with add on fronts and tails that were to be glued on and then they provided a tube of AMT body putty that was to be applied and smoothed out with that applicator. As a kid I cut my modeling "teeth" with those kits. My favorite was the 1962 Corvette kit. It had wild long nose front, a subtle rear and a "T Top" roof with clear top windows that opened up. I would kill to get one of those kits again. Anyway, I just picked up this Buick with the intention of building it in the "style" of the day.
-
That is as good a Cobra build as I have ever seen....top notch. Very convincing and subtle at the same time. Very nice.
-
Very impressive.
I love the color combo and the snake skin look. I have a Viper concept vehicle I have been working on and my plan was to incorporate a "snakeskin" look to the paint....looks like you got to it first. I am very impressed with your technique. My plan was basically a metallic red finish (after all mine is a Viper concept so it needs to be red) but the snakeskin look would be down the middle of the car and have more gray, charcoal and black in it.
Anyway, you did a great job on yours......the engine ain't bad either.
Really sweet looking ride.
-
I have to agree with everyone else...it looks great! Perfect color, stance and wheels...it looks great. Very well done.
-
Hey guys, thanks for the kind words. I had such a difficult time with the paint and BMF, I was really glad when it was over. Thanks again.
-
This is redundant.....It sure looks great. Too nice to race.
-
Mike, that is very nice...the color looks great on it. Somewhere in my huge stash of car mags, I have a muscle car magazine with that car ('66 Fairlane) in it built with a former Nascar engine in it that is also yellow, but without the white fade ( P.S. that looks great on yours) on it. Interestingly, a few years ago I built the 427 version of that car and opted for the exact same wheel and tire combo....I thought it worked nice on the car and they look great on yours. I also like now you followed through with the same color engine block. Very nice clean build.
-
Ahh, slot cars.....it brings back memories of my ut! But I have to say I never ran anything that looked that good or had as clean a chassis as that does. My solder jobs back then let a lot to be desired. My cars spent as much time on their backs in 5 car pile-ups as they did on their wheels. Great paint job. I have that kit, got it just for the body....one of these days I will get around to it. You did a great job on her. I wouldn't let it go anywhere near a track.
-
Reminds me of a Delahaye.
Very nice work. That's model making to the nth degree... designing your own car, carving the body, vacu-forming the parts... man, that's Gerald Wingrove-type stuff!!!
Thank you very much, Harry, I really appreciate the kind words. To even think about Gerald's work, let alone have mine mentioned in conjunction with his, marks the long hours on it worth the time.
As I have said before, I really enjoy the creative side of this the most. Now when I look at kits on the store shelf, I look at them as "doner" cars and parts for something elso. Thanks again.
Randy, God willing, I will have my "Dog and Pony show" at NNL again this year. I am looking forward to seeing you and your "stuff" too. As for the styling, I was really trying to exaggerate the 1930's look....you know, almost "cartoony" in scope. I made the hood too long, the fenders too big and the overall length bigger and grander than real life just because I could. I guess it is called "artist's License".
-
Peter, once again , you astound me with you're talients ! I'm going to have to come back to New Jersey some day even though I said I never would back in 1974. Truly a great piece of Vidieo sir , 4 hubcap rated too ! Ed Shaver
Hey, thanks Ed, I can always count on you. Thanks, but Ed, I have to agree with you, stay out of nearly Bankrupt New Jersey if at all possible. I want out but my extended family keeps pulling me back in. One of these days I will be headed south or southwest.
-
Thanx Peter
I just picked up the 1/20 Tamiya F60 at the LHS and found out Hasagawa or Fujimi are coming out with a 1/20 scale McLaren MP4/6
I have the McLaren, and it is a superb kit. Some guys on the F1 Model forum have complained that the tires are wrong...maybe, I can't tell, they look fine to me, but this is a great addition to the McLaren line of F1 cars because it fills a gap that Tamiya left in the 1/20 scale line up...they did this only in 1/12 scale.
-
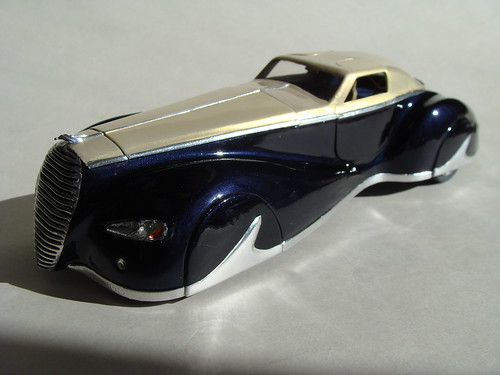
Art Deco Aero Coupe
If you are interested, here is a video of the making of the Art Deco Aero Coupe.
-
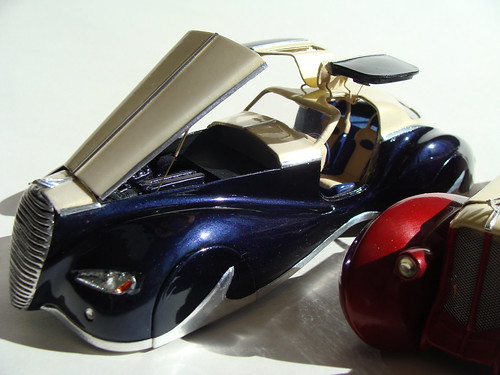
My “Art Deco Aero Coupe†is finally finished.
This is the first body that I designed, carved from a block of bass wood and vacuum formed. I drew inspiration from my 1936 Auburn Cybele Special that I built last year from a heavily modified Lindbergh Auburn kit.
My plan was to design and build a coupe “mate†to go along with the roadster from last year.
The chassis on this car is a stretched out and widened Viper Roadster. The engine and suspension came directly from the Viper.
The interior contains custom made door panels and seats for an old Prowler Concept snap together kit. The dash is a shortened 1980’s Ford Taurus piece and the floor and transmission hump are scratch built.
The windows are acetate sheet and the interior colors are custom mixed cream/tan and a dark blue/purple. The floor was painted with the same dark blue/purple paint and then covered with dark blue flocking.
The headlights are Viper units filled with clear epoxy.
The grille is styrene horizontal slots cut and shaped and then bare metal foiled. The hood is hinged and two struts were fashioned from “teeny tiny†brass tubing and brass wire. The gullwing doors are also hinged and each has one very small strut to hold them up in the open position.
The wheels came from the Revell Dodge Magnum kit and the tires from an old set of Pegasus wheels and tires that were in one of my many parts boxes.
The wheel opening spats are held on with small magnets and thin pieces of metal so they can be removed.
The taillights (kinda weird) have a “free form†opening that mimics the shape of the headlights (kinda’) with a aluminum tube filled with clear Tamiya red mixed with epoxy surrounded by clear epoxy….like I said, it is different.
The center exhaust openings are aluminum tubes bent and shaped to carry the same design theme.
All the moldings are strip styrene glued to the body and bare metal foiled.
The car is painted in a two tone combination, again inspired by the Cybele Special of last year. The top in a GM Cream solid that was over coated with a translucent Gold Pearl top coat. I looks different from every angle. The lower color is a Mopar Dark Amethyst Purple. Both were clear coated and after the bare metal foil was applied it got a coat of future.
(A side note…… I have to tell you that the BMF was really miserable to work with….as many have stated here; the quality of the new stuff is pretty poor. After it was applied and set up, it developed wrinkles and dull spots. I had to take much of it off and redo it, but it still had problems…so sorry for the wrinkles and seams but that just the way it is)
That’s it. This is the second vehicle I have now completed from my own design. I have more in the works and I am still completing the new vacuum formed body for the 1977 Tyrrell P34 6 wheel F1 car. I have built two bodies, but have a problem with the engine clearance in the back so the mold is being reworked a bit and a 3rd new body will be completed. I want it right so it is taking a little longer.
-
Really nice clean build. I have this kit, with the photo etch stuff too and the 312T (my favorite F1 car of all time) with the photo etch stuff also. I am looking forward to the time when I can build them....soon I hope. I am sorry to see the fit issue with the upper cowling. I remember the Tamiya 1/12 scale of the 312T had the same fit issue. I want to find a way to overcome that flaw in the kits.
Anyway, nice job, it looks really great. I just got conformation that my order of the Williams FW 15 (Senna's last ride)by Fujimi is shipping now.....I am looking forward to seeing that kit. I just love the new Fujimi and Hasagawa 1/20 F1 kits...I am glad that they have picked up where Tamiya has fallen down.
Curt...really nice build.
-
Mike, really nice. I remember seeing the under construction photos of this and thinking it would be "killer" when done, and it does not disappoint. The scale is much more in keeping with the '68 '69 Charger....I mean it is slimmer and lower than the current generation which I think stinks. It is a shame, in my opinion, Chrysler with the different design teams from the different ownership groups has really lost their way. As Ford and GM have evolved their designs to reflect modern design without losing the past, Chrysler has failed to accomplish that.
I think your design much better captures the flavor of what the Charger was and should be. I see much more exciting design ideas for Chrysler products coming from independent designers then the factory. Yours captures the feel of the era. I see '68, '69 '70 and '71 styling ques in this....very impressive build.
The only point that I would question on this design, and it truly is a minor point, is where are the rear view mirrors? See minor question.
Very nice job.....I like this very much. Kudos!
-
Very nice looking truck..nice and clean. I am not surprised about the HOK Tangelo paint...it is not very translucent. The orange looks great on it and, even though I would have thought so, those wheels look very nice on the truck. I like the Vietnam Service Ribbon on the license plate, I have my ribbons on my bookshelf in my office, Anyone who has those ribbons really earned them. Anyway, very nice paint for your first airbrush attempt.


1970 Baldwin Motion Chevelle
in Model Cars
Posted
I have completed my 1970 Baldwin Motion 454 Chevelle.
A quick recap. Revell Baldwin Motion Chevelle.
Only body modifications are most emblems were shaved and the doors were opened and hinged.
Bottom color is Duplicolor Cayman Green and the top is Duplicolor Black. Light Green vinyl stripe dividing the colors.
Flames were air brushed on freehand with the aid of a mini airbrush. Template
Wheels and tires
are from an old MRC set of Firestone Wide Ovals and American Mags. The engine is straight up and the hood has struts to hold it open.
A few coats of clear, bare Metal Foil and buffed out. That’s about it.