ApexSpeed
-
Posts
75 -
Joined
-
Last visited
Content Type
Profiles
Forums
Events
Gallery
Everything posted by ApexSpeed
-
Front Engine Dragster: The Old Master
ApexSpeed replied to ApexSpeed's topic in WIP: Drag Racing Models
Other than some minor dimensional differences and the magneto in the rear of the block on the 392, what else is visible? From what I could gather from HAMB, there were not any other visible differences from the outside. -
Front Engine Dragster: The Old Master
ApexSpeed replied to ApexSpeed's topic in WIP: Drag Racing Models
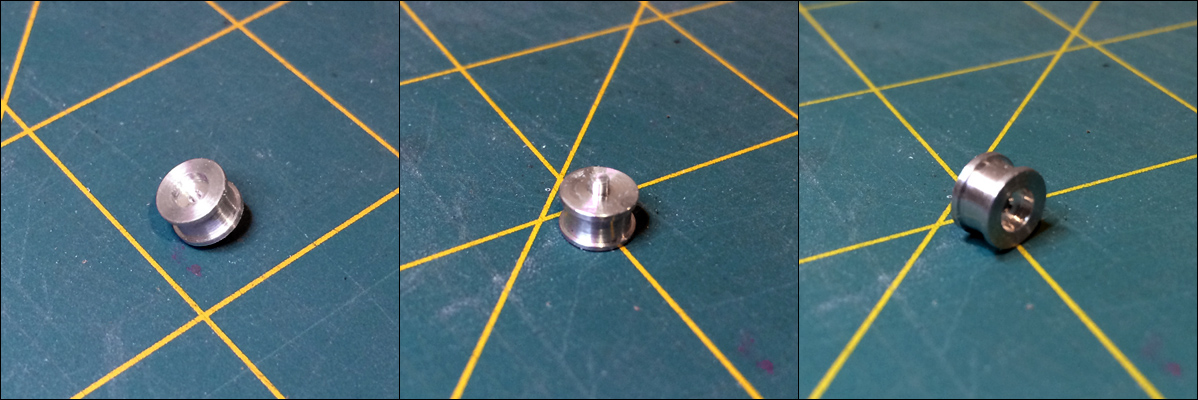
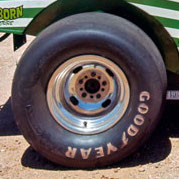
Here's a tiny update for you... you guys need to see these if you have not seen them already. I stumbled onto the eBay seller annalitt who had some really nice resin wheels listed. I was searching for something for a potential fuel altered project, and found the perfect rear wheels for this car. Turns out, it's our fearless Moderator Casey selling these. I'm sure everyone else knew, but I didn't. He sent me a set of 5-slot TF rear wheels and they are absolutely beautiful. Seriously, I had to look at them under my mag lamp because they looked like they were machined out of Delrin. Check out his eBay page and buy his stuff—it's seriously top notch resin. By the way, the kit tire is on the right. Both kits' tires are M&H Racemaster, even though the Young American kit has pad printed GOODYEAR logos on the inside of the M&H molded tire. It's the wrong era GOODYEAR logo, too, so I'm not sure what I will do for the Bluestreaks. The tire on the left is the new AMT Goodyear Bluestreak drag tire from the parts pack. Beautiful detail, quality and everything, and these wheels drop right into them, but they are way too small for this project. I wouldn't hesitate to use them in others with Casey's wheels, though. Looking for good suggestions for proper 11.0 x 16 rear slicks if you know of any. I might take a chance on decaling these to look proper, as the size and shape is right, at least. doug -
Nice build so far! When you de-chromed, what did you use? I used Super Clean on my chrome parts, and found that after they were bare, there was a very odd orange "goo" for lack of a better term that was left behind. It was in the corners of every piece, and is sticky, almost like a bees wax. It can be scraped off with a blade, but it's been a mess so far. I would love to be able to soak it in something to get the rest of whatever that is off of the parts, but I wonder if I am the only one who has seen this on this kit.
-
Front Engine Dragster: The Old Master
ApexSpeed replied to ApexSpeed's topic in WIP: Drag Racing Models
Thanks. Truth be told, it was the reason I made the chassis a touch longer. I wanted to give myself a little breathing room in case I needed to shorten certain rods to square things up. Turns out, I didn't. I need to trust in my skills a little more. -
Front Engine Dragster: The Old Master
ApexSpeed replied to ApexSpeed's topic in WIP: Drag Racing Models
The blower and scoop setup were very different than what I had in the kits here, so those were something I have been trying to line up for a few days. As it turns out, I had them under my nose the whole time. I yanked the blower and Hilborn 4-butterfly injector out of the Revel Parts Pack 429 Ford engine kit that I had sitting literally right next to me on the shelf. They will be perfect after making some adjustments to the base to get the same rake that the original induction system had. Still not sure exactly how I'm going to do this, but that's part of the fun. Original 392 Chrysler FirePower valve covers will be ordered later today, so that should take care of the big pieces of the engine. Blower pulleys and belt, and fuel punp are next on my hunt. Here's where she sits this morning in a very raw mock-up stage. It's exciting how far it has come in a week, considering how slow I traditionally build stuff. -
Front Engine Dragster: The Old Master
ApexSpeed replied to ApexSpeed's topic in WIP: Drag Racing Models
So the last couple of nights have been trying to figure out how to scratch-build the one-off fuel tank. Basically I did everything by eye and proportion. I do know that the bottom of the real tank is round with a chin towards the rear of the car for high-pressure fuel pickup, but at this point, that type of shape is beyond my skillset, so I will simplify to a sloped rectangular shape for my own sanity. I found the filler style gas caps at Ted's Modeling Marketplace, and made the front fitting from hex styrene and .020" wire straightened and looped. It's a little oversized visually, but I'm happy with the look. I still need to make the front mounts today, then that should be ready for fuel fittings to be plumbed to the engine. I'm still a ways away from plumbing, so I'm hoping my skills improve enough as I get closer to those needs. Anyone have a good rule of thumb for deciding the proper size fittings and hoses to use? -
Front Engine Dragster: The Old Master
ApexSpeed replied to ApexSpeed's topic in WIP: Drag Racing Models
Well, I was wrong. As nice as the Ramchargers car is, and as close as the wheelbase might be, there were too many things that would need to be changed (front end, bodywork, rear end, etc.). Last weekend, I found the Young American kit at the only hobby shop in the area (whoo hoo!). It's a considerably longer chassis at about 180" scale wheelbase, but the details are very much similar to the Ed Pink/Don Long car. So the obvious choice is to shorten the 180" wheelbase car to 150" in scale which is exactly 6" long. After taking a bunch of deep breaths I started measuring and cutting, using my cutting mat as a guide and template. The need to be able to make sure it all fits in the chassis and looks good, too, I decided to make the chassis a touch longer than 6". It would work out to about a 155" wheelbase in 1:1. After getting things sliced up, I realized that the front sections from the frame were not going to go back to the back half very smoothly. The logical and easy solution was to build the front half from scratch and .060" styrene rod. What have I gotten myself into? I devised a caveman method of as chassis jig, using 2" 3M painter's tape sticky side up with 1/2" tape positioning it on my cutting mat. It allowed me to hold the back have square while I was laying out the front half for the assembly. I cut off the original front end to use on the new styrene scratch pieces. -
Front Engine Dragster: The Old Master
ApexSpeed replied to ApexSpeed's topic in WIP: Drag Racing Models
So the car I am building is a 150 inch wheelbase Don Long chassis, powered by a supercharged 392 Hemi. Most of the kits that I have found are 426 Hemi powered, so that will be a hurdle to overcome. I could use the Ross Gibson 392 Top Fuel motor the center of this build, but based on my research, the real differences are the placement of the magneto and some very minor dimension that would be invisible at 1/25th scale. I'm going to relocate the mag on the kit engine to the proper location, track down the correct injector, blower and valve covers and call it a day. As for the chassis, my project begins with the AMT Ramchargers FE kit. Once out of the box and starting to work through some of the major pieces, I found that there were a lot of differences that would require much fabrication and creativity. The chassis length is very close to scale 150" wheelbase, so I was sure it was the right place to start. The details of the chassis design are very close to the original Don Long chassis, and I was adamant that it was the right direction. -
Hi guys, I wasn't going to post the progress of this project, because I am building this for a local contest this July, but I figure I need the motivation to keep with it as it progresses. I tend to not get 100% finished with things, so it will help to have an audience. I hope. Anyway, this Ed Pink front engine dragster will be easily the most advanced and optimistic build I have attempted, only having really done OOB kit builds with wiring and good paint details. I'm tremendously excited about this car for a lot of reasons, but mainly because this car has been restored by Pete Eastwood for Cacklefest and there is a ton of documentation and photo detail of this car. It was even the focus of a 1964 Hot Rod Magazine 2-issue build article following Don Long building the actual car (which I actually found the original issues). It was built in 1964 and competed in the 1965 NHRA Top Fuel class winning in it's first time on the track at the Winternationals in 1965. It has a spectacular pedigree and a wonderful amount of reference material to use in the build. So, here we go...
-
Need an aluminum machined part I.D.
ApexSpeed replied to ApexSpeed's topic in Car Aftermarket / Resin / 3D Printed
I can run a micrometer over it to get dimensions, if it helps, too. I think the bigger question is, where can I get the other two pulleys? -
Need an aluminum machined part I.D.
ApexSpeed posted a topic in Car Aftermarket / Resin / 3D Printed
Hey guys, I have a part that was in one of my VERY old parts boxes (at least 10-15 years old), and I am trying to find out who produced it. It is an idler belt pulley for a supercharged V8 drag engine, and was in my very old unfinished build of the Gary Ormsby Top Fuel dragster. I have no idea why I only have the idler pulley and not the other two, and I can't imagine it was sold individually, but I'm pretty sure that I never had the other two pulleys. The machining is flawless and the pulley is a really nice piece. The goal is to find the other two pulleys for a supercharged Top Fuel engine. Does anyone recognize this belt tension pulley? I have searched through a bunch of different company's offerings and can't seem to find any that match. Anyone know who made this?
-
Could I possibly be the only one who looks at this artwork and thinks, "how the hell did he do that?" Spectacular. Man, I have a long way to go... LOL
-
Thanks for that tip! Living without cable and using only terrestrial digital HD has been difficult without racing. The actual address you need is http://espn.go.com/
-
1968 Mr. Norm's Dodge Dart GSS (was The Engine Room)
ApexSpeed replied to ApexSpeed's topic in WIP: Model Cars
Oh, already one step ahead. I still don't have the touch I would like with the black washes on engines--sometimes it just makes it look dirty, sometimes, it looks like I haven't done anything to it at all. It has gotten final touch-ups and a better wash on it. The interior is on the plate for tonight, if I ever actually get home and don't have 3' of snow to shovel. Might have to wait for another day... -
Minimum wage is a terrible benchmark, as it has not adjusted properly over time with inflation or the cost of living. It also assumes a majority of the population is making minimum wage, which they were not. When comparing the costs of things between today and many years ago, you're better off comparing to average hourly wage or the cost of certain consumables like food, and even then it's not tremendously accurate. In December of 2013, the average hourly wage for Americans was $24.17/hour. In 1961, the average hourly working rate of Americans was $2.55/hour. Today, I just bought a 1/2oz jar of Testor's paint and it was $1.59. Based on that price, and the wages previously listed here, that would make a jar of paint about 16¢ in 1961. Fairly close? I would say the cost of models, model paint, cars, houses, food and everything else has risen fairly accurately with the cost of living and the wages of average Americans. And yes, $1.59 for a 1/2 oz of paint is absolutely ridiculous. Totally different discussion.
-
Think Pink: Engine In, Suspension Started
ApexSpeed replied to FASTBACK340's topic in WIP: Model Cars
I'm really excited to see this project develop—this is one of my favorite colors ever produced on a factory muscle car, no joke. I'm impressed so far, and looking forward to more. If you shoot any paint with an airbrush, I have a technique that can replicate a more scale krinkle or textured finish. Generally, I thin my paint for any airbrushing to about 1:1 paint to reducer--whether it is lacquer, enamel or acrylic. I don't have a perfect formula, I just try to get the consistency to be similar to 2% milk. I shoot things between 25-35 psi on average, depending on the paint and color, I adjust pressure based on feel. Here's the trick--thin your paint, in this case black, to something a little thicker--like whole milk--and dial down your air pressure on the airbrush to something barely more than blowing out a candle. Something in the range of about 5-10psi. It will feel like it's sputtering, but using this technique, you can get that wrinkle finish for valve covers or even a textured vinyl roof. I will shoot a color normally at standard mix and psi to get a color base, then shoot the thick stuff over the top in the same color. It works really well and gives a really nice, scale appearance. -
1968 Mr. Norm's Dodge Dart GSS (was The Engine Room)
ApexSpeed replied to ApexSpeed's topic in WIP: Model Cars
I did some detail work today and painted some interior pieces. I got impatient and really wanted to see the fit and assembly of the interior, boy and drivetrain, so I did a test fit. Everything is looking pretty good and aligned, with the exception of my fan blade which got knocked off (again). Everything looks really good, and I'm really happy so far. Tonight, some foil work, which will be the firt time I have worked with foil since I did half of the outer trim 10 years ago. LOL. Feeling good about where it's at right now... -
1968 Mr. Norm's Dodge Dart GSS (was The Engine Room)
ApexSpeed replied to ApexSpeed's topic in WIP: Model Cars
Now to live updates... progress! I finished the plug wires this evening, and repaired a few of the things I broke on it from Tuesday night where everything I touched made a mess. I modified the fan to be a little more realistic and sit further away from the engine, and wound up making it too far and had clearance issues. In removing it, I broke the fan. And the fan belt/pulley. And the distributor. So I got the distro back on, repainted it, and then I took all three pulleys down to round and made a new belt out of 6 layers of electrical tape. Actually looks better. While I did that, I also decided to make a dipstick and then hard fuel lines from the fuel pump to the carb. No idea why I decided to go so far on it, but I couldn't stop. Interior is all painted now, and I don't think I have the same motivation to go into great detail in the interior. A few BMF details, chrome the center console and I won't go too far with it. Famous last words, eh? Sorry for the oddly mottled photos—bad lighting plus cell phone camera zoomed in, and here's the results. I think I'm in a good place heading into the weekend. -
1968 Mr. Norm's Dodge Dart GSS (was The Engine Room)
ApexSpeed replied to ApexSpeed's topic in WIP: Model Cars
Update: 6.21.04 Quick update of the body progress... Bare Metal Foil is a beeotch. Man, this stuff is hard to work with. I need a LOT more practice, because this stuff is worse than Saran Wrap. Wow. Anyway, here's some quick detail shots of some of the decal and BMF work and a test-fit of the engine and chassis: Update 7.12.04 It's been a while since I pasted an update, as my time has been consumed lately with the new house and the effor of painting things that don't require magnifying glasses like the master bedroom. Anyway, some headway has been made on a few things like the chassis and wheel details. Some quick pics to keep the project moving forward... Dart wheel covers & redline tires; stripped and re-chromed with Alclad, centers painted semi-gloss black, and valve stem inserted: Basic chassis details: -
1968 Mr. Norm's Dodge Dart GSS (was The Engine Room)
ApexSpeed replied to ApexSpeed's topic in WIP: Model Cars
I guess I should revise this topic and do a little back-fill on this build as it went almost 10 years ago. I am actually making (slow) progress on the engine, and have made inroads on the interior, so it's moving forward. I just get small chunks of time to build, so I take what I can get and work in tiny sections. Here's the build progress as it started from 2004 (originally posted in scaleautomag.com): Wow, my eyes aren't as good as they used to be. After being away from building for a LONG time, this is my first venture back into modeling. So far, it has been a very gratifying and relaxing experience, but there is plenty of time to screw this up still. Instead of jumping back into the game with a top fuel car or something overwhelming, I decided a muscle car for the Factory Original Group Build would be a good start. I have always loved old Mopars, so this was a simple choice. I have been taking my time with this so far and doing a little bit every night for the past to weeks. My (im)patience has been tempered by the fact that just about every other day, I'm making a trip to the local hobby shop or craft store for some tool, supply, paint or thing-a-ma-bob. My toolbox didn't stand the test of time, but it's getting back into fighting shape again. [] So here's the first stages of my 440 build-up. I'm working out the plug wiring this weekend, using .024" black plug wire and stripped .036" black wire as boots, slipped over the ends of each wire. So far, it seems to be going well. The coil wire shown is done that way, and fed into a .038" drilled hole, built up with CA (wire not yet attached to distributor). I'd really like to do carb lines and a dipstick, but I'm still spending time researching the actual 1:1 engine layouts. I'm worried I'll bite off more than I'm ready to chew if I start some of that extra detail work right now (I still need to find one of those magnifying lenses). The car is planned to be Dodge Light Metallic Green with black interior and black stripes, with a black vinyl roof. I have no attention span, though, so that could change at any given time. I'll post more photos as I progress through. Feel free to leave your comments here, good and bad. The only way I can learn and get better is to hear what I should have done, and what I can do to make the model more accurate. I'm interested in any and all critiques. -doug 6.2.04 Update: The engine is completely wired now, and in the correct firing order (like that matters), and the distributor is in the correct location. Paint has been touched up where my grubby little fingers gripped it, and the plug boots have been glued in place. Coil is wired as is the vacuum advance, and I am still contemplating a hard fuel line as well as a dipstick. The chassis has been primed and the first coat of color was shot last night. I used MCW lacquers for the first time, and they are awesome. Sprayed easy and dried quickly. Nice product. Man, I can't tell you guys enough who haven't yet bought a magnifying lens/lamp how much it has changed this whole thing for me. Not only can I see what I'm doing, but I find my hands are even steadier and more accurate. An absolute MUST-HAVE. I bought a simple lamp (5X) with a circular fluorescent bulb at a local hobby shop for $35 early this week and there is no way I could have wired that little thing without it. More soon, doug There are always things that seem to get in the way of my hobbies... work, for one. I got the body ready for final paint work, last week, but just got around this weekend to test fitting everything to make sure it all fits properly. Looks pretty good, too. Tonight, I'm going to be shooting the interior and maybe if I'm really ambitious, the exterior color coats, too. We'll see how everything progresses. Here's some photos to keep the thread fresh... Paint code FF1, Dodge 1968 Light Green Metallic (MCW paint #6859 Mist Green Metallic), black vinyl roof with black vinyl interior. You can see the chassis already shot in the body color if you look close. [] I painted the interior base to get ready for flocking sometime this week (my first time with flocking), and the inside of the body is painted, and ready to shoot exterior color and clear. I'm excited for my first real paint job... Here is the real Dart (though a '69 GTS) that the model is loosely based on... -
WTD: 4 Slot Altered Mag Rear Wheels
ApexSpeed replied to ApexSpeed's topic in Car Aftermarket / Resin / 3D Printed
Thanks for the tips, I'll see if I can find those kits to pillage from. -
I'm surprised I haven't seen this thread before. I bought 4 of each of the re-makes many years ago and they have been sitting on a shelf ever since. Recently, I started pulling them out to build. The first, was the misnamed 354 Cadillac, which is really a .030" over 331 Caddy. Two transmissions, two intake systems and a REALLY neat little kit. I have nothing to put this is, because I just like building engines. I haven't wired this yet because I have too many projects on the bench right now, but it will be finished soon. Hand-cut aluminum injector stacks, Altered States OE valve covers and a couple of other little adjustments round out a stock kit. Chrome stripped from everything and the resin valve covers were Alclad chromed. Nice little builds, for sure. Anyone have a nailhead they don't want?
-
WTD: 4 Slot Altered Mag Rear Wheels
ApexSpeed posted a topic in Car Aftermarket / Resin / 3D Printed
I have been searching and searching, and I was sure I had seen them before... do any of you guys know if someone makes a set of altered 4-slot rear wheels? Thanks in advance, doug
-
Here's my great trader list... (screennames in parenthesis) Karl Smalley (afxmustang) Don Sikora II (Don Sikora II) Always looking to add to my list! BAD TRADER list: DW Jones (Jones45) : took my trade and followed up with nothing but excuses for 2+ months—dishonest.
-
As it was, I mixed my own based on photos and in-person memory (basic Testors blue + green enamel). I had already built and detailed my engine in orange (ugh) when I found out that that color didn't start until 1969. Duplicolor also makes a spray can engine paint, too, part number DE1619. They call it "Chrysler green engine enamel." Second kit needed, new engine in progress (still): I didn't get it quite as dark as I wanted, but it was close enough...