

JohnnyK
-
Posts
208 -
Joined
-
Last visited
Content Type
Profiles
Forums
Events
Gallery
Posts posted by JohnnyK
-
-
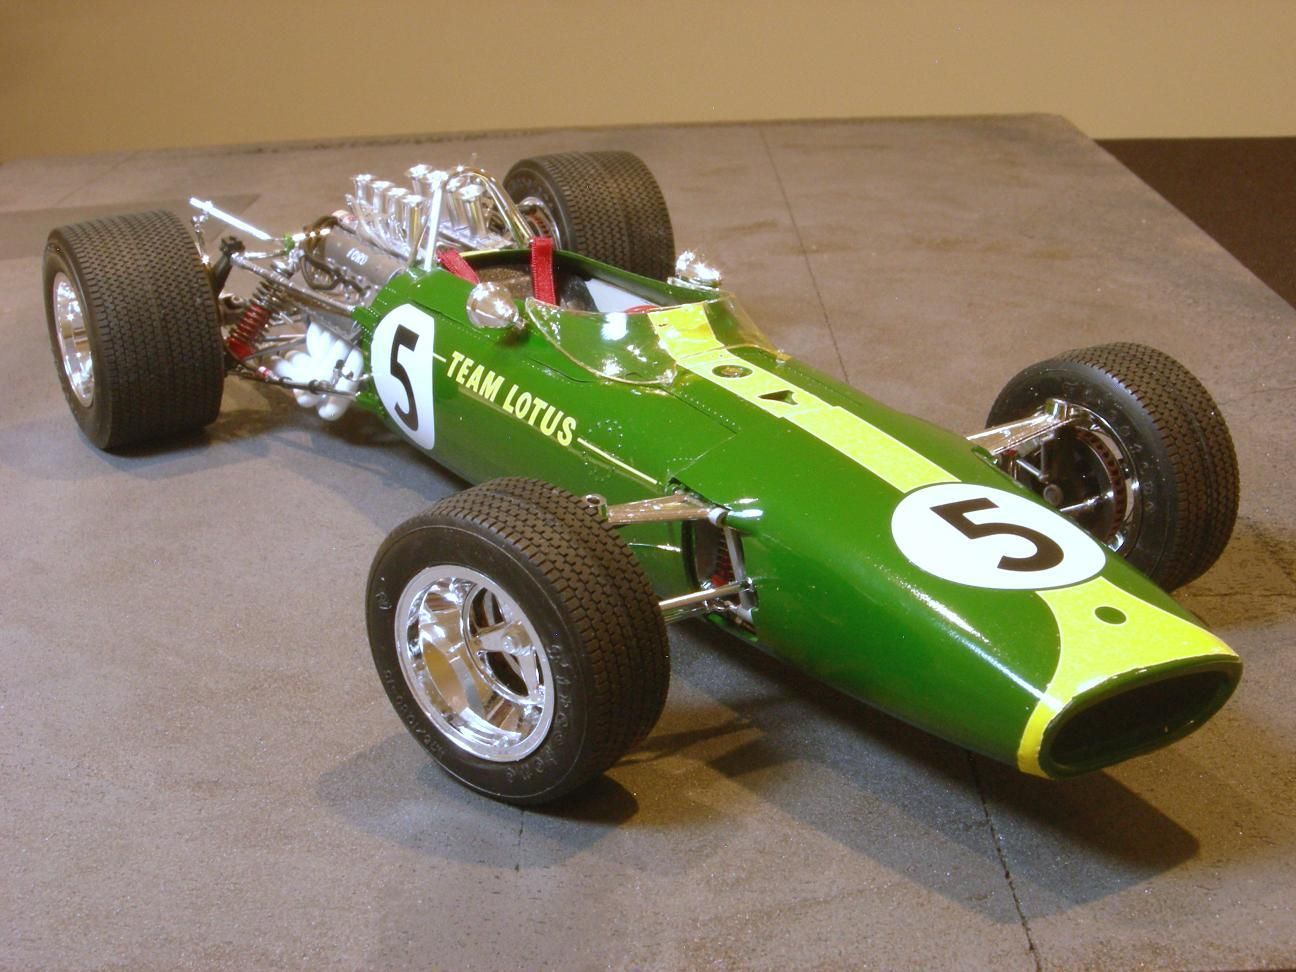
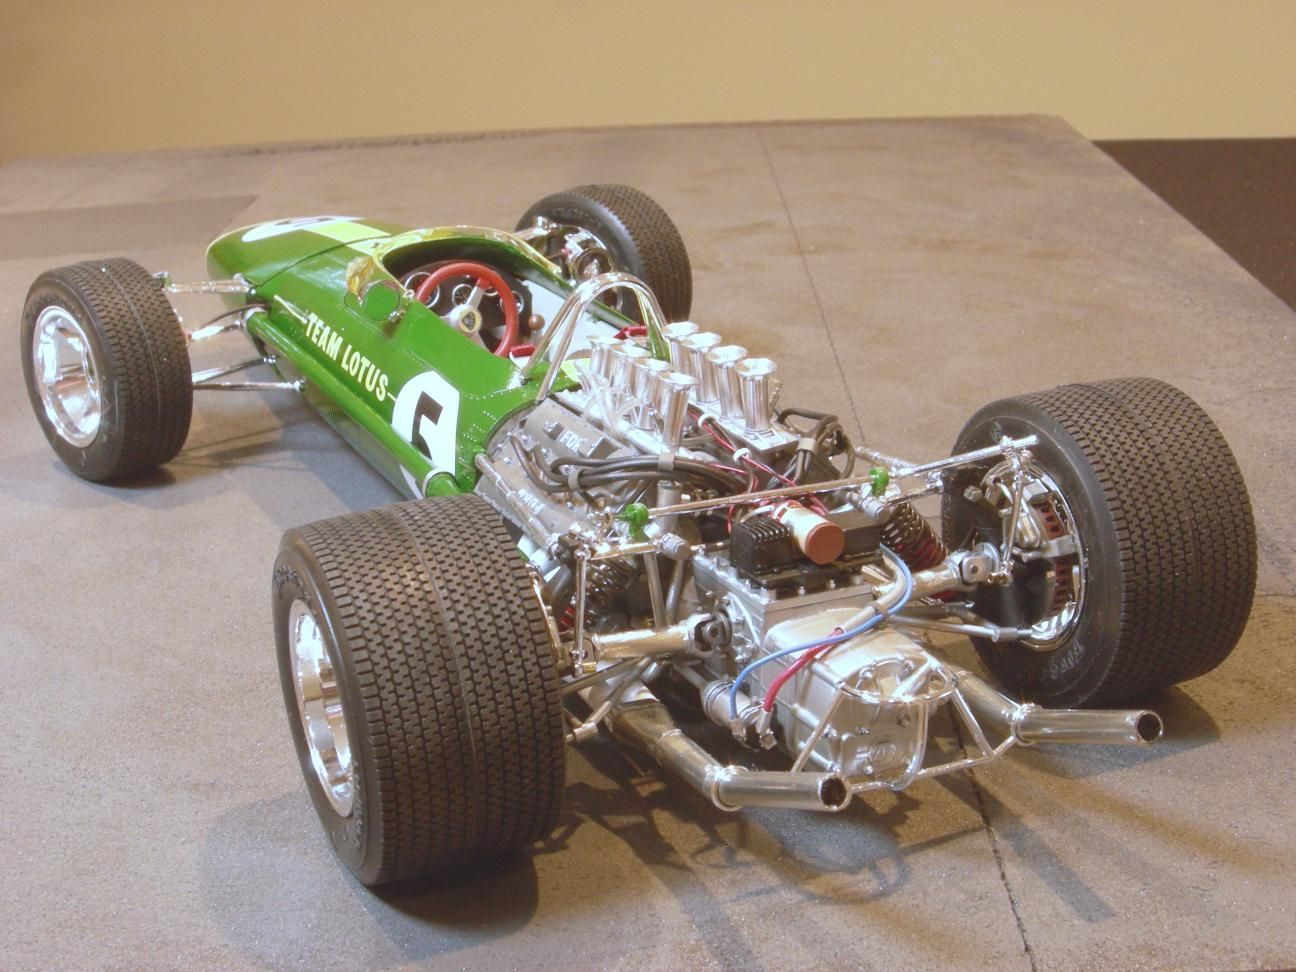
I am a retired architect. If you happen to know an architect, you know that architects have the patience of a saint and love to get mired in the details. The perfect attributes for building model cars. I enjoy building large scale cars because I can get absorbed in the details. Last Spring I finished my first 1:12 kit, the Trumpeter Ford GT40 MK II. I learned a lot about detailing a 1:12 kit from that experience. Most importantly, I learned that it is really essential to include a large quantity of detailing to prevent the finished model from looking like a toy. This summer I decided to super detail the Tamiya Team Lotus Type 49 in 1/12 scale. The original kit was first released in 1973, and re-released in 1991 with new photo-etched parts. That means that the basic kit is 42 years old and a lot of the parts show the age in yhe way of mold lines and flash.
Before starting on the Lotus I downloaded numerous photos of the 1:1 car. I then visited Home Depot and my local craft store to purchase wires in a number of gauges. The wire can be used as fuel lines, break lines, battery cables and general electrical wires. I then stocked up on steel bolts, compression fittings, tire valve stems, seat belts, clamps, stainless steel braided lines from Pro Tech, Scale Hardware, and Detail Master. Following are photos of the finished product.

I used Tamaya rattle can Racing Green paint. I polished out the orange peel as best as I could and then polished the car with wax. The decals are too thick and would not conform to the shape of the car's nose.
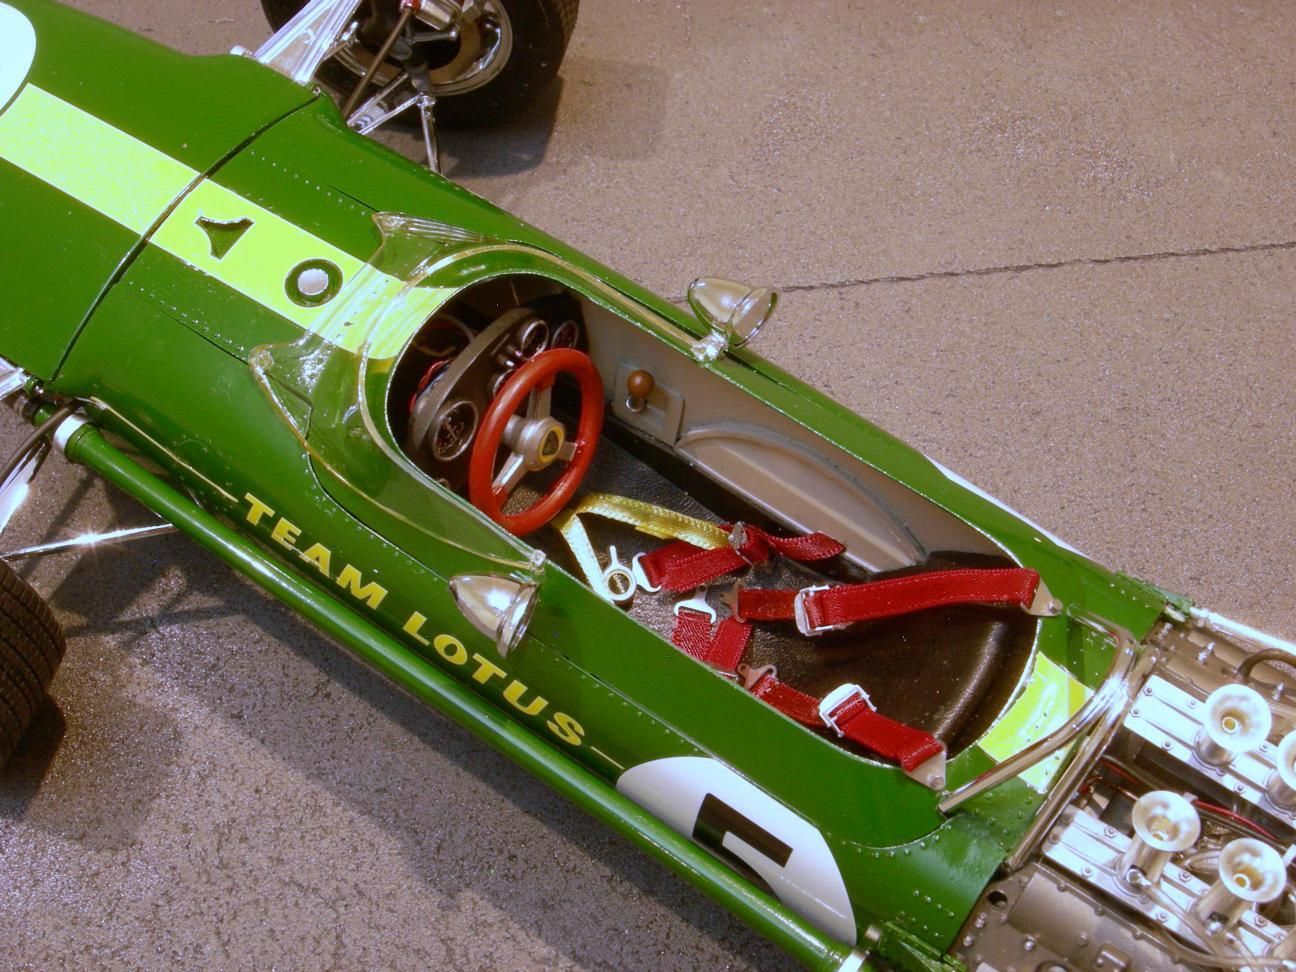
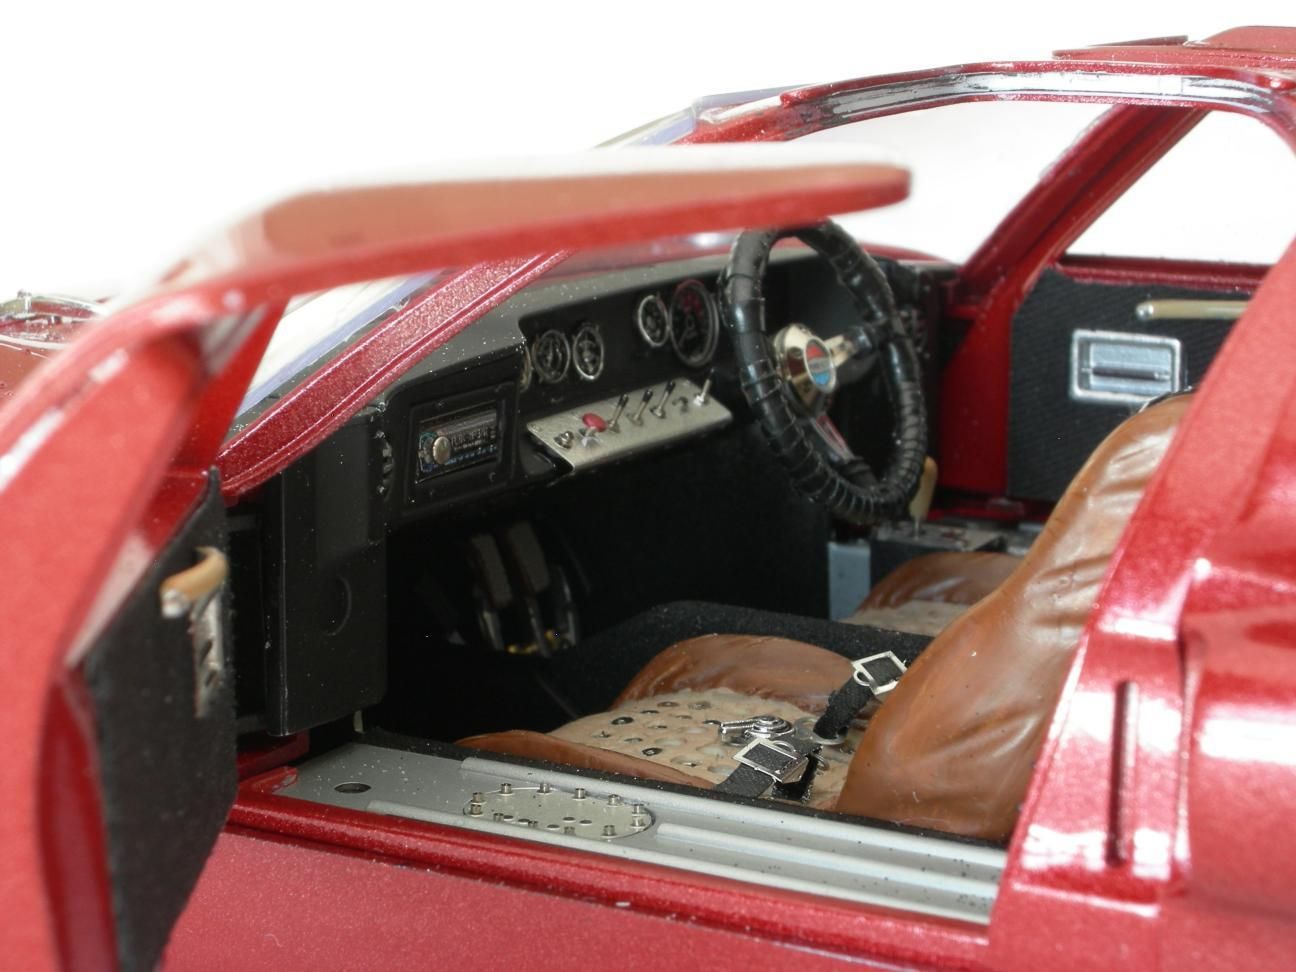
The model did not include seat belts, so I bought some on-line. The leather texture that is molded into the seat looks bad, so I purchased an old black leather purse from a Good Will Store, cut it to size and glued it onto the plastic seat. I think it really looks good. Since the back side of the instrument panel is visible I added wires in a varity of sizes.
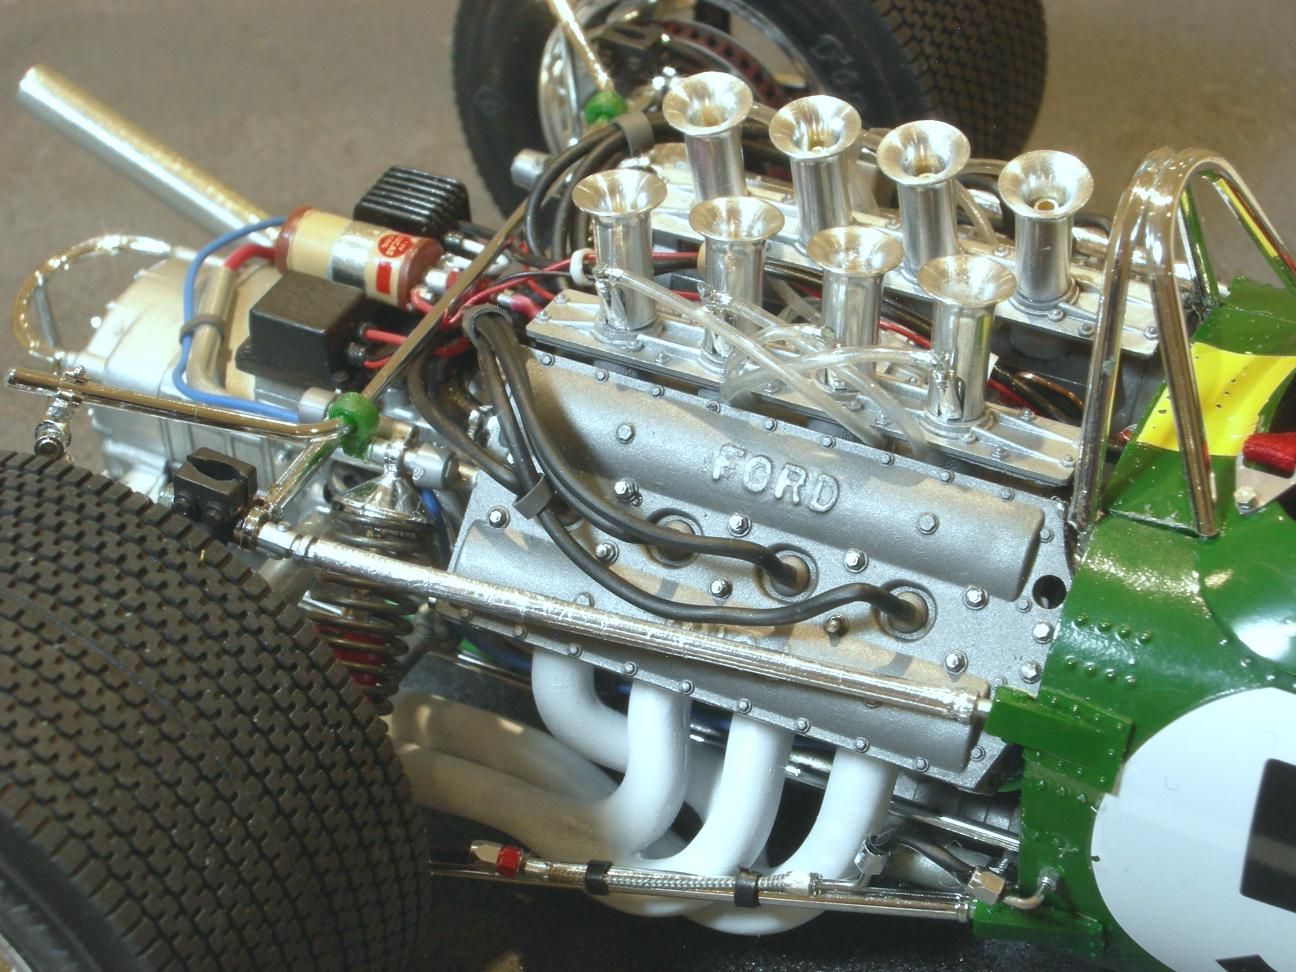
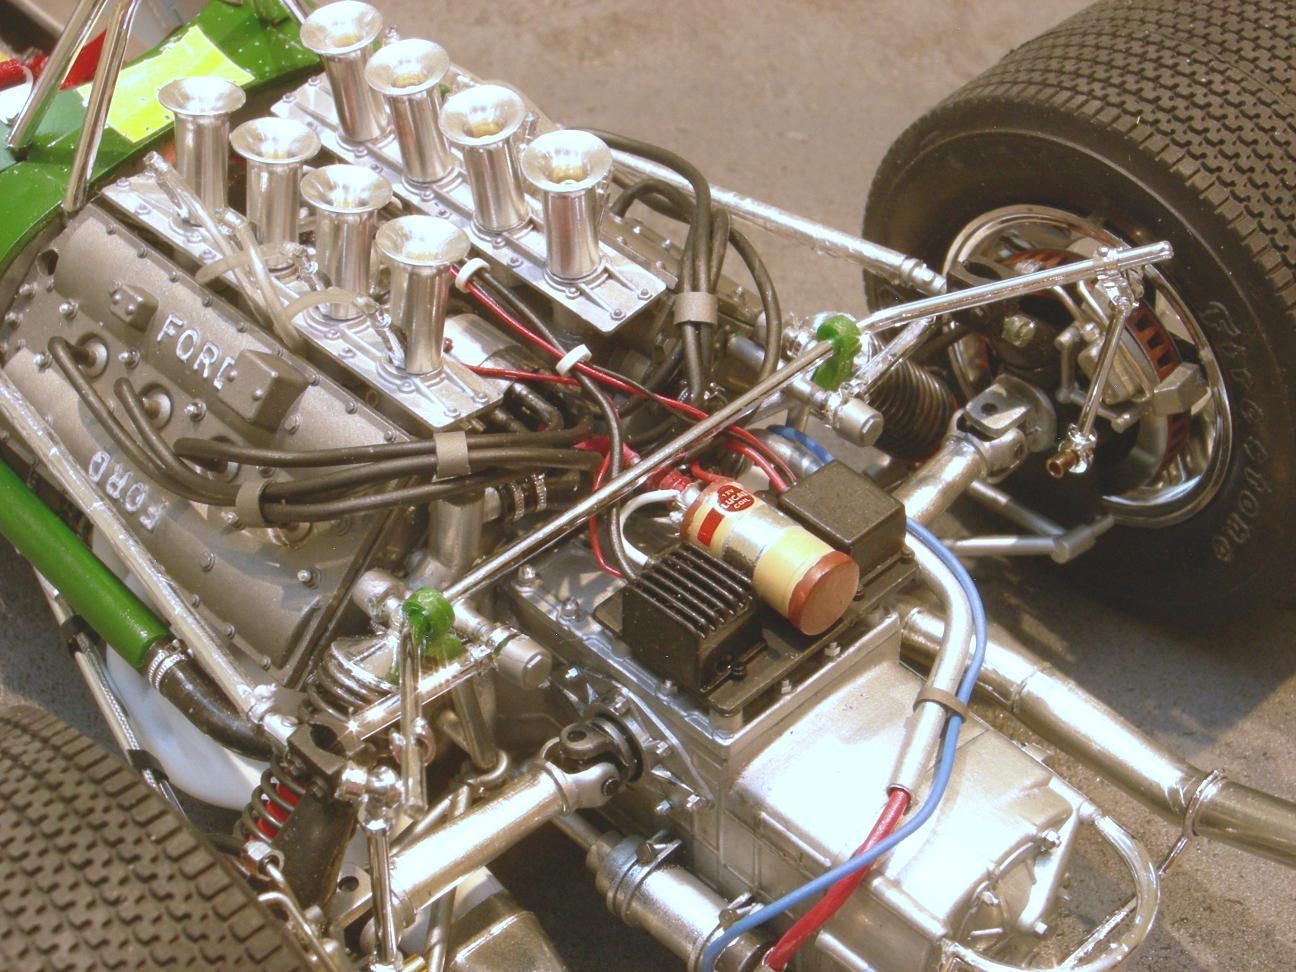
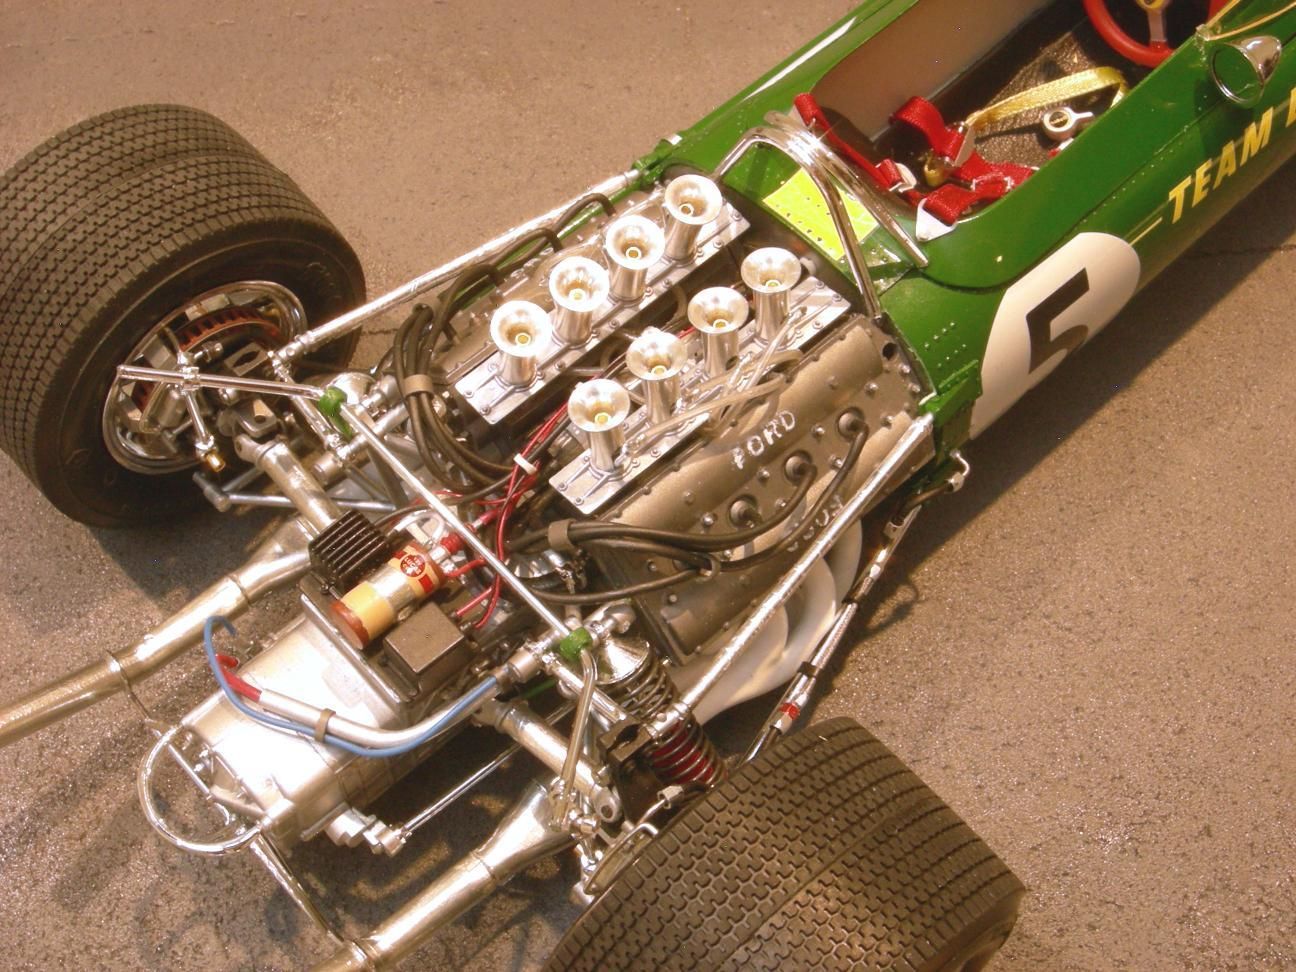
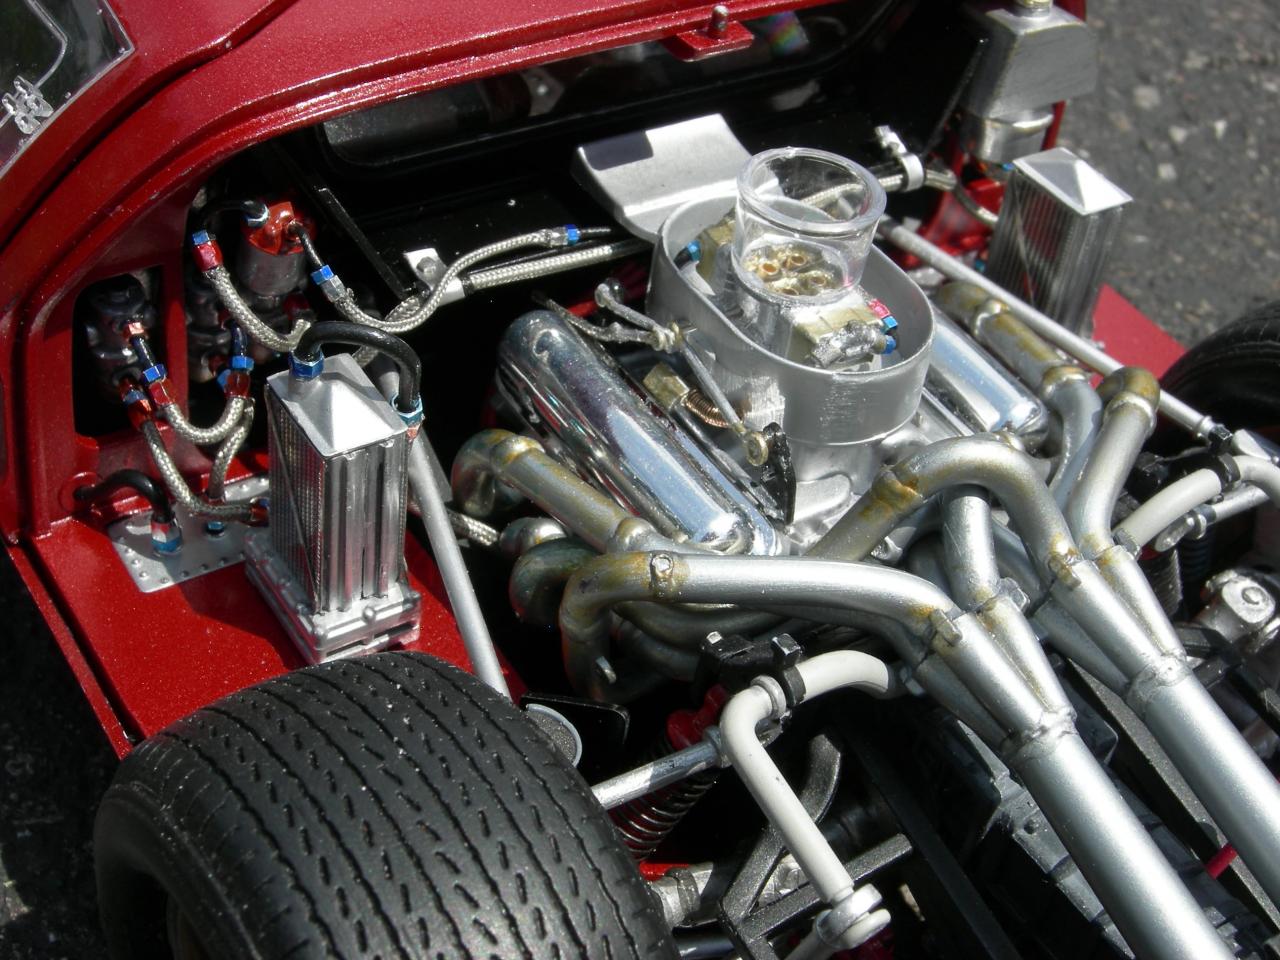
Now the fun part. I added as much detail to the engine and breaks as possible. I removed as many of the plastic nuts as possible and replaced them with metal bolts. Check out the bolts on the starter clamp and on the transmission. The 1:1 car had a metal conduit for the starter cables, so I bought some aluminum tubing at Hobby Lobby and used that as the conduit. I threaded a heavy wire through the conduit and surface mounted a wire that would have been attached to the ignition switch. I used some leftove hose clamps from the Ford GT on the cooling hoses on the Lotus model. Wires in a number of sizes were added to the ignition system. The rubber band wire looms were cut from wire insulation. These closely match those found on the 1:1 car. The rear brake lines are composed of stainless steel braided lines, rubber hoses, wires for brake lines and compression fittings. It took hours of trial and error to make these look correct. I think that they add a lot to the looks of the model. The drive shafts and exhaust pipes had terrible mold lines, so I decromed them, sanded down the mold lines and covered them in metal foil. I found some small brass tubes at Hobby Lobby and glued them into the inside of the fuel injection trumpets.
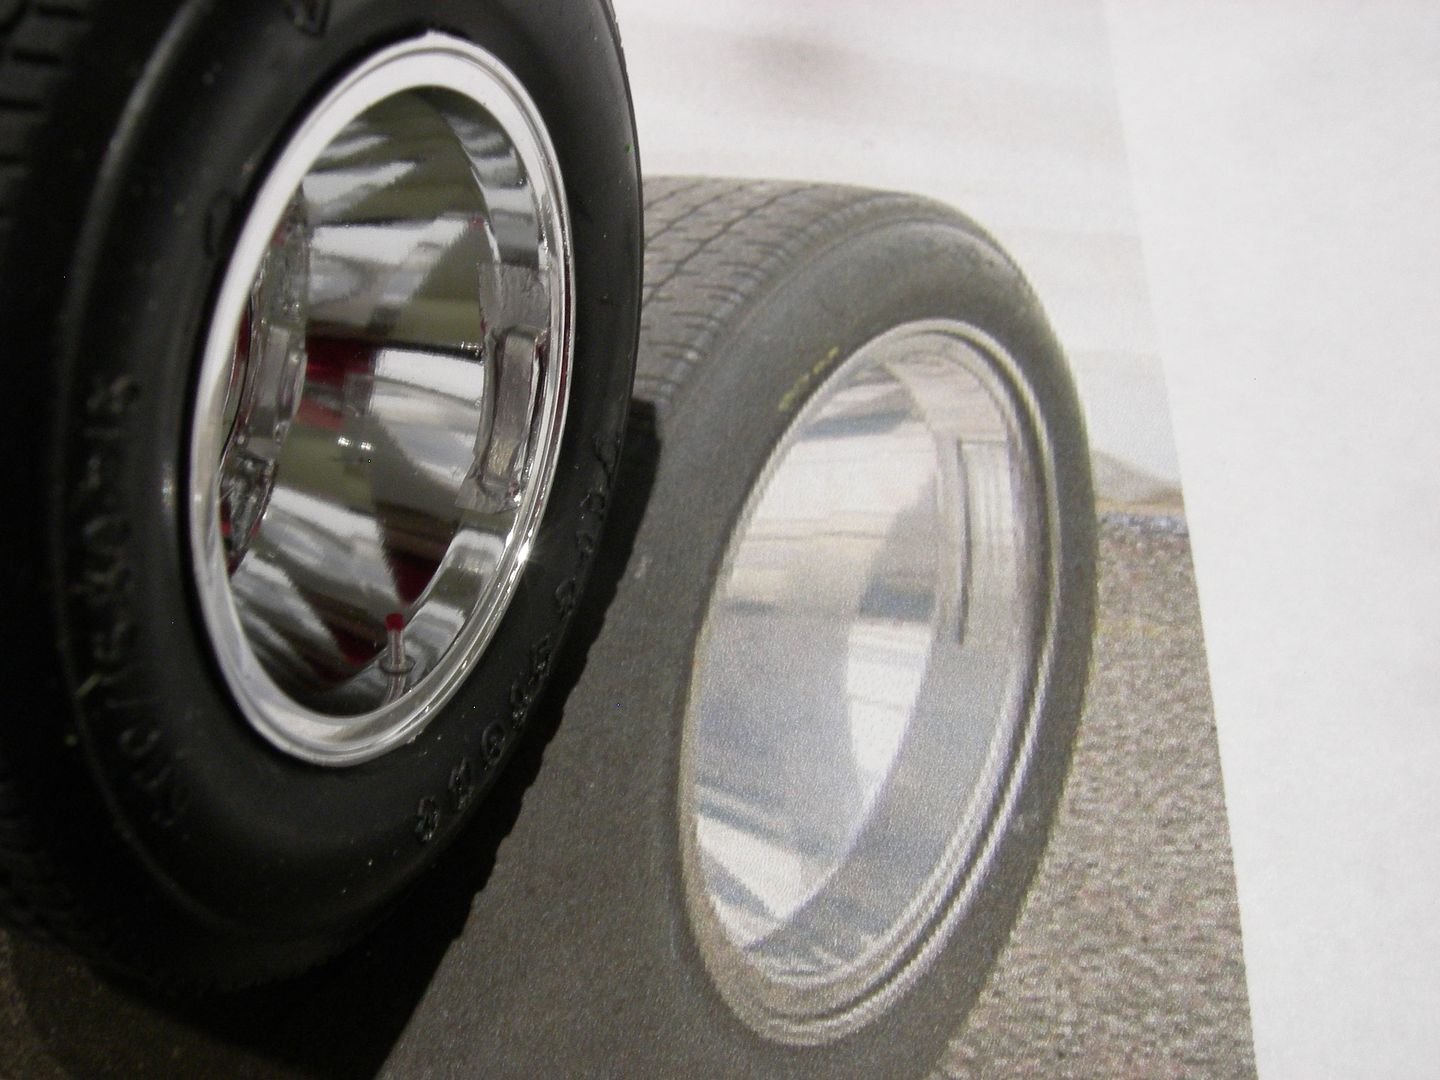
I added valve stems to the wheels and balancing weights just like the 1:1 car. In the photo abpve the model's tire is to the left and a picture of the 1:1 tire is to the right. I cut some small pieces of the foil cap that is used on wine bottles to simulate the wheel weights. I then used some metal foil to simulate the duct tape that was used on the 1:1 car. I think that it really looks good and adds a lot of pop to the model.
This build took a long time, so I plan to build a B-17 before I attempt another large scale car.
-
I really appreciate the offer, Hugh! t one point I was thinking of using a piece of veneer, but I think it would be too thick. A sheet of photo paper seems the thinnest I can get and would be great to have a piece of veneer to photograph at high resolution. The 1/24 dash is 1.75 x about .5", so I wouldn't need a large piece. Here's a photo of my TR4A dash so you can see what I'd like to get close to.
If you have something that might be close, I'd be happy to just photograph it and get it back to you.
OMG, OMG, OMG!!!!! Your car is beautiful. That is a great dash. In college I had a TR-4, TR-4a and a TR-6. Those were really fun cars. Too bad they all were eaten by the rust monster. I now drive a Z3 that I have owned for 18 years. It is as much fun as the TR's except it does not require weekly maintenance and constant repairing.
-
I went to the GT 40 website and looked at the photos of the parts. I remember when I opened the box two years ago, and it is a really big box, I freaked out over the large number of parts. So many bags with so many parts. The website mentions all new tooling. I doubt that. That would cost a lot of money. The model that I assembled wasn't that bad. Very little flash and few depressions.
-
Large scale models are difficult to do, However, that is a really nice build. It looks like the real deal.
-
There are some problems with the kit. The car sits too high, the seats are wrong, the carb is wrong, the tires look bad and there are too many chromed parts. However, the overall shape of the model looks correct and the exhaust pipis are right on. With some work the model looks really good. Isn't that why we induldge in thois hobby? We enjoy a challenge.
-
I have the 1/12 Tamiya wR1 Wolf and the Ferrari T4 in the stash pile as well as a pile of the 1/20's
The Lotus will be great, do a WIP thread so can follow along
Lovin the Gt40....that one is high on my want list, but very rare
Cheers
My wife bought the GT40 as a Christmas Present in 2013. Since it was OOP for a few years, and very difficult to find, she paid $200 for the kit!!!! It takes a lot of work to make it not look like a toy. You can see photos of the GT 40 here: http://www.modelcarsmag.com/forums/topic/103425-just-finished-trumpeter-112-ford-gt40-mk-ii/
-
I am now working on the 1/12 Lotus model 49. It is a lot simpler build than the GT 40.
-
I used Future/Pledge as a gloss coat on my Trumpeter 1/12 scale Ford GT. It developed micro cracks on the roof. Maybe I put it on too thick. Plus, I do not think that it has as nice a deep finish as a clear lacquer. Does anyone know if it is possible to polish Future/Pledge?
-
Well, I just bought the Lotus Type 49. This a weird kit because it has the vestiges of a battery compartment on the bottom of the body! Gap filling super glue to the rescue.
-
Really nice very impressed with the engine detail
Great Job ??
XJ6 ?
Thanks. Large scale cars require a lot of detail to keep from looking like a toy.
-
I have had a difficult time using Future as a clear coat. I used it on my 12:1 Ford GT MK II and after a month the clear coat started to micro crack.
-
YIKES!! Those paint jobs are fantastic. Can you share you secret as to how you were ale to get such great paint jobs? I am not able to get such a fantastic shine on my models.
-
What brand of paint do you use? I have been using Testors but I am running out of colors.
-
I agree, the yellow is a great color for the Rat. The green that is shown on the box just looks awful.
-
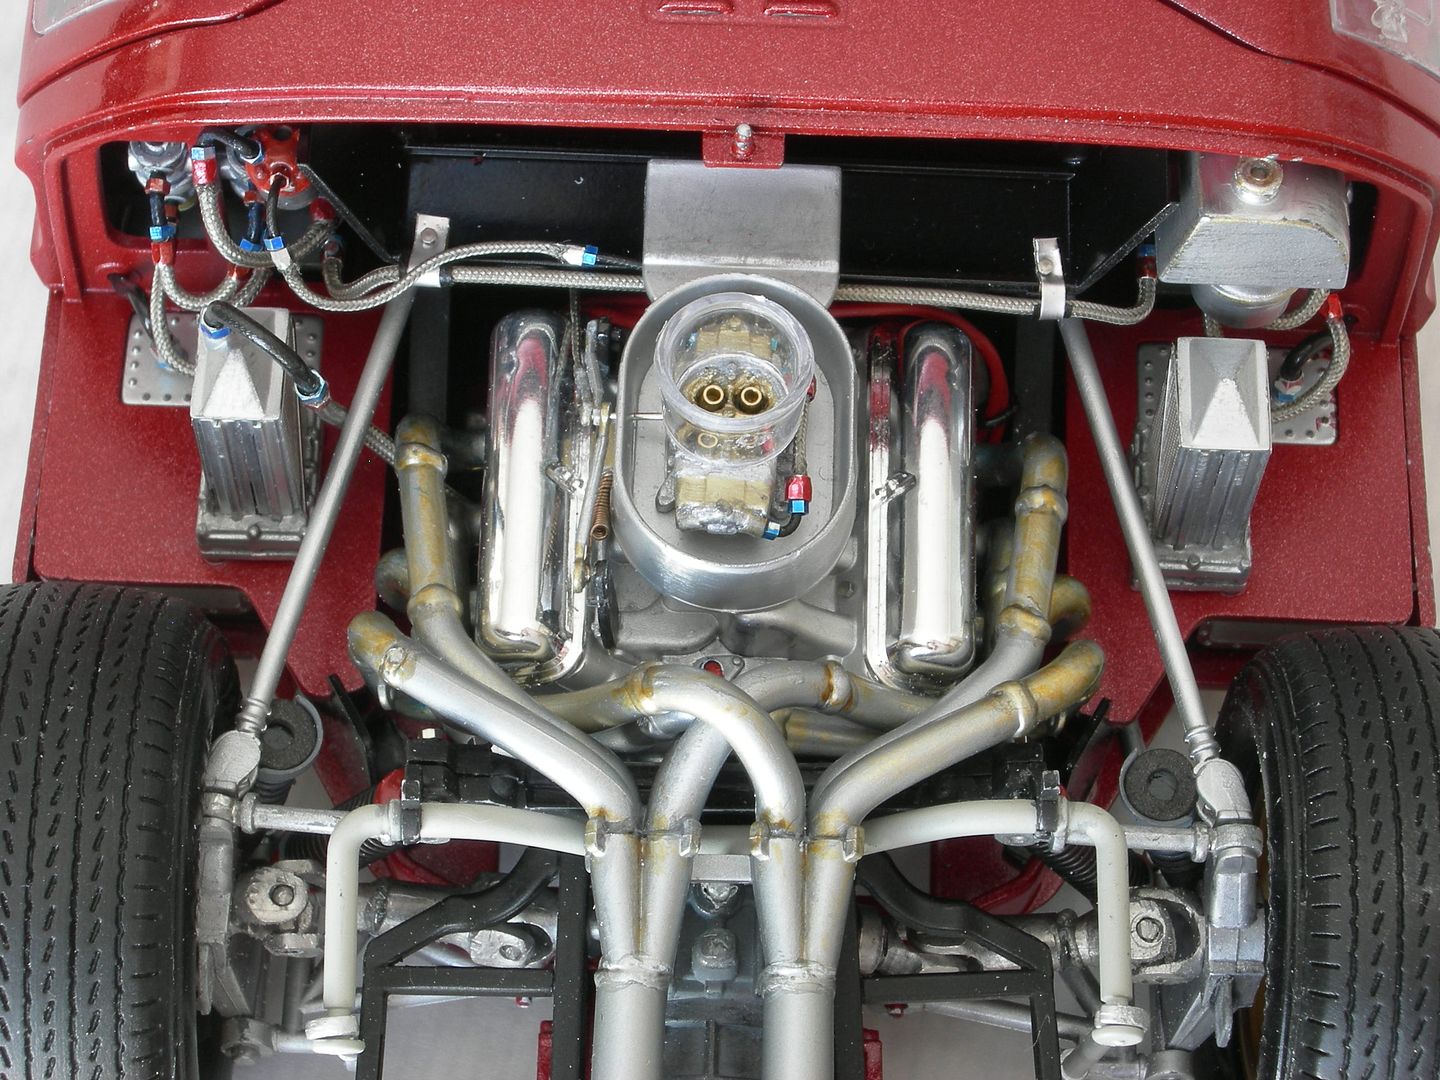
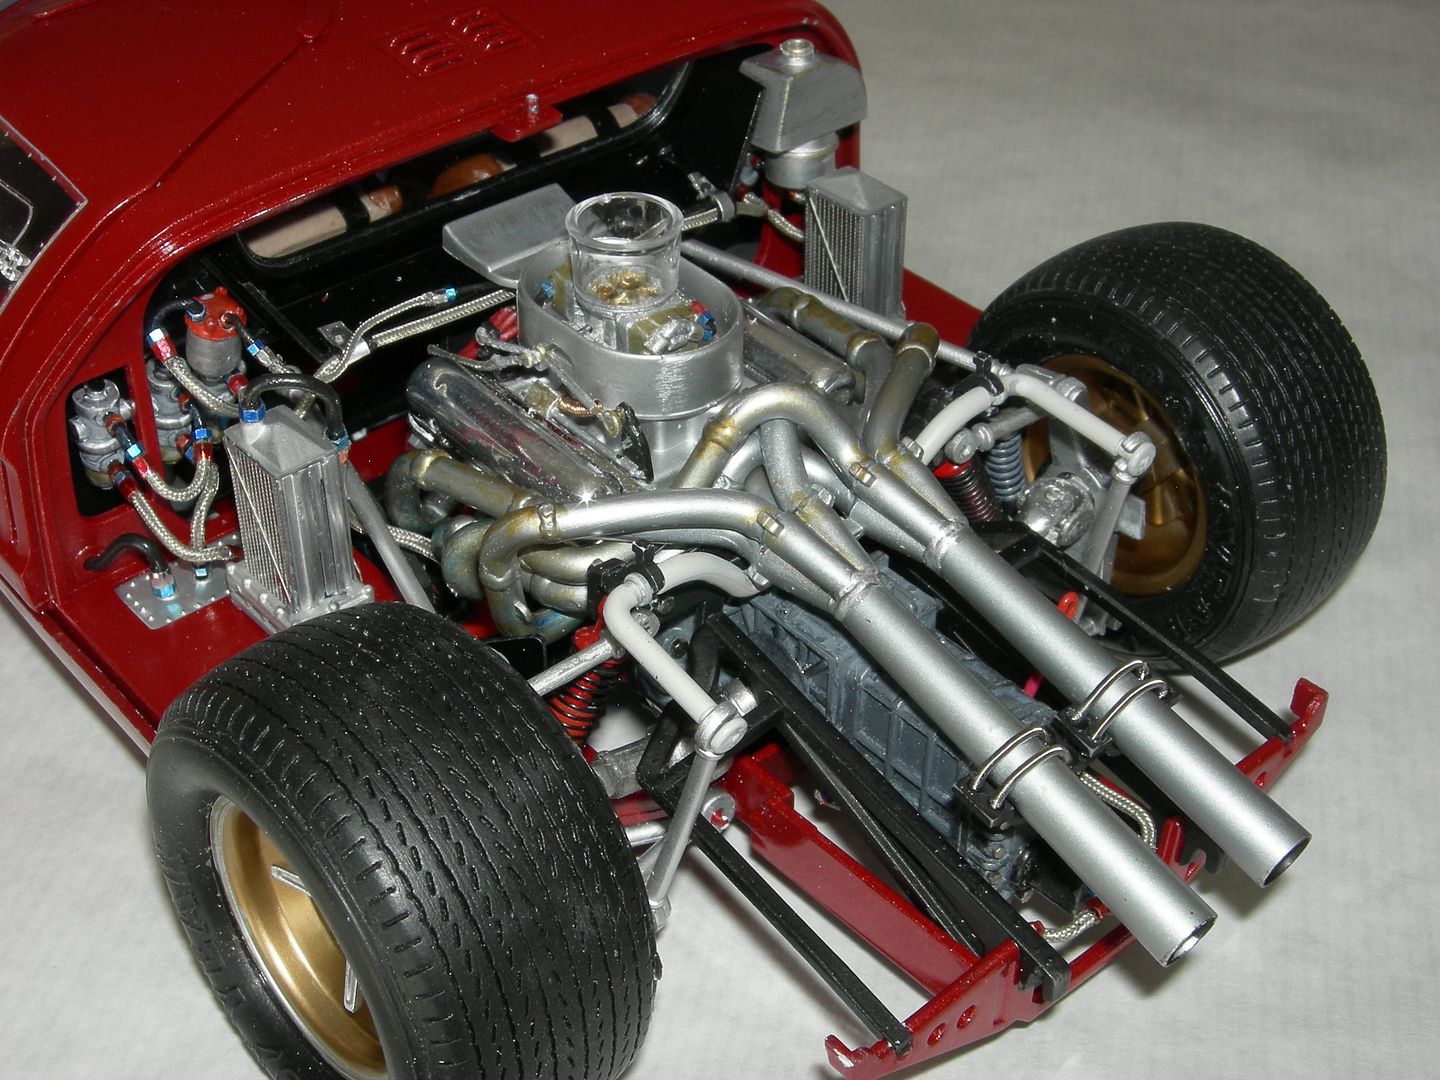
Okay, this was a exhausting build. I think that I spent more money on aftermarket detailing parts than I spent on the model. The kit has a number of issues: the tires do not look correct, the carburetor looks like a Quadrajet instead of a Holley, There is no distributor???, and the braided hose lines are unusable. So I replaced the carb with a Holley card, replaced the tires with Icon Automotive Miniatures' tires, installed KA Model photo etched parts, used Pro Tech braided lines, used hose fittings from Detail Master and replaced all of the molded bolt heads with real stainless steel bolts. Making the numerous braided lines took forever.
I painted the car with Testors' metallic red paint and used Pledge as a top coat. That was a mistake!! After the model was finished the Pledge started to micro-crack. The cracks are not visible unless the light reflects off of the car in a certain angle. Plus, the Pledge just does not have a really deep shine. That is the last time that I do that.
This model took a lot of time to complete, but I am happy with the results.
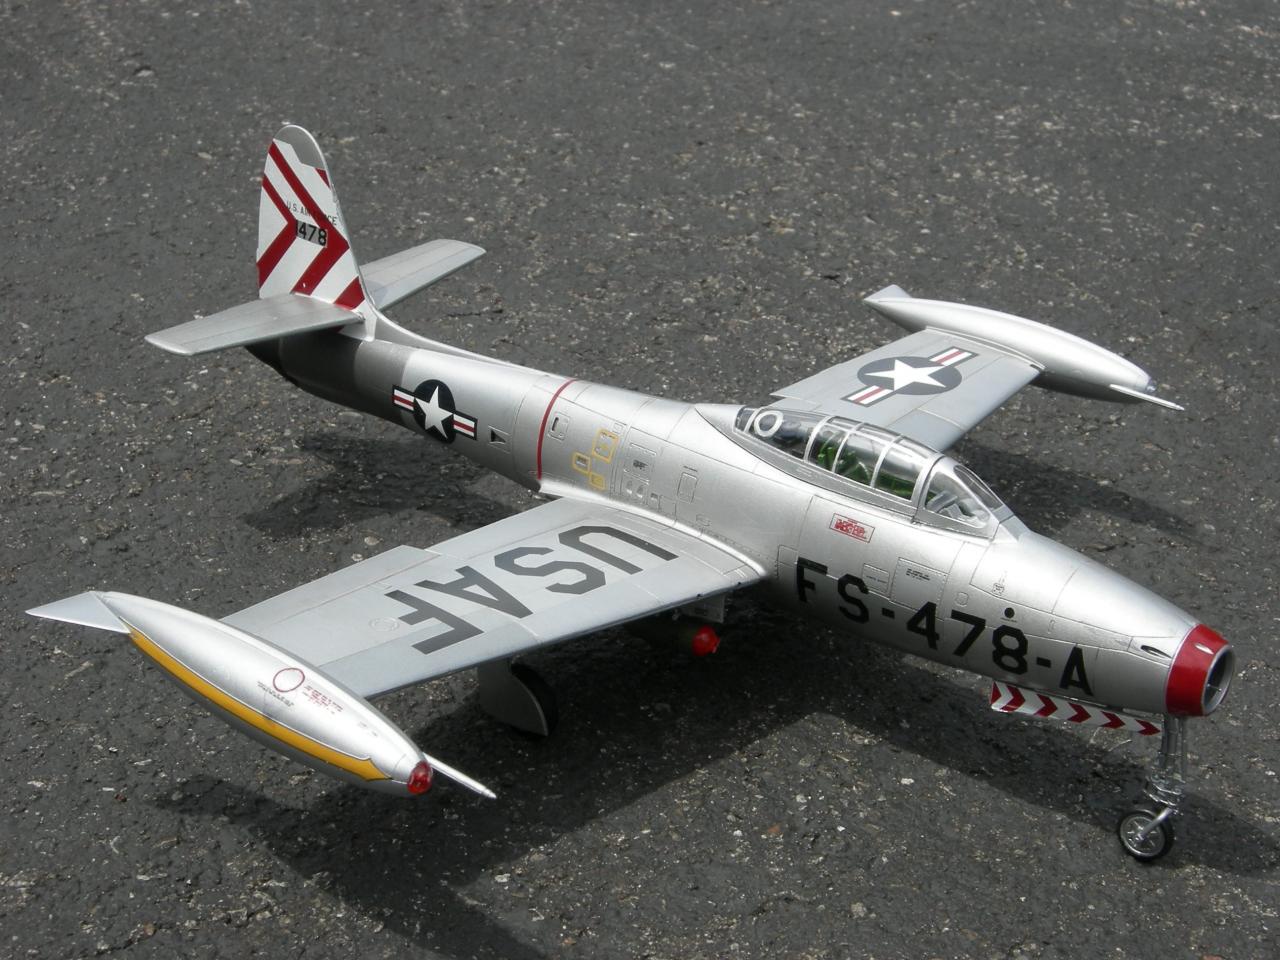
By the way, I also build model airplanes. I find that I get burned out just building model cars.
-
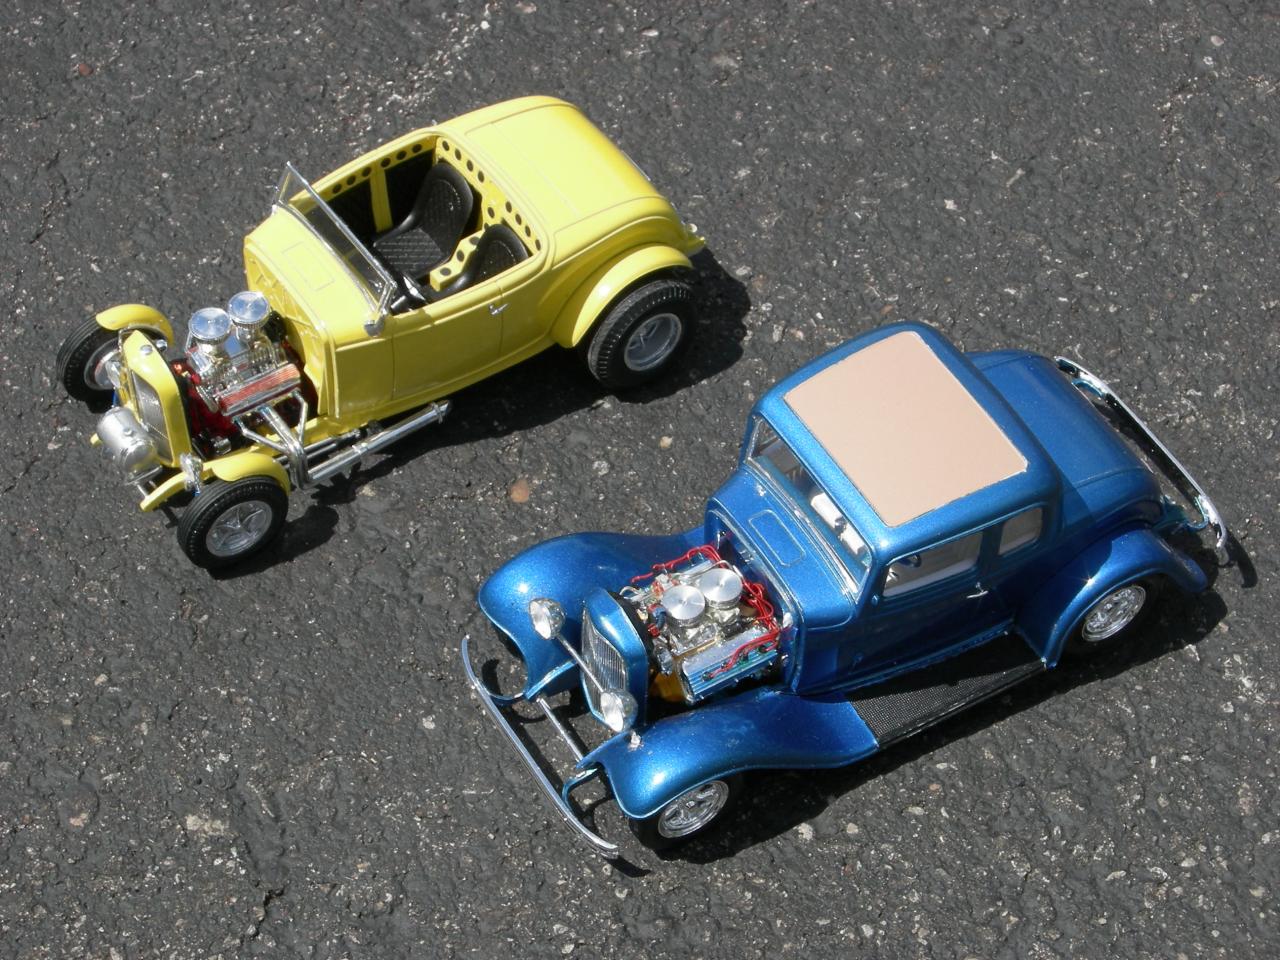
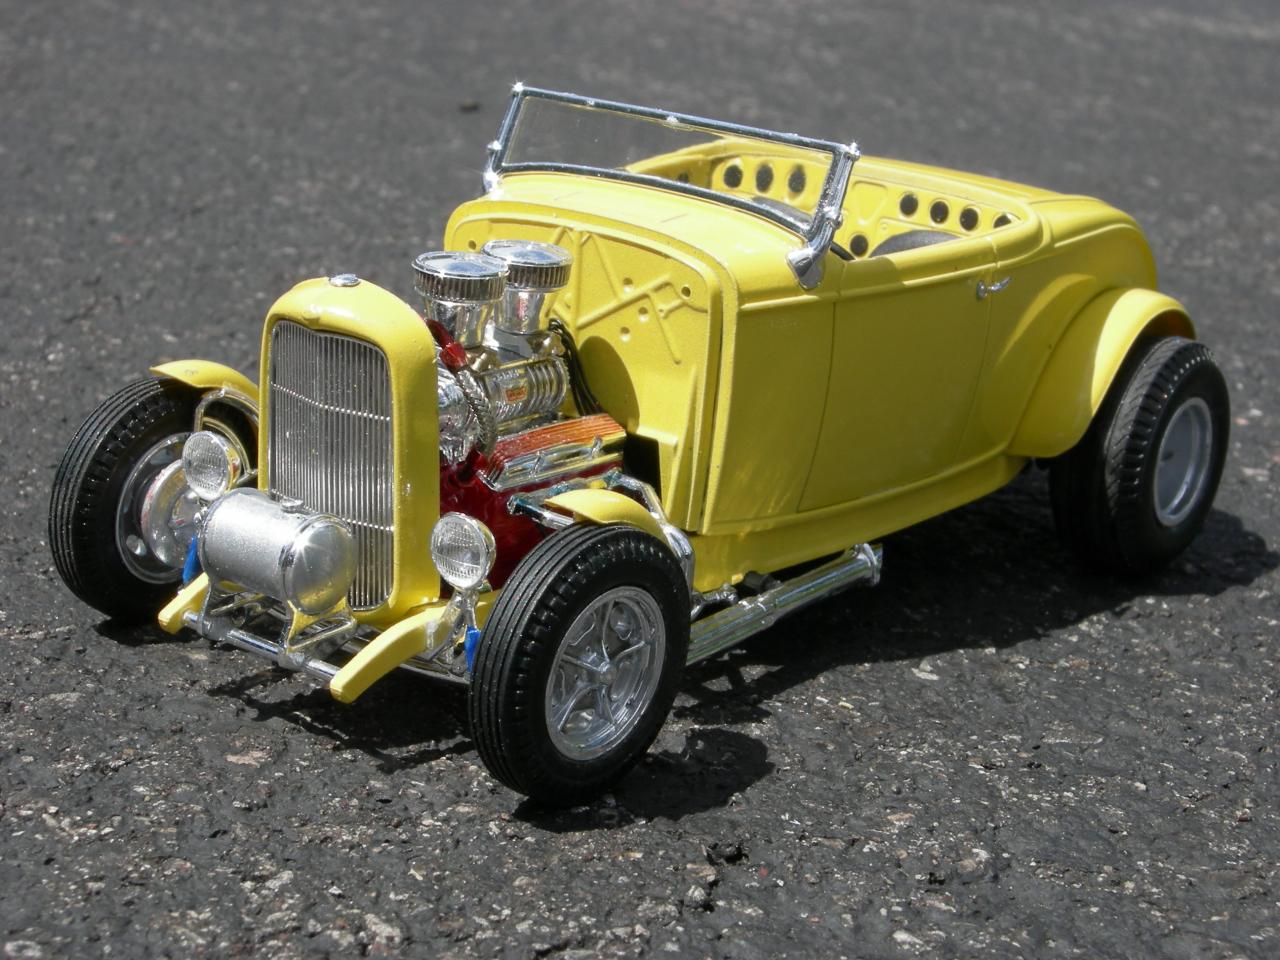
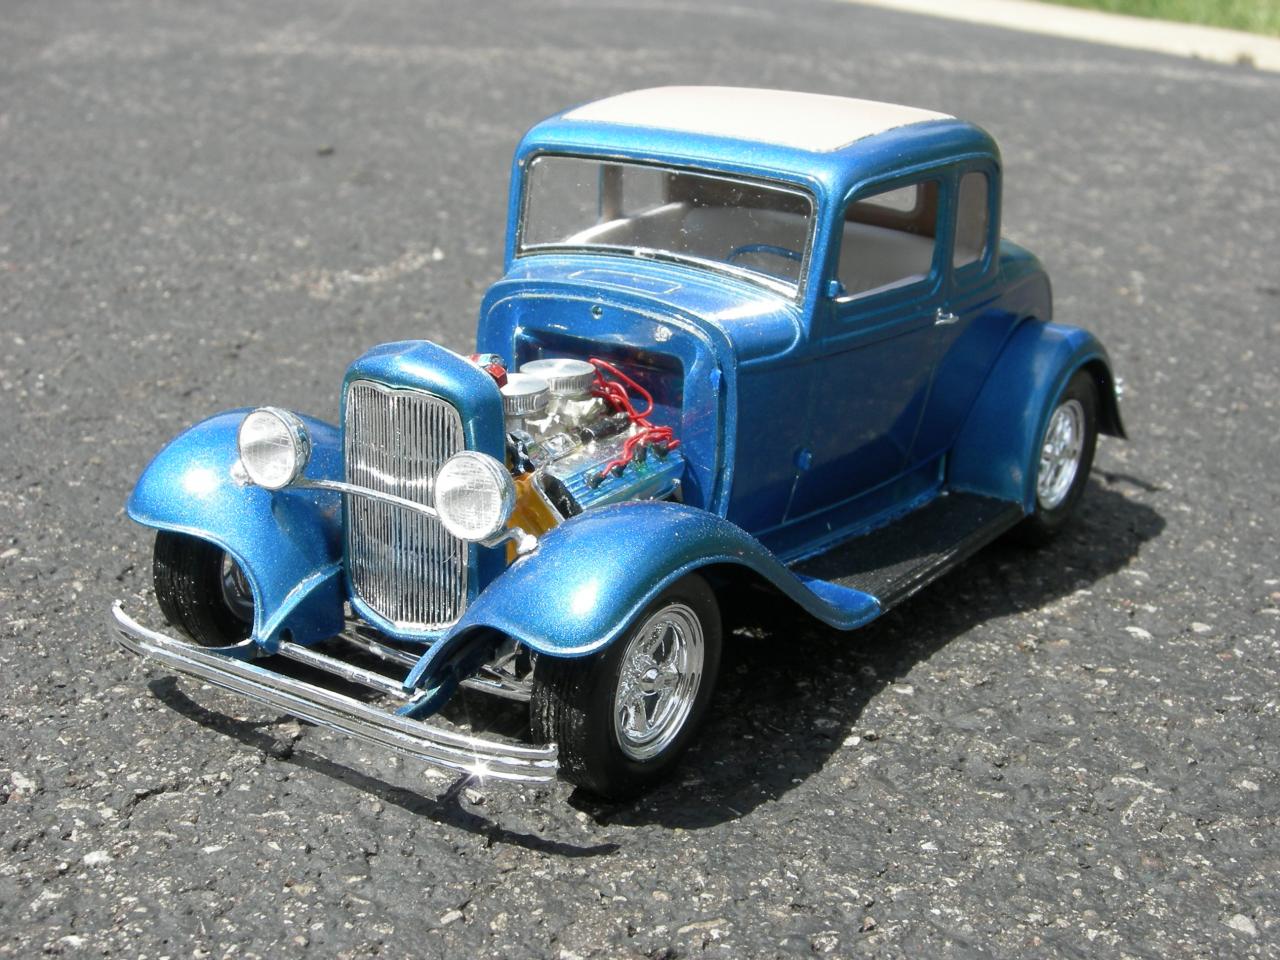
Attached are photos of my two Revell 1932 Fords. The blue one is the 5 Window Coupe and the yellow one is the Rat Roadster. Both are painted with Testors' rattle cans and both cars have ignition wiring. I warmed the paint cans in warm water before spraying. That made a really noticeable difference in reduction of orange peel. These were both fun builds.
-
Anyone here build the recent Tamiya Lotus Type 49?
-
I recently finished the 1/12 Ford GT 40 MK II. I spent more on aftermarket parts than the model cost. But Hey, That's part of the fun. I need a recommendation for a 1/12 Formula1 car. Thanks.
-
You did such a nice job overall that calling out your "mistakes" seems awfully petty... but in the photo of the engine looking forward, you missed a few mold seam lines on the rear suspension parts, you could have added some more realistic bolt heads on the rear suspension arms to replace the kit connection points, and you should have sanded the tire treads to give them a more realistic look.
I tried to sand the tire treads to make them look more "used", but I just could not get them to look "worn". Maybe I should have used a lower grit sandpaper. Any thoughts?
-
484820_10202108227361525_2093488402_n.jpgFabulous at 40. Seriously - very nice work. I have done nothing on mine except open the box. I did notice the windshield and side windows on your build seem to not be flush with the body which I assume is just a characteristic of the kit. I'm going to test fit mine and may add some body color paint to the white glue to hold them in or black to replicate trim and/or sealer.
oh - and ouch on the price of the tires - $68.
35500_10152139826515049_311957675_n.jpgNone of the clear parts fit correctly. All of them were too large for their openings. I had to sand each clear part in order to make them fit, the windshield being the worst. I never got the windshield to fit properly. The doors would not open properly when I taped the windshield tight against the "A" posts. Bad quality on the part of the manufacturer.
-
Super-nice build. That engine is just killer.
Thanks. The engine compartment is the highpoint of this car. It really needs a lot of detailing to visually pop. I wish that I kept track of how many hours I spent on detailing the engine compartment. It took hours and hours to get those braided hoses to look correct.
-
There are a few nits I could pick, but I won't. Overall, you did a really nice job on a tough kit.
Harry,
I'm all for improving my modeling skills. What did you notice that I could improve?
John
-
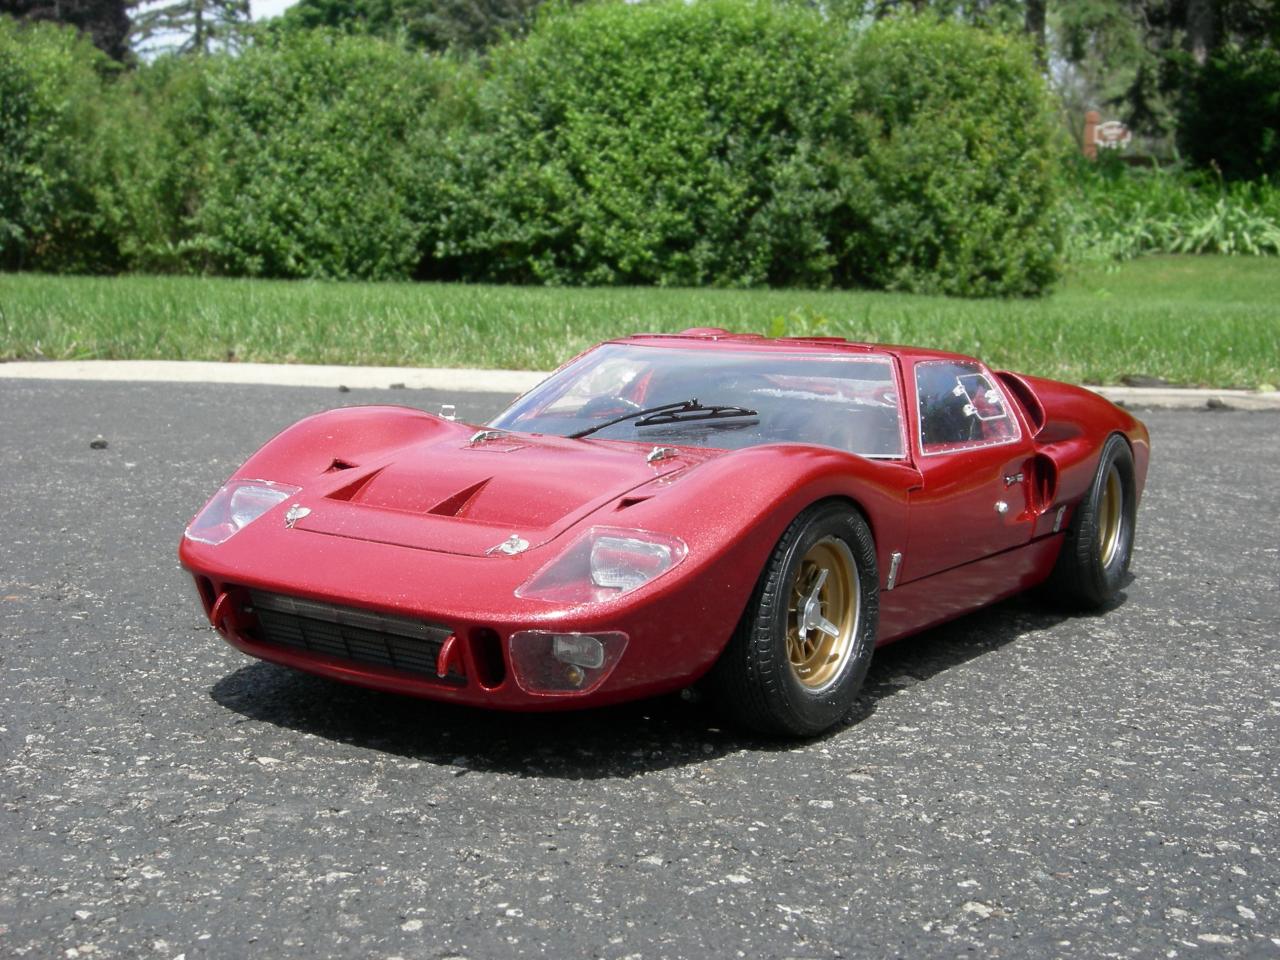
Well, I finally finished the Trumpeter Ford GT 40 MK II and it was a beast of a build at 1/12 scale. I started building it in December 2012. My wife bought me the model as a Christmas present. You can see how much larger it is than a 1/25 scale model.
I stopped building car models in 1966. This was my third car model that I built since I restarted building models in 2012. I built it as a daily driver, instead of a race car.
This kit has a bad rap for looking toy-like, so I added a number of aftermarket detailing to the model:
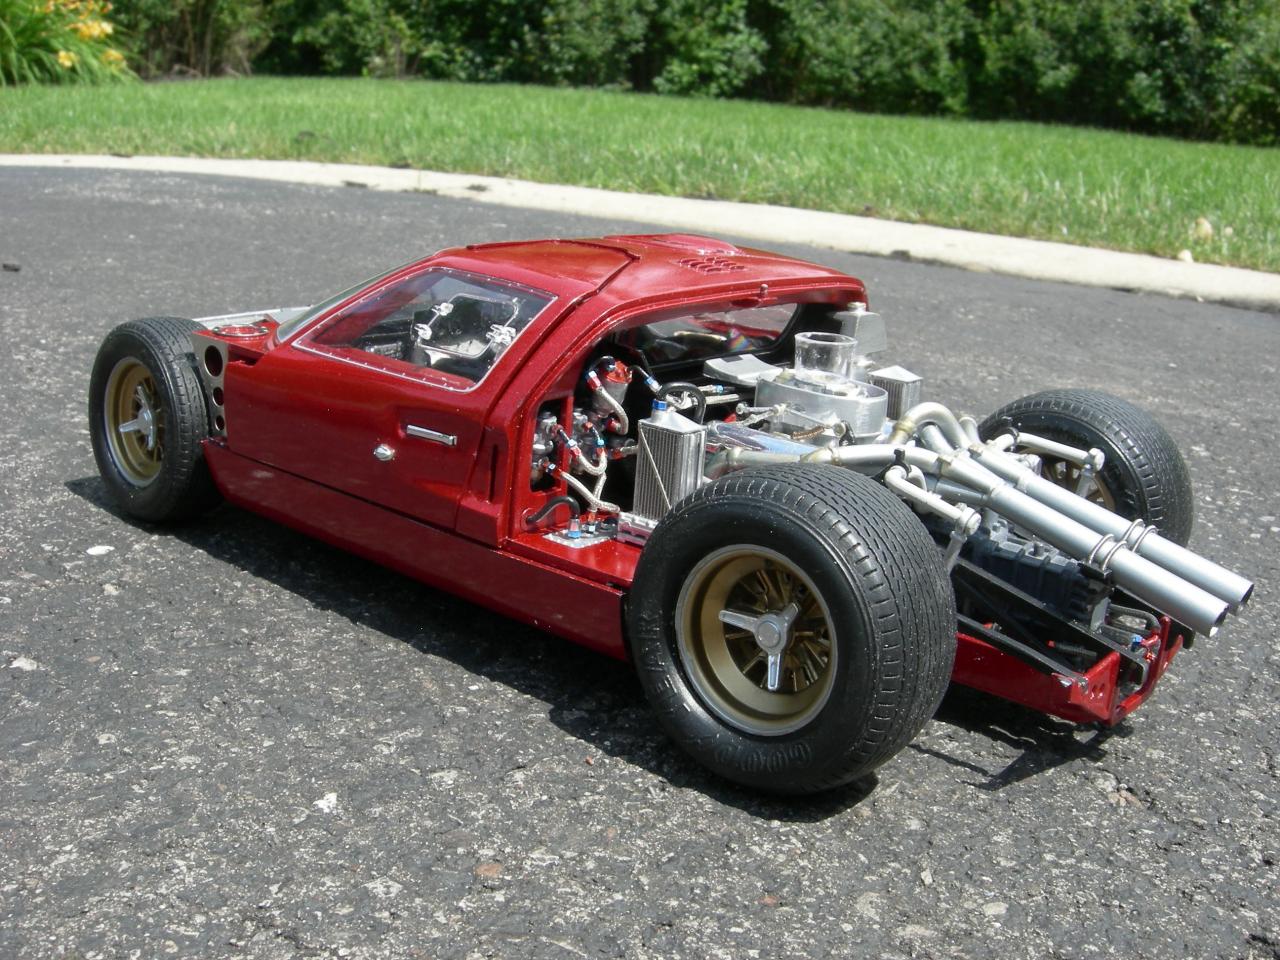
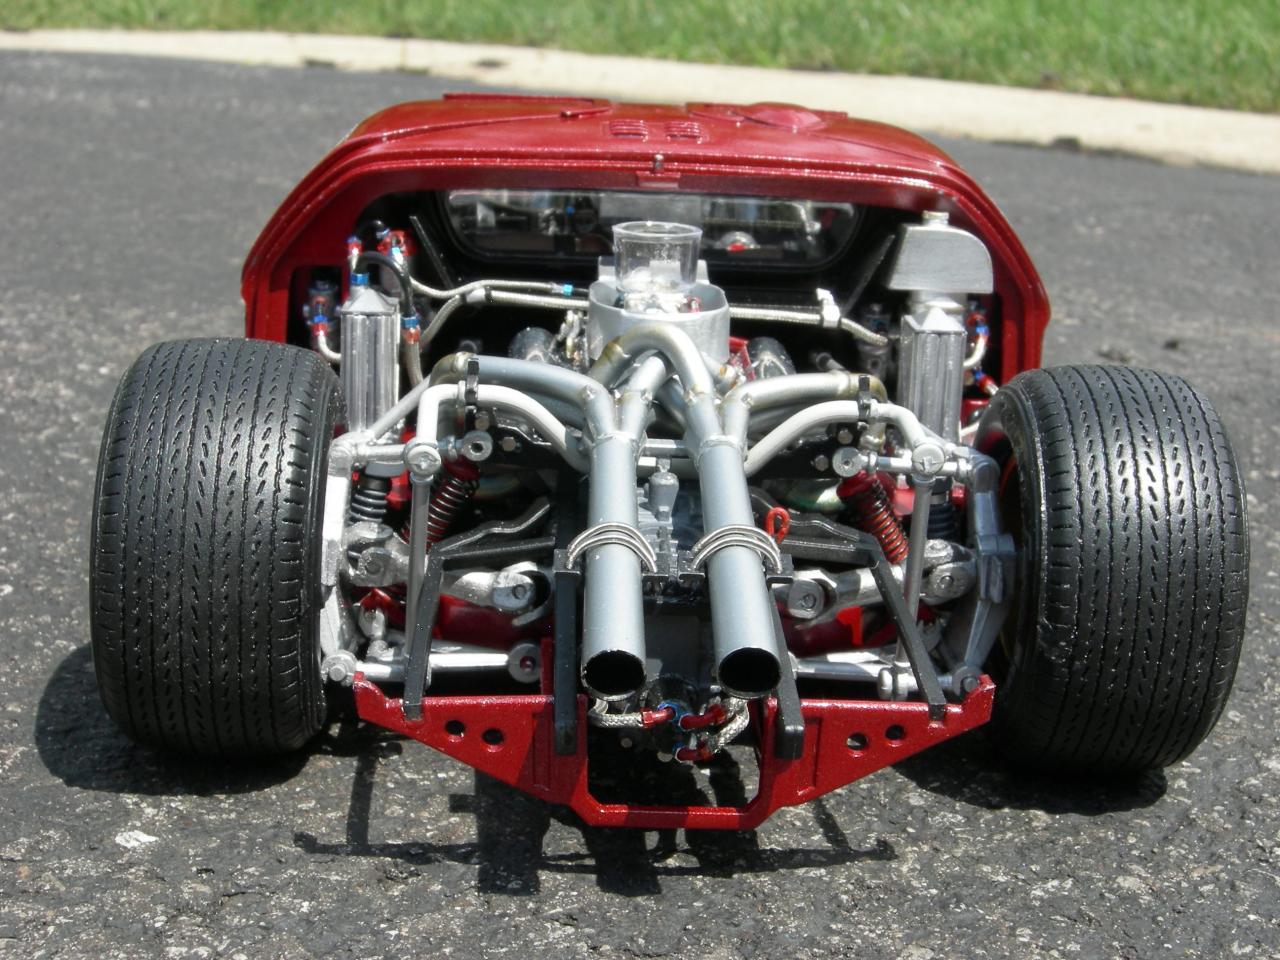
- The carburetor in the kit looked like a Quadrajet carb. Ford only used Holley carbs, so I found a Holley double pumper on ebay. The brass carburator barrels are brass rings that I found at Hobby Lobby.
- The tires in the kit are too tall and square in profile with the wrong tread pattern, so they were replaced by tires from Icon Automotive
- I used braided lines from Pro Tech and fittings from Detail Master.
- I removed all of the plastic bolt heads on the engine and suspensiion and replaced them with real steel bolts from Scale Hardware.
- Photo etched parts and two seats came from K.A. Models
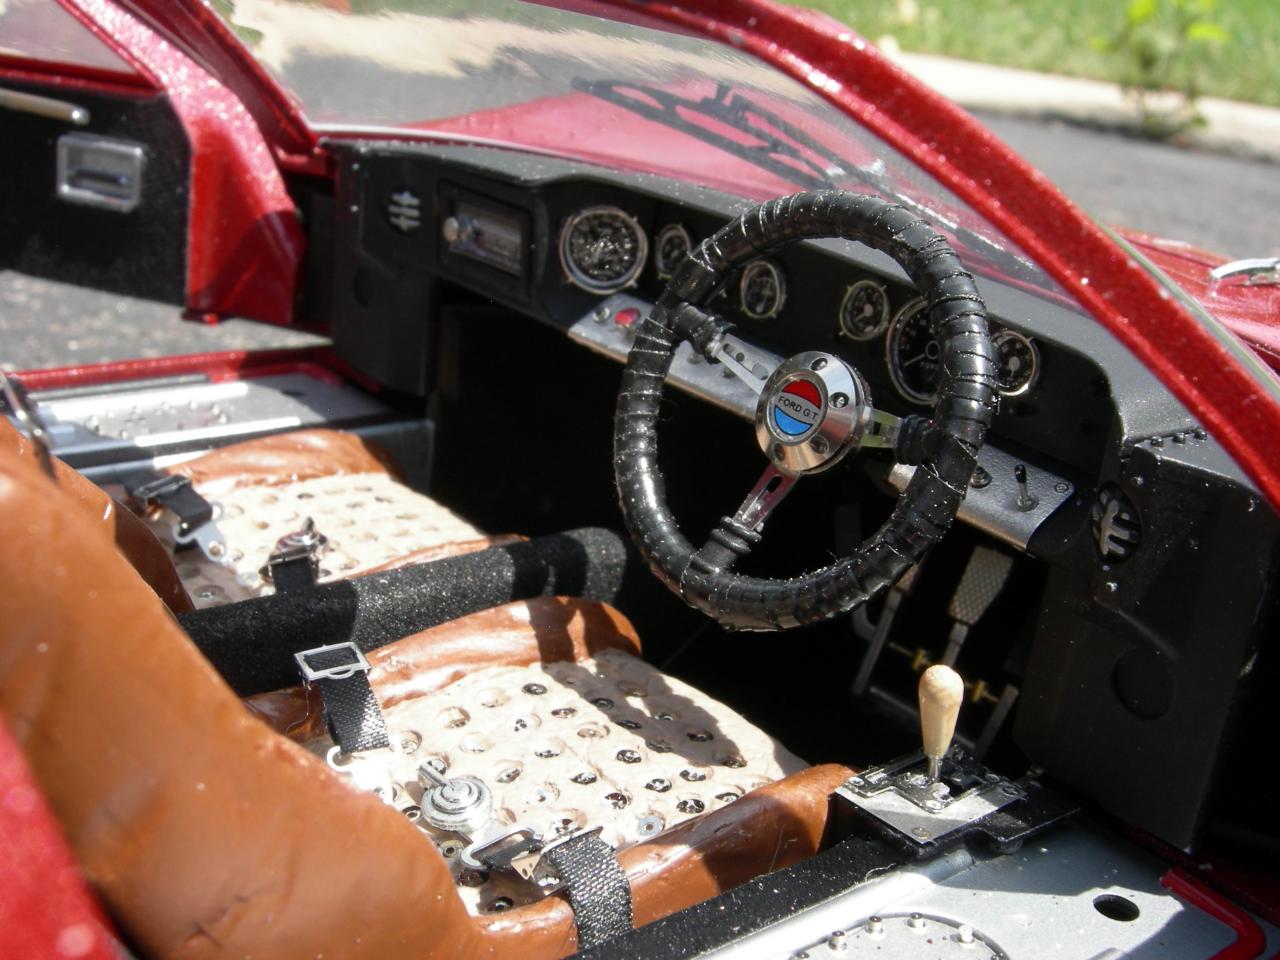
I wrapped the steering wheel in electrical tape to simulate leather and used switches from K.A. Models. I replaced the fuse box located in front of the passanger with a radio with knob. The floor is flocked and the interior door panels are a material used to repair torn jeans that I found at Hobby Lobby.
I used white glue to simulate weld joints on the exhaust headers and used clear blue and yellow to simulate overheated header pipes.
To prevent the flexible break cooling hoses from kinking, I inserted soft earplugs in them before I bent them. Worked just fine. I uded electrical tape to simulate hoses on the cooling pipes. You can see all of the photo-etched detailing at the front of the car.
The finish of the car is composed of one coat of primer, one coat of Testors’ Black, one coat of Testors’ Flame Red and finally multiple coats of Testors’ Revving Red. All the paint came from rattle cans. I used Future as a final gloss coat. This was the first time I used Future as a final coat. IMHO, it looks too thick and not shinny as I would like. It also micro-cracked in some areas. I probably will not use Future as a top coat again.
I am really pleased with the final result; however, the car seems to sit too high off the ground. Not much I could do about that. This build, with all of the subassemblies and photo etched detailing, really wore me out. I think that my next build will be an airplane.
-
Highlight your complete Word document, then do command or Ctrl, then c to copy.
Go to the copy box here and do command or control plus v to paste
Simple copy and paste.
But as Howard said, just type into the appropriate boxes here. Do you want to start a new topic or rely to a topic? You'll see the clickable buttons here and the box will appear.
Now this is strange. Cut and paste works using my laptop, but not my desktop. The desktop is running the current version of WIndows, but the laptop is running a previous version of Windows.


 Seriously - very nice work. I have done nothing on mine except open the box. I did notice the windshield and side windows on your build seem to not be flush with the body which I assume is just a characteristic of the kit. I'm going to test fit mine and may add some body color paint to the white glue to hold them in or black to replicate trim and/or sealer.


I just finished super detailing my Tamiya Lotus Type 49 kit
in Model Cars
Posted
Thanks for the kind words. It took a while to build the kit, but since I am retired, it didn’t matter how long it took because there is “Always tomorrow”. It took about one year to really unwind from my corporate mind set of go go go.
Regarding the photography, I used nothing special. The lighting was from three ceiling LED can lights and one LED floor lamp. I taped a paper towel to the floor lamp to diffuse the light. I used a point and shoot camera mounted on a tripod. The base for the model is a black foam board from Hobby Lobby with the paper backing removed. The black foam was painted with a mixture of craft acrylic black, white and tan. I used a wadded-up paper towel to paint the foam board.