
dptydawg
-
Posts
337 -
Joined
-
Last visited
Content Type
Profiles
Forums
Events
Gallery
Everything posted by dptydawg
-

a vintage gravel hauler
dptydawg replied to dptydawg's topic in WIP: Model Trucks: Big Rigs and Heavy Equipment
Thanks Tim This type of truck is still poular in Ontario also. The only difference from the one I modeled is size. This one has a capacity of 10 cubic yards. Modern ones run about 25 cu yd. They also have a lot more wheels on the ground these days to. Carl -
a vintage gravel hauler
dptydawg replied to dptydawg's topic in WIP: Model Trucks: Big Rigs and Heavy Equipment
Hi Win Your right on about the function of the rope. This was a '50;s vintage truck, so technollogy was simple and mostly mechanical. this is a close-up of the trip mechanism. These pics are during cunstruction of the trailer. The spring loaded dog kept the gate closed. pulling the rope released the catch. The trailer was used to spread gravel a couple inches thick on township roads. Depth of gravel was controled by the trucks speed. The Gate is latched closed in this pic The Gate has been tripped. The handle on the latch was to reclose the gate. The chain length could be adjusted to control gate opening. These trailer had juice brakes operated by engine vacuum to a brake booster unit that operated a master cylinder. I have not instaled the braking set up yet. It will mount on the rear subframe Thanks fpr looking Carl. -
Hi folks Here are a few pictures of my latest build. This 1953 ford tractor and gravel hopper are replicas (as close as my old memory will allow) of the trucks that my uncle owned back in the 1950's. The trailers were shop built in his maintenance shop. As a kid my cousins and I used to log many an imaginary mile on Sunday afternoons hauling imaginary gravel in their yard. The tractor is a GearBox diecast 1953 Ford wrecker. I modified it slightly by adding parts box suspension, flathead engine and rookie rods on the bumper. Also added door windows and no-drafts. The tires are the stock tires with AMT 1000 X 20 retreads glued on top to bring them up to 7.75-8.25 x 20 tire size. The saddle tanks are scratch built also. The hopper is entirely scratch built with the exception of parts box wheels and tires The trailer has been lightly weathered but the rattle can paint job I did on the Ford looked so good I haven't weathered it yet. Used TSC tractor paint. Best rattle can paint I've found yet The dump gate trip and closure mechanism is functional. the gate opens if the string is pulled Thanks for looking Carl
-
Here are some pics of figure kits that are (were) available. from Fujimi There was also a Testers version of the Mechanics set from Tamiya At one time Tamiya made some 1/25th scale military figures that could be converted into civilians with a little grinding and body putty from Hasegawa I also have some Hasegawa ralley mechanic figures and racing groupies but I must have tossed the box. from Revell Germany Italeri has 2 sets of truck driver figures with their truck accessories kits Thanks Carl
-
Hi Dwayne There a few basics to consider before you start. 1) Size! how many cars do yo wish to display at a time? how much room do you have. 2) Material for base. Plywood or particle board (MDF) will all work but they are heavier than Stytrofoam. Again size determines the structural strength needed for the base. 3) Subject matter? Are you going to show the starting line/christmas tree (most comon design used)? Finish line with win lights and speed traps? Pits with pre/post run activities? or Staging lanes to show lots of vehicles? The one thing about a drag strip is that the terrain is dead flat and usuall all asphalt or concrete Once you have these basic questions answered then you can start building in the details Good luck Carl
-
I have a room in the basement for my models. It includes a build area, kit storage and model displays. However some of the finished models have migrated into the rest of the house. Thats something that doesn't thrill the wife too much. A couple years ago I redid the model room walls in slatwall. This gives great flexability in shelf arranging. My paint booth is an old audio -visio unit that I rescured from our firehall. It is on casters, Has 2 downdraft fans and vents out the window. here are a few shots that show the typical mess that usually lives there My paint booth. Compressor rides an botom shelf My work bench. Stoll it from my kid after she went off to school. I doo most of my work on the front 6" of the desk The opossite end of the room (storage and display area) This is along the wall behind my desk. It has a 4'X12' display table with storage below. The room is about 16'X11' Thanks Carl
-
Hi Spike I would recommend that you check out some plow manufacters websites such as Meyers, Arctic and others to get design ideas and specs. In your part of the world there should be lots of plows to measure for dementions. The easiest conversion to scale is measure in inches and build in millimetres. This will give you 1/25.4 scale. Build your plow as a series of small models. Buy some suitably sized evergreen stock for the job The plow mount The plow frame The angleing rams The lift ram and pump the plow blade Then put all the sub assemblies togeather for the final package. here are a couple shots of a Meyers wanabe that I built for a Jeep. Everything was scratch built using ther above method. The turn circle was made from the bottom of a perscription pill bottle. The trip springs are finw wire which was wrapped arround a finishing nail. To get the curve on the blade I wrapped it around a glass jar then immersed it in very hot water, hile the angle iron suports were shaped by draging them over a sharp edge (like curling paper) I hope this is of some help to you. I look forward to seeing your work Thanks Carl
-
I have several 1/25th scale diecast bulldozers from SpeCast and First Gear, however the favourite diecast in my collection is this Liberty Canadian Tire diecast bank. Only the body and frame are from the original model. The running gear is from a Revell CJ5. I added a slant six engine. the flat rack, sand box and snowplow are scratch built. Thanks Carl Avis
-
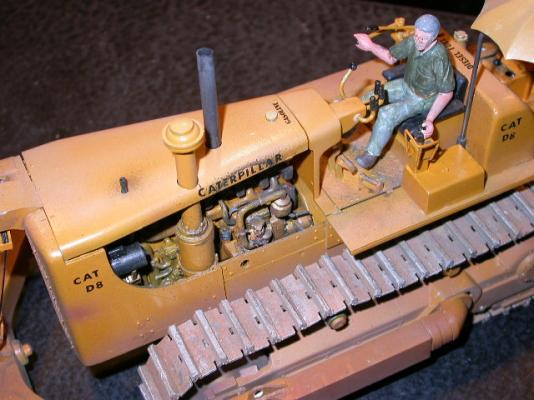
Quote from JAFFA "O.o, we got one of them D8's at home! awesome! Aint happen to have a pony laying around for it? " HI Jaffa In this part of the world we call them pups but others know them as pony engines. Here is an in-progress shot of the engine. It is scratch built from parts box pieces. main block is made from blower casings and fuel injection housings from drag race engines. Here is a shot of the pony (pup) in the finished dozer For those of you who are not familiar with earlier Cats, they used a 2 cylinder gas powered engine to start the main diesel engine. These were known as pup or pony engines and were usually crank started. The AMT kit comes with an electric start engine Thanks for looking Thanks Carl Avis
-
If you could only choose ONE photo of any of your builds, wich would it be?
dptydawg replied to JAFFA's topic in Model Cars
This is my favorite picture of one of my favorite models Its a modified version of the AMT D8H that has been backdated to a 1958 D8 Thanks Carl Avis -
Wilson Grain Hopper
dptydawg replied to broch's topic in WIP: Model Trucks: Big Rigs and Heavy Equipment
You've done a fine job on your grain hopper. I'm sure somewhere at sometime one was built with a floor insert. besides if you don't point it out, no one will know. I would leave it as is because it will add structural strength to the whole trailer. just my thoughts Carl -
Scratch Building A Gravel Crusher
dptydawg replied to dptydawg's topic in WIP: Model Trucks: Big Rigs and Heavy Equipment
Hi All I finally got my crusher finished. I had a show deadline that kind of forced me into it. Here are a few shots of the finished product. and here's what the show ready piece looked like It will now become part of a gravel pit diorama Thanks for looking Carl -
Scratch Building A Gravel Crusher
dptydawg replied to dptydawg's topic in WIP: Model Trucks: Big Rigs and Heavy Equipment
I've made some more progress on the beast lately. Some of the painting and weathering as been done. I did a mock up of the frame without the screen to show the various components. the shafts still have to be trimed to fit. The froon end needs to be dirtied up a bunch. Here are ssome shots with the screen in place Thanks for looking Carl Avis -
Scratch Building A Gravel Crusher
dptydawg replied to dptydawg's topic in WIP: Model Trucks: Big Rigs and Heavy Equipment
I spent a good chunk of the weekend trying to get some more done to the crusher. These are some pictures of the various modules mocked together. I hope it gives some sense of the finished machine. Once I install the front screen supports the screen is locked in, therefore I have to paint and weather everything before final assembly I discovered a SpecCast diecast 1937 Ford pickup with an Resin International U2 gas engine in the bed. While its not as big as the UD14 diesel engine on the prototype, I have it and don't have to scratch build one. I turned a new pulley for the engine and wrapped it with thread. Rope wrapped pulleys was one of the tricks used to increase friction between the pulley and the belt The rollers supporting the screen are inner wheel centres stolen from an AMT Lil Red Express kit. The red pulley is made from some old truck rims. it drives a differential that turns the screen. This shows the .differential Like the prototype it is a truck rearend that has been cut up and had mounting brackets welded on. The shiny thing in the background is may first attempt at the belly pan that goes under the screen. My sizing is off but the technique worked. I'll be making a better fitting one soon. I used some old aluminum press plate that I had. Its very soft and easy to work with. I built the stuff under the frame and infront of the screen as a module that I could paint and weather then hopefully install with minimum damage done to the rest of the model. The belly pan goes between the rollers, the paddles on the screen sweep any gravel that falls through the screen out onto the yet to be built conveyor belt. The black strip at the rear is the feed conveyor. I have it weathered and will remove it before the rest of the frame is painted Thanks for looking Carl -
Scratch Building A Gravel Crusher
dptydawg replied to dptydawg's topic in WIP: Model Trucks: Big Rigs and Heavy Equipment
HI Guys Thank you all for the kind words. These Sandy Crushers were sort of legend in the local construction folklore. I really enjoy making construction models and scratch building. Since there is not a lot of consturctuion models offerd in 1/25th scale, I started to build th eodd one on my own. The crusher seemed like a natural. It has lots of interesting sub assemblies and since the original was essentially home made it did not have many compoud curves to form. It has however taken much longer than I figured it would. It seems that of the hundreds of referece pictures and measurements I took I always managed to miss something critical for building it. These crushers were built as a trailer to be mobile. The rear axles were old truck rearends with the pots removed. They didn't bother with springs or brakes either. I suspect that they were pulled by single axle gas powered tractors. thanks for looking Carl -
Scratch Building A Gravel Crusher
dptydawg replied to dptydawg's topic in WIP: Model Trucks: Big Rigs and Heavy Equipment
Paint and Assembly Once painted with some battle ship gray and a lot of shades of rust the jaw was reassembled This is a shot of the bottom showing the tension rods which hold everything tight against the toggle plates. The springs allow movement as the cam rollers follow the eccentrics on the main shaft. This is a front view with the various parts labled. Still to add are gearboxes and chain case covers on the right end of the main shaft and a pair of flat belt pulleys on the left end. Main drive pulley All power used by the crusher is transmitted from its diesel engine via a flat belt to the main cam shaft, which acts like a layshaft and distibutes power through pulleys, gears and chains to the rest of the machine. The main pulley is 48"X 9"flat pulley. The rim is a 9mm slice from a plastic container. The spokes are 1.5 X 4 mm Evergreen strip with 2mm half round added to both sides. The hubs are 5mm slices of 10mm kniting needles. The centre was drilled to fit the main shaft. Ther is a secondary 15" pulley outboard of the main pulley. A 15" mag rim from the parts box was dechromed and machined flat to form this pulley Both pulleys were painted Neutral Gray then weathered with several rust colours. The pully faces were painted metaloc gary them brushed with dark metalizers, and steel. The faces were coated with future to give a shine like worn metal from belt friction. this is where I'm at curretly with my build. The next phase is to mount the various components onto the frame of the crusher. As I make progress I'll post more pictures Thanks for looking Carl -
Scratch Building A Gravel Crusher
dptydawg replied to dptydawg's topic in WIP: Model Trucks: Big Rigs and Heavy Equipment
The Jaw Crusher The unique design of the crusher jaws were patented by Tom Sandy in 1935. I used his patent office drawings to help build my model From these drawings and field measurements of old crushers, I made a pasteboard/masking tape mockup of the jaw frame. This I used to check for clearances on the model From the mockup I then cut the various bits from Evergreen sheet and strip styrene Which were then built up into the various components of the jaw crusher. The shafts were turned from 6mm plastic knitting needles. The eccentrics and cam rollers were turned from 10 mm knitting needles. The jaw plates were made by gluing 2mm half round strips to a 1mm plate. The pillow bearings are trailer landing wheels that were cut in half then glued to a plastic block and the whole assembly was drilled to clear 6mm a #B drill bit. The Roll Crusher Along the left side of the jaw crusher there is a roll crusher which does the secondary and final crushing of rocks. I built the support frame from surplus truck and trailer frame parts in my parts box. The rolls are built up from a pair of truck brake drums. The hubs were cut from the drums and used on the frame as bearing caps. The structure on top of the jaw frame is the feed hopper which directs rocks dropping off the screen buckets into the jaws. With all the pieces fabricated the jaw was ready for painting and assembly. The pillow blocks are held in place with small screws that were pillaged from an obsolete camera. This allowed for assembly for fitting then dismantling for painting and reassembly again. -
Scratch Building A Gravel Crusher
dptydawg replied to dptydawg's topic in WIP: Model Trucks: Big Rigs and Heavy Equipment
the first part ...building the Screen I Started this project by building a screen. The overall diameter is about 120 inches. The length is 6 ft. Since I scratch build at 1mm = 1 In. The screen is 120mm dia. X 72mm long. When I started I didn't have large enough sheets of Evergreen to cut the rings so I built the rings from segments The 3 rings were tied together with 2X2 stringers to form a cylinder. After the glue had cured I wrapped nylon window screen over the outside of the cylinder to form the screen. I then installed strips of styrene over the outer edges of the screen. This is the wear ring where the drove wheels for the screen run. Next I installed the scoops and buckets inside the screen to pick up the large stones for further processing. I also installed strips across the outside of the screen. These are the paddles that push the gravel out of the crusher and onto the conveyor belt. Looking at the rear of screen And the front of the screen These crushers are constantly exposed to the elements as well as the abrasive conditions of rock dust therefor there is little or no paint left on them but they are well rusted. The primary colour is rust in about 10 different shades to be continued Thanks for looking Carl Avis -
This is a little background on my current modeling project. For the past several months I have been slowly piecing together a 1/25th scale model of a Sandy Construction Gravel crusher. From the mid 30's to the mid 50's Tom Sandy built these gravel crushers in Goderich Ontario. The unique design was patented by Mr. Sandy. These units were very popular with the local contractors in Western Ontario. Several of these old crushers still survive and a few are still in operation. Since my uncle and later his son owned a Sandy crusher as well as several other of my friends had Sandy crushers cross their paths, I decides that I had to build one to preserve some of the local history of the area. What follows is a chronicle of my build with some pictures of the real thing plus my model. For those forms that have a 3 picture rule per post, I'll try to stay close to your limit and post often. The most distinctive feature if these machines in the revolving cylindrical screen Gravel that passed through the screen was pushed out by the paddles on the screen to a conveyor belt to a waiting truck. If the rocks were too large to pass through they were scooped up to the top of the screen then dropped into the jaw crusher which cracked the rocks into smaller pieces. These were either sent to the conveyor belt or again carried to the top and this time dropped into a roll crusher. The cycle repeated until the rocks were small enough to pass through the screen. The machine was powered by a diesel engine. Usually a UD14 International or a 3-71 Detroit Diesel via a flat belt drive. Some have been converted to run off tractors pulleys Thnks for looking Carl Avis
-
I have a couple models in my collection that I think are my favourites. One is a diorama with a lot of scratch building The other is an AMT D8 that will be part of a future gravel pit diorama Thanks Carl Avis
-
Autocar Heavy Dump
dptydawg replied to phoneguy's topic in WIP: Model Trucks: Big Rigs and Heavy Equipment
I found an old slide I had of the Sicard I mentioned earlier. Its not a great pic but... The plow on the right is an FWD the one on the left is a head on shot of the Sicard. If you look to the left of the windshield centre line there is a dark object. That is the exhaust pipe coming straight up out of the hood. The bump on the roof is a rotqting light I believe this oicture was taken around 1962 Thanks Carl EDIT: I just took a closer look at the picture. My memory must be going because the truck on the right looks like a Sicard and the one with the verticle hood stack looks like an FWD. Anyway the one on the left still has the stack -
Autocar Heavy Dump
dptydawg replied to phoneguy's topic in WIP: Model Trucks: Big Rigs and Heavy Equipment
Back in the 60's there was a Sicard snowplow that ran past our house. it had a 250 Cummins with an exhaust stack that came straight up out of the hood. It was ungodly loud. One of the old operators tells me that if they stood on it in front of the bank, the vibrations shook the windows enough to set of the alarms. It would wake me up at night when the went by. So you exhaust system did exist in real life Thanks Carl Avis -
What Models Did Not Make It For 2007,and Whats On Your Drawing Board ?
dptydawg replied to Barbo's topic in WIP: Dioramas
I planned to have my gravel pit diorama finished for the Megacity show in Toronto last Sept. However that was another deadline that slid by. My D8 dozer took muck longer to finish than I anticipated and my gravel crusher is coming togeather at glacial speed. And I have yet to start on the base. Maybe next year it will make it to megacity. I did manage to get a display diorama put togeather for my diecast construction models. Its big and heavy and does not travel well, so it won't see the show circuit. I have plans for an old B/A gas station dio that I wanted to build this year but that didn't happen either. Thanks Carl -
Hi Ricky If you go with foam core for the garage walls the total weight would be easily suported by 1.5 or 2" Styrofom. Just put a wooden box frame around your junk of insulation and start building. Carl
-
Hi Ricky The base you choose for your diorama really depends on the size and contour and texture you want to achieve. Bigger heavier models will require stronger bases. Some things you could think about using are: Expanded foam insulation board (the pink or blue stuff), suspended ceiling tiles (this is the same stuff as homesote) plywood, or if it is a small one a picture frame or wooden plaque. I like the Styrfoam insulation because it is easy to contour, and takes acrylic paints well. However for a simple diorama a piece of plywood works quite well. Homesote is a pressed paper building sheeting product. It should be available at building supply places like Home Despot, Lowes, Rona. I've used suspended ceiling tiles as a base. It is very similar to Homesote in structure and redily available. I hope this helps Thanks Carl Avis