
Tyler62990
-
Posts
382 -
Joined
-
Last visited
Content Type
Profiles
Forums
Events
Gallery
Posts posted by Tyler62990
-
-
It's been a little while since I've posted, mostly due to Photobucket annoying me to no end. Thank God for the new format here that allows me to let them fade into the past where they belong.
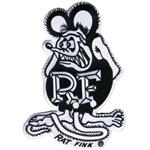
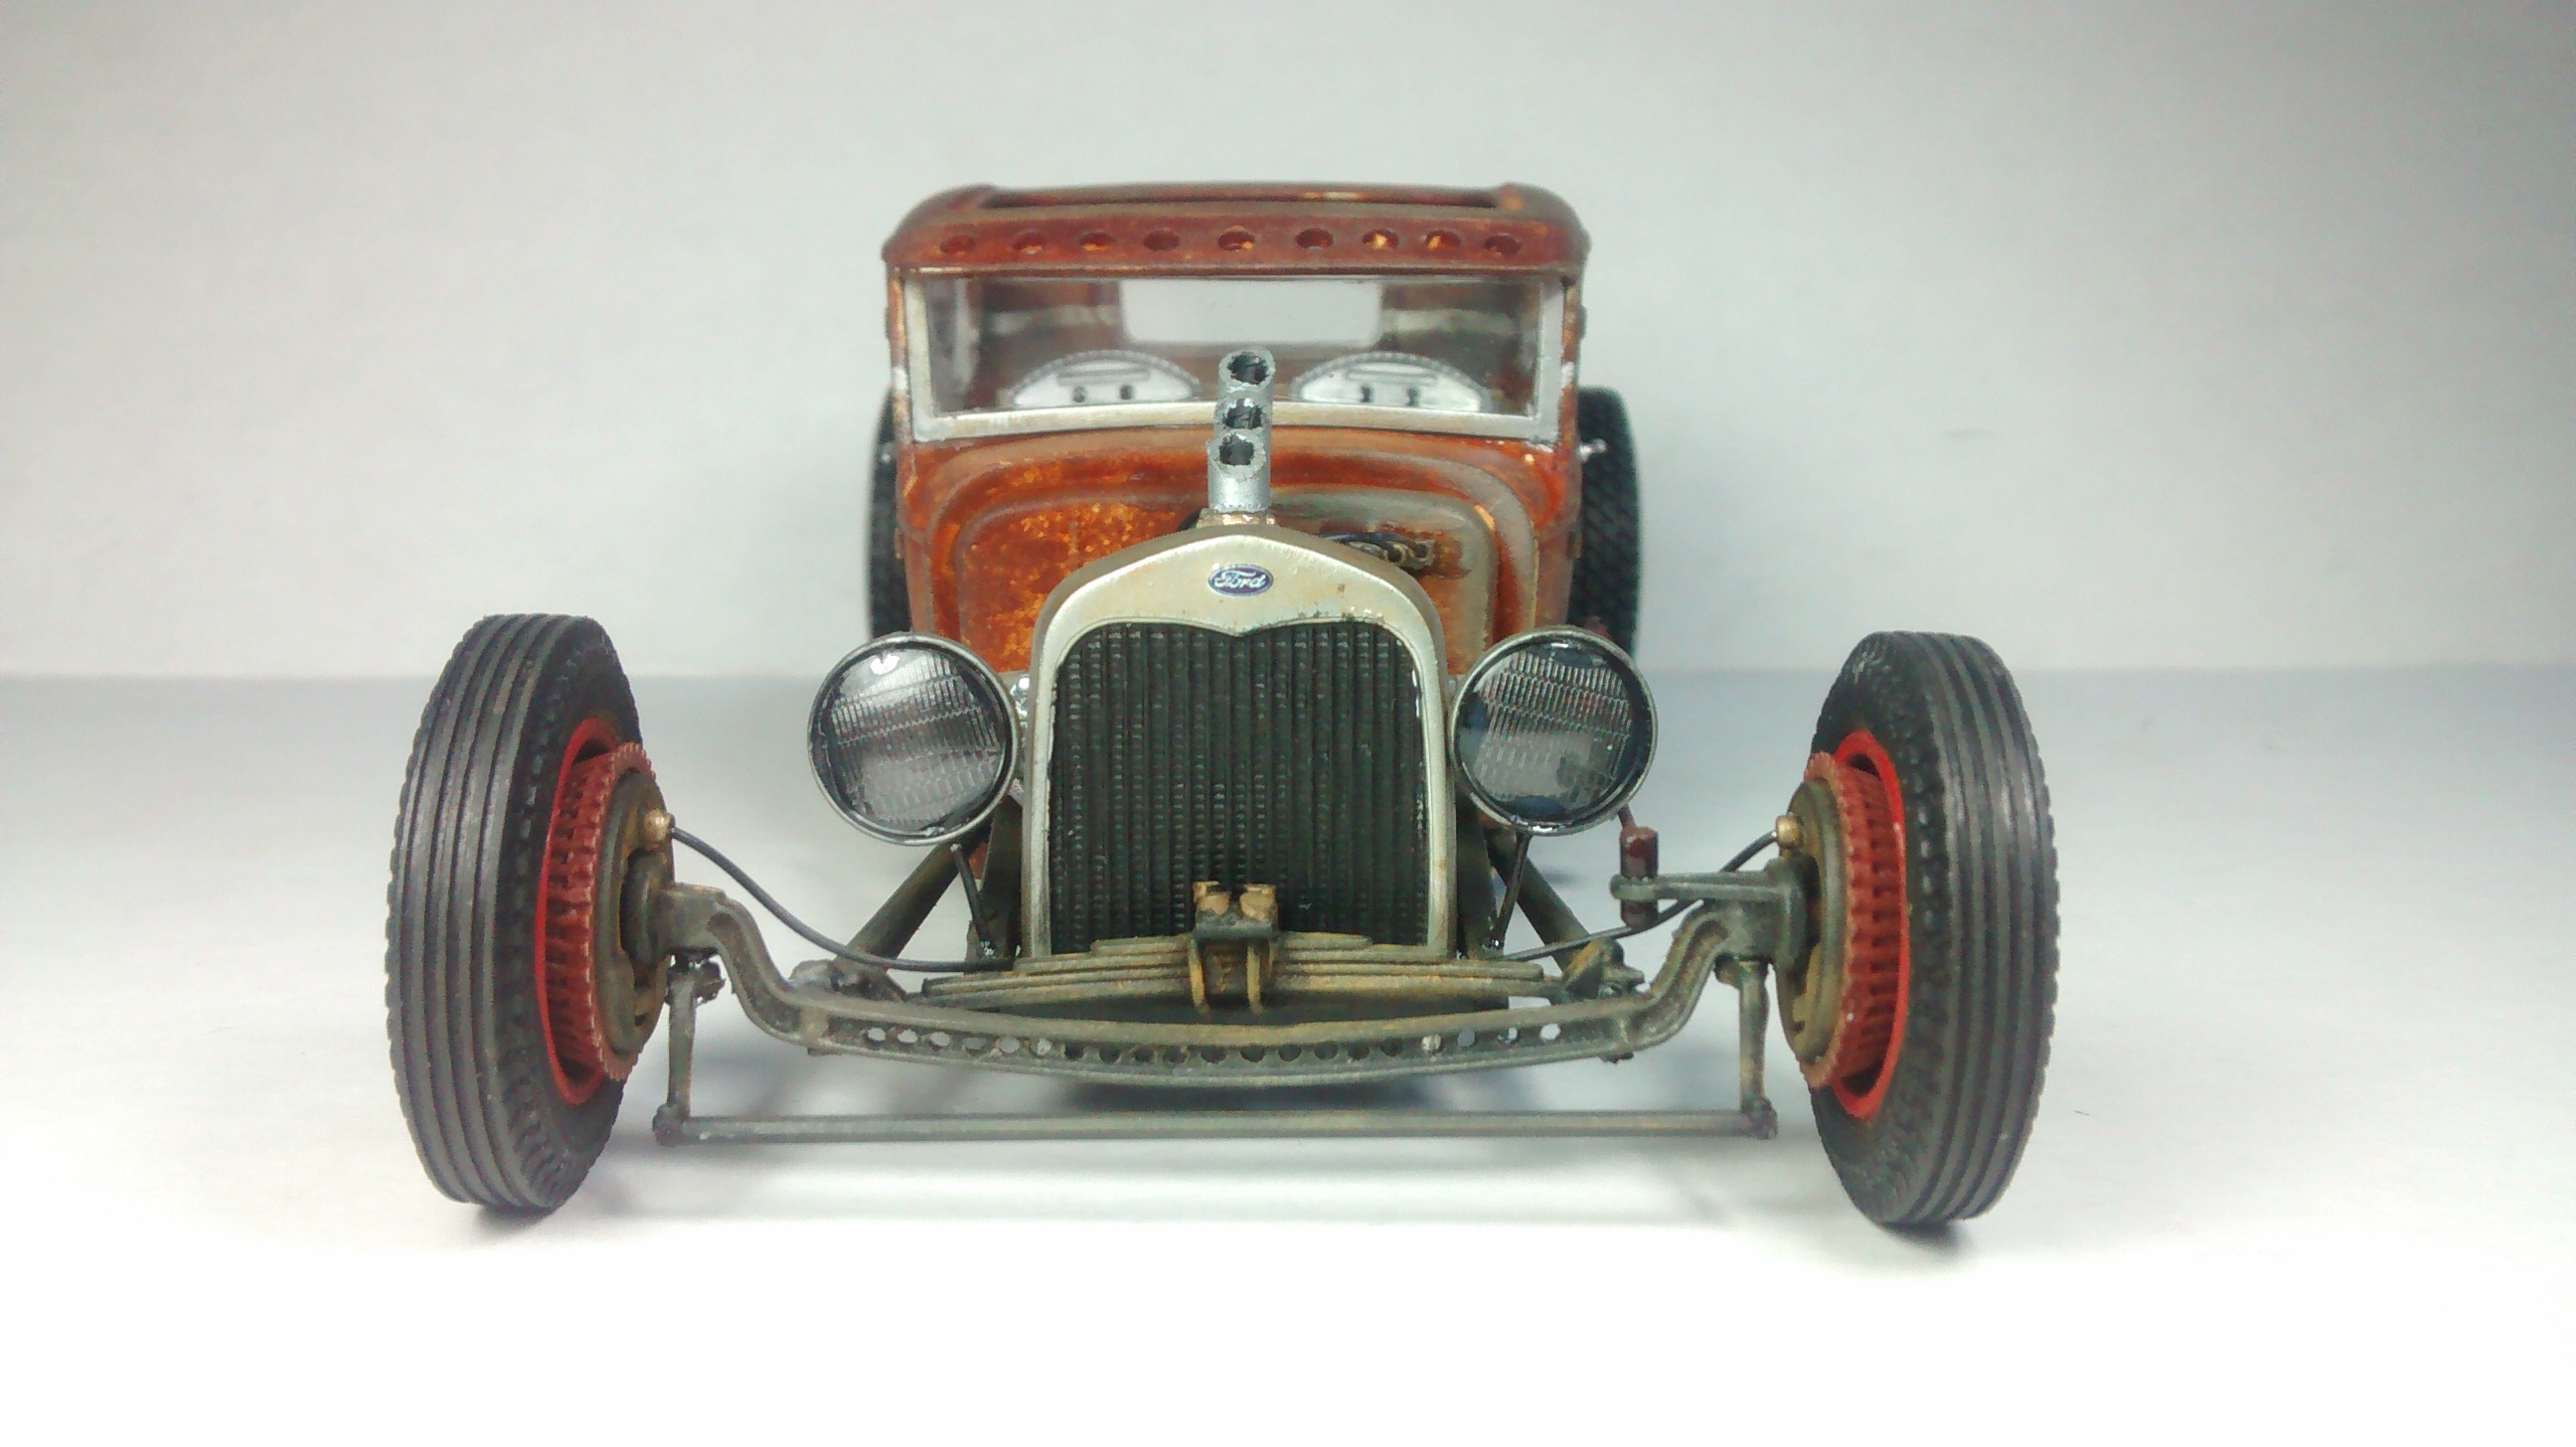
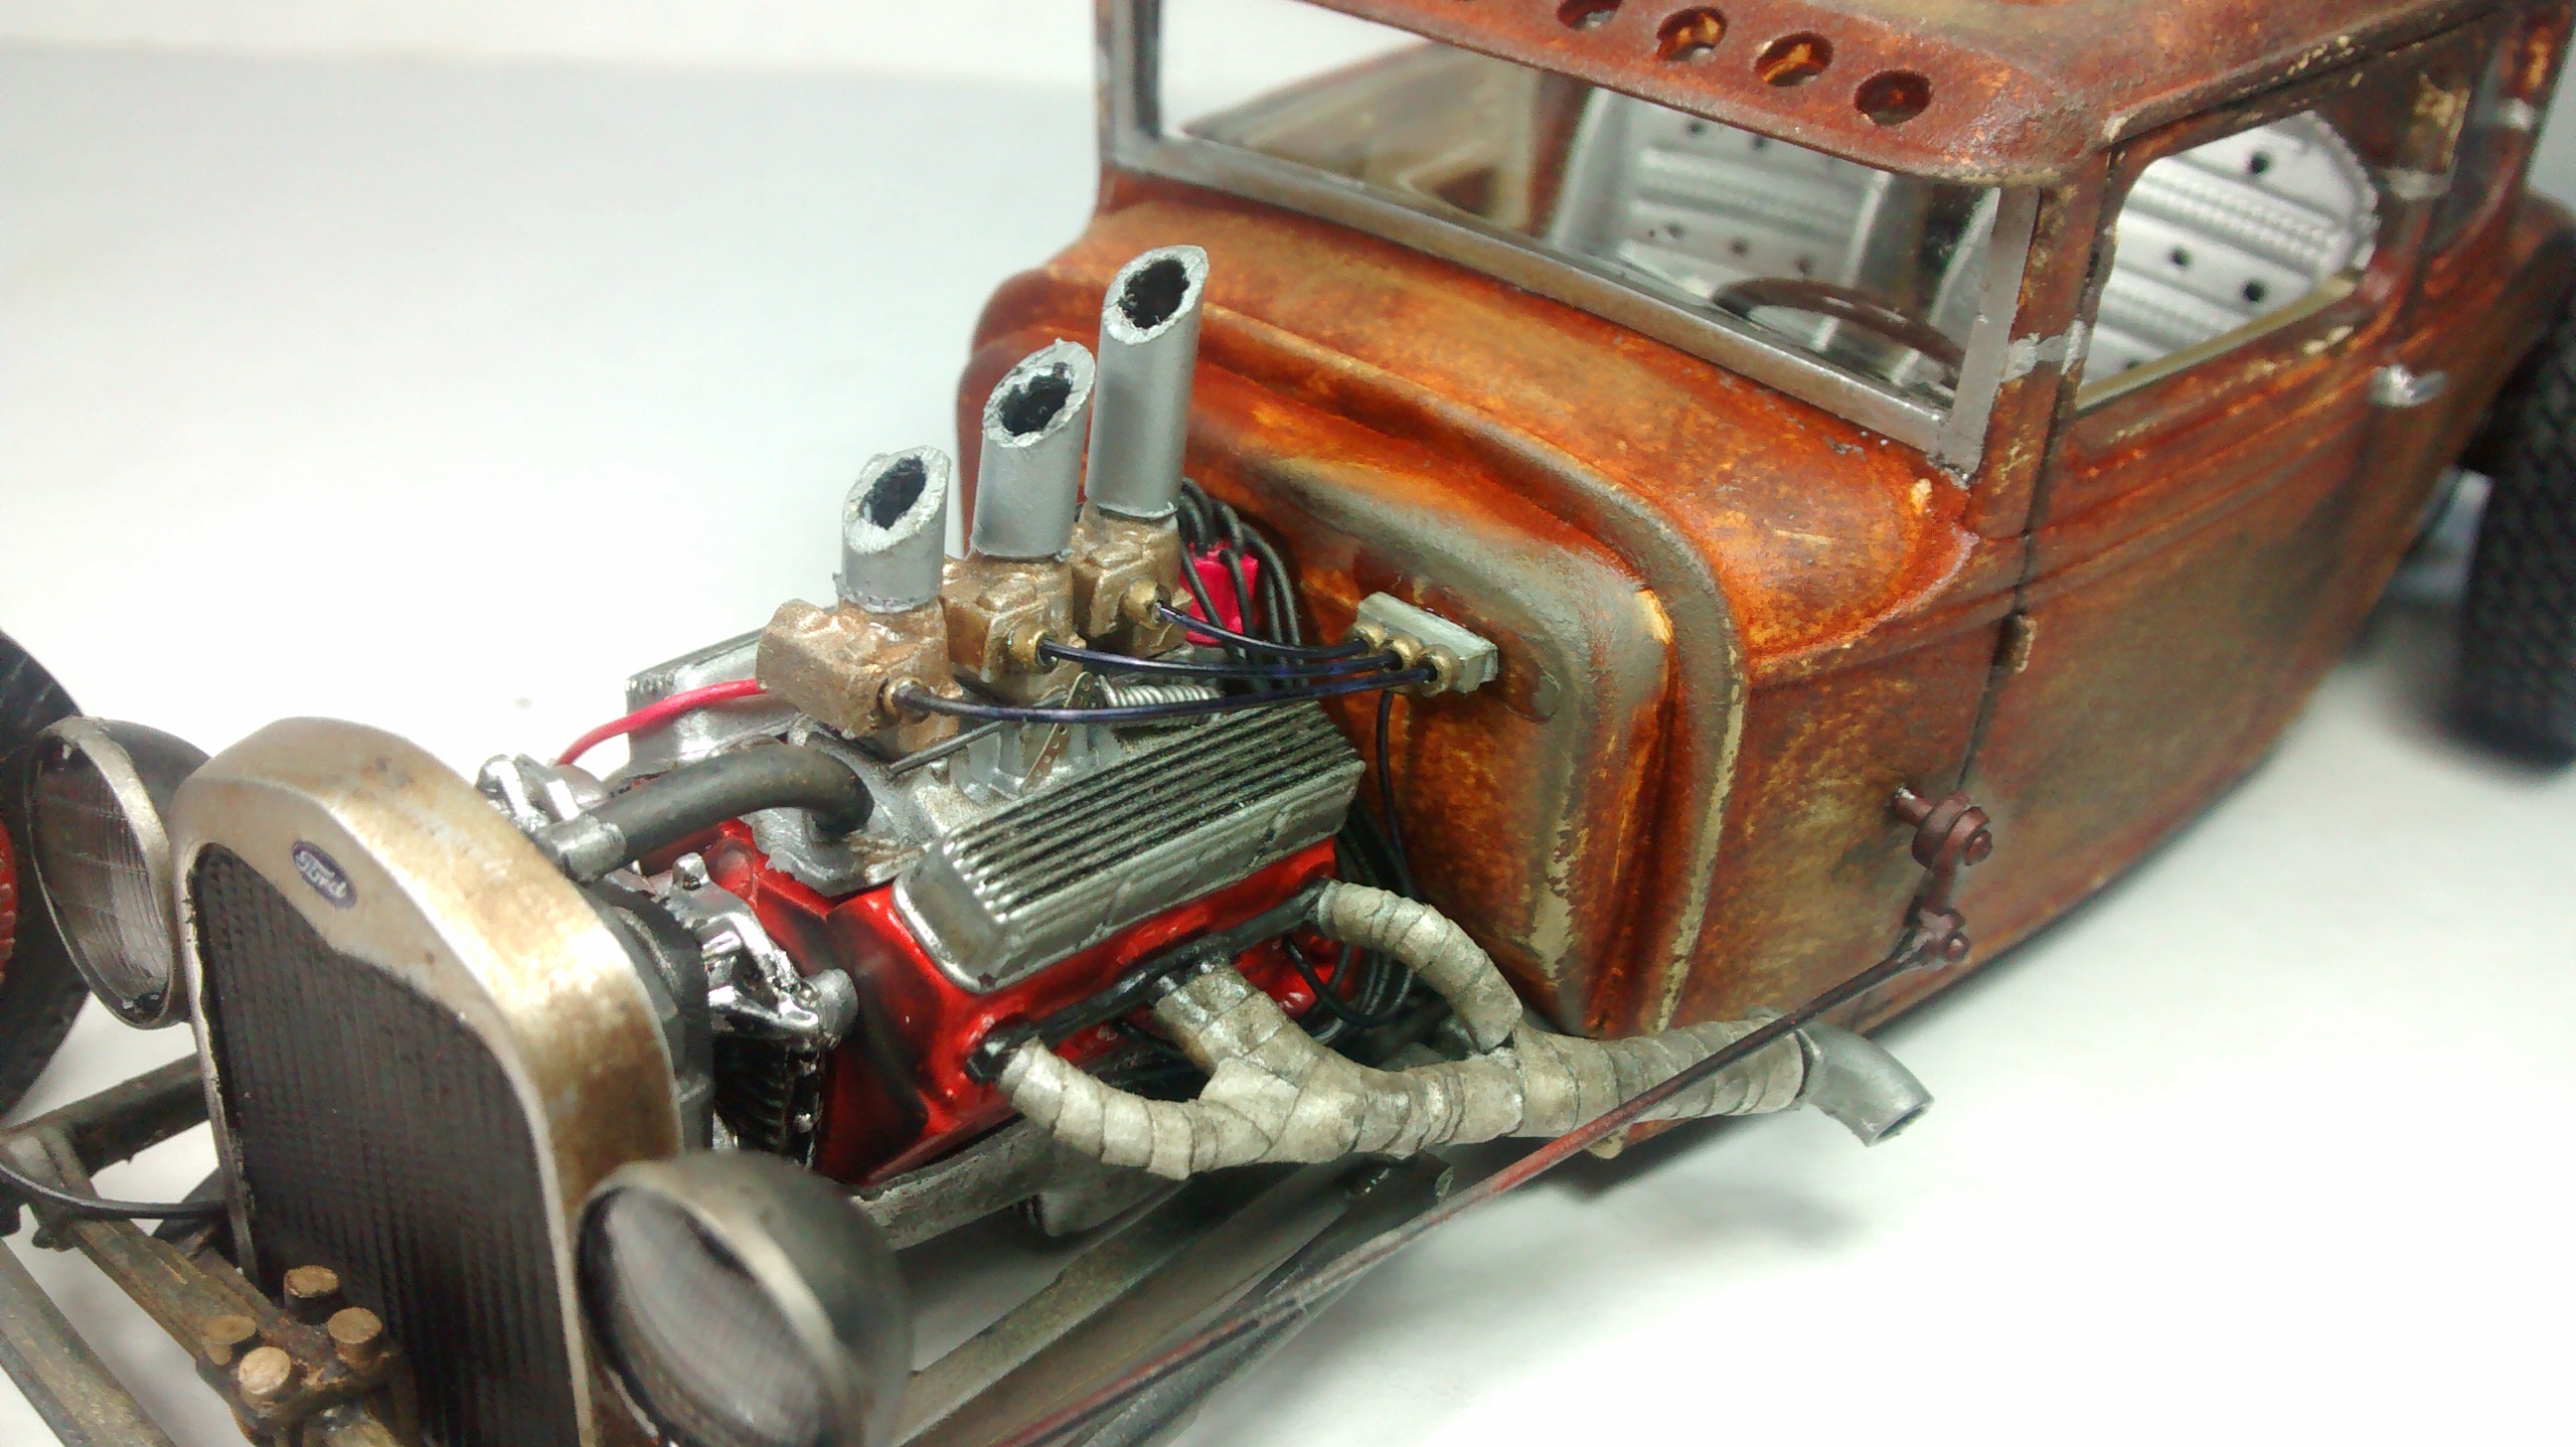
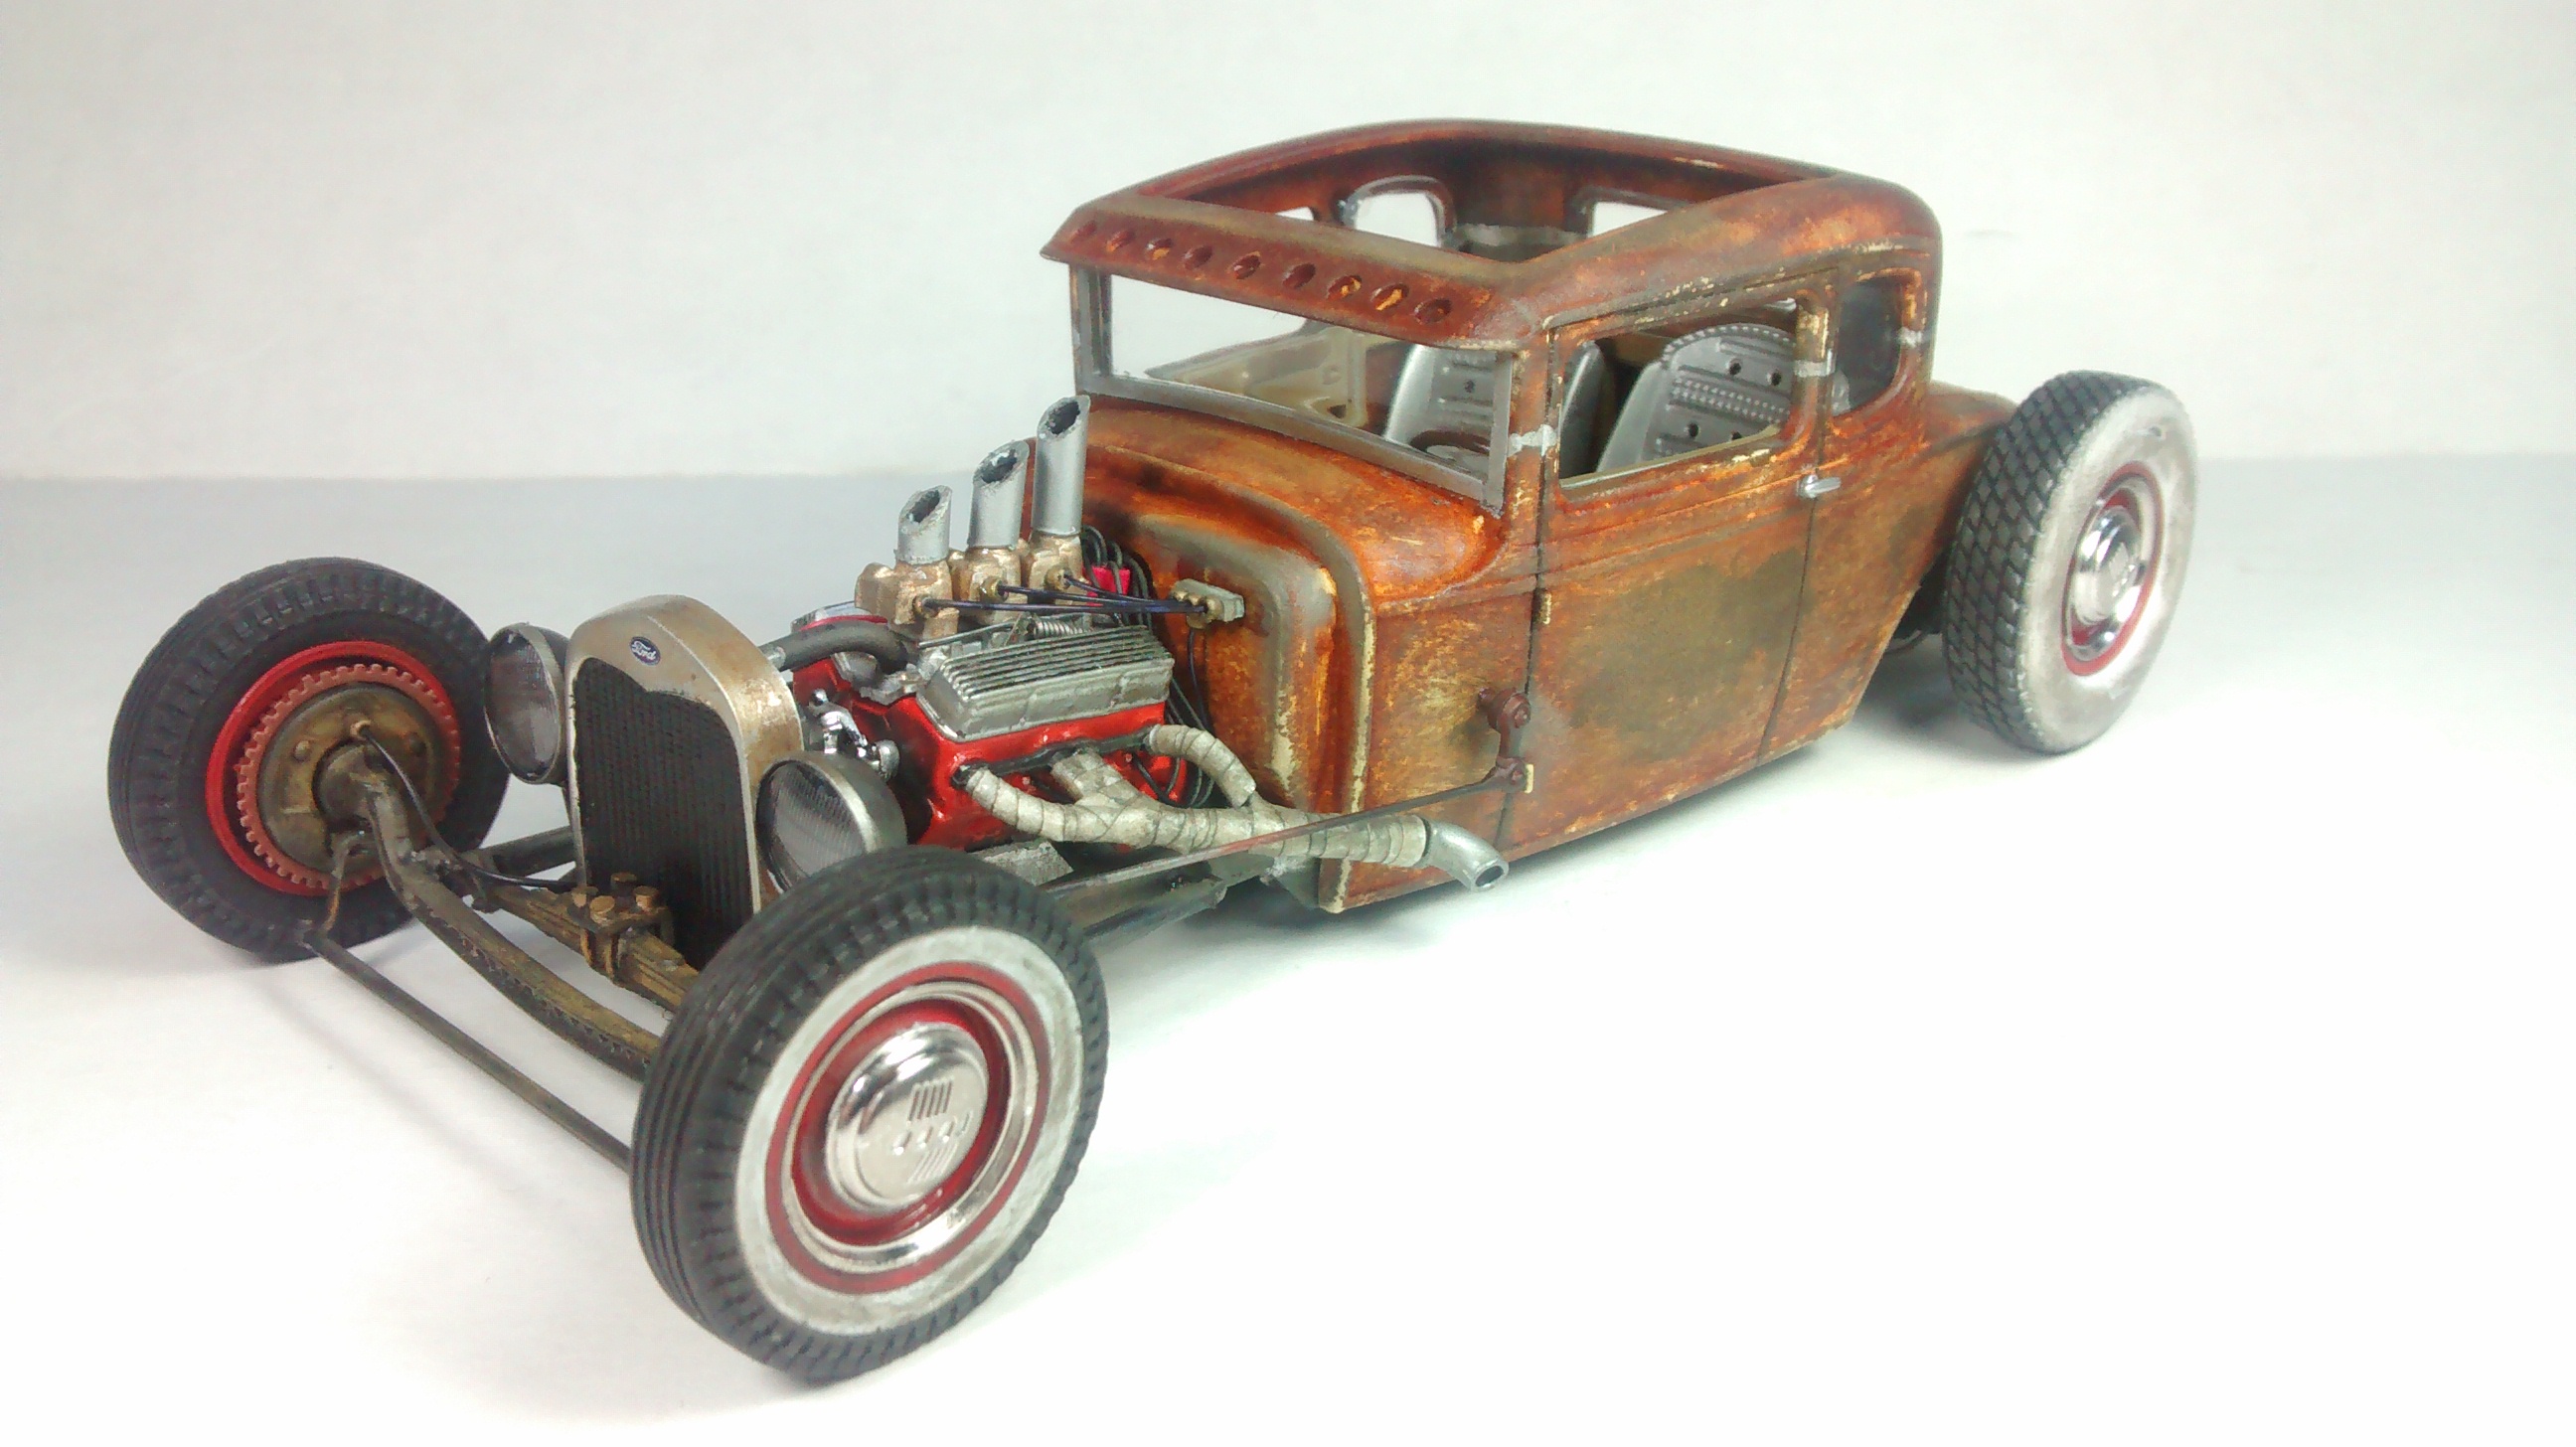
Anyway, I recently completed this 30 Ford. The frame was double z'd with the suspension mounted suicide style up front. With this kit allowing you to build a channeled version OOB, the work to get the super low look that seems to be in vogue nowadays is actually really straight forward and easy. I decided to use the skeleton interior, but wanted the transmission and driveshaft exposed. Having to cut the floor in half to do this complicated things a bit, but it was still pretty easy to achieve. With the tranny exposed, I thought it would be a good idea to scratch up some shift linkage. It's almost impossible to see, but at least I know it's there lol. The engine was wired and plumbed, and some masking tape was wrapped around the exhaust to simulate heat tape. A couple pieces of plastic tube were cut for carb stacks. The whitewall decals had me climbing the wall, so I sprayed them with some Duplicolor primer, forgetting solvent paints don't dry on vinyl or rubber very well. It ended up being a happy mistake, though, as the paint doing funky things while handling somehow gave them a nice weathered look and saved me some work. The body received some holes in the sun visor and a healthy dose of rust. Well, that's about it. Thanks for looking!

-
I'm participating in a group build on Facebook to pay tribute to the late Blair Pletcher. He was a forum member here, but extremely active on Facebook where he never hesitated to share ideas, motivate people, and give tutorials on everything from scratch building to airbrushing cheap craft acrylics. His knowledge, coupled with his very friendly demeanor, helped young bucks like me learn. For that, I'm forever grateful for the few short years we spent bouncing ideas back and forth and complimenting each other's work. Rest easy brother.
Well, onto the car. I started off with the AMT 49 Ford kit. I always loved the look of these cars as is, so no sectioning, chopping,, rolled pans, grill swaps, etc. The only thing it needed was to be a bit lower, get a flashy paint job, some new wheels, and an engine that sets it apart from the others. The door and trunk handles were shaved and the body was painted Testor's White Lightning pearl lacquer and OPI My Gecko Does Tricks nail polish sprayed over Duplicolor white primer. I'll take some new pics soon to better highlight the paint. It's actually a green/gold flip flop with green metal flake mixed in. The wheels were swapped for a set of chrome reverse deep dishes that came in the AMT 53 Ford Pickup. Whitewalls were painted on using the kit tires. The engine is the kit supplied Caddy mill with VCG Resins' Weber cross ram manifold. A few other little details here and there wraps this one up. Thanks for looking!
-
Thanks for all the kind words guys! I really appreciate it. This one's not completely done just yet, though. Keep an eye out for the trailer and road base this thing will reside on soon!
-
Alright, so the time has come to get the trailer for this done. Just about every panel was severely warped, so that was project number one. After getting everything straight for the most part, some Rustoleum Metallic Aluminum was sprayed onto all of the major components. The underside got a misting of flat black just to add some depth and provide a base for the weathering to come. After that, I decided that the inside of the trailer was way too plain for my liking. After gathering up some supplies, I started building the inside up a bit.
Some plywood was cut to size and treated to varying degrees of enamel stains to break up the uniformity of the wood. After they dried, they were glued in place.
I also got a pretty decent looking finish on the floor with some Rustoleum paint for the base, then completely covered with an acrylic wash, finally wiping if away with a paper towel to give it an aged, stained look.
Some runners for straps/load bars were made from plastic sheet and glued in place. I'm not very happy with the "holes", but once some freight is in there it should be a little harder to see the mistakes. I also noticed that most of the trailers at my terminal are marked on the inside with some poorly done rattle can work. I tried to replicate this with a Sharpie. Not perfect, but it'll do. Well, that's all I have for now. My to do list is 1. Make decals. 2. Make the roll up door operable, but not AMT's ghetto idea of using a piece of tape lol. 3. Make various types of freight and corresponding pallets. 4. Apply generous weathering to match the cab. And 5. Actually get this thing together straight. Wish me luck!
-
Thanks for following along guys! The cab is finally off to the Under Glass section if you wanna check it out. Next up is the Trailmobile pup trailer that she'll be pulling along. Updates on that will be posted in this thread, so don't go anywhere! There's two pieces to this puzzle, so this thread ain't dead just yet!
-
Well, after a few months of on again/off again work, I'm calling this one done. Well, the cab anyway, the trailer will be coming soon. All in all, I enjoyed this kit quite a bit. One of the issues was the cab getting hung up on the front bumper while tilting forward. That was fixed by taking about an 1/8 of an inch of so off the frame rails and bringing it in a bit. The mirrors were another hang up. Let's just say whoever designed those things is a tried and true sadist lol. Anyway, I'll let the pictures do the talking.
I took a stab at scratching up some glad hands here. They're not the prettiest, but they'll do.
That's all for now until I get the trailer built. Stay tuned for that one. Like I said above, this is a pretty cool kit for how old it is. It was definitely a challenge, but I never felt like introducing this one to the wall, until I got to those mirrors that is lol. I've learned a lot on this one for sure, and while I would change a few things here and there, I'm really happy with this one considering it's my first rig build. Well, that's all I got. Thanks for looking guys!
-
Thanks guys! Next update you'll see is the finished product. The cab hinges are proving to be a pain, but I have a plan for that. Check back later this week to see how it turns out!
-
Alright, as much as it sucks getting buried under two feet of snow and shoveling your life away, there's always a silver lining, such as being off of work for 3 days and getting some build time in. Well, that's what happened, and that's what I did. Here's this weeks progress.
I decided to install a small support hook for the air/electrical lines. Not really much else to say here, just figured I'd share.
I also sanded down the ridiculously thick mudflaps for a more in scale look. They aren't perfect, but after a coat of my dirt mixture they ended up looking fine.
After doing a mockup, the rear frame rails looked a bit too open To fix that problem, I made a catwalk out of some plastic sheet and some wedding veil material. I don't know where or how I acquired the stuff, but it works pretty good in a pinch. After it was glued together and trimmed, a coat of flat black finished it off.
Here, the finished chassis gets worse and worse in terms of dirt, rust, and grease. Here's a couple closeups of what's going on.
The rear leaf spring were given a generous coat of a pavement colored acrylic paint/baking soda mix and dabbed with gloss black to simulate heavy grease buildup.
The front end also got its fair share. The rust and oil stain powders, pavement acrylic, and gloss black really came together to form some nice varying shades.
The inside of the frame rails also got some "dirt" smashed in there. While I was doing that, the u-joints were just begging for some "grease"
Doing the fifth wheel was particularly fun. The flat black base was rubbed with some silver Tamiya powders in the middle, and some light rust around the edges and underside. After that, a generous coat of grease was applied. I'm a little convinced I may be going a bit over the top for a functioning fleet truck, but man am I having fun doing it! Thanks for looking!
-
Thanks guys!
Nice. I need to be following this. What did you use to weather the engine/trans? They look great!
Thank you! I made some oil, coolant, and other fluid stains by streaking on a bit of acrylic craft paint. No thinning necessary, just a wet brush and light dip in the cap. Some super serious-type painters may yell at me for that, but sometimes being lazy works haha. The rest was just a bit of Tamiya weathering powders, dabbed, smeared, or whatever works, finished up the rest.
-
This would have been during 1993-94 when I was there. I can remember when because that winter we got a TREMENDOUS amount of snow!
It's one of the reasons I moved back to the south-central part of the state. We can get a good amount of snow, but nothing like what you guys get in the Pocono regions! I don't remember any local clubs in that area (Hazleton, Wilkes-Barre)...........I do remember always coming back down this way if I wanted to get to a club meeting/show (MAMA, CPMCC). I'm sure there are many closet builders that have yet to come out of the shadows. There's evidence of that whenever I've been to shows such as the NNL East for instance. That show seems to get bigger each year, so there's definitely "new" ones coming there!
Yeah, they have to be around somewhere, because whenever I stop by the hobby shop and decide to wait out buying a kit I have my eyes on, it's almost certain that it will be gone the following week lol. It would be cool to at least get a show or meetup around here, just to meet some more people to bounce ideas around with. I've been getting a few request from guys in the local car scene to build replicas of their cars, much like this one was, to display along the real ones at local shows. Who knows, maybe that'll spark a little interest and put a few bucks in my pocket,
As for the snow, my god was this week a killer. 24 inches in one day with 5 foot drifts due to wind. So far, my triumphs were building an 8 foot tall snow mound to clear out my grocery getter, helping to dig out two backhoes that got stuck on my block, and unearthing the fossil that is my 49 Hudson. No mail, newspaper, work, or driving because of a travel ban. I'm too young to remember dealing with '93, but after this one, I don't blame you for going south. Just for fun, here's a pic of my car putting the sled back in lead sled haha.
-
Thanks for all the kind words guys! I really appreciate it, as always.
I dunno..............from where I sit it looks mighty fantastic to me! Those old Monogram '56's still build up nicely, but yes the plastic version is not as crazy making.
I see you're in Wilkes-Barre! I used to live right below you in Drums once upon a time------right off Rte. 309.
Awesome, you're the third guy on this forum to tell me you lived/live around here lol. Just going by statistics, it's funny I never bump into anyone at the LHS. No shows, swap meets, anything. I guess we all hide in our houses here haha
-
So, progress has been made! I don't know why I'm moving so slow on this one, but it'll get done soon enough. Anyway, here's where we're at:
I got the interior together and gave it a light weathering job. My brightness settings must have been turned up a bit too high, though. You can't really see the light dirt and grime, can you? Eh, no big deal. I was going to add some work gloves, a bill box, possibly a lunch sack, etc., but decided against it because you won't see it anyway. Here's why...
Because this thing needs a bath haha. The windows in this kit were very badly scratched and had a bit of tire burn, and while a vigorous polishing helped, they're beyond total repair. That's actually half of the reason why this one is going to look used and abused. After some masking tape was applied, the window unit was misted from the front to back to simulate the truck getting blasted by dirt from the vehicles driving in front. Anybody who's driven through a northeastern winter knows all about this. The molded in trim was also painted to wrap up all of the paintwork needed for the cab, minus further weathering of course.
The underside of the cab also got a generous coat of pavement colored acrylic paint mixed with baking soda. A little black was added to the engine area to simulate oil/grease. I thought I went a bit over the top with it until I remembered seeing our guys pull into the terminal after 12 hours on Pennsylvania roads during the winter. After that thought, I think I may not have added enough. Man, do those trucks get filthy!
I also got the engine assembled, wired, and plumbed. An oil stain here, coolant stain there, some rust, a bit of grease, and a little tranny fluid were added to show a little wear. Overall, I'm actually pretty happy with how this turned out. I didn't want it to look like DOT would take it off the road immediately, but I didn't want a factory fresh engine in an old work truck either. After it was installed in the frame, I decided to add some air lines from the compressor to the tanks. I'm not sure if the routing is correct, but it will do. I also started adding some pieces for the rear suspension. That's about as far as I got so far. More updates coming soon.
-
Thanks guys!
You have made a bit of progress and it looks pretty good . Your choice for the blue looks about righ. The orange is a bit off and seems to have a pearlescent effect. I used to use testor .
racing orange and a dark blue. Kinda like the Gators colors. The dash looks pretty good from here .
Be Well
Gator
Yeah, for some reason a weird pearl effect shows up in photos under certain lighting, but never in person. I'm hoping the weathering will tone that down a bit. I'm fine with how it looks on the bench, but taking pictures is half the fun.
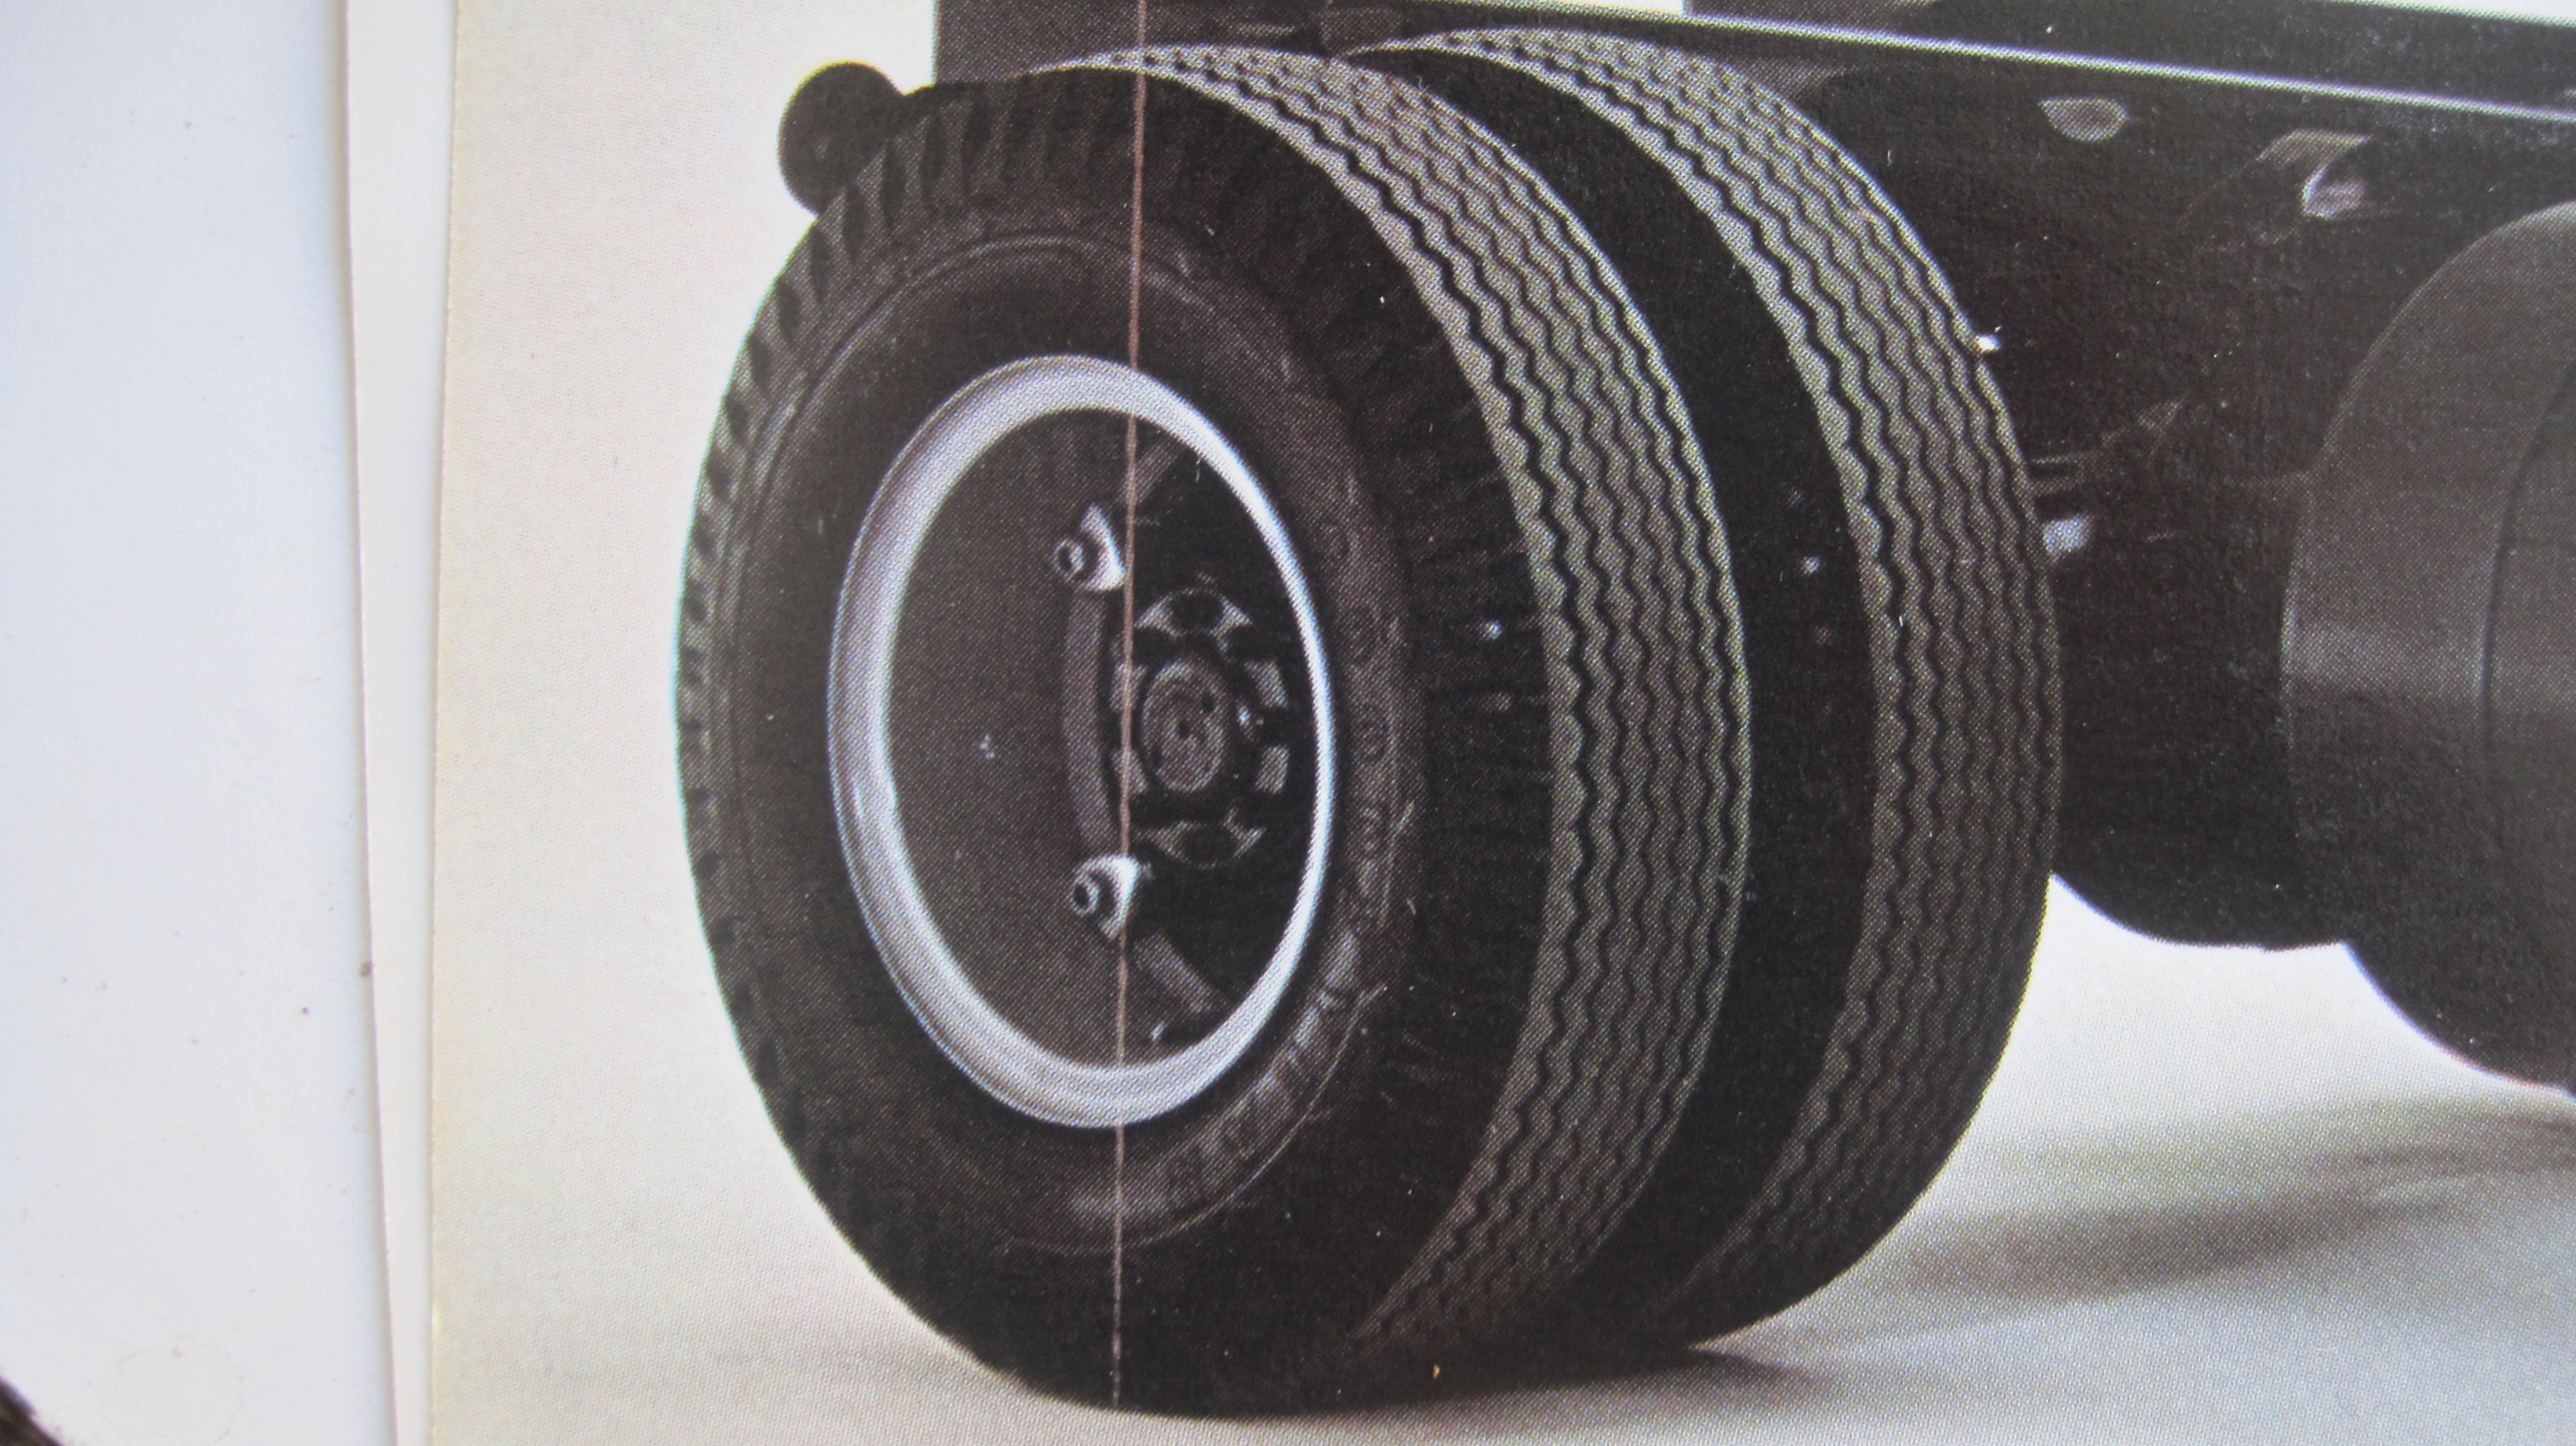
Nice work! Fleet trucks are my favorites, I did a Willig C 900. Unlike some other Ford kits , this one is labeled correctly as a C900. One of my pet peeves about the kit is the rear axle hub. Looks identical in diameter as the front hub, but with nuts, which can't be right. A C 900 would have a larger and flatter hub design when in the 22-23k lb rating. Here is a more realistic view of what should have been supplied with the kit.
If only I knew that before I discovered there's just as big a resin market for trucks as there is cars, I probably would've tried to find a set lol. Eh, I'm not gonna get to nit-picky about this one, though. I'm more or less just focusing on making everything in the box work and getting the hang of building truck models. This has been a really fun project so far, so I can see myself getting into industrial-type models pretty heavily. I actually see a C-Series fire engine coming sooner or later. I guess we'll see...
-
Alright, after quite a long break from this one, I decided to get moving on it once again. There's not a whole lot to report on, but here's where I'm at.
The cab finally got its two tone. A cheap can of Rusto Navy Blue gave me almost the EXACT blue I was looking for. Needless to say, I'm very happy I don't have to mix up any custom colors now. I also brushed on a little flat black for the window moldings and started doing a bit of the detail painting.
I also decided to start weathering various parts. For the sake of not having to post 100 pictures of random parts, here's a pic of the wheels. Since this things supposed to look like it's seen some miles, expect lots of grease and grime.
I know I'm jumping around all over on this one, but the dash looked like a fun little challenge to take on. I'm a bit spoiled by the new kits with gauge decals, so painting the old AMT dashboards has always been a weakness for me. All in all, I'm actually pretty happy with how it turned out.
Well that's all for now. I should have the engine done in a few days. It's taking a bit longer than expected since I can't find many reference pics. I might not even be searching for the right thing lol. From what I understand, the engine in this kit should be a 534 BB Ford. Any experts out there?
-
Thanks again for the kind words guys!
-
This was a project that was handed to me by my mother's boyfriend a few months ago so I could build a replica of his 1:1. It started off as a half assembled, metal body monogram kit from the 80's. It was the definition of a gluebomb when I got it, lacked a lot of detail, all of the metal was badly oxidized, had glue damage to the chrome and clear parts, and a few broken pieces. To cap it off, the plastic pieces were molded in red. After wondering what I got myself into, it quickly became evident that this thing was cursed lol. I had just about every problem you could encounter on such a simple kit, probably made worse by my total lack of interest in T-Birds. When it was all said and done, though, I ended up being pretty happy with it, and extremely happy to finally have it off my table. It was all worth it when I gave it to him for his birthday this week. For every little flaw I see, he finds something new that he likes about it and will be showing it off on his air cleaner at every show this year. If he's proud of it, that's more than good enough for me
-
Well, with all of the problems I encountered, a build off project being on the bench, and my inability to stay focused on one build at a time, I didn't make my Christmas deadline. However, it did make a nice birthday present when I wrapped it up earlier this week. Check her out in the under glass section!
-
Awesome
-
Once again, you nailed it! I love all of the stock builds you do. It's nice to see the canvas before these crazy hot rodders get a hold of them lol
-
Awesome pair. I'm loving that Super Bee
-
Man, that's a REALLY nice build. I'm usually not a fan of that wheel choice on these types of cars, but they just look right on this one
-
Great looking build!
-
Thanks guys!
-
Maybe I should post a pic of the real deal lol


")


32 Five Window - Traditional Style
in Model Cars
Posted
Here's one I've been working on off and on for a little while. The base for this one was the Revell 32 Five Window. The front suspension and engine were sourced from the Revell 29 Roadster. Surprisingly enough, with the relocation of the motor mounts and some trimming here and there, most of these parts fit pretty well. The only hang up I had was mounting the engine a bit too high, leading to the down tubes on the exhaust not fitting at all, but two pieces of solder and a little bending solved that pretty quick. The fenders and stock firewall come from the Stacey David Rat Roaster. The grill is a lightly modified piece from a 37 Ford pickup. In my decently sized parts box, I couldn't find any steel wheels that would work for me. I settled on some spare Caddy caps from a 49 Merc kit, which I ended up being pretty happy with after all. The rear slicks are AMT parts pack pieces. The distributor was drilled and wired, and the carbs were plumbed. I don't know if it's entirely accurate, but I wasn't sure how six carbs with a front mounted fuel pump are fed, so a distribution block was added to feed the two fuel rails. The carbs in the kit appear to have molded in linkage, so I just glued a piece of wire in to connect them and called it a day. The last little touch was to get rid of the rear that came with the kit and swap in a quick change from a Paddy Wagon kit. The is Ford Toreador Red Metallic over a Torch Red base, topped off with Testors Wet Look. Thanks for looking!