

ShakyCraftsman
-
Posts
732 -
Joined
-
Last visited
Content Type
Profiles
Forums
Events
Gallery
Posts posted by ShakyCraftsman
-
-
Thanks guys
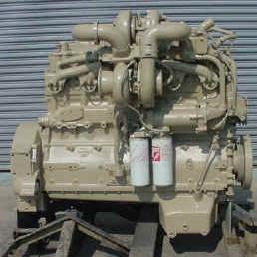
I have the Cummins NTC-475 twin turbo just about finished. I'm almost ready for paint. Here are some pictures for you to look at.
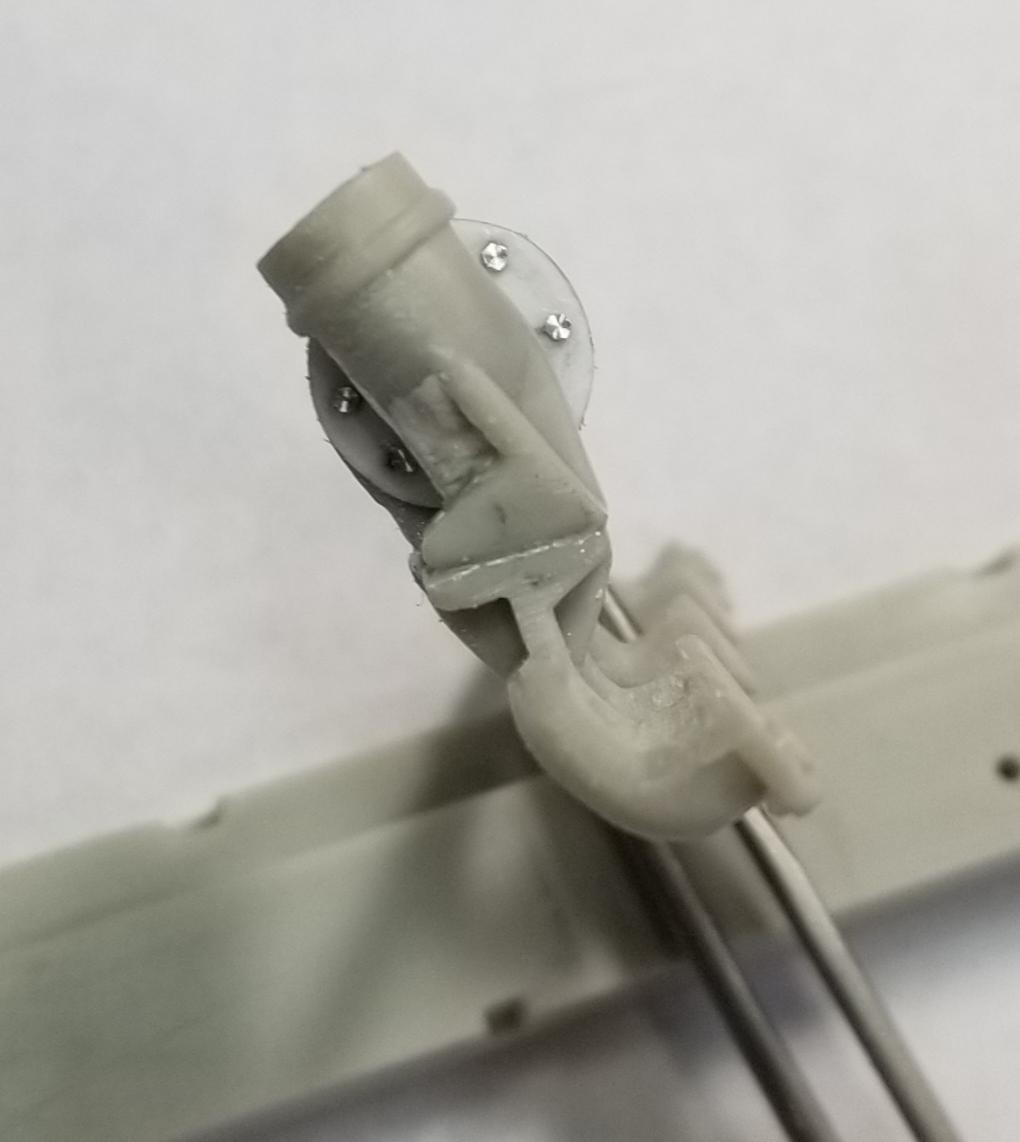
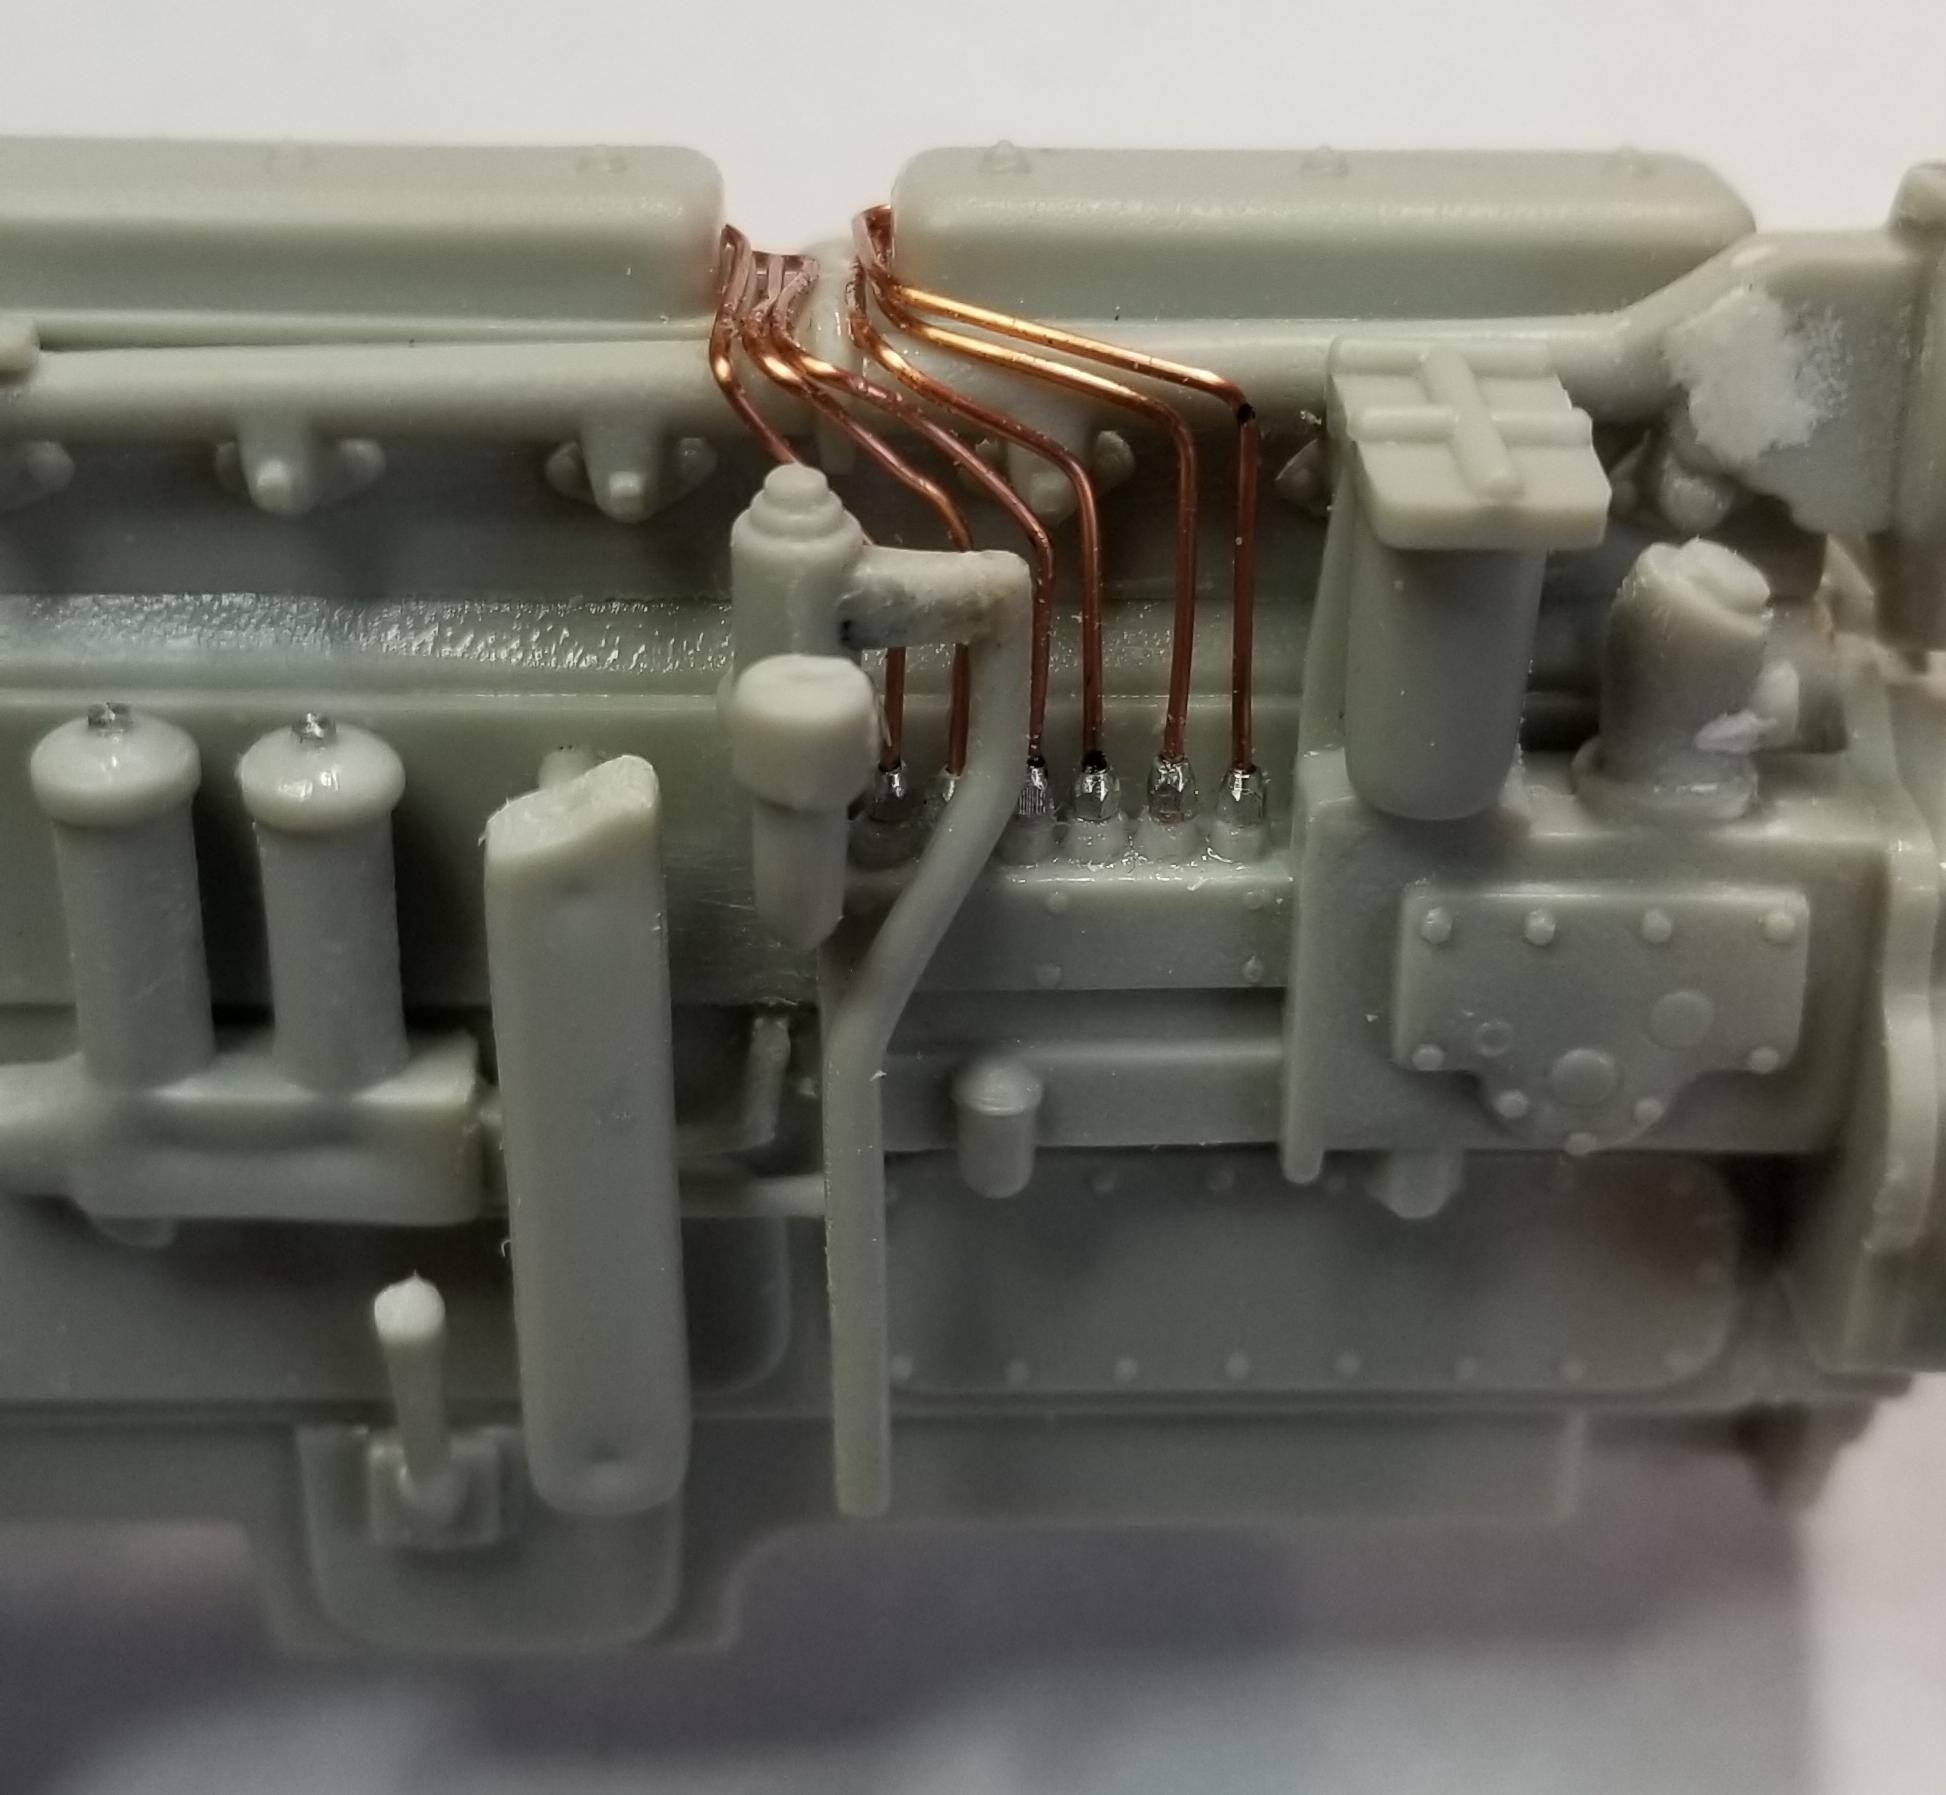
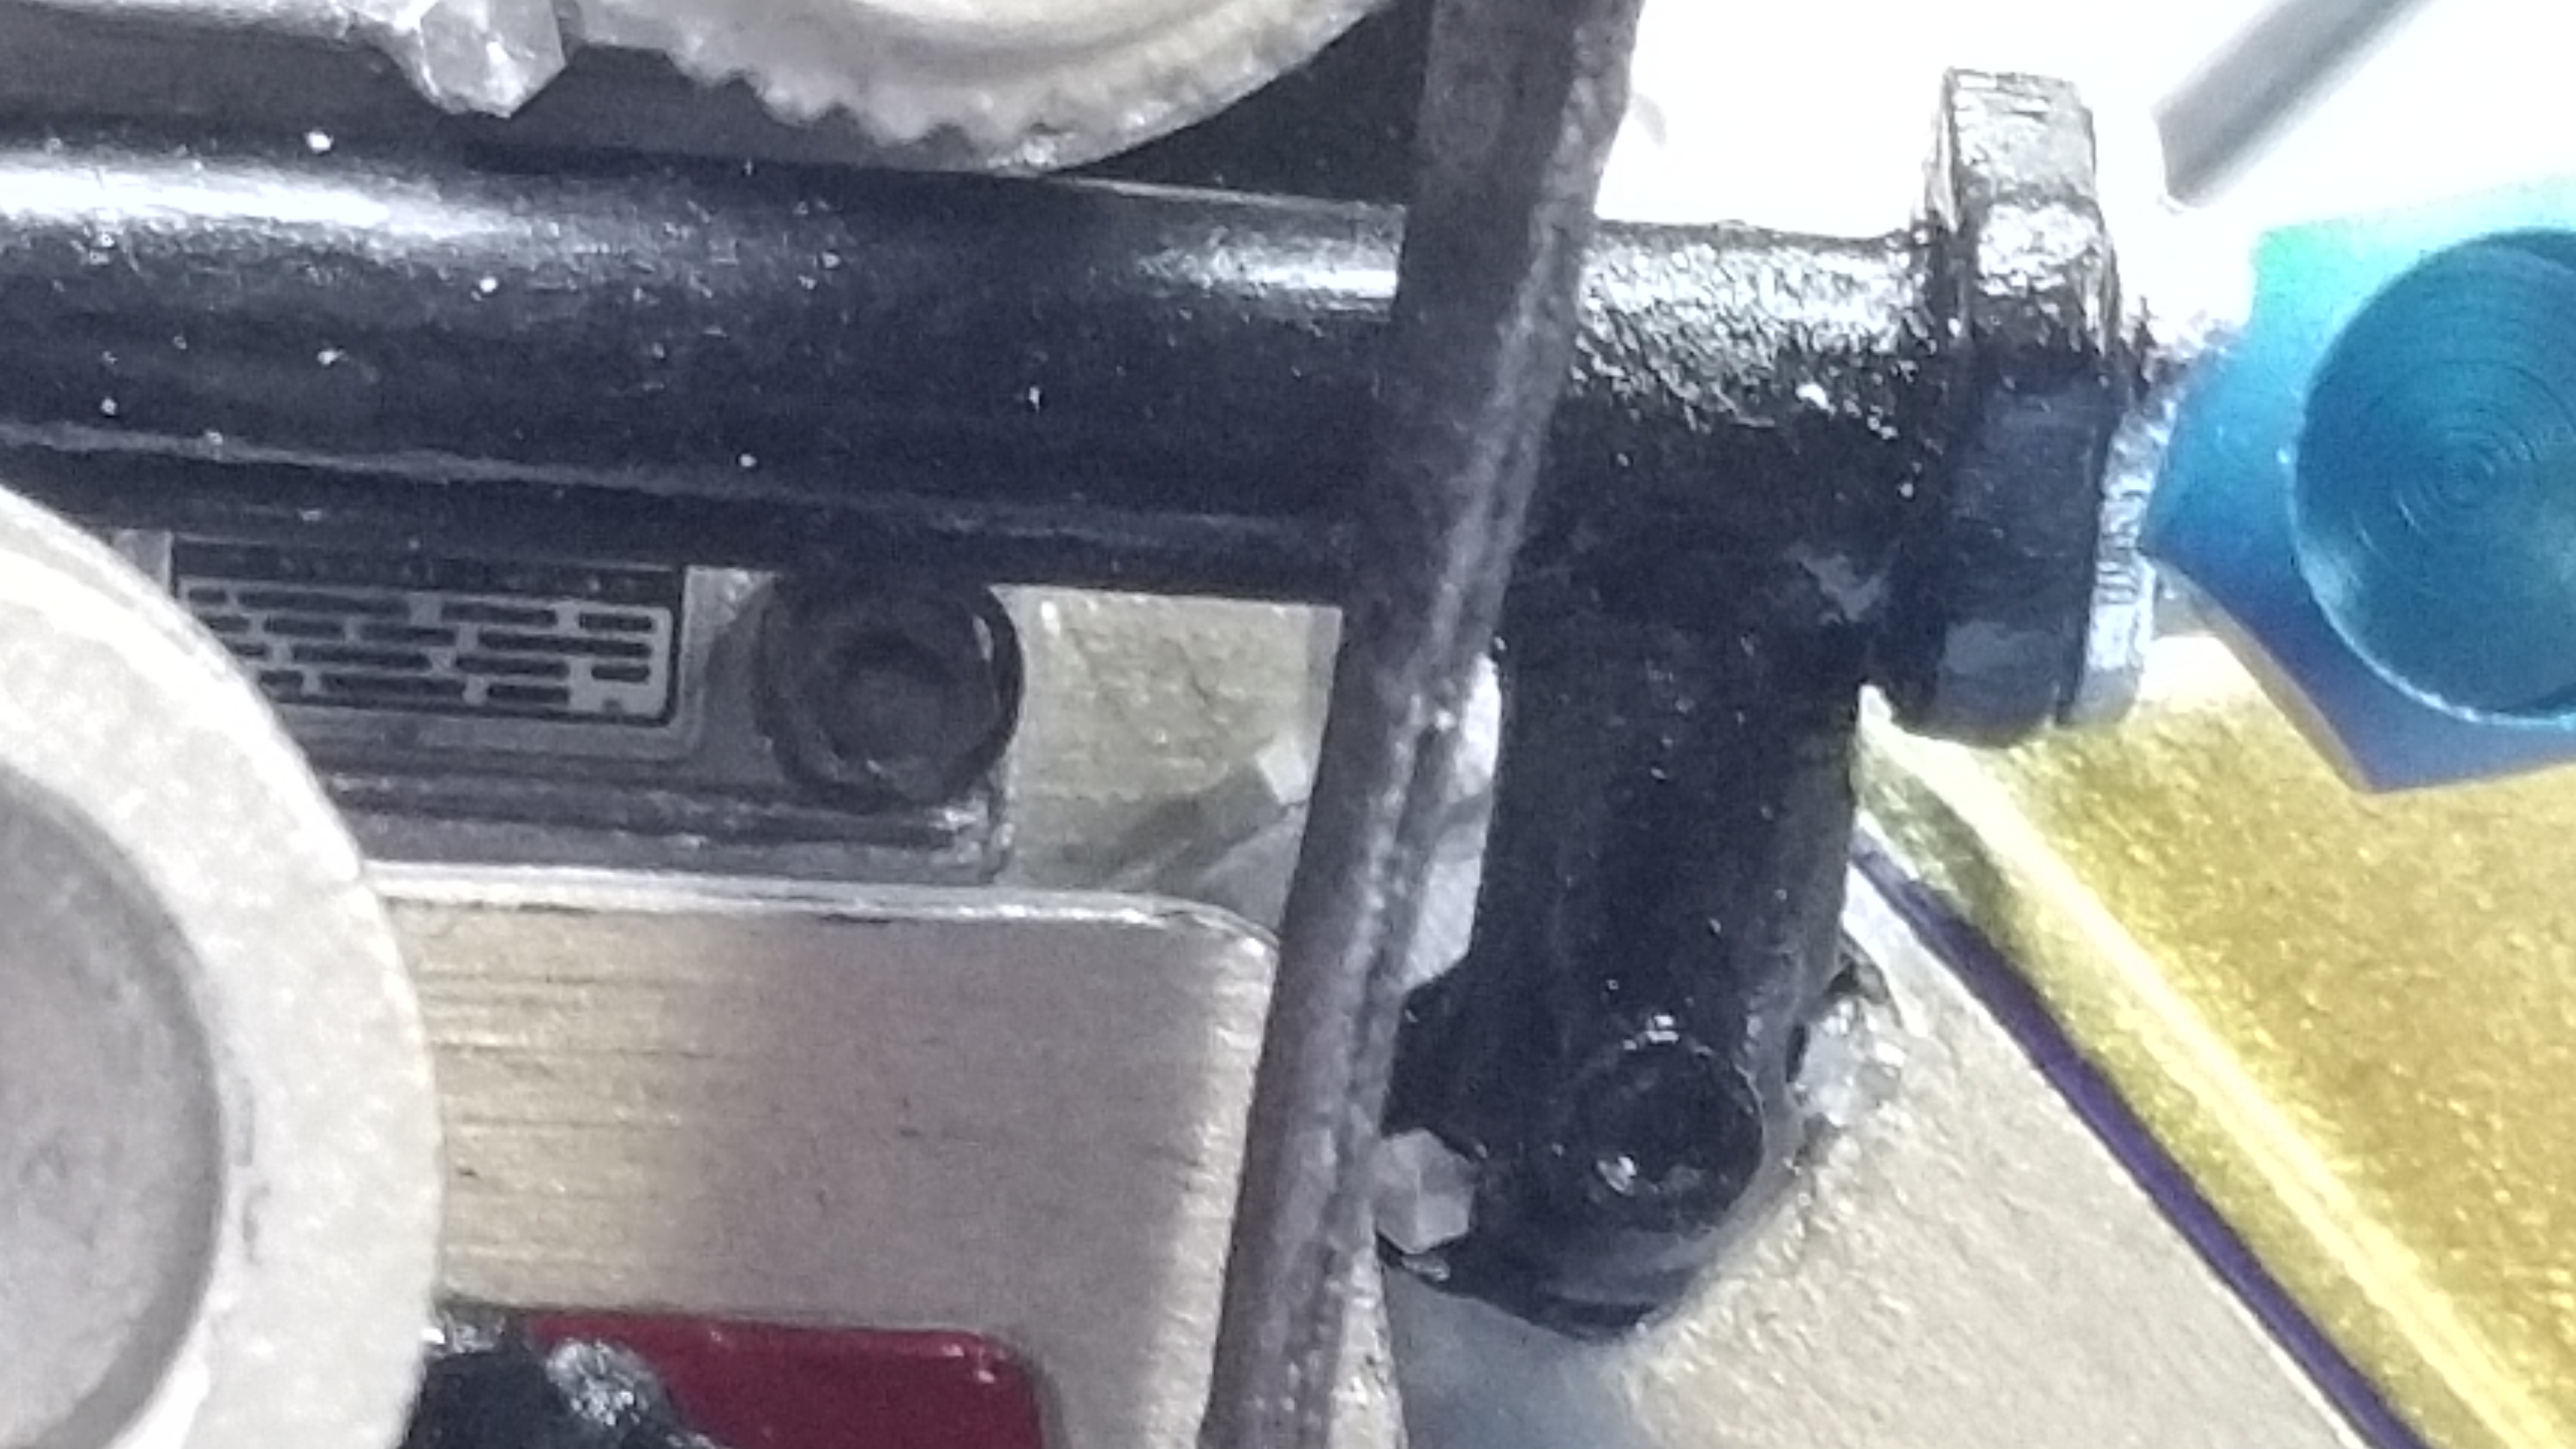
 this view shows the alternator that I had to add, wasn't one in the kit, the sediment filter from the parts bin, and all the oil, fuel, air and water lines I added.
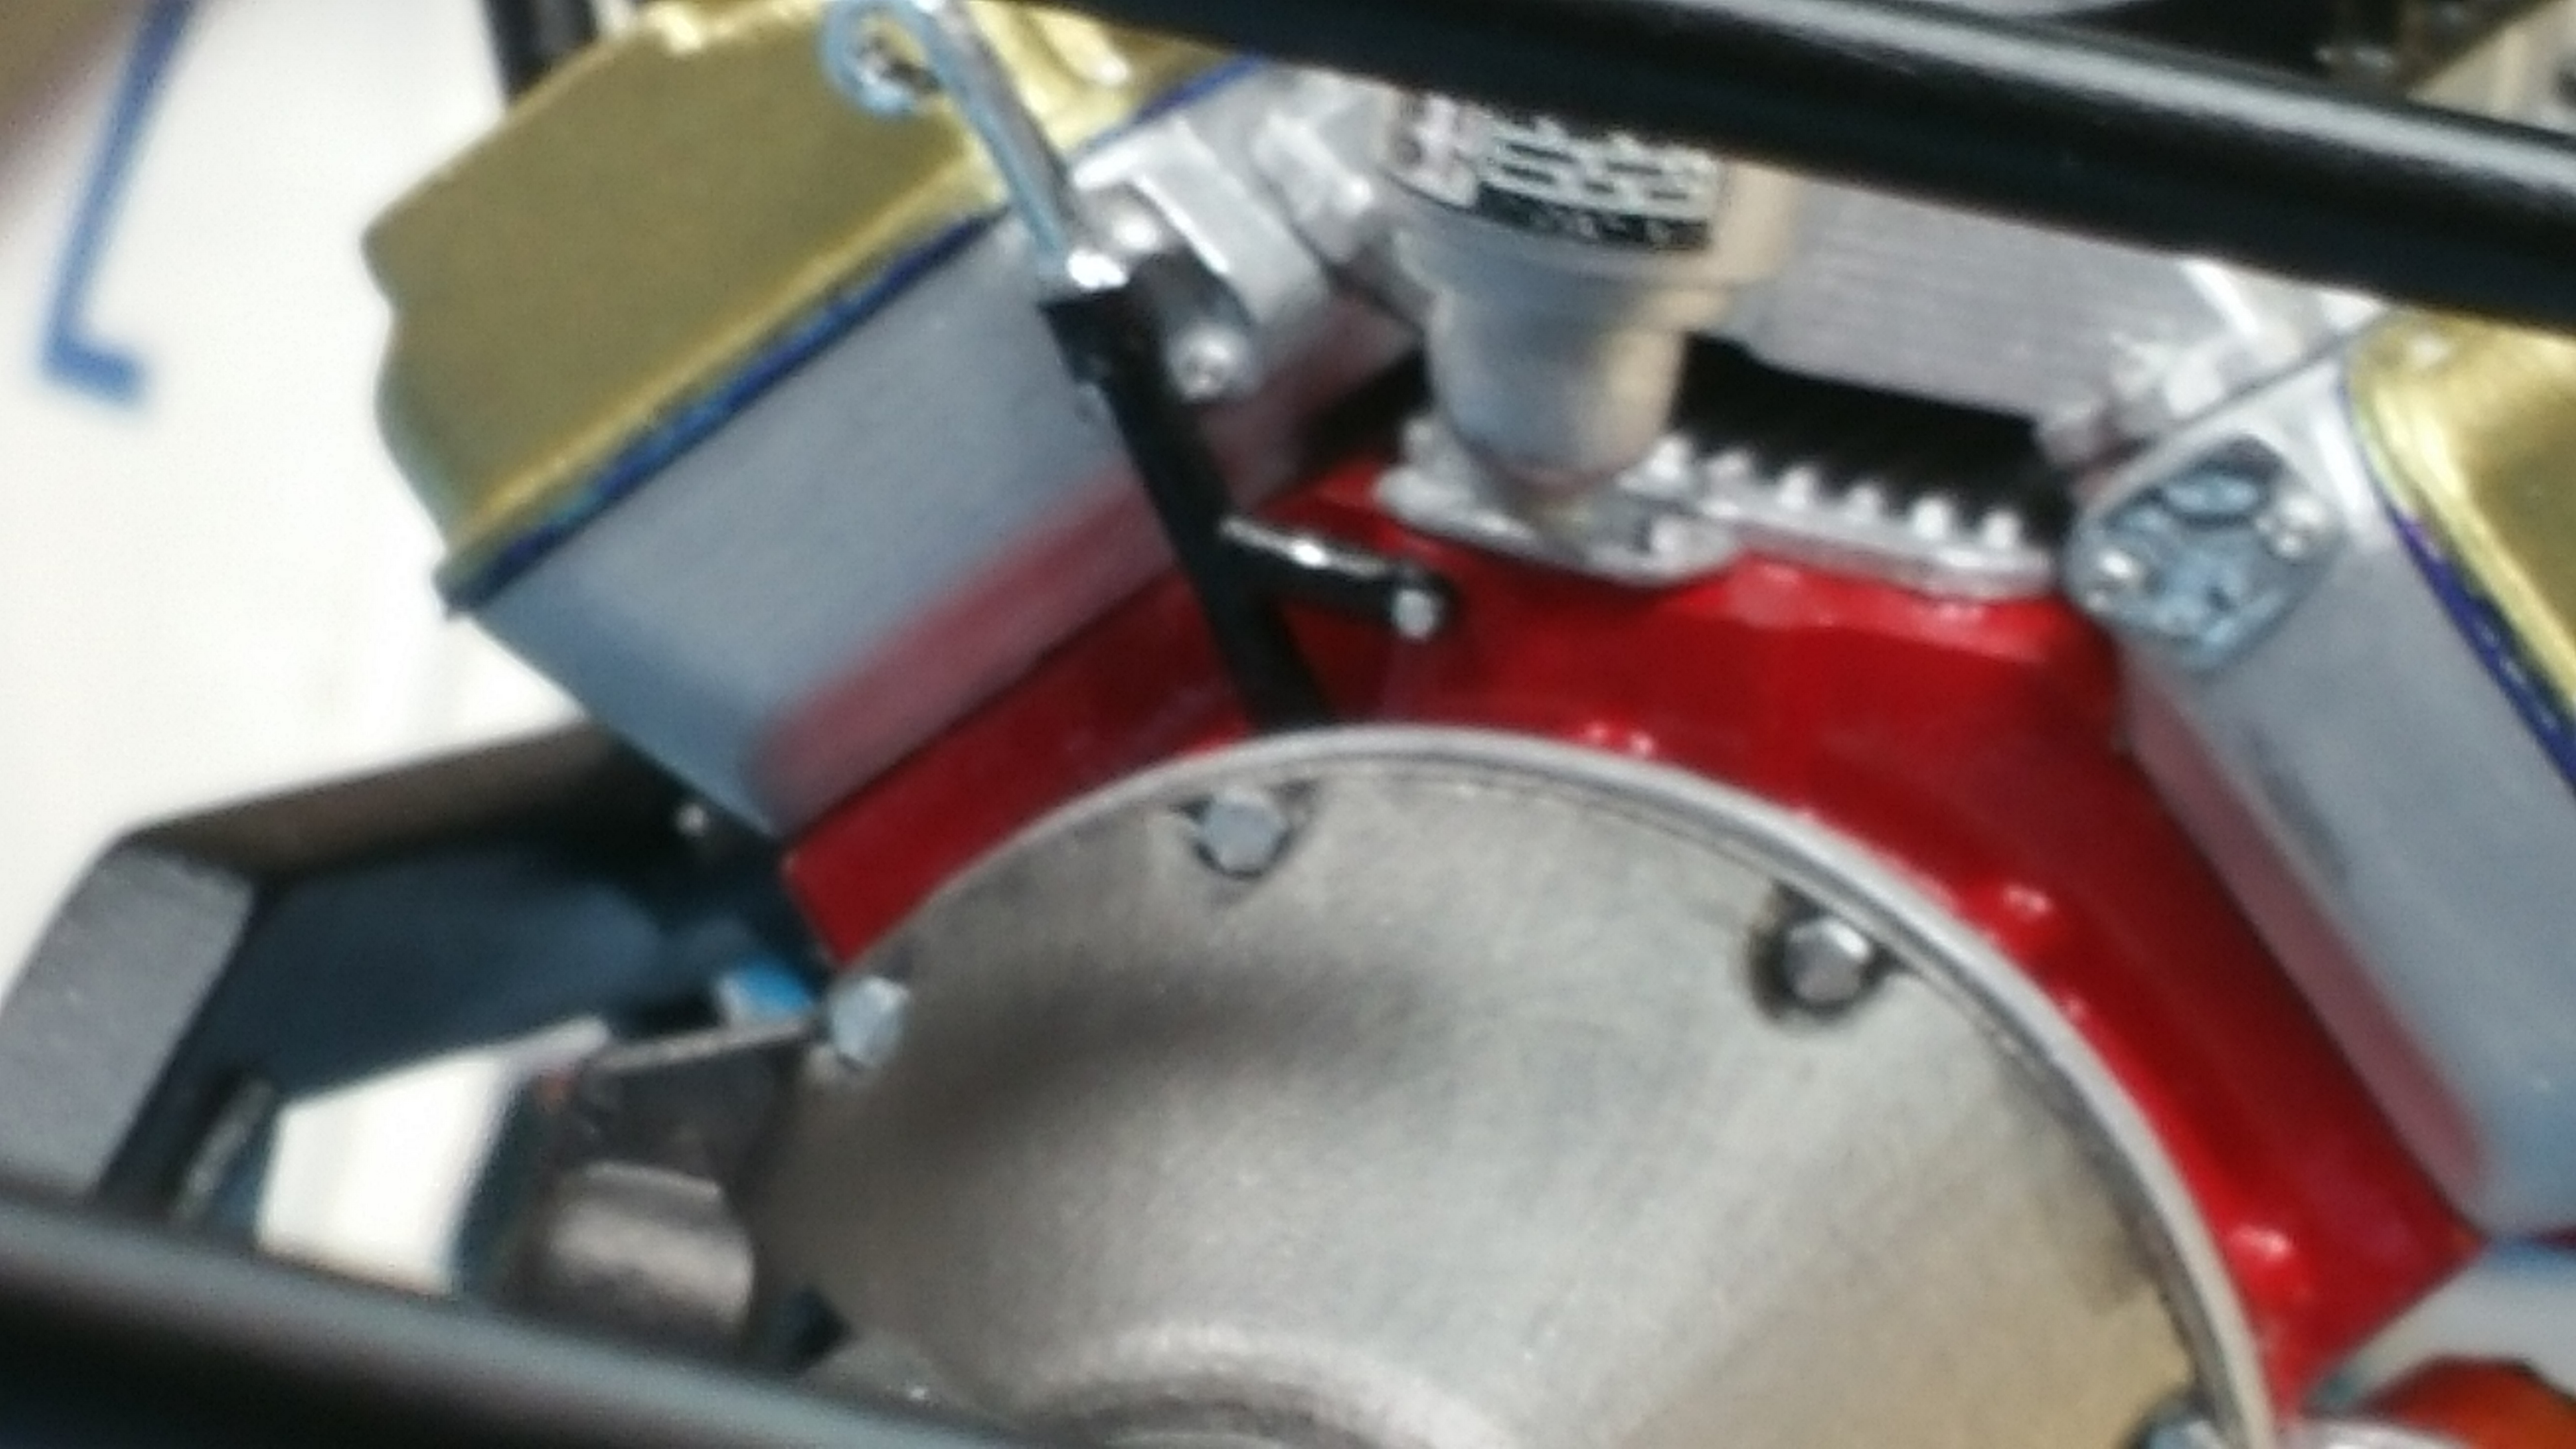
this view shows the made from scratch starter moter, fuel and air lines and fuel fittings at the rear of the block. I added the pipe at the bottom of the engine from oil pump to the oil pan.
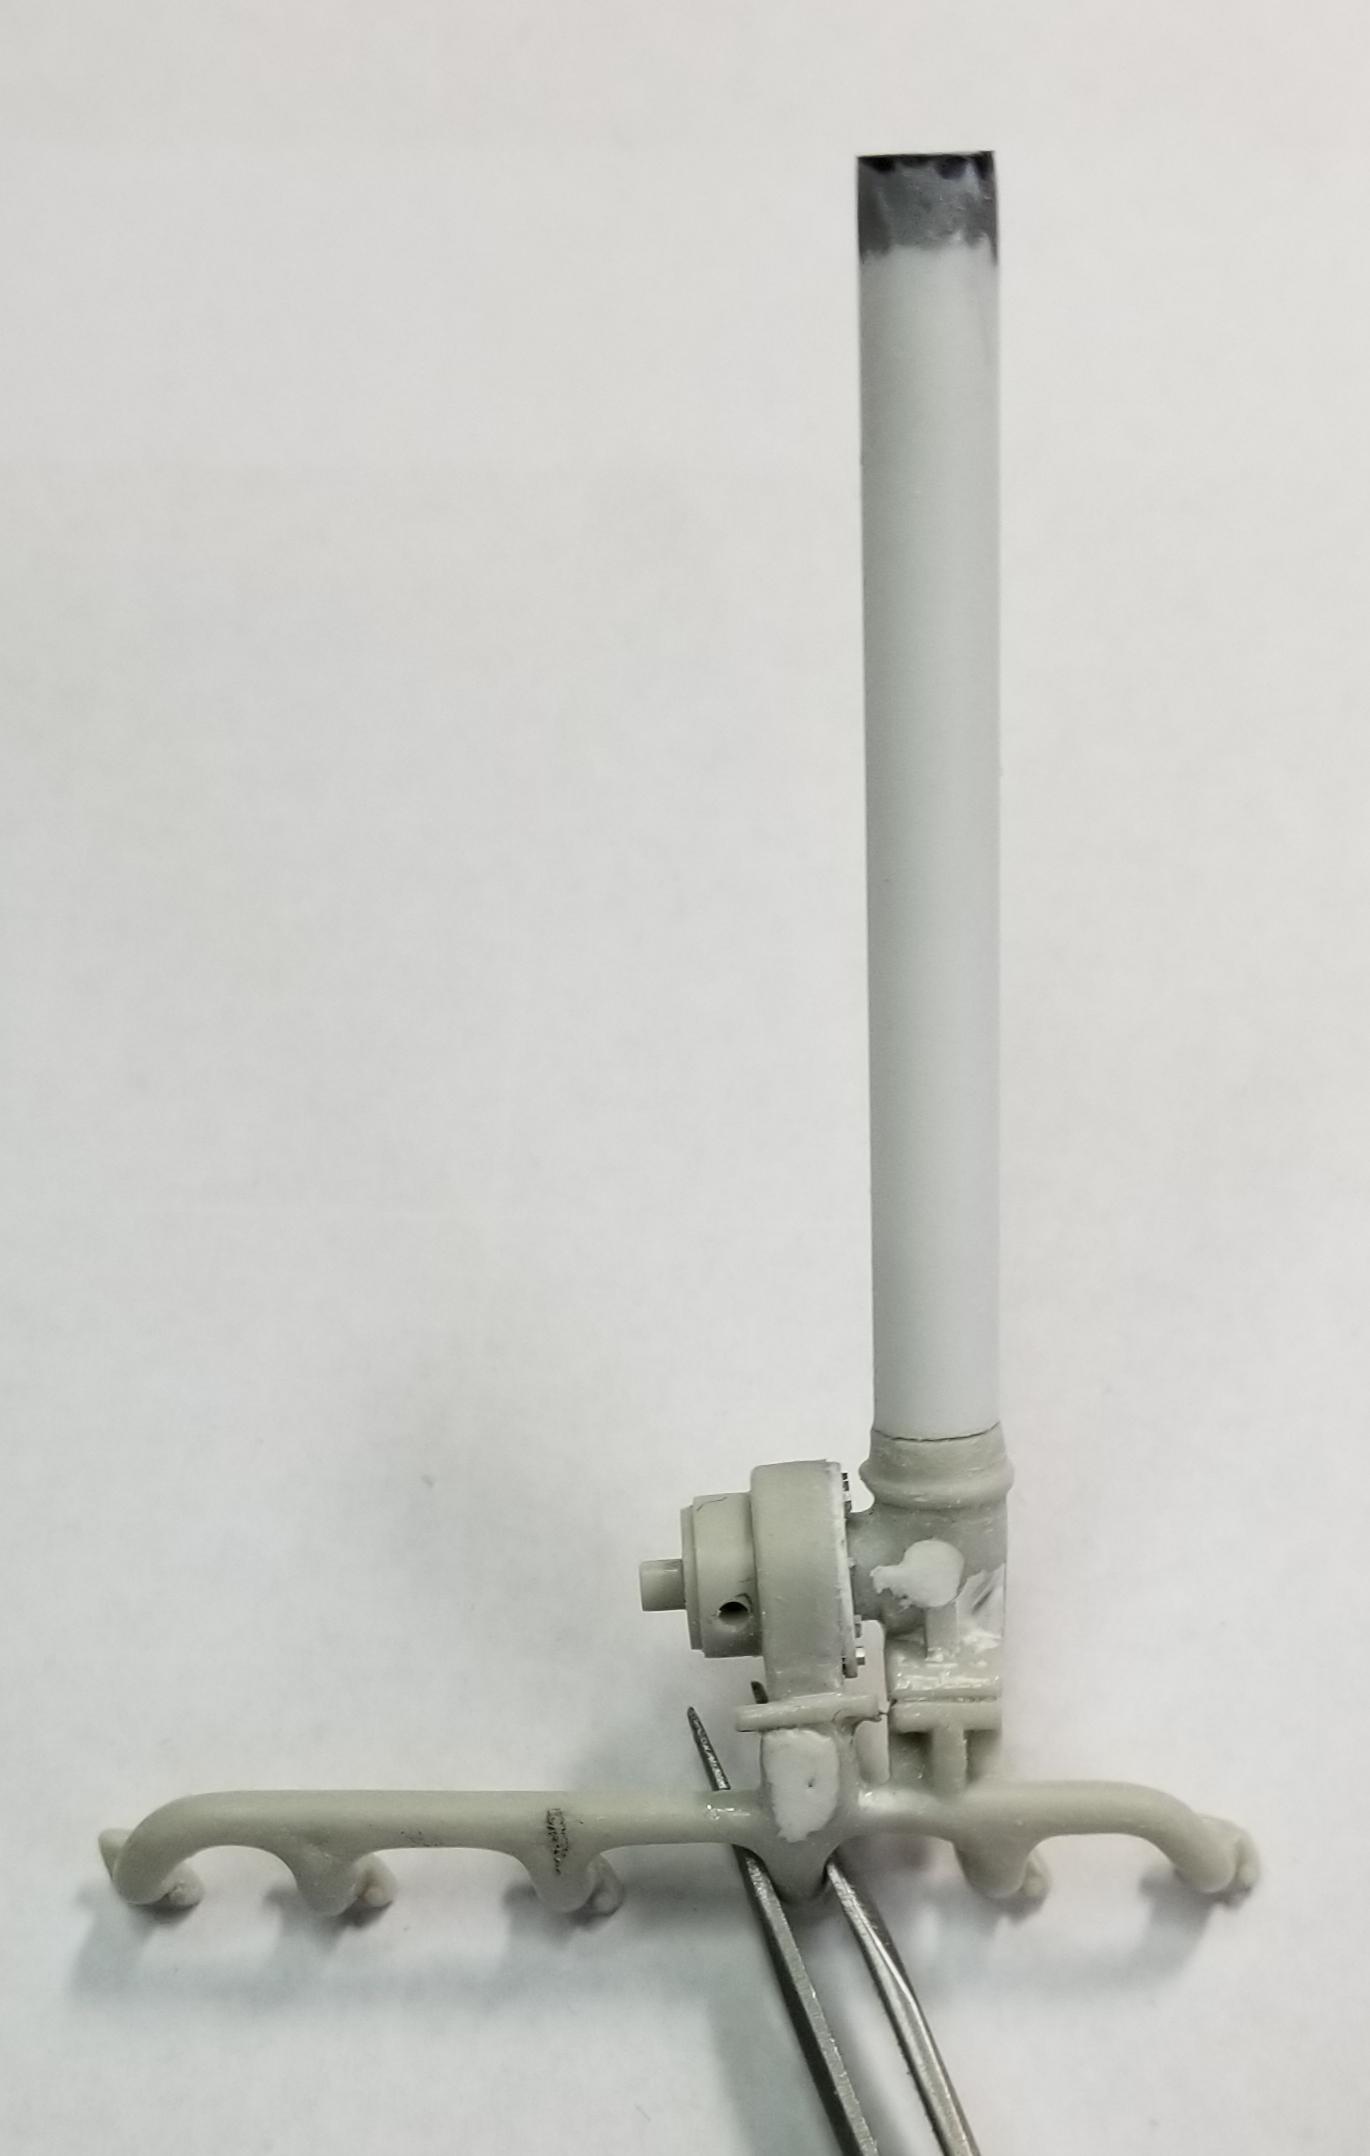
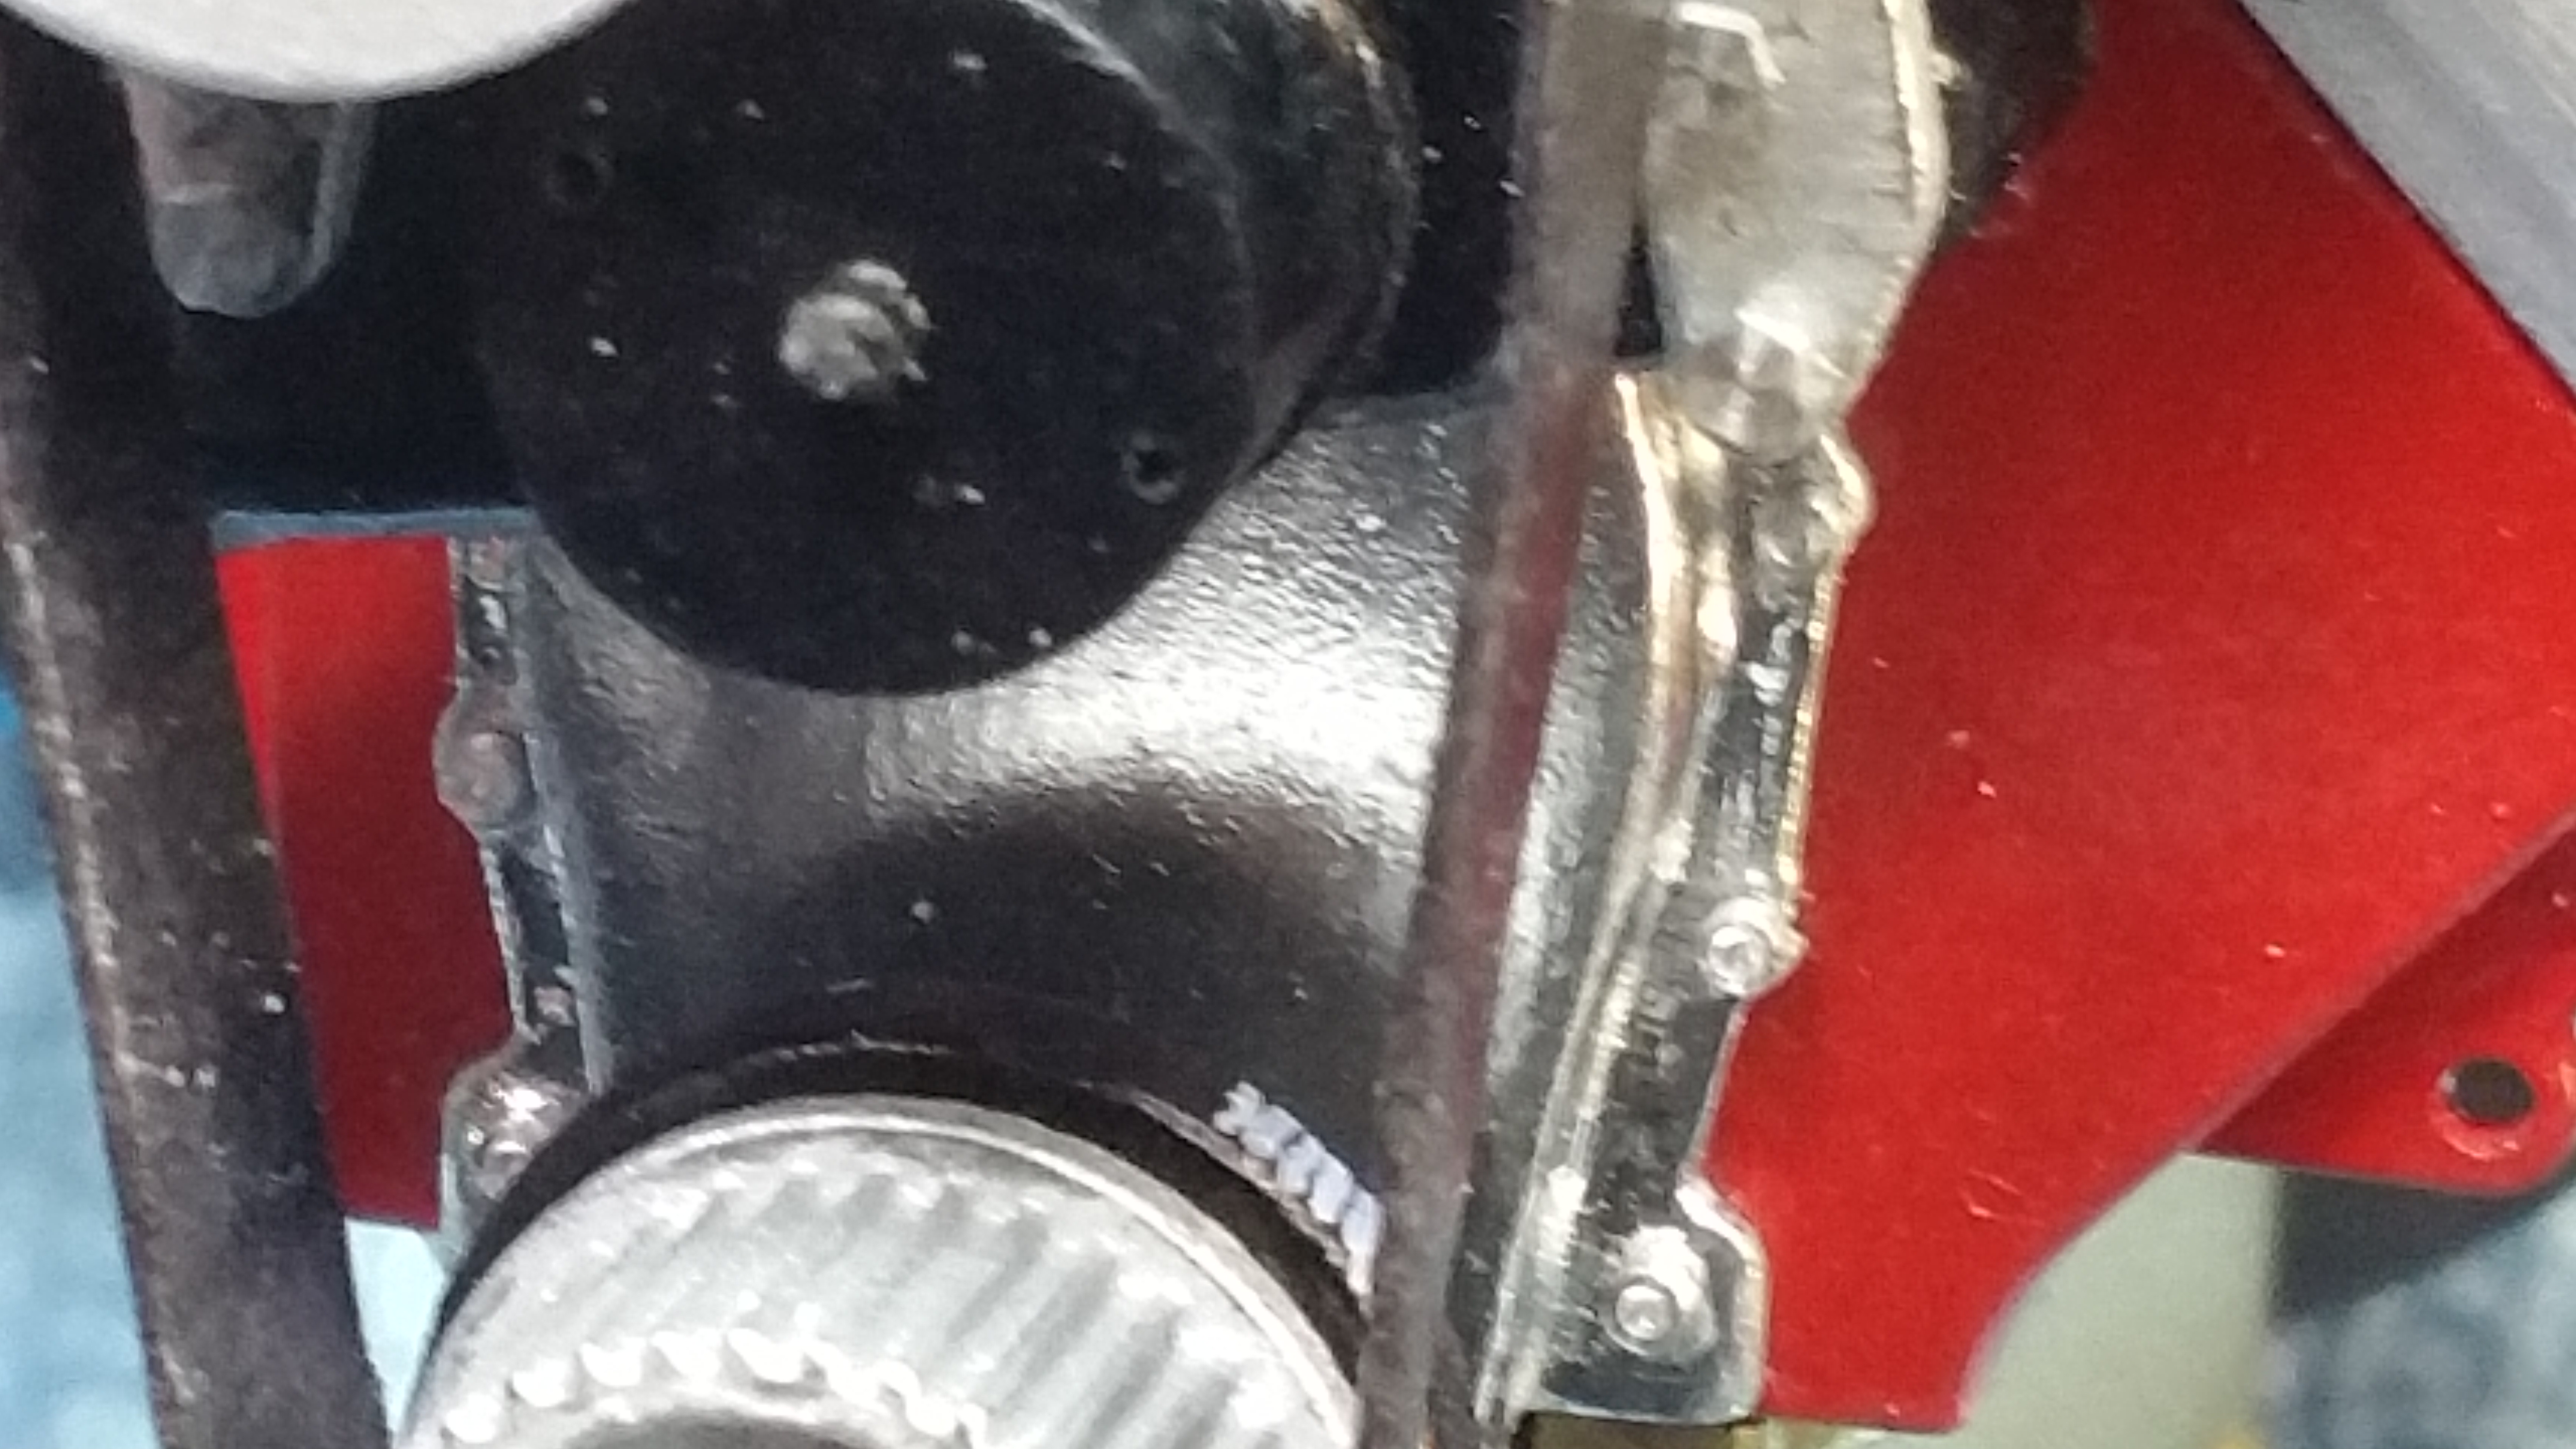
this view shows cooling lines from air compressor to water inlet housing at tge front of the engine.
view of the front of the engine
view of the passenger side of the engine in the frame.
view of the driver side of the engine in the frame.
this view shows the big Pete engine top left next to the Kenworths NTC-370 on the right. I put the Cat D8H d352 engine on the bottom for size comparison. Well that's all for now be back soon with more updates.
this view shows the alternator that I had to add, wasn't one in the kit, the sediment filter from the parts bin, and all the oil, fuel, air and water lines I added.
this view shows the made from scratch starter moter, fuel and air lines and fuel fittings at the rear of the block. I added the pipe at the bottom of the engine from oil pump to the oil pan.
this view shows cooling lines from air compressor to water inlet housing at tge front of the engine.
view of the front of the engine
view of the passenger side of the engine in the frame.
view of the driver side of the engine in the frame.
this view shows the big Pete engine top left next to the Kenworths NTC-370 on the right. I put the Cat D8H d352 engine on the bottom for size comparison. Well that's all for now be back soon with more updates.
Ron G
-
-
Hey all
Here are some pictures of the D352 engine in the Cat Dozer.
this view shows the kit parts and some that I modified. The brass wires are for the fuel lines.
this view shows the exhaust manifold, the intake turbo and exhaust stack. The small aluminum bolts are from a guy that does stuff for formula 1 cars in different scales, but I forget his name.
this shows the bolts added to the exhaust turbo.
this view shows the exhaust turbo and exhaust stack mount.
this view shows the exhaust stack in place.
this view shows the fuel injection pump, the fittings and the fuel lines.
another view of the fuel injection pump.
this view shows the fan belt and the bolts I added to the alternator.
this view shows the intake manifold and the fuel injectors I added to the head.
closer view of the fuel injectors.
this view shows the fuel injection pump added to the engine.
I added this bracket/mount for the fan belt.
view showing the fan belt installed.
this view shows the fuel lines added to the injectors.
this view shows the fuel lines added to the fuel injector pump.
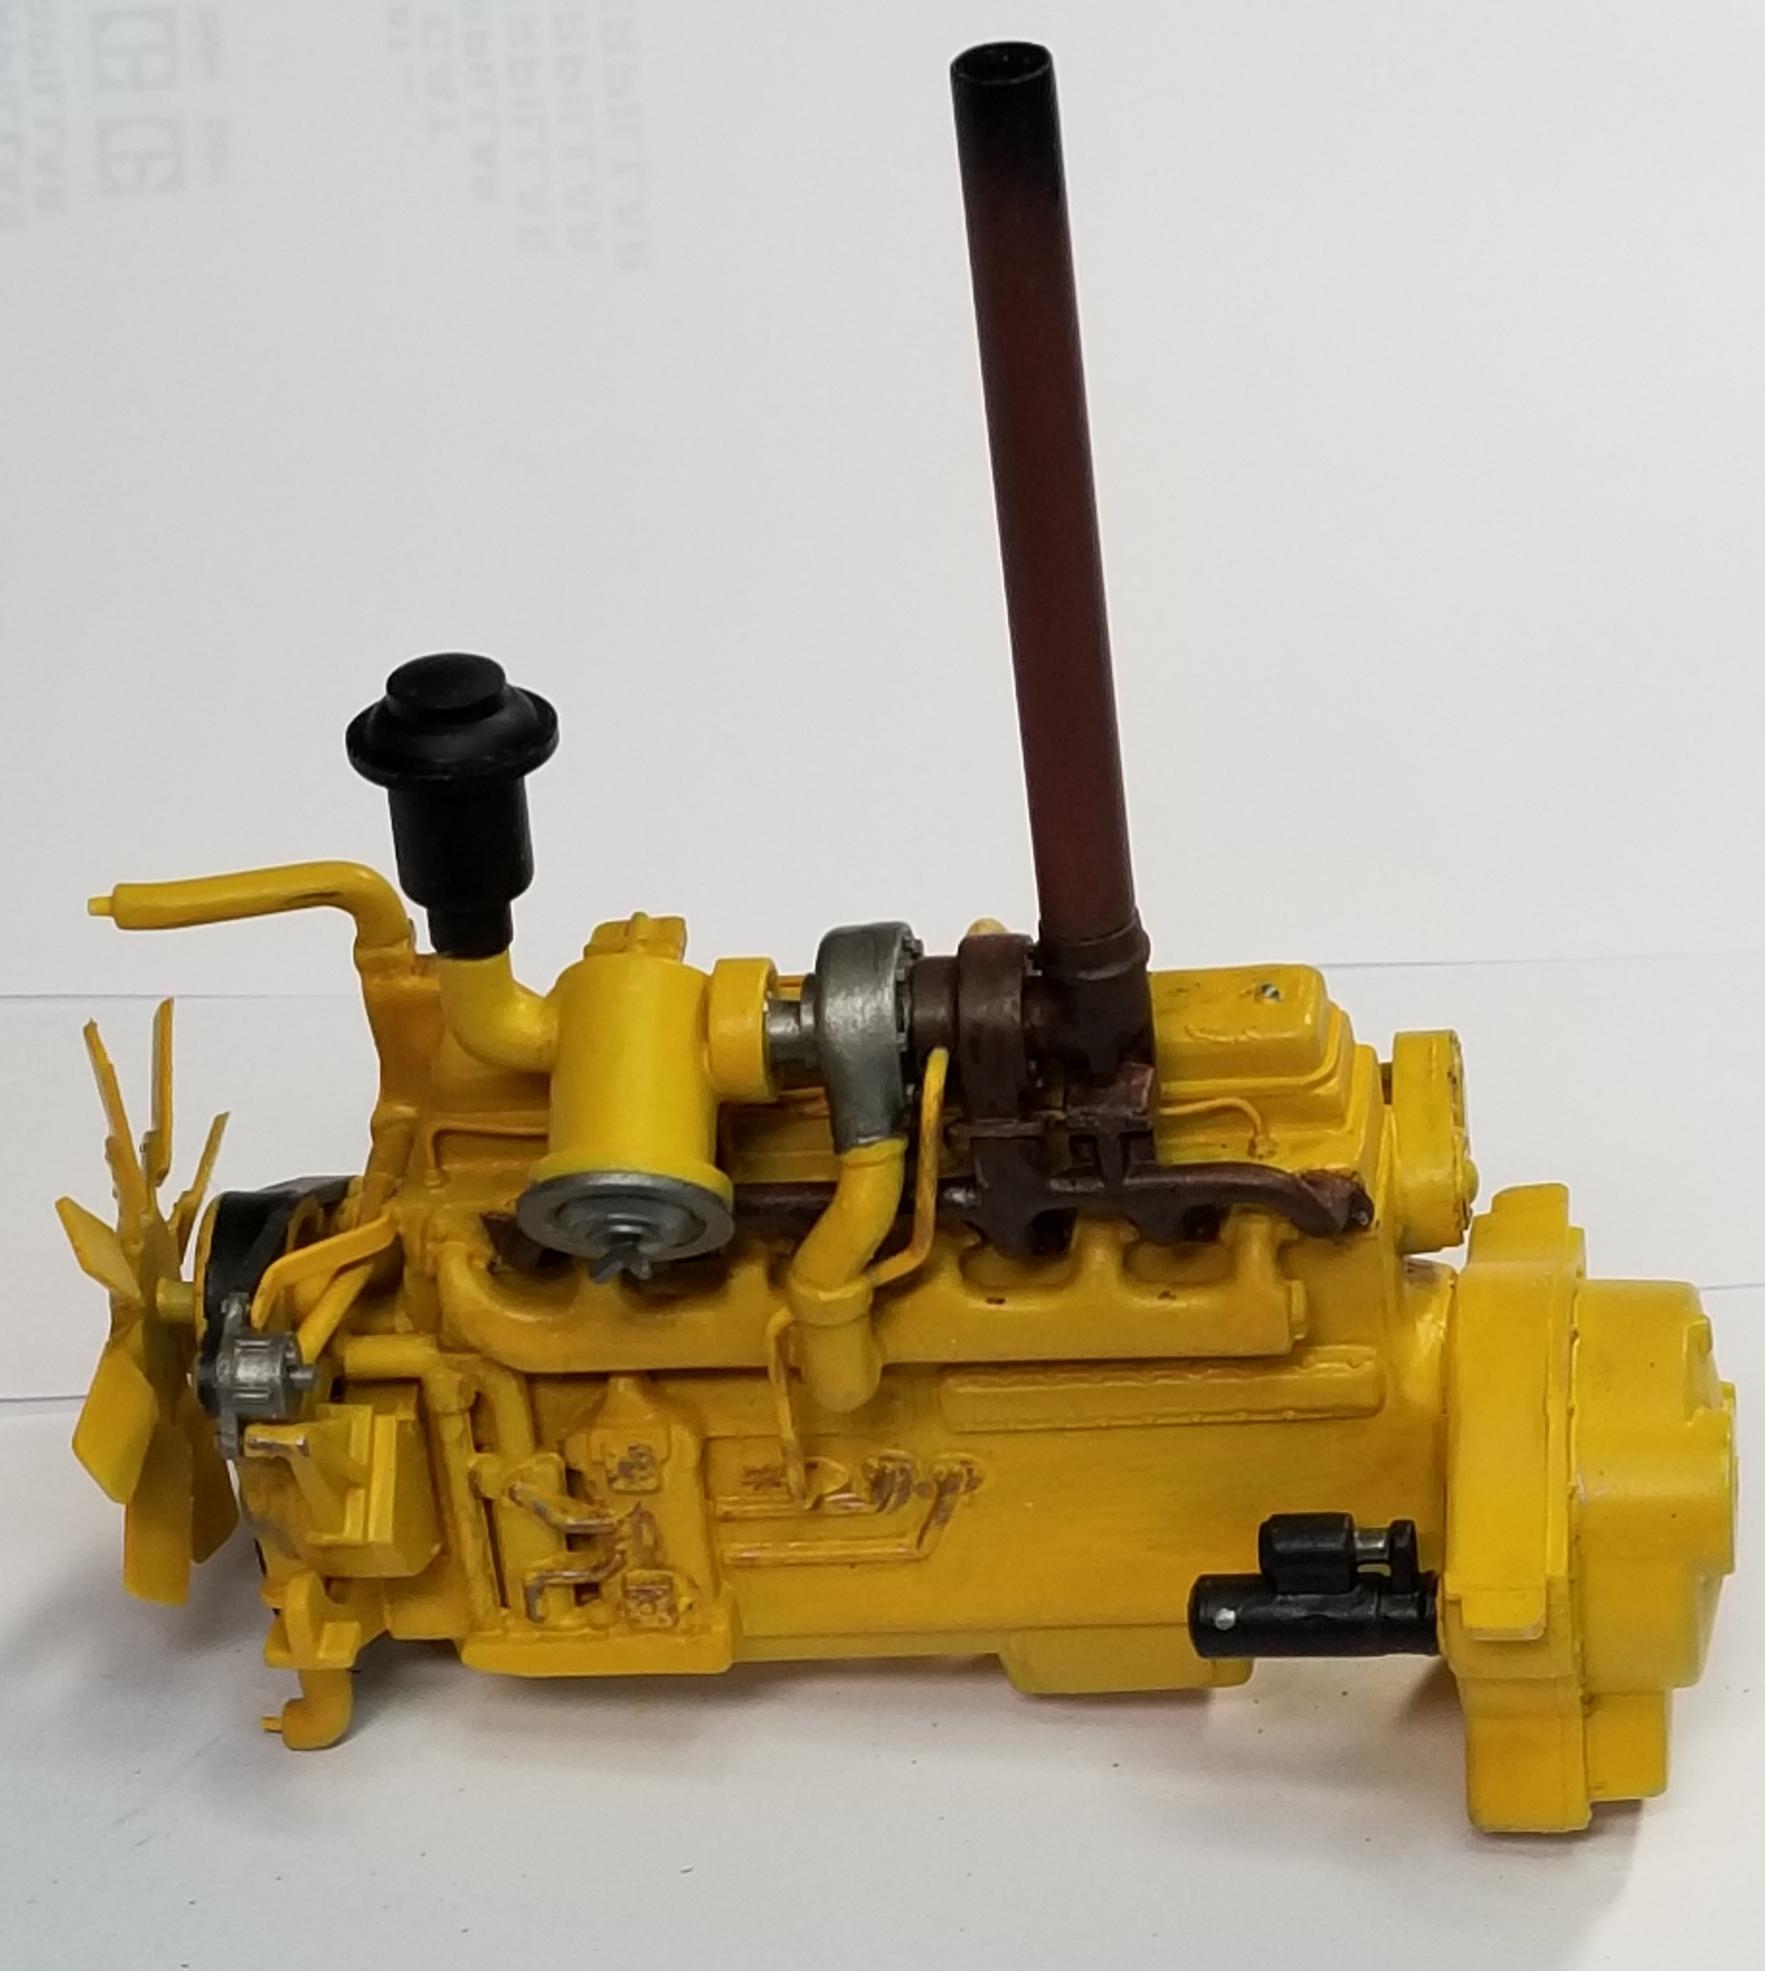
And here it is painted.
intake/exhaust side of engine.
this view shows the wing nut I added to the air cleaner. And oil line from turbo to block.
fuel pump side of the engine.
another view of the fuel pump side of the engine. I added a line from the exhaust turbo to the oil gallery.
and here it is sitting in the Dozer. I still need to give it a coat of gloss and then weather it. Thats it for now be back with more soon.
Ron G
-
Thanks Jeff
I have the 4 axle stretched out to a 27'0" well now, it still needs some tweaks but it's getting there.
Ron G
-
Hey all
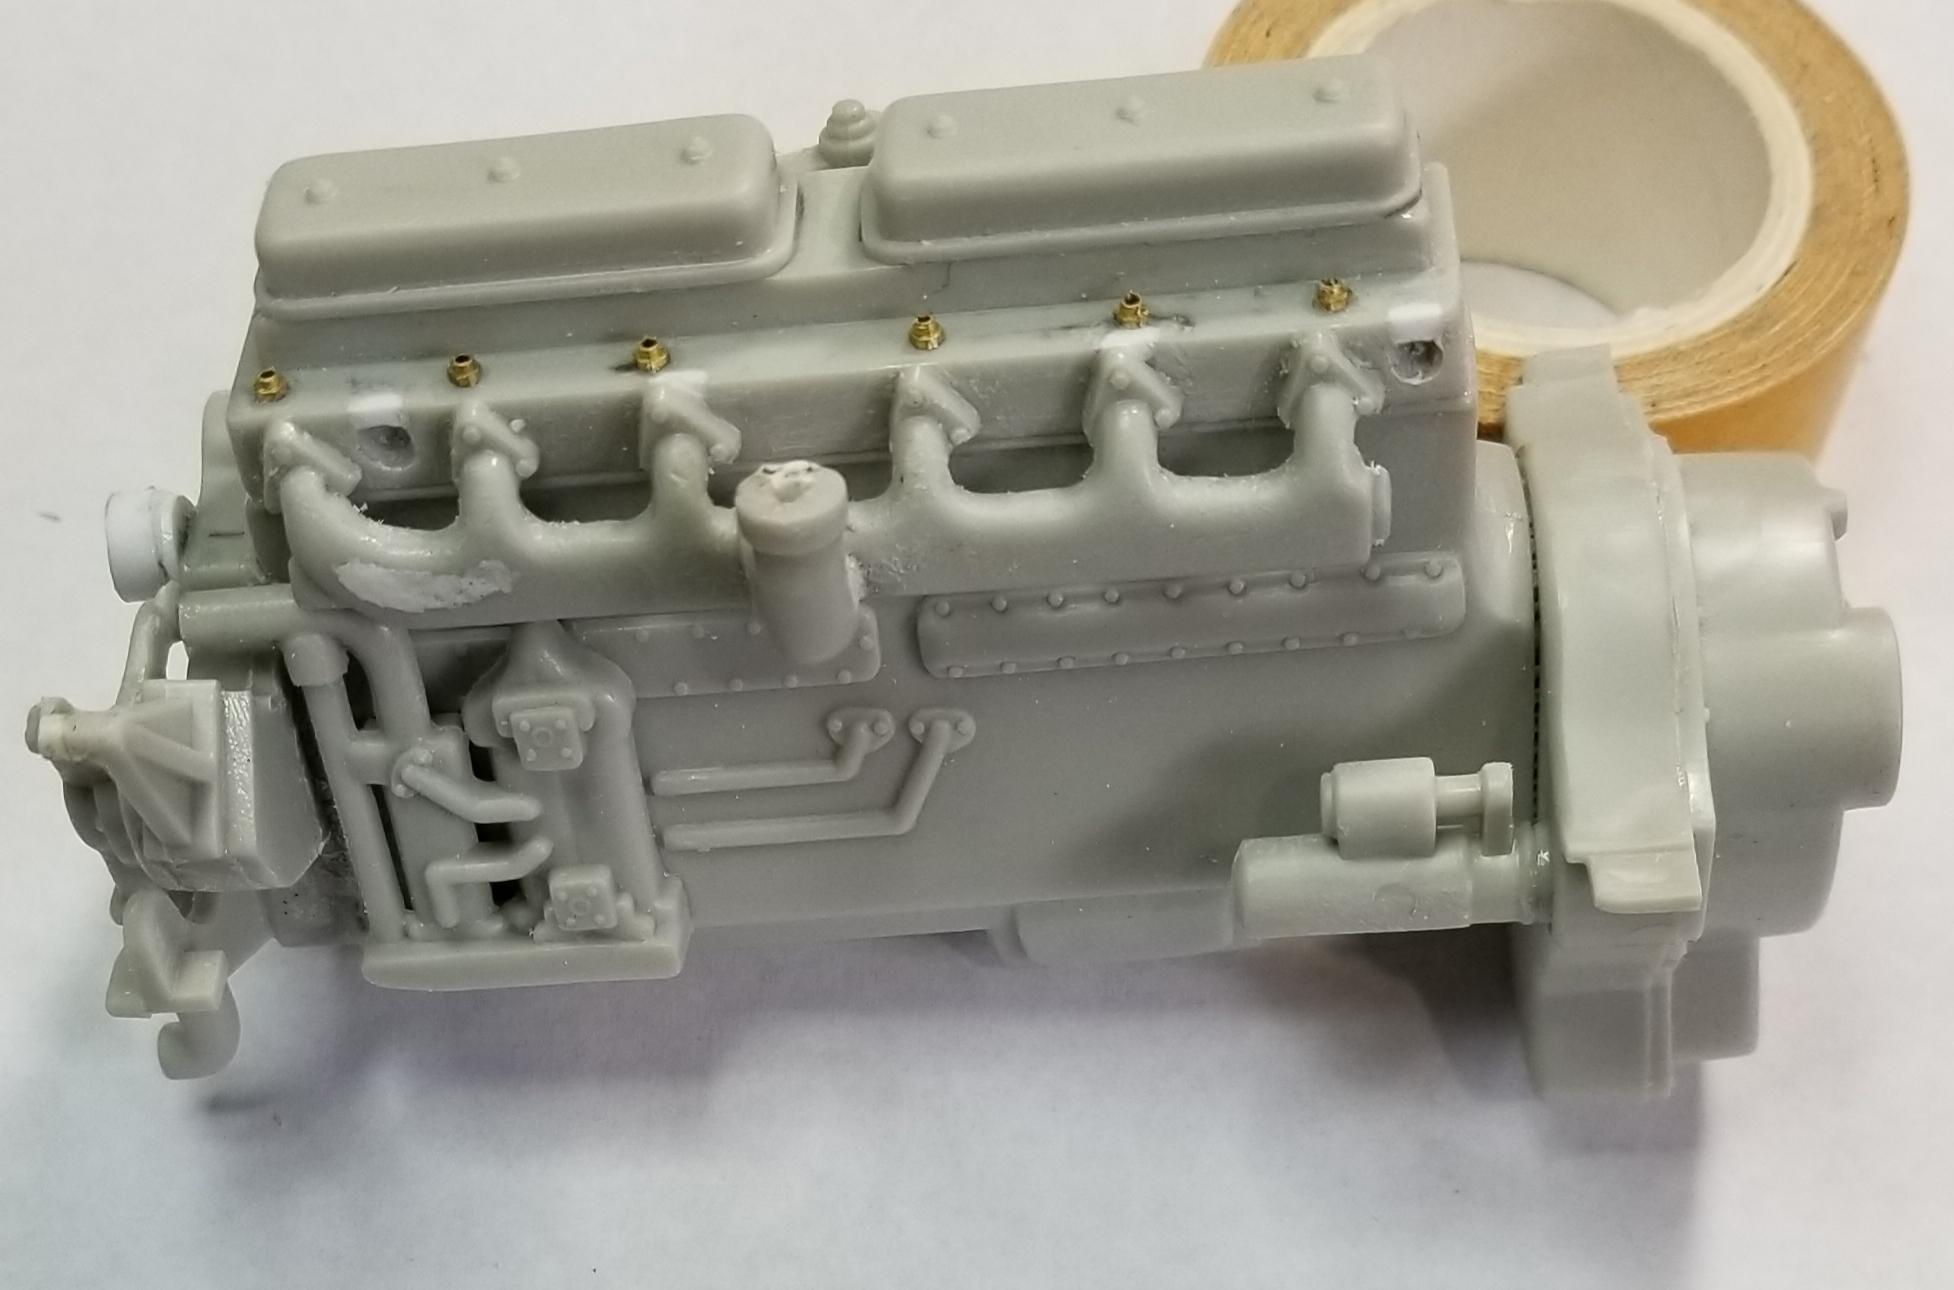
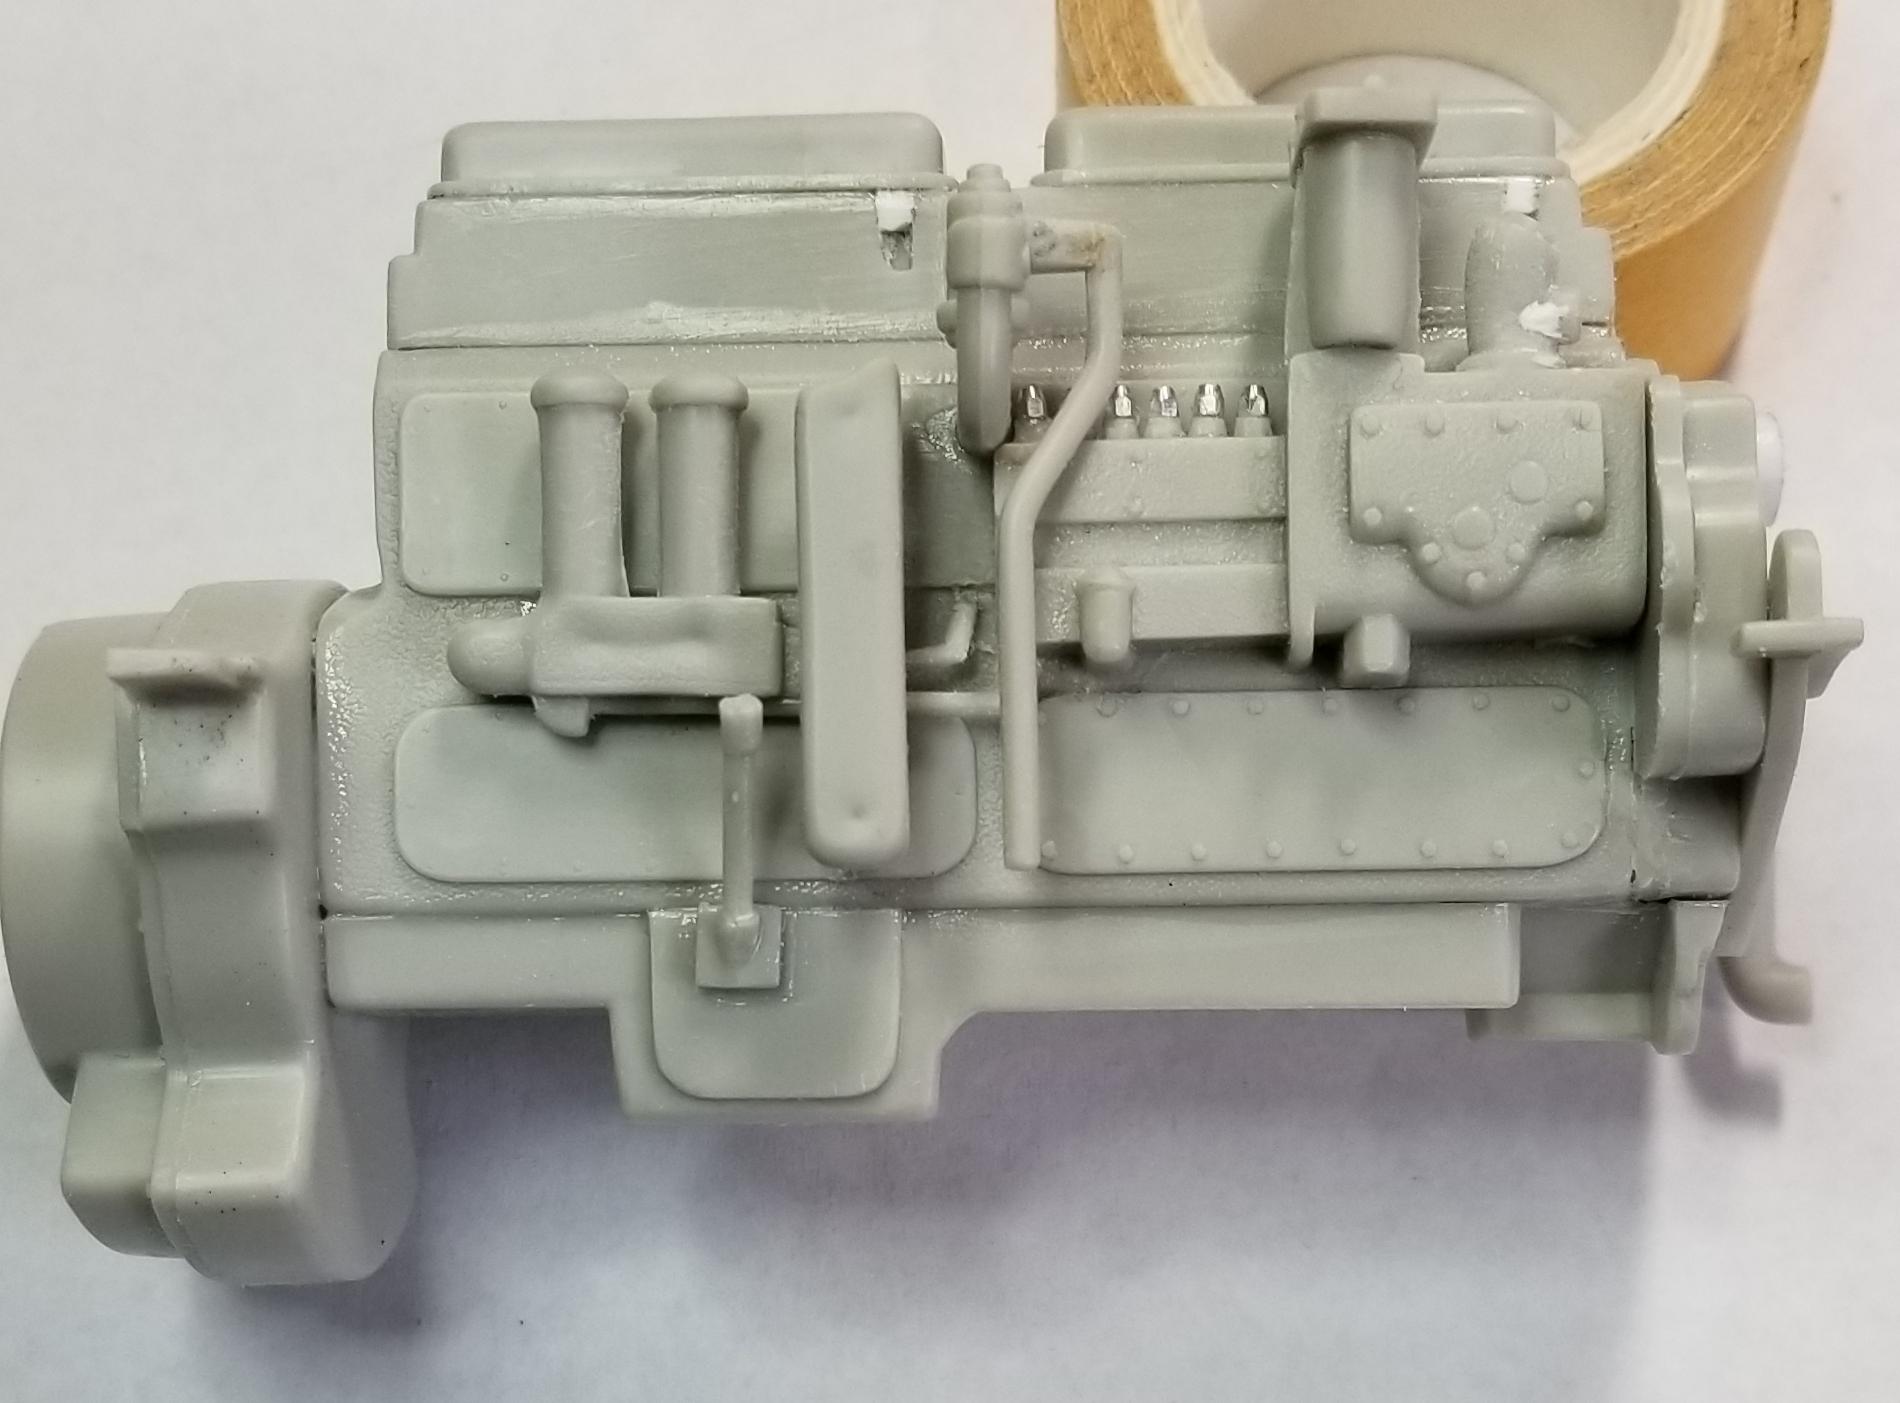
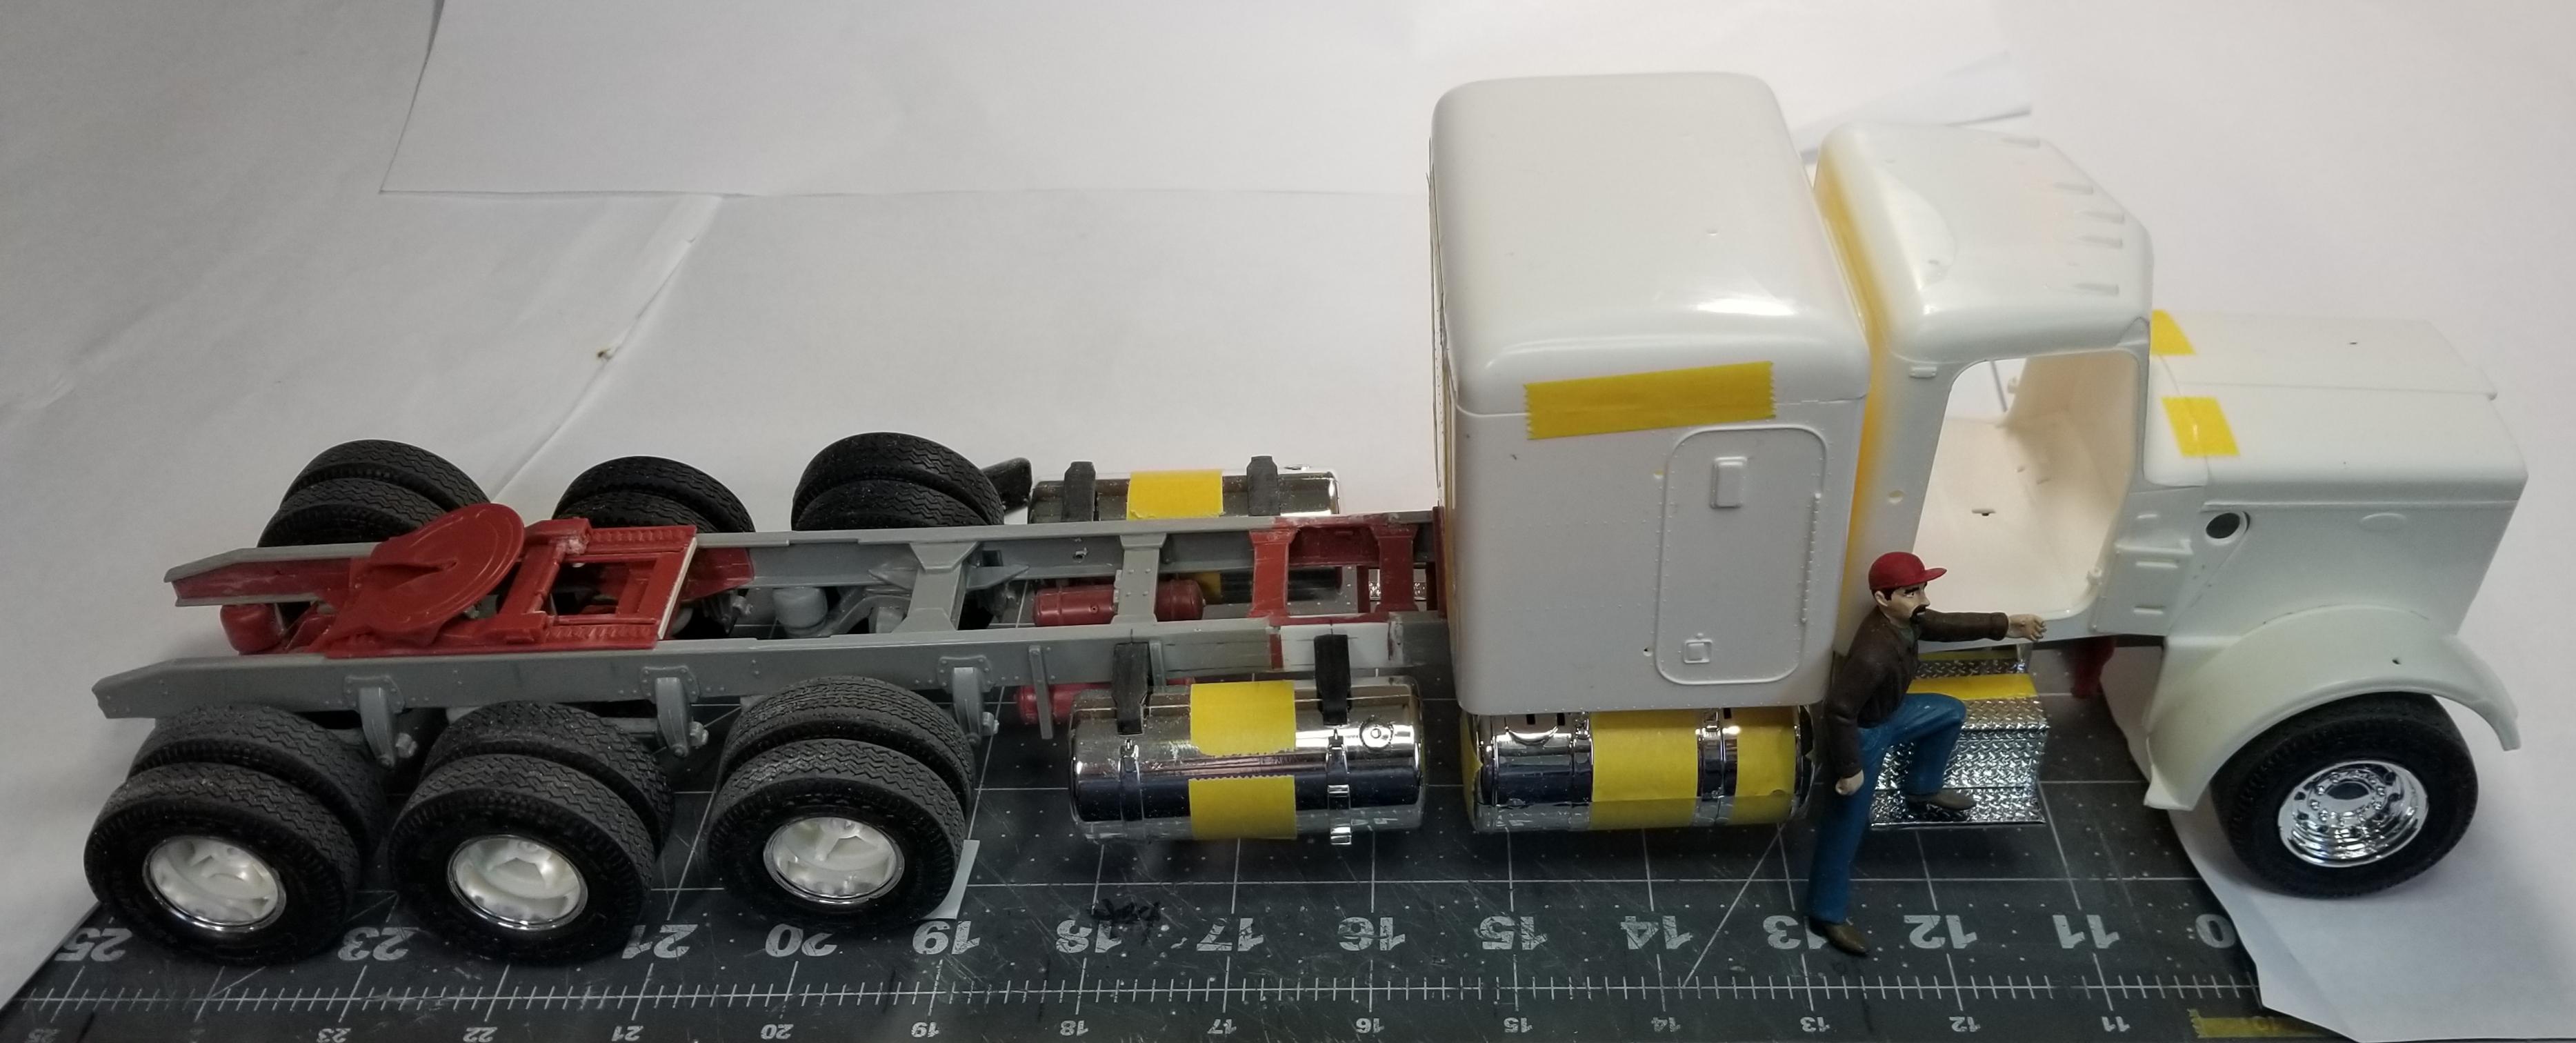
Brief update, I have the NTC-475 Cummins twin turbo engine assembled ready for paint. This Revell Cummins engine is pretty nicely detailed, but it was missing two pipes one oil one fuel, it was missing the oil dip stick and it didn't come with a stater moter!!! really Revell, big no no. Right now I'm waiting on wheels and tires from Scenes Unlimited so I can finish up how the wheels and brake drums will mount. I need to know this so I can finalize the frame so I can paint it. I need some 0.014" diameter brass rod so I can make the door hinges (I have a set of piano hinges from Model Garage). I'm debating weather I should have the sleeper top removable to display the interior detail or not, I'm still up in the air with this.
This is the NTC-475 turbo side view.
This is the fuel pump side view.
Ron G
-
Hey all
Here's what I plan on making as soon as I get the Michigan gravel train, Peterbilt 359 Heavy haul and the Loadking 3 axle 55 ton trailer done.
This is only in Cad right now, although I do have a 1/32 (actually it's more like 1/24 scale) Newray excavator. I used this and pictures and info off of the internet to model this up on UG NX11. Here are some preliminary pictures of the excavator.
this view shows the Newray excavator that I used to model up the Cat 336E on Cad.
this view shows the excavator sitting next to the cab of the Revell Peterbilt 359 cab and you can see it is way closer to 1/24-1/25 scale then it is to 1/32 scale.
this is the excavator at this moment. It needs some reworking to make it look more like the Cat 336E.
view from the rear looking forward
view of the other side
view of the cab with the operator in place.
this is a view of the 1/24 scale RC die cast Cat 336E from Diecast Masters (I ordered one of these, there around $92.99) there pretty cool and from the videos on YouTube they work real good.
another view of the Diecast Masters 336E
side view of the Cat 336E, as you can see I have alot of Cad work to do to accurize my Cad model. Thanks for looking in and follow along for more info. Since I modeled this in full scale, I can, if I can get the files organized print some of this on my 3D resin printer. Thats it for now be back with more soon.
Ron G
-
Hey all
Here is my build of the 1/25 AMT D8H Caterpillar bulldozer. I'm basically building this OOB, but I'm adding a lot of details to make it look more realistic. Things like the tilt cylinder on the left side of the dozer with it's hydraulic lines. I remade the lift cylinders and added the hydraulic lines. I added a hydraulic manifold on the tube between the two lift cylinders that all the cylinders plumb to. From this I added the lines down to the hydraulic pump. I added bolt detail to both the intake and exhaust turbos. Added oil lines from the turbos to different areas on the block. I added the fuel injectors to the cylinder head and the fuel lines from the injectors to the injector pump. I will be adding more detail as I progress on the build. I found some 3D printed tracks from Shapways. I couldn't afford to get them in the fine detail resin (almost $200.00!!!) so I got them in the regular white plastic material and that process made the tracks not very movable. Let ne explain, they were printed assembled into individual side assemblies that if printed in the better material are movable. Mine are very stiff, I'm probably going to have to drill out all the pivot pins and replace them with scratch built plastic rods. All 42 per side?. Well here are some pictures for you to .ook at
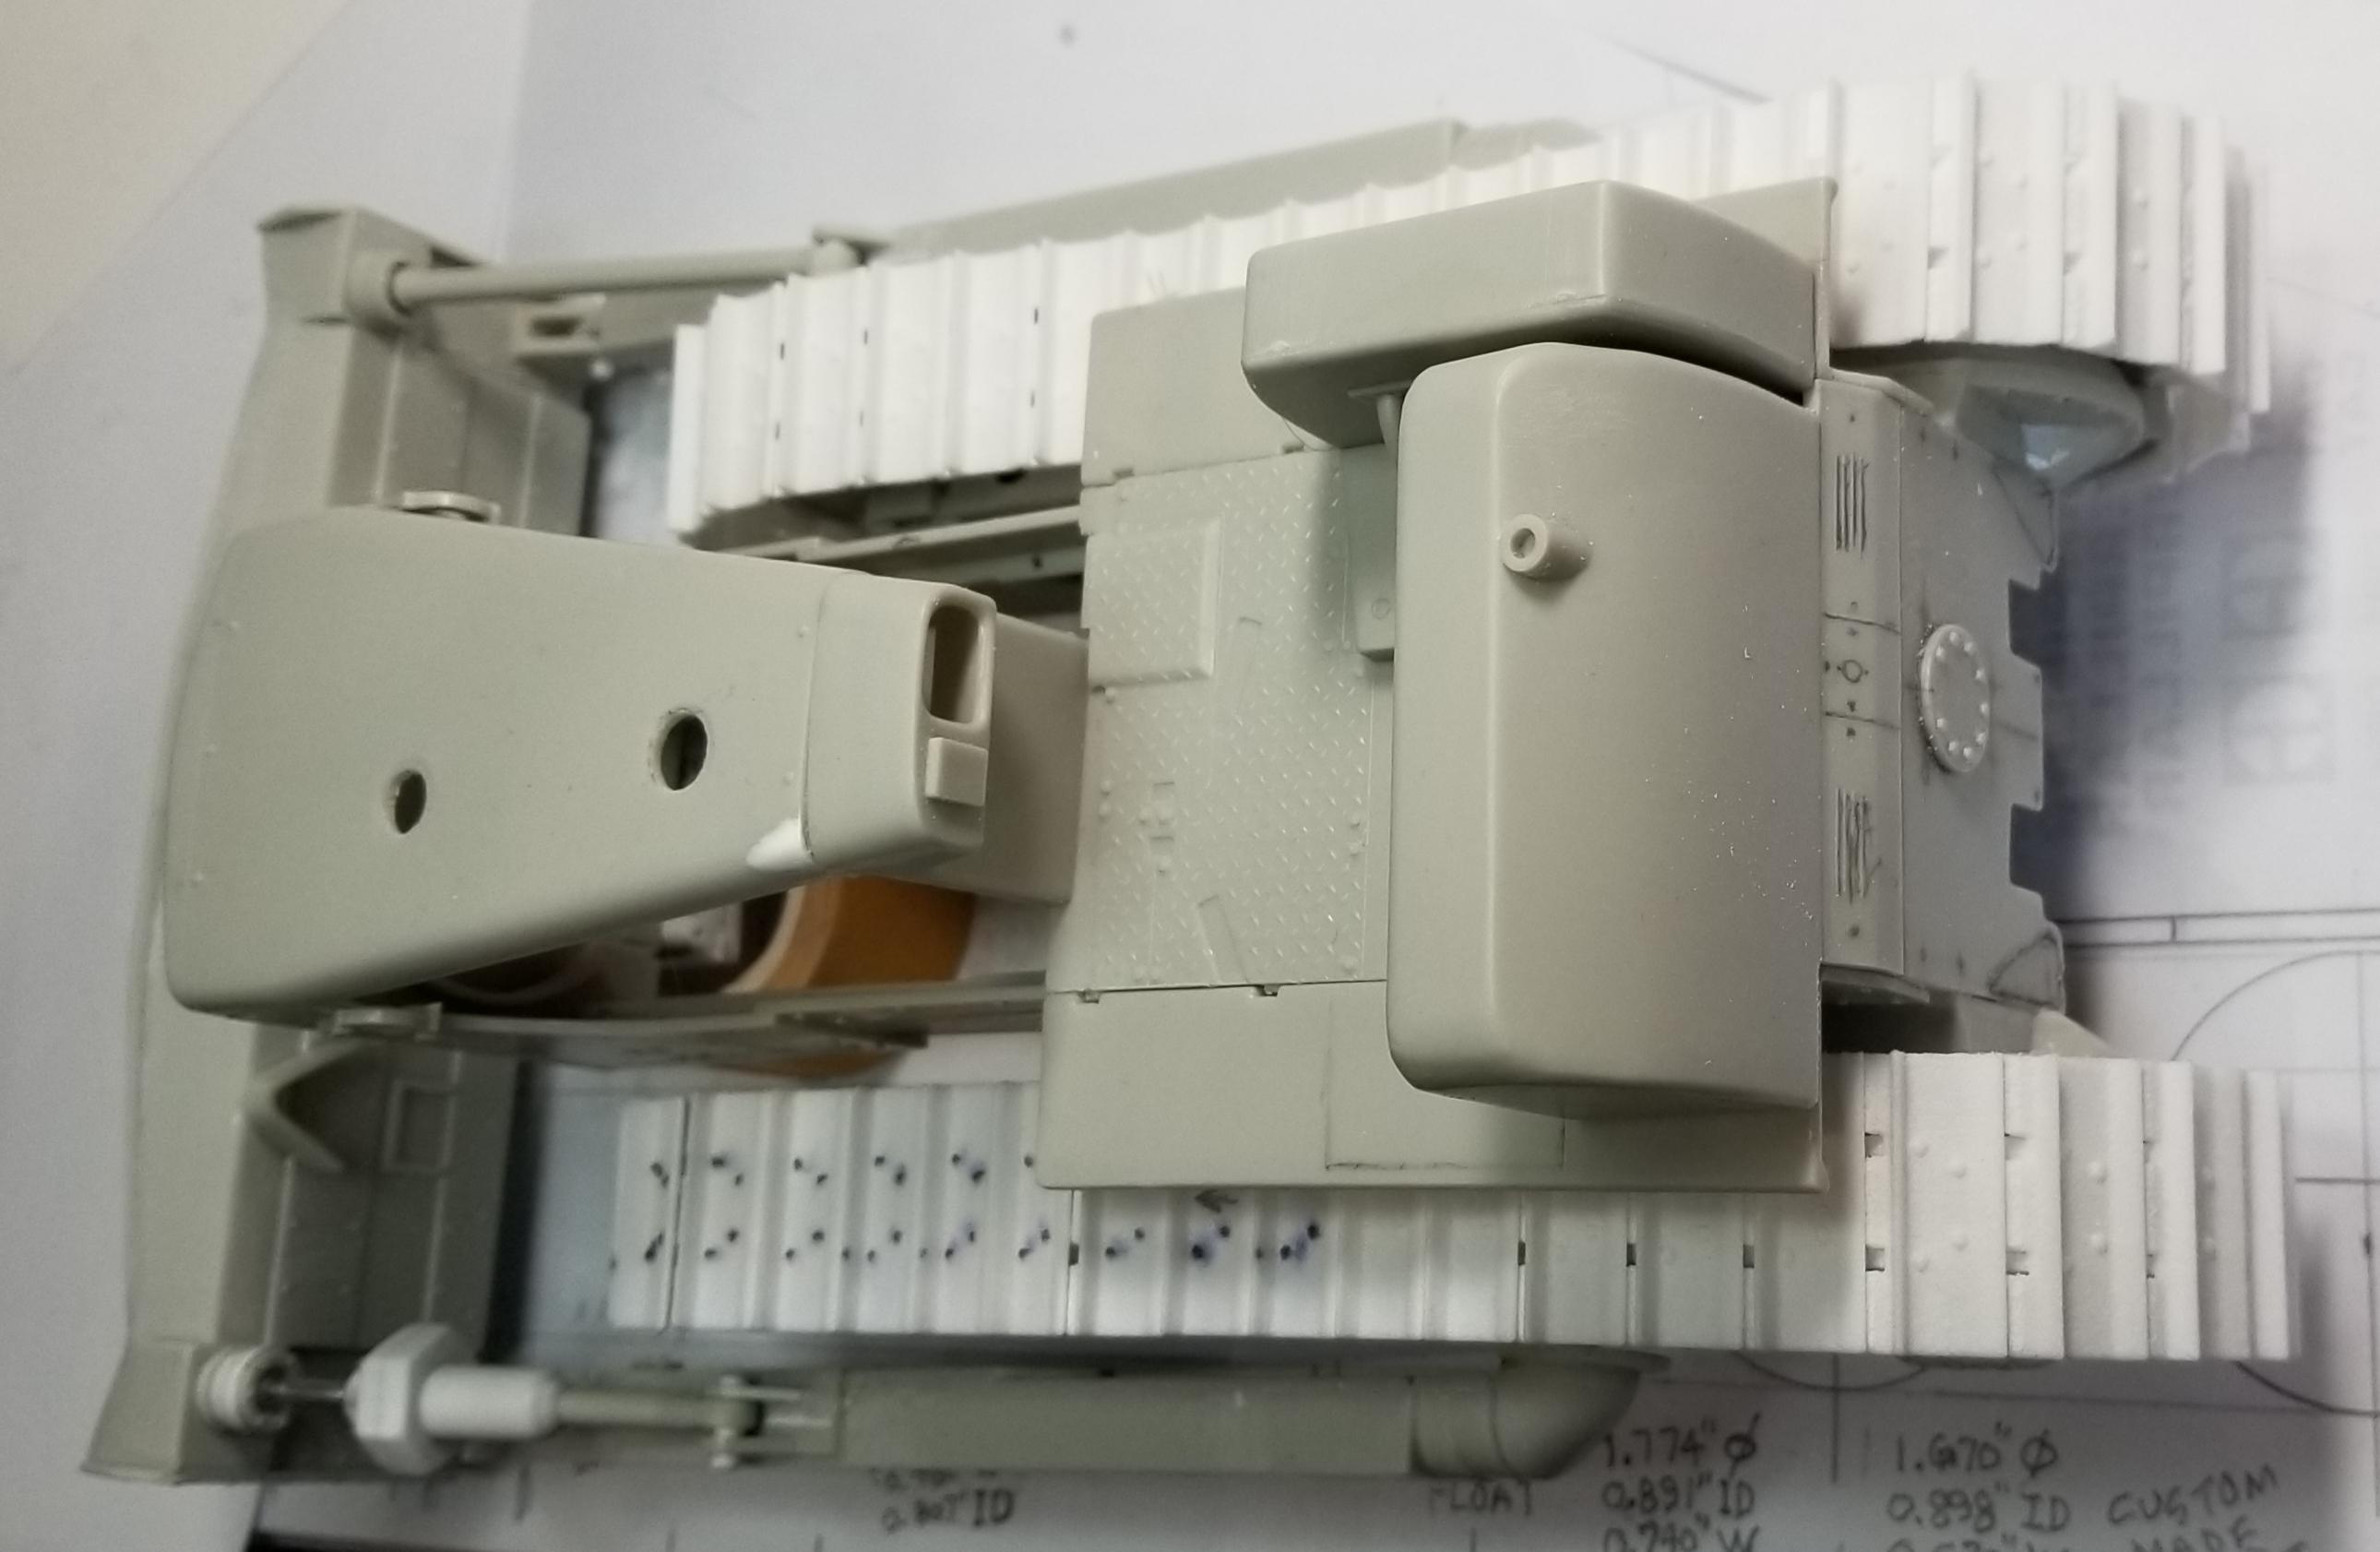
this view shows the dozer partially put together for pictures only.
view looking from the rear forward.
view from the front down.
top view.
view from the front of the blade.
this view shows the 3D printed tracks and the modifications I made to the track slides at the bottom.
I have more pictures of the engine, cylinders, and the detail I'm adding that I will post soon.
Ron G
-
Hey all
This is my 1/25 scale Loadking drop nose lowboy trailer build. I started this as a drawing on paper of a trailer that I wanted to build for the AMT D8H bulldozer that I'm in the process of making. While I was scouring the internet for pictures I came across a 3D model of a 3 axle 55 ton Loadking drop nose trailer for a free download. It has air ride suspension, flip up rear axle has all of the out riggers and "D" rings. I also came across a 4 axle 100 ton drop nose lowboy trailer 3D model that I downloaded. It has spring suspension and flip up rear axle. It only has a 14' well, no out riggers or "D" rings. I plan on modifying it into a 27' well with air ride suspension, out riggers and "D" rings. It does have a better front nose set up, it has a hydraulic mechanism for supporting the drop nose on the frame of the tractor when not hooked to the trailer, and bigger hydraulic cylinders for lifting the trailer deck. My plans are too combine features of both trailers to make both a 3 axle and a 4 axle drop nose trailer with air ride, out riggers and "D" rings. Here are some pictures of the Cad models.
this view is looking from the front aft of the 3 axle 55 ton Loadking drop nose lowboy trailer.
this view shows the rear of the trailer looking forward.
view looking down at the deck of the trailer.
this view shows the bottom of the trailer.
this view is of the 4 axle 100 ton trailer Cad model.
this is a view from the rear looking forward
this is a side view of the trailer.
this view shows the front nose and mechanism for supporting the nose on the tractor frame.
this view shows the bottom of the trailer and the spring suspension. That's it for now be back soon with more updates.
Ron G
-
Hey all
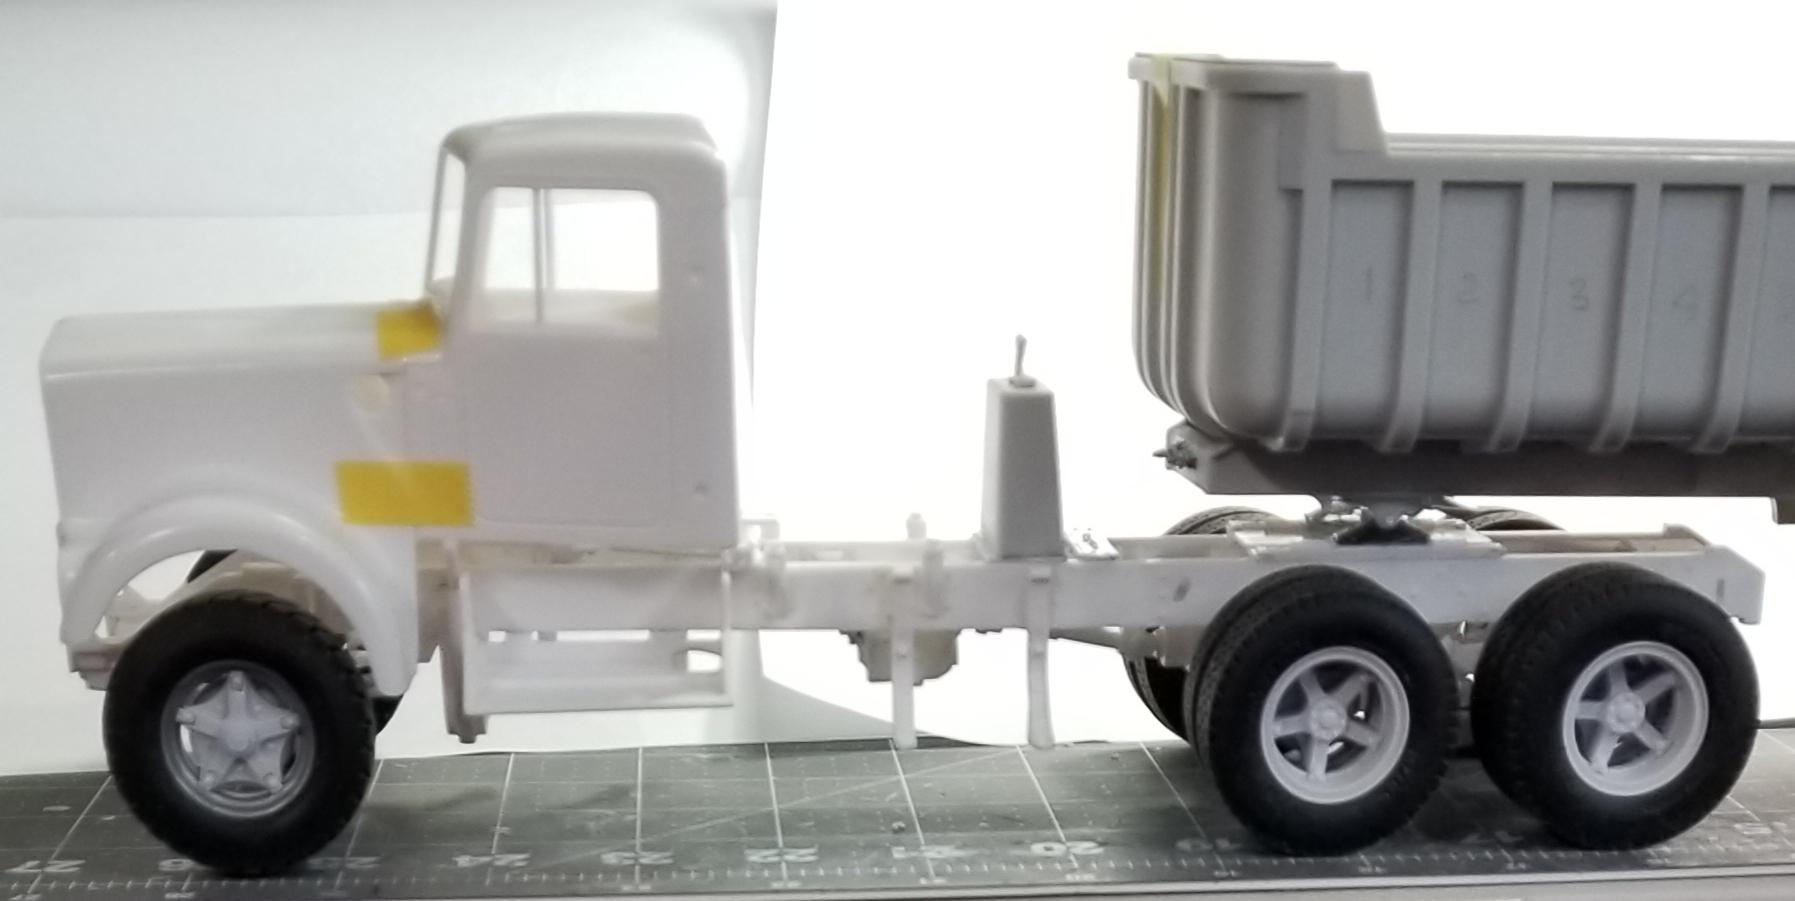
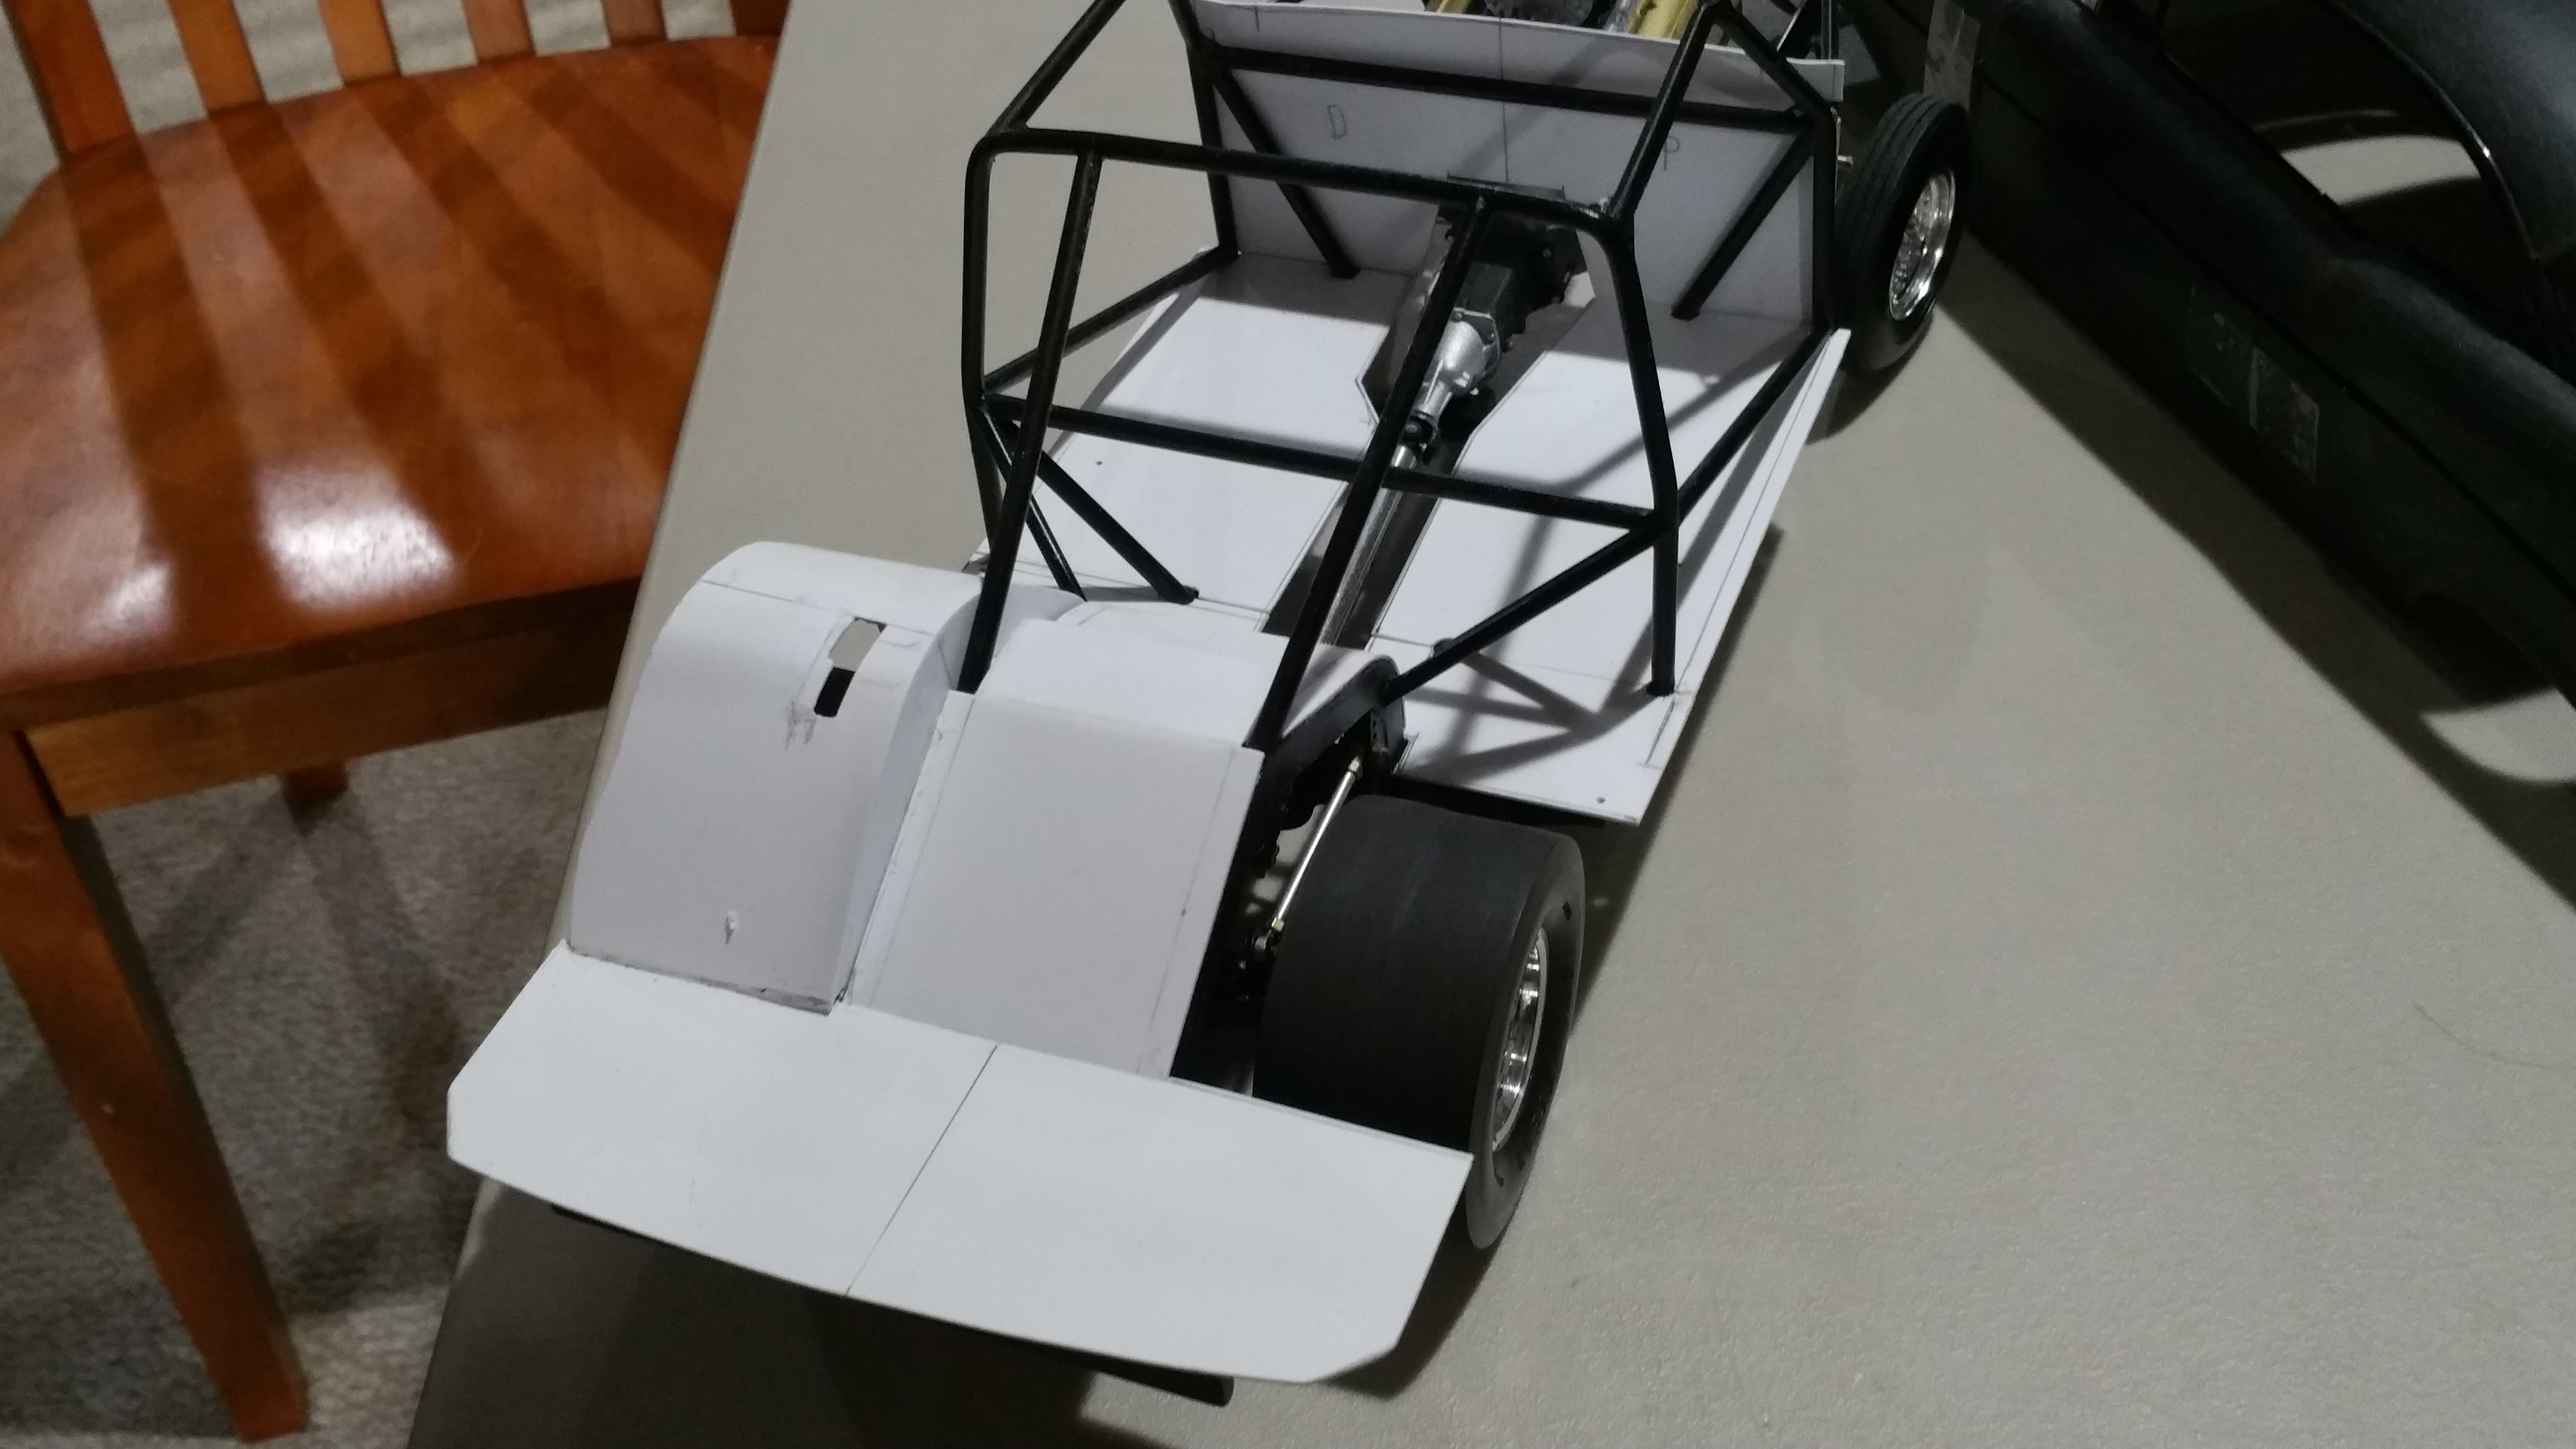
This is my Revell 1/25 Peterbilt 359 4 axle heavy haul tractor. I'm making this from the Revell "can do" wrecker kit.
I started this by assembling the frame and suspension. I also stretched the frame a scale 2 feet so that I could add two extra tanks, 4 fuel tanks in all. I also added a step in between the two tanks on the drivers side.
This rig will have Scenes Unlimited 10 hole Alco wheels, Bridgestone L375 445/65R 22.5 front floats, Bridgestone M710 285/75R 22.5 drive tires and Michelin "X" 445/50R 22.5 super singles on a lift axle.
this view shows the frame.
this view shows the frame and front steerable front axle.
this view shows the frame next to the frame of my Kenworth W925 gravel train tractor.
this view shows the whole thing just temporarily put together for pictures.
view from the other side.
another view showing the headache rack.
view from the front looking aft.
view from the rear looking forward. I have a aluminum fender kit that will cover all three rear axles.
this figure is from the 1/24 Airfix Mosquito kit. I modified him by removing his officers hat and turnig it into a baseball cap. I also turned his shoes into cowboy boots.
another view of the driver figure for this big Pete.
this view shows the Pete heavy haul that I modeled up in NX 11 (Unigraphics).
this view is from the aft looking forward.
this view shows the rear of the rig
this is a side view of the 4 axle Peterbilt 359. I also have a 3 axle 24' well Loadking drop nose trailer with flip up rear axle, a 4 axle drop nose trailer with flip up rear axle, a Caterpillar 336E excavator and I'm working on a Cat D8H/K and D8T bulldozer. These are modeled up in NX11 and I my be able to 3D print parts of them on my 3D resin printer. Since I modeled them full size I should be able to print them to any scale. Well that's it for now be back with more updates soon.
Ron G
-
Hey ReduitRetro
Sweet build! Hey you should turn that Cummins into a NTC-475 twin turbo! A lot of Petes ran those back in the day, and you can get them to put out 800 hp!
they sure look wicked!
Ron G
-
Hey MD
The tubs will be aluminum and the chassis will be black.
Ron G
-
Hey Mopar D
I'm thinking along these lines. Orange and Black (my birthday colors)
Ron G
-
Hey all
Well lets get started with some pictures.
this will be the tractor for the gravel train. It will have Hayes 5 spoke 24.5 wheels & Bridgestone tires from Scenes Unlimited. I added a hydraulic tank just behind the sleeper for running the dump cylinders on the dump trailers.
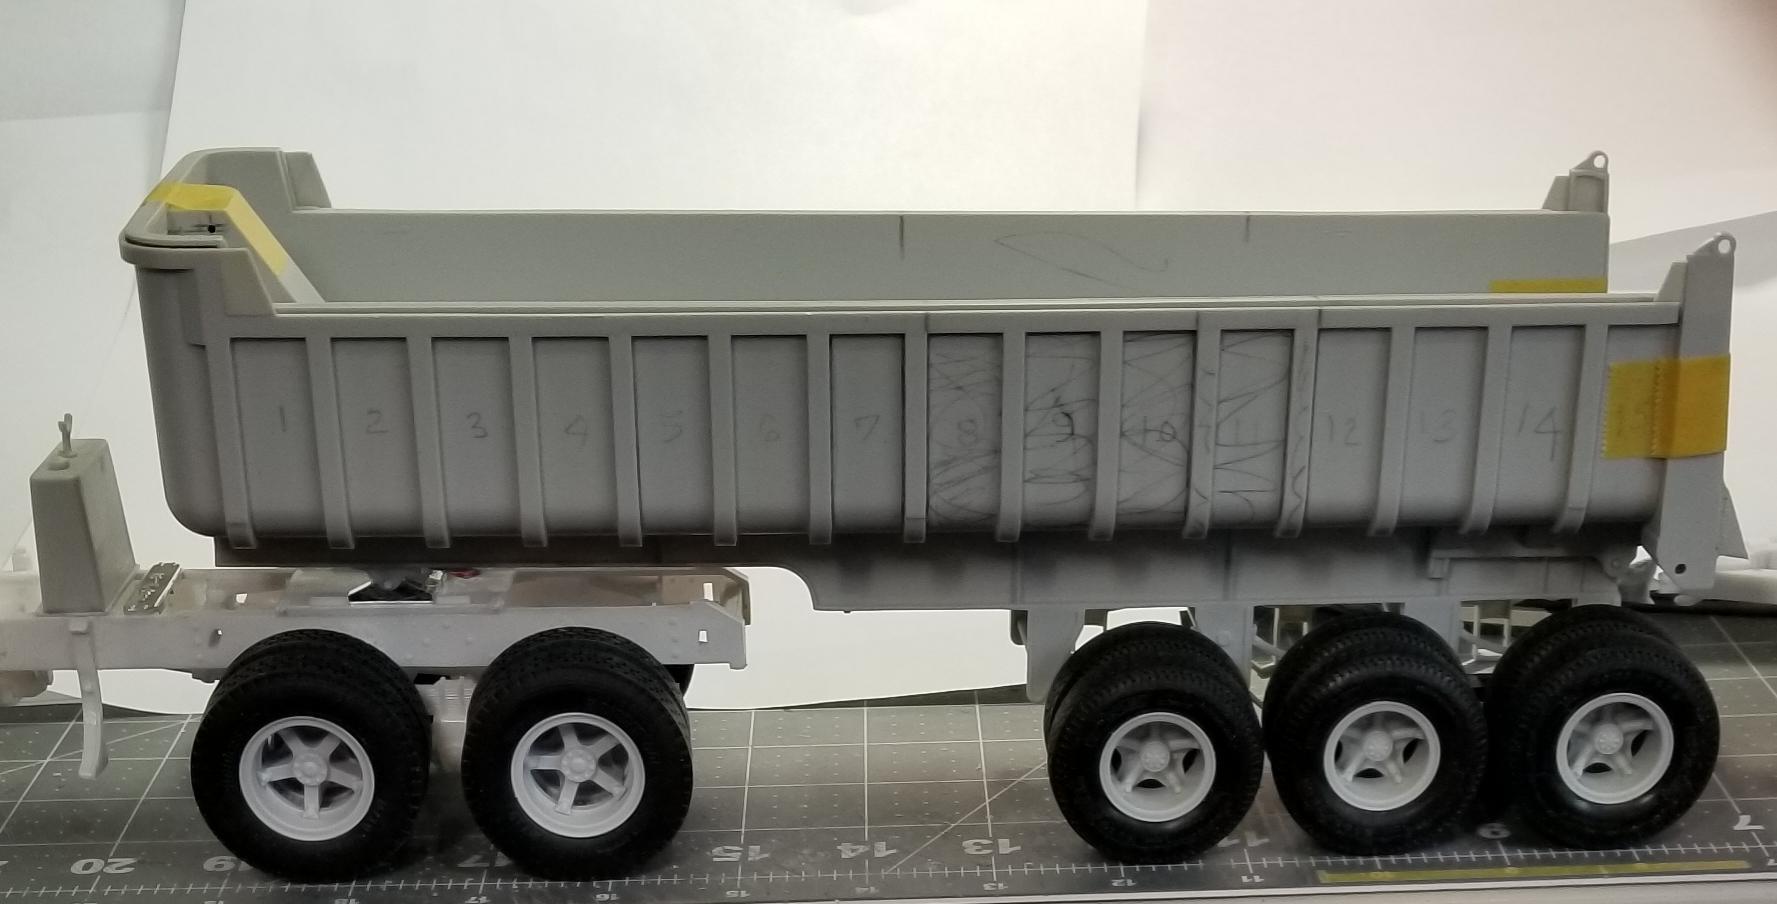
this view shows the trailer kits I will be using.The front trailer is 24' long (OOB) the rear trailer will be modified to 18' long from the stock kit one by cutting out a scale 6' section.
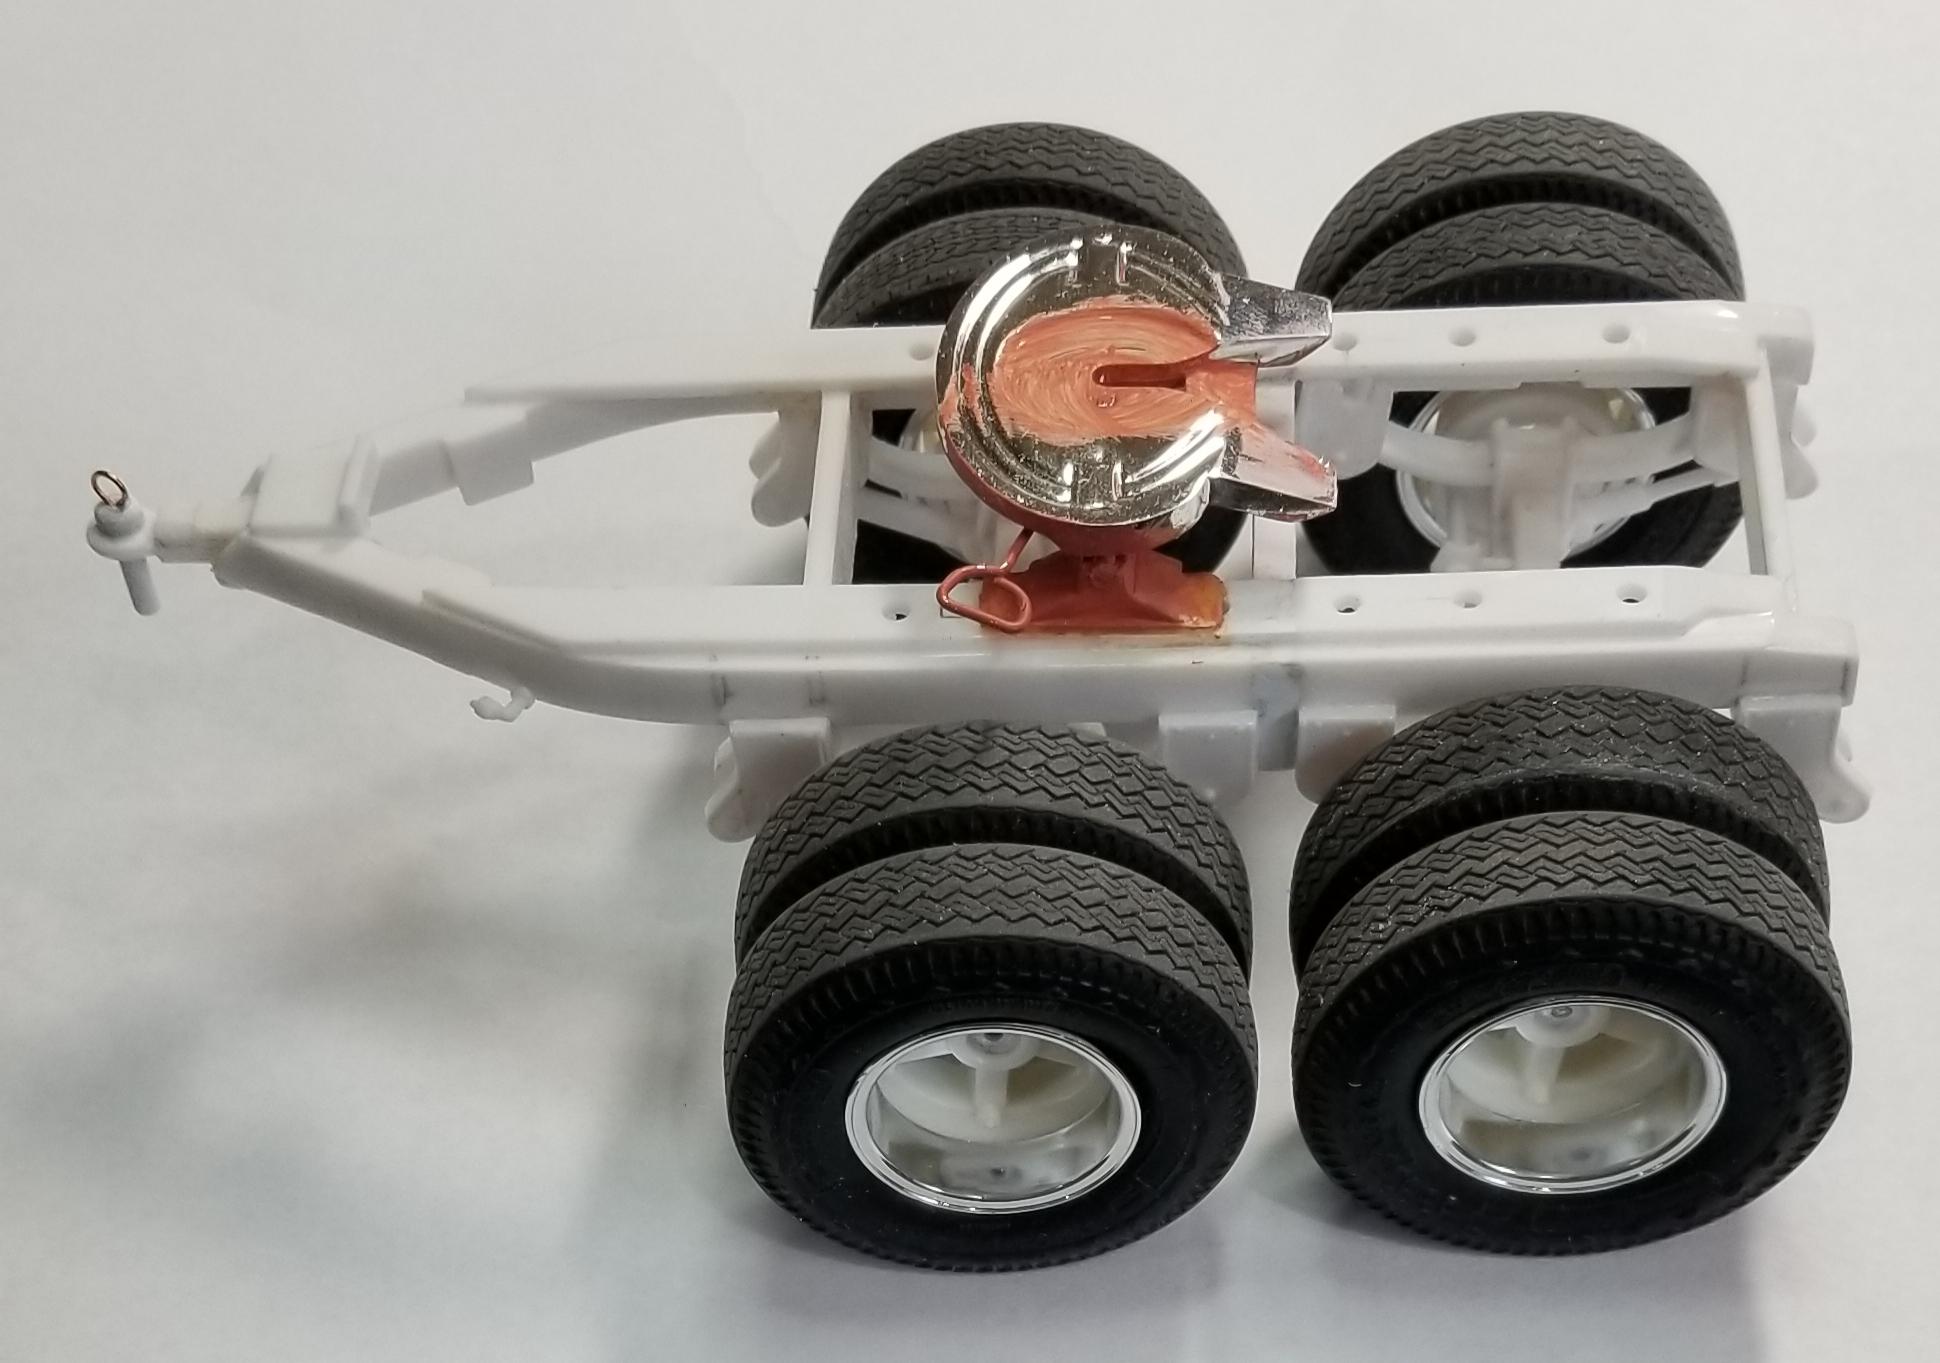
this kit is for parts. I used the dolly parts from this kit to make a tandem dolly. The wheels are a little different then the ones in the gravel trailer kit, but there pretty close.
So far I have the frame for the tractor assembled, ready for paint. I started on the front dump trailer, and I have the frame assembled for it. I started on remaking the hydraulic cylinder for it, but it came out to big in diameter, I used plastic tube and should have used aluminum tubing instead. So I ordered some Aluminum tubing and I'm remaking the cylinders right now.
I have the tandem dolly scratched up and ready for paint. So here are some more pictures for you all.
this view shows the tractor.
this view shows the front dump trailer.
this view shows the scratch built tandem dolly.
this view shows the Bridgestone L375 445/65R 24.5 front floats. I reworked the front Scenes Unlimited Hayes 5 poke wheels into float wheels with some bits from my spares box.2
this view shows the front dump trailers wheels/tires
this view shows the dolly's wheels/tires.
this view shows the air, electrical and hydraulic connections.
this view shows the glad hands (aftermarket) tge electric connector made from scratch and tge hydraulic connector made from scratch.
closer view of the connectors. Well tgats ut for now be back soon with more updates.
Ron G
-
Hey all
I'm new here as you can all imagine. I'm 69 going on ancient...lol. I've been modeling off and on since I was 7 years old. I hVe a few projects going on at the moment. First one is I'm reworking the Revell 1/25 " Can do " wrecker into a 4 axle stretched heavy haul tractor. Second one is I'm building from scratch and 3D printed parts a 1/25 scale 48' Loadking drop nose lowboy trailer. Third is I'm doing the 1/25 scale AMT D8H bulldozer with a lot of extra details that will be the load for the trailer. And fourth I'm making a "Michigan gravel train" from the 1/25 AMT Kenworth W925, two AMT 1/25 gravel trailers and the dolly from the AMT 1/25 double trailer kit.
I plan to do some build threads on all of these, as long as I don't have trouble posting pictures from my phone.
Ron G
-
Hey Jrb53
She already knows how to drive, she can't anymore cause of a bum right arm, and she ain't that light...lol
RonG
-
Thanks Dave, it is defiantly alot of fun. Now if I can just turn off the volume on the wife it would be perfect.
-
Thanks all
I haven't been working on it for the last week. Been messing with this
2017 Challenger 392 T/A in Gomango orange. Got tired of climbing in and out of my lifted jeep jk wrangler.getin to old for that but not for this...IT'S F'N ASSUME!!! It's got 485hp/475lbs-ft cold air intake and does the Quarter mile in the low 12's.

-
Hey all
Here's some more pics to look at. I starting on the interior panels these are just temporary for fitment purposes only.
So look em over and let me know what you think.Thanks RonG
-
Hey Xx Rusty Xx
What quadruple turbo? The motor I'm using has 2 turbos not 4. With the right combination you could theroiticly make in the neighborhood of 2500 hp.
RonG
-
Thanks geetee66
I'm still trying to improve on how the door opens and closes, It's not quite there yet, plus I still have to replicate it for the other side then I can get on to the interior.
Thanks RonG
-
Hey all
Here's some more pictures to look at.
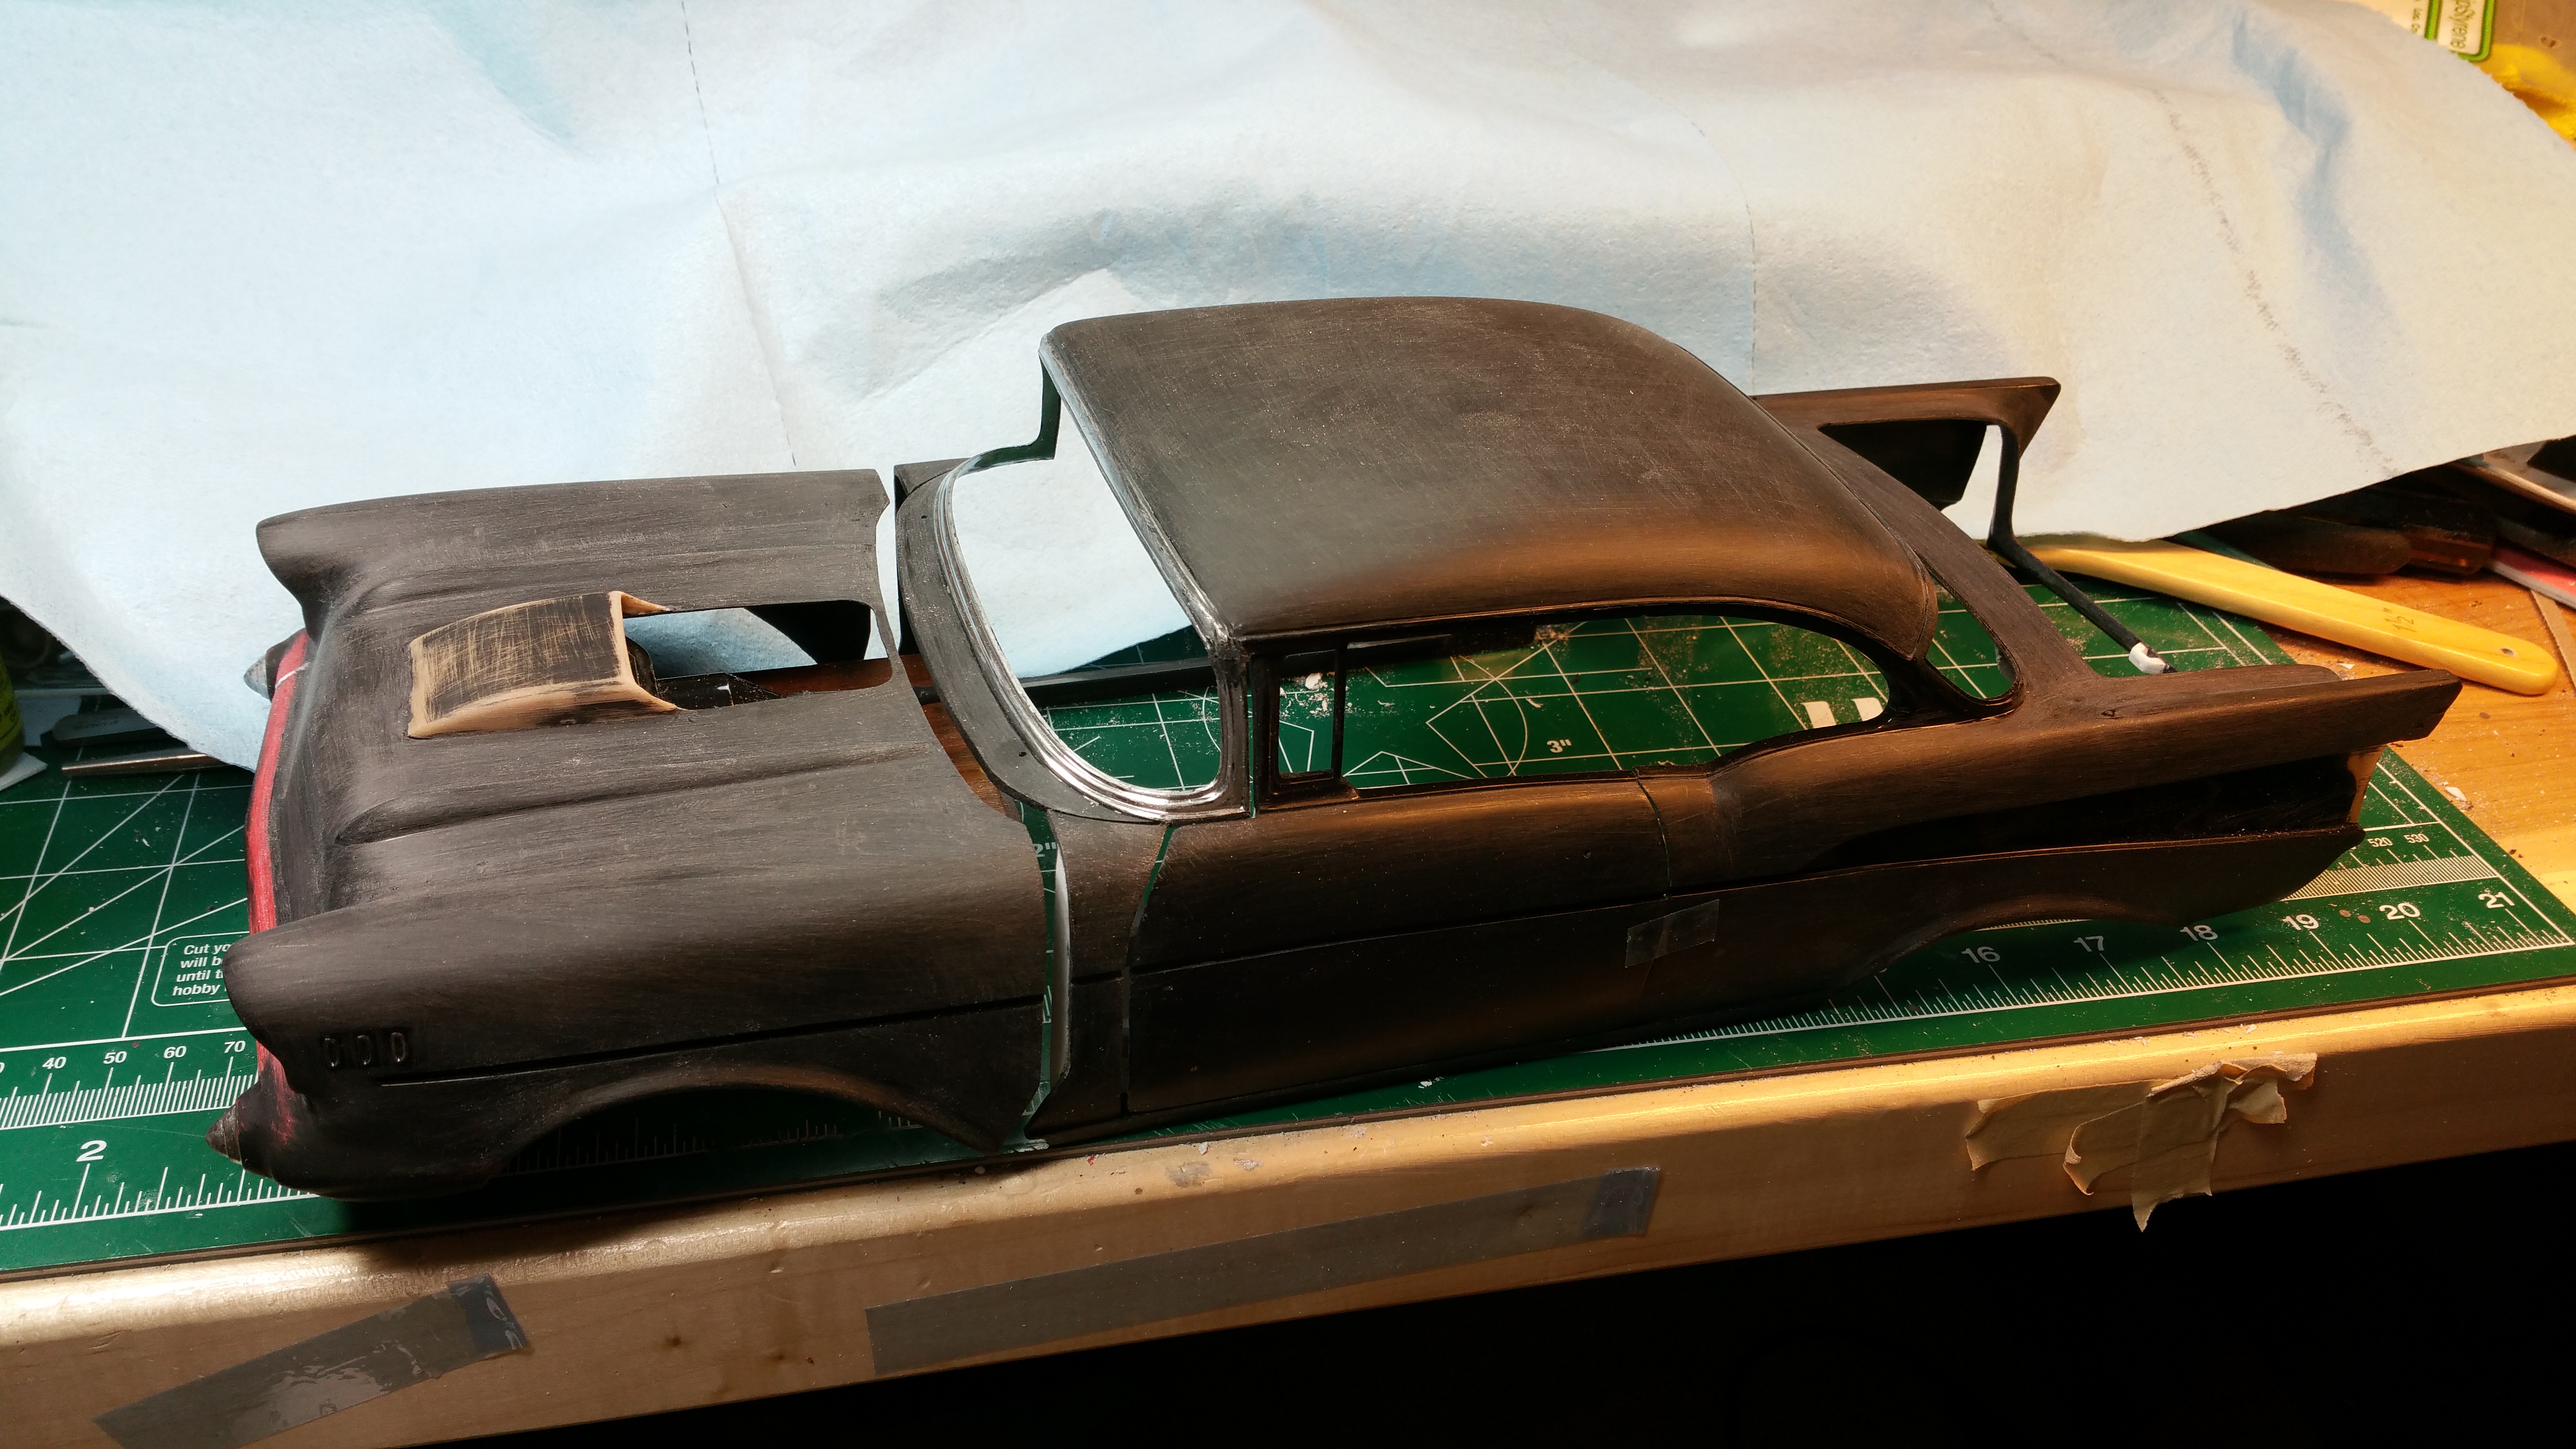
This view shows that I finally cut the body for the tilt front end.Another view showing the tilt front end.This view shows the opening front door.View from the inside of the front door.View of the front door hinges.View looking through the passenger door aND roll cage.View of the trunk lid.View showing the trunk lid open aND the hinges.View from the bottom showing the hinges and latche.View of the underside of the trunk lid.Another view of the trunk lid from a different angle. So look em over and let me know what you think.Thanks RonG
-
Thanks afx and DumpyDan
It's slowly getting their one nut and bolt at a time...lol. Here are some more pictures to look at.
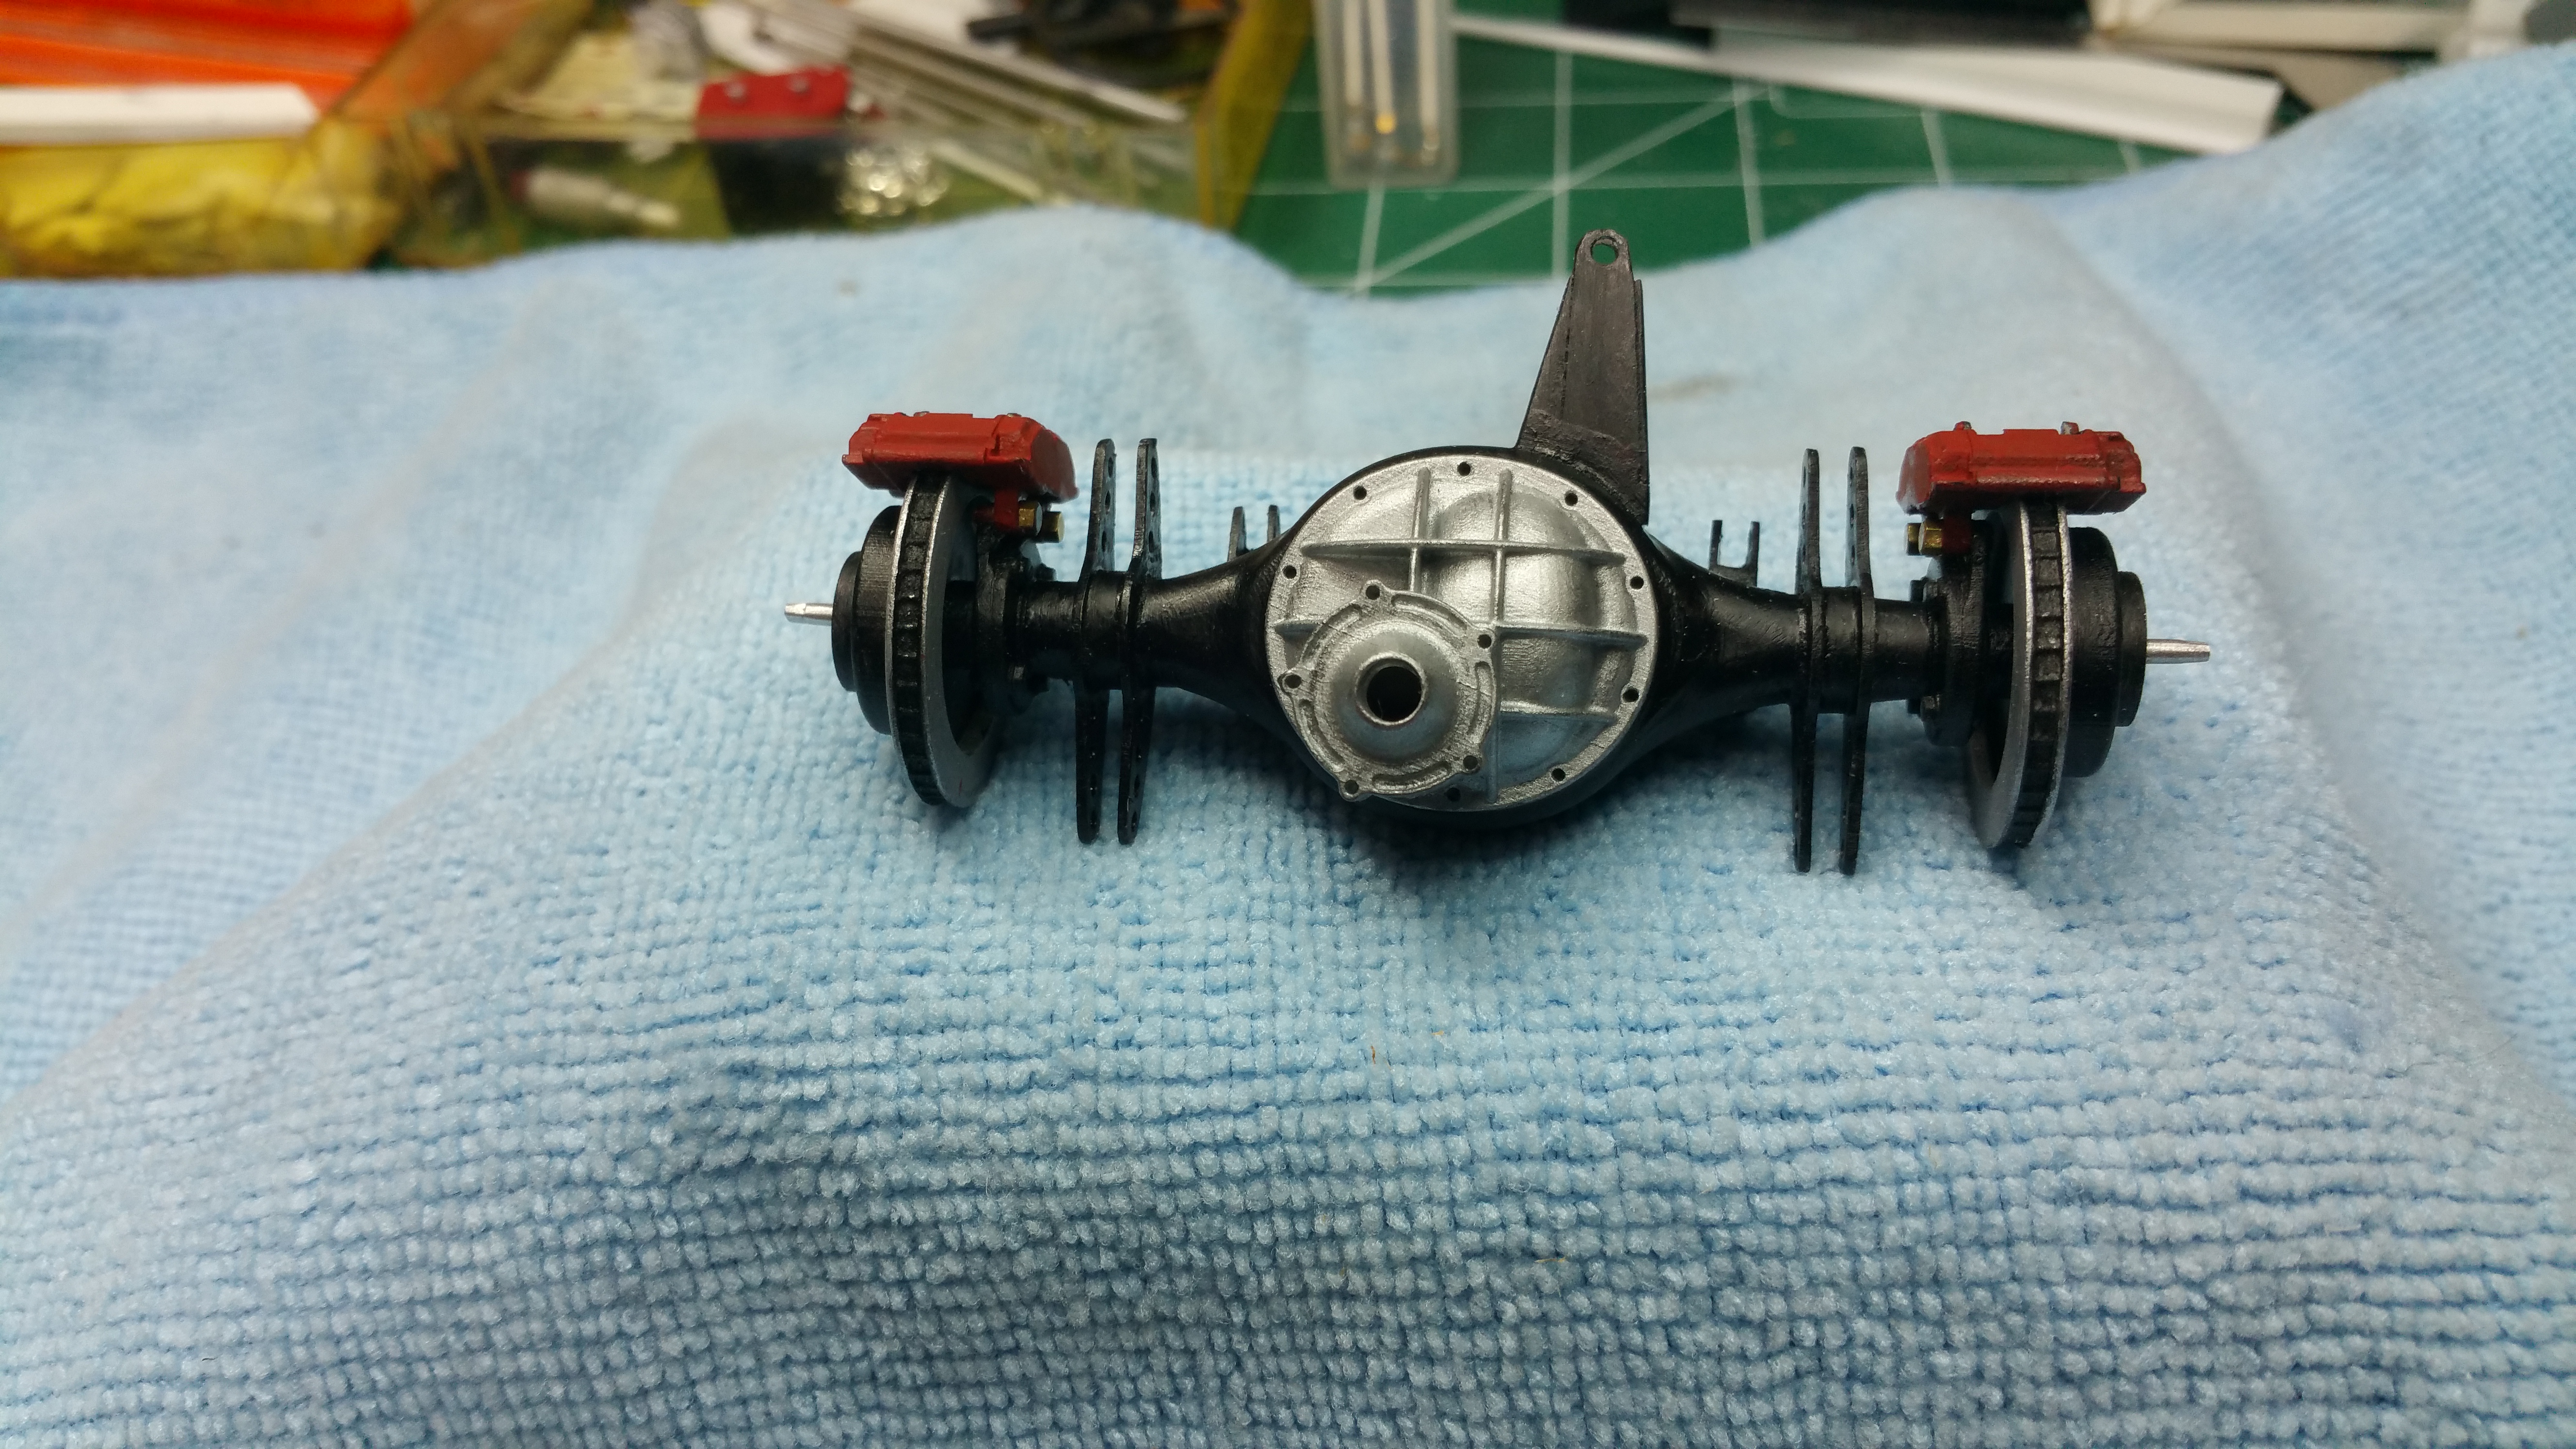
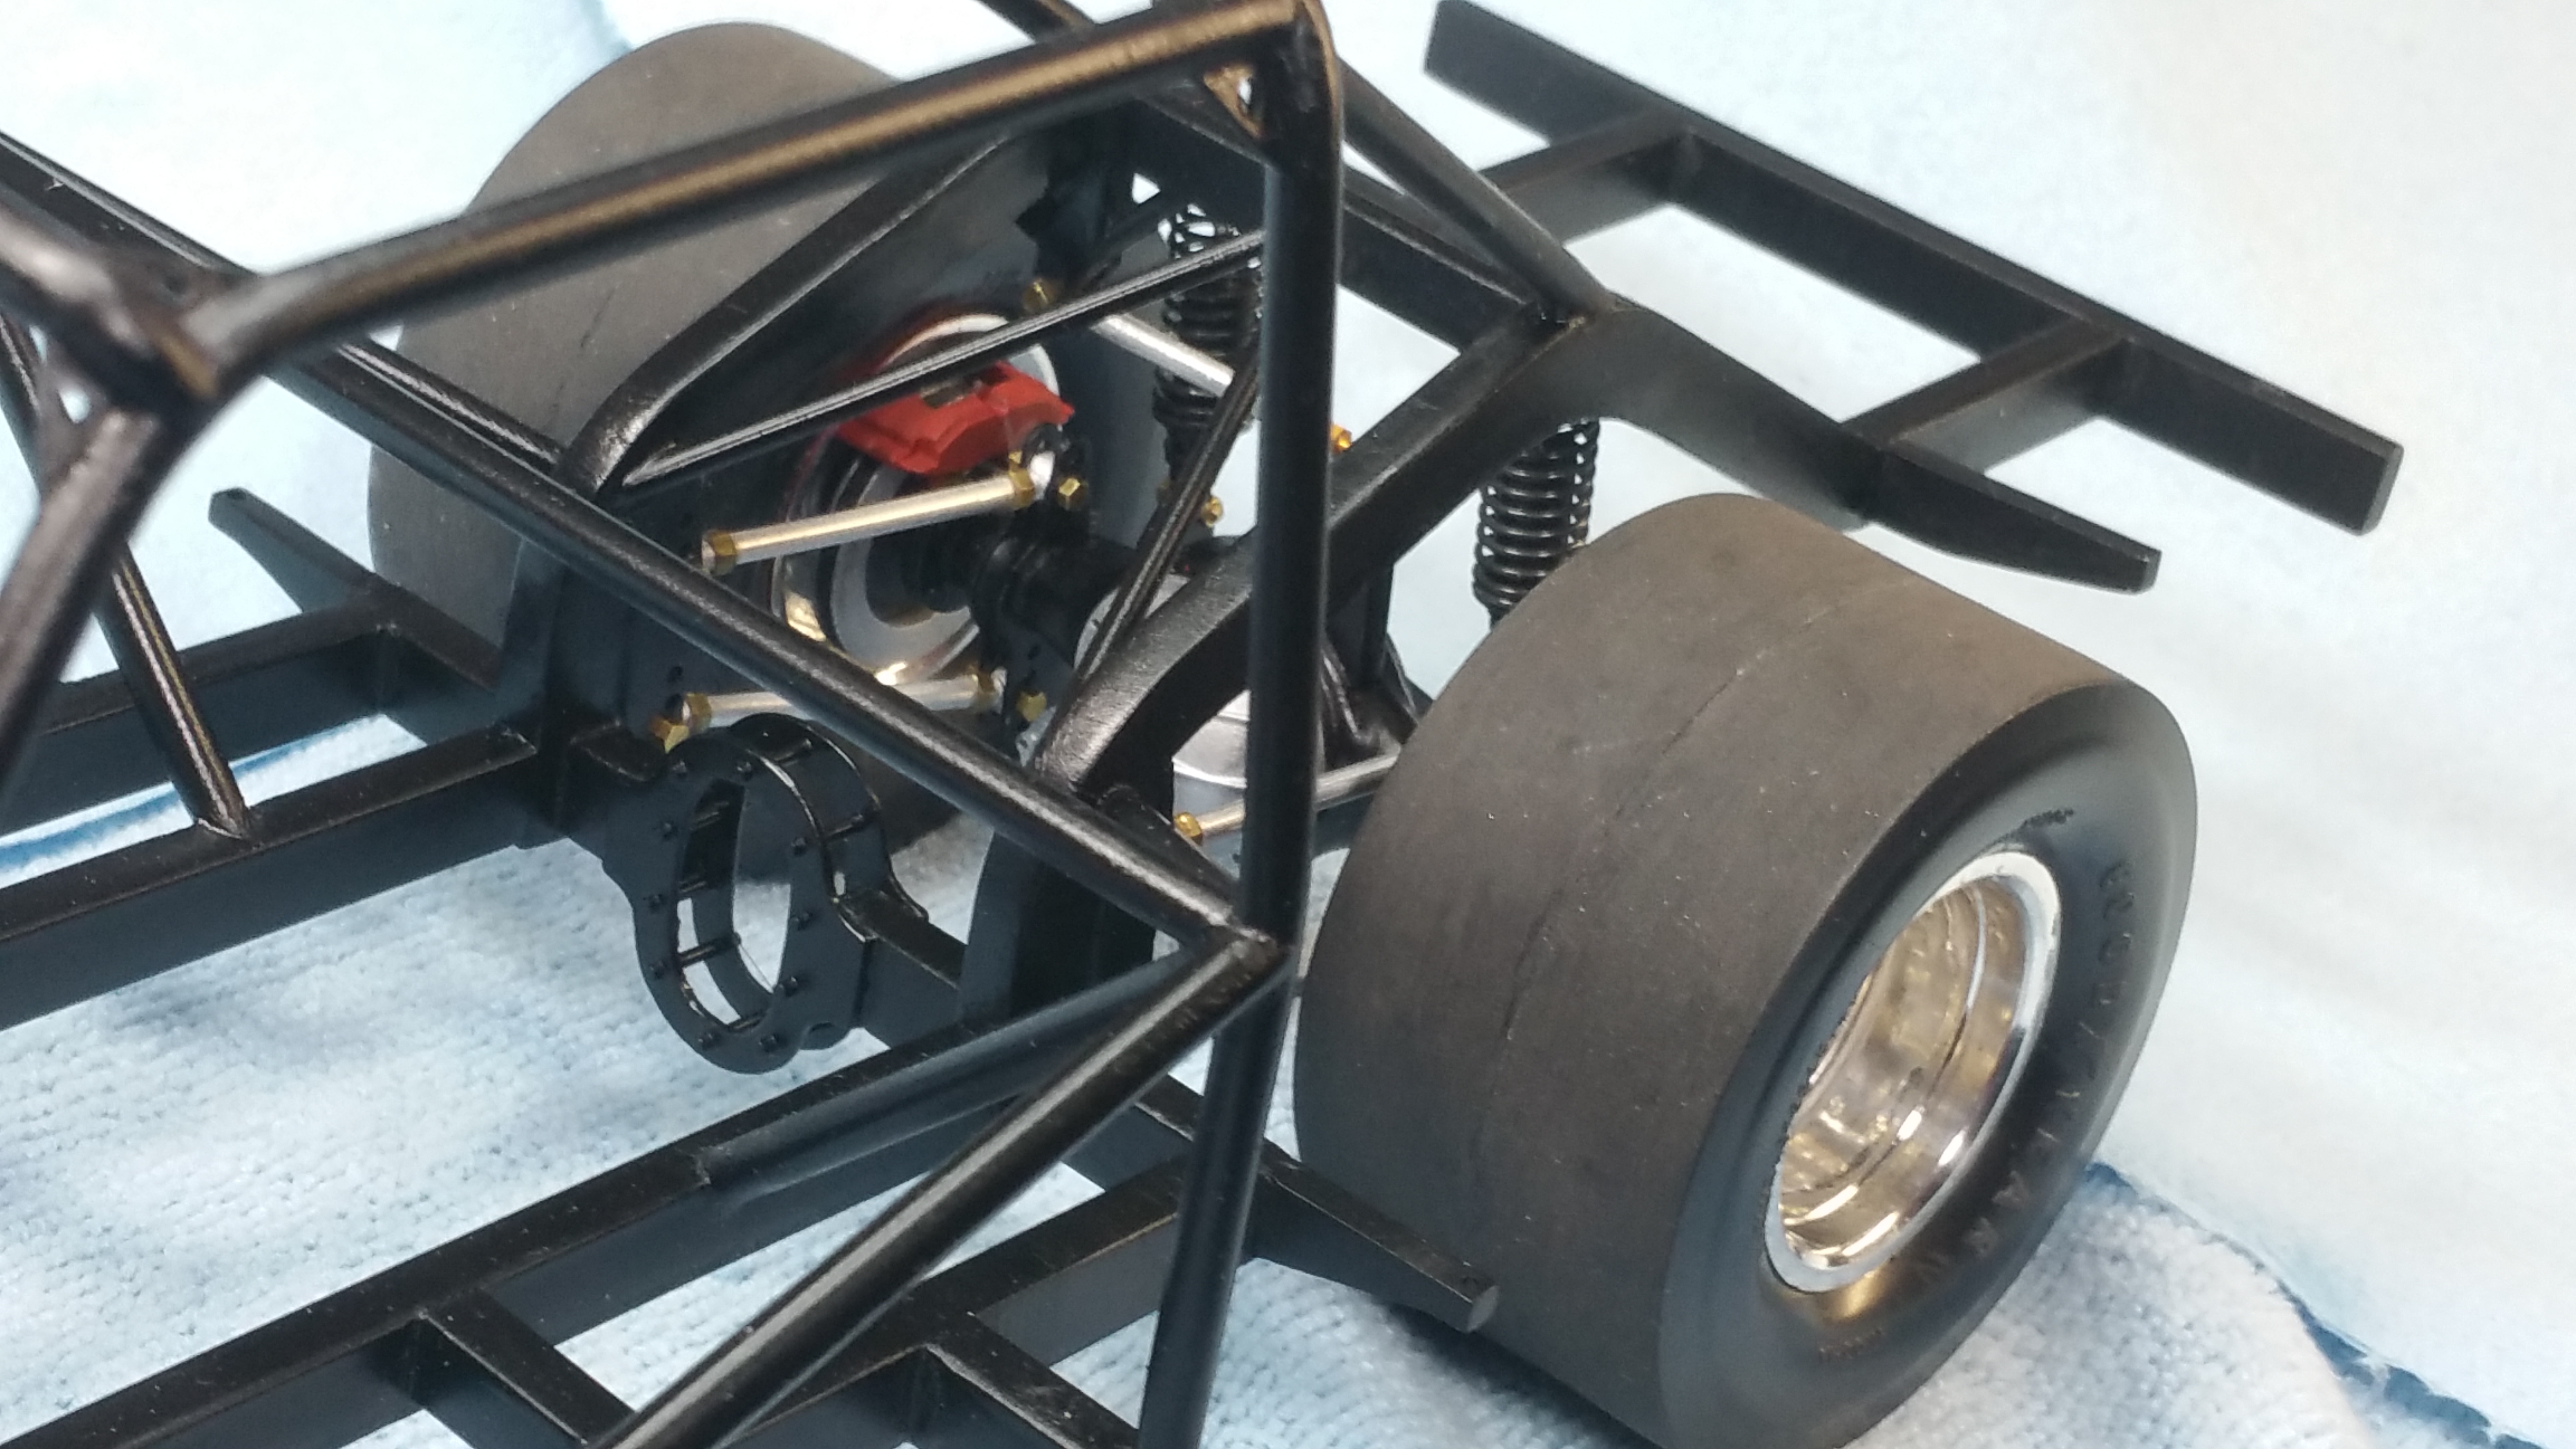
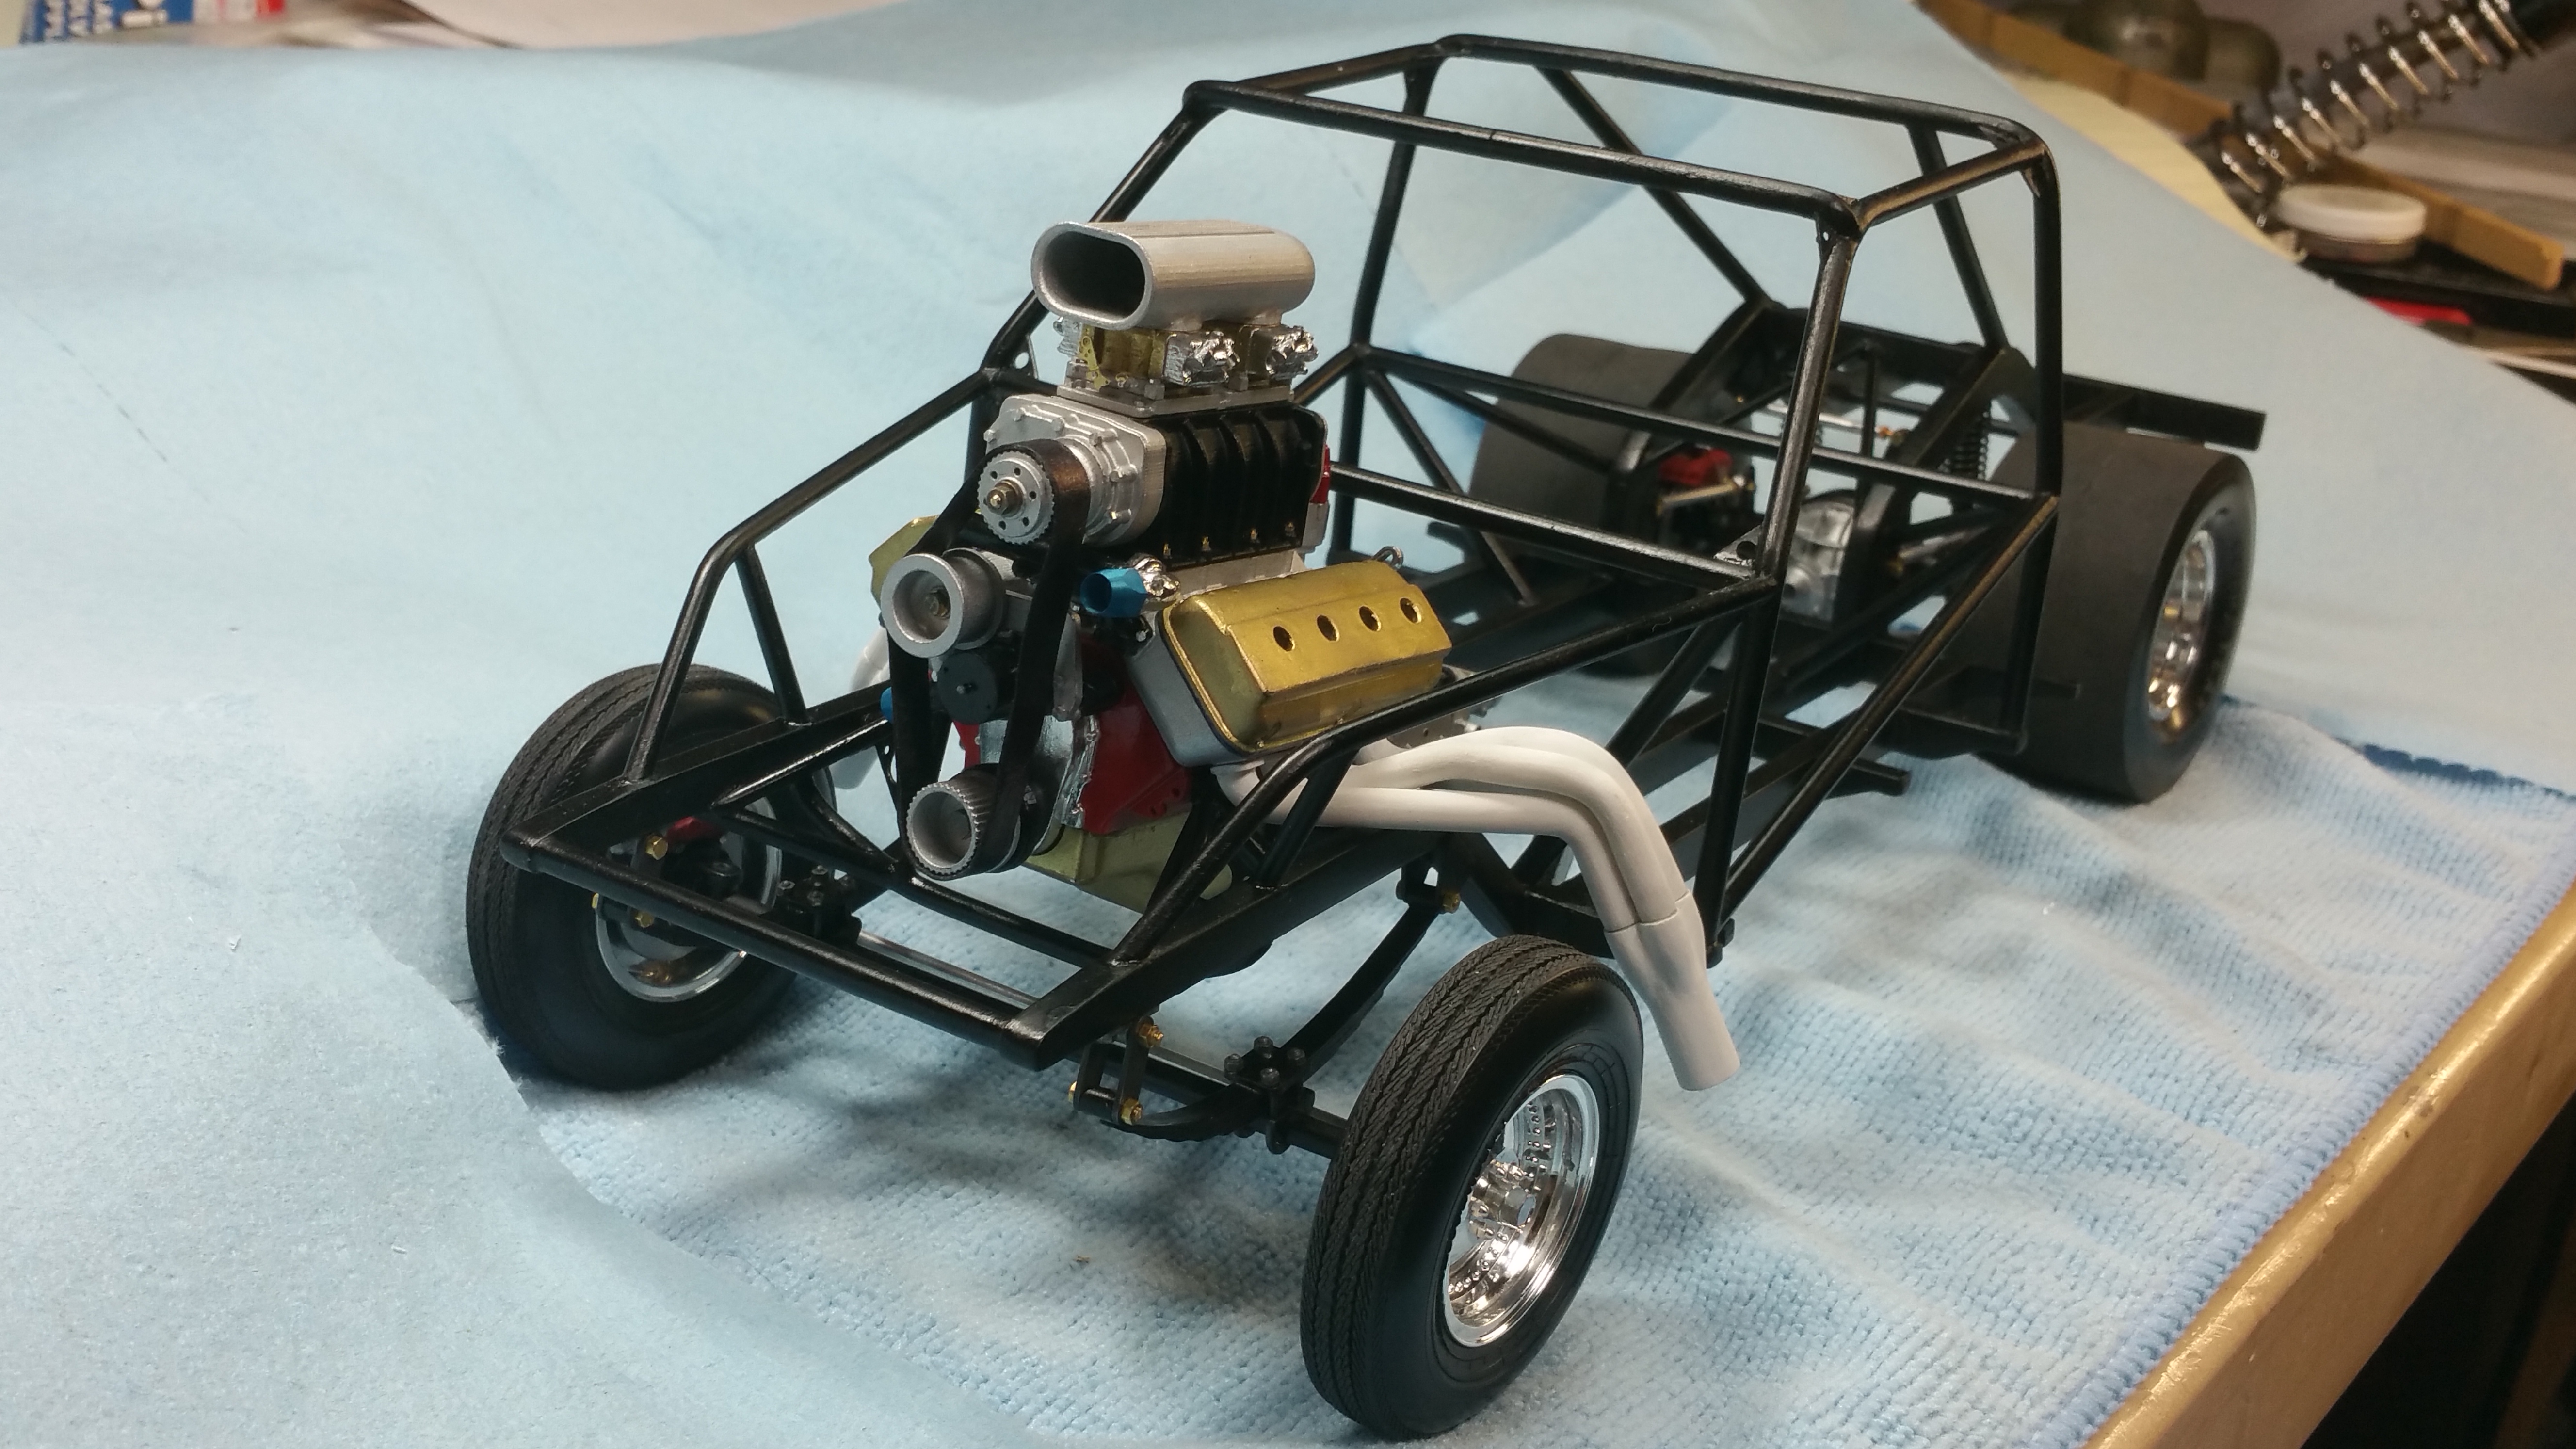
View of the front axle assembly.View of the drive shaft.View of the rear end assembly, still have to add the bolts to this.This view shows the whole thing kind of temporarily put together.View of the front end and engine.View of the rear end.Another view of the engine.View with the body on.Another view of the front of the body.View looking in through the drivers door.Last view from the front showing the engine. So look em over and let me know what you think.Thanks RonG
-
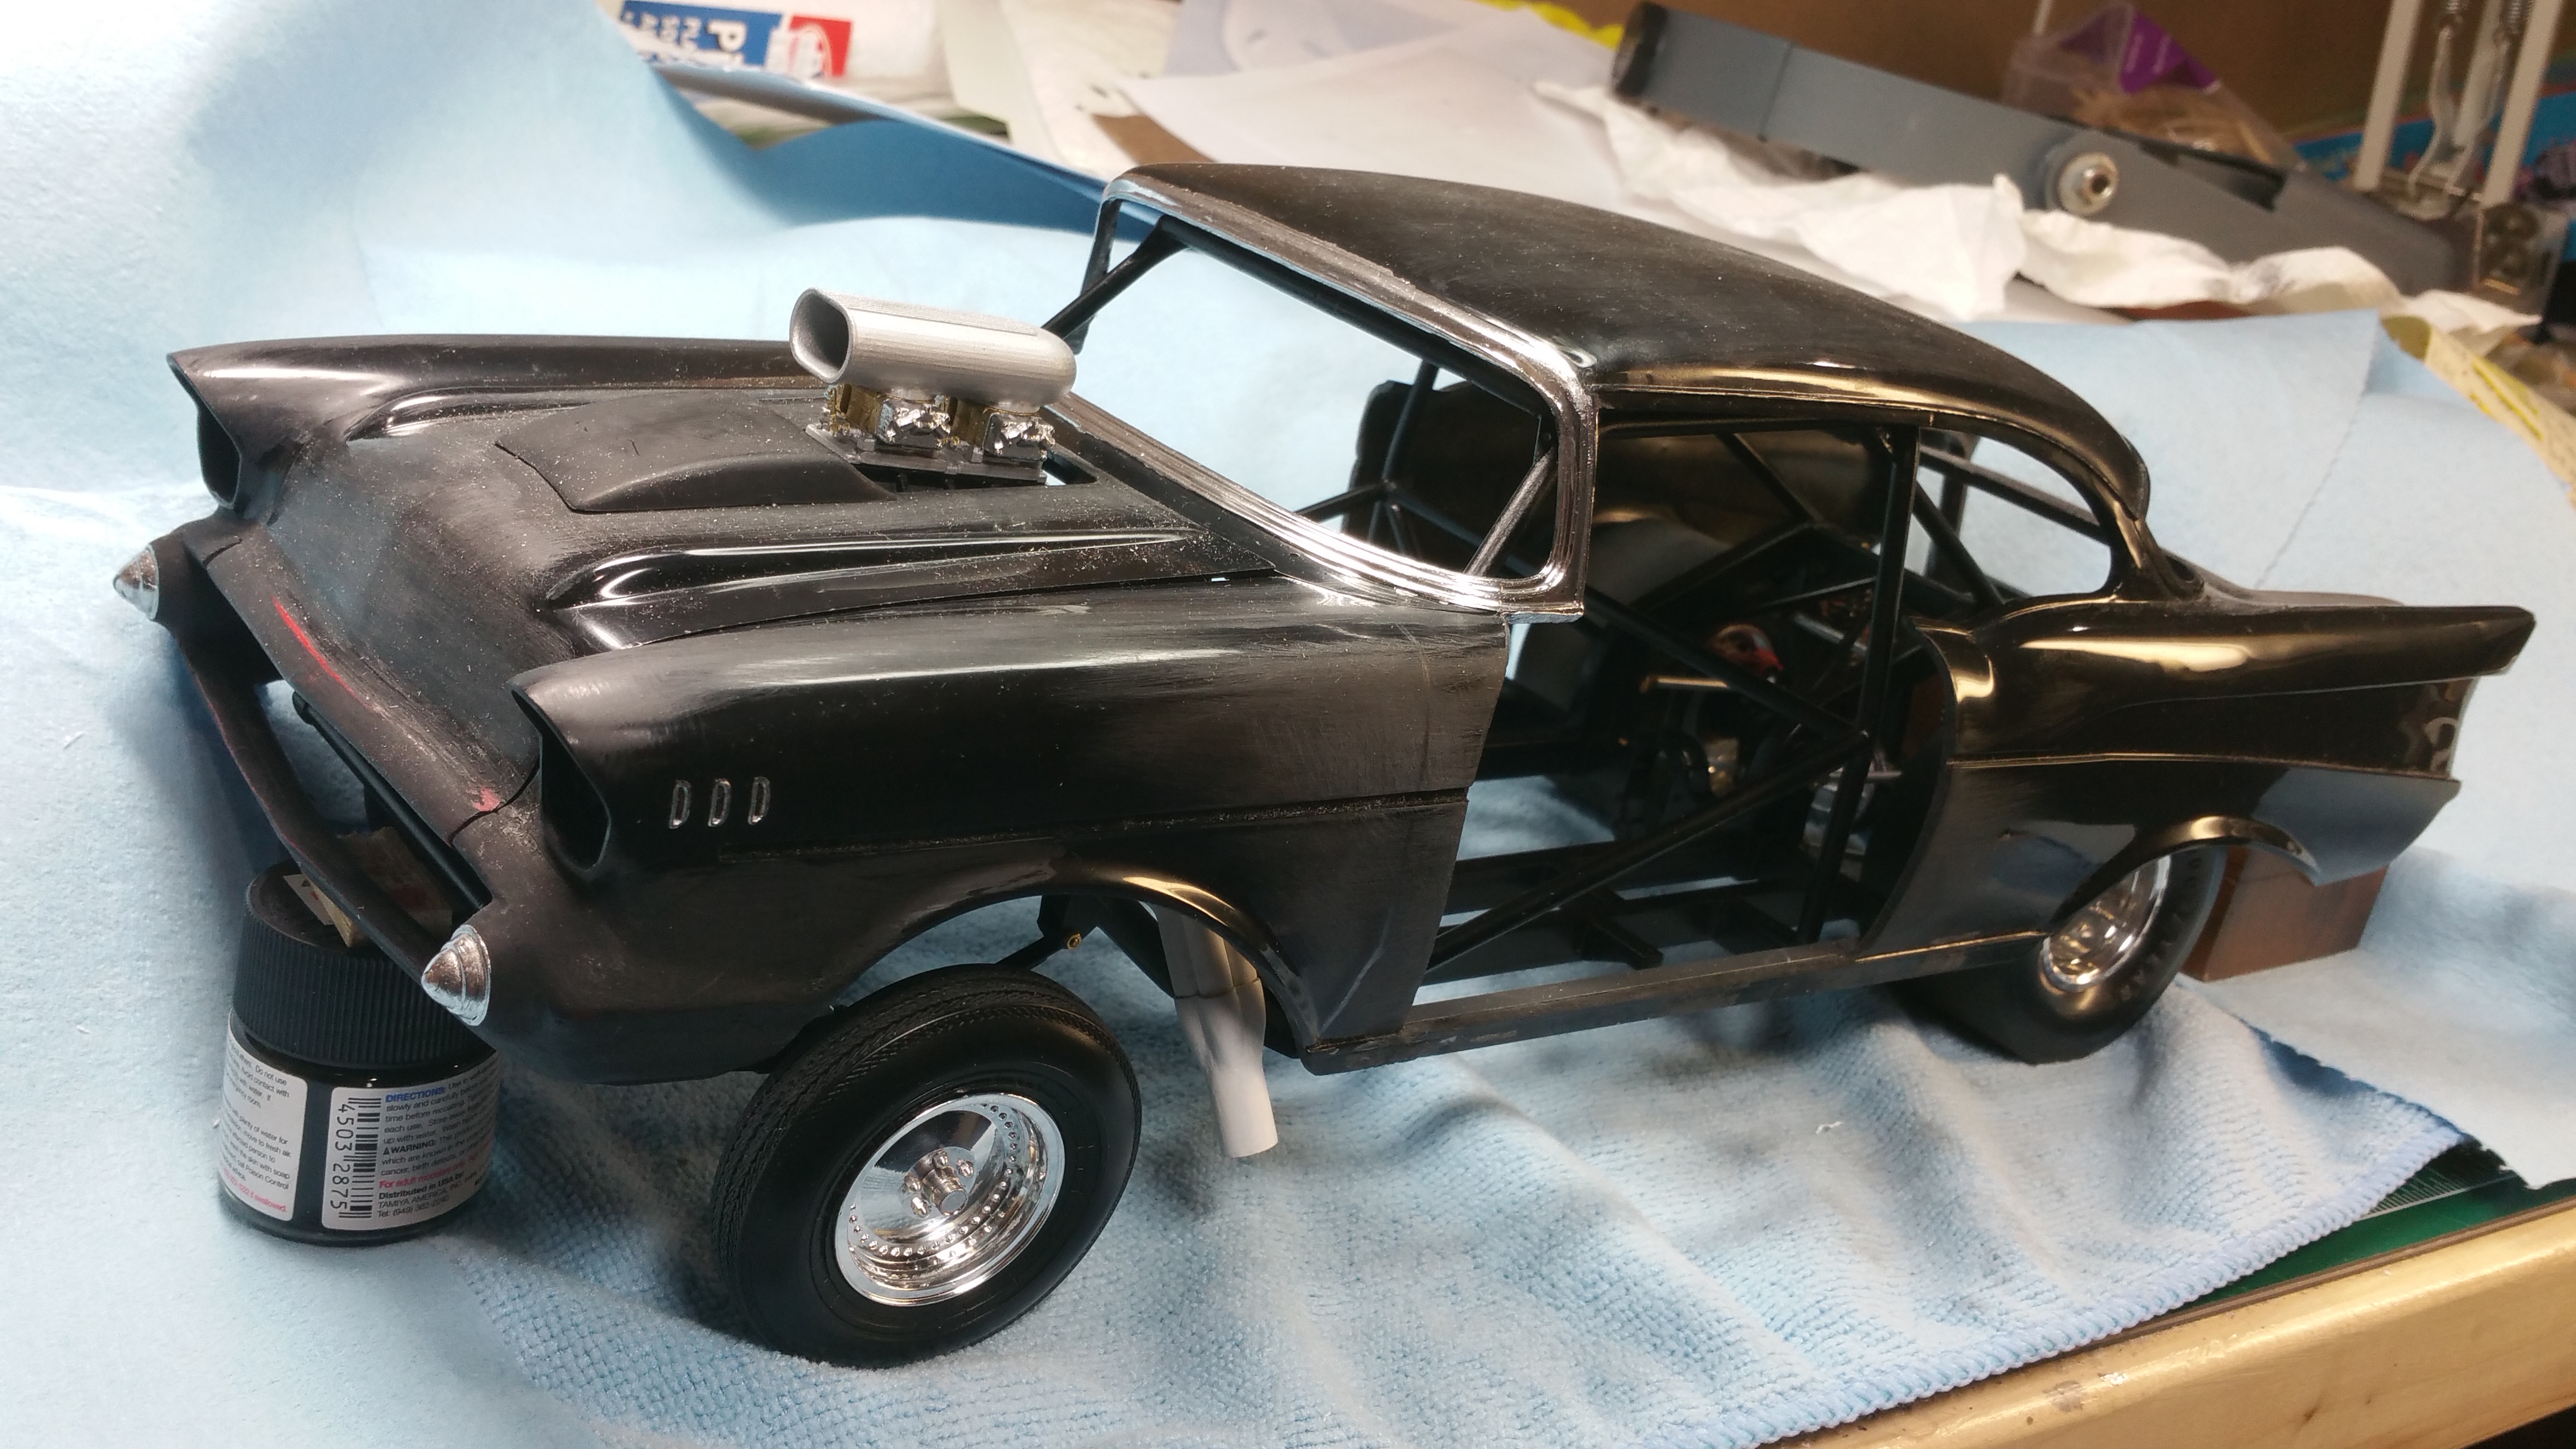
Hey all
Well the paint got dry...lol. it's been a while since I posted on this. The engine is put together permanently now. I have all the bolts & nuts added. I made some pop off valve springs for the blower and added a decal to the plate. I mounted the dipstick and distributor with added decal. The frame and roll cage are painted with Tamiya semi gloss black. Here are the pictures.
If you look closely you can see that the carb bowls and timing cover have been chromed with a molotow pen.View showing the pop off springs.View showing the decal on the blower burst plate and the pop off springs.View showing the decal on the MSD distributor and the dipstick.This view shows the dipstick aND the chromed bloc of plates for the hemi heads.View of the blower studs and valve cover bolts.This view shows the chromed timing cover and electric motor for the water pump also the soc. hd. scrs. for the timing cover.This view shows the oil filter, the starter and oil pan and pan bolts.View showing the starter and inspection cover.View of the RBMotion radiator hose ends.View of the frame and roll cage.View of the rear end assembly, the front end assembly and drive shaft. I still have to polish the blower scoop and chrome plate it. I also have to add the bolts to the rear end assembly. So look em over and let me know what you think.Thanks RonG
-
Hey fast Floyd 2
Thanks
Hey NYLIBUD
You can get a cheap one for $200-$300 dollars, but the part quality from them is pretty low. You get a part, but by the time you clean it up and rework it, it would probably be easier to scratch build the part. They are improving them and the quality and prices will probably drop so keep looking and keep up with trends.
Thanks RonG


1/25 scale Michigan gravel train
in WIP: Model Trucks: Big Rigs and Heavy Equipment
Posted · Edited by ShakyCraftsman
Hey guys
I have the Cummins NTC-370 engine just about done and it's almost ready for paint. I added most of the oil, fuel, air and water lines to it, at least as many that I know of. So here are some pictures for you to look at.
Ron G