The Keeper
-
Posts
12 -
Joined
-
Last visited
Content Type
Profiles
Forums
Events
Gallery
Everything posted by The Keeper
-

1970 Charger pinstripe decals ,,,WHO ?
The Keeper replied to gtx6970's topic in Model Building Questions and Answers
Wow, those are really crisp! https://public.fotki.com/customike/aftermarket-compani/keith-marks-decals/p1090209.html#media Hope I can use them on a project soon. Keeper -
airbrush newb questions
The Keeper replied to youpey's topic in Model Building Questions and Answers
Here I go again; Japanese airbrushes are made by Fuso Seiki. Master is a Chinese knock off and here's what you're in for: Here they have needles that bent when you throw a suspicious look at them! Nozzles made of a 0.3 or even 0.2 mm brass sheet, loose threads, cheap rubber O-rings and scratches left after surfacing in the factory. It all reflects into final price. My Master airbrush is a nice example. More here: http://airbrushdoc.com/discussion/best-airbrush/ hth Keeper -
airbrush newb questions
The Keeper replied to youpey's topic in Model Building Questions and Answers
If you can find a brand name on your current airbrush you might be able to buy a needle/cone set for it. Your pic looks like one of the Fujiosaki clones so you might be able to do an upgrade. If it's a Chinese copy the threading may be incompatible. Got a art supply/craft store close by where someone could take a look? Keeper -
airbrush newb questions
The Keeper replied to youpey's topic in Model Building Questions and Answers
I started out with a Badger 350 kit including 'air can.' Total waste of time n money. The air can froze up after 1 minute and the airbrush wouldn't spray fine enough. Sounds like you're on the other side of the coin. The Master airbrush you're looking at seems like a good choice, you've got 3 needle size options which should cover most apps. Most of the newer technology airbrushes are made by a Japanese company (Fujiosaki?) and then branded for Iwata, Tamiya, Bear, etc. You'll go dizzy doing comparisons, check out the Iwata line and if you see one (like the Master) that looks the same and isn't made in China by a substandard knock-off company, that's a safe way to go. On the Murican side, a Badger 150 or Paasche H can give you years of trouble free service. They've got newer models as well, just get one that has 3 needle capability. As to propellant, I highly recommend CO2. Any industrial gas supplier can fix you up with a 10 pound tank that will last for at least a year. On the budget side, you can get a mechanics air tank which will need refilling from a service station compressor but it's quiet as well. Only disadvantage to this is getting an inline filter to make sure you don't get oil or moisture in your line. You'll also need to buy fittings to go from your airbrush line to the air source. If you're going to paint flames or Luftwaffe camouflage you'll be needing a regulator. Buy the best one you can afford. If you're just spraying car bodies you can work without one. HTH Keeper -
Oh boy! Can I chime in here? SPRUES would be the plural of sprue. In polypropylene molding (toy soldiers n such) the larger pathways are called trees and the smaller pathways are also called sprues. And of course you can hear the term runners as well as gate or gateway for the part attachment point. A spruce is a conifer. Ain't terminology fun? Responding to the initial question; masking tape is designed to peel off without leaving residue, use decent quality tape for holding parts, I usually just make a loop out of regular tape as opposed to the more expensive double sided version. Cyano and toothpicks are great for holding parts in unseen locations. I also use rubber cement which cleans off easier. Cut or sand the end of your round toothpicks for a larger 'grip' area. Flat toothpicks and lots of other long items in your trash can all come in handy. There are some parts (car hoods, etc. ) that you're just going to have to paint twice, grin and bear it. I like to wait at least 24 hours before taping or gluing for the next coat. hth Keeper
-
After you've got the paint properly stirred up, use a 'stick' and pour. By pressing a stick (cocktail stirrer, toothpick, kitchen skewer, etc.) against your lower bottle lip you engage molecular attraction and the fluid will trail down the stick into your receptacle rather than try and drip down the sides of the bottle. Old school painter's technique. Practice with some water first if you need to understand the action. hth Keeper
-
Improved Lighting & Magnification Options?
The Keeper replied to nitrojunkie's topic in Tips, Tricks, and Tutorials
As Snake indicated, once presbyopia sets in, your lens starts drying out and your microvision needs help. I started out with a jeweler's loupe and transitioned to different strengths of reading glasses from local discount stores. Optivisors are great but out of my budget range. Wound up getting a few of the cheap Chinese knock-offs like this: My dentist and docs have a really cool set of glasses with mini scopes on them and they dial in their magnification and focal length to suit their needs. Sadly, they run around $600! So I again got the cheap Chinese knock-off: You get four sets of lenses (up to 25X) and the lights are nice but it's technically just two jeweler's loupes and you've got no panoramic vision and you have to hold your subject real close; only good for high detail work. I've also got the Carson style visor but swapping out the lenses means you've got to keep your lens box close at hand so that one stays on the bench. I've got models of the Visor with the flip down lens and swing in loupe on every floor, comes in handy working around the house. When we get together for our monthly group builds I've noticed the consistent contest winners are all myopic; they take their glasses off to work on a model! The rest of us are hyperopic so we've all bought Visors of one style or another. I just today bought an LED bulb LI battery Ott Lite on sale for Mother's Day from their site. HTH Keeper
-
Austin Flying A Hood Ornament
The Keeper replied to JPolli's topic in Car Aftermarket / Resin / 3D Printed
Like Like Gman said, some heavy glue, caulk, or putty can be used to meld the transition for the feet. If you do make one in plastic, you could also melt the feet on a hot tray; warmed to about 125 degrees in the oven but that's a very trepidacious technique and you'd want to practice on some strut stock first. Feet may not be noticeable in this scale, your call. I also wouldn't bother with the 'web strut' between the 'A' and the 'wing' because I doubt you'll need it in this scale and the original manufacturer's probably wouldn't have included it unless they needed it for structural integrity. hth The Keeper -
Austin Flying A Hood Ornament
The Keeper replied to JPolli's topic in Car Aftermarket / Resin / 3D Printed
It looks like it would be easy enough to make one from sheet brass or aluminum. Take some measurements (preferably in millimeters) and divide by 25, use a fine point marker to draw your pattern and start cutting. A Dremel tool would make it real easy. Don't be discouraged if the first one doesn't turn out perfect, I typically get it right on the second or third try. hth The Keeper -
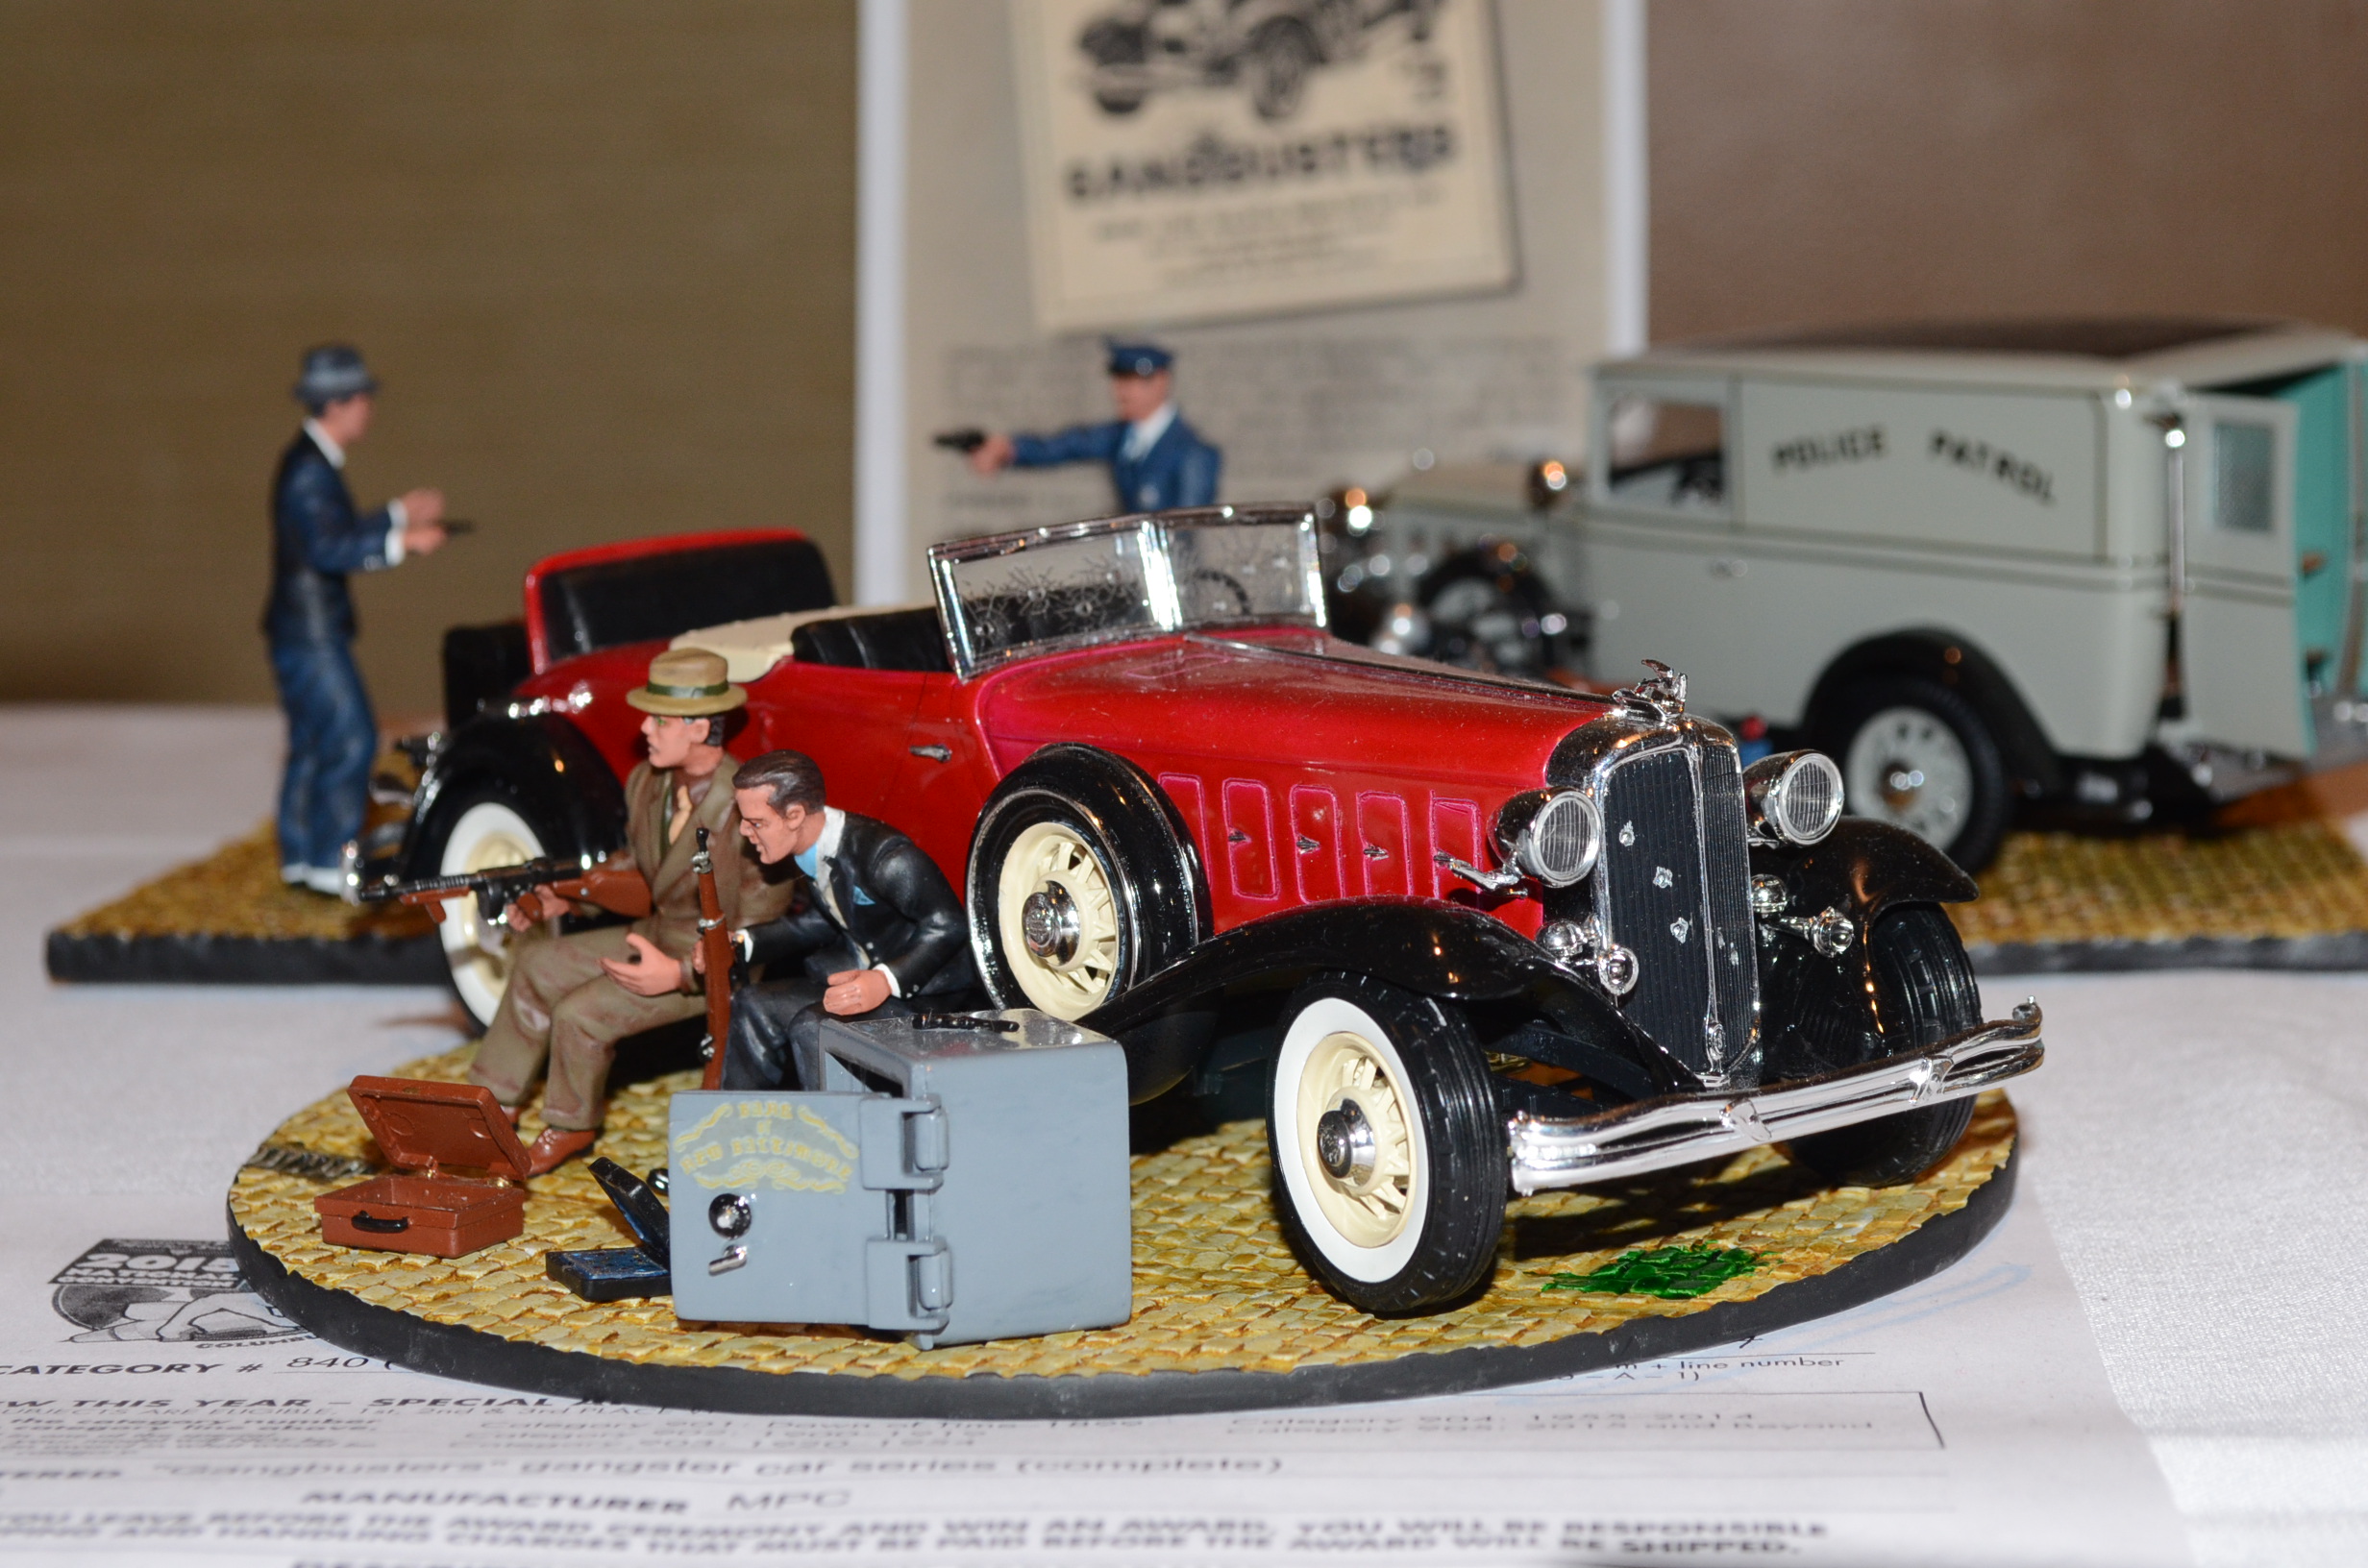
Thanks Kurt! In keeping with the topic of this thread I'd like to show you what was done with the MPC Gangbusters at the IPMS Nats, Columbus 2015: https://forum.ipmsusa3.org/topic/15576-gangbusters-at-the-2015-columbus-nationals/?tab=comments#comment-84012 Now that I've done that I see my photohosting site is down or defunct. I'll see if I can post a couple here, I can post the rest if there's any interest. Paul of Atlanta did an amazing job on these down to the cobblestone bases. Cheers, Keeper
-
When I first saw the posts about the cane exterior I envisioned a bamboo wall! Thanks for the pix, I now see it is more of a Rattan mat. One could easily replicate this using a decal or fabric from doll house suppliers at your local craft store. For those of you who would like some leather decals for the interior, check out Uschi Van der Rosten https://www.uschivdr.com/shopping-categories/shop-leather-decals/ They've also got some neat woodwork decals for Woodies etc. HTH Keeper