Plumcrazy Preston
-
Posts
143 -
Joined
-
Last visited
Content Type
Profiles
Forums
Events
Gallery
Everything posted by Plumcrazy Preston
-
 I'll will have to start spraying in the morning a little after sunup. The sun has to be up enough to give good light for painting outdoors. It gets too damm hot later on the day here anyway. At my apartment, it's just tedious work to have to keep putting up my spray tent and pulling it down again for each and every spray session. I will have a bunch of parts already to paint at a time to reduce fooling with the tent. If you live in a house you can erect your tent in your backyard and leave it up for days, use a tool shed to paint or your garage. You may also have one of those little tabletop paint booths that vent fumes out the window indoors. I'm compromised for proper work facilities living in a SW Oklahoma apartment. I can get away without the tent if the air is calm enough outdoors. It's usually calm on summer mornings. Calm outdoor air is also not conducve to contaminating wet paint with dust.
 -
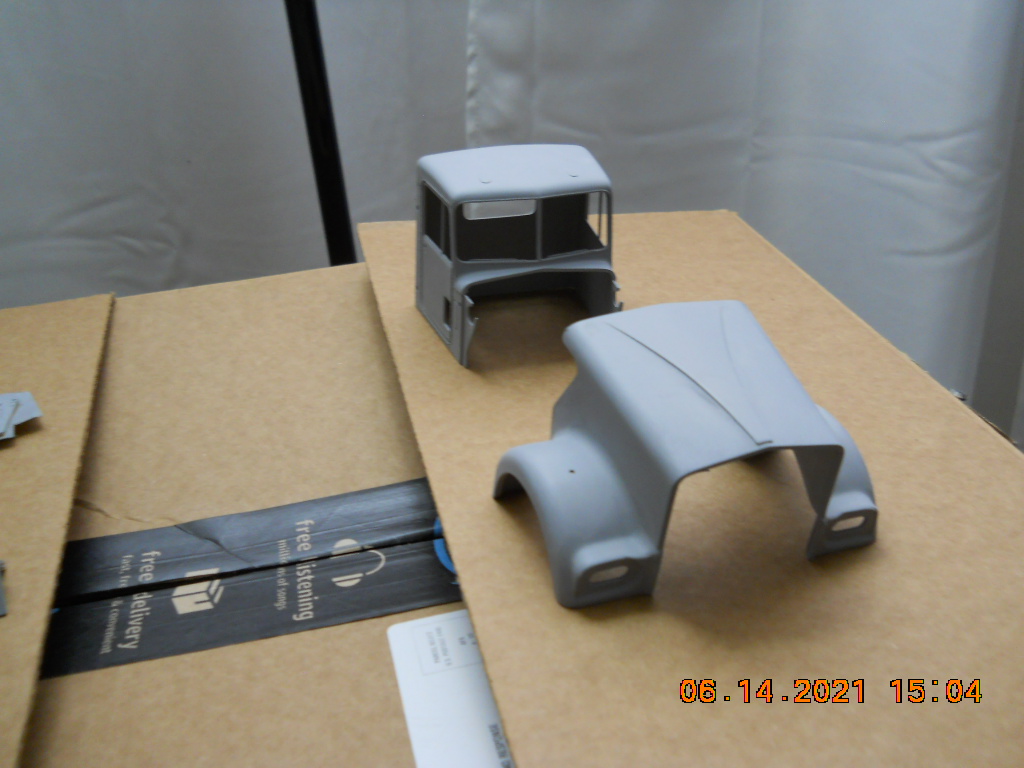
actually the bottom of my frame rails did not orange peel with Testors, if I recall they were sprayed outside on a warm and calm day, back in May, I need to shield the work from the wind before painting, it's also more humid in SW Oklahoma in the month of June Tamaiya is not made for kitted plastic static models. I read it will eat the type of plastic static models are made of, ABS, isn't it? I think Tamayia paints are for RC models only. The only Tamaiya product I use for my static kits has been surface primer. It was about $13 for a small can. It has sprayed on and dried beautifully and evenly over my bodywork with no mottling. My body work color paint will be Model Masters lacquer. Decals will be sealed by Testors Glosscote. I will give the bodywork the fanciest and most expensive paint because this is a high beauty area. I can get away with unprimed Testors enamel on low visibilty parts.
-
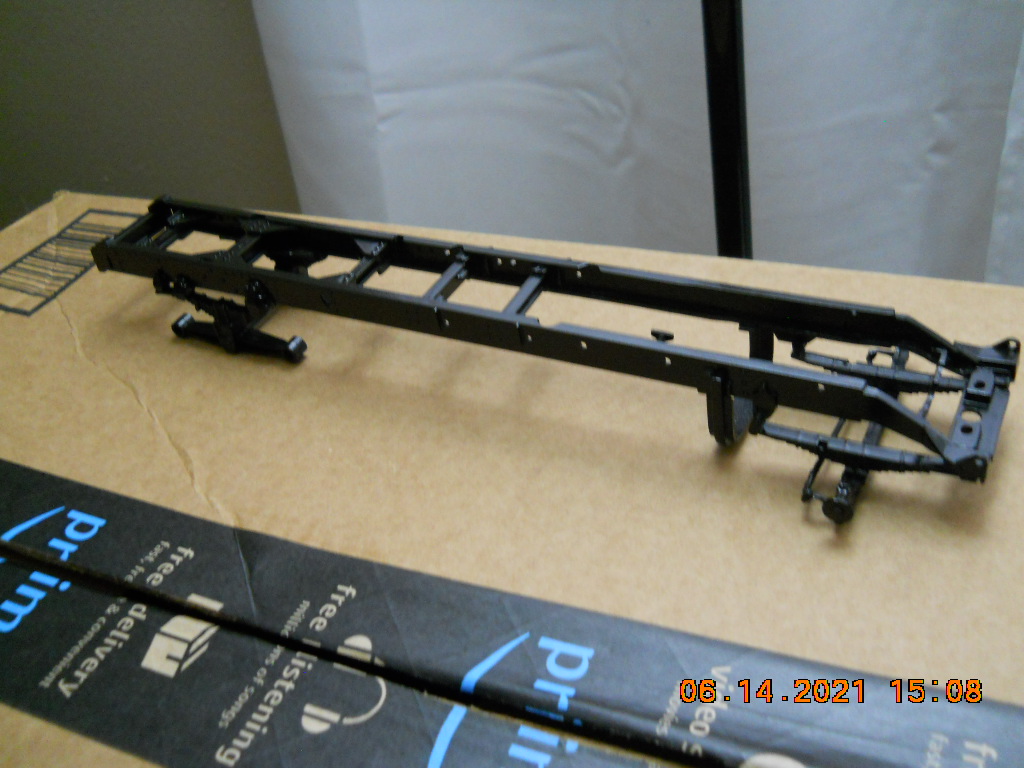
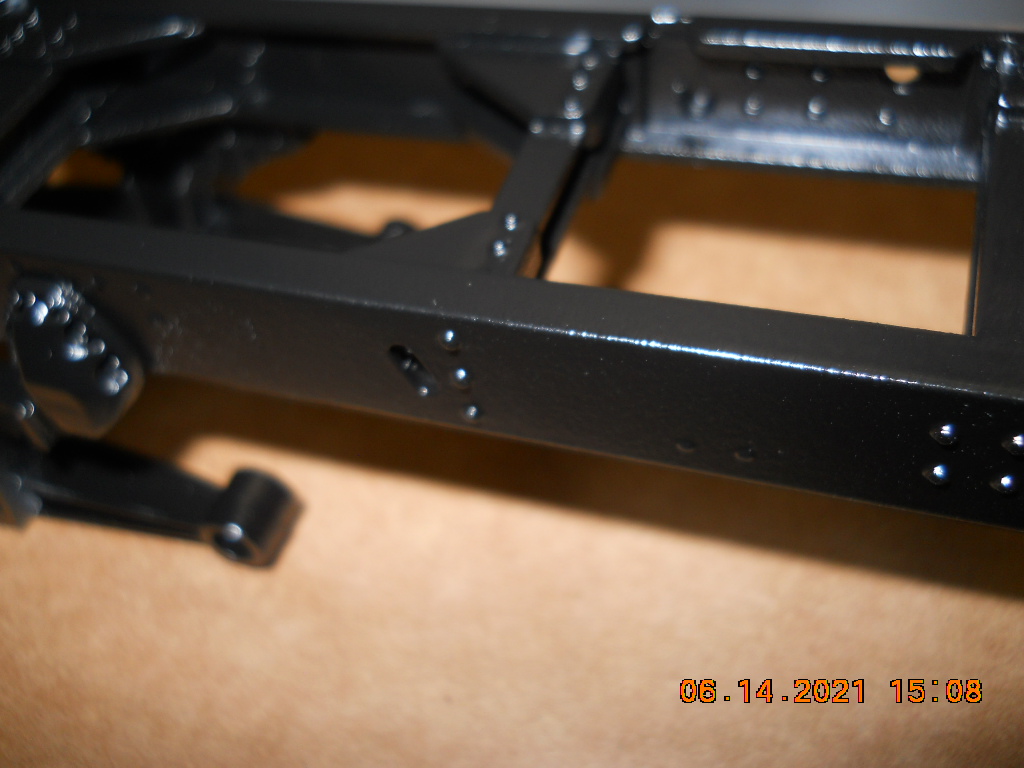
I am using Testors semi-gloss black enamel for my truck's frame. I am planning using a lacquer gray primer, laquer color and lacquer clear for the exterior body work. I have a portable paint booth tent. It is now hot and humid in SW Oklahoma. Breezes and dusty air is common here. I put freshly-painted wet parts in a closed cardboard box immediately to protect from dust. It seems as spraying in a breeze might be conducive to orange peel. I tried spray paintng my truck's frame inthe slightest breeze and got orange peel. On the calmest day the underside of my frame was painted and it was quite smooth. I had to wet sand the bad part of my frame and I plan to put on another coat under better painting conditions, preferably in my tent. Sometimes I feel too lazy to set it up.
-
Come to think of it, I will try to get the frame rails neater on paint texture. I have wet sanded them with 5000 grit to smooth out as much orange peel as I could since there are rivets and other protusions in the way along the rail side flats. I use Testors semi-gloss black enamel in cans and no primer for the frame. This time I will use my paniting tent to keep wind and dust off my work. The workpiece will warm up a while under the tent. The can will be immersed in hot tap water for about two minutes and have the devil shaken out of it. I spray about 12" from the work piece in rapid ocsillating strokes to prevent puddling in one spot. Using this method, the rattle-can lacquer primer on my body work came out nice an smooth. No aribrushes for me, only rattle cans. I just looked at freshly-painted new truck frames online. There should be no noticable pebbling at all. Bodies are a little eaier to wet sand because there's not much in the way of protruding parts to get in the way. The back of the truck cab and sleeper sheet metal has little rivets so one has to be careful not to sand them away.
-
The weather can slow me down. I live in SW Oaklhoma. Rain, thunderstorms, humidity. I was also slowed down also because it took me several months to find a vendor online to make satsfactory waterslide decals for me and I held up on model bulding until I got those secured. Now, construction is full bloom. It's summer and have good weather to paint parts outside. I can't spray paint inside my home. All the body parts to be painted in body color (purple) are now primed and wet sanded. The frame is complete and painted in semi-gloss black enamel. The engine is fully assembled and painted. There is minor orange peel on the frame rails but is evenly distributed and gives the impression of authetic texture on a real vehicles painted chassis. Real trucks don't generally have refined smooth paint jobs on chassis members and most of the frame parts will be obscured by bodywork, fuel tanks, splash guards and exterior accessories anyway. I will have to erect my paint booth tent to spray the body color laquer on the bodywork and the clearcoat that will seal everything off to get the finest paint job possible. The cab, sleeper and hood are the points of beauty on a truck. When I shot the frame with enamel, exposed on a table outside with no shelter, there was a slight breeze which I attribute to that slight orange peel effect. The frame was not primed but several even coats of black enamel went over it. The bare frame plastic was slightly sanded before painting.

-
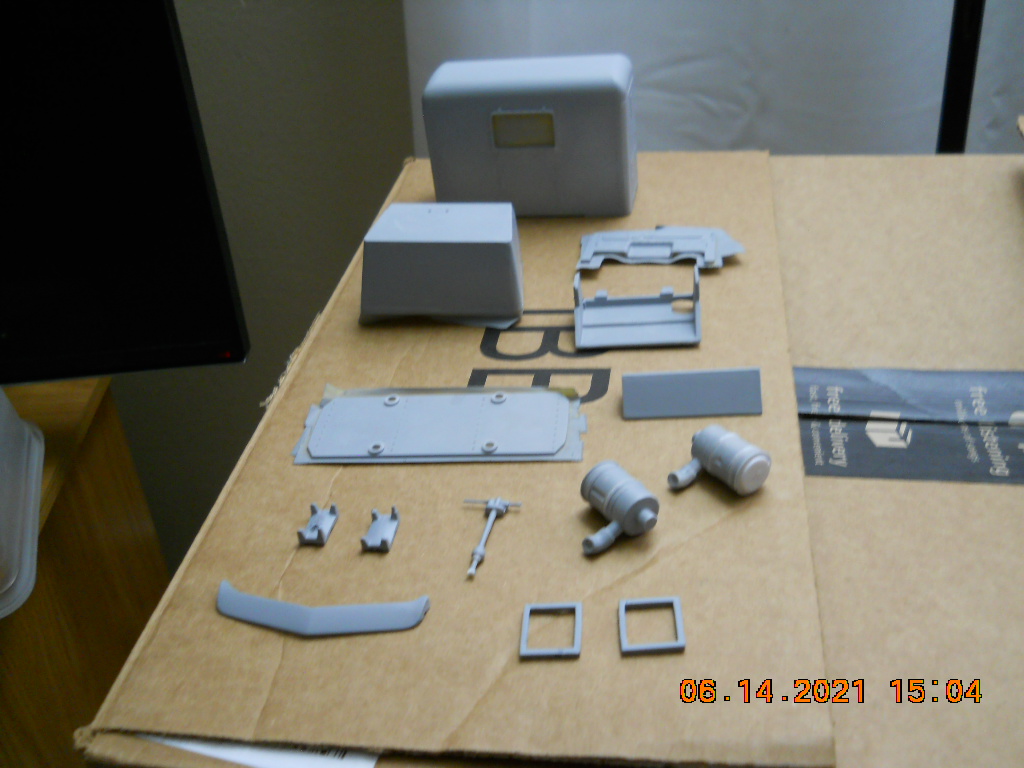
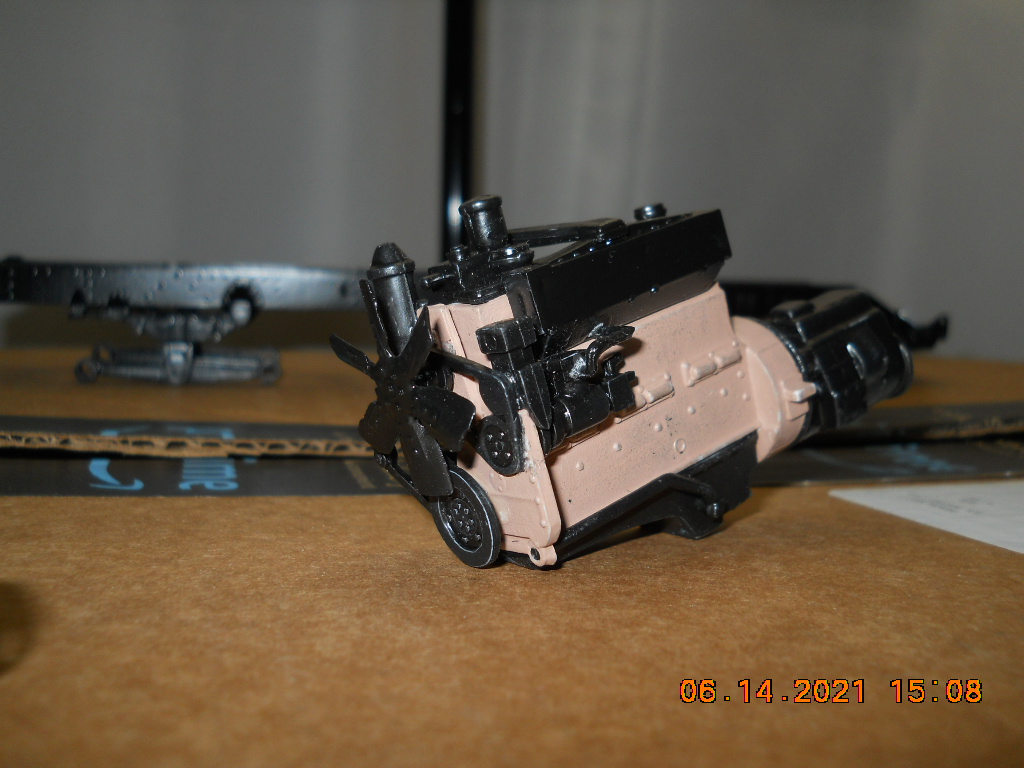
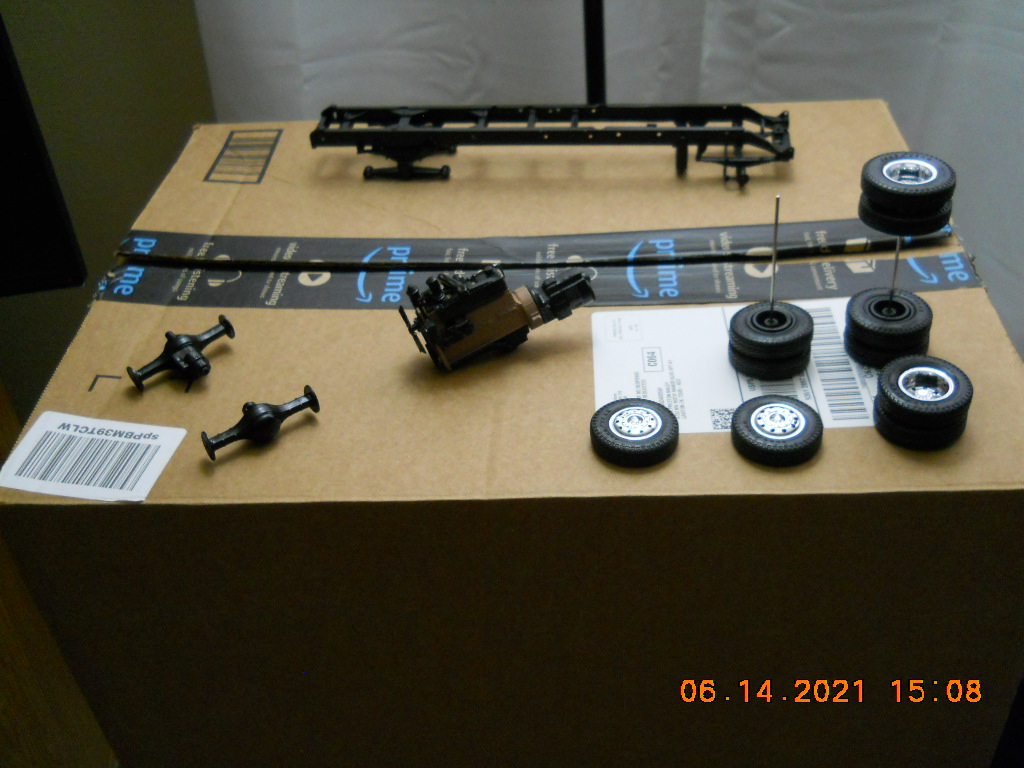
I use Testors in the bottle with brush applicator because it's clear liquid and not goopy like airplane glue in tubes. It eats paint on surfaces easily and sometimes it doesn't bond well with bare plastic parts even. I'm thinking about using Krazy Glue or a similar fast-bonding product for finicky small parts that are difficult to glue with Testors cement. I've tried scraping the paint off for applying Tetsors but still sometimes parts don't hold. The AMT Kenworth W-925 Tractor kit is especially difficult to glue together (many parts lack tabs and holes) and having to bond painted parts makes matters much worse. Right now I'm assembling the engine. Several cemented parts like the oil pan and the dipstick keep falling off even with bare plastic mating surfaces. The block was painted tan and the accessories are painted gloss black. Many parts don't have tabs that fit in holes but some do. Klazy Glue type adhesives should work well for tiny parts glued directly to paint or tiny parts where getting a good hold is difficult even in plastic-to-plastic contact. These would be small parts like engine accessories and small body trim components like the visor and mirrors. Naturally, my truck chassis is cemented together plastic-to-plastic. But Krazy Glue might work for stubborn parts that keep coming loose with Testors cement as the model is being built. Is there a tough-bonding adhesive for plastic kits that's also not messy? Epoxy is messy too. What do you think?
-
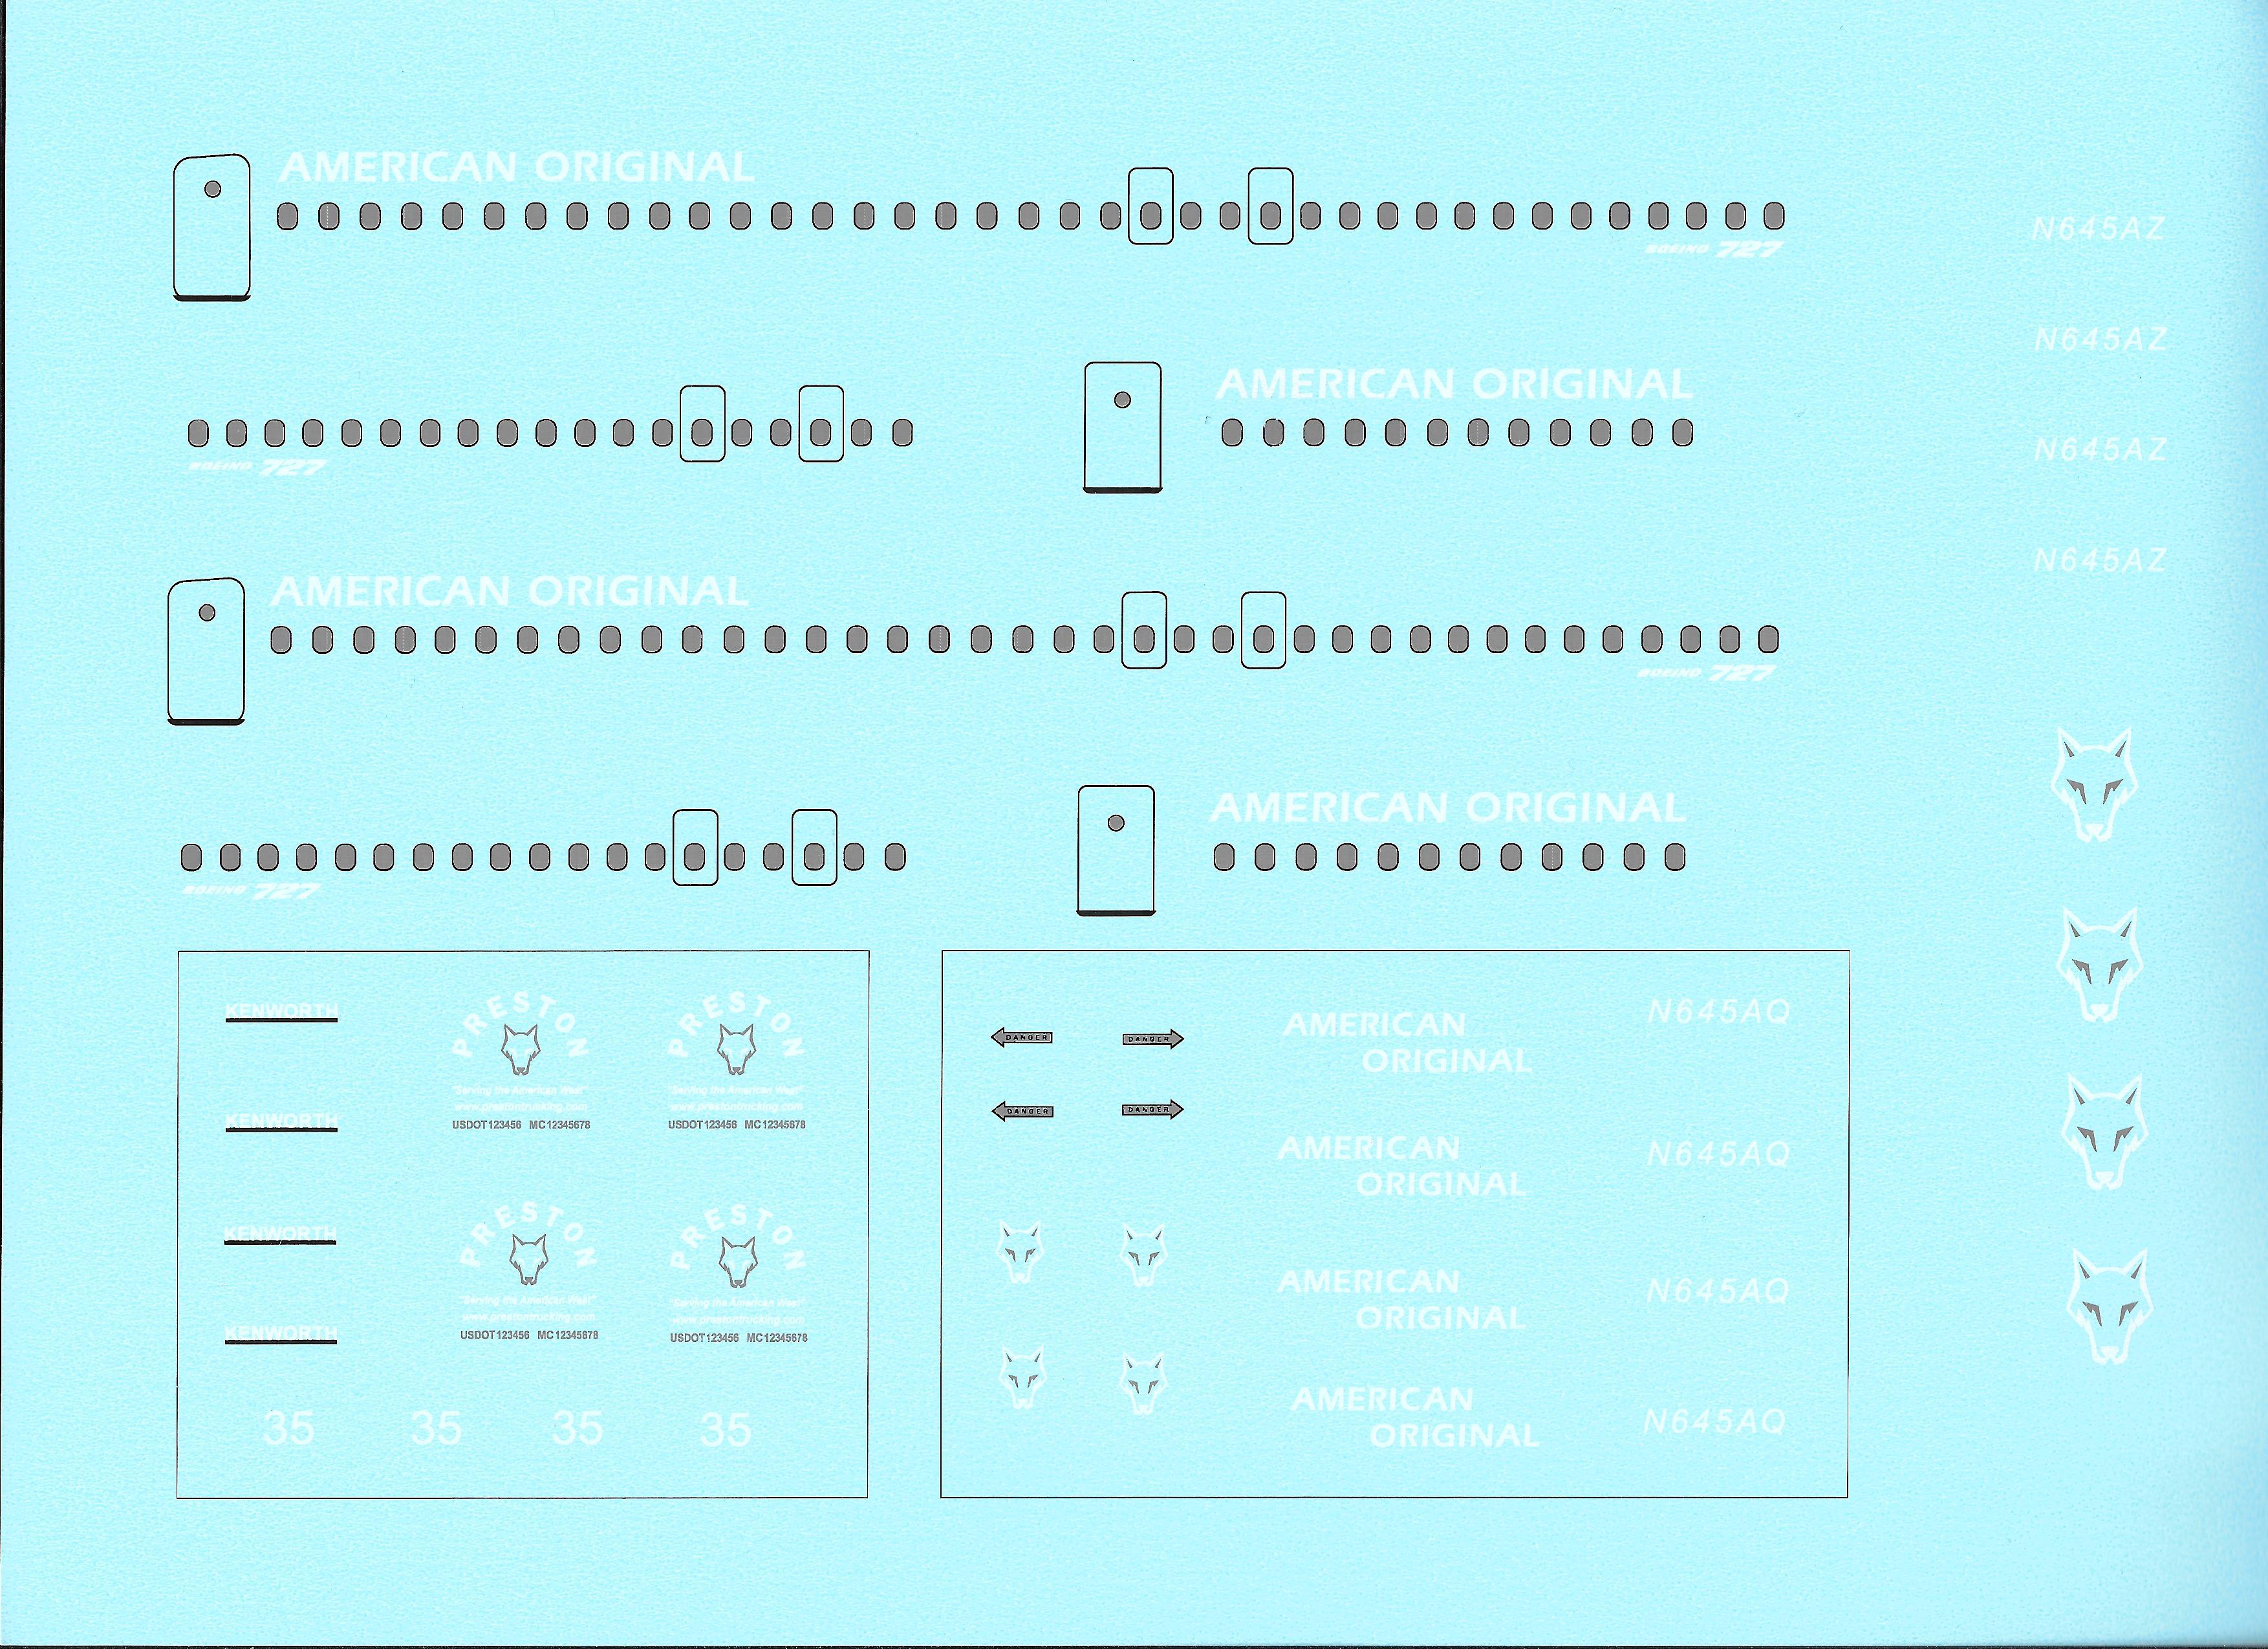
https://highballgraphics.com/ I got their email address from their website and sent them a message asking about custom decal work with an attachment of my artwork. A guy named Jim replied, said my artwork looked good and told me how to place the order. I submitted an 8" x 13" PDF reworked in three Pantone colors, transparent background and vector curves done from BMP by a third-party called Copyartwork.com. One decal sheet for me was $39.00 including shipping. I examined the sheet with my magnifier and it was good for the most part. There was a big human hair embedded in the sheet but the decal can be trimmed off the sheet and miss that hair. Most if not all decal printing firms fail to print decal sheets in 100%-dust-free environments. Many decals on my sheet are duplicates, extras, so I have spares in case one of the decals was botched in printing. The "M" in one of AMERICAN ORIGINAL objects has jagged edges at the bottom center of the character but the duplicate looks perfect. Laser printing presses powder toner onto the surface of the sheet with a hot drum. Under the magnifier, the white objects will appear to have the texture of flour or snow. I tried email-communicating with that German guy, Carsten Glaubitz, at DecalPrint but he is hard to communicate with in English so I said the devil with him and did more searching and found this Highball Graphics. Highball Graphics has no issues with trademarks like Kenworth or BOEING. They print a lot of model railroad rolling stock (locomotive and railcar) logos after all. I tried using Josh Muma at Bedlam Creations twice since last December and he botched the decal sheets completely both times. The first time it was due to using colors not Pantones. The second time there were a lot of jagged edges around the white letters and lots of hair and dust embedded in the printed sheet. He used that ALPS method which may print white objects sloppy as if it were white touch-up paint for cars. White objects especially seem hard as the devil to print and do so neatly. Highball Graphics claims at their site to use this printing method: We print using an OKI C942 Printer. This is a 1200 dpi toner type printer. Black and White toner on 5 separate drums to produce high quality images. It has a much tighter grain on the process prints. It prints in 1 pass with excellent registration. Quite different than the old ALPS ribbon printing technology that we previously used. Using any commercial decal setting solution these decals will snuggle down over details much better than their older counterparts. If you wish to use this company, it's best to visit their site to get their contact information first and ask what they can do for you by email. They mainly do stuff for model trains but they can print stuff for static model and R/C model hobbyists as well. I submitted my PDF file with a transparent background. I have posted an image of my decal artwork over Plum Crazy purple again to show you all here. Now, i will have to see how nice these decals will look applied to my finished models still in progress. High Ball Graphics has some instructions for proper decal application at its site.
-
I really stepped into something I know nothing about. It's what used to be cheap plastic models for a shelf back in the old days for crying out loud. I didn't anticipate printing decals to be something of "rocket science".
-
Clarifications? You asked for it. The original artwork file was a BMP file I authored and then it was modified in a "vector" program by a third-party, copyartwork.com online, for a nominal fee. Then that file was saved as a PDF and sent to me and that file was sent to the decal company, bedlamcreations.com by me. Essentially, the decal printer made my decal set from that same PDF file I received from copyartwork.com. The "vector" work done by the third party was to make everything razor sharp around the edges and ensure the colors were spot colors, Pantone. I want nothing short of razor sharp edges on the decals I'm to place on my home-built models. I paid this bedlam creations $57 and the decal sheet I got looked like crapp for the amount of money paid. I need a highly competent decal printing concern. The BMP file from copyartwork.com did not look corrupt at all. The image was razor-sharp when examined by me in Adobe Reader and zoomed in. I believe this bedlam creations is a crappy outfit. That's all. I need a printer and operator with top-notch equipment and top-notch skills. I'm going to have to consult with the German bloke when he opens up for business again this spring. I hope he won't disappoint me.
-
Ok, I will have to contact this German fellow again this coming March. The only reason I passed him up because he is shut down until spring. I had no idea that ALPS made products looked that cheesy when held up under a magnifier. The stock decal sheets boxed inside model kits look so much more refined than what this Muma dude provided me. I also wasn't sure of the QUALITY of the German guy. There is cheesy mopeds made in China and there is Mercedes-Benz as an analogy. Is the German printer at least "Mercedes-Benz" grade if not Rolls-Royce grade? Remember that I have white objects. Can the German print white decals with razor-sharp edges? The white objects on the decal sheet Muma sent me are sloppier than the black objects. Some of the small silver text objects have small holes in them, they are slightly broken up. The trouble is I can't examine the workmanship samples of all these various printing firms in person. A picture posted on the Internet doesn't provide the same level of detail that a magnifier can provide to the naked human eye.
-
I had Josh Muma, from Bedlam Creations online, print me a decal sheet on a second new order and it came out sloppy too! It took him about a month to get this order shipped to me and once again I'm disappointed with the cosmetic appearance of the decals. This was indeed printed from a vectorized PDF and has three Pantone colors: silver, black and white. Bedlam claims to use ALPS thermal printing technology. I carefully examined the decal sheet under bright light with a magnifier. The white objects are mostly text letters and they look rough around the edges like white paint that was chipped. The smaller text objects are somewhat distorted. The silver about the wolf's heads appears too dark in tone. The airplane windows appear to have serrated lines running through them. There appears to be artifacts as dust particles on some parts of the sheet that were shellacked over. So all that said, which commercial online decal printing firm actually produces decal sheets with a very high degree of overall neatness? Here is a photo scan of the decal sheet I received but you won't be able to really see the defects here.
-
AMT kits suck!
Plumcrazy Preston replied to Plumcrazy Preston's topic in General Automotive Talk (Trucks and Cars)
For nearly 40 dollars I expected much better from AMT. In the old days most kits did not exceed $10 and were commonly sold in drugstores. -
AMT kits suck!
Plumcrazy Preston replied to Plumcrazy Preston's topic in General Automotive Talk (Trucks and Cars)
Monogram always fit together nicely. You could cement the parts firmly and paint the models too. So how do I know if a kit is good before I buy it? I took a look at the parts for my new Atlantis Boeing 727 kit and that looks very promising. Virtually every part has slots and tabs for mating. -
AMT kits suck!
Plumcrazy Preston replied to Plumcrazy Preston's topic in General Automotive Talk (Trucks and Cars)
Why did they not have tabs and holes for mounting the horns, lights and visor on the roof? Some parts have these features but many don't. Why were they too cheap to not supply rubber tires? Holes and tabs also give a much more solid connection for gluing parts together. -
AMT kits suck!
Plumcrazy Preston replied to Plumcrazy Preston's topic in General Automotive Talk (Trucks and Cars)
I gave this kit a 1-star at amazon.com where I bought it and told everybody there the same thing as in my OP here. -
Are there better quality kits on the market these days than AMT? AMT kits suck because: 1. they are too expensive for the low quality 2. the parts lack precision and excellent fit 3. many parts don't have holes/slots/grooves for other parts with tabs to insert into 4. the instructions aren't very good 5. the assembly diagrams aren't very clear as to where to precisely locate parts 6. some parts don't fit well 7. some parts are put into hollow places and they are allowed a certain degree of rotation as the transmission and the engine bell housing: there should be a keyway with a tab to keep these mating parts from rotating upon each another and why doesn't the rocker covers have tabs to mate with holes in the top of the engine's head? I'm working on the W-925 Kenworth tractor right now. The limp stretchy Goodyear vinyl tires are cheesy and not made of nice firm well-fitting rubber. The bead area is too large in diameter to fit the rims snugly. I tried using that 3/8" foam rod stuff. The beads of the tires just get pushed right over the measly little flanges of the rims under the pressure of the stuffing material. The visor for the top of the cab has no tabs/holes to locate it. Where am I going to apply the cement? Both the cab and the visor are to be custom painted but cement doesn't adhere well to paint. With mating tabs and holes I normally scrape the paint away on those spots and put glue there. There is no precise way to locate the 5 marker lights on top of the cab. This expensive plastic AMT kit is rather mickey-mouse quality. Is Revell or Monogram much better in overall quality than AMT? Virtually every Monogram kit model had snap-together parts with optional gluing. For close to $40, I'm rather disappointed with this AMT Kenworth kit. I expected much better for the price.
-
Force, thanks I just ordered this: https://www.homedepot.com/p/Frost-King-3-8-in-x-20-ft-Grey-Poly-Foam-Caulk-Saver-C21H/100067266 How long should each piece of foam rod be, the outer circumference of the tire? I will need this for my AMT Wilson cattle trailer as well.
-
I would like my AMT Goodyear tires to fit the flanged rims of my Kenworth W-925 tractor a bit more sung so "the bead is set". Any tips?
-
I ran my frame under scalding hot sink water for about 20 seconds then gave the frame a bend to the right a couple of times. It now seems pretty dam straight. I monkey with it no more.
-
...Copyartwork.com made a few goofs so I went to their Corrections page to submit a correction. Goof Number 1: they changed the PDF file page size from 13" x 8" to 15.90" x 11.65". My decal firm needs the page size to match the decal sheet size, 13" x 8". Goof Number 2: They made the BOEING 727 logos black instead of white for some unknown reason. The KENWORTH logos are white as they are supposed to be. At least they don't seem to have any trademarks issues. I made the KENWORTH letters for the the nose of the hood white because that's closest spot color to real bright chrome there is. Silver looks too dark. Otherwise, the vectorized work looks super sharp.
-
It seems like I read somewhere that one could immerse the frame in hot water to soften the plastic then place the frame in a vise or under heavy weights like a book or blocks of wood to straighten out. I can't find the web source where I read that. The plastic should hold the proper shape once slowly cooled down again under some sort of jig. Die-cast metal might be ideal for vehicle model frames, at least the side rails.
-
I noticed the frame looks warped curving somewhat to the left while looking down the top of the frame rails from the rear. Plastic doesn't seem to have the precision of metal. The frame seems to lie flat while on a tabletop. What is the frame straightening trick?
-
Very impressive. The model train factory looks like it has millions of dollars in equipment. How they tool up to mold each and every scale part is mind boggling. I see some work with a camera was done.
-
Since I am getting only spot colors in Pantones done this time from Bedlam, I expect no noticeable textured patterns, just pure solid colors as if the art objects were painted on. The way you get neat art on models and vehicles in fussy colors in reality is by actually using paint mixed in special colors . I don't know of any company that stamps custom stencils for painting letters, numbers and markings on scale models. It would be neat if color decals could be printed photographically the way a Nikon camera prints a picture on 35mm film. How about if artwork could be photographed directly onto a model body? The model would have to be covered with special color photographic chemicals in a dark room and be exposed to light projected onto it and developed just like prints. Think of all the colors a Kodak Instamatic camera used to render. Have any photographic computer printers been developed?
-
Ok, Roland is the state of the art decal printer for 2020 and beyond today. How do Roland-printed decals compare in crispness and durability with ALPS printed ones? Will Roland print any Pantone without dithering? Josh Muma at Bedlam Creations quoted me $57 to print a single 8" x 13" decal sheet on his "highly-praised" ALPS machine and that his laser decals were of a lower quality and durability. He says he doesn't use any inkjet technology because people can do that at home it can't print white. Well, my HP Officejet has no white ink: it's CMYK. I could print my decals at home if I were to use them on a model painted yellow since I would use dark colors (black, gold, navy blue) for that purpose. I would still need a 3rd party for the vector rework. Here is a wiki on ALPS: https://en.wikipedia.org/wiki/MicroDry