Plumcrazy Preston
-
Posts
143 -
Joined
-
Last visited
Content Type
Profiles
Forums
Events
Gallery
Everything posted by Plumcrazy Preston
-
 When converting a BMP file to a PNG or TIFF file, I've noticed the image gets resized dimensionally about three times. The original image for decal artwork is 1:1 scale. The objects are drawn precisely to fit the specific models. I'm going to have the vectorizer firm make the file in the format of PDF. PDF is universal. They must realize that the original image is that of a decal sheet 8" x 10". Nothing is to get resized in the conversion process. Size is of the utmost importance for printing decals. A serious model builder should have a steel ruler in graduations of 32nds and 64ths as I do. Authoring the art objects for the decals took me a lot of making measurements on the actual model body parts themselves. One must pay attention to size and proportion when designing graphics.
 -
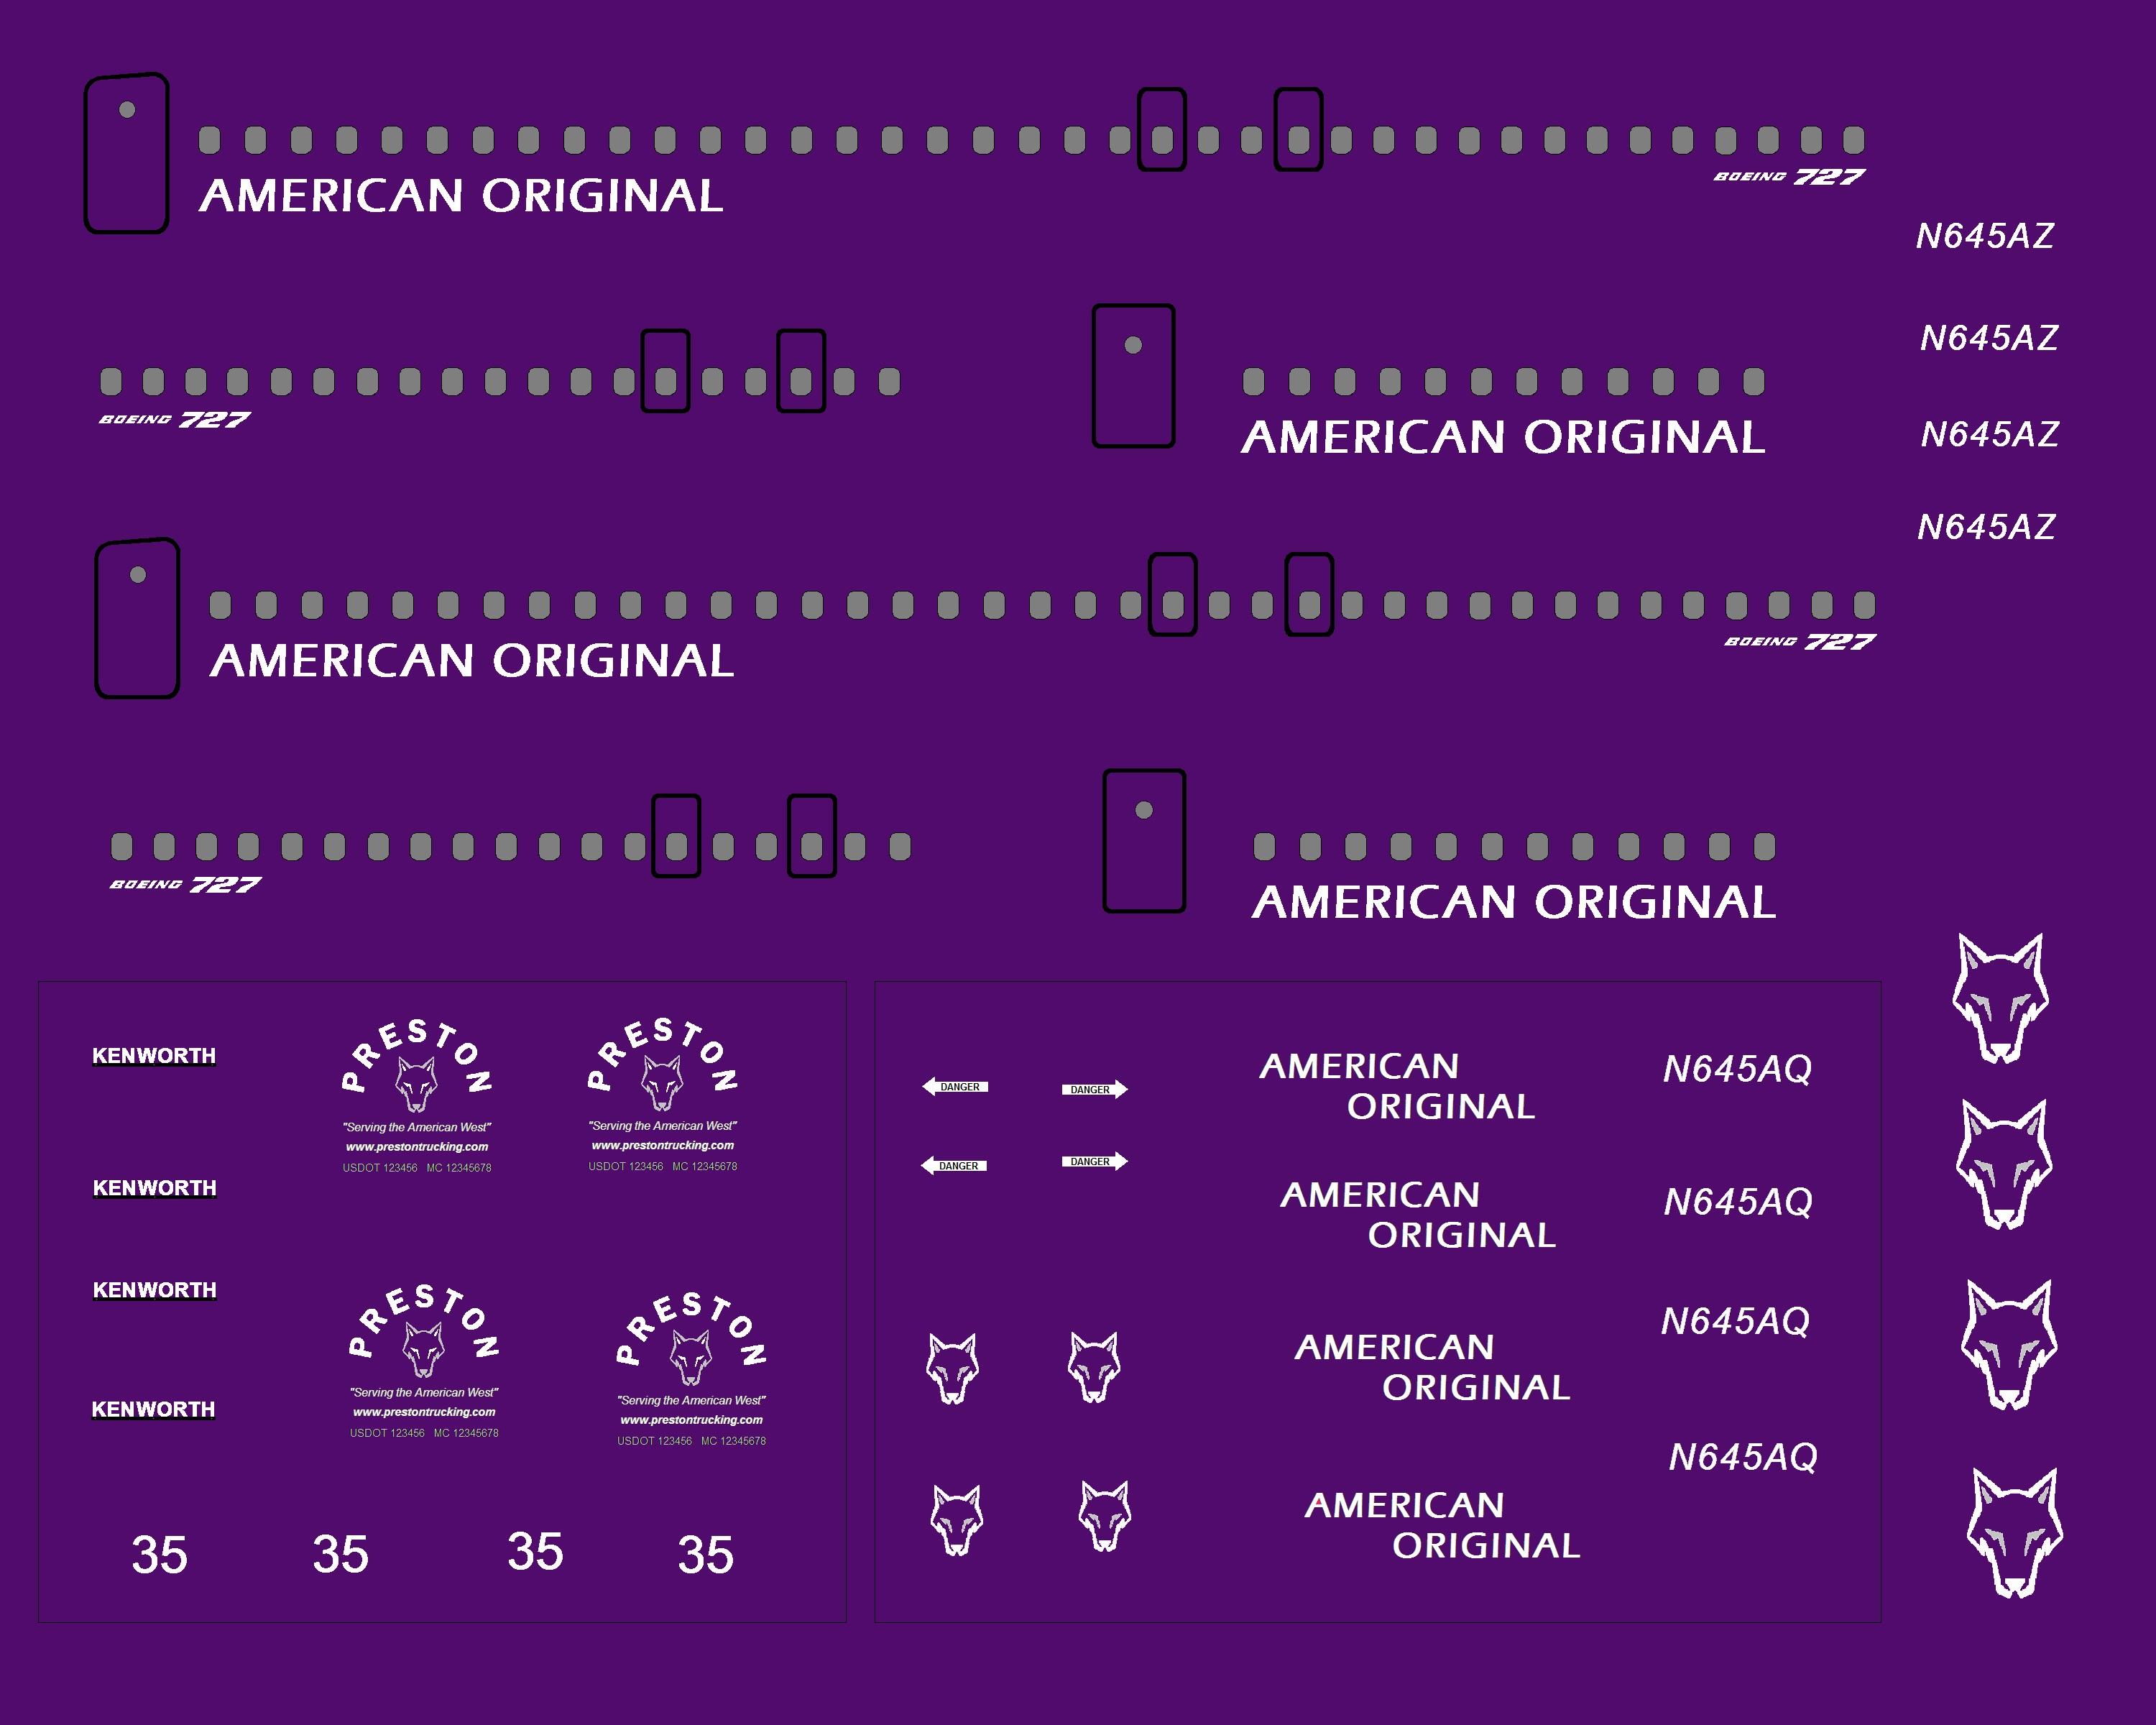
Copyartwork.com just gave me a quote for $25 for a vectorization job. Here is my decal sheet image in JPG form to post here. The vector company got my file in TIFF form because BMP was too large to upload there. The purple background is Plum Crazy and is to be transparent for printing.

-
I found a site called online. I'm going to see if they can do a nice vector conversion for me. I'm using simple monochrome art objects. Black, white and greys. Then maybe I can submit the vector work in for decal printing.
-
Paint only works in 300 dpi.
-
I sent the file in the form of a PNG. Many laymen don't have vector skills and software. The average Joe who cements model planes together lacks this skill usually. The average Joe won't have custom decals made anyway.
-
How about just submitting images in monochrome: black, gray, white, silver, how doable is this? How hard is it to print NEAT monochrome decals? If I make an image in Paint, can somebody re-author that artwork in vector for a certain fee?
-
Can text and numbers be easily authored in a vector program?
-
The image I submitted to Mr. Muma was authored in bitmap 300 dpi. I used two online sites to convert it to a 600 dpi PNG file and make the hot-pink background it had transparent. The JPG image I'm showing here has the purple background which is to approximate the model color the decals are intended to be applied to. Mr. Muma did kindly issue me a refund in full and made this reply: (my legal name), Unfortunately with the files supplied and not wanting them to be altered this was the quality that could be produced. I will go ahead and issue you a full refund for this. I do not believe you will be able to accomplish your goal based on what you are looking for unless you have a mass print run done with screen process which I do not do. Sorry I was not able to achieve what you were looking to have done. Please either return or discard the decals. Sincerely, Josh Muma
-
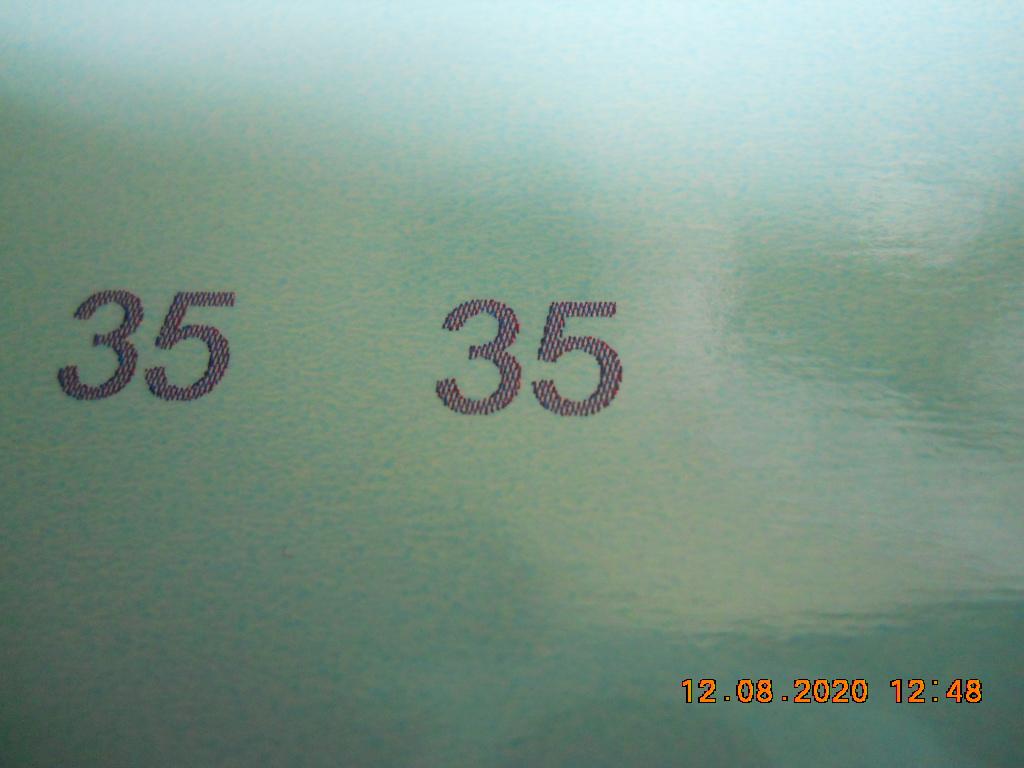
I just received a custom decal sheet from Josh Muma of Bedlam Creations and I yelled ARRGH!! out loud like Charlie Brown. This thing cost me $57. I've attached my original image design with a Plum Crazy background color and a few photo samples taken with my digital camera up close. I emailed Mr. Muma the following message: 12/8/2020 Josh: I'm sorry to say that the decal sheet appears to be a total flop. I was not expecting a fish-net pattern over my decal objects but rather crisp decals in solid colors. The fish-net pattern is almost as dark if not darker than the purple background which is to be my painted models.I don't think that many of those decals will even show up on my darker-purple-painted models. Even the light-silver KENWORTH decals have some dark purple fish-net over them. I used my digital camera and photographed parts of the decal sheet and placed them next to my original decal image designs for visual comparison. I've attached a file with my original decal sheet design and a few samples of photos of the actually decal sheet received for visual comparison. Is there another method than thermal ALPS that produces much crisper decals truer to the original image? I have printed much nicer-looking decals with my home HP Officejet on Testors decal paper but I can't print white or light colors, pastels, on that machine, of course. I've only printed black and red decals. How come decals that come in factory-boxed model kits look so clean and nice? I was expecting "factory" quality. Sincerely, (my full legal name) Now my question is, what decal printing company should a fussy serious model builder really be using instead? I authored my image for a decal sheet print job in Microsoft Paint. I don't have Corel/Vector drawing skills or software. The quality of the custom decals will make or break my model projects.
-
I looked over the instructions. The rear axles have to be attached to those pieces the book says to angle back. I don't think they should be cemented to the suspensions. The axles will have to be moved to connect those driveshafts to the pumpkins. Should I put a light coat of R/C plastic grease on the parts of the wheel hubs that rotate to prevent wear? The book says something about attaching the hood with the radiator not installed then aligning the cab up with the hood by mounting the cab.
-
Here is my cheesy RC boat. I put the custom vinyl decals on and the resin German shepherd on the deck. The Boat 54 is a spoof on the TV series "Car 54" (where are you?). The cheap toy R/C boat originally had POLICE on the side of the superstructure. I played the devil getting those side stickers removed. The railing posts are real brass and the railings are metal wires.
-
I started building model airplanes in 1972. I sucked at it when I was young. I did not have proper skills training, workspace, lighting and tools. I did not have that neat liquid Testors cement in a bottle but that messy airplane glue in tubes. Revell and others virtually all had holes and tabs that mated for precise alignment of ALL parts. I don't think AMT quality is quite up to par with Revell, Lindbergh or Monogram. When a finished model is packed up for moving, there is a chance one or more parts may come off during the move. I would say the mirrors especially are quite fragile on these truck models. Components on the interior as steering wheels, seats, windows, dashes, pedals and gear shift levers could jiggle loose in transit. It's imperative these hard-to-access parts be rigidly cemented before the cab is sealed shut to the interior bucket. There are times when modellers may have to move or transport their completed works. I have a number of die-cast car and plane models but you might call them "toys". The Daron Toys Boeing jetliner planes have rivets on the bottom to keep the two fuselage halves together and non-scale toy-like landing gear, the bodies and livery look quite scale though. They were only about $10 each. I think Daron makes expensive scale models also. The more realistic Toyota car models and the 1928 Studebaker fire engine have screws on the bottoms of the non-scale underbodies. The cars, Camry and FJ Cruiser, have opening doors and nice smooth glossy paint. The Camry's hood raises to show the engine. They look quite scale when they are parked on the shelf. Nobody casually observes the underbodies anyway. I have couple of cheap semi-scale R/C cars too. A yellow Toyota Celica racer and a BMW police car.
-
I think I will forgo the driver figure. There is no guarantee of perfect fit behind the wheel. I wish model kit manufacturers would supply people figures for vehicles though. Another thing, this AMT truck model does not have opening doors. Once the cab is cemented in place its permanently sealed against cab interior access. A seated driver might break loose and there is no way to secure the figure. Attaching the steering wheel will be tricky to get it in perfect alignment with the steering column. There is a concave hole in the steering wheel hub and a convex nipple on the end of the steering shaft. AMT should have used a perfect cylindrical nipple to fit into a perfect cylindrical hole for precise alignment. This kit has a few flaws: -no opening cab doors -no easy access to cab interior once assembled, screws should have been used to attach certain parts like the interior bucket to the cab and the cab to the chassis for easy model maintenance, often die-cast models use screws for assembly -the visor has no tabs and the cab roof has no slots for precise mounting of this part -the rooftop marker lights have no tabs for mounting -the battery box cover has no way to secure it in place except to cement it shut and the battery inside then can't be viewed -the front axle wheels don't steer
-
No, I've never heard of them. For my truck's body color I will use Model Master 1970 Plymouth Plum Crazy purple in metallic lacquer. Testors glosscote lacquer will eventually seal in those decals. I use Testors enamels for everything else like the chassis which will be semi-gloss black. Only the cab, hood, sleeper and other parts in body color get the lacquer purple. The cab interior from the dash level up will get exterior body color. The firewall also gets body color. The interior buicket gets body color on the bottom but stays molded white inside. The engine will be painted. I think I will use the curved stack option for the exhaust pipes. The sleeper stays molded white inside. Never learned the skill of airbrushing. I have an outdoor paint booth tent. I cover fresh painted parts up with a cardboard box to keep dust off. I use Testors plastic putty for filling holes and seams. I have an AMT Wilson cattle trailer this tractor will be hooked up to. I can't find animals in 1:25 scale to put in the trailer. I can't find a 1:25 scale seated driver figure either. So, this rig will be on my model shelf like she's parked and not in service.
-
I'm having a little trouble priming the parts that are to be painted in body color. I used Tamiya gray surface primer. Expensive stuff at over $13 a rattle can. I placed the can in a glass of hot water for a few minutes then shook the devil out of the can. There is some paint puddling on the vertical side of the battery box cover/step and on the inside of the hood there is some orange peel. This will definitely take some wet sanding to smooth out. I'm still mastering the art of spray painting. I have the patience but it will take some serious time to get this tractor model looking cherry. The custom decals are now on order from Bedlam Creations.
-
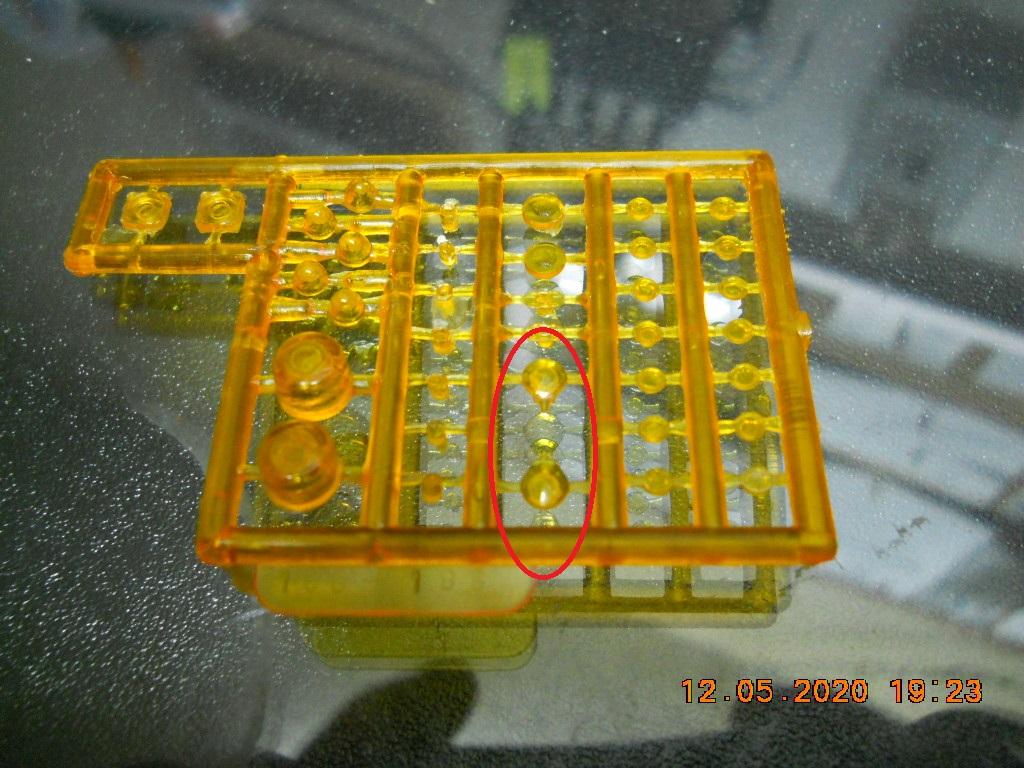
Kenworth W925 Tribute
Plumcrazy Preston replied to Mahogany Rush's topic in Model Trucks: Big Rigs and Heavy Equipment
Mahogany I'm now building this same AMT Kenworth W-925 kit in a custom 1970 Plymouth Plum Crazy livery with a fictitious Preston trucking company door sign. You are missing the lollipop flasher lights from the fenders. Did you get a set of amber lights on a runner like this one? Could AMT send you some replacement lights if you were to contact them and ask them?


.JPG.b4c28c634b90f1b63ab6a6d463fdcbd0.JPG)
.JPG.dca61dad9d0539063e2e92eaa31a014d.JPG)
.JPG.27f33201f5cda5f0390737882336bfcb.JPG)
.JPG.042cdf68f845dd888b265f8cf7e5843c.JPG)
.JPG.14f85abe007e4fd1f3cbb19402bf0286.JPG)