

papajohn97
-
Posts
627 -
Joined
-
Last visited
Content Type
Profiles
Forums
Events
Gallery
Posts posted by papajohn97
-
-
I’d use the PE grill, the plastic grill screams “toy” IMO. You can easily bend the PE to match the body contour at the opening.
Your build is coming along nicely so far. I agree with TransAMMike on the base coat red, light sand and re-spray if necessary to smooth out, I’ve never had luck fixing a bumpy base coat with clear coat. -
Nice execution on a very cool subject!
-
Beautiful build, particularly like your foil work, the interior and that incredibly detailed engine bay. Thanks for posting!
-
Gorgeous clean meticulous build! A fitting tribute to GM's (Bill Mitchell's) best styling years. I also love your super sharp outdoor photography and the rock backgrounds which really complement the car's colors. Thanks for posting!
-
Very nice job Steve on a car that’s close to my heart. I learned to drive in my mom’s nearly new Artesian Turquoise ‘66 Malibu. Her’s had a 283 which was a good thing for me and those around me at the time, can you imagine a 16 yr old learning to drive in a 396?
I love the colors and the look of Torque Trust wheels on this car and am amazed that you painted the bright work freehand using Molotow pens. You must not be a coffee drinker!
-
That engine and interior is really sweet. Looks like you put a ton of work into this build, very well done!
-
Great execution Mike! (From one of AMT’s worst all-time kits IMO). I particularly like the work you did to make the very crude kit supplied SOHC look realistic and the hand painted safety harness and dash and steering wheel details in the interior.
-
There’s nothing I don’t like about this build Nick. The subject, the paint work, the foiling, decals, that well-detailed big SOHC, Torque Thrust Mags, just an all around beautiful model! Would love to see a photo of the underside if you have one to post. Thanks for sharing!
-
The notch patching and paint looks great so far. I agree with you on the wheels, they varied a lot back then based on ref. photos.
On the Silver Leaf painted blower, I have found TS-30 to be fairly delicate and easy to tarnish if handled so be careful when touching. If it was a large part I’d recommend hitting it with some semi-gloss or matte clear coat but you should be ok as long as you minimize contact with fingers.
-
6 hours ago, Zippi said:
John....what paint did you use on the blower? I like it.
Hi Bob, I think I used Alclad magnesium over gloss black enamel. I'm hoping to phase out of Alclad and find something that doesn't require a black gloss base and that is less fragile. I just ordered some Mr Color metalizer and have Zero metalizer on back order, I'll let you know if these work easier/ better/ more durable than Alclad.
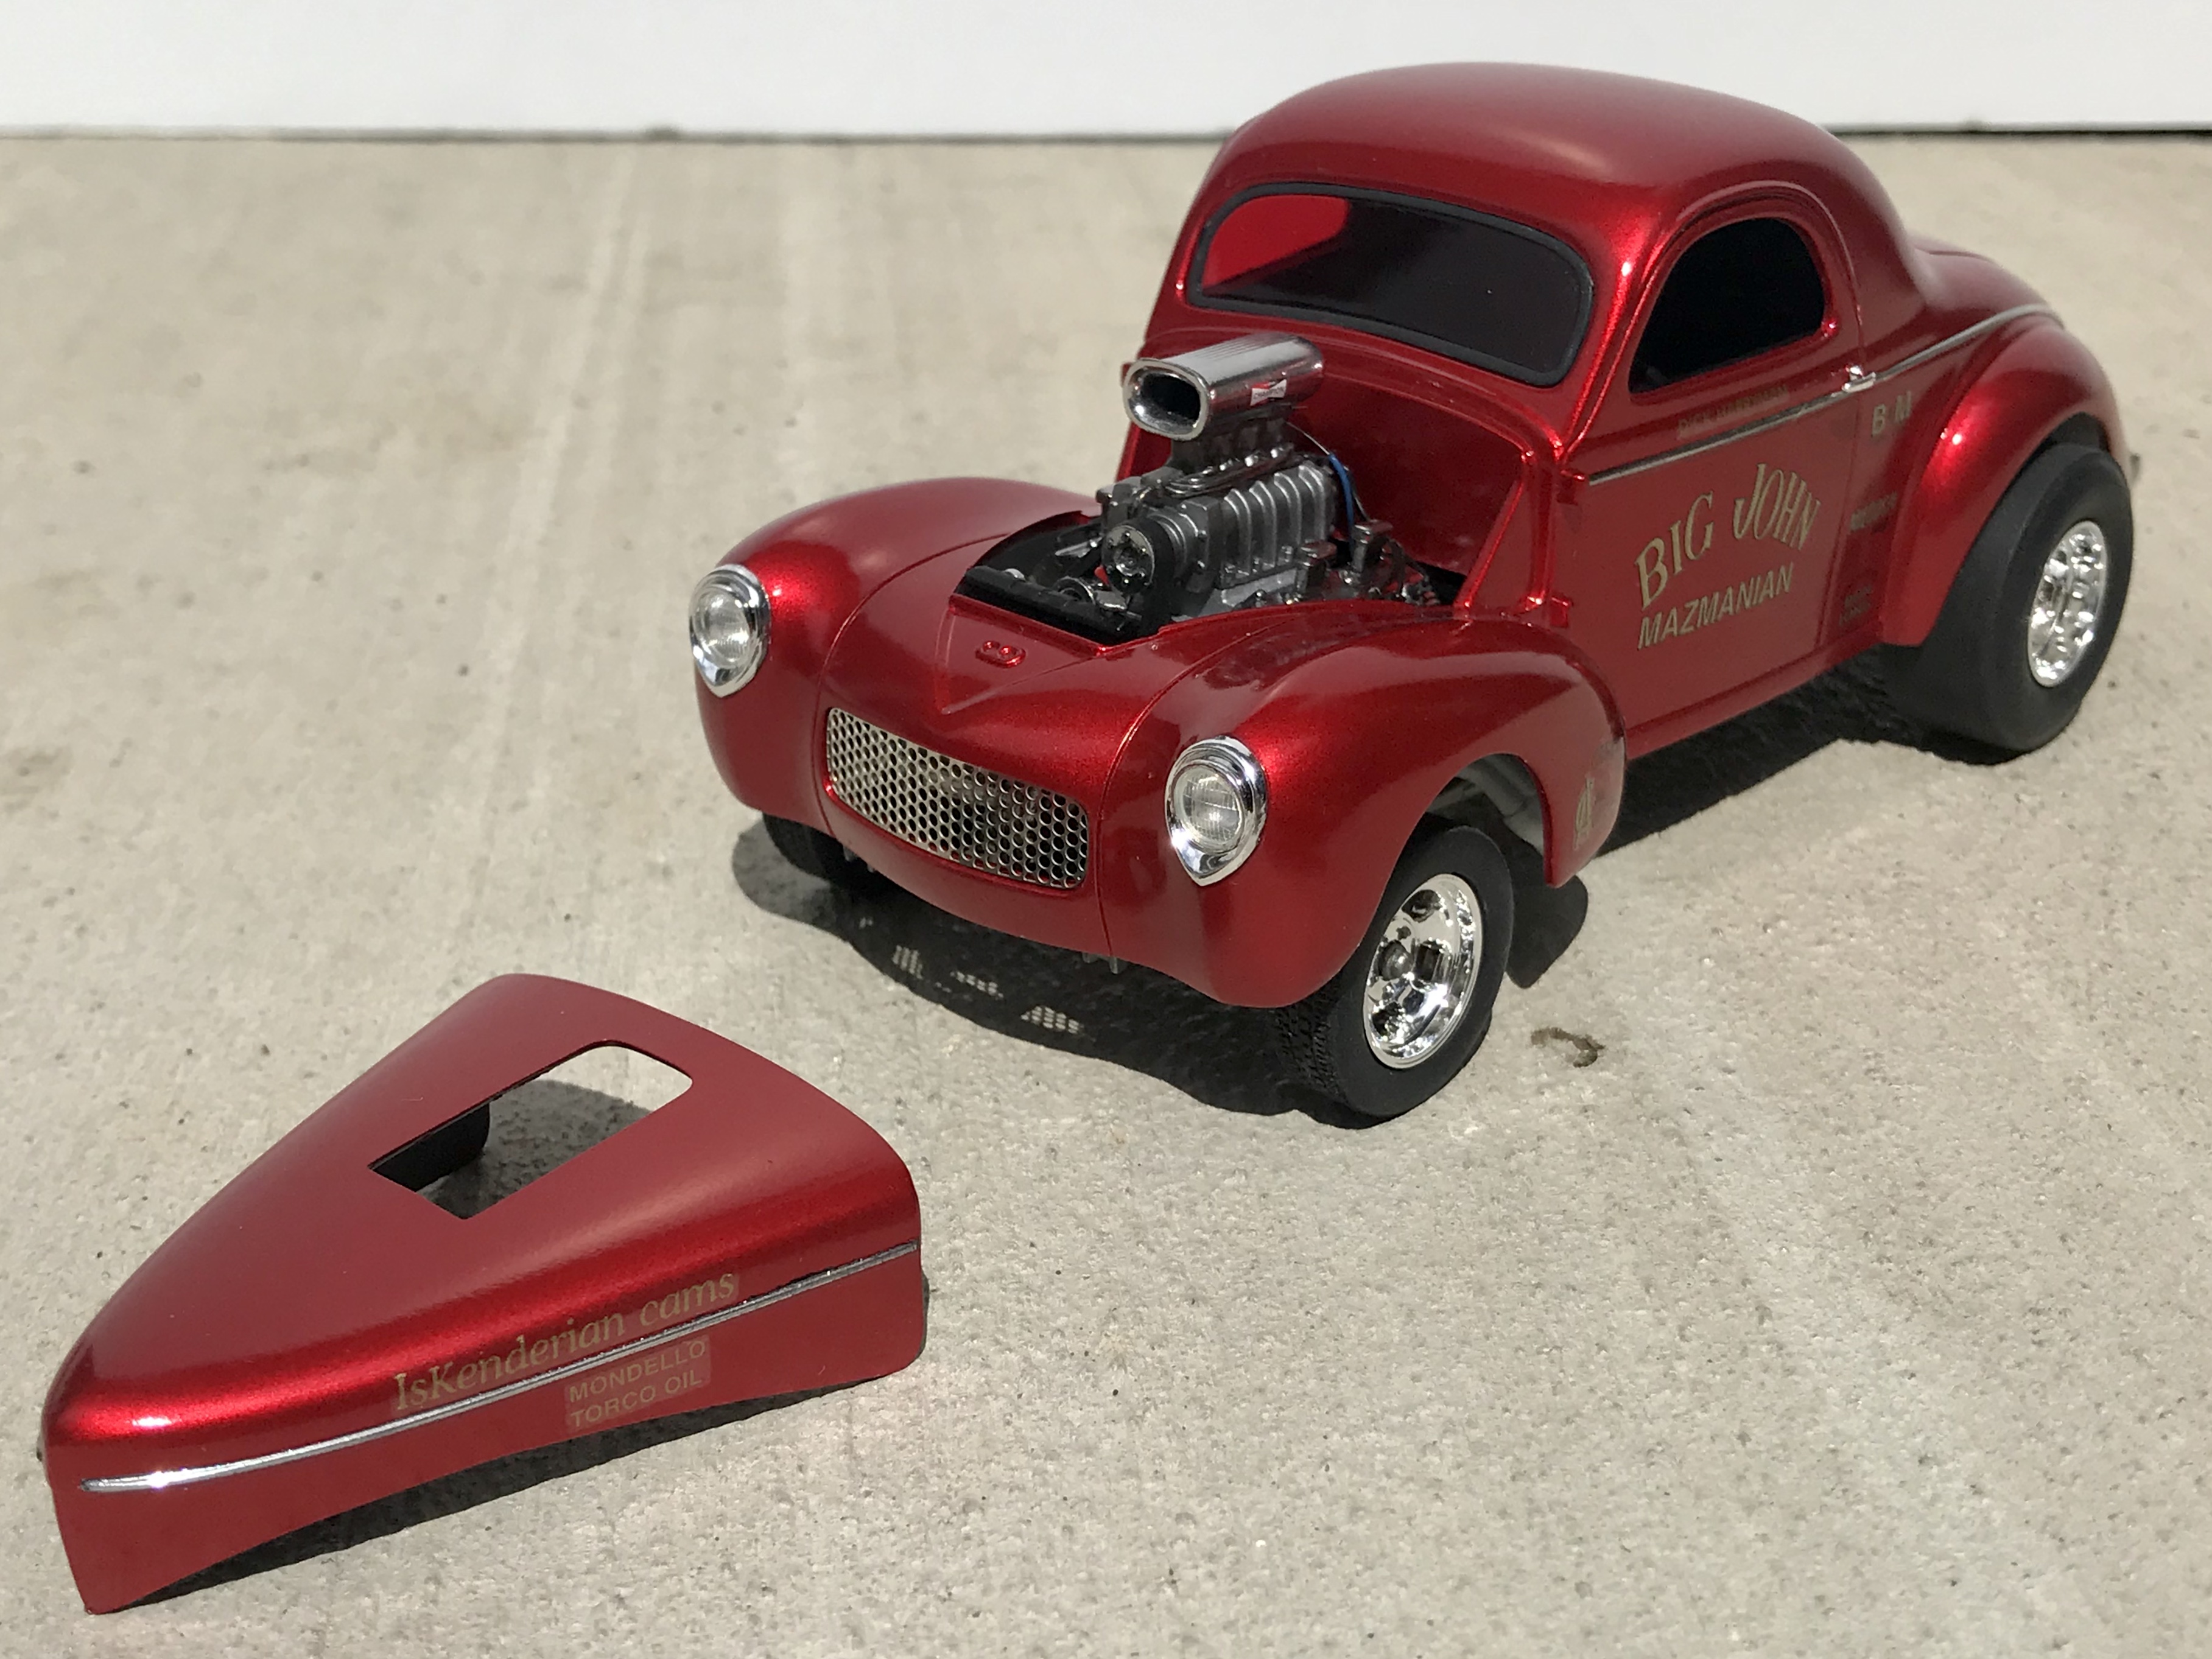
I got to see this actual car on my very first trip to the drags (in '64 - I was 11). It was the cleanest prettiest most dazzling car there that day and a crowd favorite. I drive a bright red Mazda sedan these days, it's "Soul Red Crystal" in color, when someone asks me "what do they call that bright color?", I always answer "John Mazmanian Red!!!".
-
I cut the snap-fit tabs off the rear lower edges of the hood and filled in the mating notches in the body with styrene strips and putty. No idea why Revell thought these features were necessary to begin with… ?

-
 1
1
-
-
Beautiful job on an ancient kit! I’m really impressed that you were able to get the roof retraction mechanism working. I remember looking down into the rear roof storage bay in a 1:1 Ford Retractable at a car show years ago and being mystified by all the linkages, relays and wiring. Looked like a nightmare to do repairs on.
-
Very clean build. I like the sleeper look you achieved with the steelies and the dog dish wheel caps. I noticed you removed the mid portions of the stock exhausts but left the mufflers in place - are the mufflers molded into the chassis?
-
That’s pretty cool! The lace paint effect on the top is very well done!
-
Beautiful clean build. I like the understated champagne and black, a nice change from the brighter colors you usually see for these (grabber blue, mint green, bright orange or red). The wheels are my favorite part.
-
Great job David! I love that you used different shades of blue for each. That Galaxie is particularly stunning with the white roof and interior. I thought about getting this re-release for the Falcon but read that it uses the old AMT Mustang funny car chassis and engine which is disappointing. Your Falcon actually looks much better over this chassis than the Mustang IMO.
-
Okay, this has got to be one of the most boring looking drag cars ever posted on here but I needed an early Ford super stocker to round out my 1/25 collection of early 60's super stockers and in '61 - '62 they were all pretty unsexy. This model was intended to reproduce 1 of the 11 "factory lightweight" super stock cars with the new 406 cu. in. V-8's and dual Holley carbs that Ford had Dearborn Steel Tubing Corp. make from bone stock stripped-down Galaxy sedans. NHRA made them classify these cars as factory experimental because of all the non-factory-optional mods such as the fiberglass and aluminum body parts. Here's a good link on the background history:
https://www.dragzine.com/features/muscle-cars-you-should-know-62-ford-galaxie-406-lightweight/
I used this Mecum auction posting as a"walk-around" reference:
https://www.mecum.com/lots/FL0118-312672/1962-ford-galaxie-500-lightweight/
This is my first attempt at kit bashing a resin body (Jimmy Flintstone) to an injection molded kit, in this case the ‘60 Ford Starliner. This is also my first attempt at DIY decals and I made a point of selecting a monochrome decal subject due to the cheap HP inkjet printer I had available. It’s been an education for me working with resin and I have even greater appreciation now for the beautiful resin builds I see posted here - it’s not easy! Lot's of casting flash, very rough uneven inside surfaces, really heavy and variable wall thicknesses, it's a testament to the strength of these Flintstone cast parts that I didn't break anything while cleaning them up. The AMT '60 Starliner interior and chassis fit this resin body with very little required in the way of modifications. I scratch built the windows using .005” clear styrene sheet and it worked out okay for this subject, at least for the two sides and the rear, the front windshield ended up a little too recessed. I used Tamiya TS-54 light metallic blue lacquer for the interior and airbrushed the base paint on the body using an original factory color, Corinthian White, which I ordered from Scalefinishes.com and clear coated it with Tamiya TS-13.
Far from perfect but good enough to provide an early example to add to my early sixties super stock collection. I promise to build a prettier one next time!
Still not tired of building these classic old SS'ers!
Cheers,
John
-
1
-
-
Thanks Bogger44, I removed the rear quarter windows by drilling out the inside profiles with a small drill (1/16”?) cutting the remaining connections with an X-acto, cleaning up the rough edges with the same X-acto and then taking a course, medium snd fine sanding sticks to clean up the final frame. It’s an easy mod to do. I used the kit part for the front/ rear glass and .005” thick clear styrene sheet for the sides.
-
Hey Bill72sj, you’re on, let’s go! May the faster cammer win!
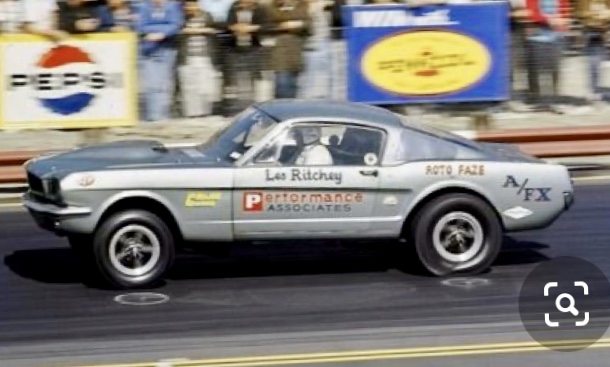
Love the amazing job you’re doing on that sweet ‘67, keep going please! I have the Revell 1/24 ‘65 2+2 kit in the stash with an extra Moebius ‘65 Comet Dyno Don A/FX kit for the donor SOHC that I want to use to build Les Richey’s non-AWB car:
Hoping the 1/25 wide cammer engine will fit into the 1/24 engine bay with a minimal amount of mods. A pair of big Fireball Holley’s on the top should help fool the eyes that it’s all of one scale. I’m just waiting for some custom decals before I start. -
Thanks everyone for the compliments, so nice to share builds here and not just add them to the big plastic storage box in the top of my side of the bedroom closet to be forgotten!
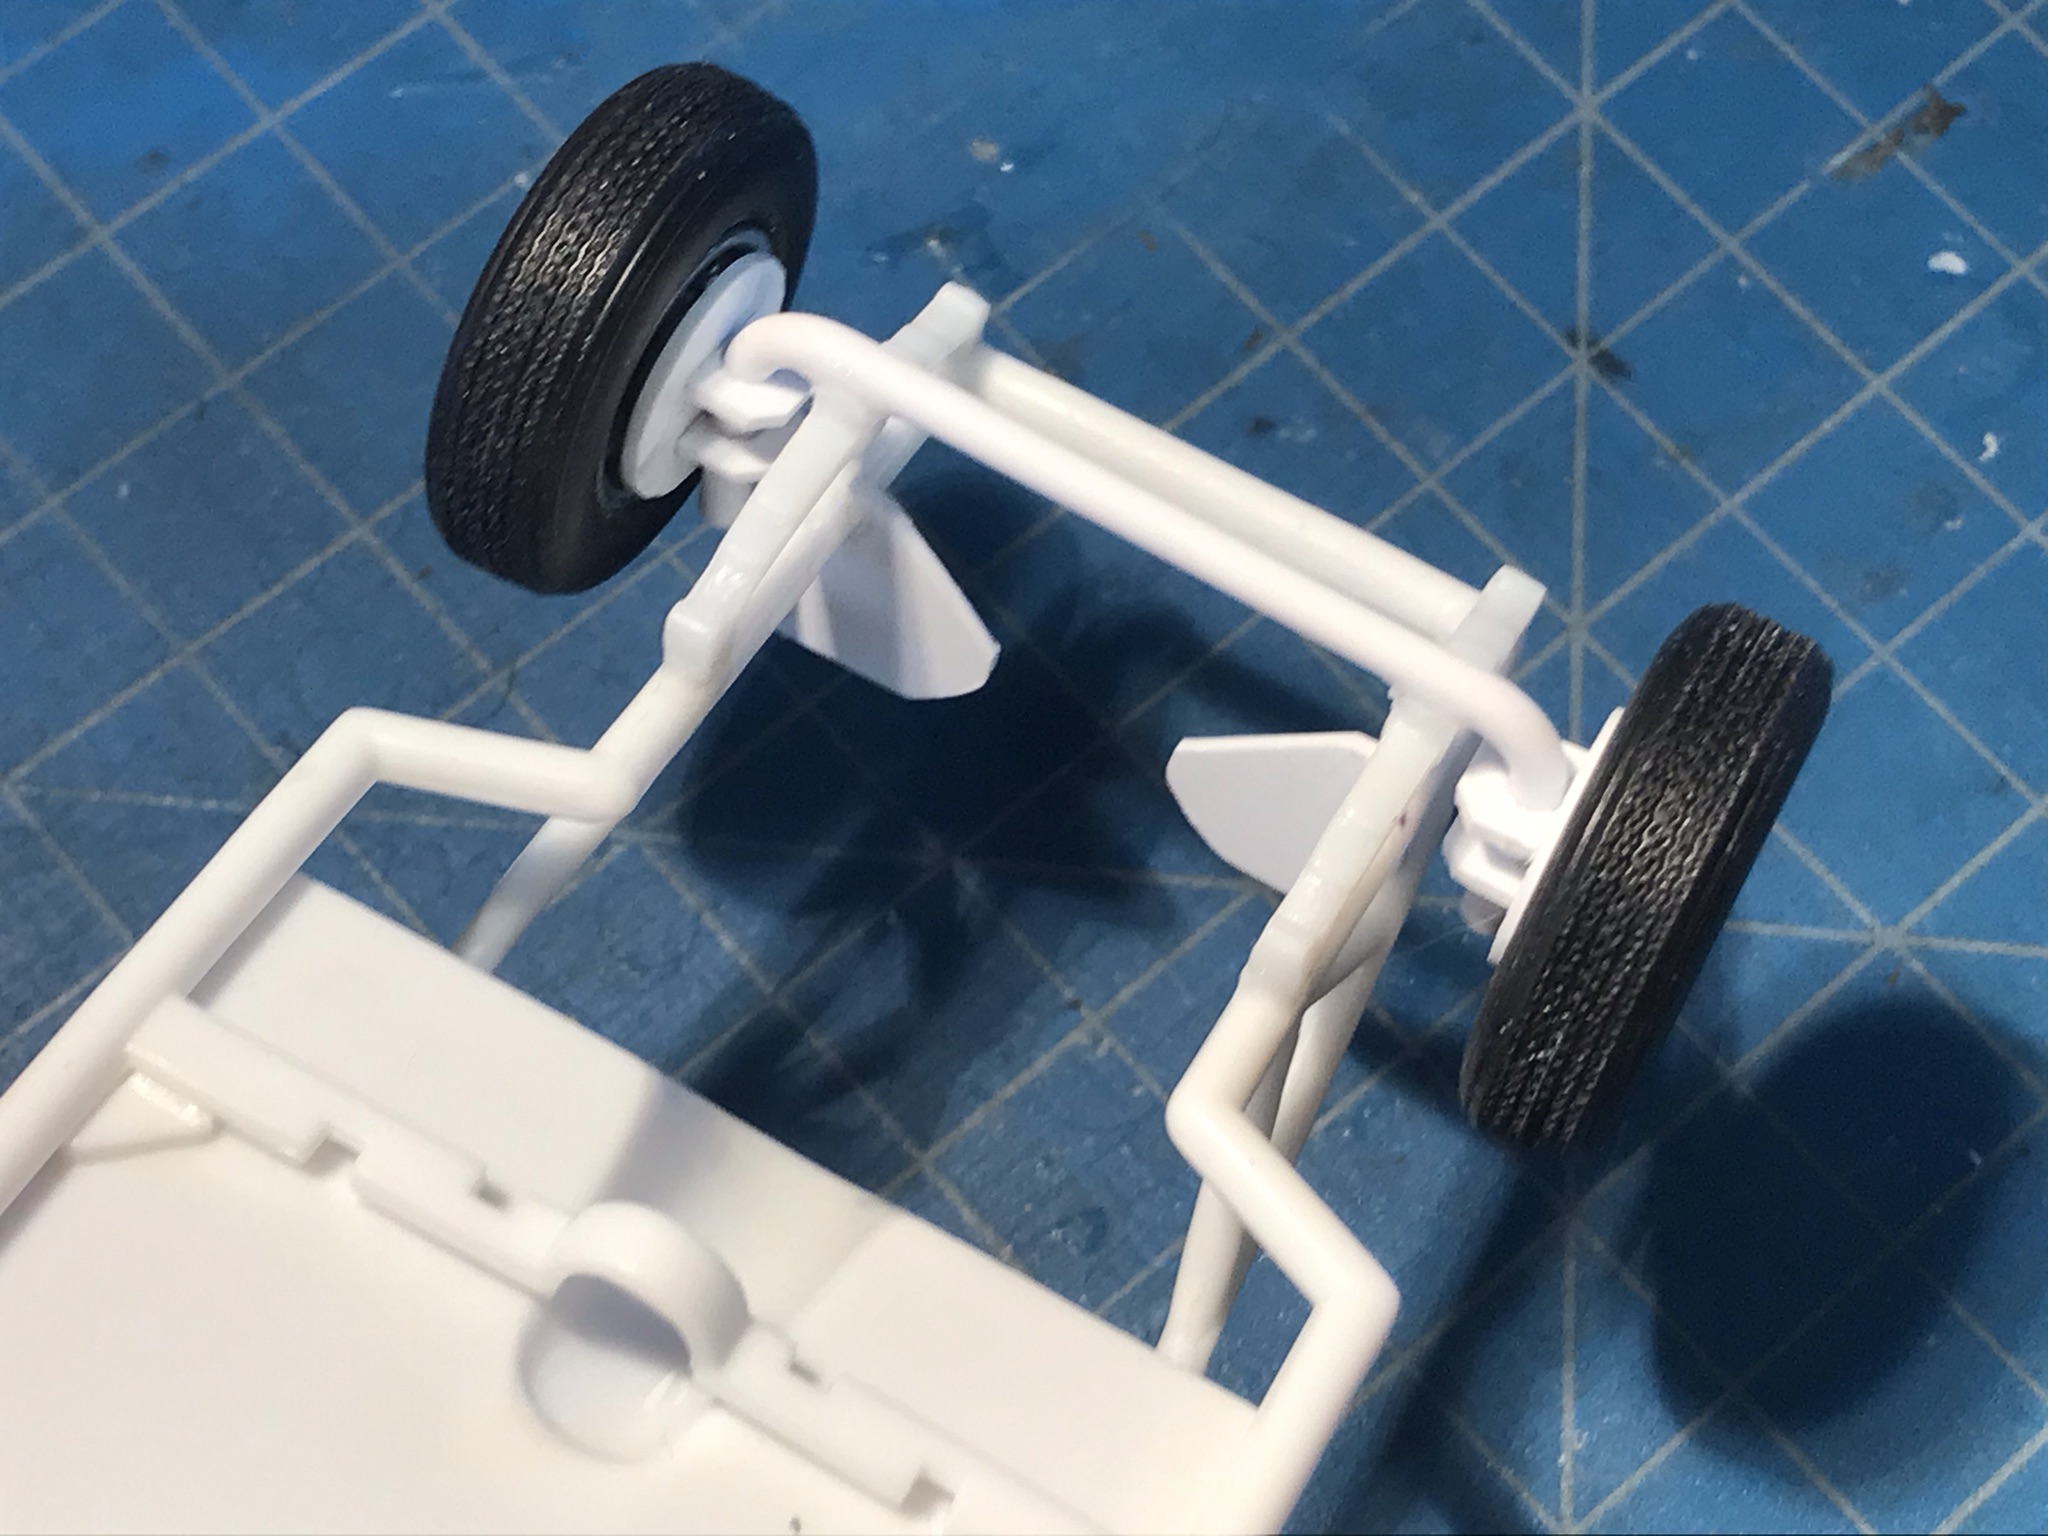
The injector velocity stacks and front leaf springs are from speedcityresin.com. The distributor, plug wires and looms are from Detail Master. The fuel lines are made from 0.5 mm solder and the fuel pump and fuel log junction is scratch built from styrene rod and sheet. I used a round piece of photo etch from my spares box for the front bulkhead detail on the fuel pump, this piece probably coming from an Eduard 1/32 aircraft PE set.I did replace the kit supplied straight axle with a scratch-built one I made from styrene rod that allowed me to lower the front of the car. I also had to incorporate scratch-built engine mount brackets from .04” sheet styrene onto the kit supplied tubular front clip to adjust the engine position relative to the front axle to support the final stance.
-
1
-
-
Gorgeous meticulous super-clean build Harry! Hard to believe this one is only your fifth effort, you obviously pick up skills and learn fast! I think the ability to research techniques and learn from each other over the web has made us all much better builders than we were as kids.
I love the engine detail you achieveed on this fuelie. I built the Revell ‘57 Chev black window a few years ago and the 283 FI engine compartment didn’t come anywhere near as nice as yours. Your metalixing on the mechanicals is A+. And that interior is so realistic and sweet!
I’ve been airbrushing cars/ planes/ ships for years but I still find “shiny” to be the most challenging and still use Tamiya Lacquer color and TS-13 Clear coat rattle cans for most of my car builds.
Thanks for posting! Build & post more please! -
Excellent clean stunning build Tony! (of what must be a relatively rare kit?) Is this 1/32? If so, I would love to have one this nice in the form of a Scalectrix or Revell slot car to race against my Chaparral! That spare tire on the dash of the actual 1:1 must have been a bear to extract if it was ever needed!
-
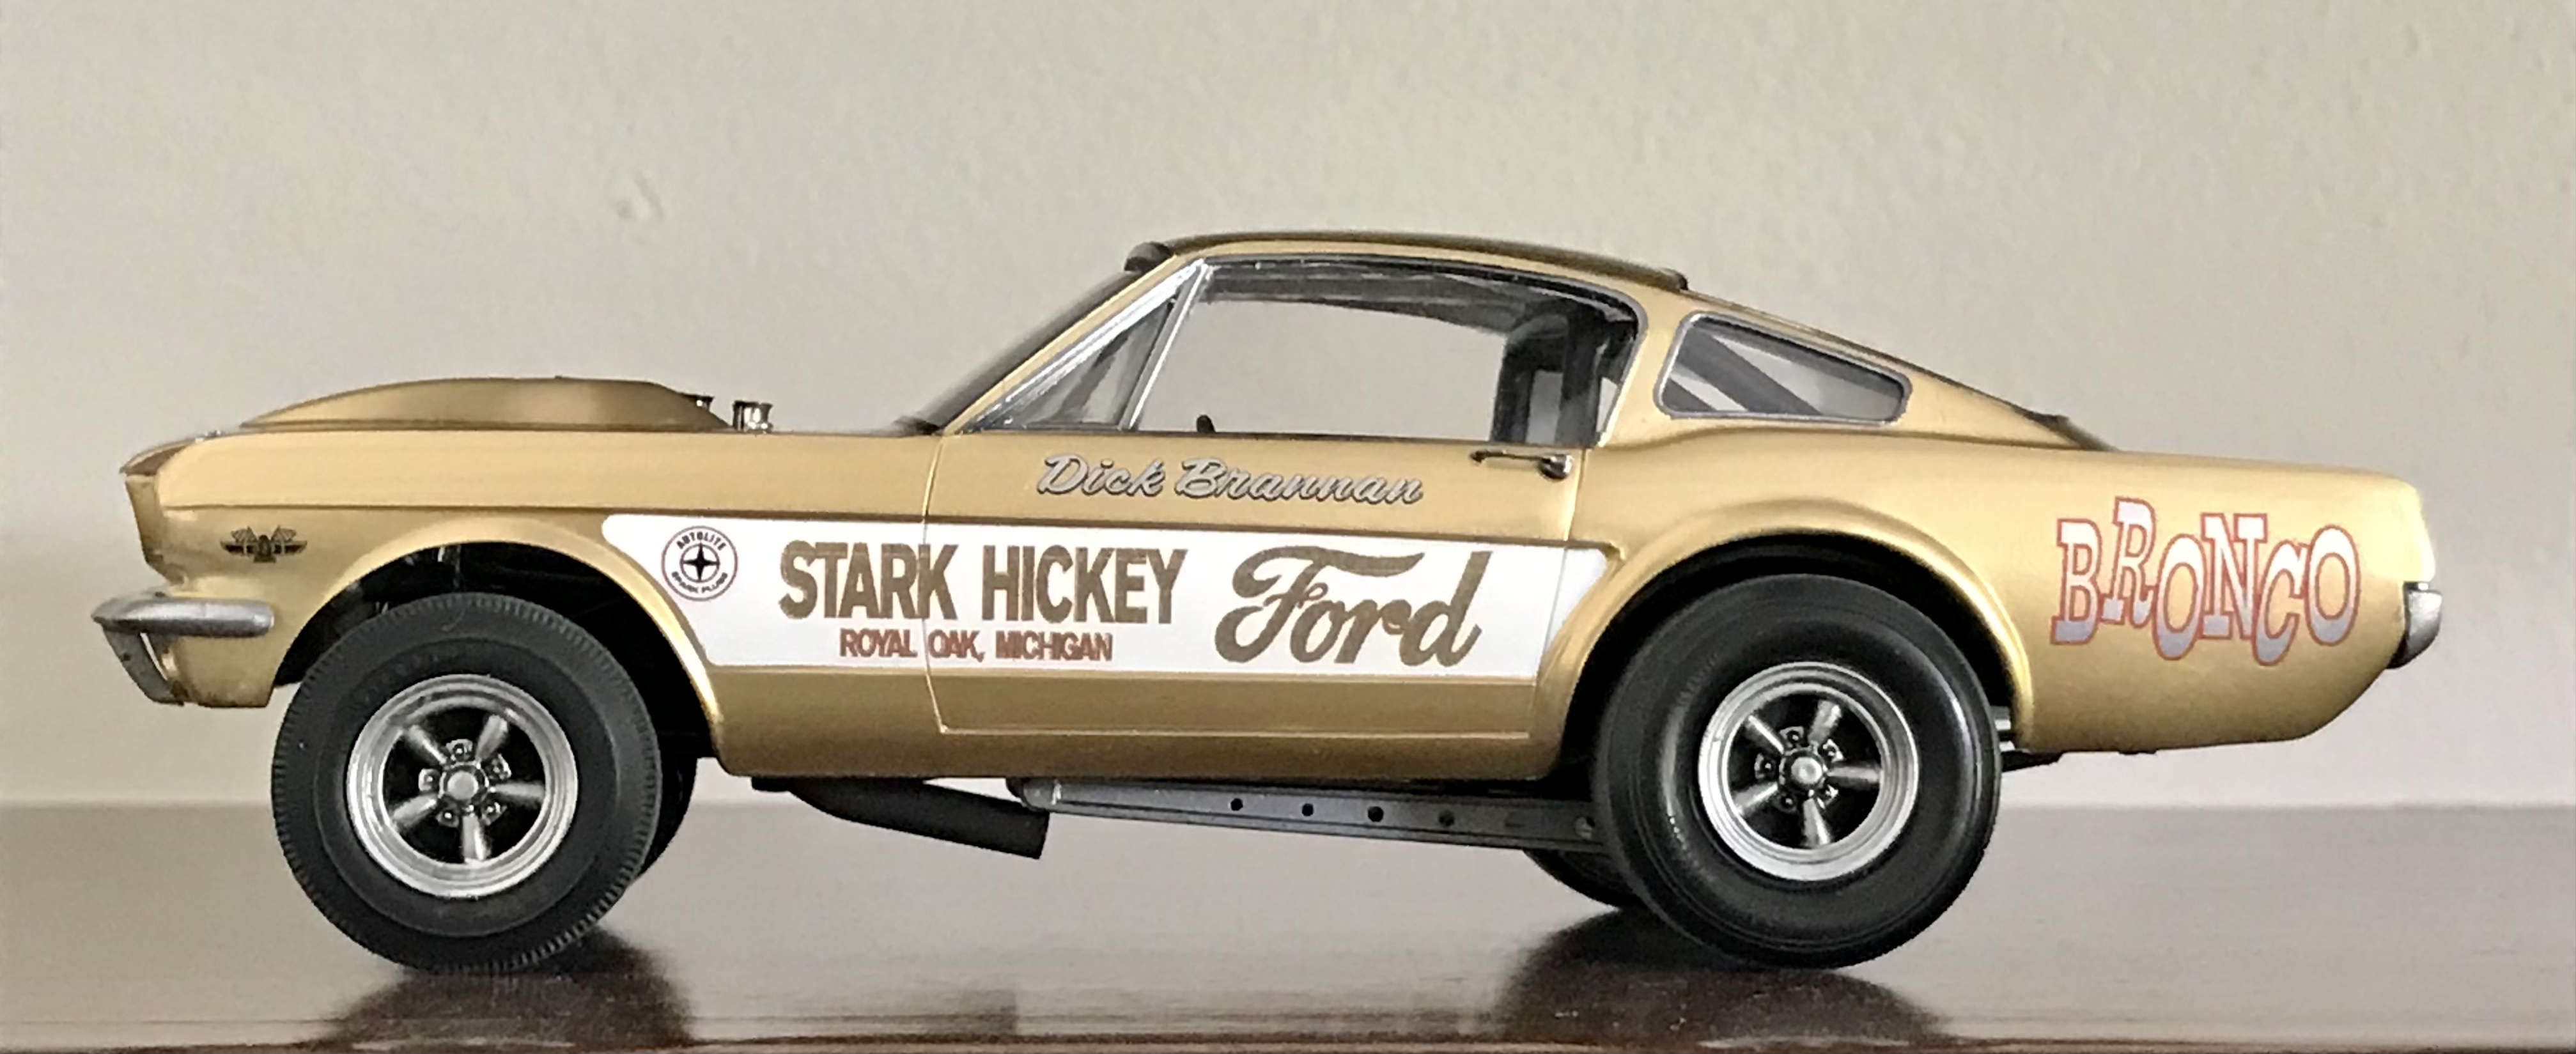
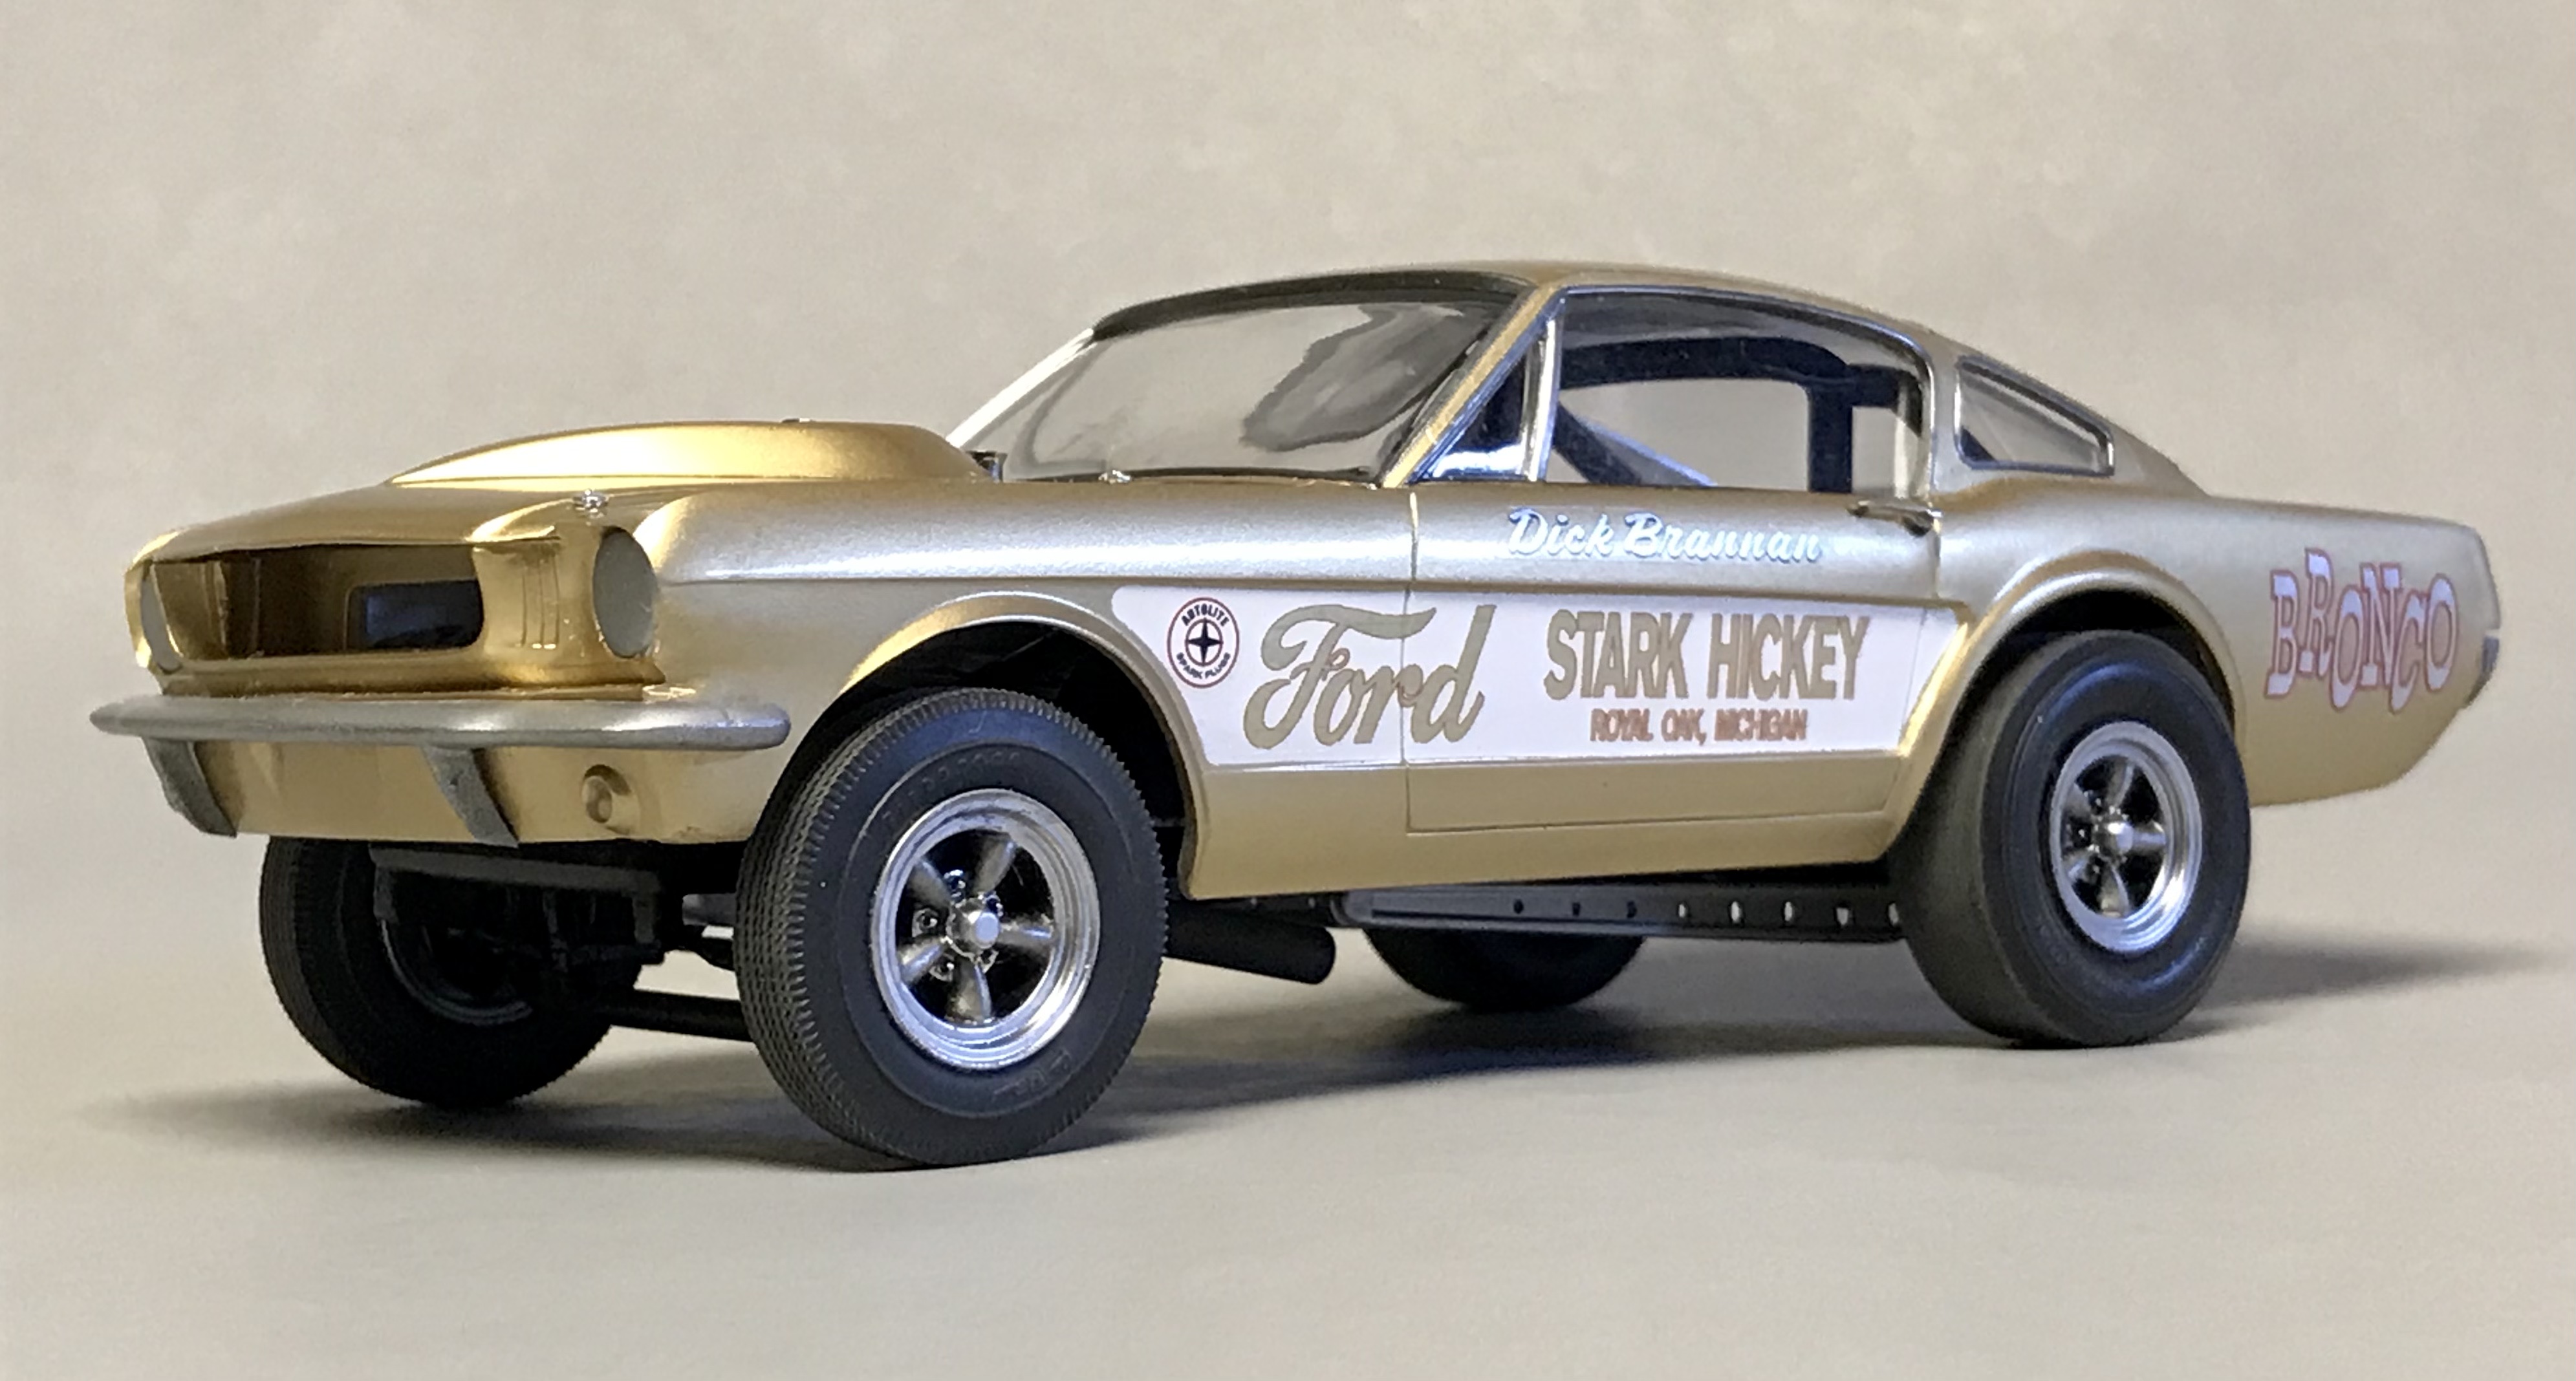
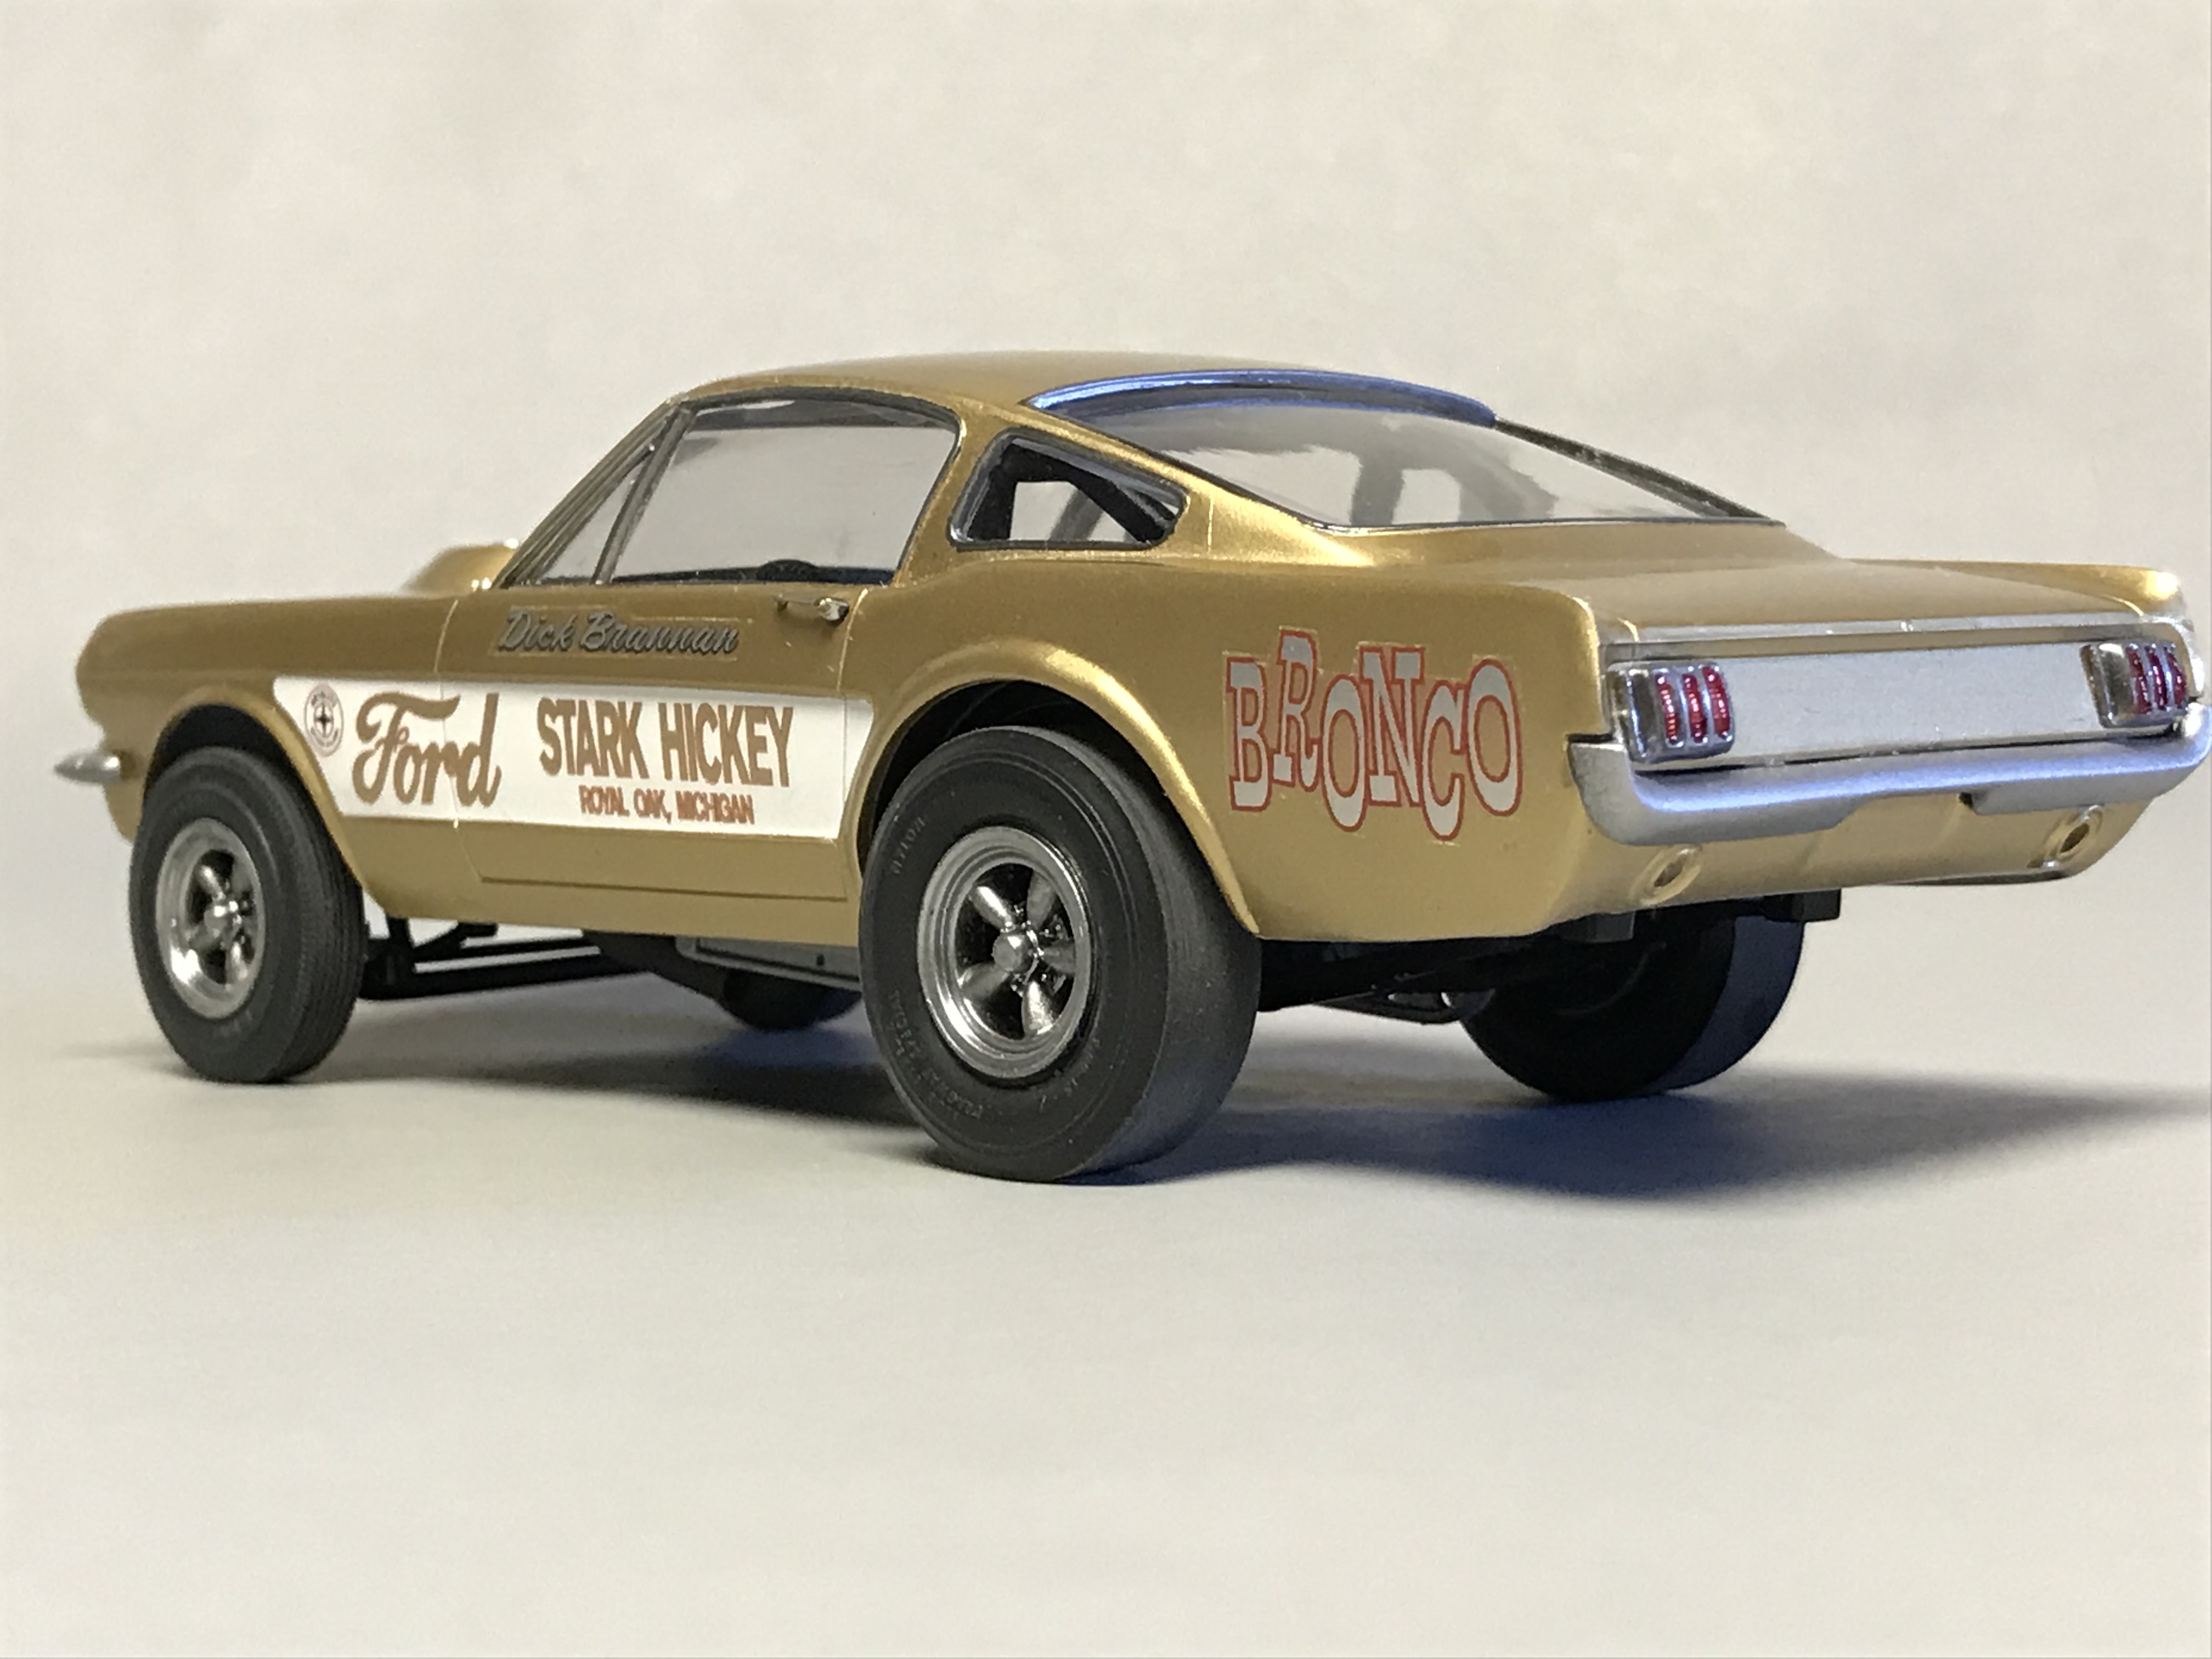
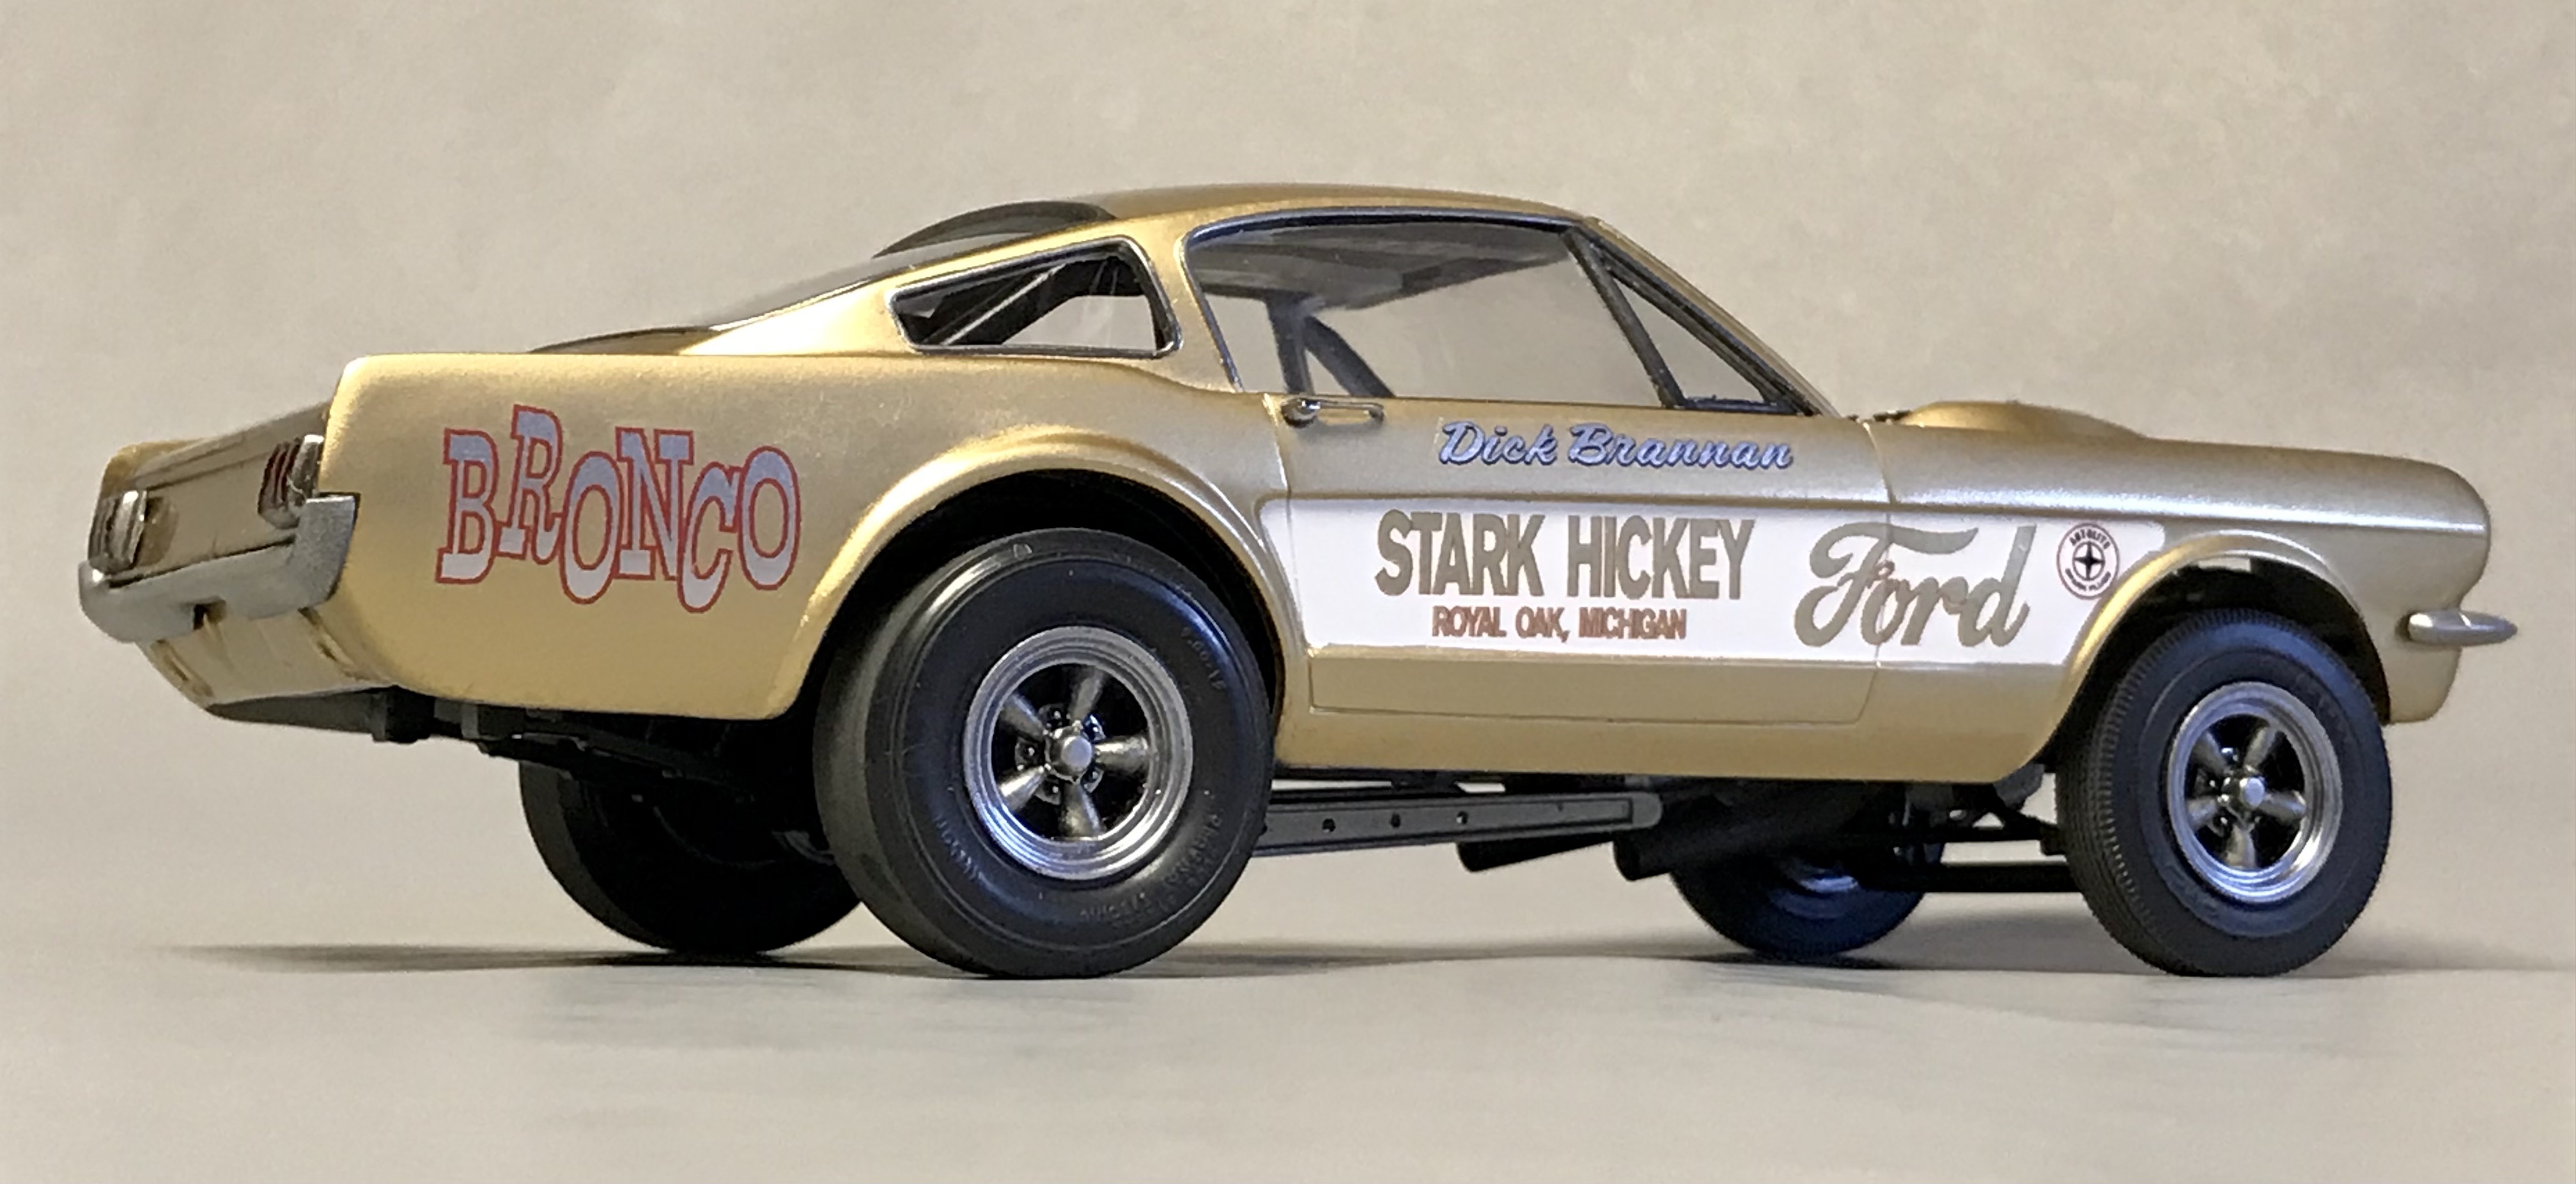
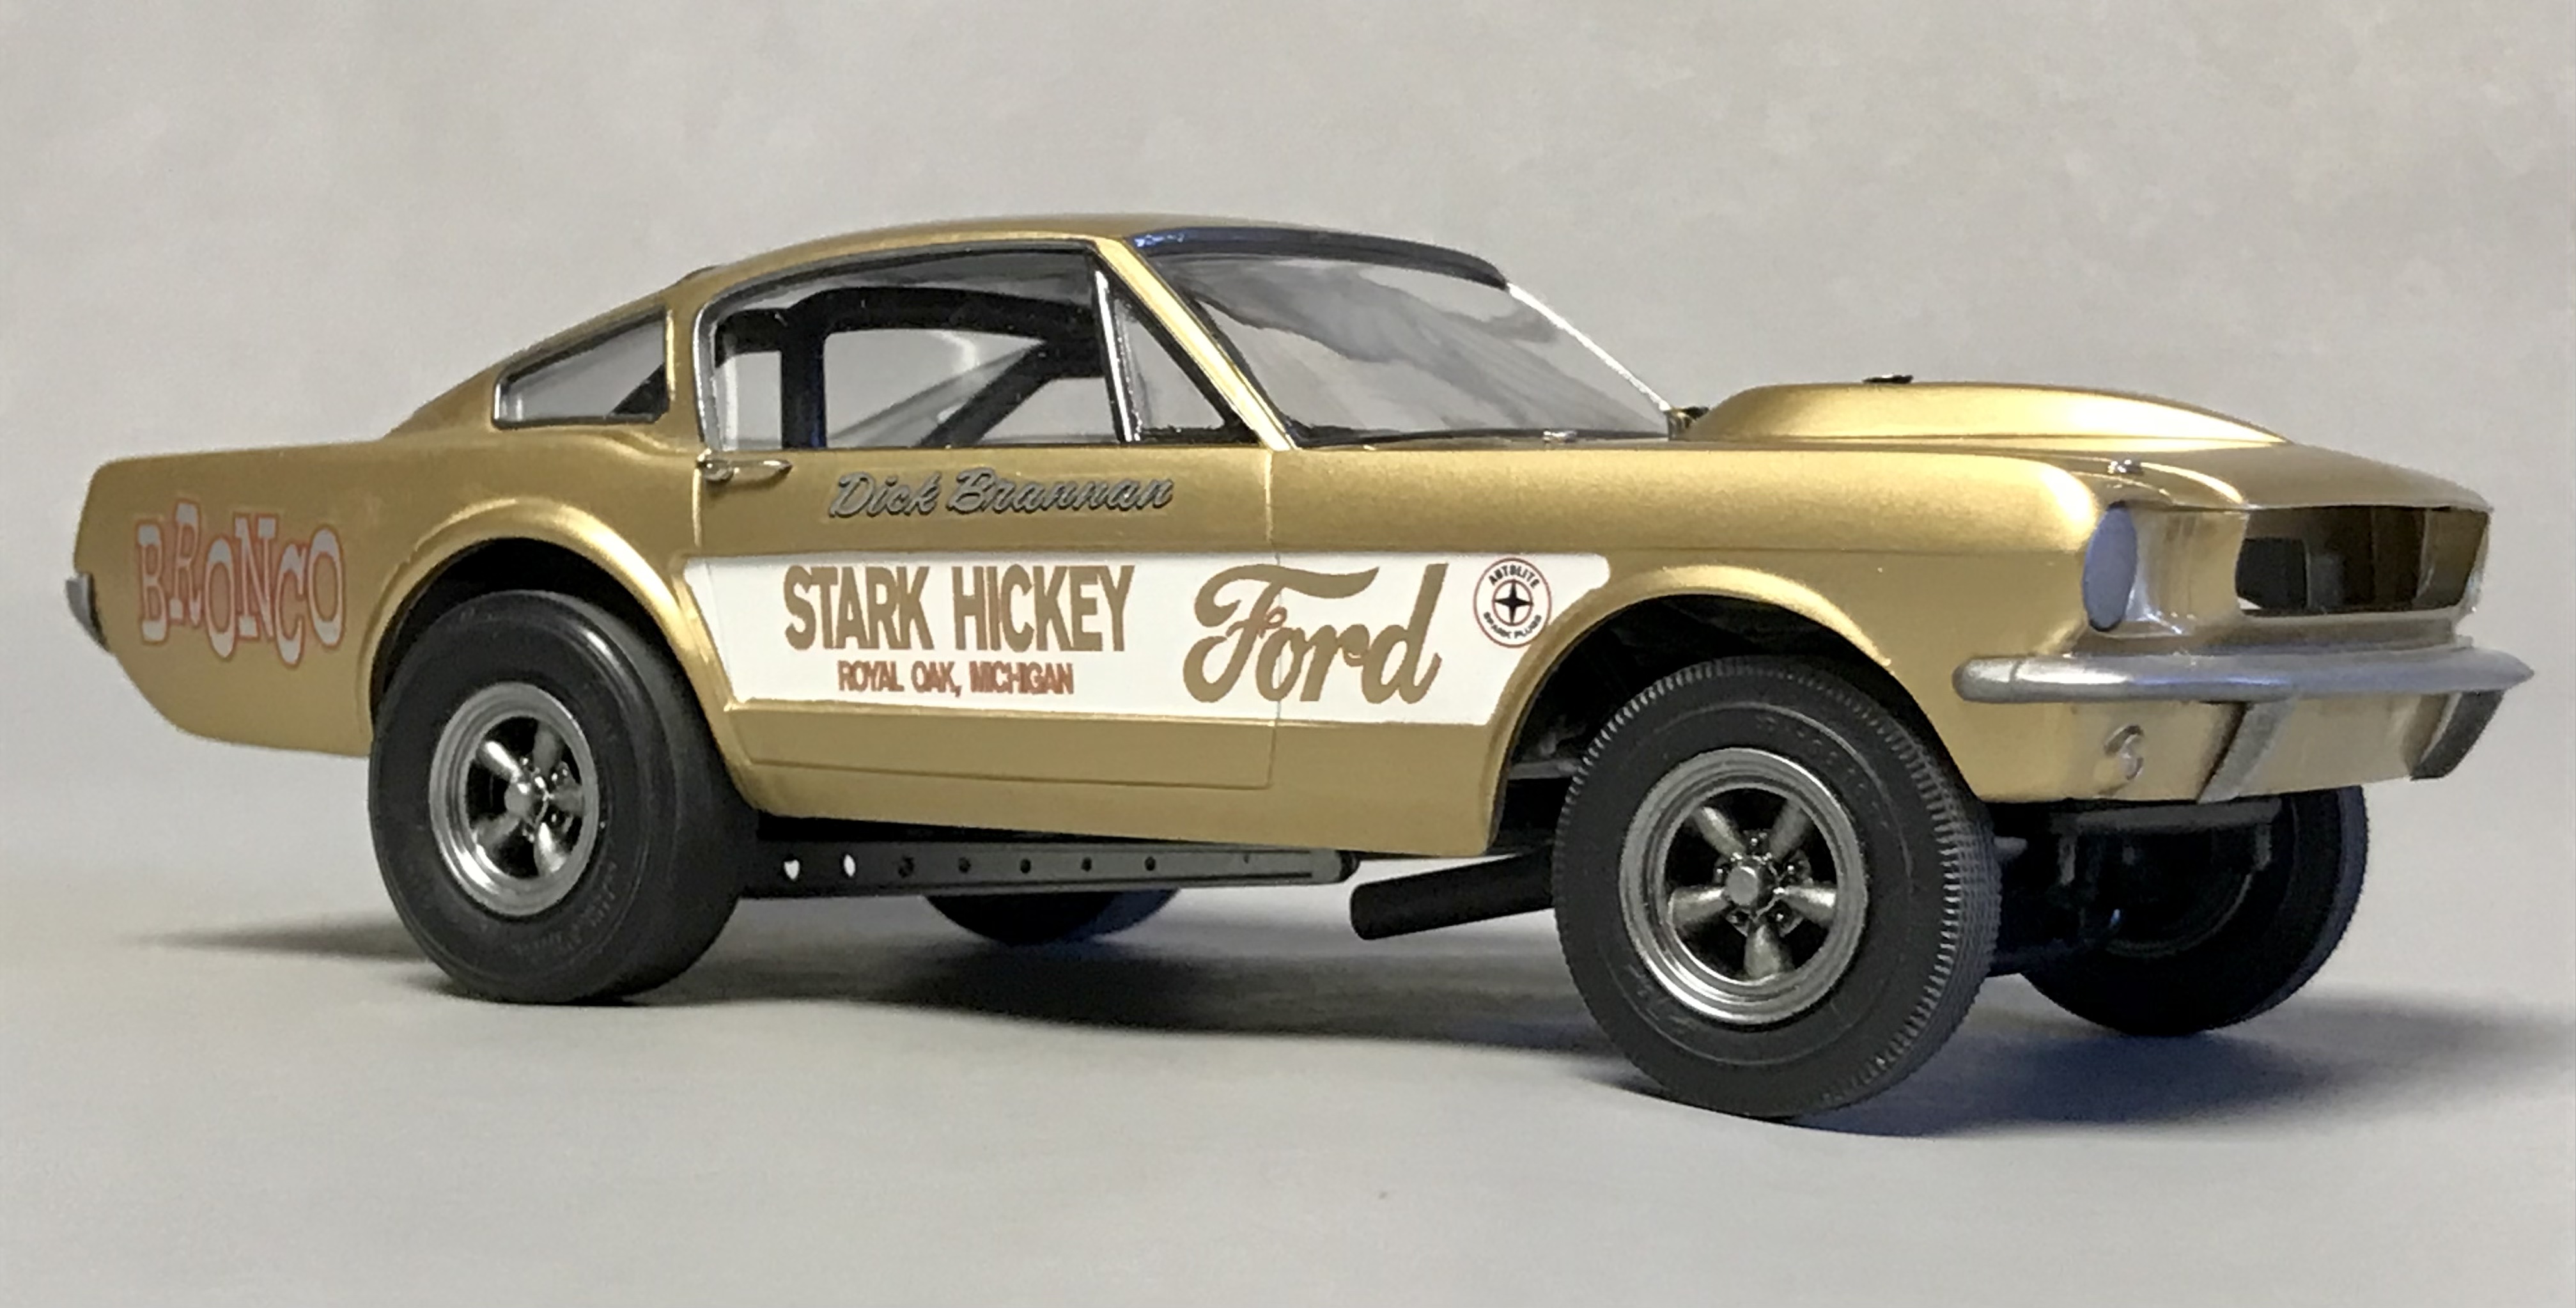
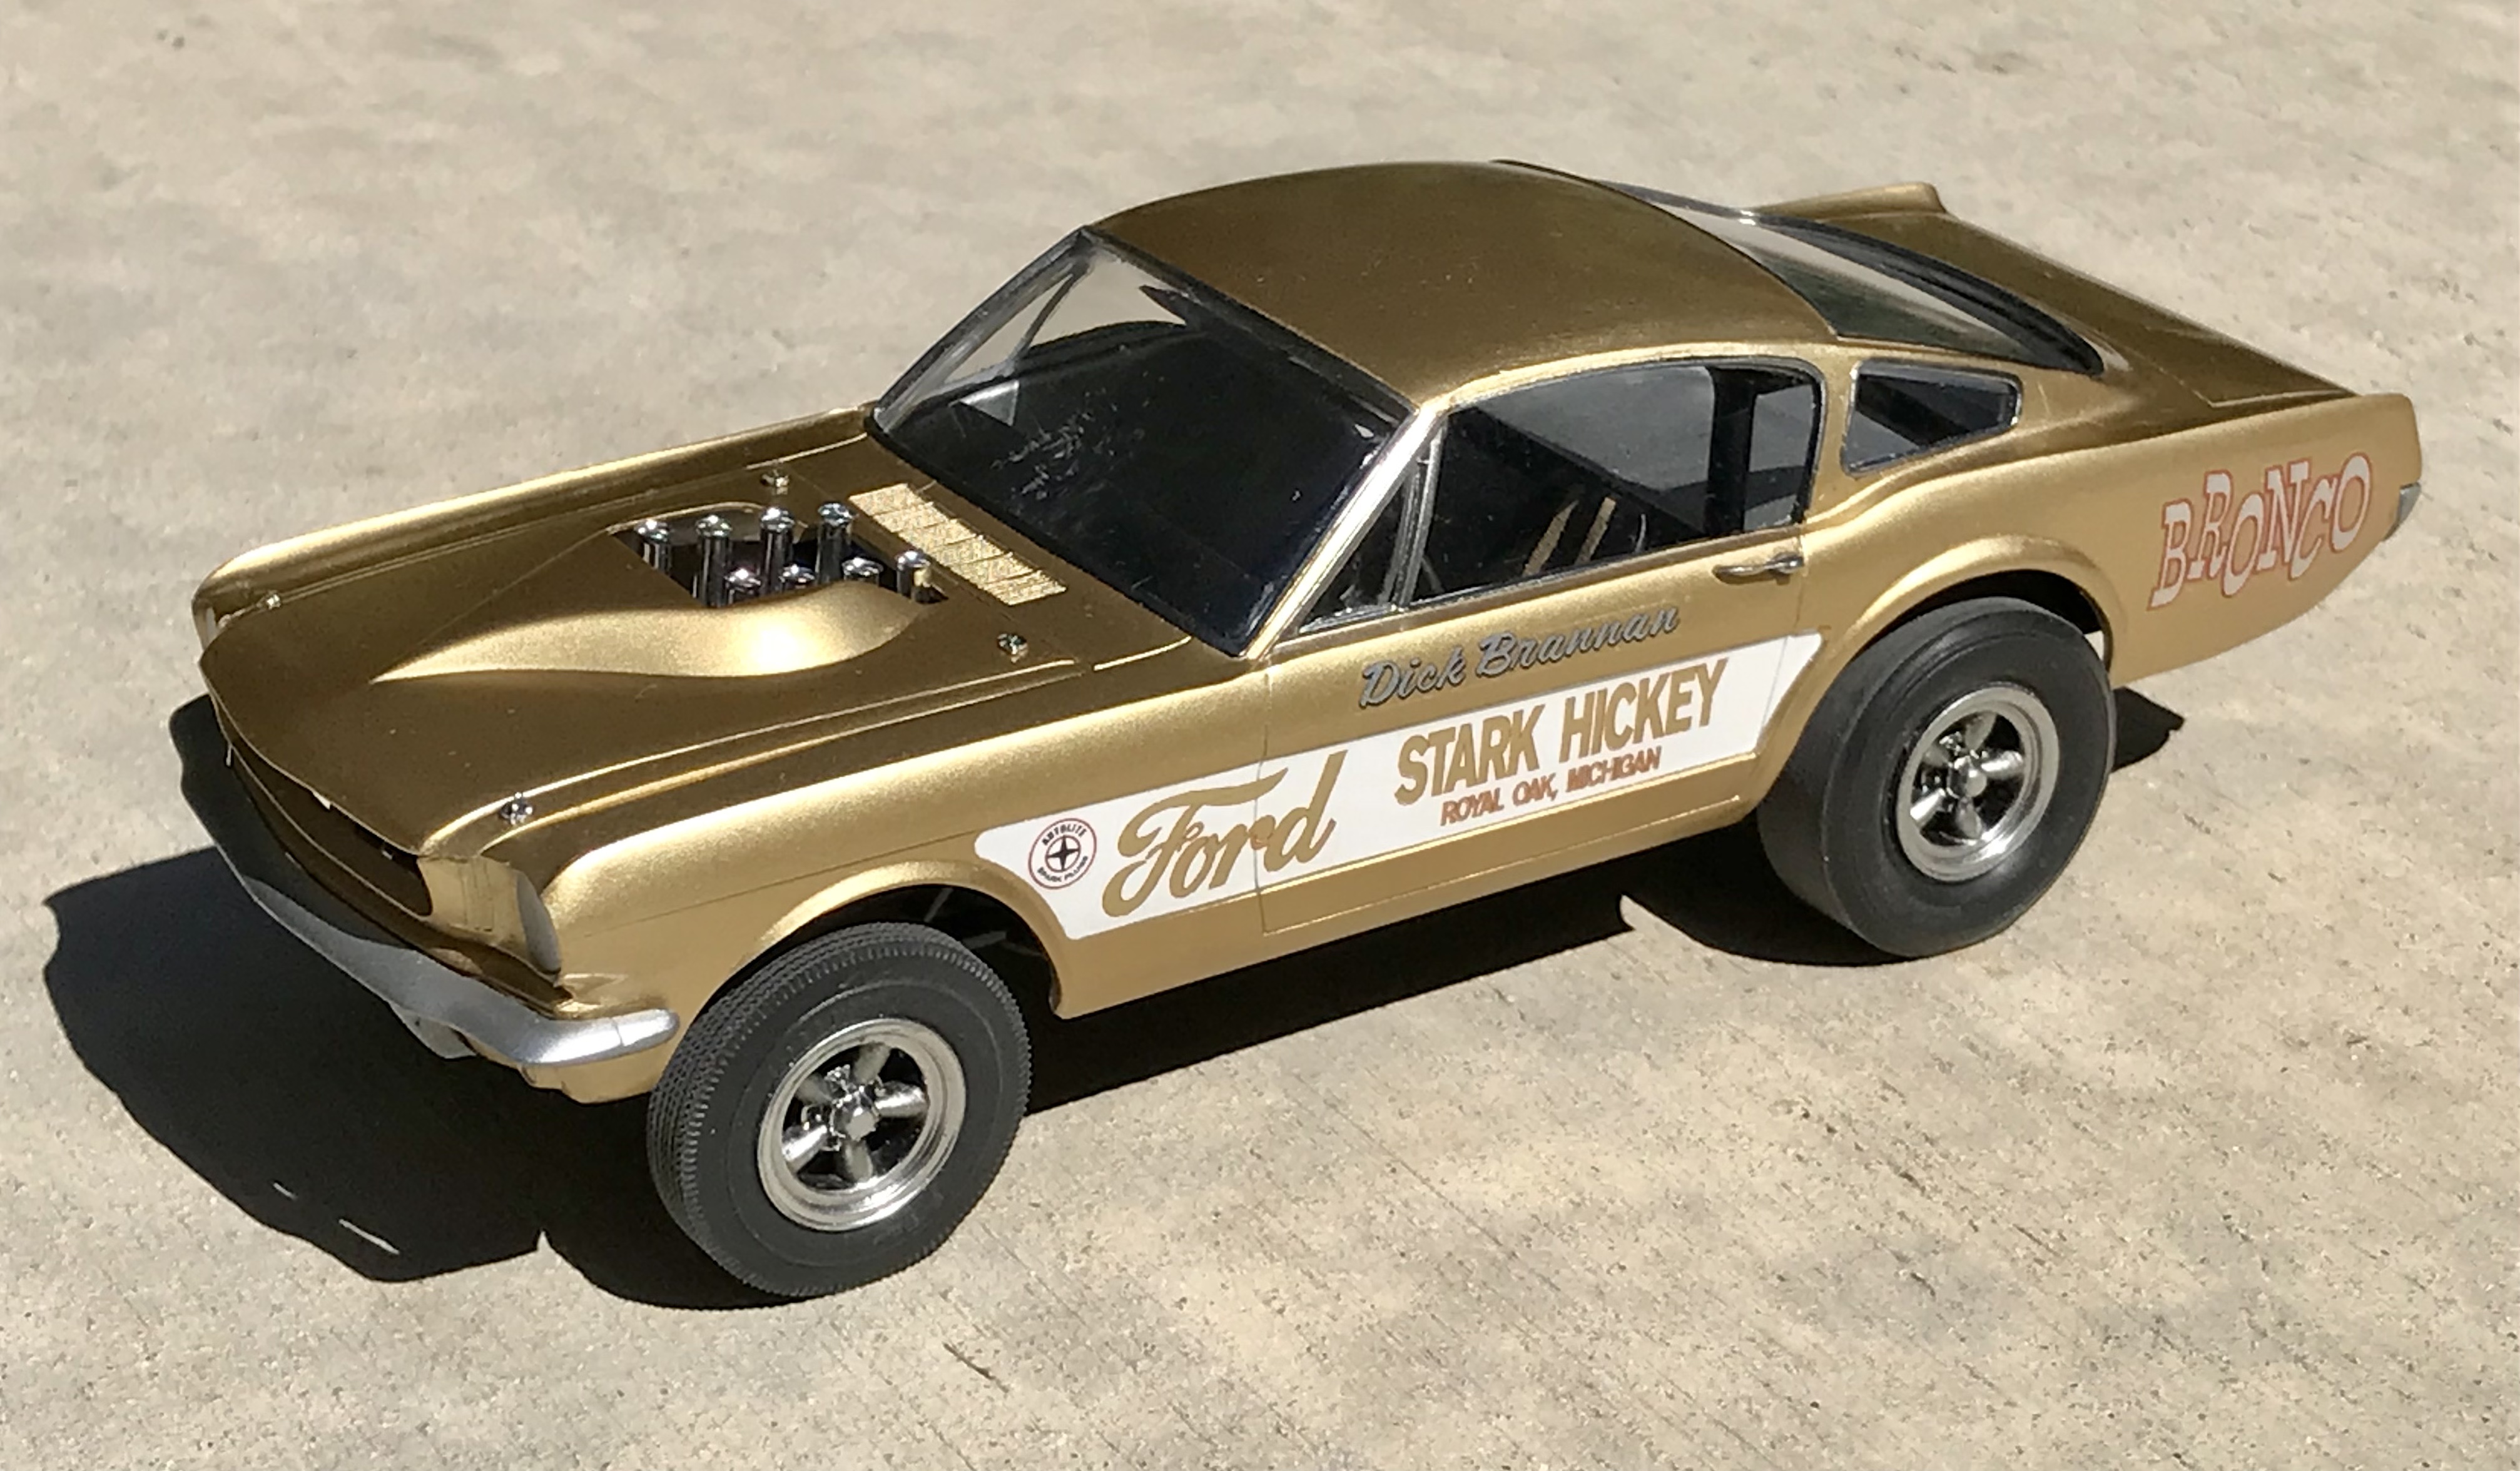
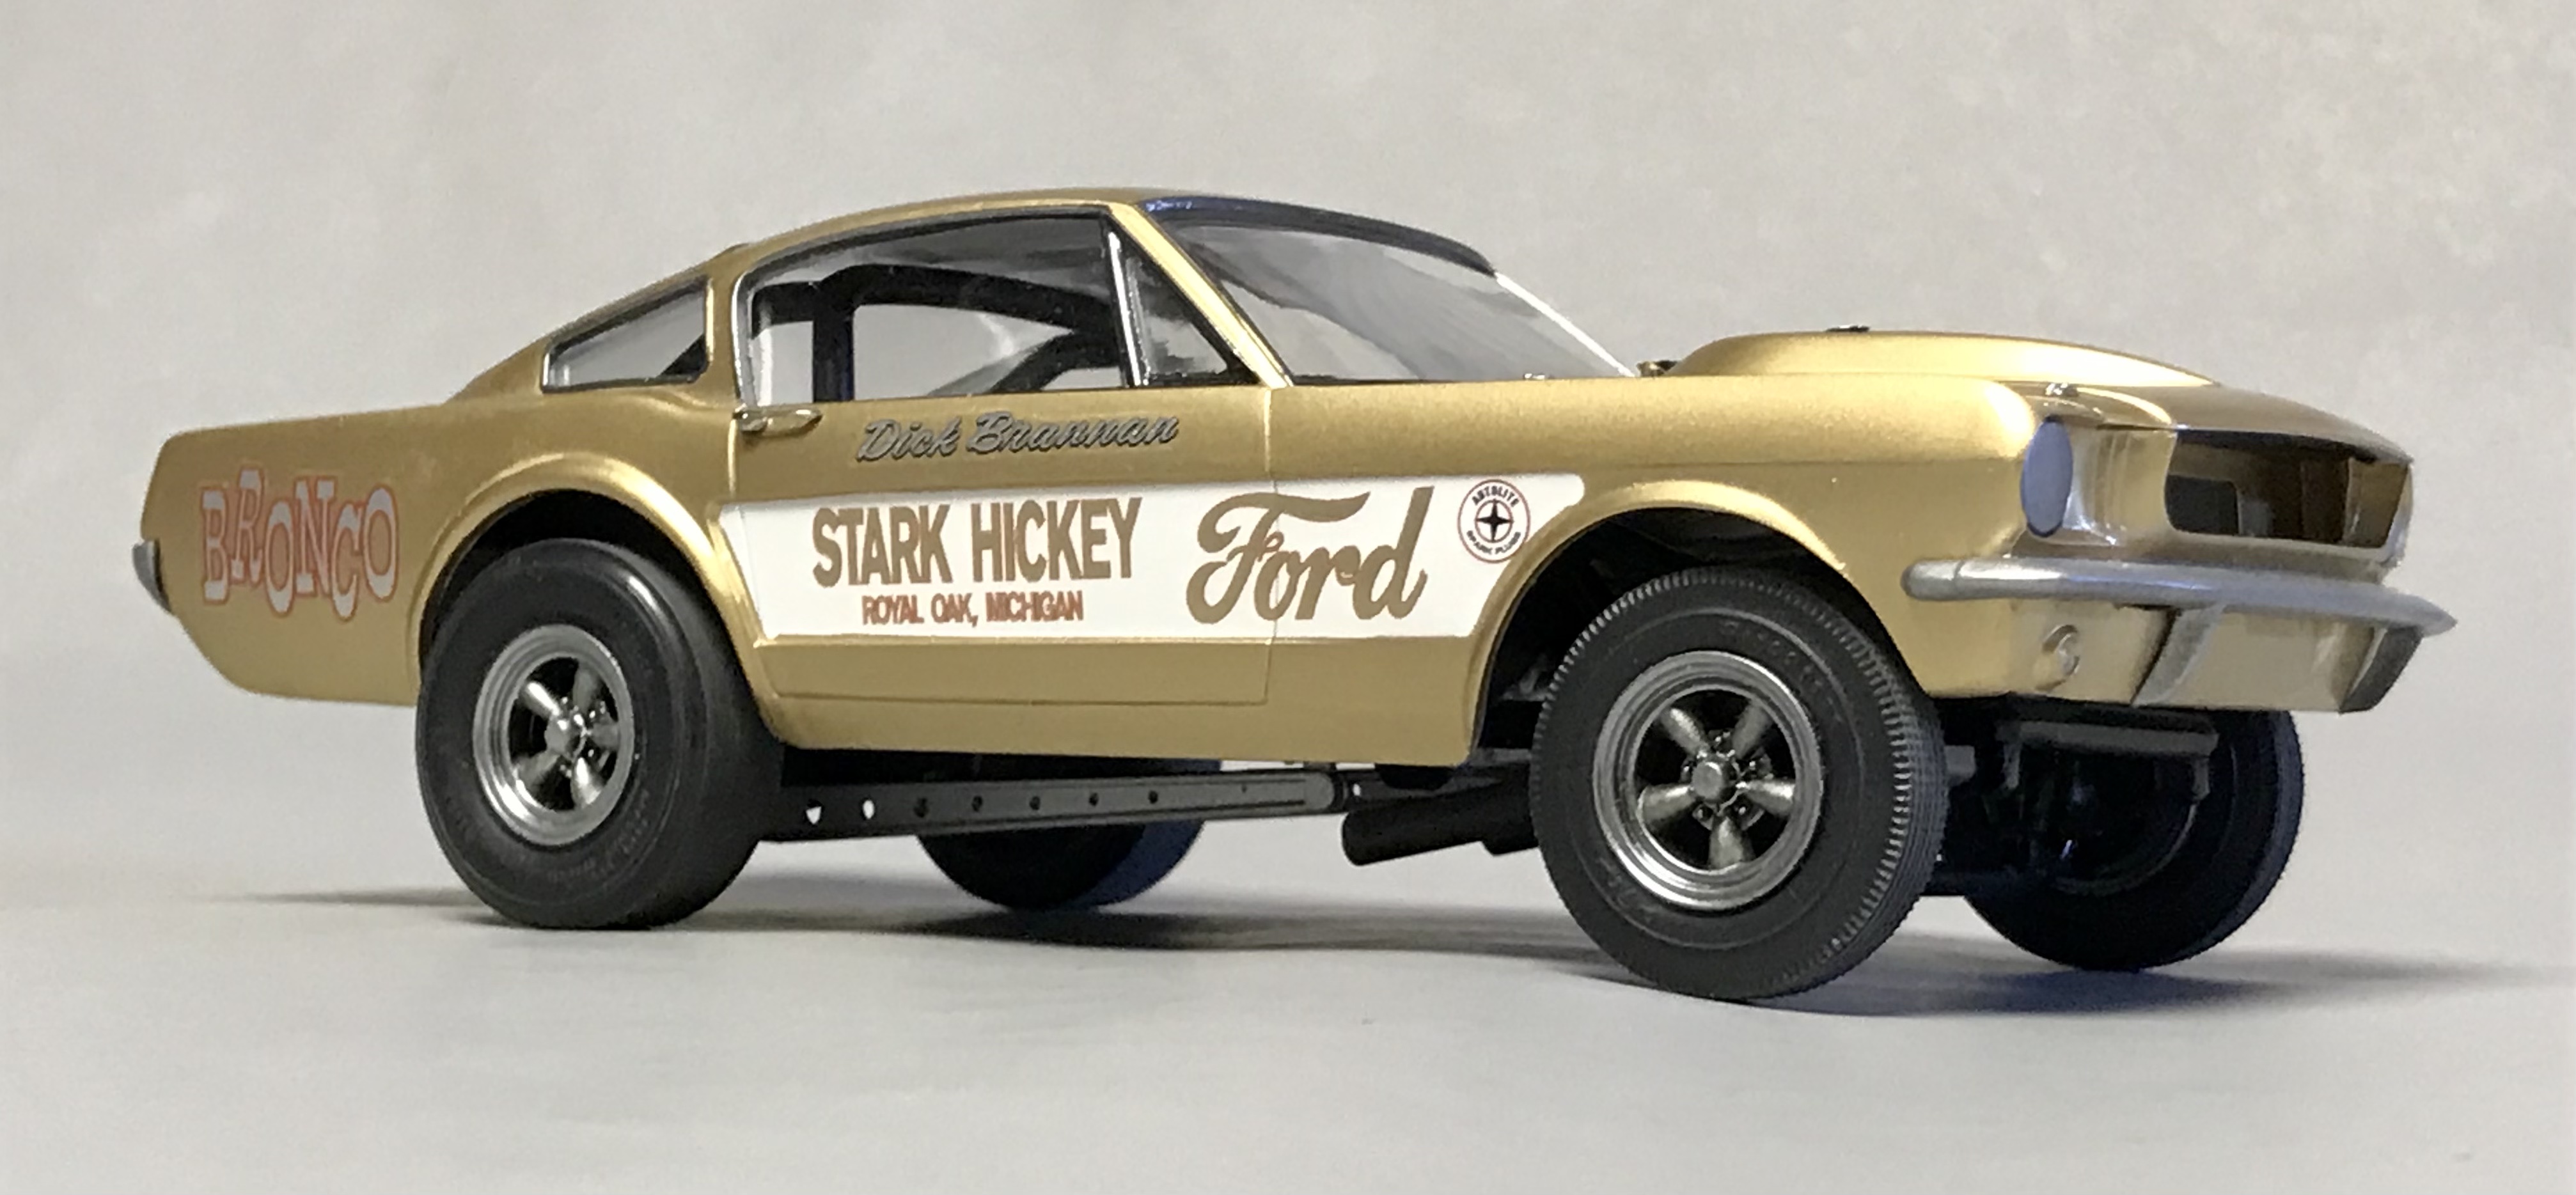
Fixed the decals on the left side to match the actual car (reversed the “Ford” and “Stark-Hickey”) and added ‘427’ emblems to front fender (from Revell ‘64 Ford Thunderbolt kit, love it when they give you extra decals!).
-
1
-
-
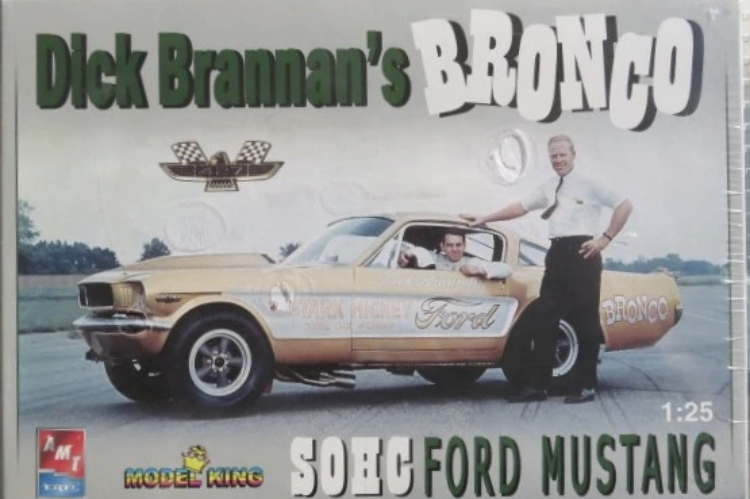
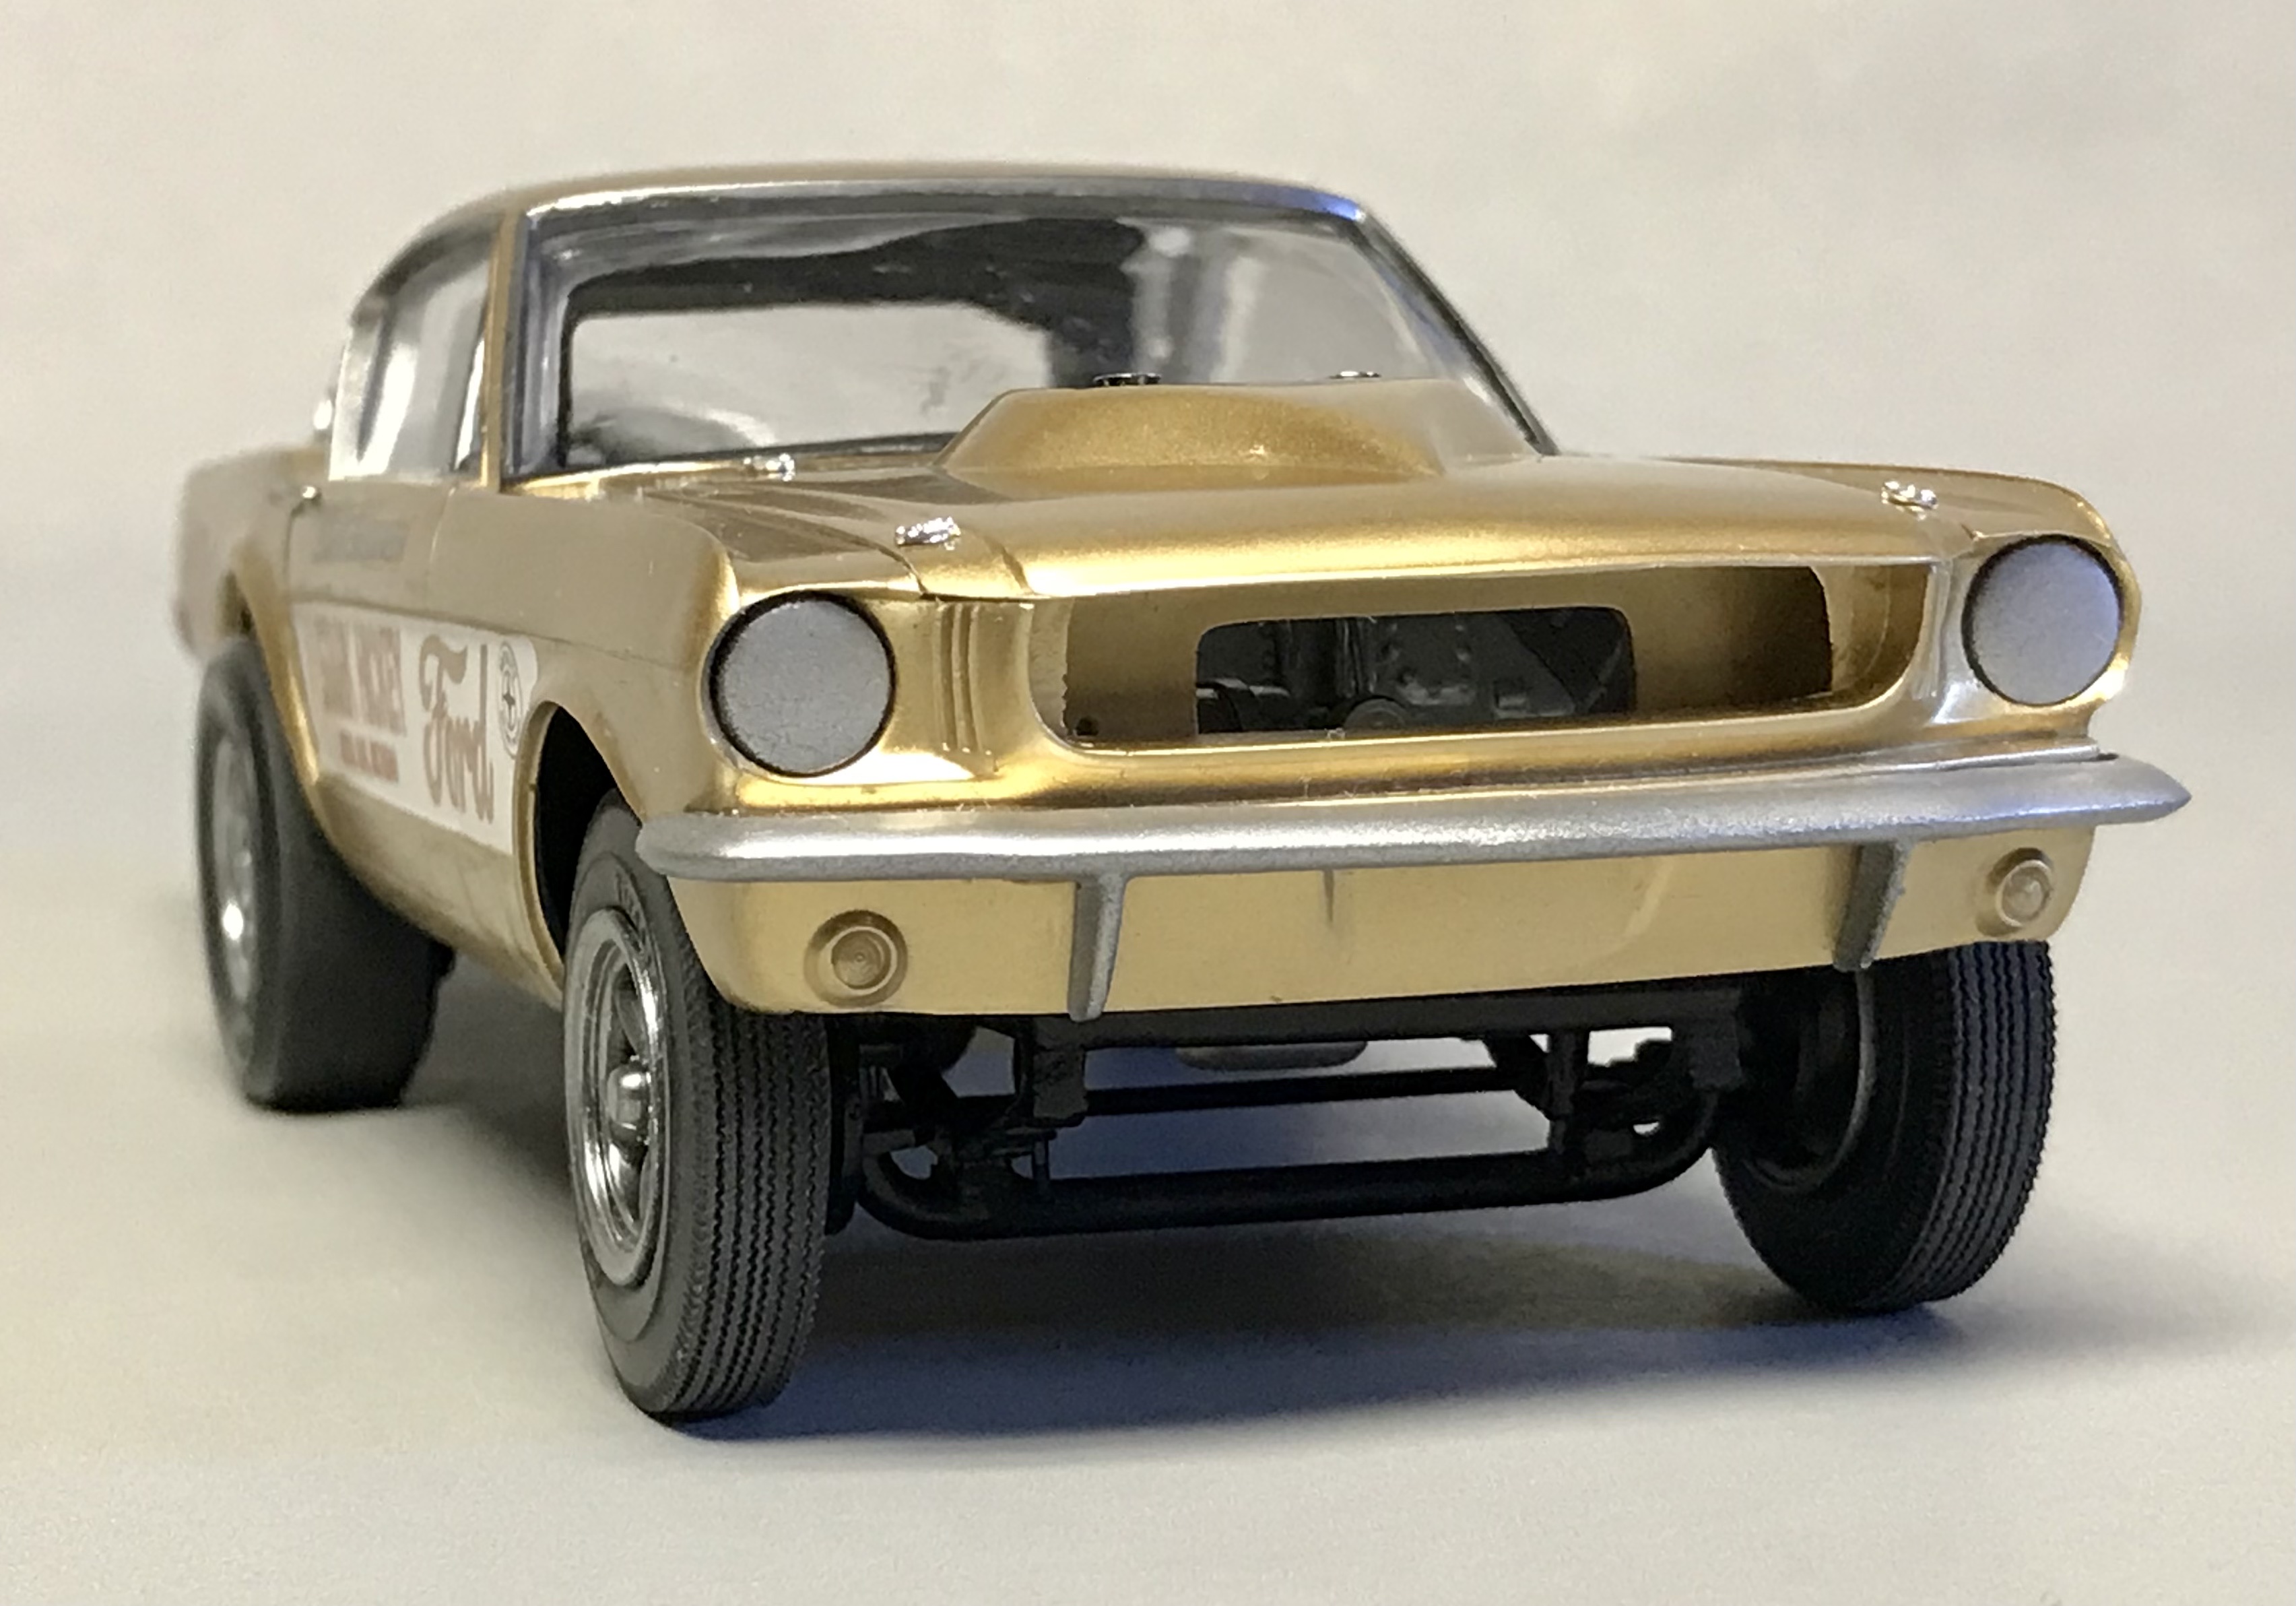
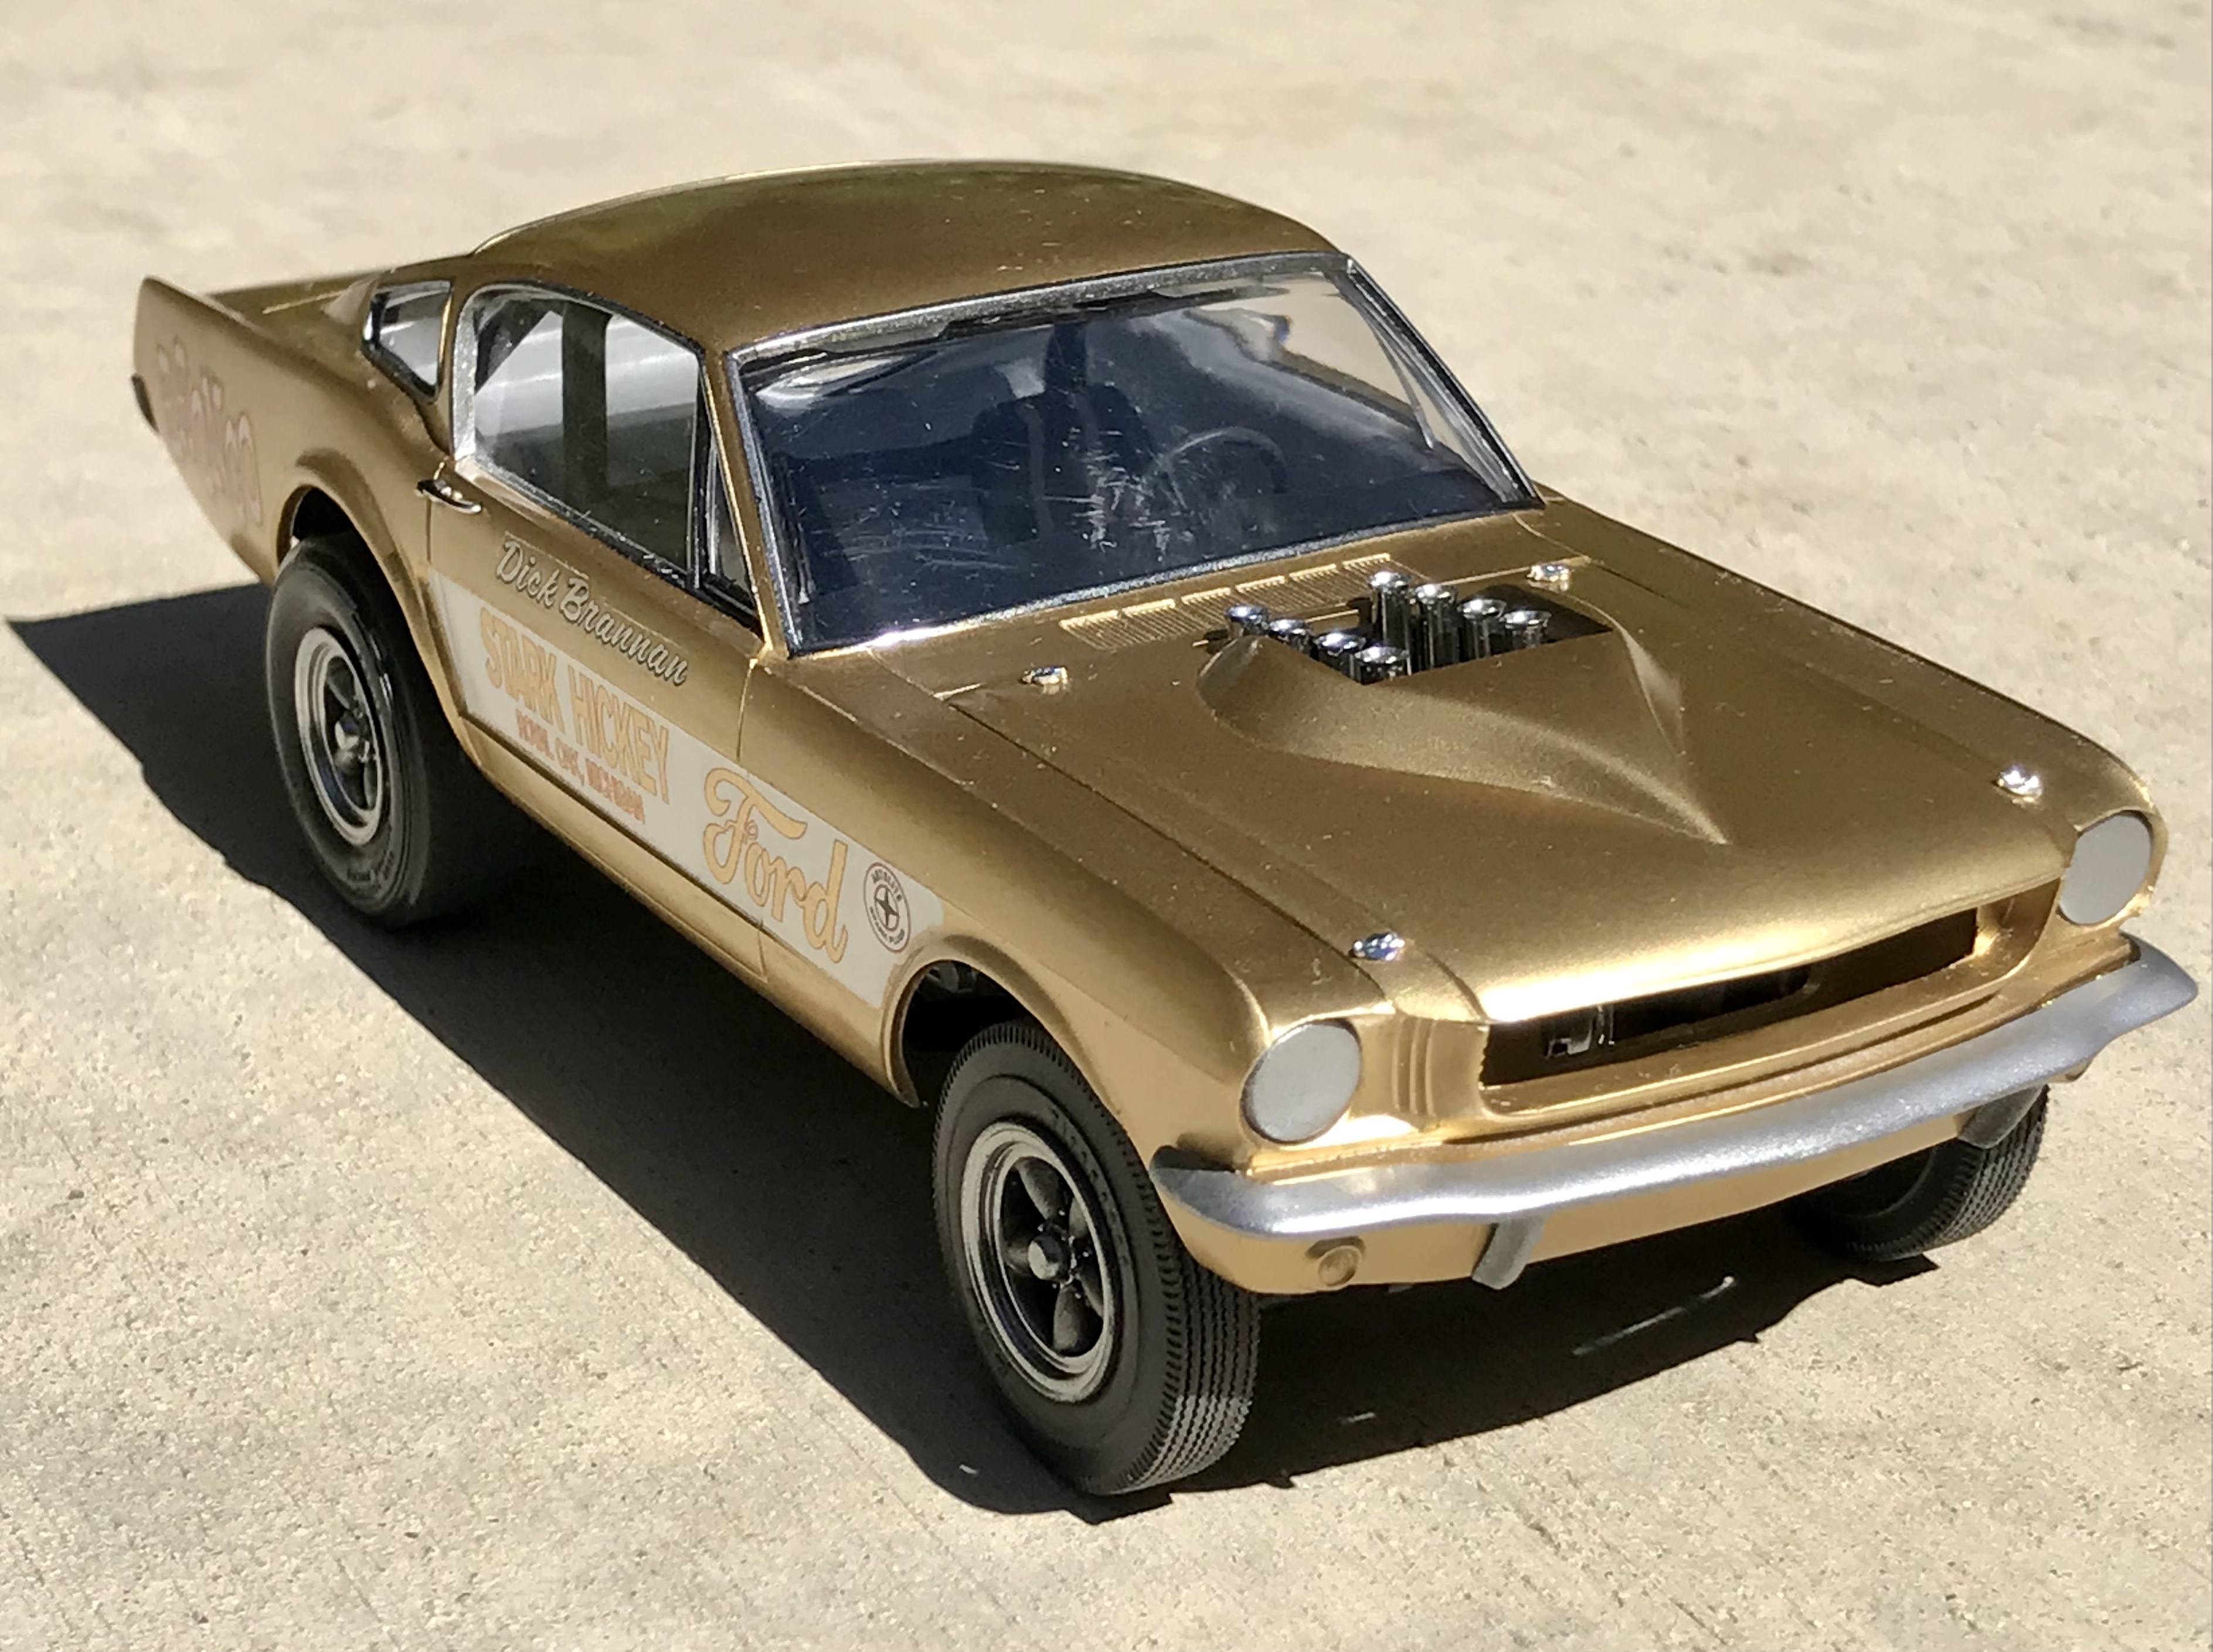
This was built from the less-than-stellar old AMT 1/25 Mustang “Funny Car” kit containing parts that don’t quite look like the actual Brannan car shown on the box:
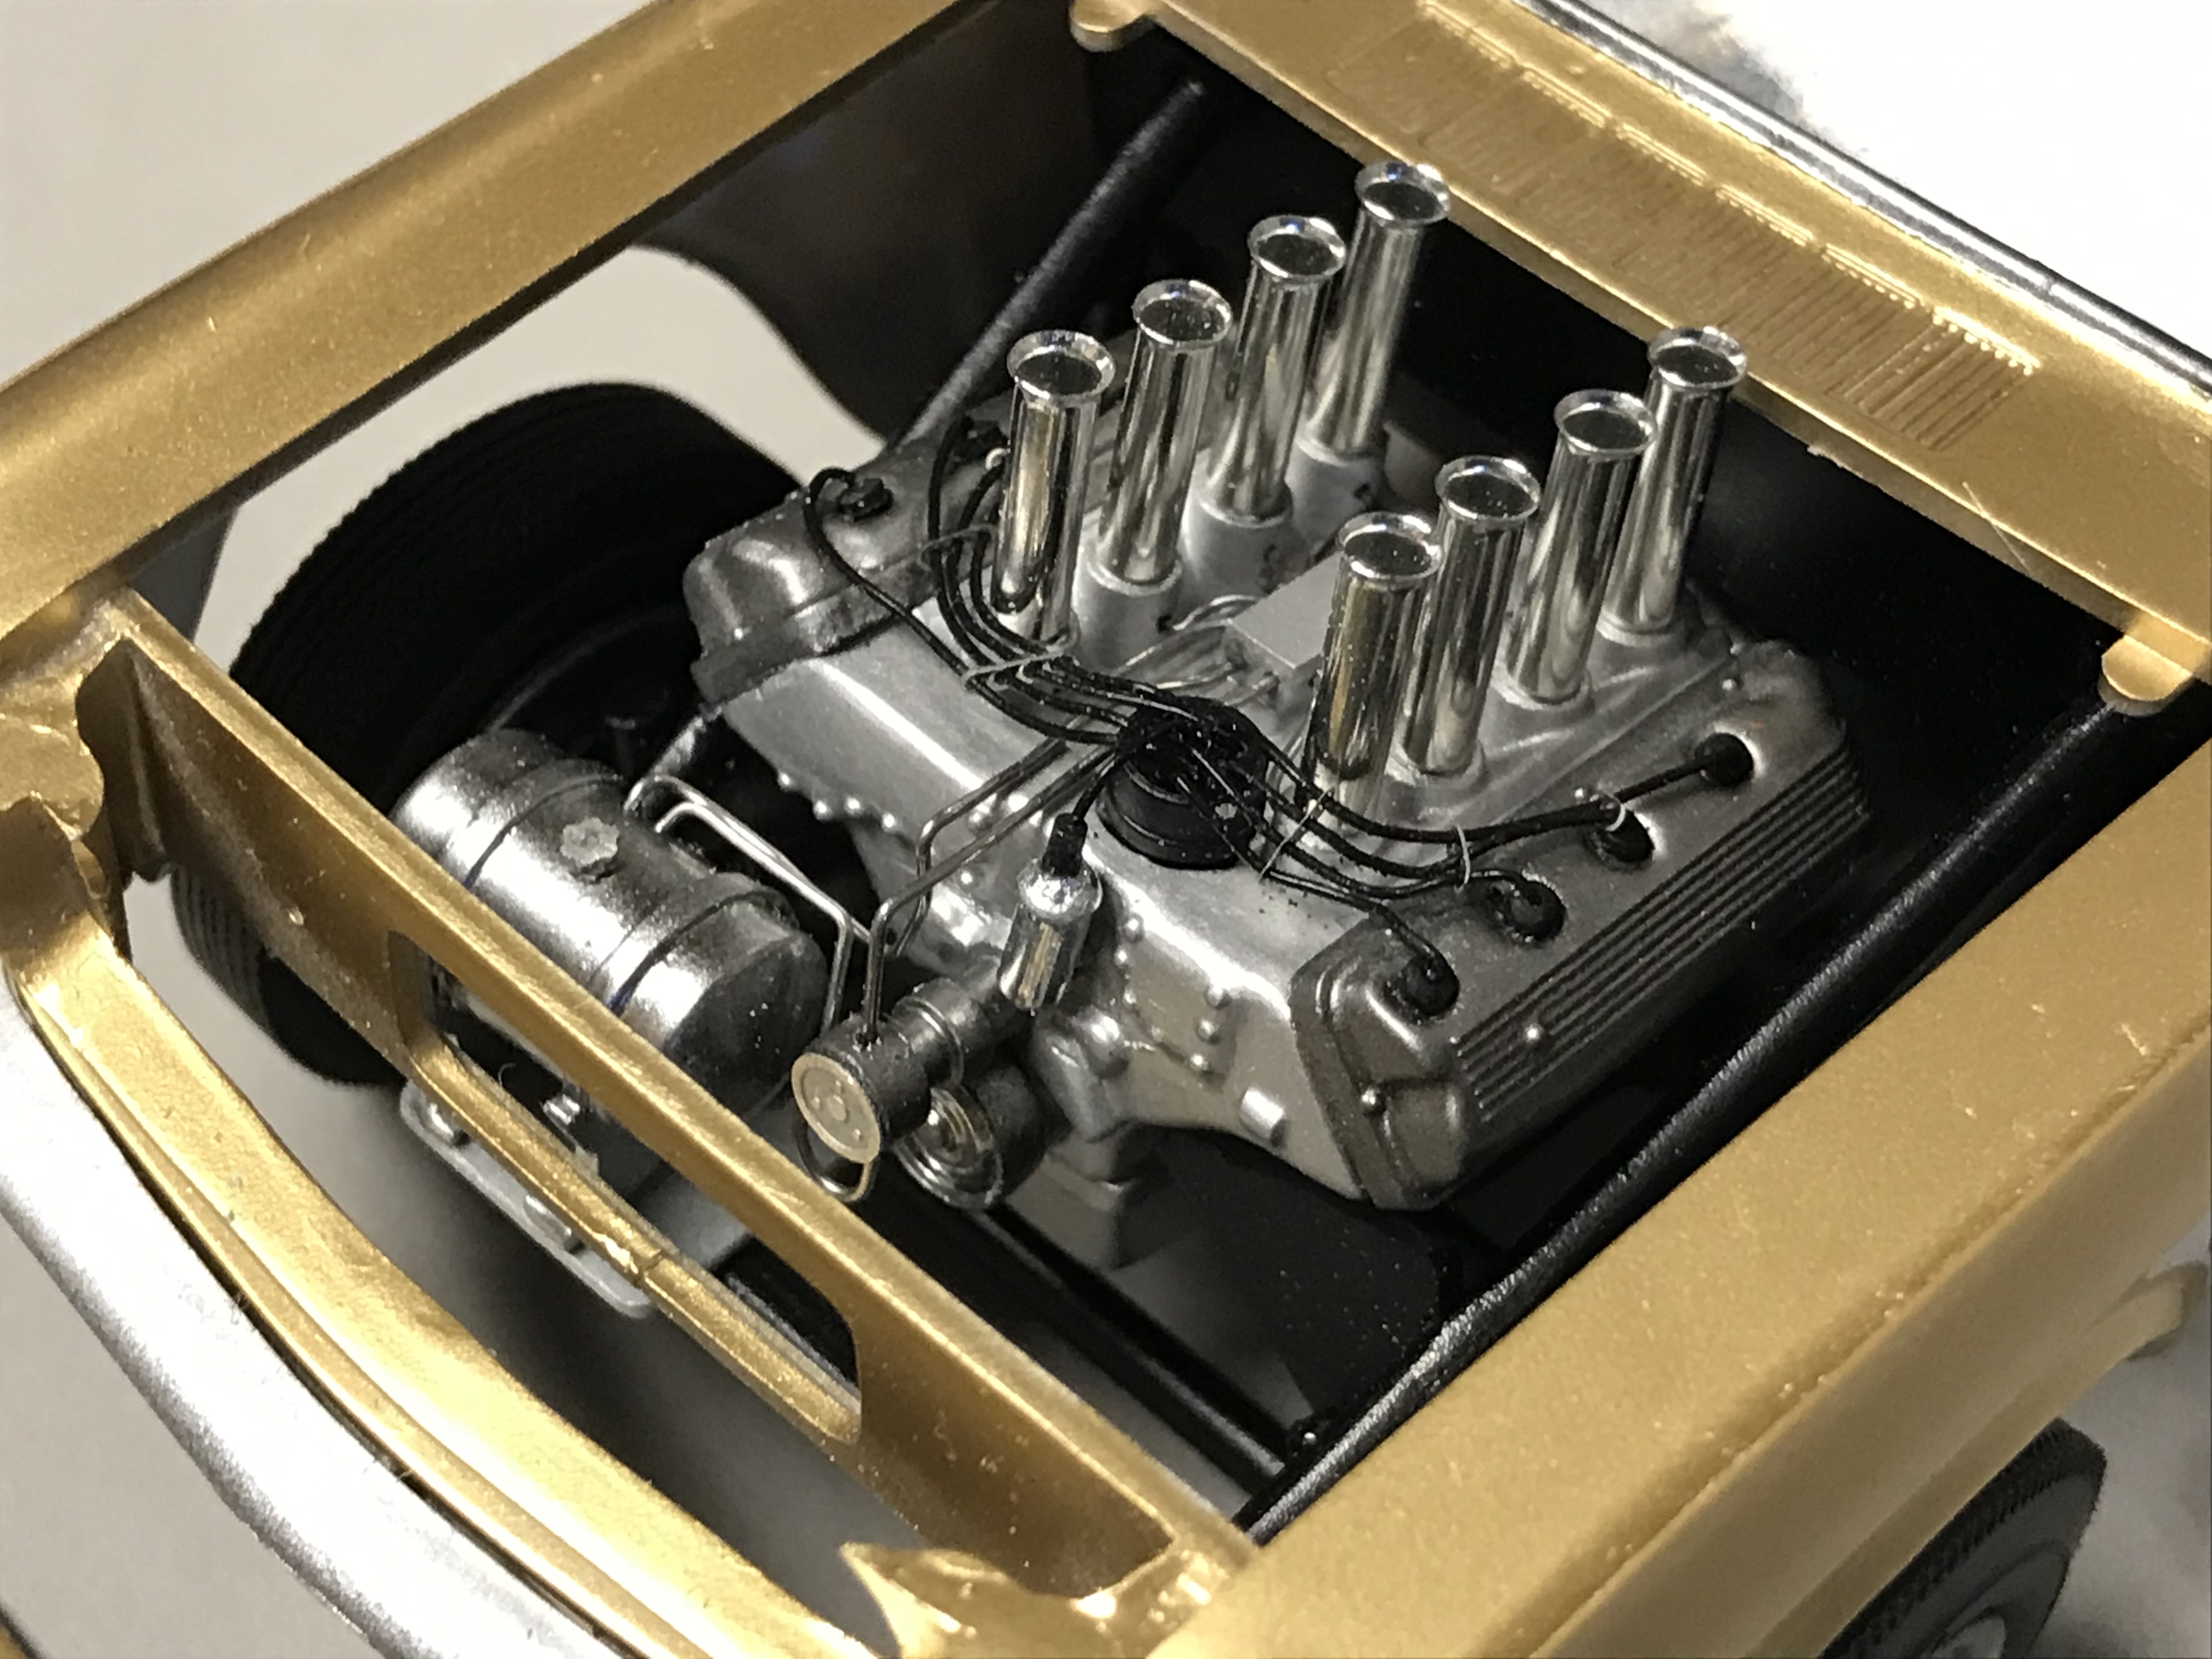
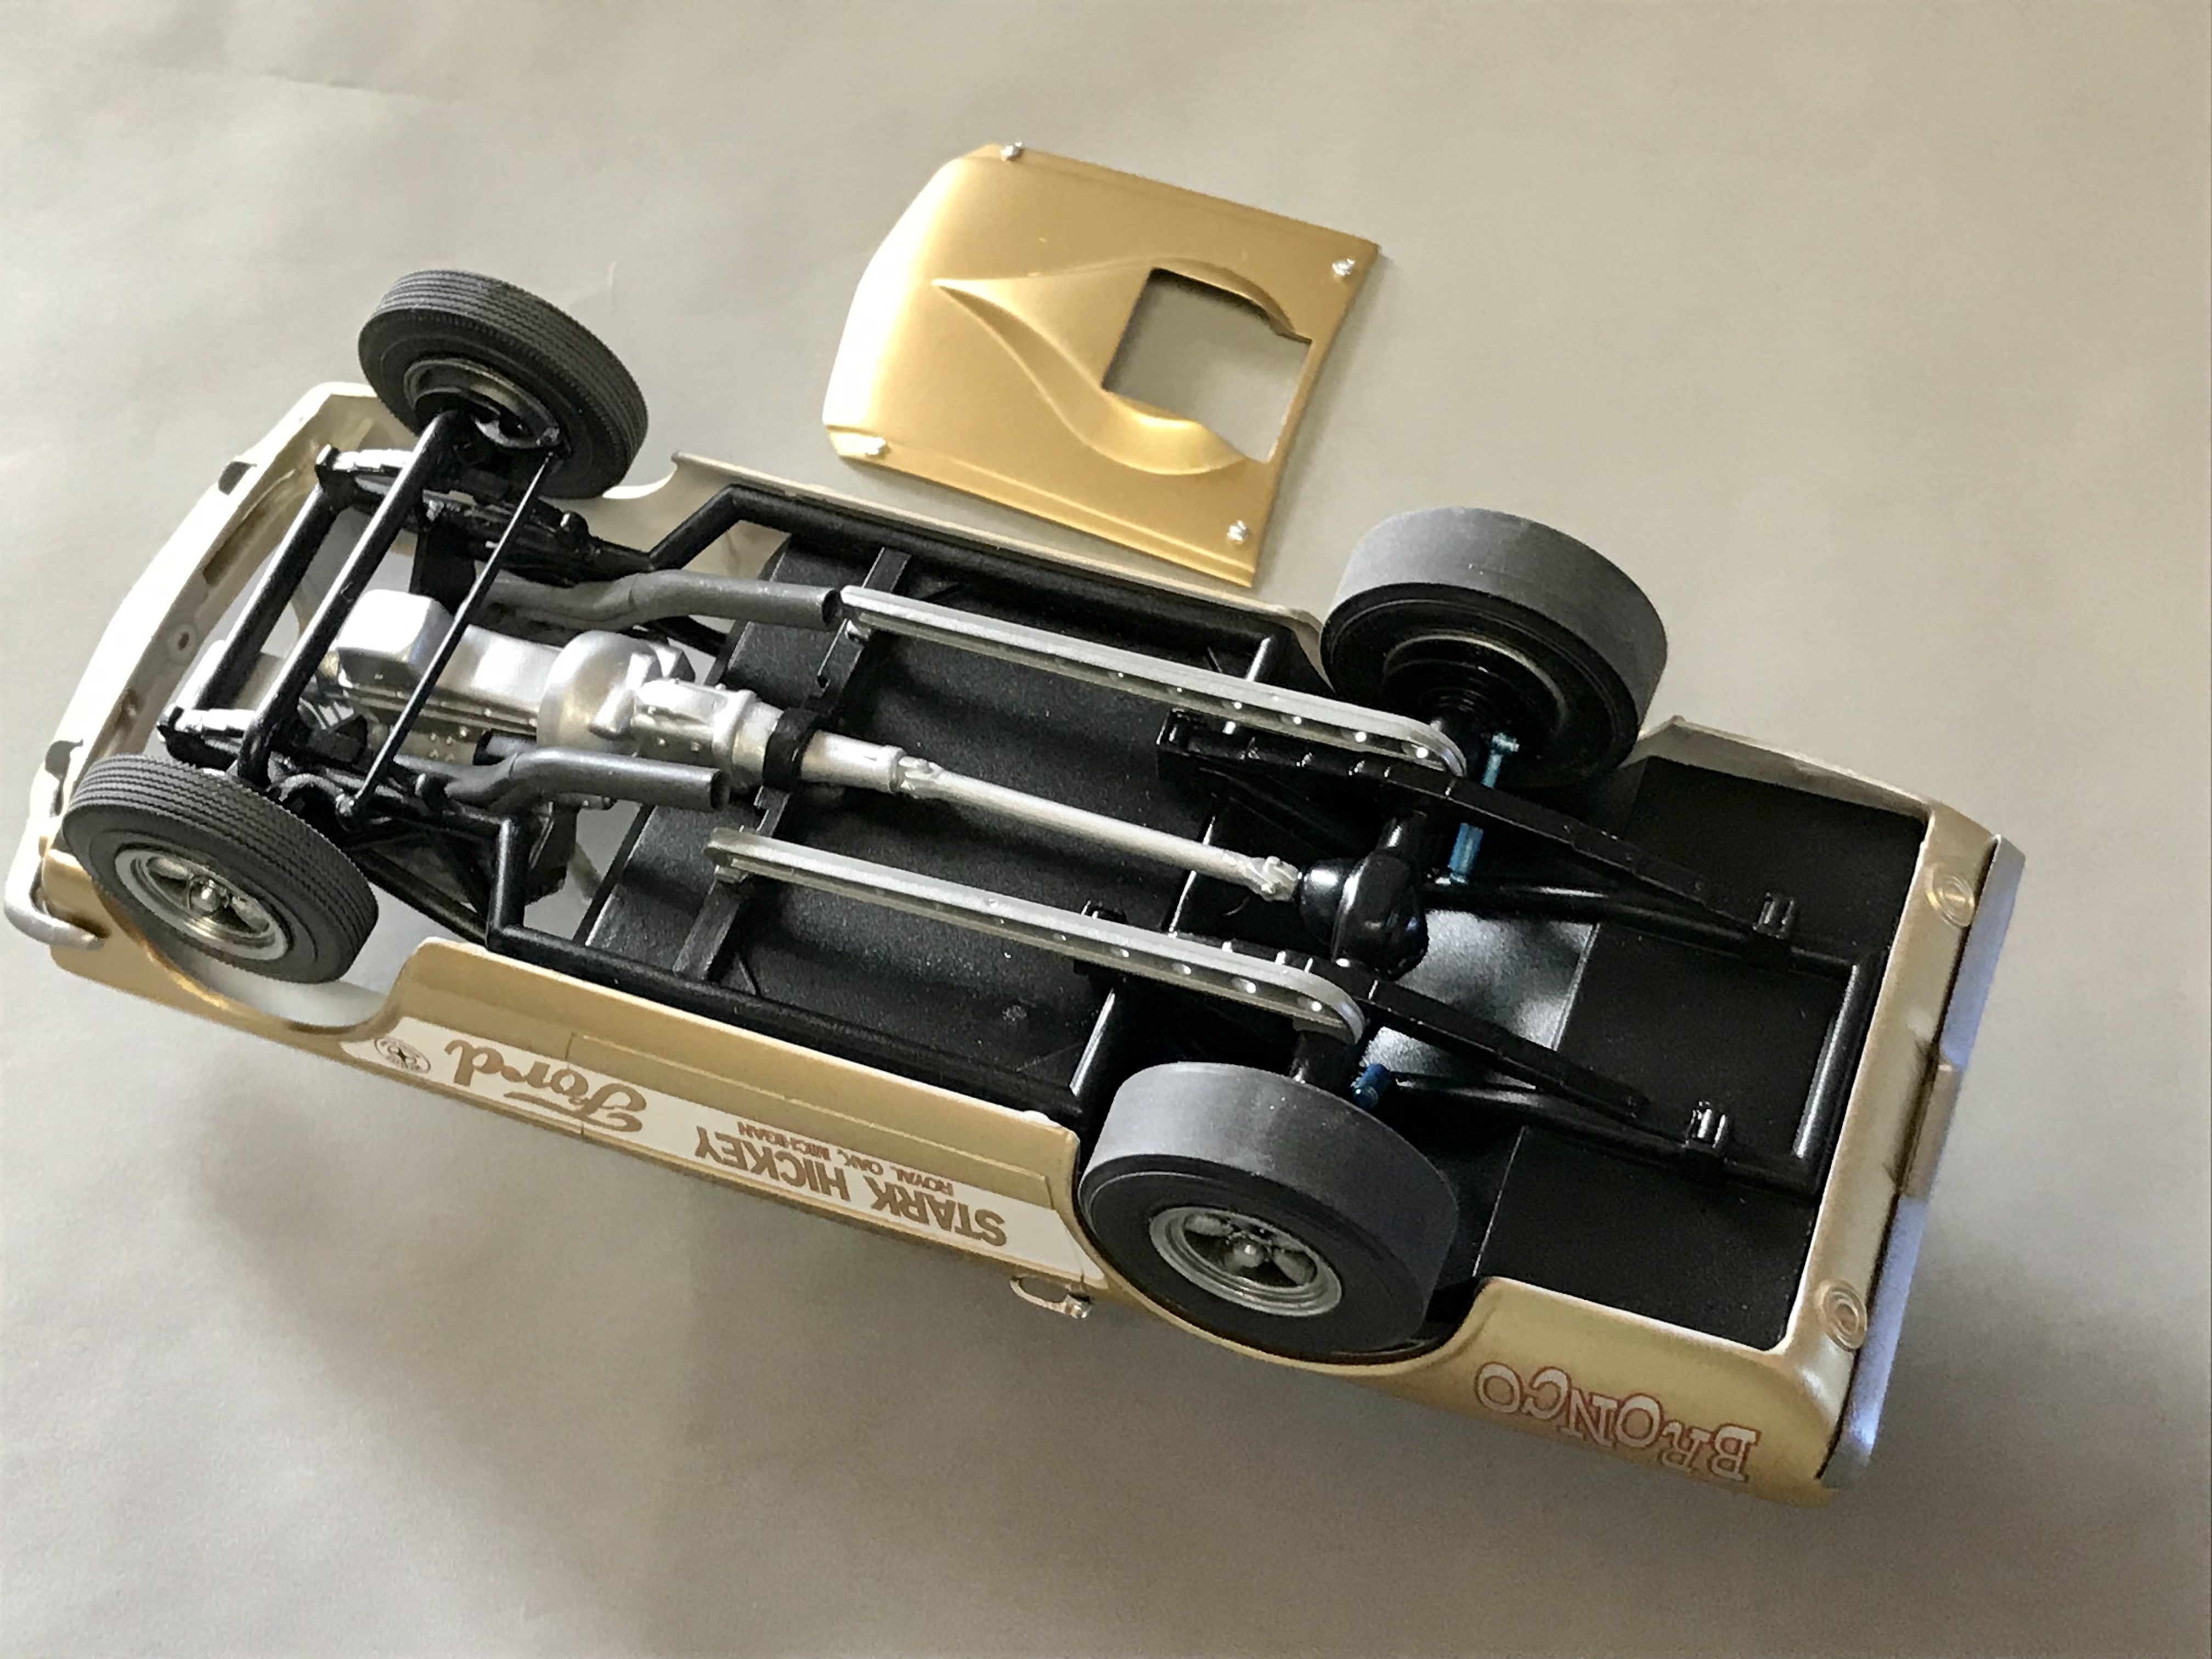
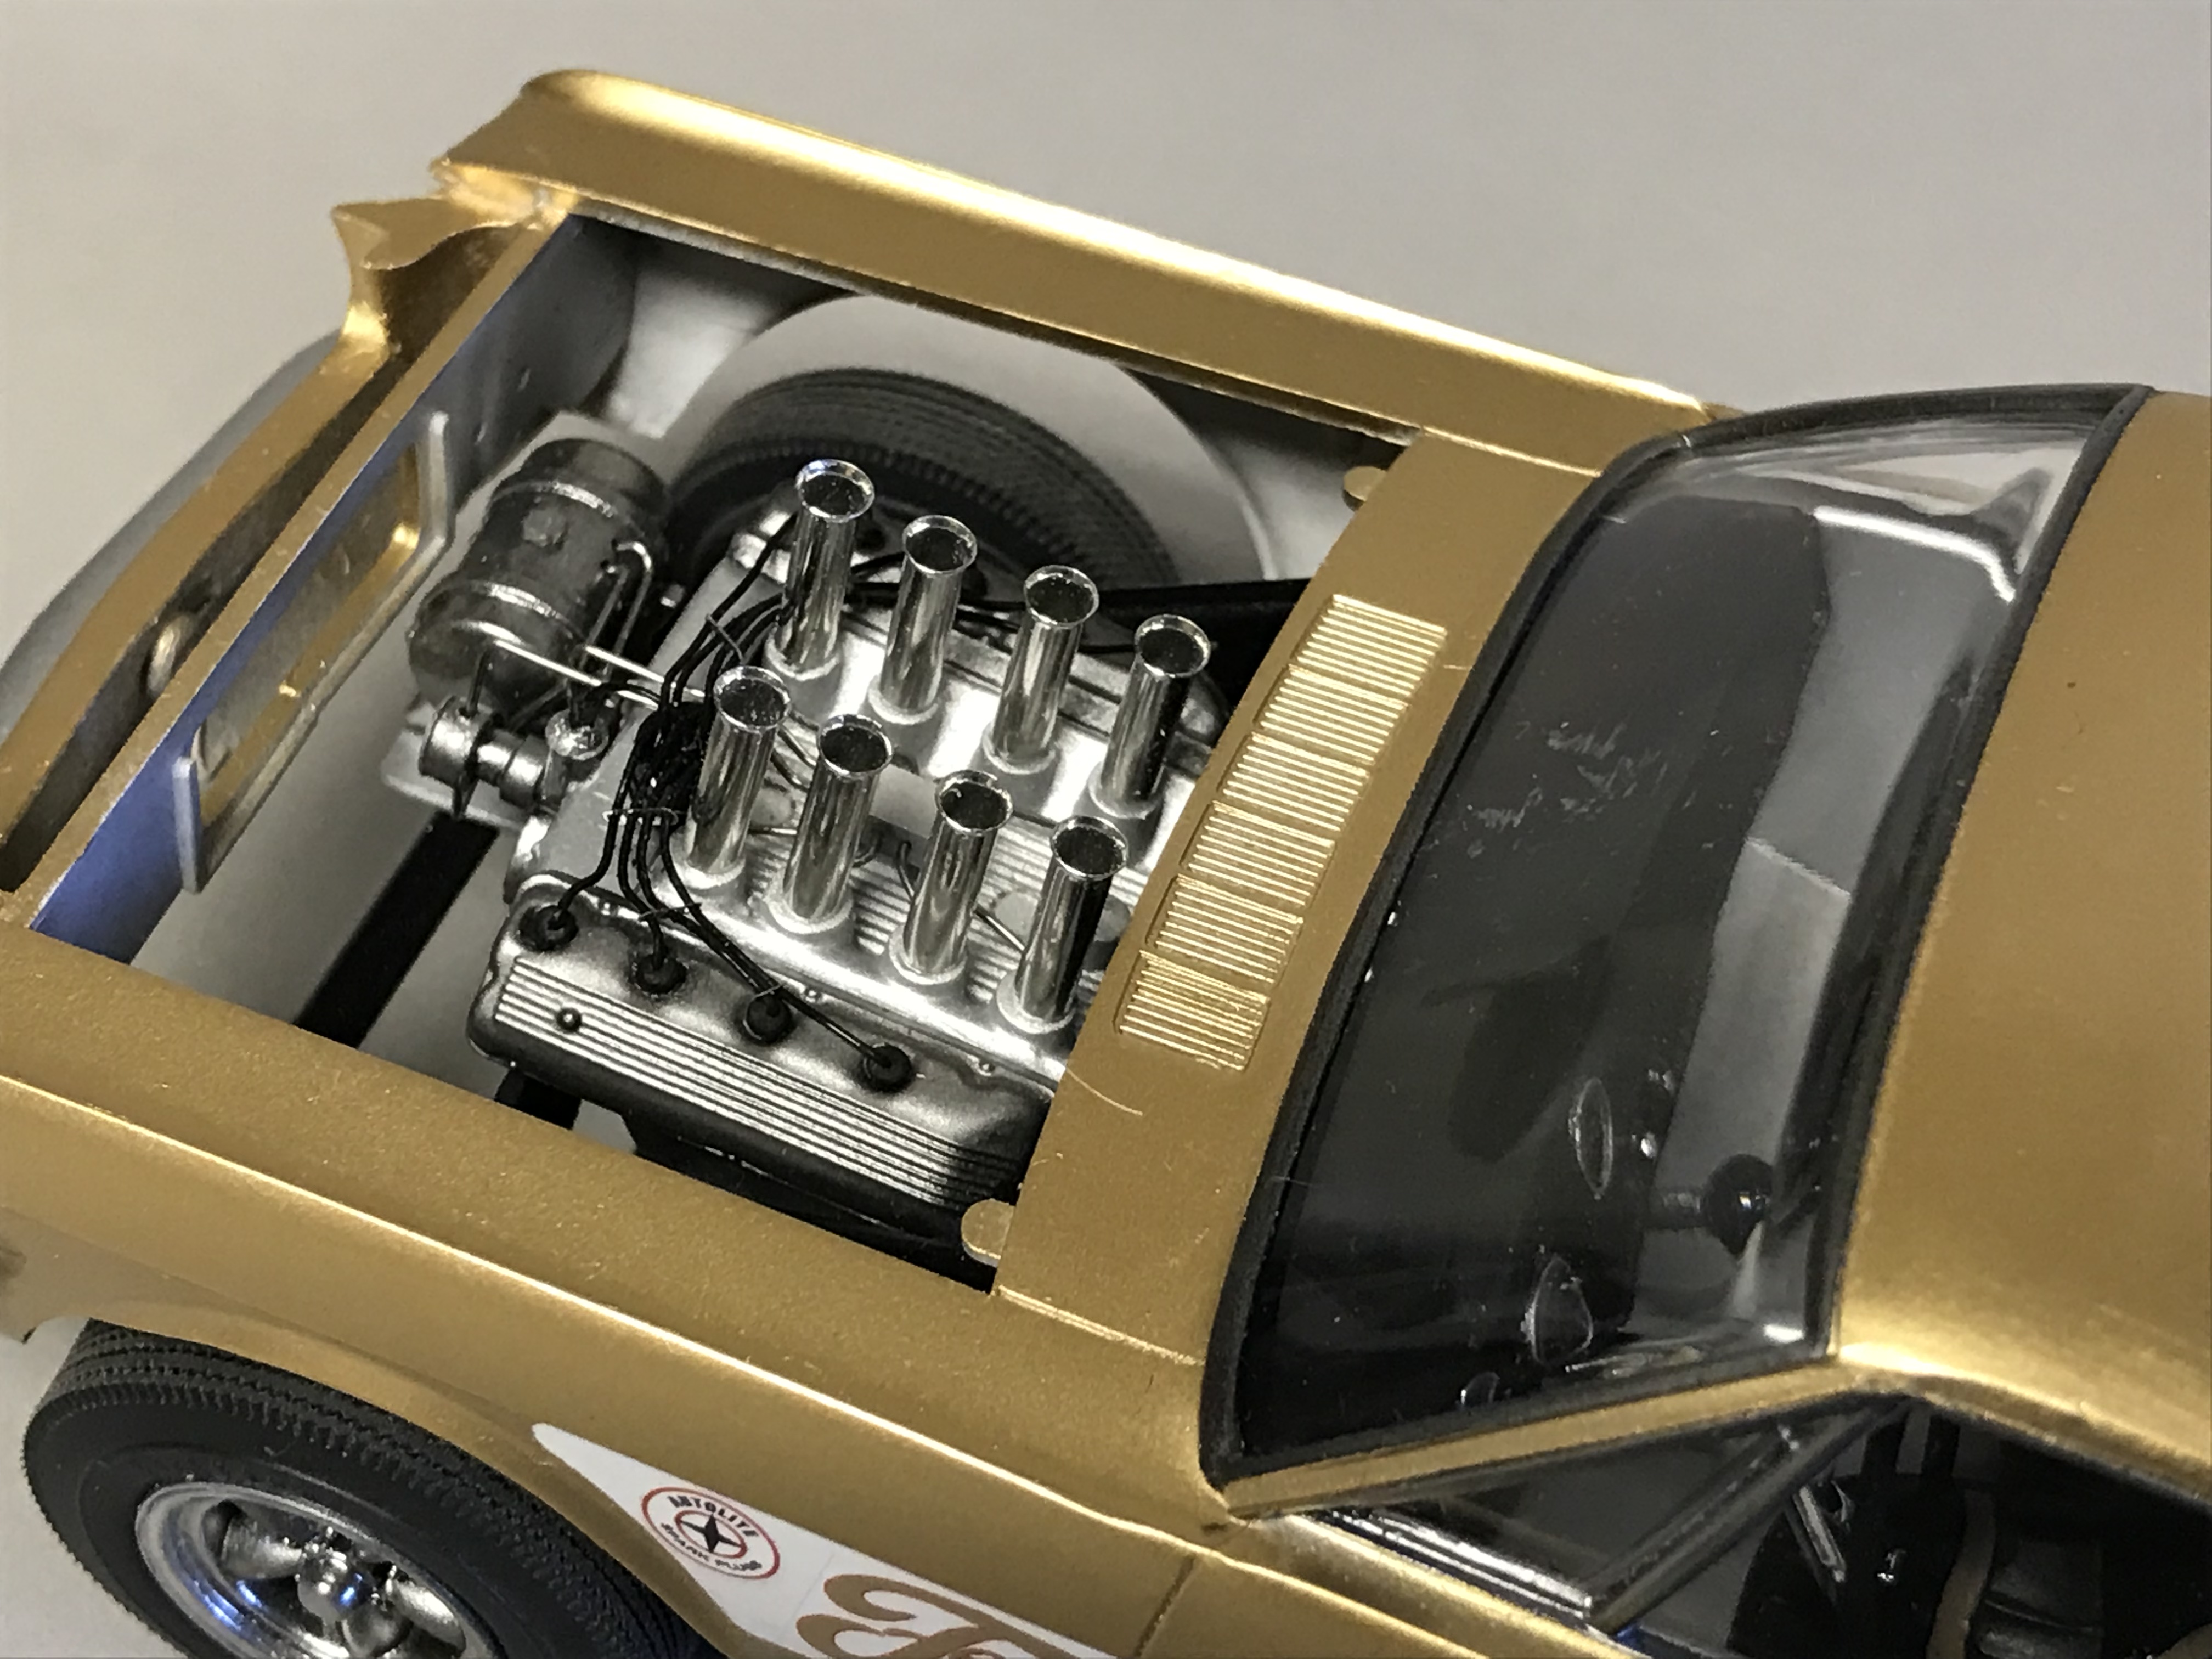
I attempted to build a Hilborn injected “match racer” version of this car (not complying with A/FX rules) and so I took a lots of liberties, particularly with the front end (solid axle with leaf springs) and omission of the radiator and belts (kind of an early pre-flipper funny car build). My goal was to try to approximate the stance shown on the box photo which I really liked. I thought about replacing the toy-like cammer SOHC kit engine with one of the new tooled engines out of the excellent Moebius ‘65 Comet A/FX kits but decided to try to make the best of it with the kit engine.
The decal graphics supplied with the kit were quite inaccurate so Joe Curtis at Fremont Racing Specialties came to my rescue and made a fabulous set of replacements for me. Joe is incredibly talented and a great guy!
This is not one of my better efforts, lots of errors and screw-ups, particularly on the paint and windows, but I’ve been bogged down for a few months on this and decided to wrap it up and move on. I didn’t list all the details above on changes/additions I did on this kit but shoot me any questions you might have and I’ll be happy to supply more details.Thanks for looking!
John
-
1
-
 1
1
-


Fujimi Ferrari 330 p4
in Other Racing: Road Racing, Salt Flat Racers
Posted · Edited by papajohn97
Changed fender to fenders
Loved the Christian Bale line in the Ford v Ferrari movie “If this was a beauty contest, we just lost….”
Fabulous execution of a moderately challenging kit. I remember fighting the chassis to body fit on this one as well as the Fujimi GT-40. Nice job on mounting the PE spoilers on the front fenders. I remember wrestling with the decals as well, particularly that circled number one on the rear deck. Love the look of these gold wheels against the red.