AaronM
-
Posts
74 -
Joined
-
Last visited
Content Type
Profiles
Forums
Events
Gallery
Everything posted by AaronM
-
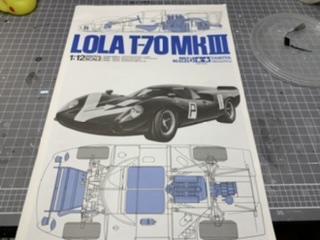
1/12 Tamiya Lola T70-MkIII
AaronM replied to AaronM's topic in WIP: Other Racing: Road Racing, Land Speed Racers
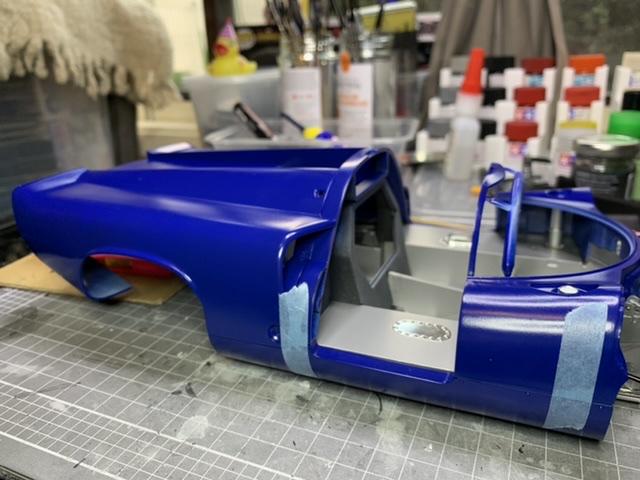
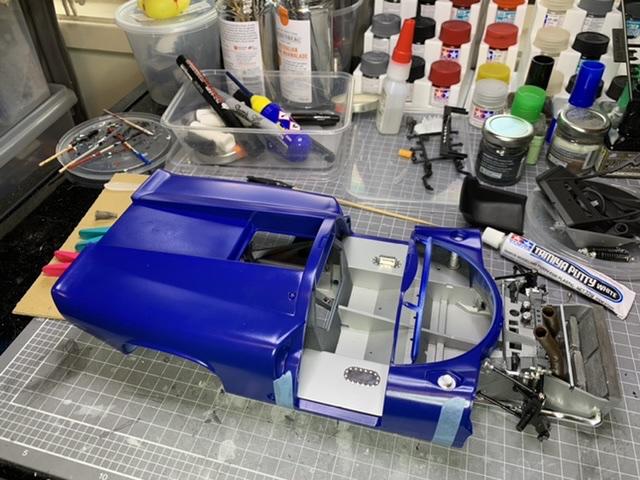
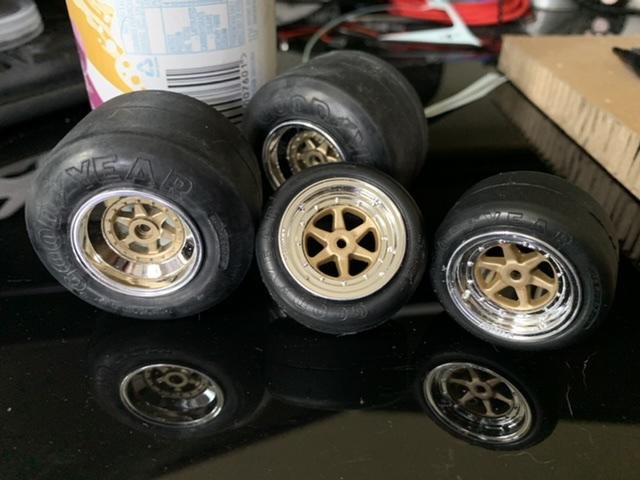
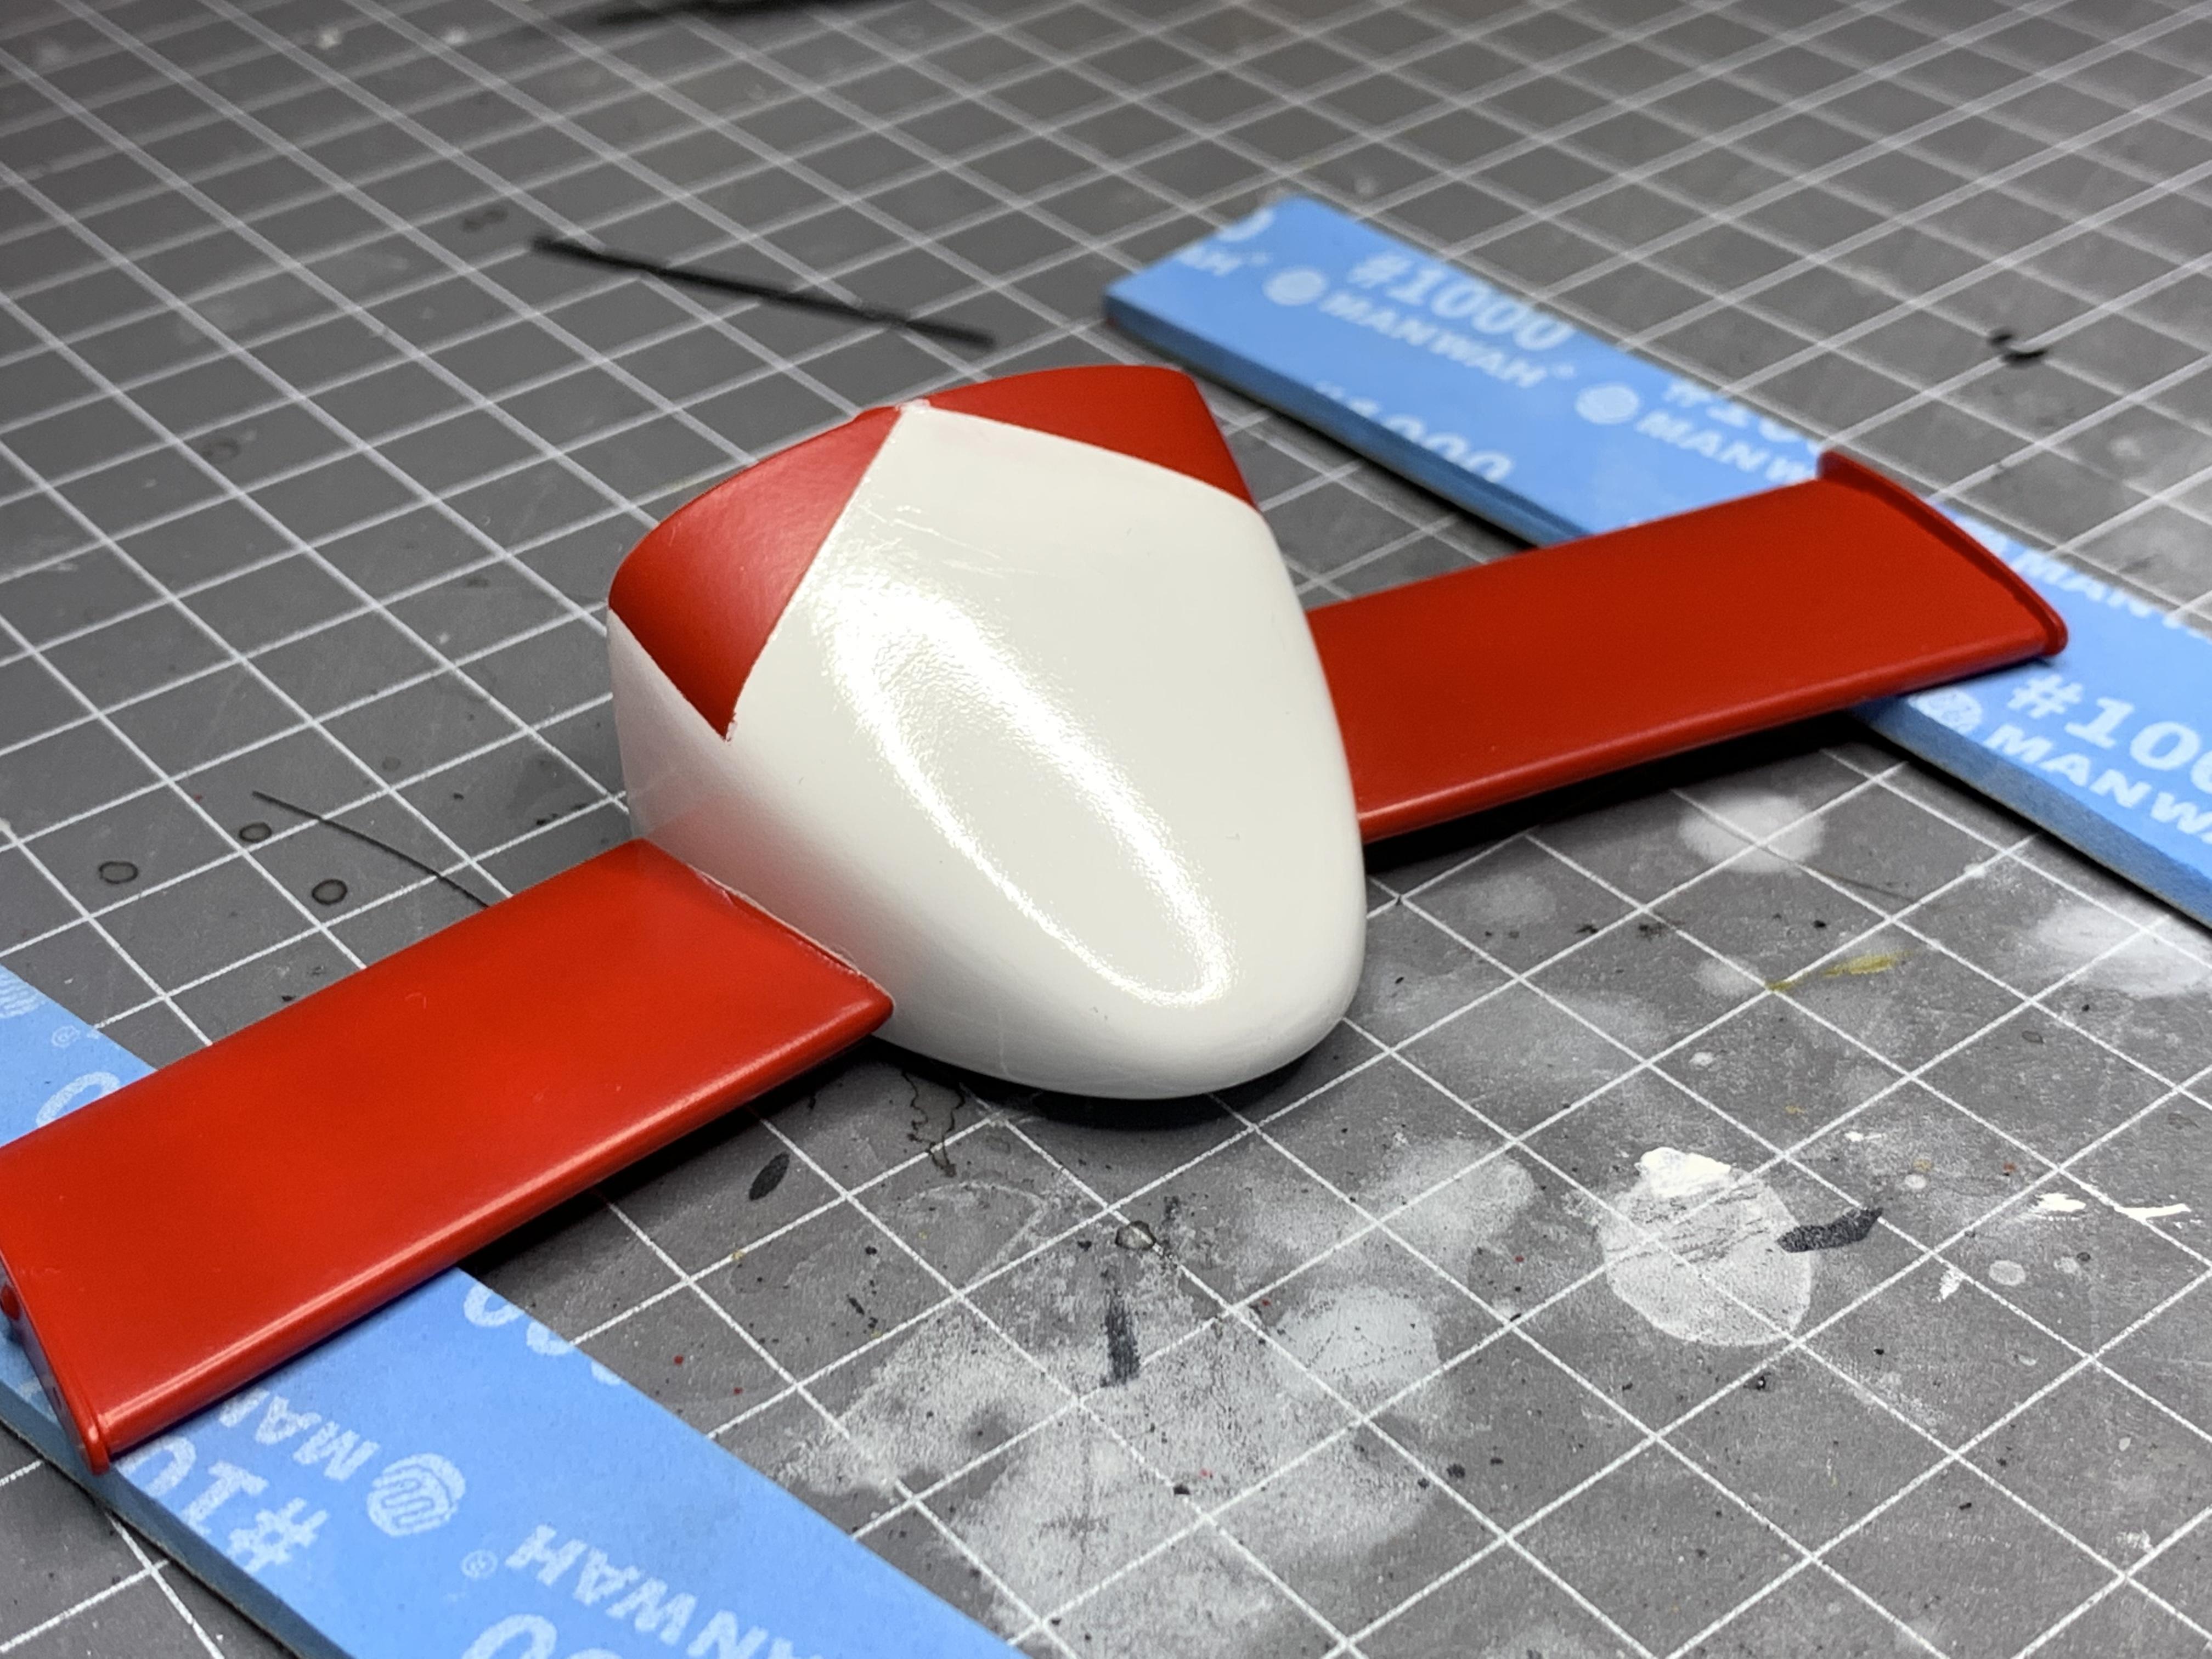
Progress has been slow while giving paint and decals curing time. I built the functional Jack body sections being taped in place for Decal application. Built the wheels Body fit for me seems pretty good. Decals were a struggle but have come up mostly OK. I will start clear coating the bodywork so it can cure. Then paint inside of the body and finally get back to work on assembly.
-
Italari 1/12 Alfa Romeo Monza 8c
AaronM replied to kpnuts's topic in WIP: Other Racing: Road Racing, Land Speed Racers
Just ordered the “old box” version of this Kit. So watching with interest Would you share some of your colour choice plans etc? I will probably do mine with a black chassis etc as was the fashion of the period.. The instructions are delightfully vague -
1/12 Tamiya Lola T70-MkIII
AaronM replied to AaronM's topic in WIP: Other Racing: Road Racing, Land Speed Racers
Headers the next day were done and ready for paint. Primed prior to being painted flat white with a transition to flat black at the collector. doing rough fits of the body sections sanding some of the bits that should be flat to work out what isn’t flat. Fitment between the fixed and opening sections needed a lot of fine tuning. finally baking on some primer. Royal Blue time - I’m using SMS Advance Royal blue rather than the Tamiya. They appear to be identical colours but the SMS is more readily available local to me. In the sun it’s a very nice blue. another tray ready to bake! Also been working on some of the smaller pieces for the interior.
-
1/12 Tamiya Lola T70-MkIII
AaronM replied to AaronM's topic in WIP: Other Racing: Road Racing, Land Speed Racers
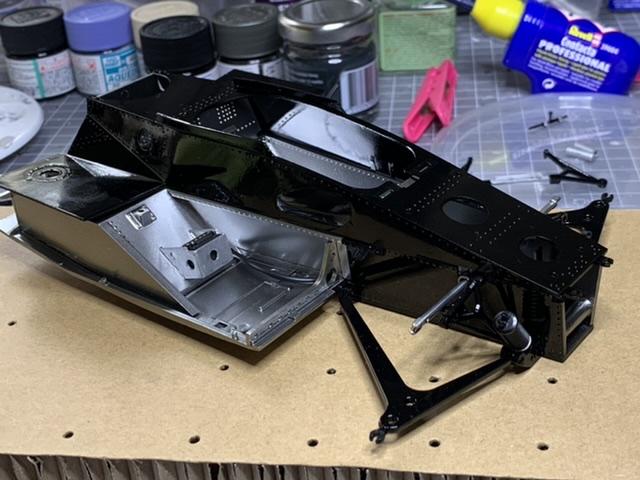
Being Christmas Day I’ve been doing a little bit here and there between eating and drinking. Ended up trialling a few grey ideas and decided to stick with a basic “Grey” gloss. It’s on the darker side but I was able to find a couple of period correct cars and they were a few different shades of grey. This would be right on the fringe of too dark, but not unbelievable. I used a bit of panel accent to highlight some of the separation. The headers have been added to through the day. Both sides are unique. Although they follow the same basic shape there’s a few different kinks. Each piece takes about 10 minutes to do rough prep on, test fit and then glue. Tomorrow they can come off, get a finishing sanding and I’ll start painting. That will near finish the engine and gearbox under the rear suspension comes together. In parallel I’ve been working on the fit/finish of the major body sections. In particular the rear and front clamshells to their respective central body sections. Out of the box the fit is not great. But with clearancing it’s actually really good for a 1970 scale down of a hand laid 1960’s fibreglass body. At the moment my biggest concern is making room between the elements in their closed state to have a layer of paint. Lots of filing. My intention is to get the fit set right on the bench. Then when eventually the fixed elements are mounted to finesse the fitment on the moving parts before finally painting them and finishing the model. -
1/12 Tamiya Lola T70-MkIII
AaronM replied to AaronM's topic in WIP: Other Racing: Road Racing, Land Speed Racers
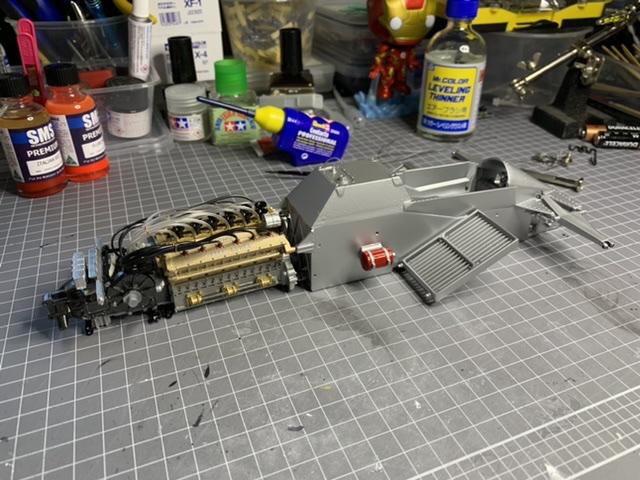
Been flat out the past few days so only touched this today for a couple of hours. Sprayed the base AC12 Bare Metal Silver on the chassis and significant chassis components. I’ll next paint the steel elements in a grey/white mix to give very light grey. At the same time I’ll do some washing over some of the panel sections to give that differentiation of materials. It won’t be perfect but it will be interesting. On the arms, I suppose I could do a metal finish on them, but for now I think the black will actually look better as all the various metal finishes don’t visually seperate well enough when scaled down. Added the fuel lines to the carbs and started the exhaust build. In a few hours I’ll set the second pipe on each side, adding pipes over the next day when the previous pipe is set in position. Then pop them off the engine, final sanding and paint. -
1/12 Tamiya Lola T70-MkIII
AaronM replied to AaronM's topic in WIP: Other Racing: Road Racing, Land Speed Racers
Engine looks Ok
-
1/12 Tamiya Lola T70-MkIII
AaronM replied to AaronM's topic in WIP: Other Racing: Road Racing, Land Speed Racers
I like making things hard for myself. The grey piece started life as a solid wedge of plastic with circular depressions to represent the speed holes. After making the effort to drill out all the other ones on the bulkhead I guess I had no choice but to do these. The problem as such, was drilling them out wouldn’t really give the effect of anything except a deeper depression as the piece was solid. So a grabbed a file. Ultimately I filed it down to a flat 1mm with two legs remaining at the back to set the angle. In progress. Now set in place it gives a critical sense of depth and “nooks and crannies” in that area. Most of which will be completely hidden when the radiators get installed on their bulkhead! Also. The Engine fits. -
1/12 Tamiya Lola T70-MkIII
AaronM replied to AaronM's topic in WIP: Other Racing: Road Racing, Land Speed Racers
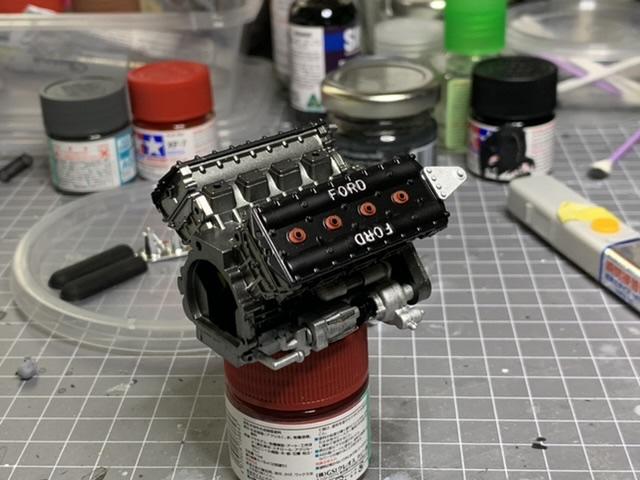
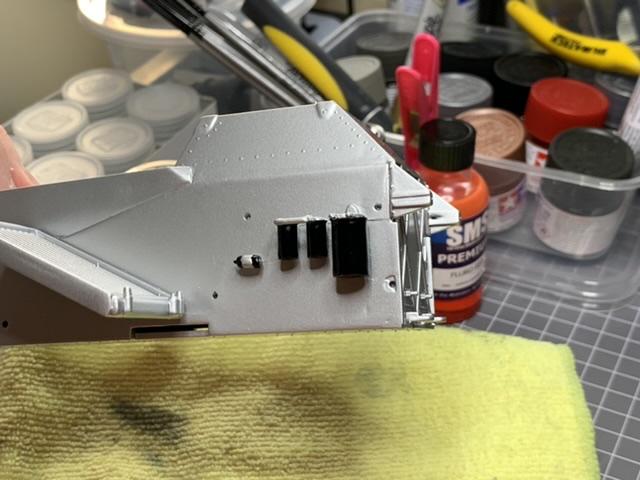
Yesterday I finally got to do some painting. The instructions call for the engine and Gearbag to be Falt Black. I settled on Zurc Obsidian Black which is similar to a gun metal finish. The metallic is very fine so it just as a light sheen to it, this sprayed over a car body with a nice gloss would be awesome. The detail is great, although the sink under some bits sucks. The inside of the tub got a coat of Zurc Black Primer, this has minimal filling capability but gives a great uniform finish to see imperfections. Drilled out bulkhead was very much “the right move”. I have to touch up the filling on the side pods. Not a huge amount though, the ejector marks in their filled start and the old file scratch will give the surface some detail. With the upper section of the front bulkhead held in place you can see I need to drill out top section as well, the upper piece is drilled through, just the upper surface of the vertical portion needs drilling. At least from this point I can start assembling the engine. In true Canberra fashion I’ve had to order some paints because nil-stock. This may pause elements of the build. -
1/12 Tamiya Lola T70-MkIII
AaronM replied to AaronM's topic in WIP: Other Racing: Road Racing, Land Speed Racers
I may have mentioned cats a few times. Mostly when I’m down in the study I have a co-worker (also work from home a fair bit thanks to the pandemic). But he also participates in builds. it’s does make the build process interesting. The there’s the time when I’m obviously making poor choices
-
1/12 Tamiya Lola T70-MkIII
AaronM replied to AaronM's topic in WIP: Other Racing: Road Racing, Land Speed Racers
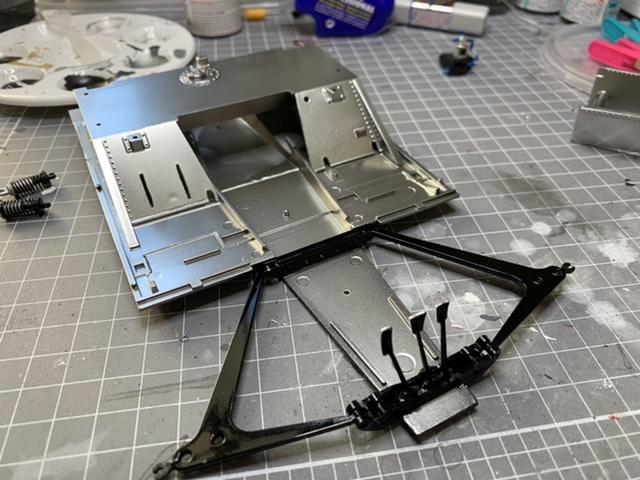
One down! This is the front lower arm. Circled is the moulded pin that is used to locate it for the regular build plan. You can barely see there’s a shoulder to the pin as well. First I cut off the pin ends leaving the shoulder that gives the total width needed to fit between the bulkhead sections. Then drill a small pilot hole down the middle. (0.9mm left hand drill) Then using a couple of steps up in drill size I end up at 1.4mm where my circa 1.3mm “bolt” is a snug fit. Shoulder is a bit clearer now. Test fit in the bulkhead. With a bit of zoom action you can see how important keeping that shoulder is. Otherwise I’d have to shim the arm. Slip bulkhead into the chassis, put arm in position, slid in the bolt. Winning. Now to do the upper arms, the other lower arm, smooth out the notches in the tub, then final sand the bulkhead, glue that in place. Also have to make the bolt head detail and glue on the “inside” of the bulkhead. That’s going to be huge if I get that done today. -
1/12 Tamiya Lola T70-MkIII
AaronM replied to AaronM's topic in WIP: Other Racing: Road Racing, Land Speed Racers
I remembered I have a 3D printer last night. Cue 5 hours of effort to change some things about. On the front bulkhead the suspension arms and shock mount using pins moulded on the arms located in holes on both pieces of the bulkhead. This means the bulkhead halves have to painted before the suspension arms can be assembled into the and the two halves glued together, then the entire lot glued into the chassis. I want to build up the bulkhead as a solid piece, and then glue that into the chassis, paint the chassis and finally assemble the suspension onto the completed chassis. The first step in the process is shown in the above pic. I had to notch the tub where the lower arm mounts. To do the final assembly I will need to insert a pin through there. I will also have to cut the pins off the suspension arms, then drill a 1.3mm hole through the arm for the pin to go through. Initially I was just going to heat and draw some scrap sprue to make the pins. I need 4 for the front suspension and a couple slightly larger for the rear. Then I remembered the 3D printers sitting in the other side of the house. So out with Fusion360 and I taught myself how to make bolts. An hour later and I have a stack of hex-head pins. I will set a hex head on one side, leave the hole in the flange, and then insert the pin from the other. I made the hex heads taller than scale to let me file/sand them to the right height. At the rear it’s a little different. The pin is part of the bulkhead moulding. And there’s a moulded hex in both sides. First step was to cut the pin off and the fake hex head. On the female side there’s a hole for the pin backed by another fake hex (left side of the pic above). With some extreme zoom you can see the printed hex head. I used the Flashforge FDM printer instead of the Resin printer largely because I have yet to set the resin printer up (cats and resin printing!) With the head given a quick file and sand it’s slightly “oversized” but not out of the realm of scale. They’re representing a bolt with a ~20mm shank, and in metric land that means a ~30mm head. I set the head size closer to 32mm. And that’s how I spent 5 hours on a Sunday night. Today it’s buy more paint and finish these bulkheads (including doing the suspension arm mods) -
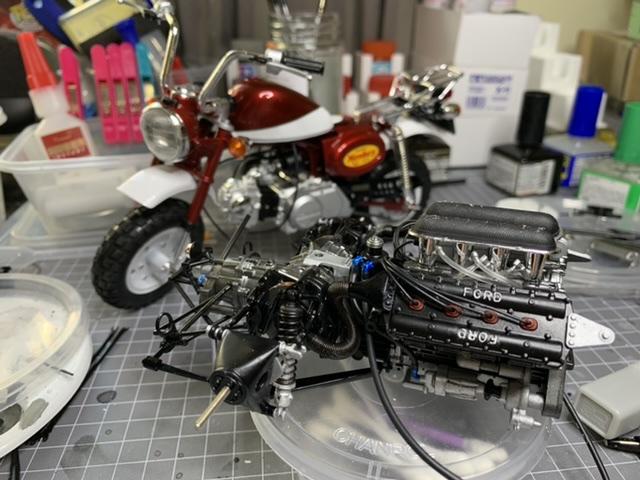
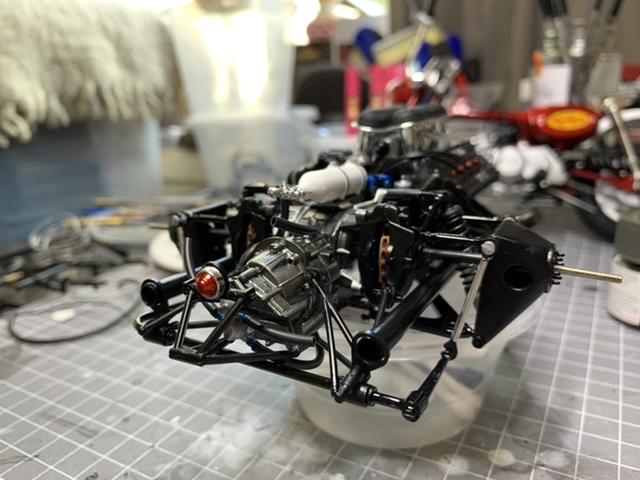
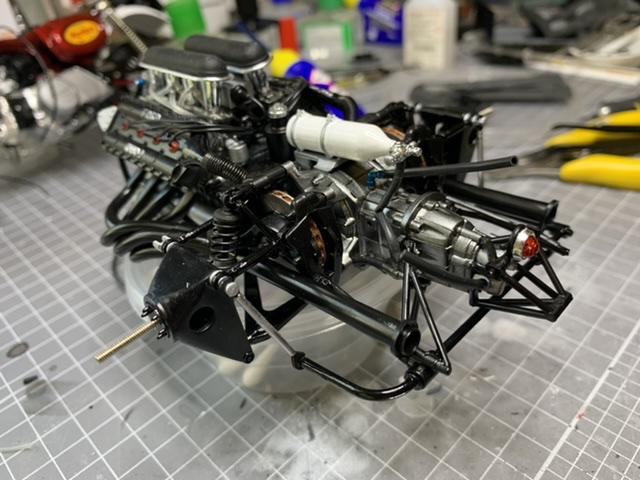
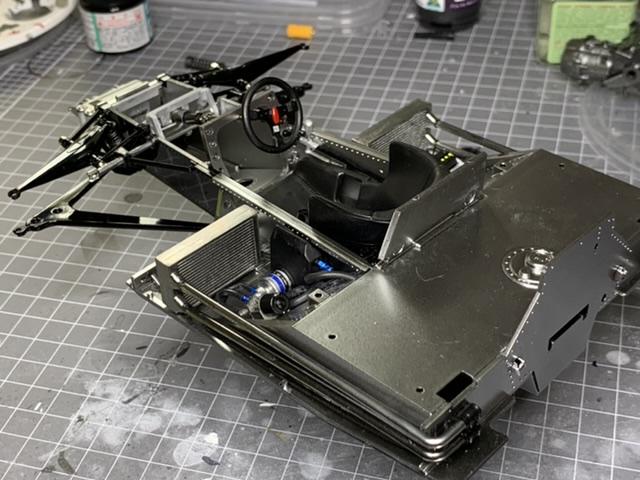
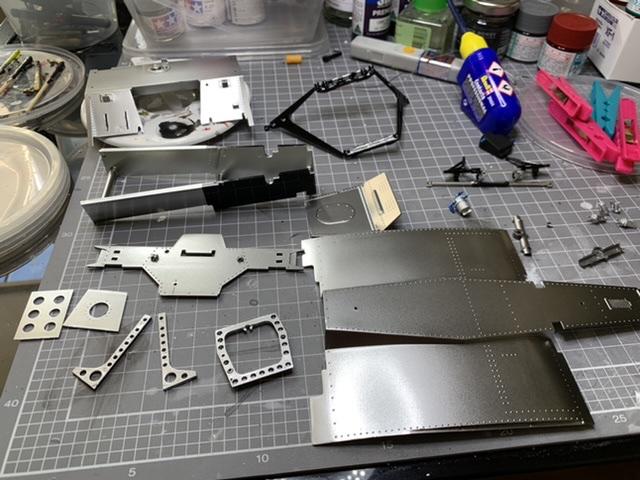
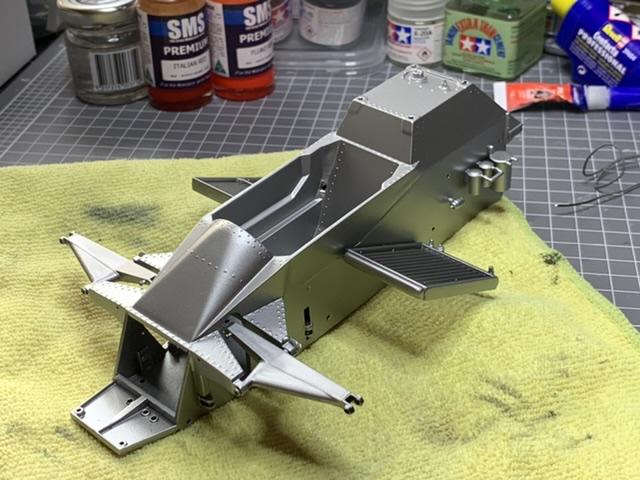
I picked this kit up cheaply as it had no box, and that’s also the reason that the same day it arrived I’ve started on it. The arrival was also fortunate as I’d literally just clear coated the Lotus 78 JPS body parts and they need a week or so to cure before final assembly can occur. Always a relief when a kit arrives are the manual/decals are in great condition. The size is a bit of a shock to me, having built two 1/12 F1 cars this is going to be just that bit bigger. Even for an older kit this isn’t quite up to the standard you’d expect from Tamiya. Lots of deep/badly placed ejector marks, flash and some sinkholes. luckily Tamiya also sell filler. Engine assembly starts, but thanks to the filling requirements and somewhat poor directions on paint colours progress will be quite slow. The ejector pin marks on the intake runners are a great example, on the outside of the part, so instead of just sanding a bit and knowing they’re going to be obscured upon assembly it’s out with the filler and a lot more effort. Once glued in place the issue becomes clearer. a coat of flat aluminium brings it all together! Meanwhile filing and sanding later the tub is getting close to “ready”. I’ve got to finish tidying the rear (gearbox) subframe section before I can fix it into the rear of the tub. Where feasible I’m trying to get the structure glued into the tub before painting - even if that means some rethinks of the assembly process. Other things like the front bulkhead structure benefit from a different approach. Out with the drill to make the speed holes (aka weight reduction) real. Obviously mounding the part punched through like this would be far more difficult and it’s only a couple of minutes effort for me to get a far more “real” build.
-
1/12 Tamiya Lotus Team JPS Mk3
AaronM replied to AaronM's topic in WIP: Other Racing: Road Racing, Land Speed Racers
After clear coat letting the body parts get touch dry before curing. Very happy with how the Zurc Mirror Gloss Clear lays over the decals and settles. overall the pieces looks fantastic. After 5-6 hours in the curing oven it come out with an even better finish. I generally run the Clear coated parts for about 15 hours in the oven at 40 degrees to ensure the finish hardens up before getting back to assembly.
-
1/12 Tamiya Lotus Team JPS Mk3
AaronM replied to AaronM's topic in WIP: Other Racing: Road Racing, Land Speed Racers
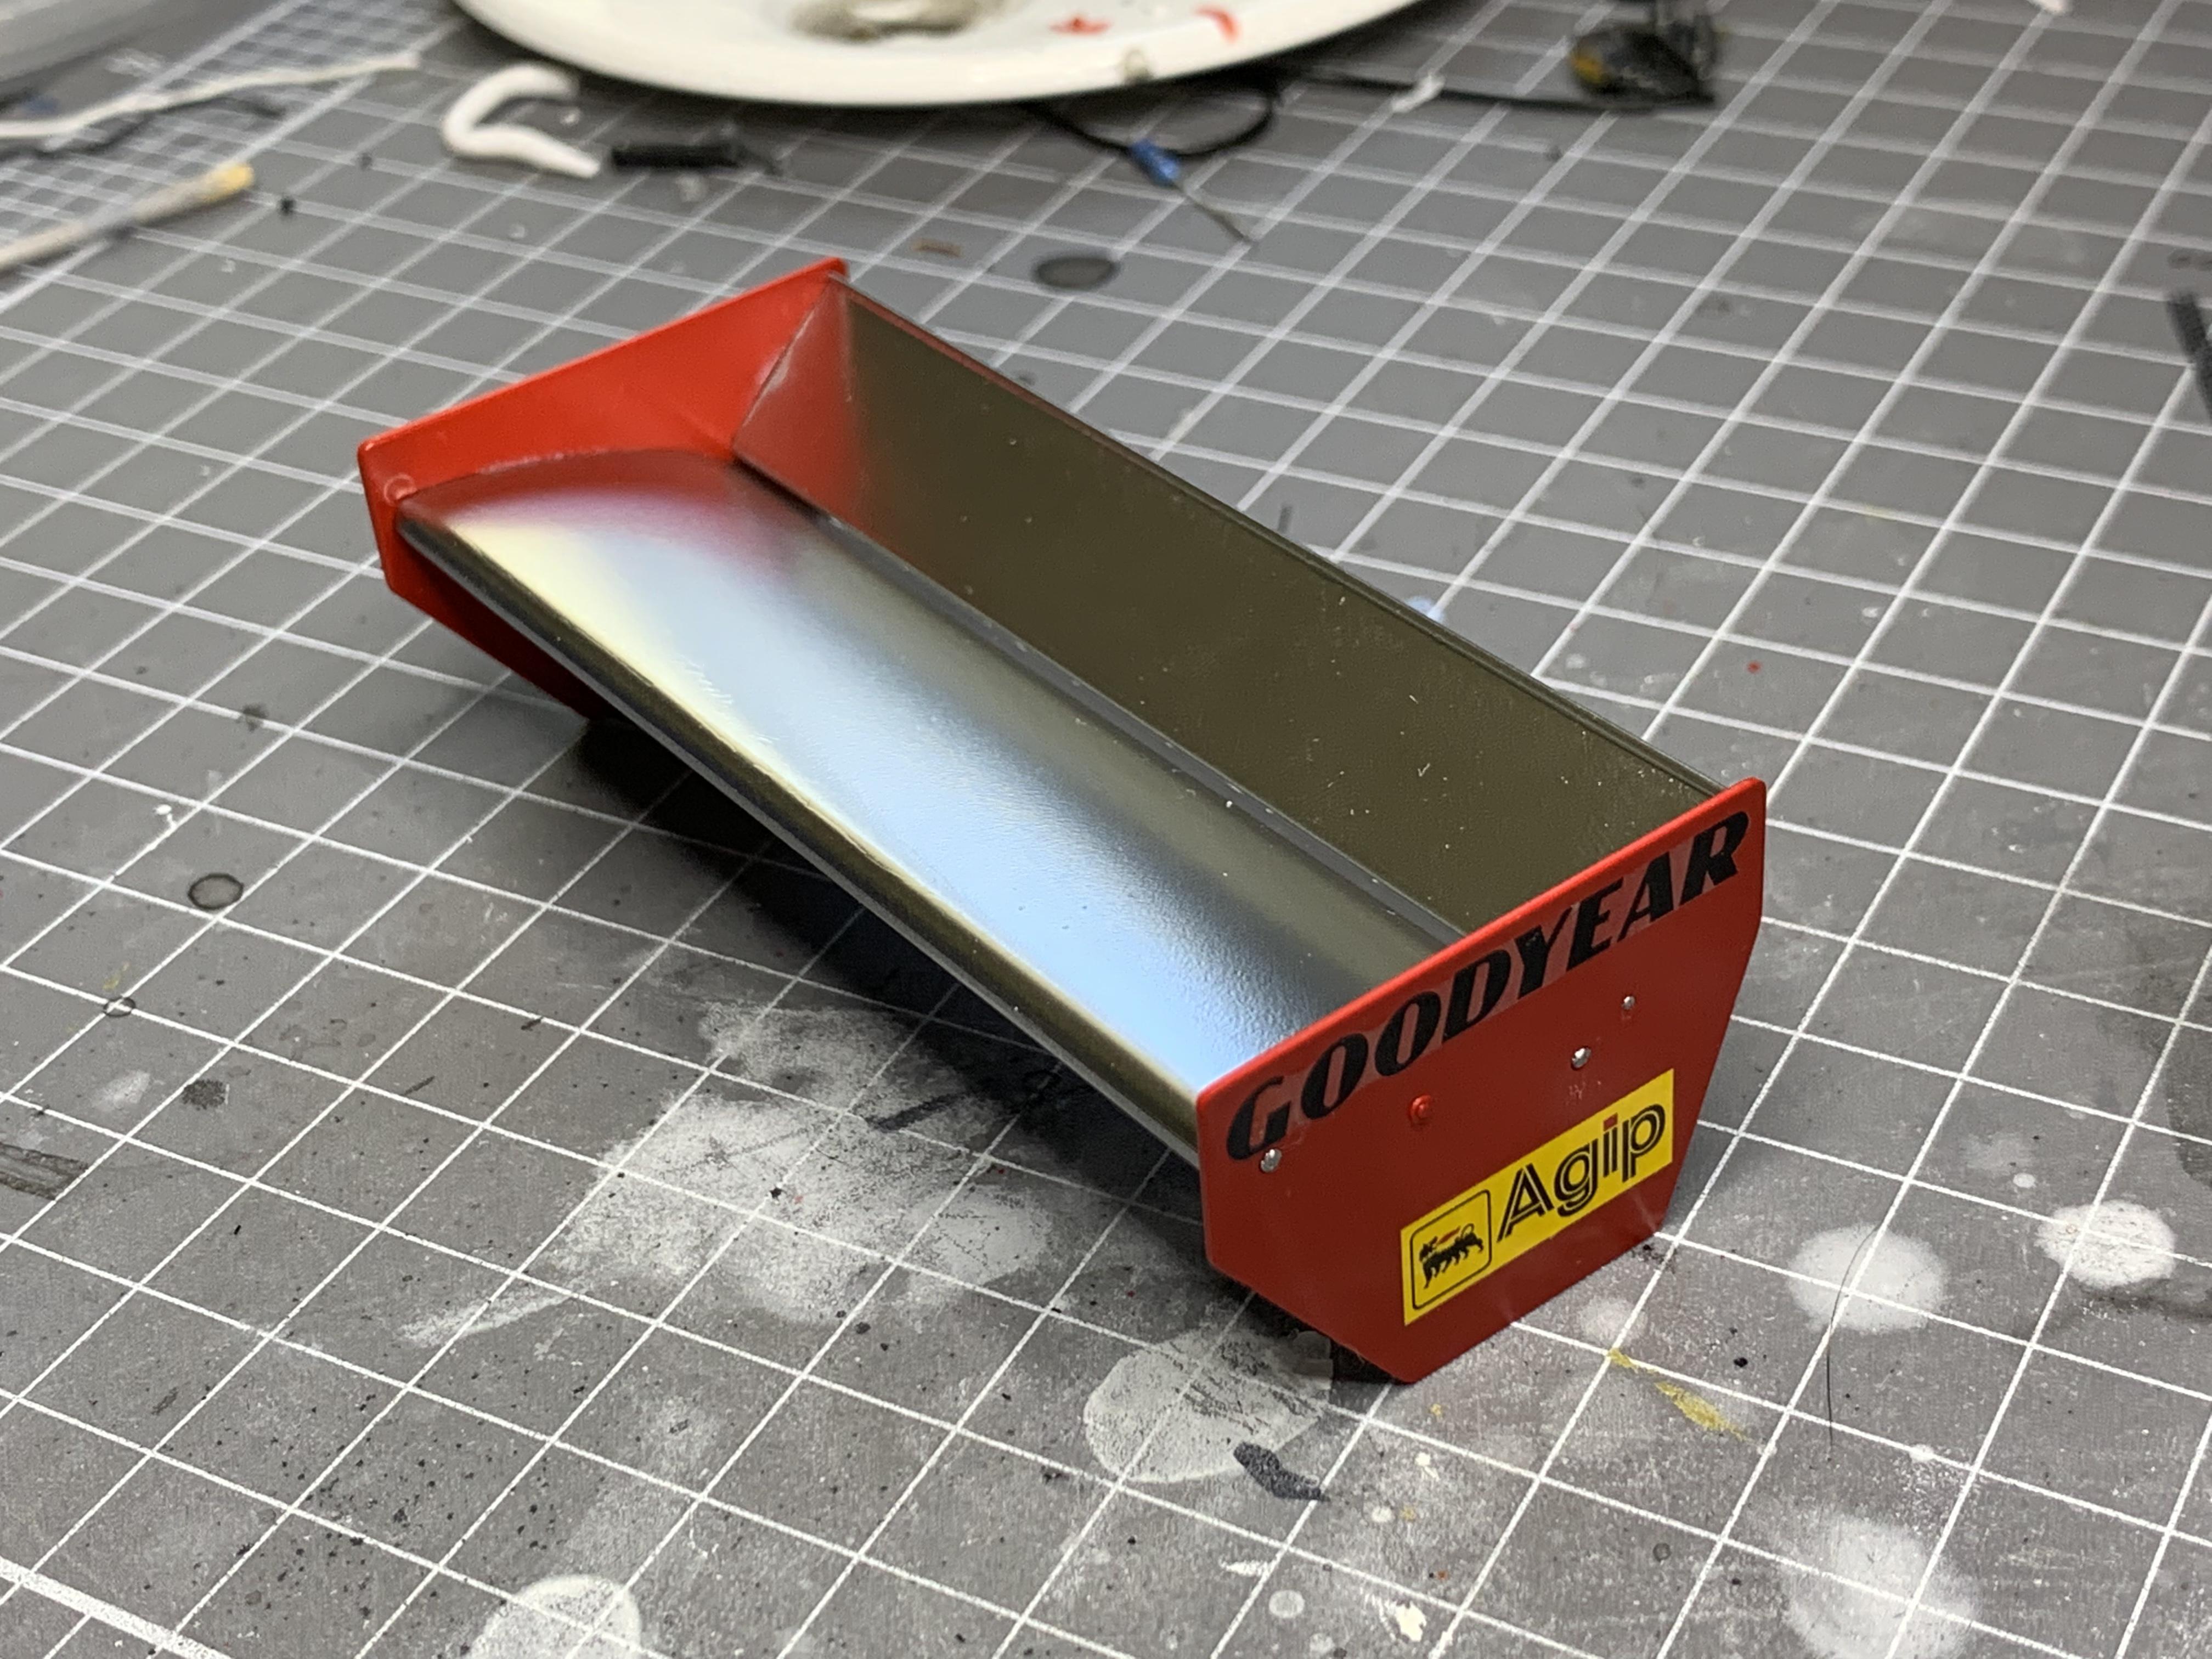
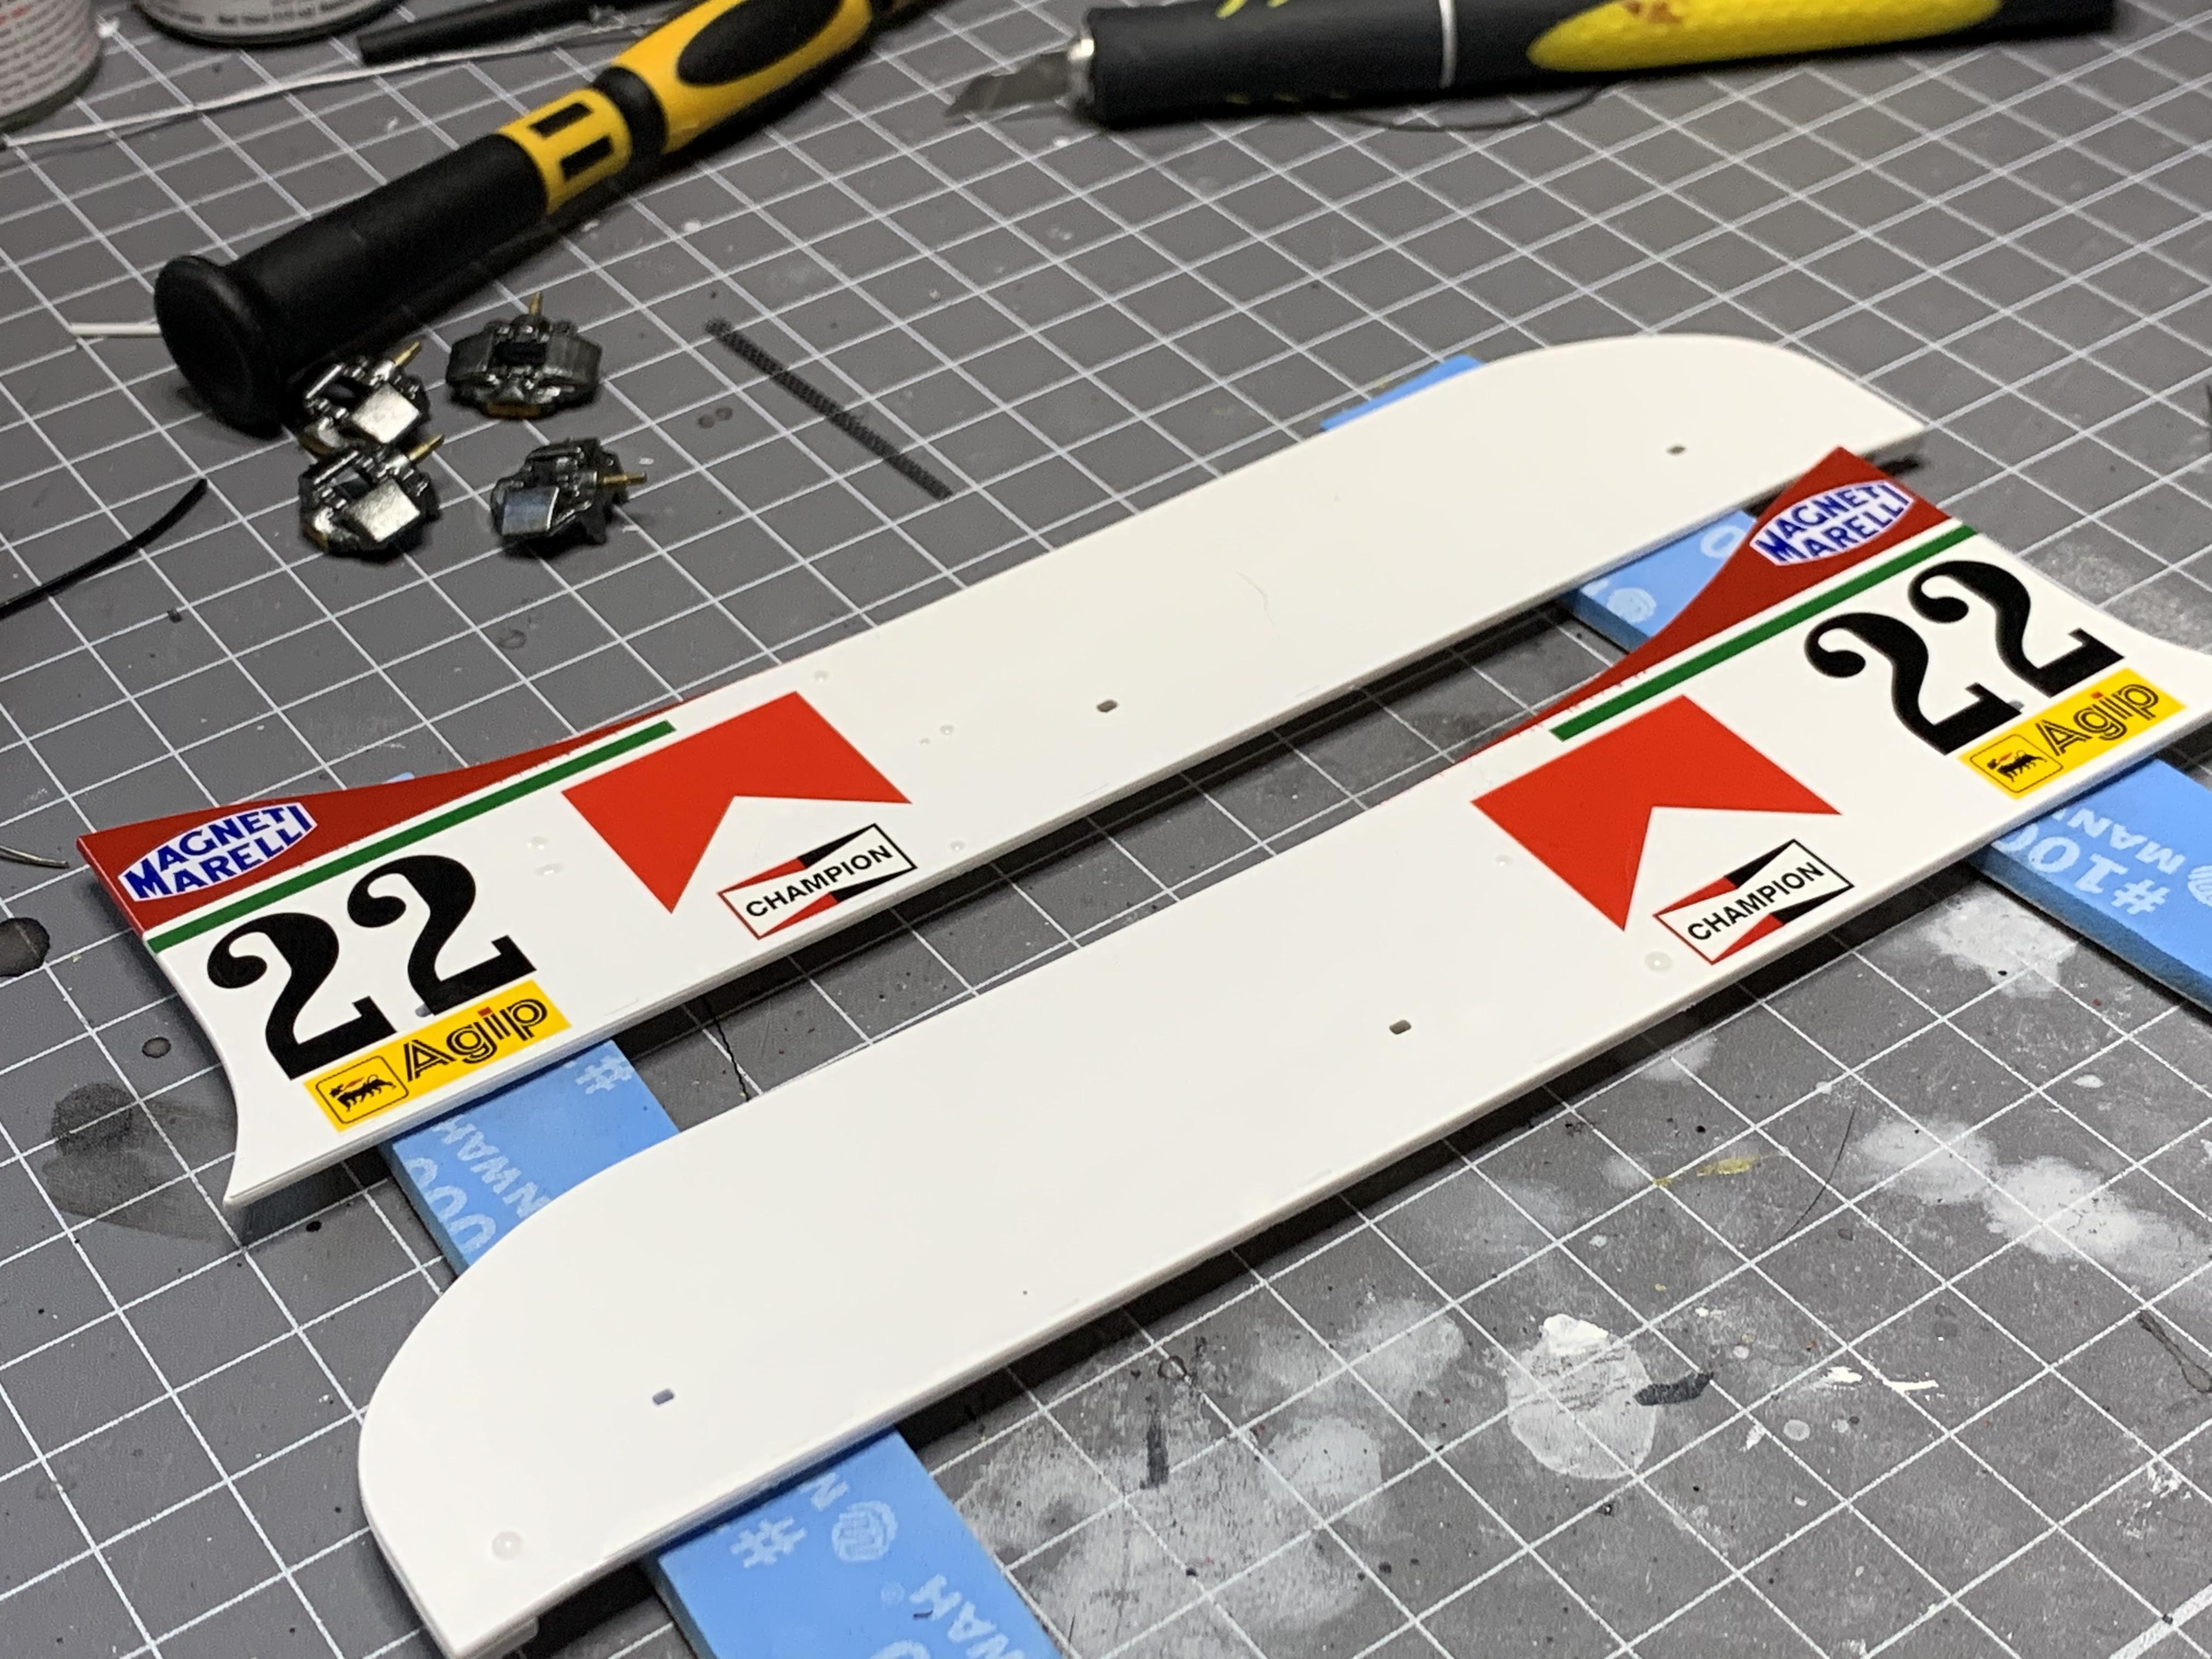
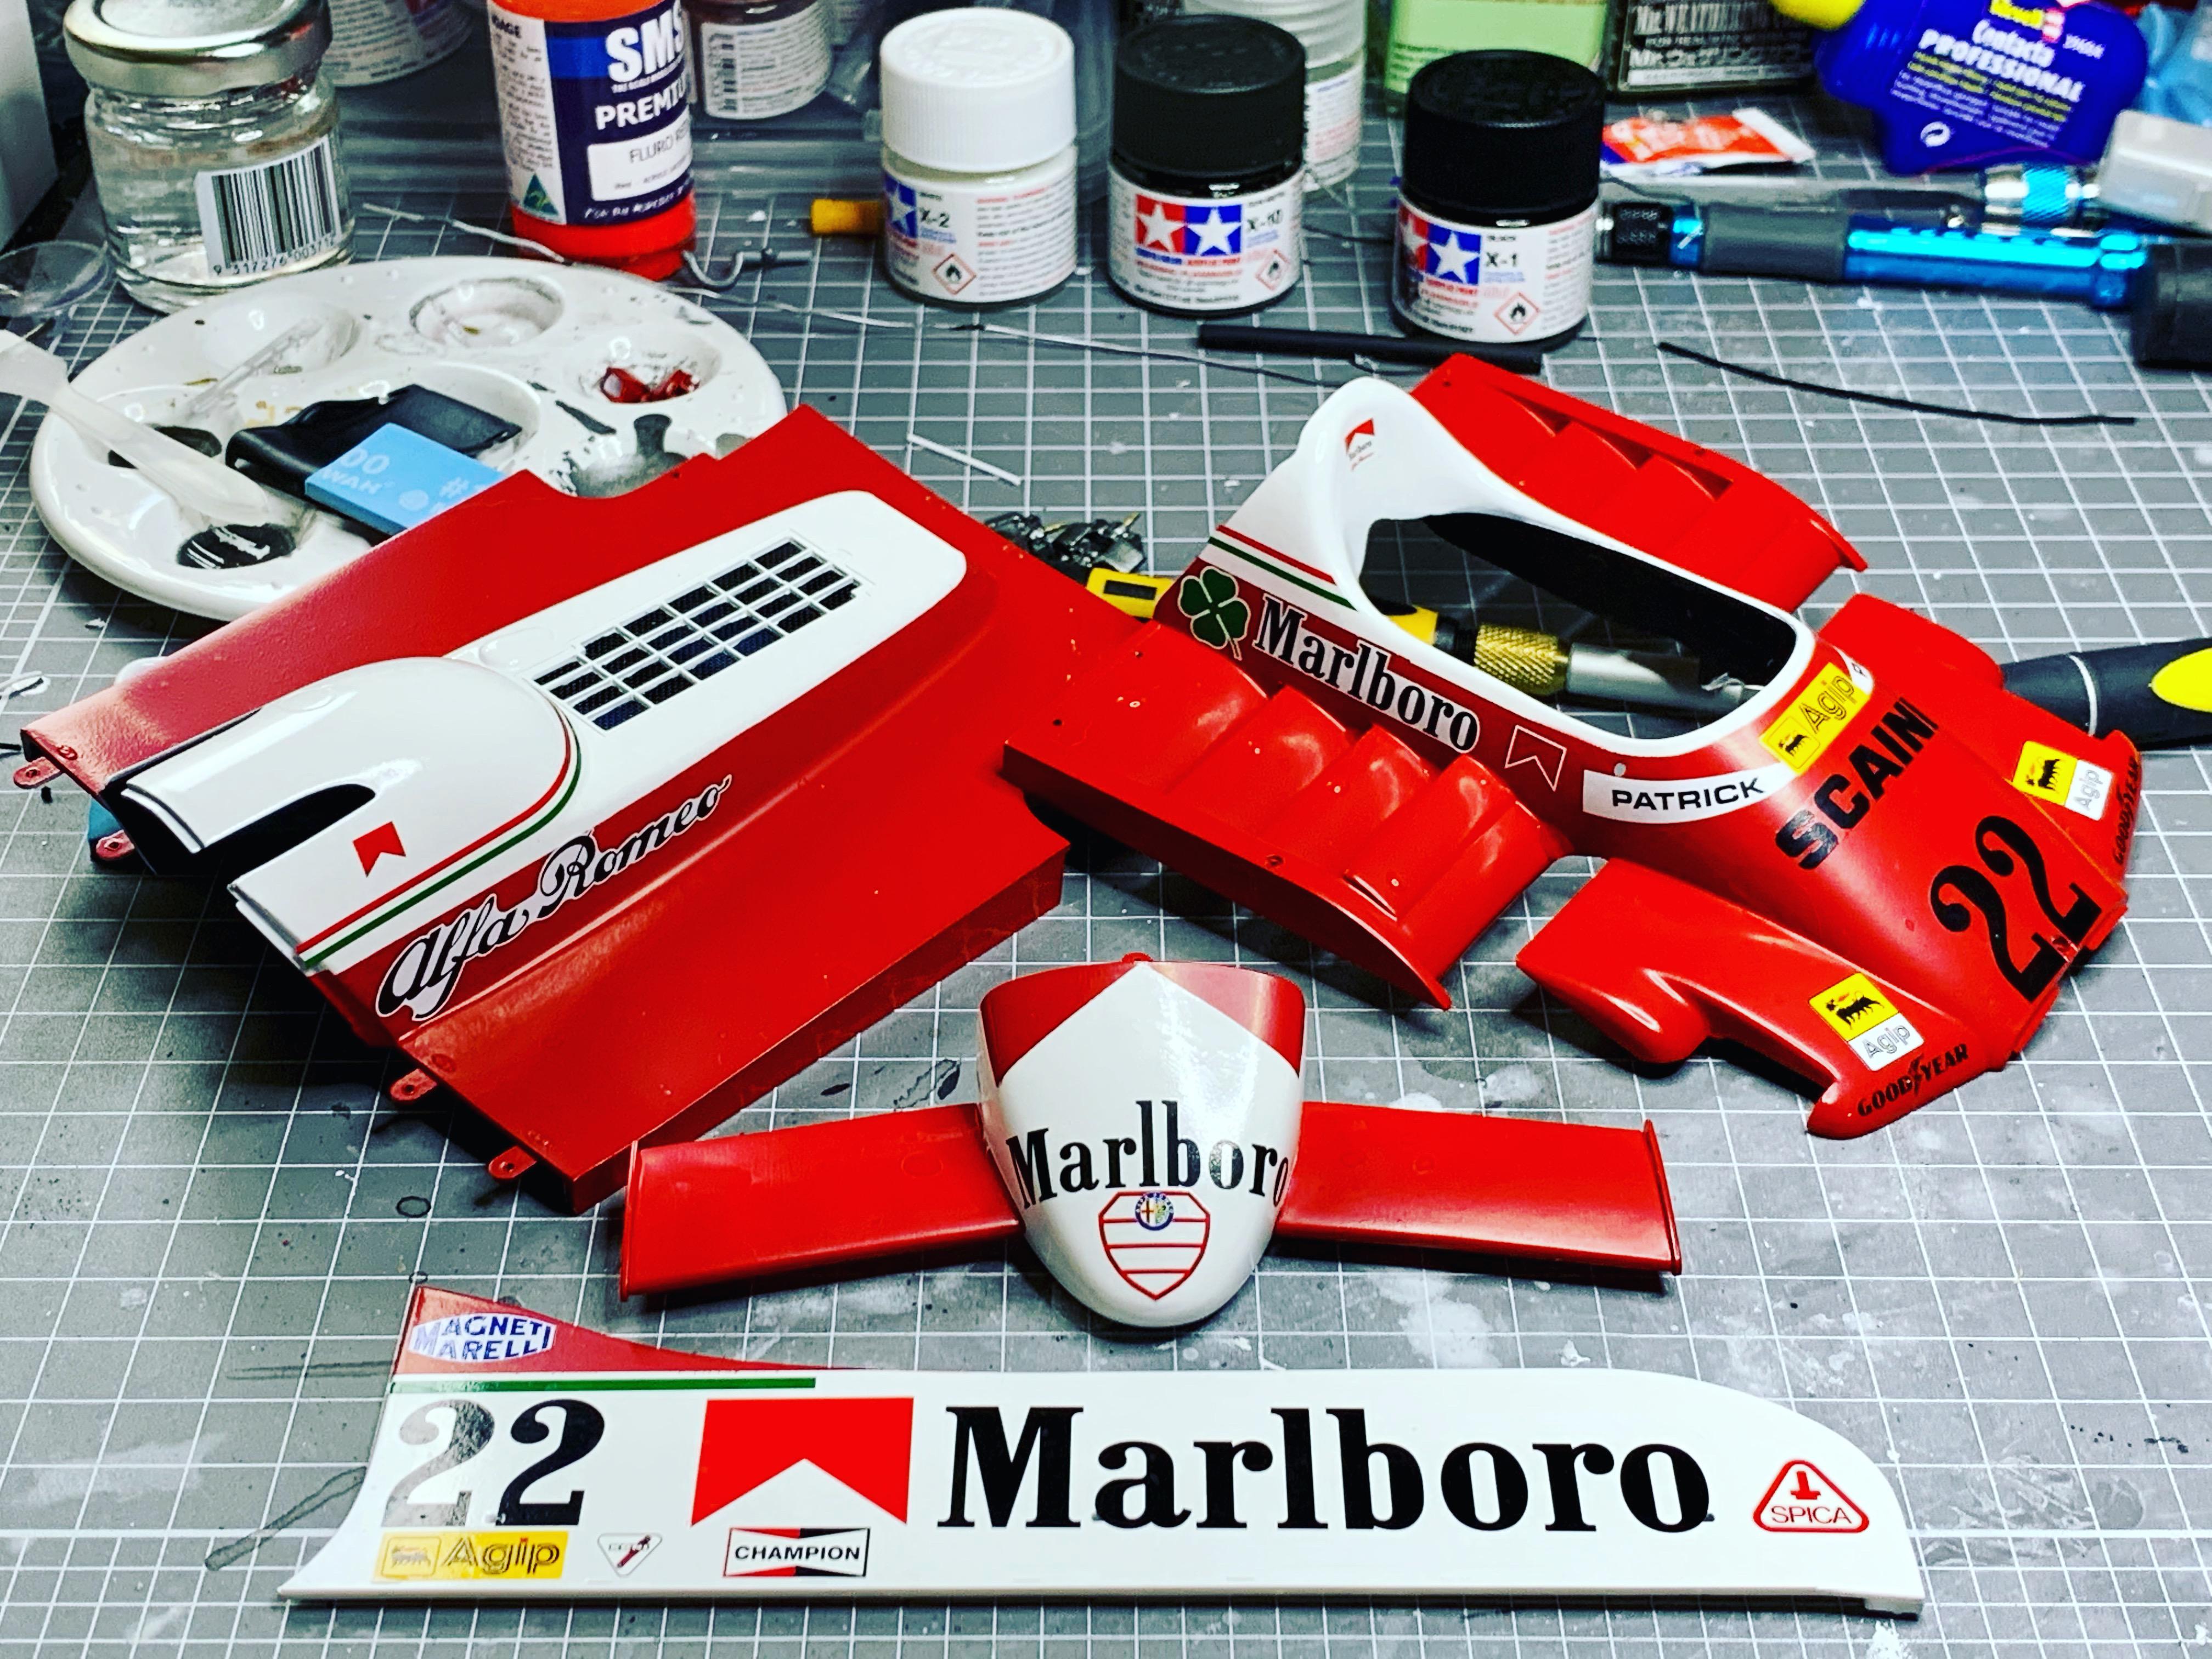
doing the body fit tests. The main upper section of the monocoque has a bunch of decals to be applied before it can be glued in place, but thankfully it locates well without glue. as the Tamiya kit decals were in rough shape I ordered a replacement set from IndyCals. A key difference is that the IndyCals are the correct shade of beige/biscuit like the actual race cars. On camera it registers as gold, but back in the day the cars were hand sign written in beige! I was a little worried about getting a good result with the way IndyCals prints the decals, but with some careful trimming and Mr Mark Setter and Mr Mark Softer they went OK. I did the big/simple ones first to get familiar with the feel of the material. The pin striping requires a lot more trimming just to get to the point of application. Then the challenge of assembling the body pieces, applying decals section by section and somehow keeping them all lining up! I mixed a bit of flat aluminium with the gold to lighten the wheel centers. This worked out being a good match for the IndyCals colouring while still being a gold rather than beige colour.
-
1/12 Tamiya Lotus Team JPS Mk3
AaronM replied to AaronM's topic in WIP: Other Racing: Road Racing, Land Speed Racers
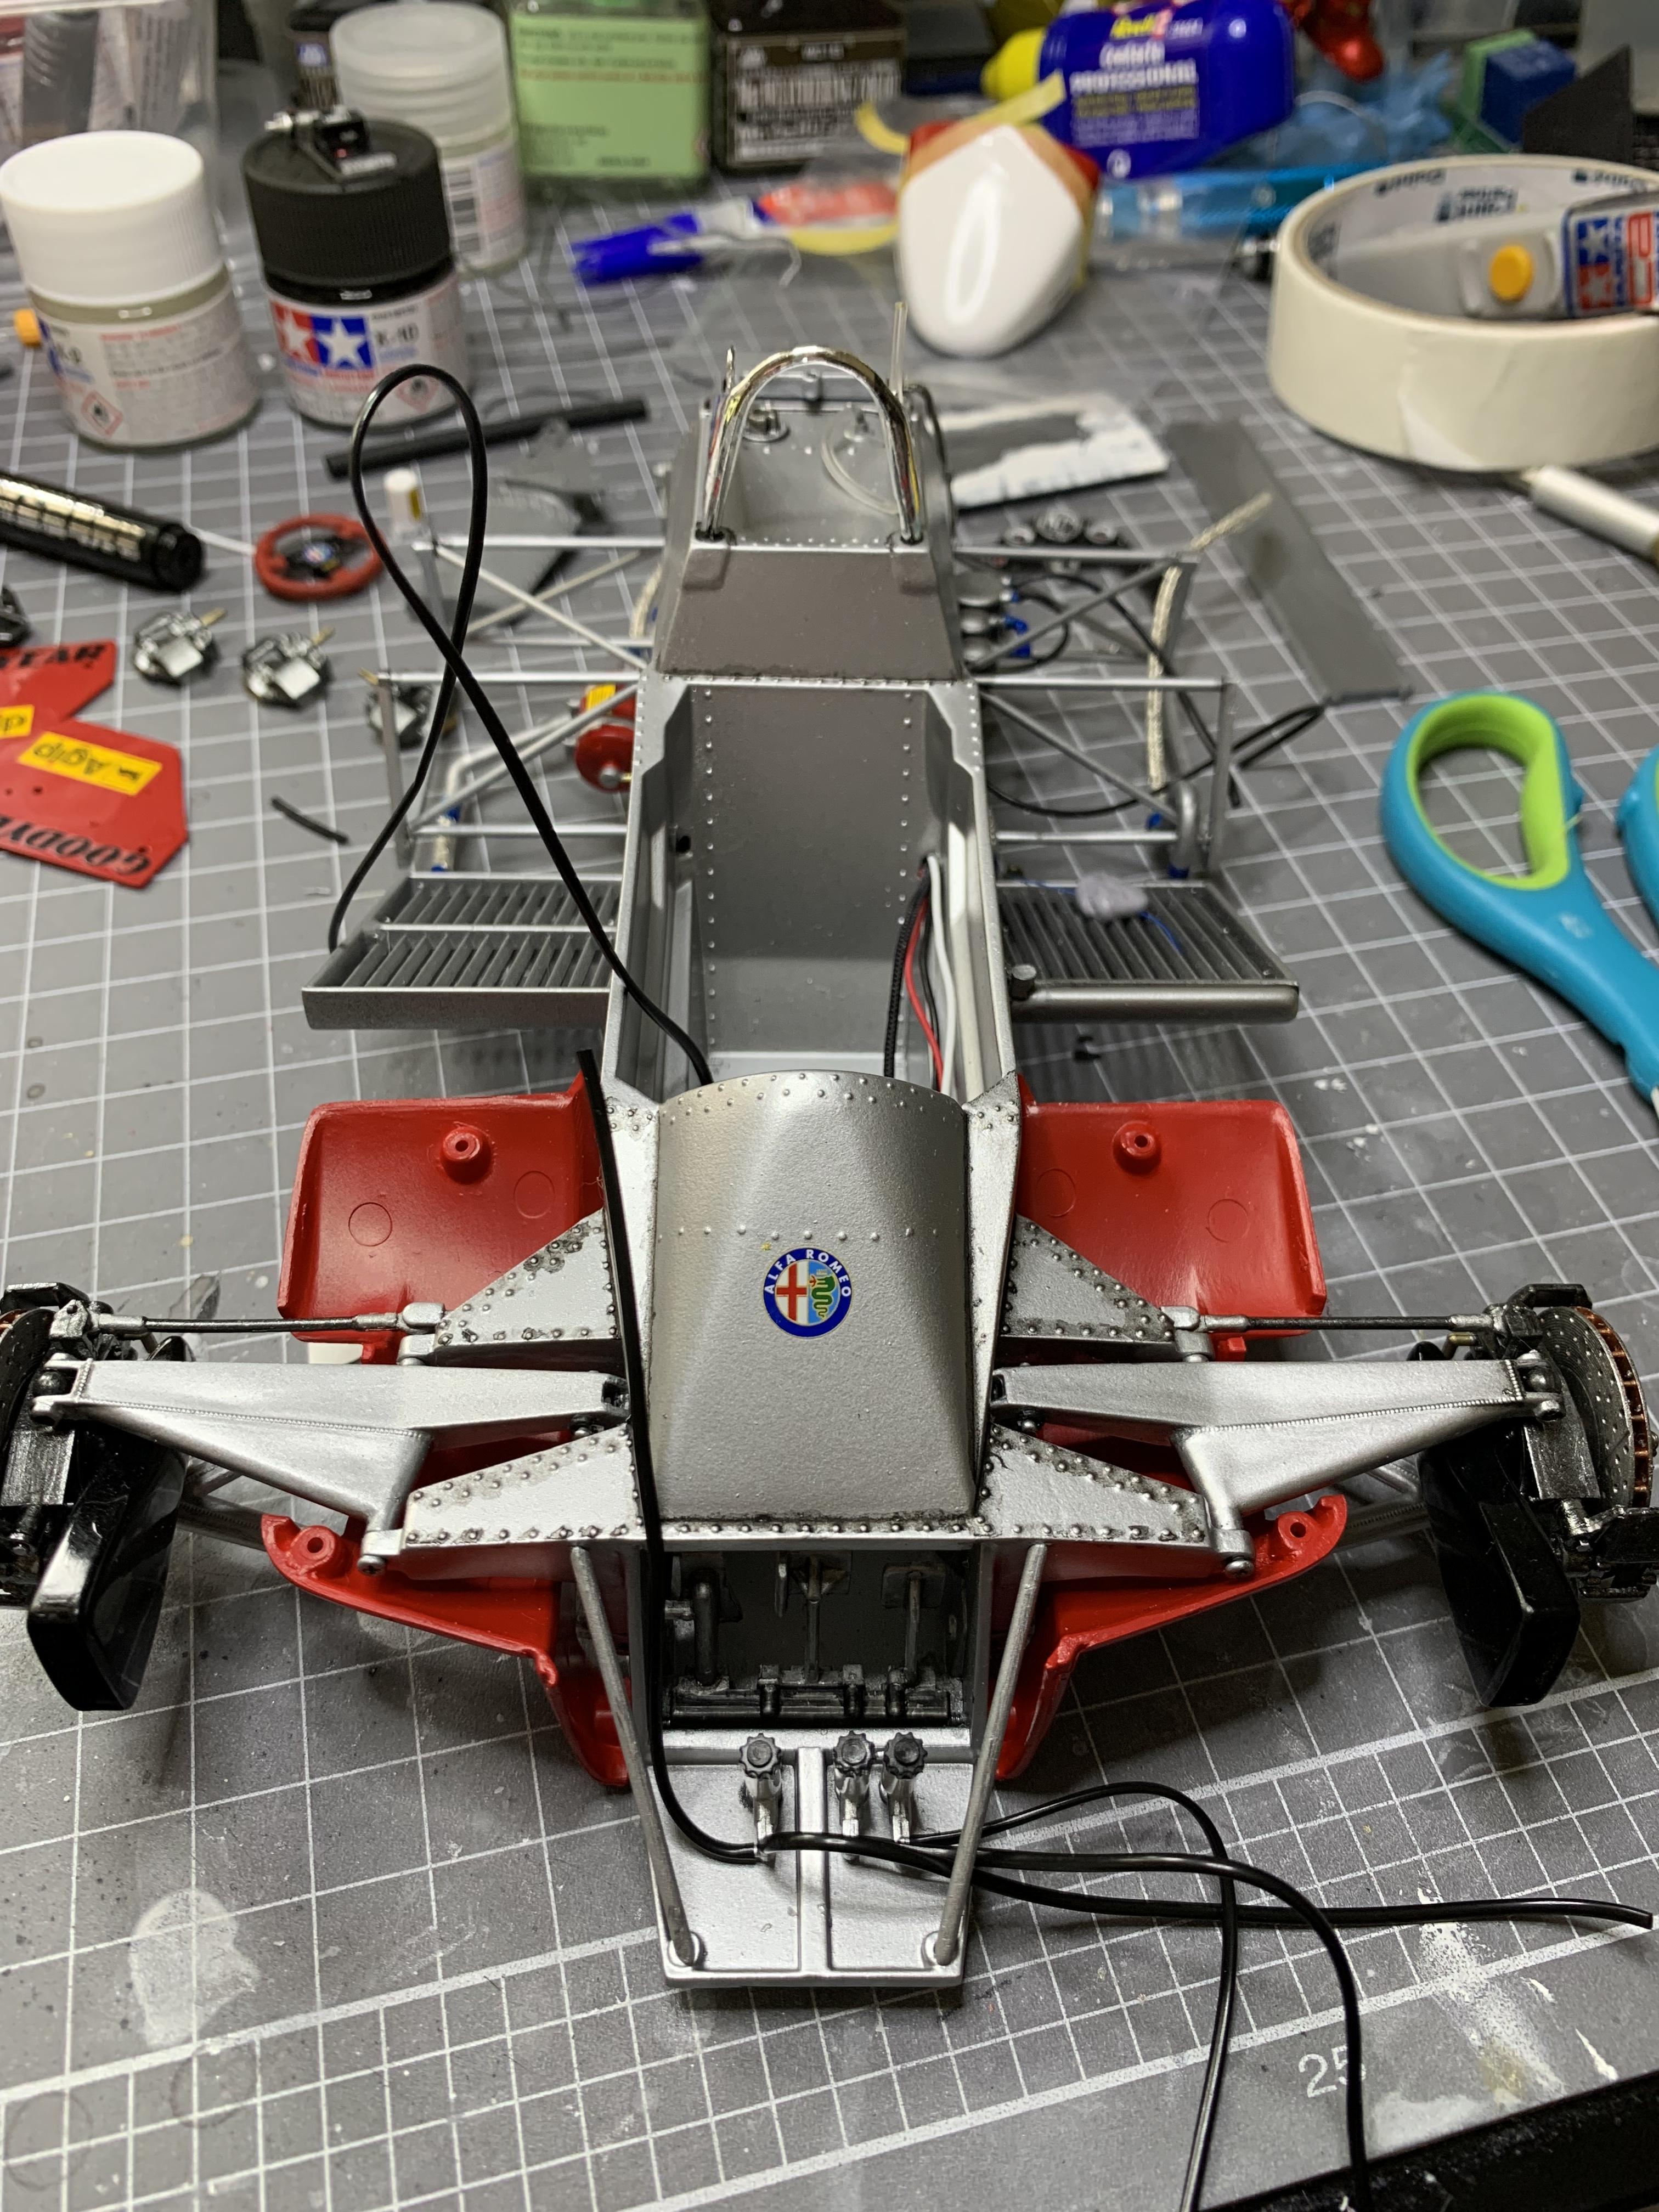
The outer bodywork assembled and into the fill and sand and prime and sand phase Black primer alternated with grey Surfacer it’s looking pretty good now! but it still gets another rub! meanwhile the rear suspension and rear structure gets built up. Those headers looks good from any angle. Test fitting body parts and fine tuning the assembly process prior to decals, clear coat and finishing!
-
1/12 Tamiya Lotus Team JPS Mk3
AaronM replied to AaronM's topic in WIP: Other Racing: Road Racing, Land Speed Racers
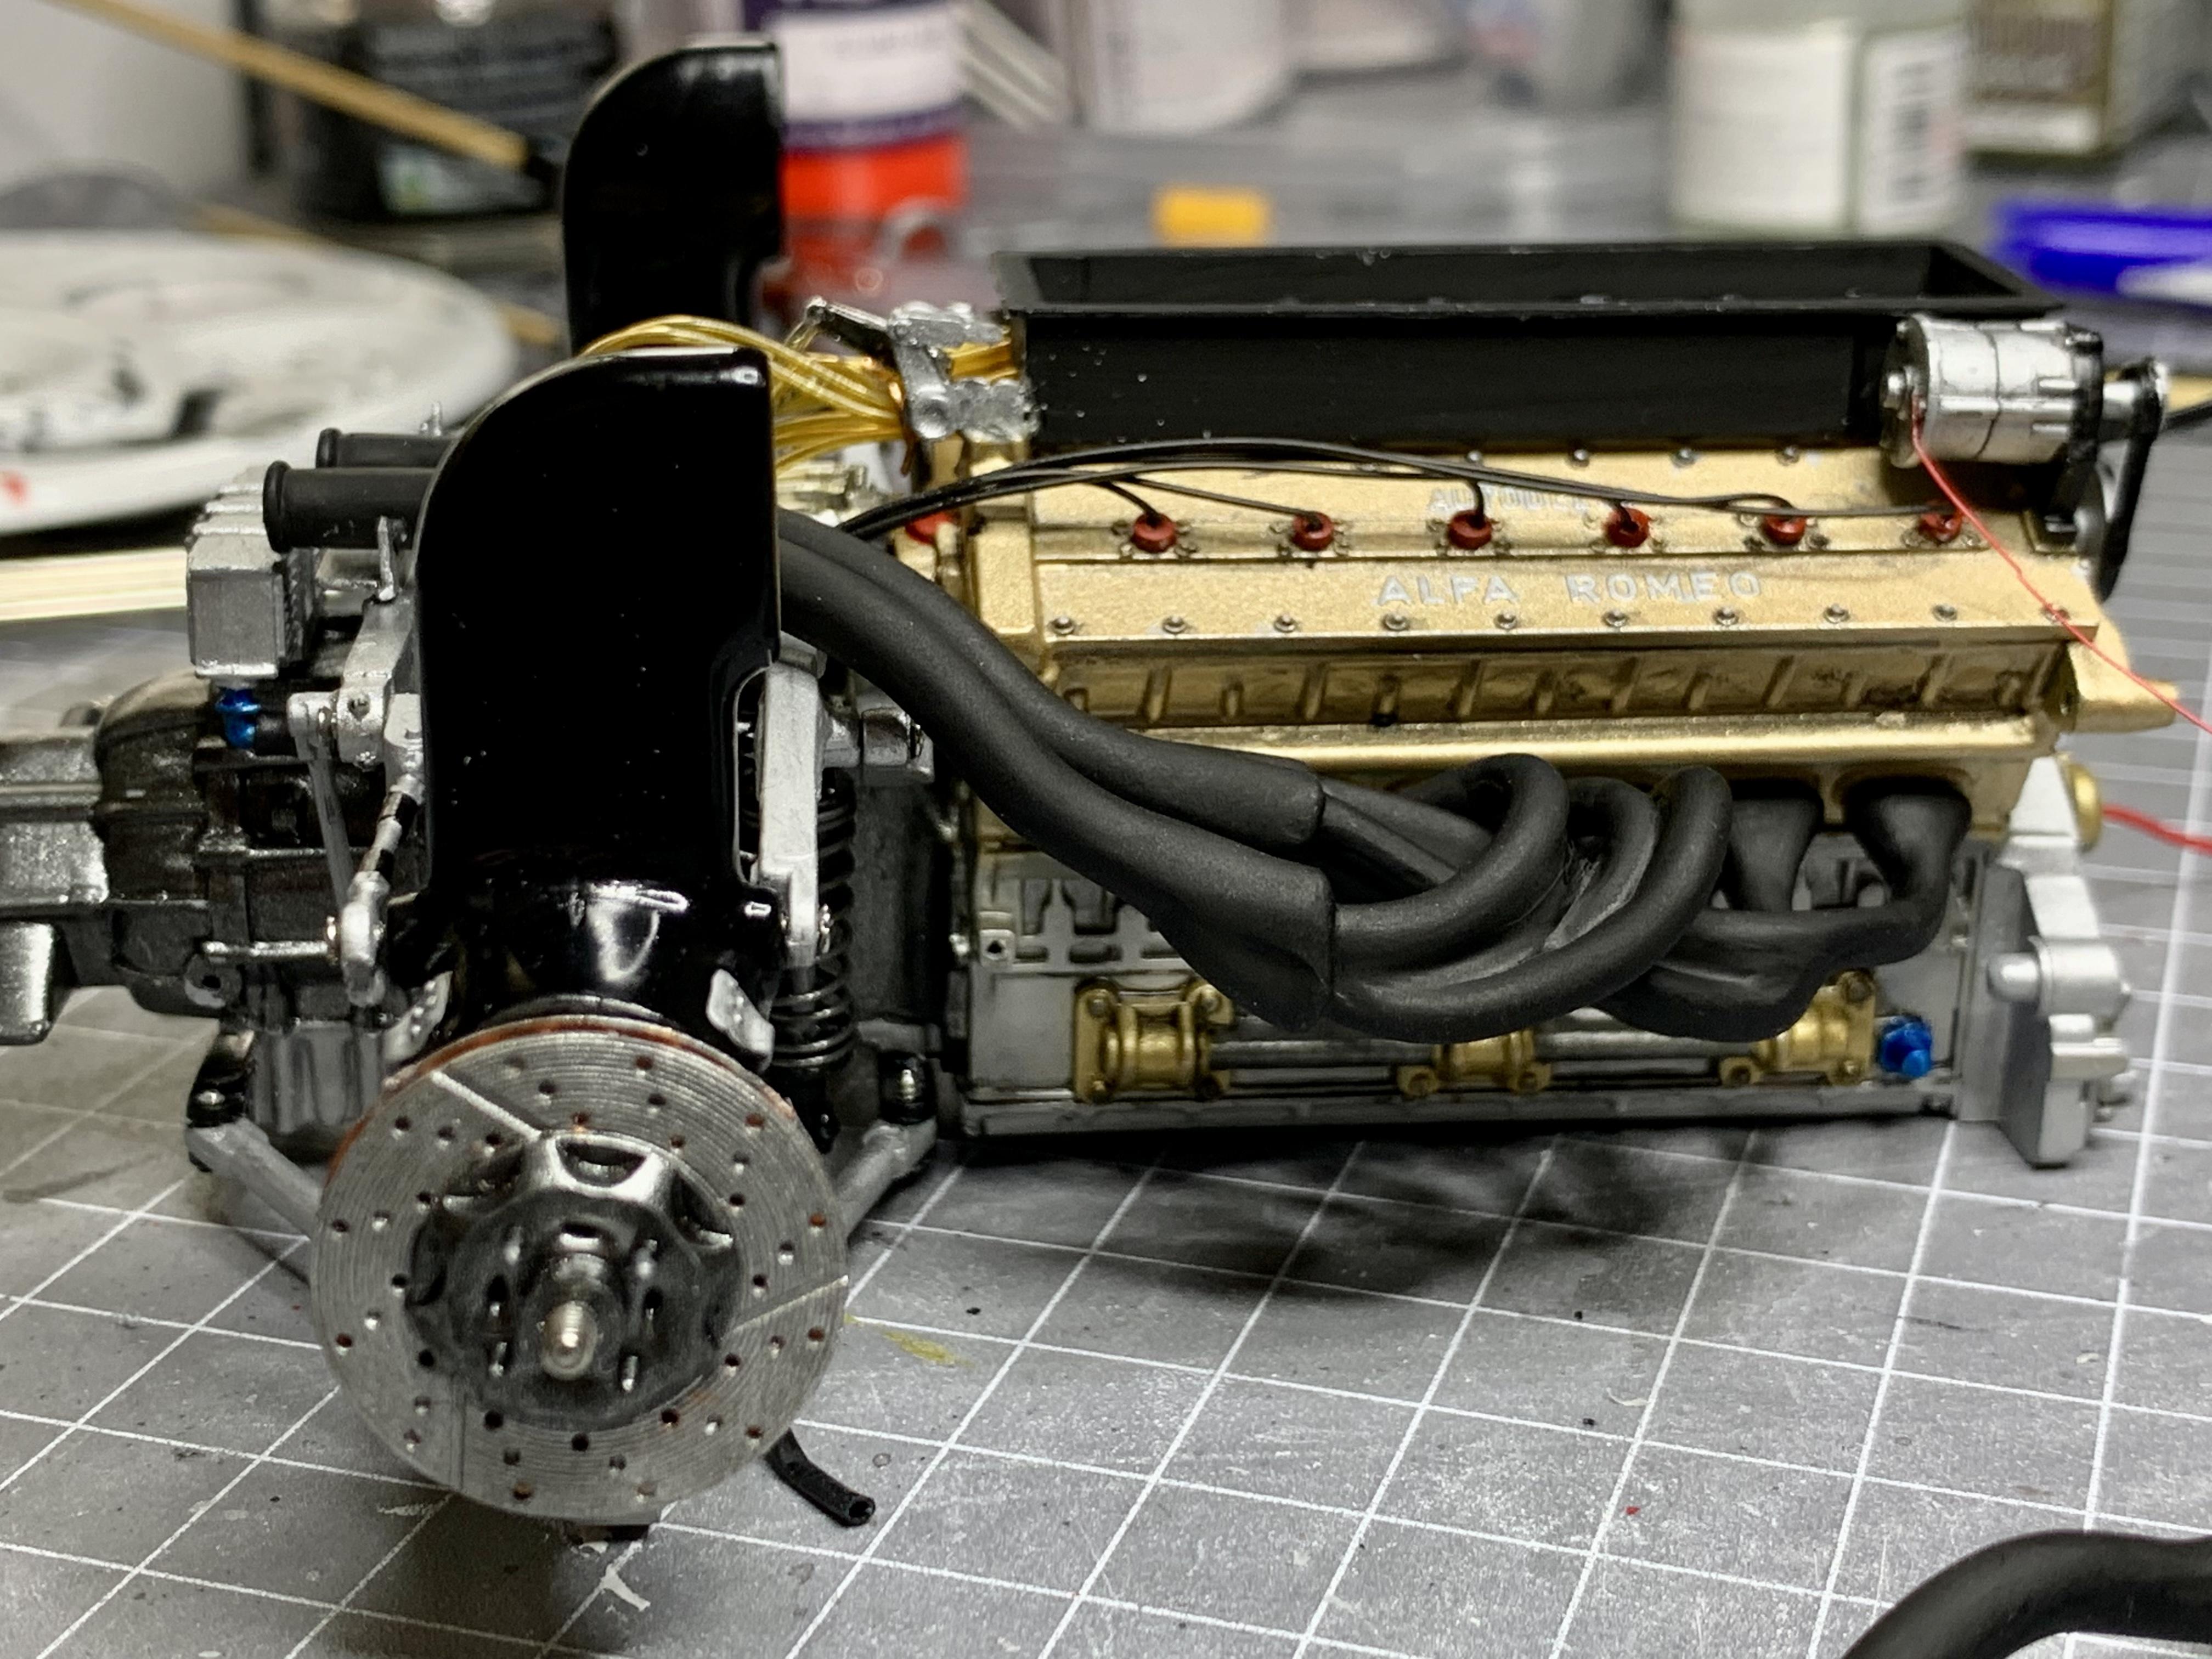
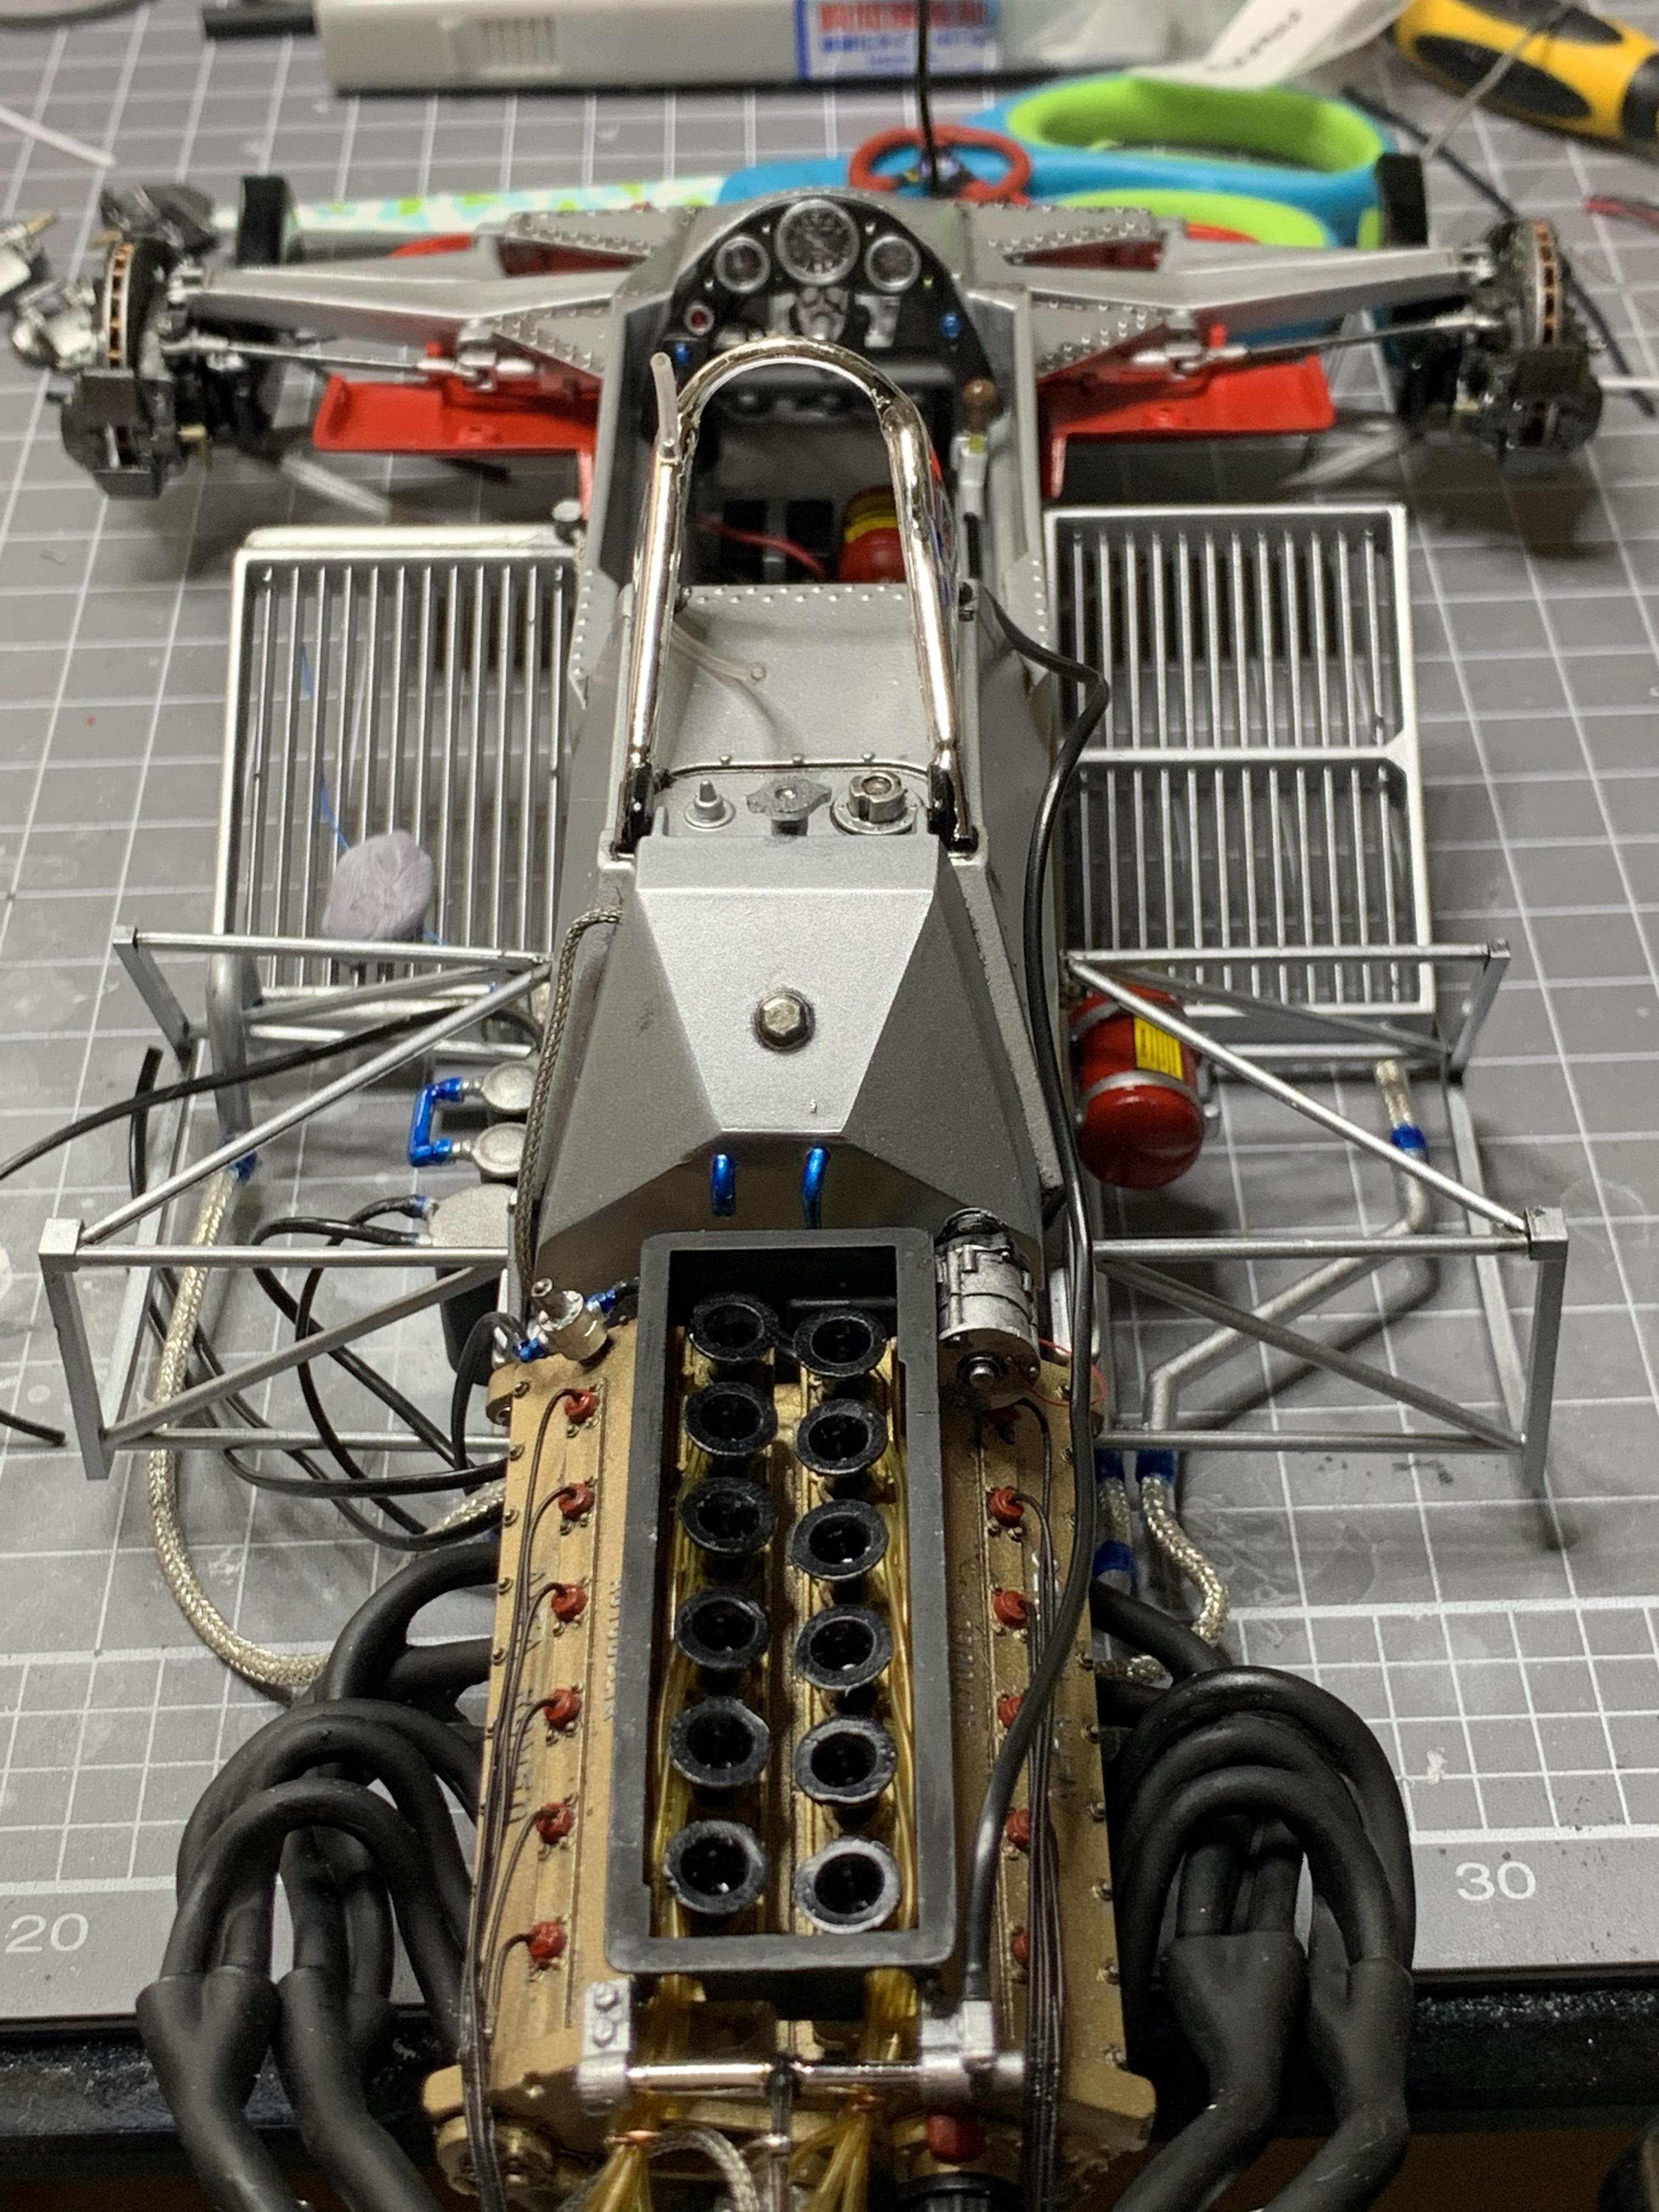
Like all Tamiya kits the out of box detail is great, but it still takes filler and sanding to bring out the best. Trying to up the details a little without going too far. Its such a contrast between the livery and the chassis. Starting on the radiators. Engine and gearbox coming together. Front of the chassis nearly done. Awesome details in the kit. Engine parts ancilliaries are go! Drivetrain getting close!
-
I bought this kit in a bundle from an Auction (as in a legit collectables auction in regional Australia not eBay) in the middle of one of the many lockdowns this year. It had be started with some pieces of the monocoque glued up and painted. Since discovering that 99.9% isopropyl alcohol removed paint instantly with no plastic damage I immediately stripped the old paint and started again. This is my third build since coming back to the hobby, the second being a Monkey bike, and the first an Italeri Alfa Romeo 179. Step 1: Stripper! Work out if the already glued bits are “close enough”. Dummy fit, and eventually glue the large monocoque sections. Start with the Gloss Black painting (using Zurc Gloss Lacquer) Definitey black! Suspension arms and quite a few other mechanicals are gloss black on these. Over the gloss black base Zurc Hyper Silver gives a bright alloy finish. Some sections are left black as they are not covered by other bodywork. Build up small details.
-
1/12th Italeri Alfa Romeo 179 /179C
AaronM replied to AaronM's topic in WIP: Other Racing: Road Racing, Land Speed Racers
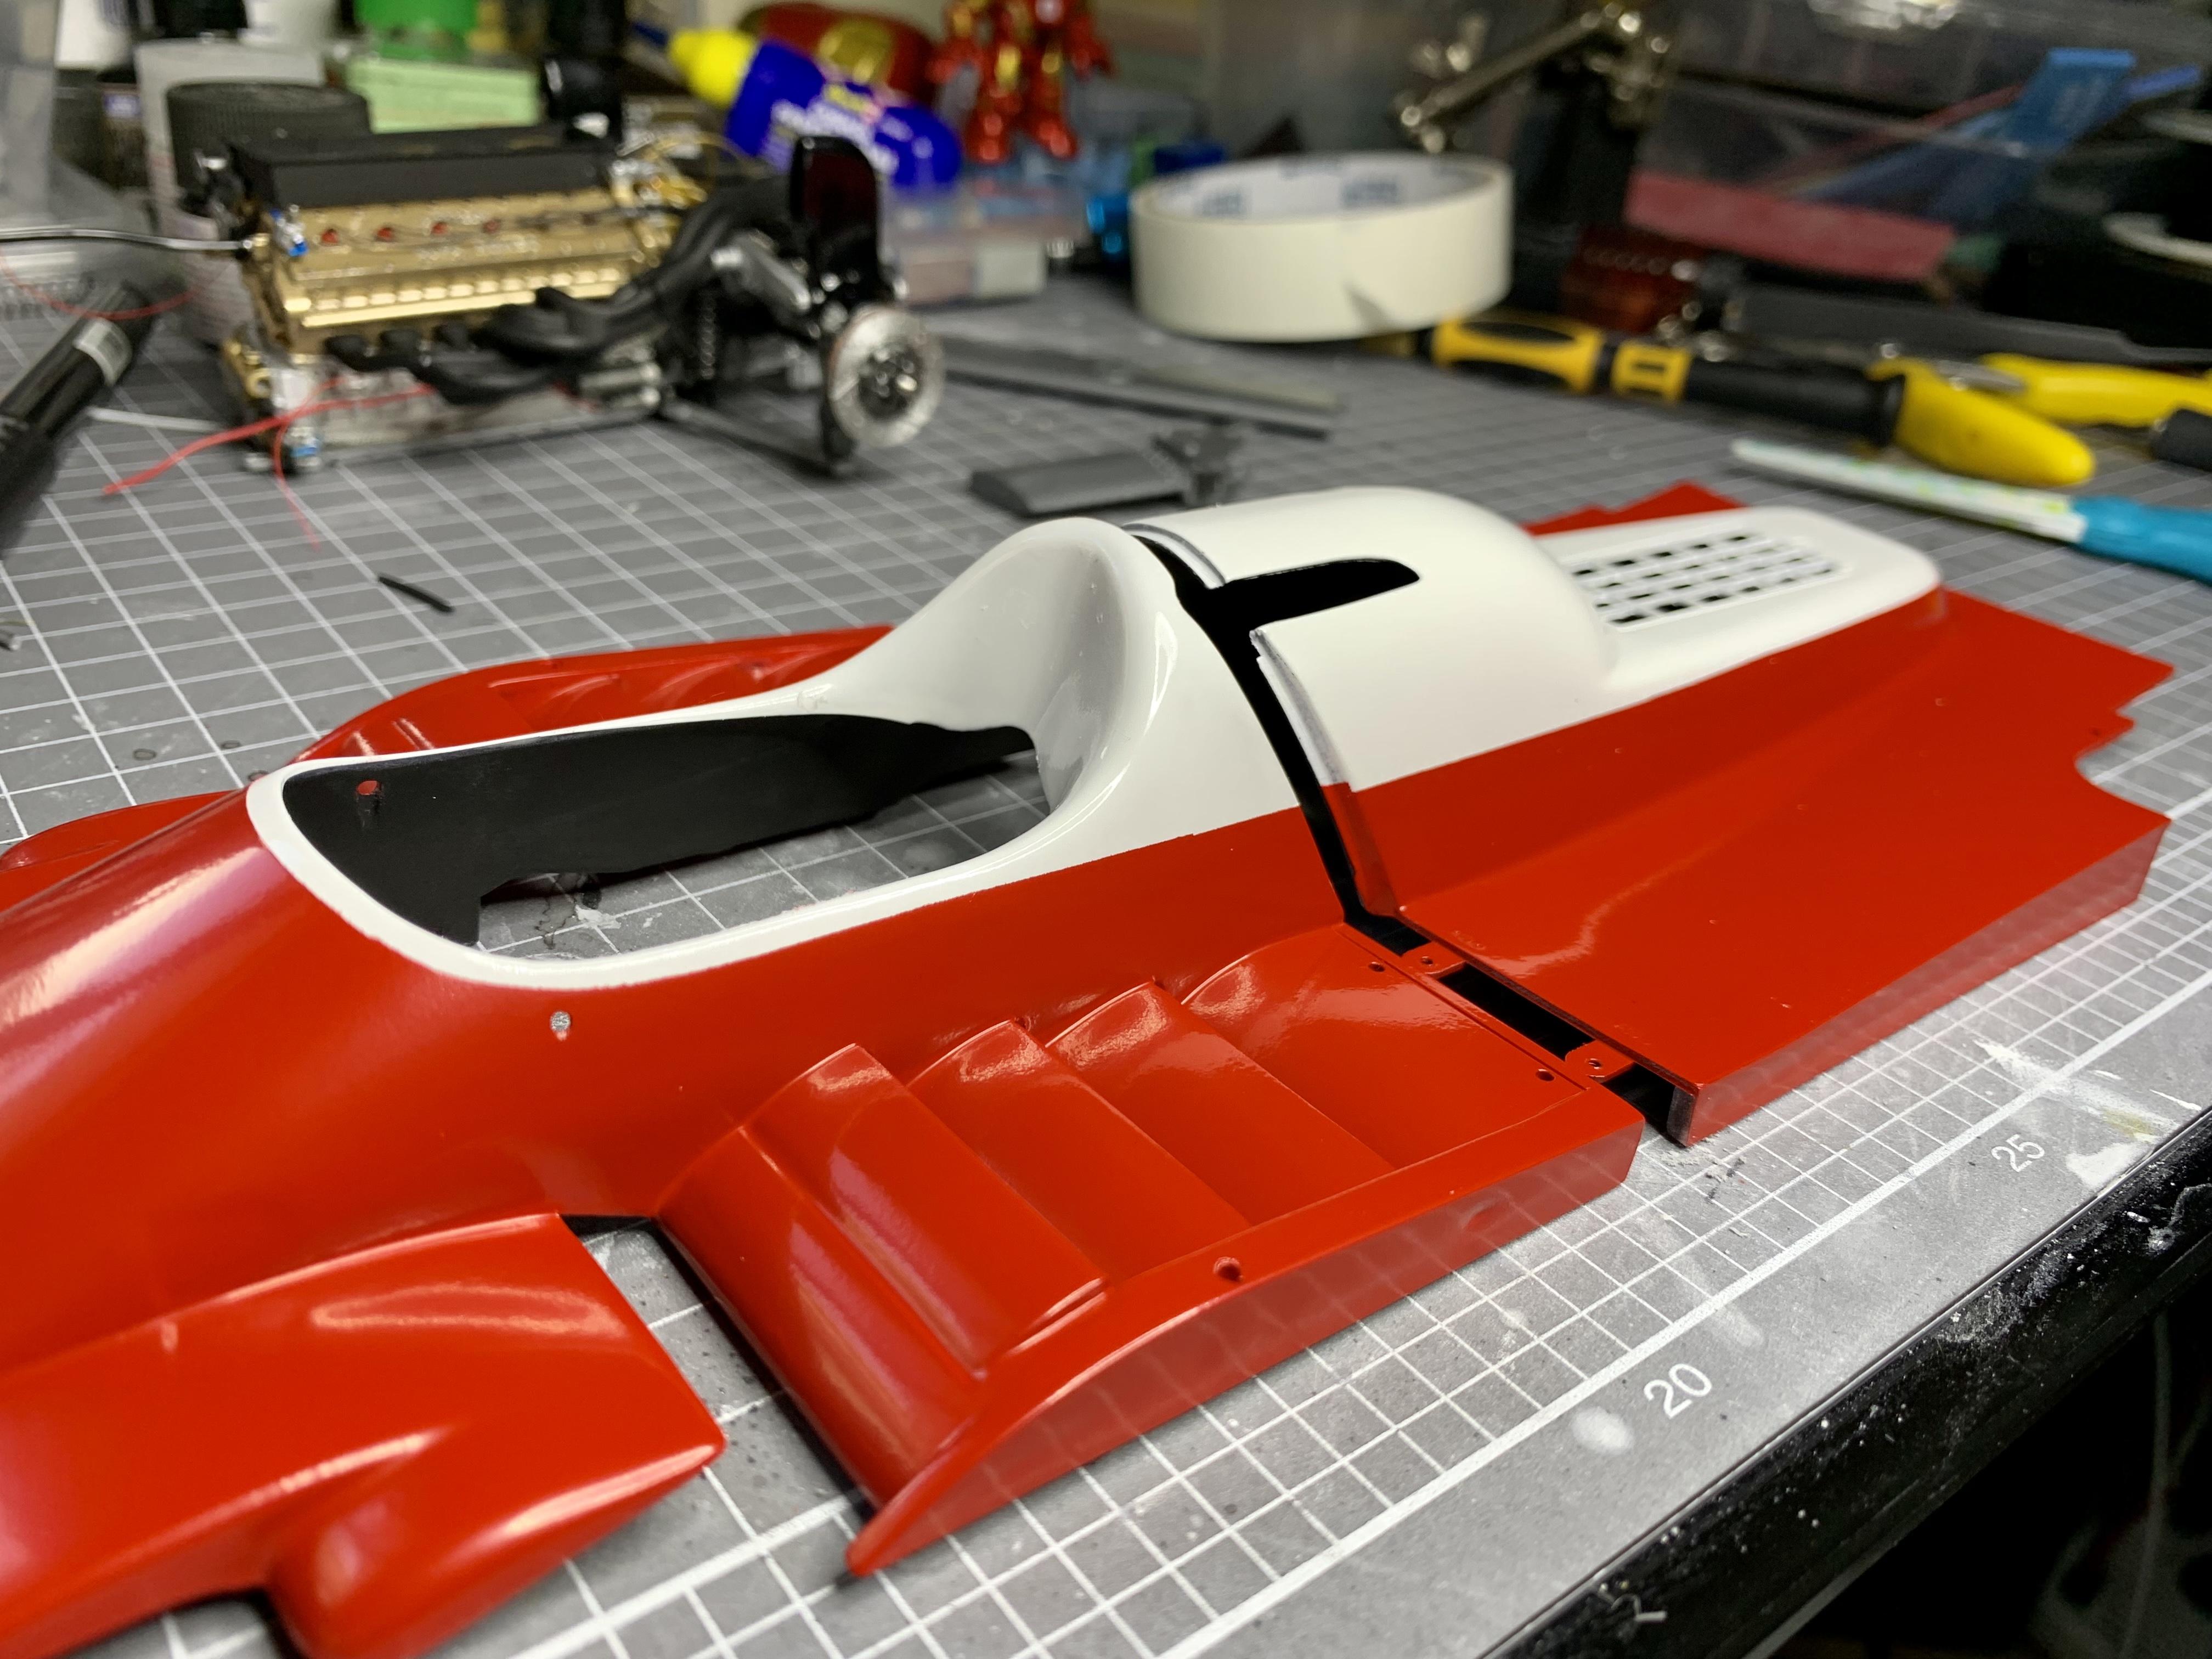
Thanks. decals were very time consuming. I did them all by “feel” trying to match the instructions but also how some things lined up in pictures. Some things aren’t as symmetrical as I’d like, but then on the real cars there were differences in placement through the season as well, maybe because of crash damage, or different applicator. Ive now got the clear coat done and really only have to finish up some brake lines and wiring detail, the seat and harness, then it’s time for fancy photos and putting away on the shelf. As it sits now. I had the cat walk over the beach and that resulted in some minor decal damage so I rushed to clear it before worse happened. the clear absolutely transformed it. I used Zurc Mirror Gloss and am super impressed (but as a novice I’m impressed by anything that doesn’t fail on first try)
-
1/12th Italeri Alfa Romeo 179 /179C
AaronM replied to AaronM's topic in WIP: Other Racing: Road Racing, Land Speed Racers
still have some chassis details and clear coating to go.
-
1/12th Italeri Alfa Romeo 179 /179C
AaronM replied to AaronM's topic in WIP: Other Racing: Road Racing, Land Speed Racers
Working away.. the end is close, very close
-
1/12th Italeri Alfa Romeo 179 /179C
AaronM replied to AaronM's topic in WIP: Other Racing: Road Racing, Land Speed Racers
Thanks. It’s been a struggle but I can fi ally see some light at the end of the tunnel. -
1/12th Italeri Alfa Romeo 179 /179C
AaronM replied to AaronM's topic in WIP: Other Racing: Road Racing, Land Speed Racers
-
1/12th Italeri Alfa Romeo 179 /179C
AaronM replied to AaronM's topic in WIP: Other Racing: Road Racing, Land Speed Racers
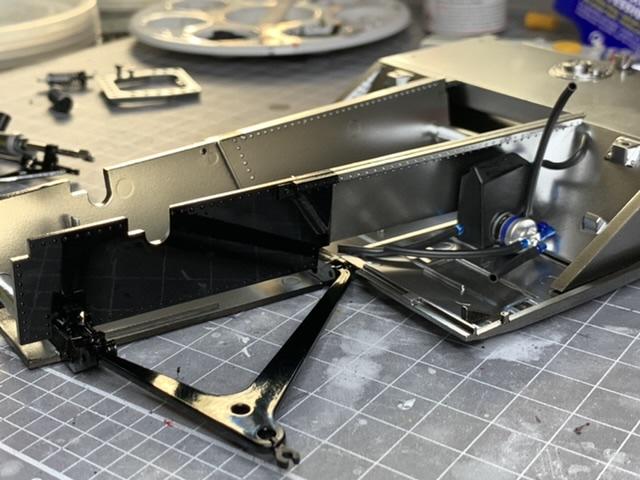
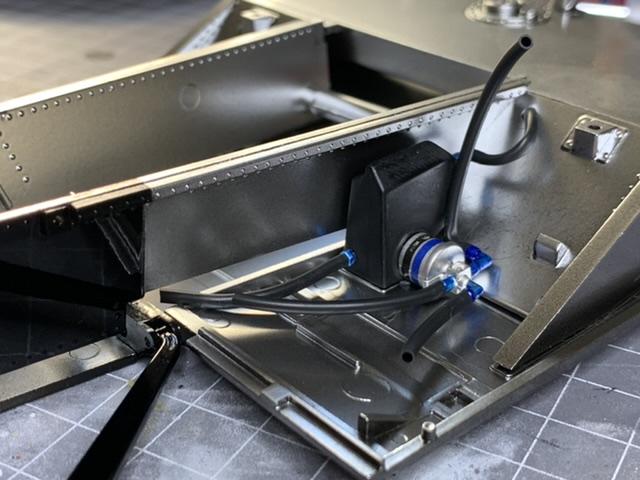
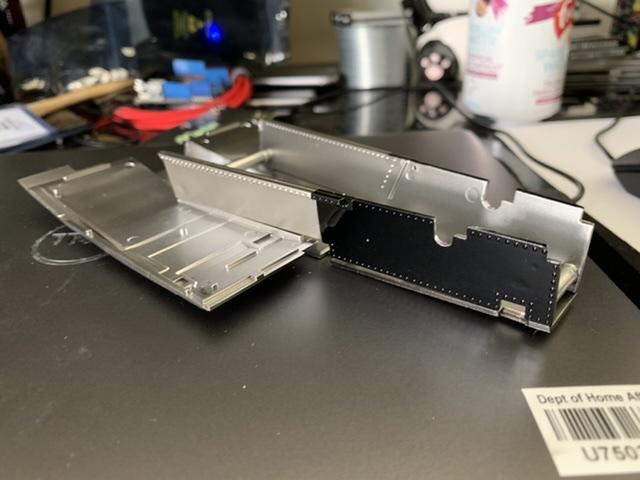
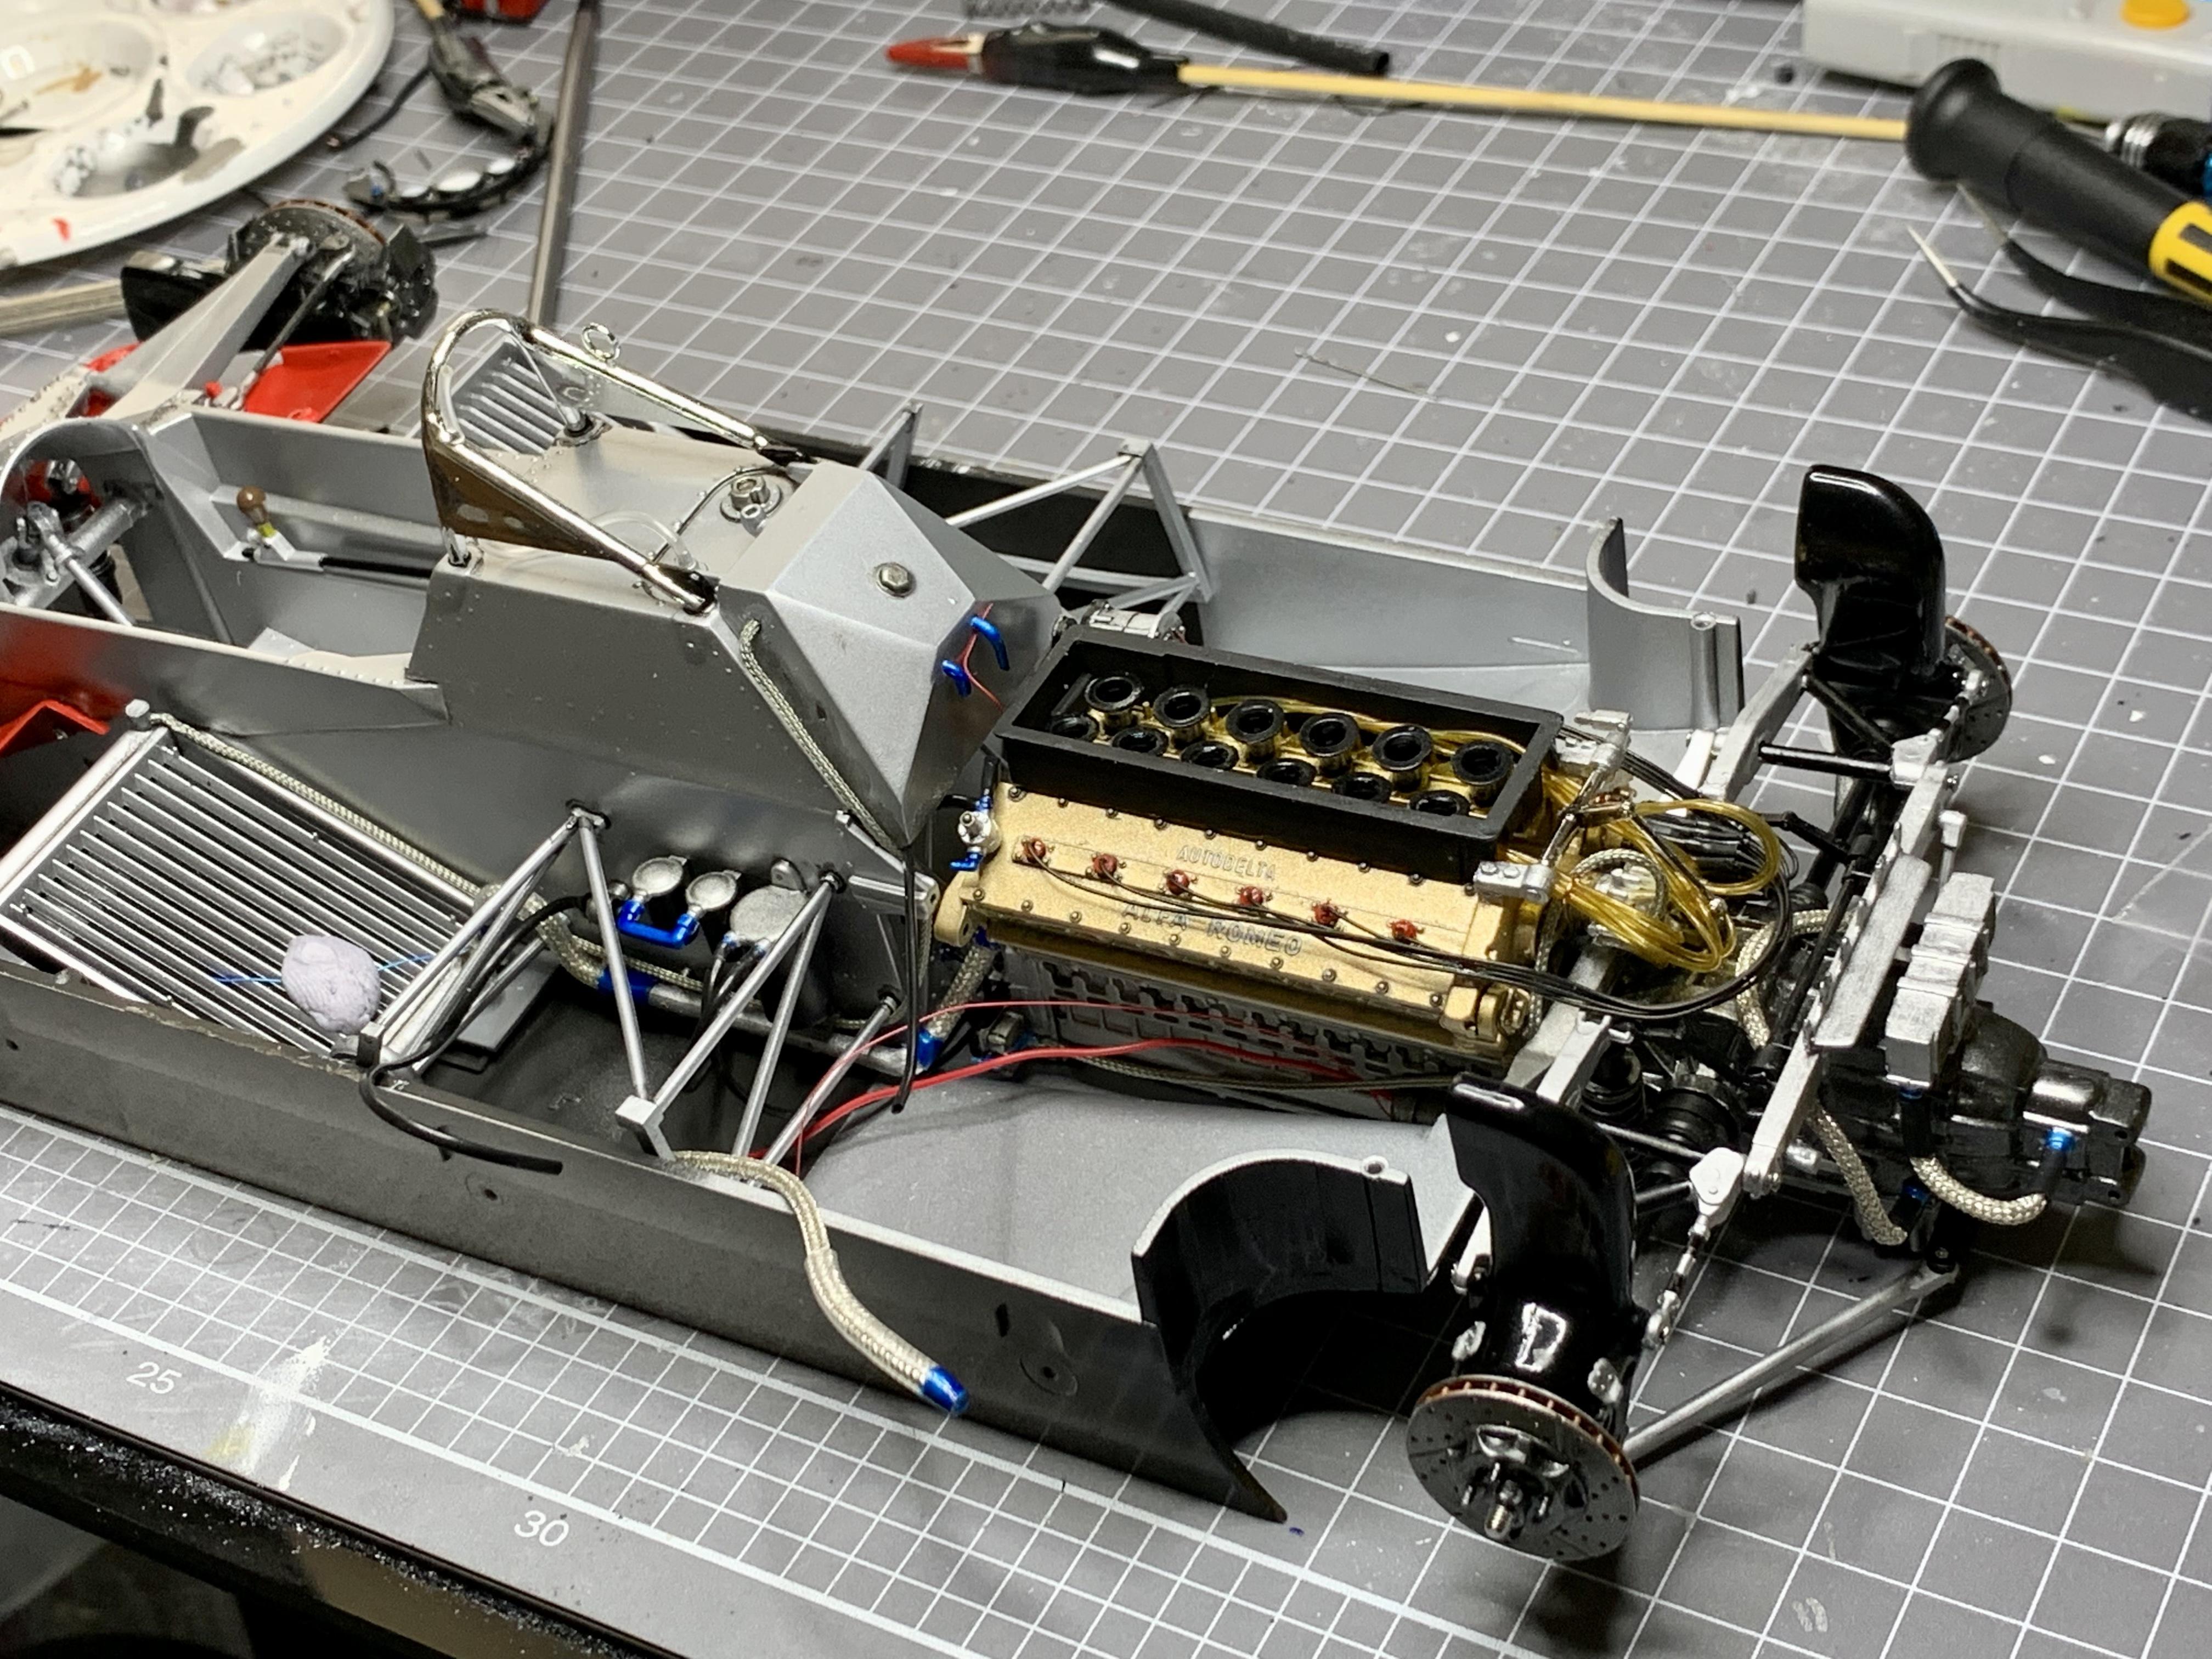
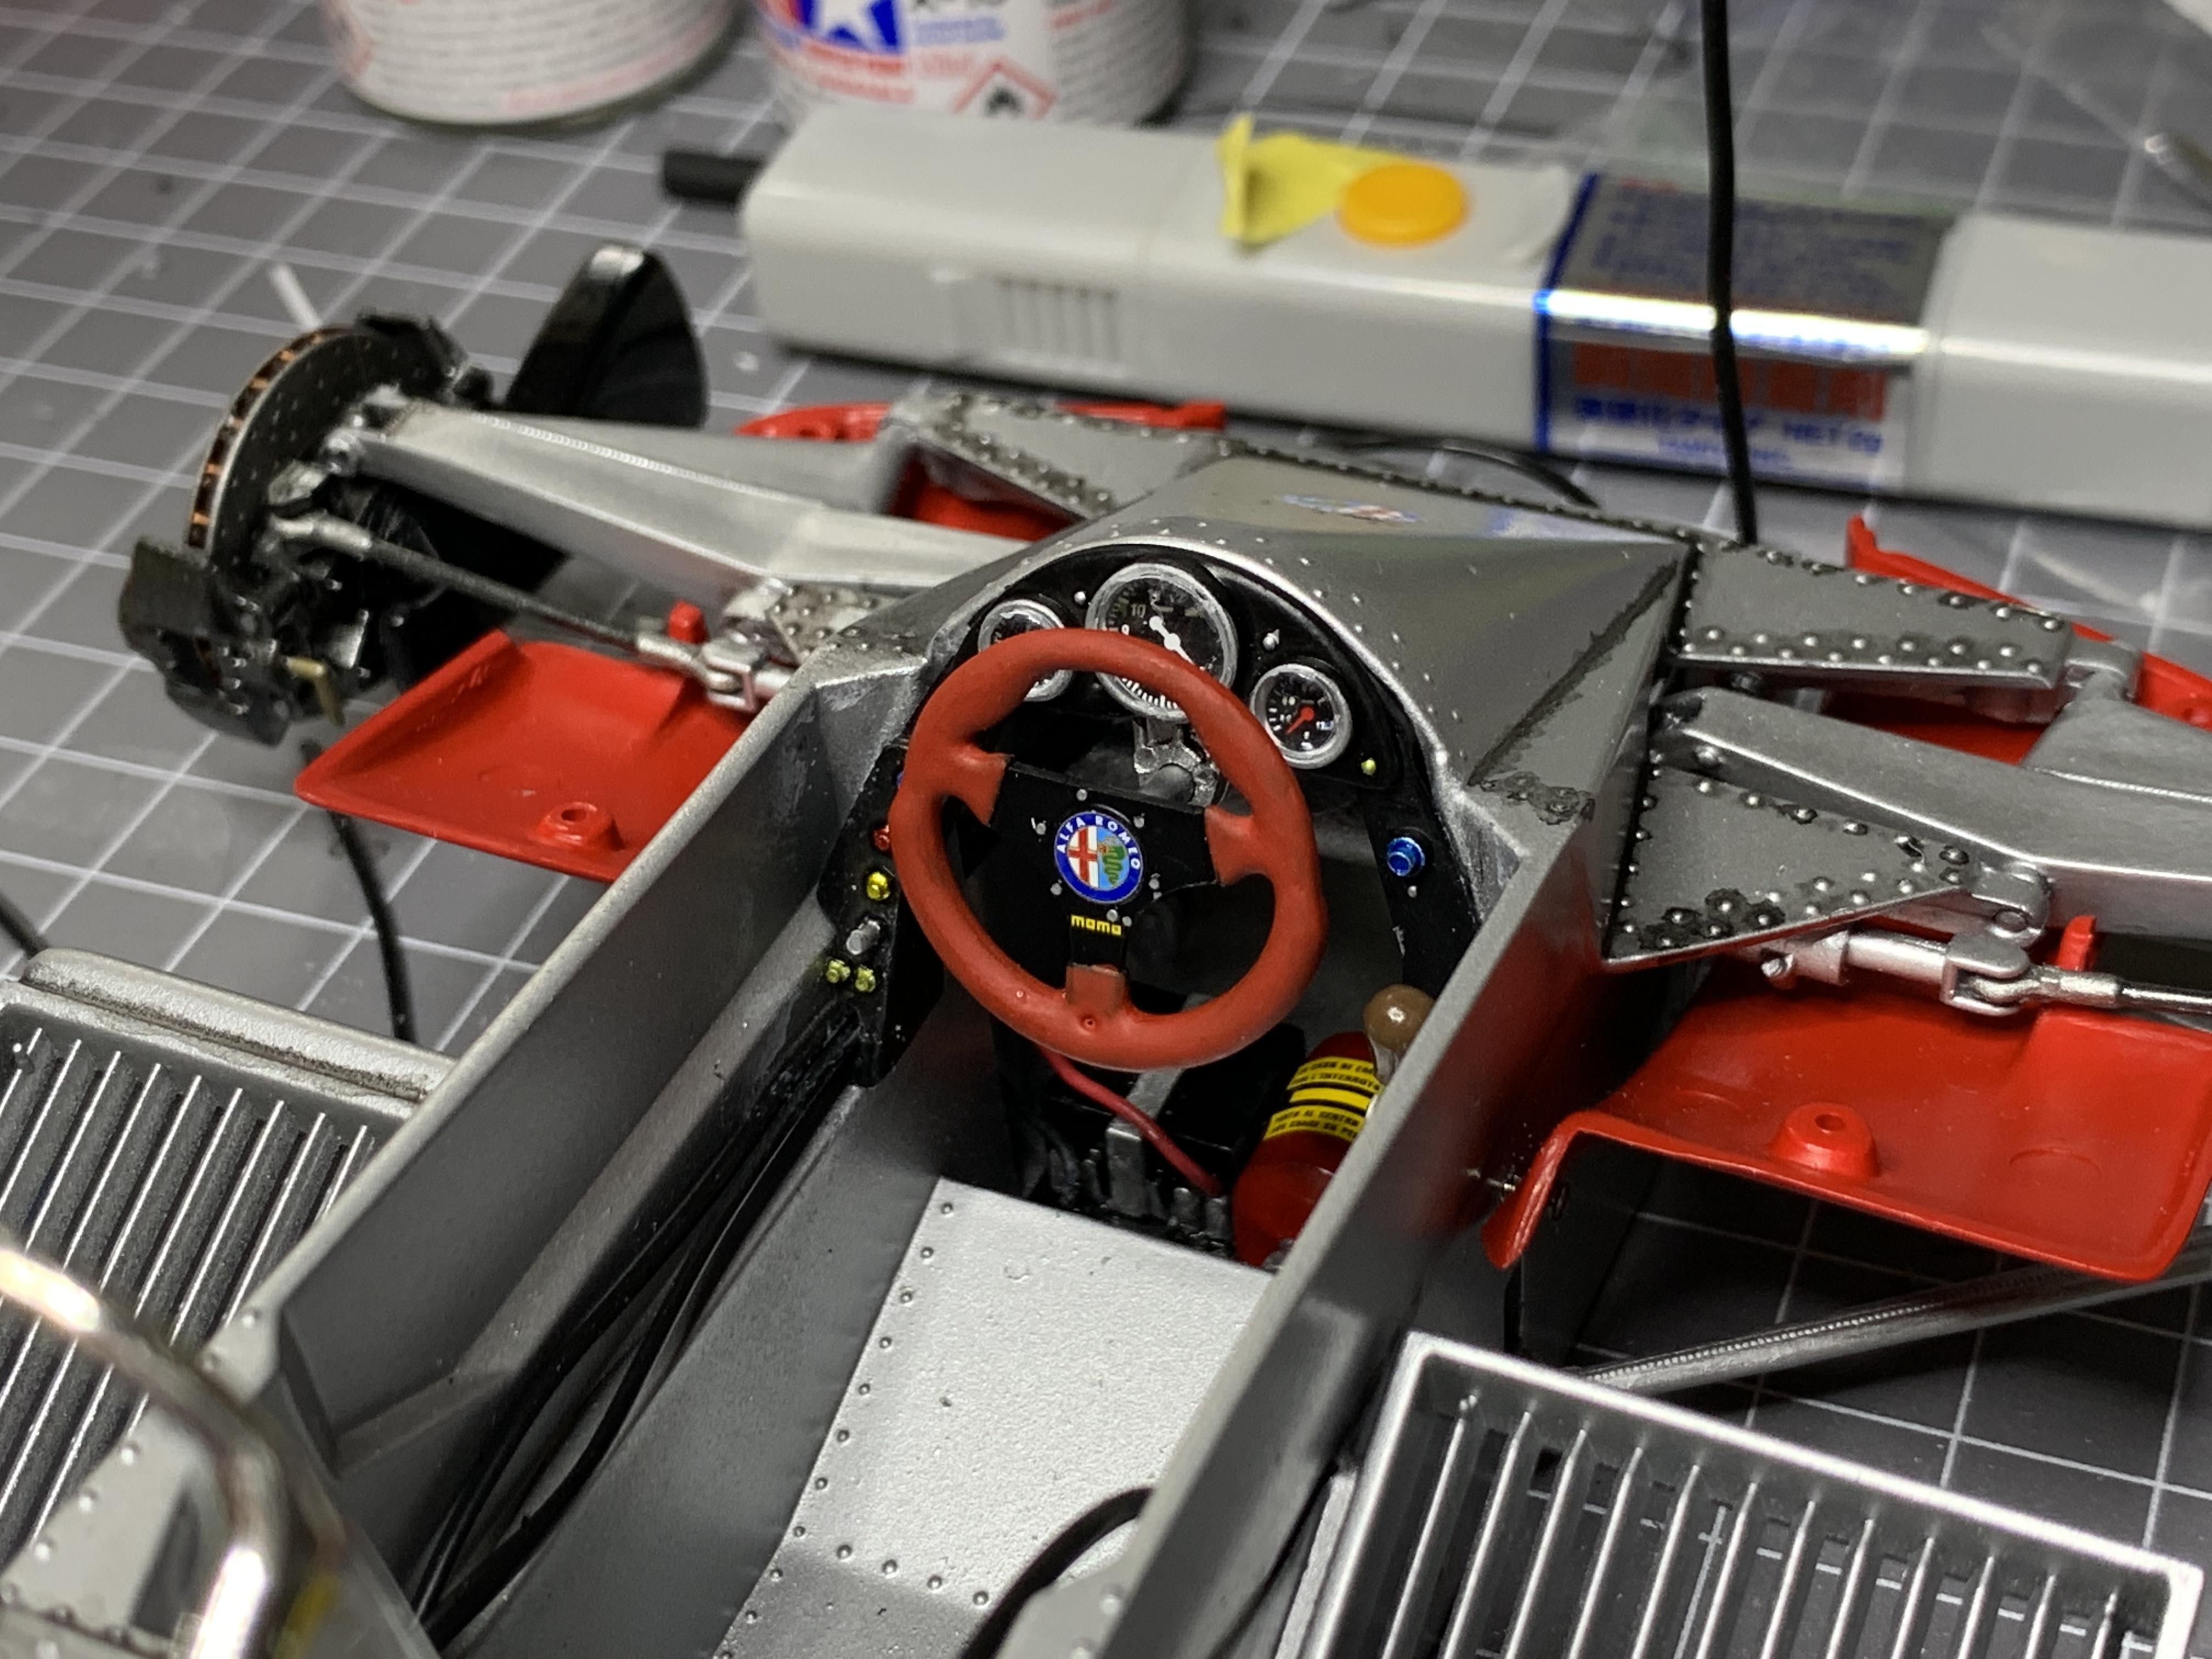
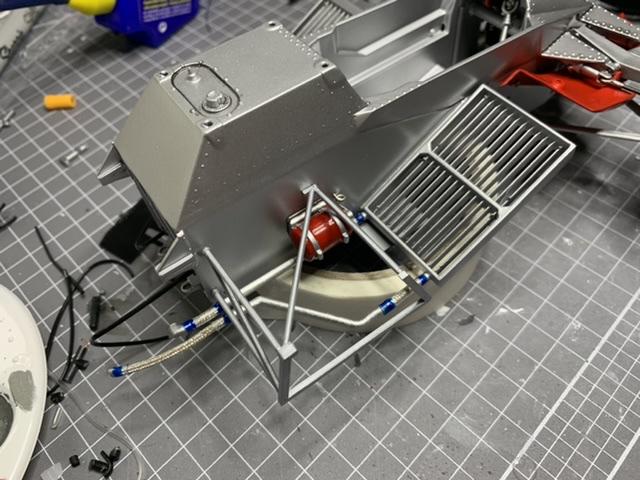
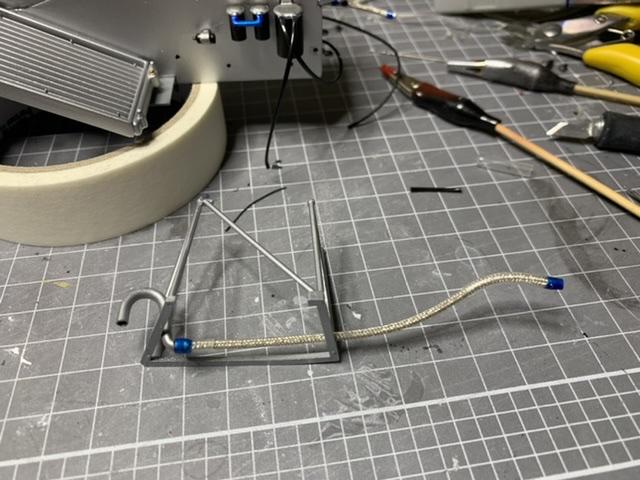
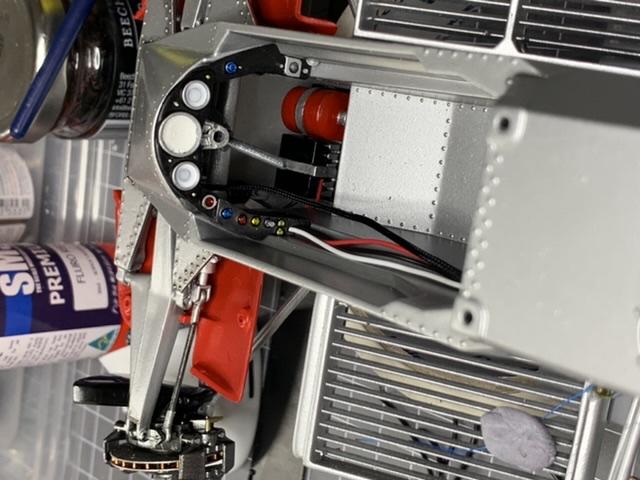
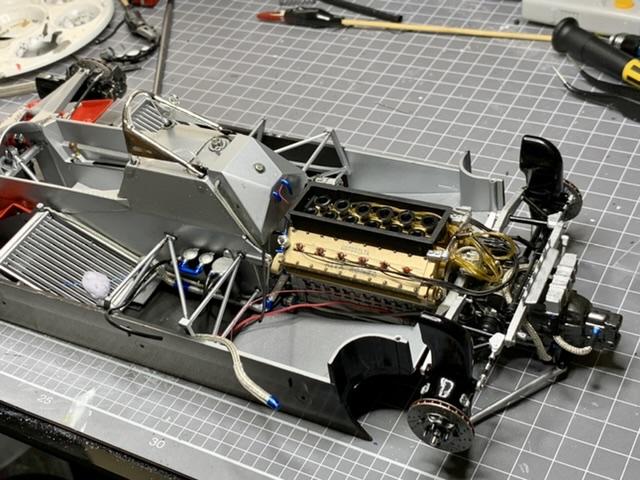
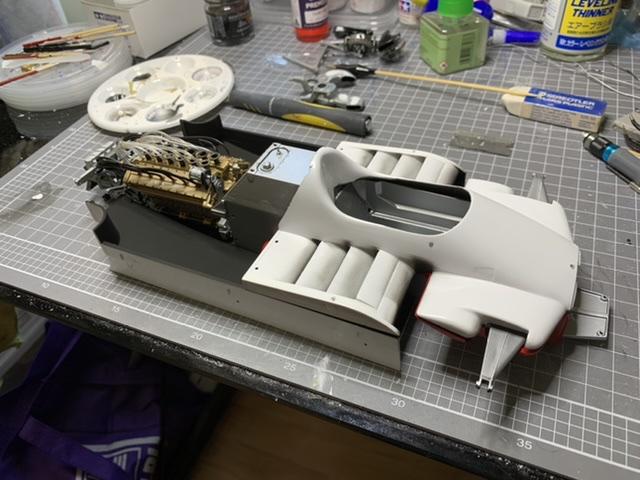
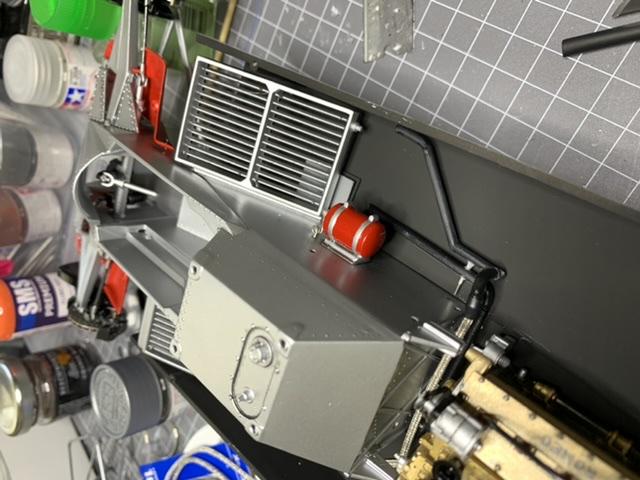
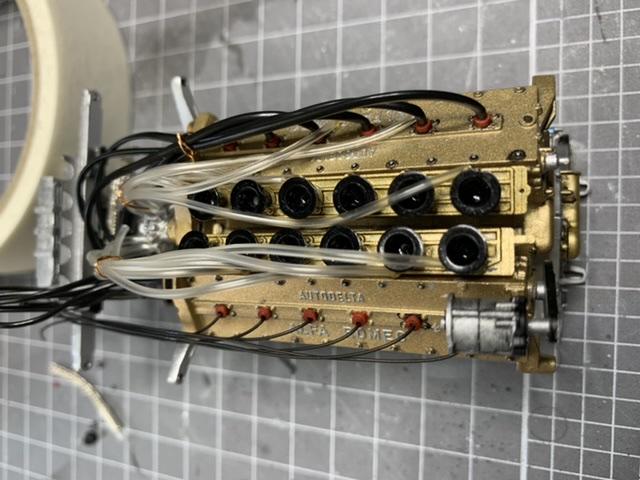
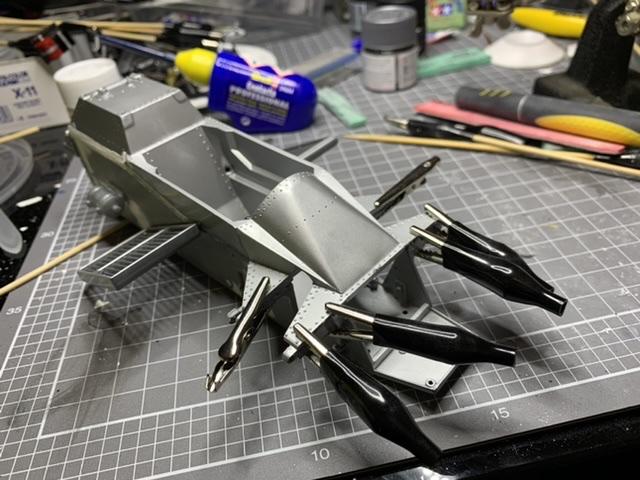
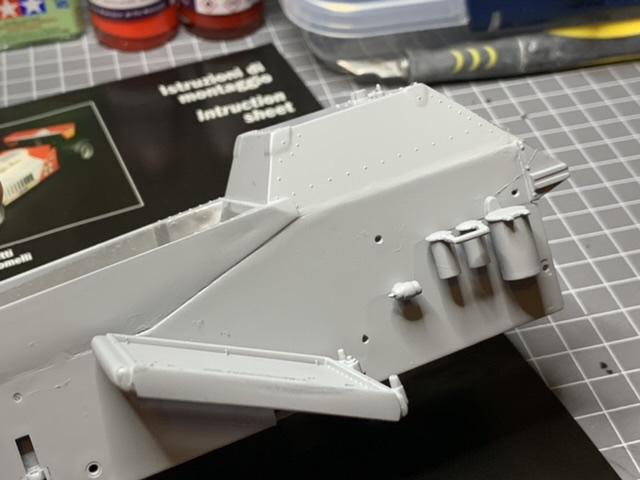
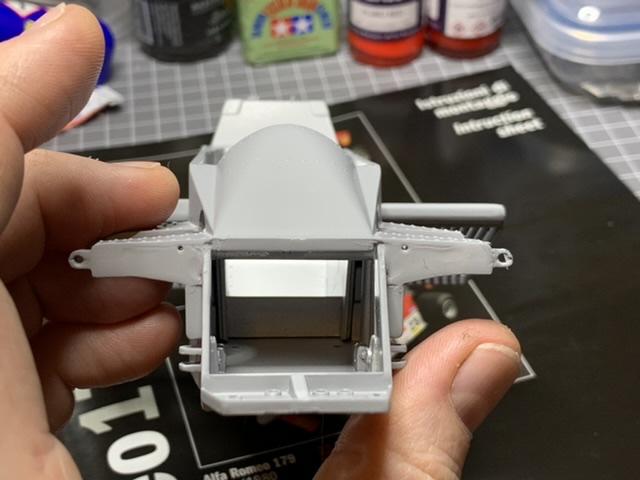
back to work on this. Primed in black. Sprayed in Tamiya Gloss Aluminium. I was hoping to try a new paint but it’s lost in the mail. Started to paint the details that were moulded into the sides of the tub. Added the kit supplied injection lines and spark plug leads. They’re not a good look. Started the rough fitting of the bodywork. There’s more sink holes to be filled, and a lot of finessing of edges etc. Built up the front brake rotors, had to drill out every BLAH_BLAH_BLAH_BLAH hole. Started work on the rear uprights and the integrated brake ducts. The moulding was terrible and needed a lot of filling. Painted some body parts in SMS Italian Red. My first time spraying this brand of paint, and only the second batch of parts I’ve ever sprayed with an airbrush. Just keep working more and more on the details around the tub. Decided to redo the ignition wires and fuel lines with more scale appropriate alternatives. That meant cutting the nubs off the plug boots then drilling out holes for the wires to go into. I’m now working cooling system hard lines, oil cooler lines and some other pieces that aren’t included in the kit. While my scratch build skills aren’t great I know I need to have a go to make the side pod areas more realistic.
-
1/12th Italeri Alfa Romeo 179 /179C
AaronM replied to AaronM's topic in WIP: Other Racing: Road Racing, Land Speed Racers
With work on the tub stalled for lack of paint I started on the engine. It’s a very simple assembly and after some sanding and filling it was primed. Im deviating from the paint scheme a little. Some bits go together easier than others. First time airbrushing on a model! bring some elements together, paint some fine details and the pretty rough quality of the Italeri kit fades a bit.
-
1/12th Italeri Alfa Romeo 179 /179C
AaronM replied to AaronM's topic in WIP: Other Racing: Road Racing, Land Speed Racers
Joining the upper and lower sections of the tub presented the next issue, how to deal with the seam. It’s just ended up being a case of fill, sand, fill, sand until it looked ok. Then once I’d done that to a point where I was fed up out came the Primer and all the bad bits became visible. Looks good from afar! Just kept on refining the finish. Eventually it paid off to a point where I’m happy to prime it for the silver. Except the paint to do that is lost in a postal system bogged down with COVID.