RoninUtah
-
Posts
449 -
Joined
-
Last visited
Content Type
Profiles
Forums
Events
Gallery
Everything posted by RoninUtah
-
Convoy, take 7
RoninUtah replied to Jürgen M.'s topic in WIP: Model Trucks: Big Rigs and Heavy Equipment
This is turning out to be an amazing build! Keep going! -
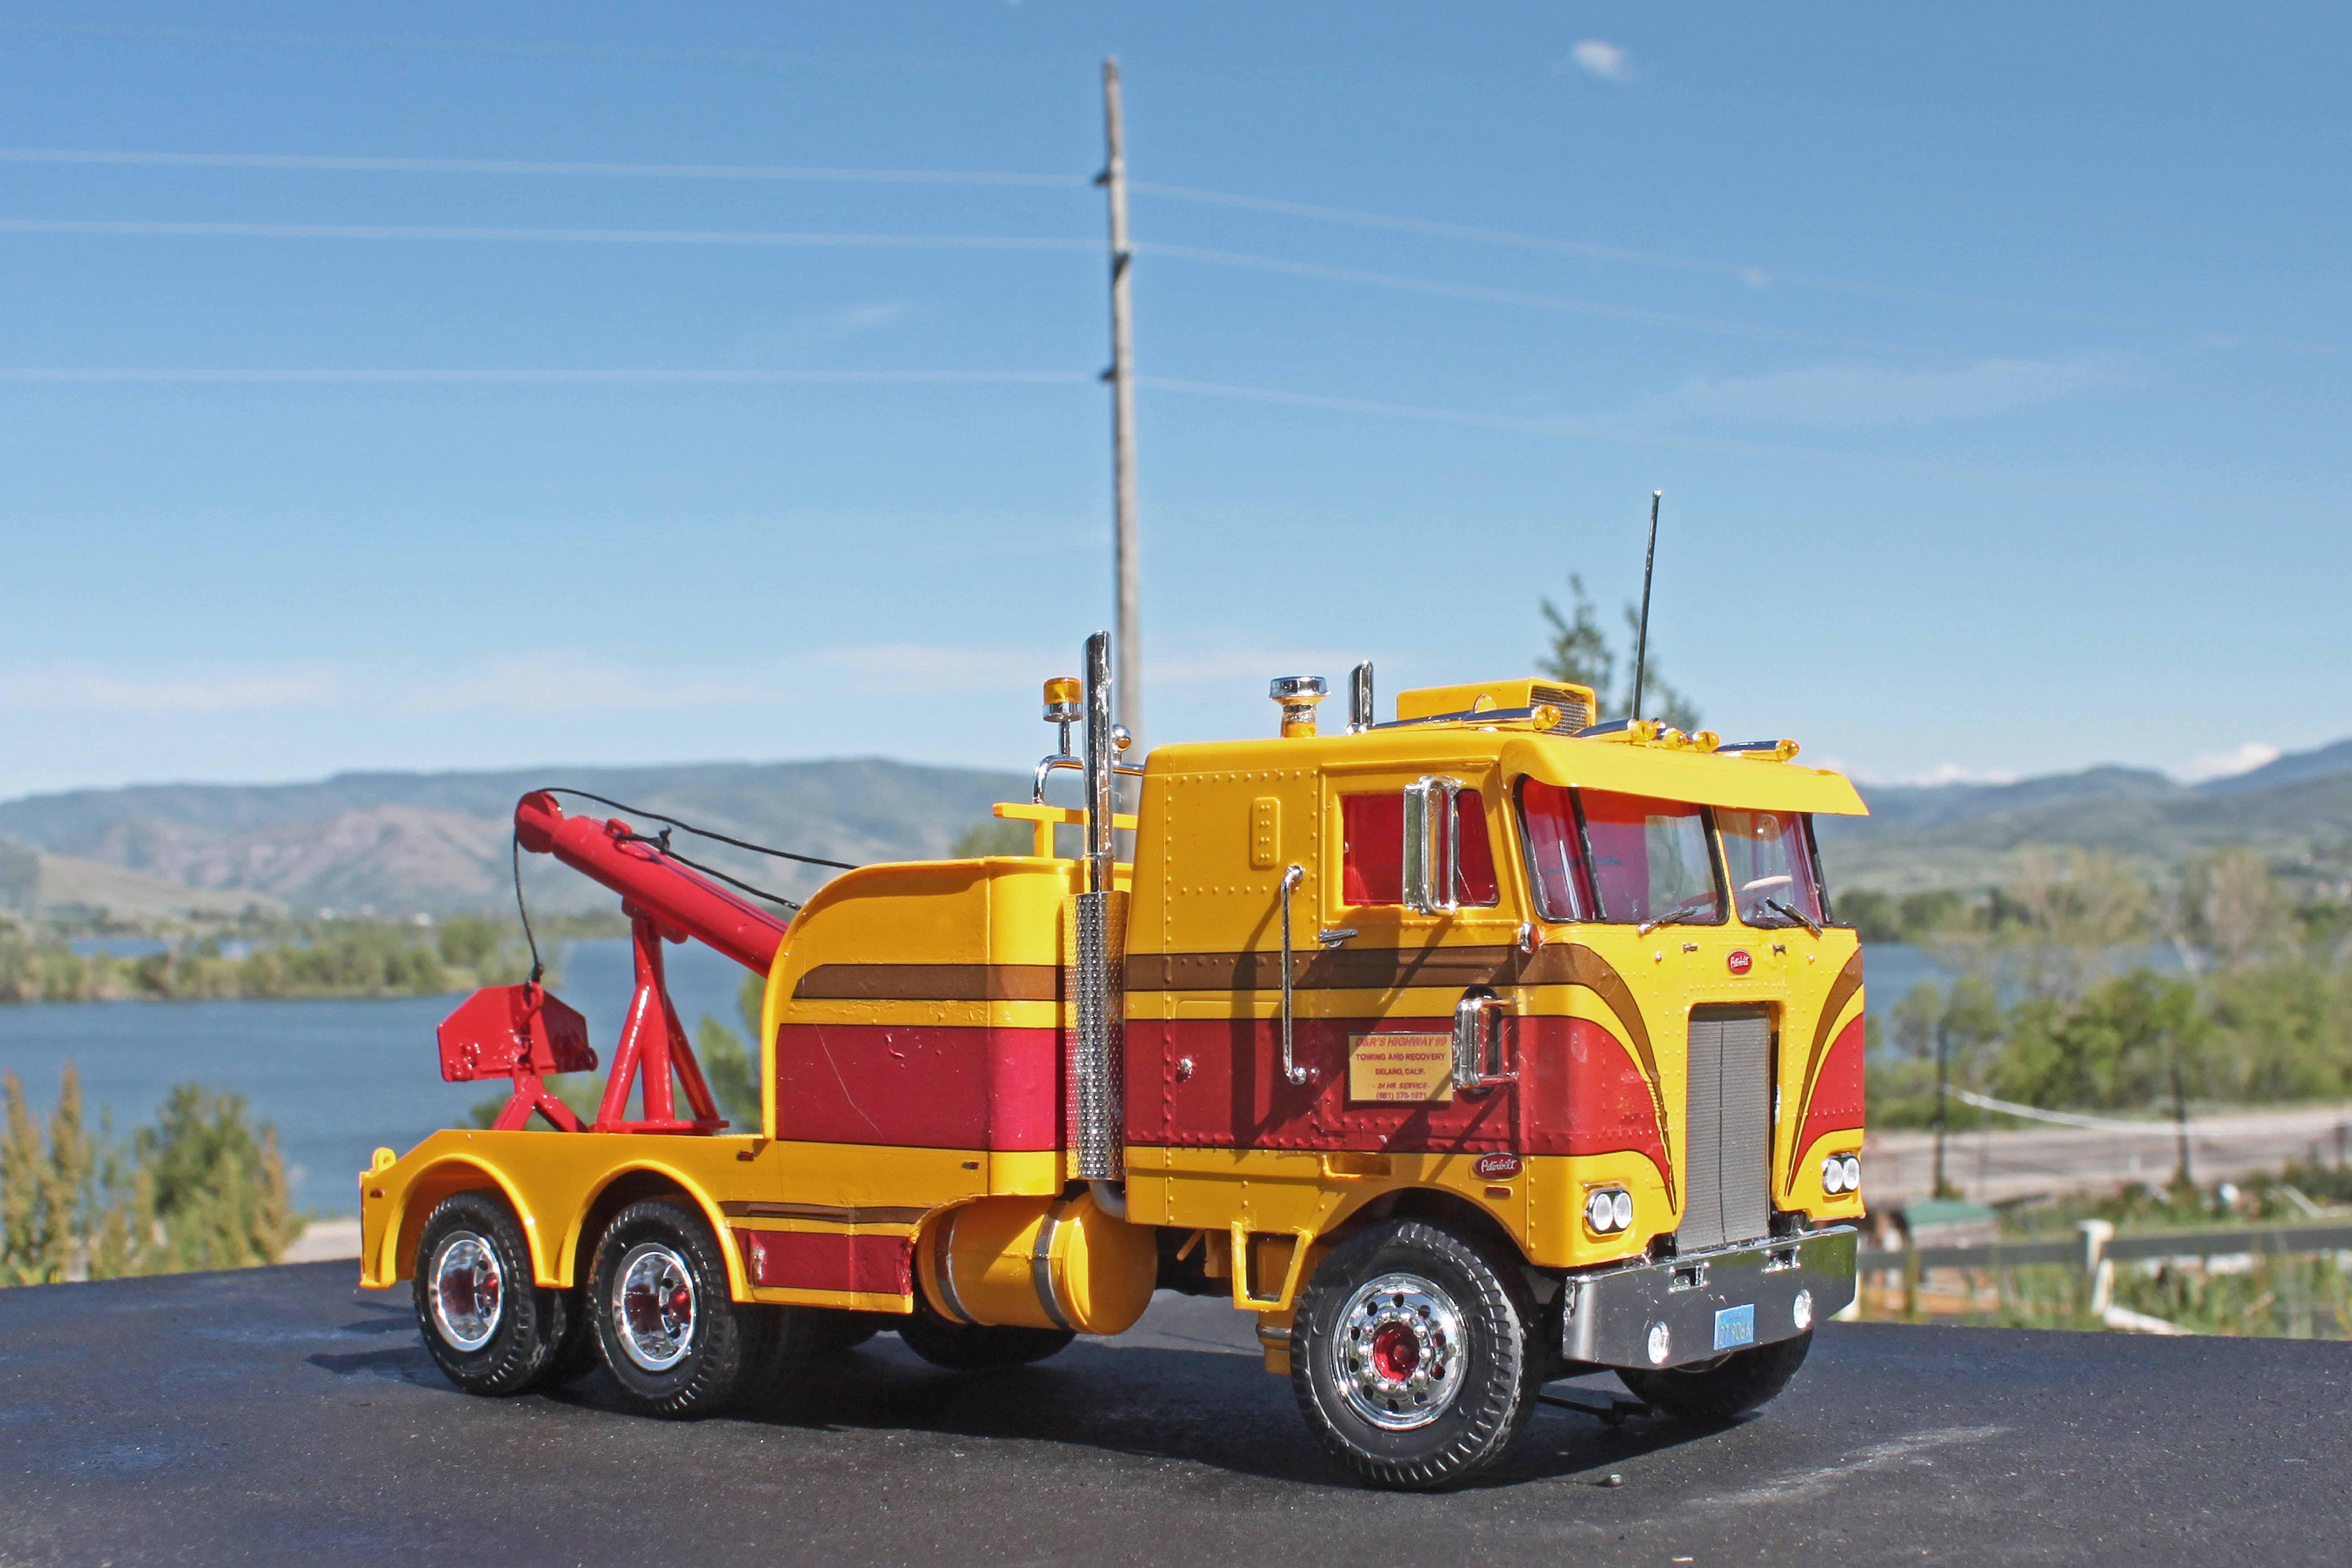
Thanks guys, your kind words mean a lot to me! Yeah I lengthened the frame about 18 scale inches to accommodate the wrecker body. I think it’s pretty close now to what those Heins Union Body Works wreckers in the Bakersfield area looked like back then… I can almost hear KUZZ playing Buck Owens on the AM radio!
-
Thanks Steve! Actually, this wrecker, is fairly straightforward, especially compared to the big Revell Kenworth and Peterbilt wreckers. But like all AMT products, it takes some work and futzing to get everything to fit right. And stringing it is a bit of a pain. That said, you shouldn’t have any problem with it!
-
Thanks Brian!
-
Thanks, Jim! Yeah i was surprised too, but nearly all the examples in the WOT article (which were mostly from an old Heins brochure) were sleeper COEs. As the article said, Heins preferred COEs.
-
Thanks, Anderson!
-
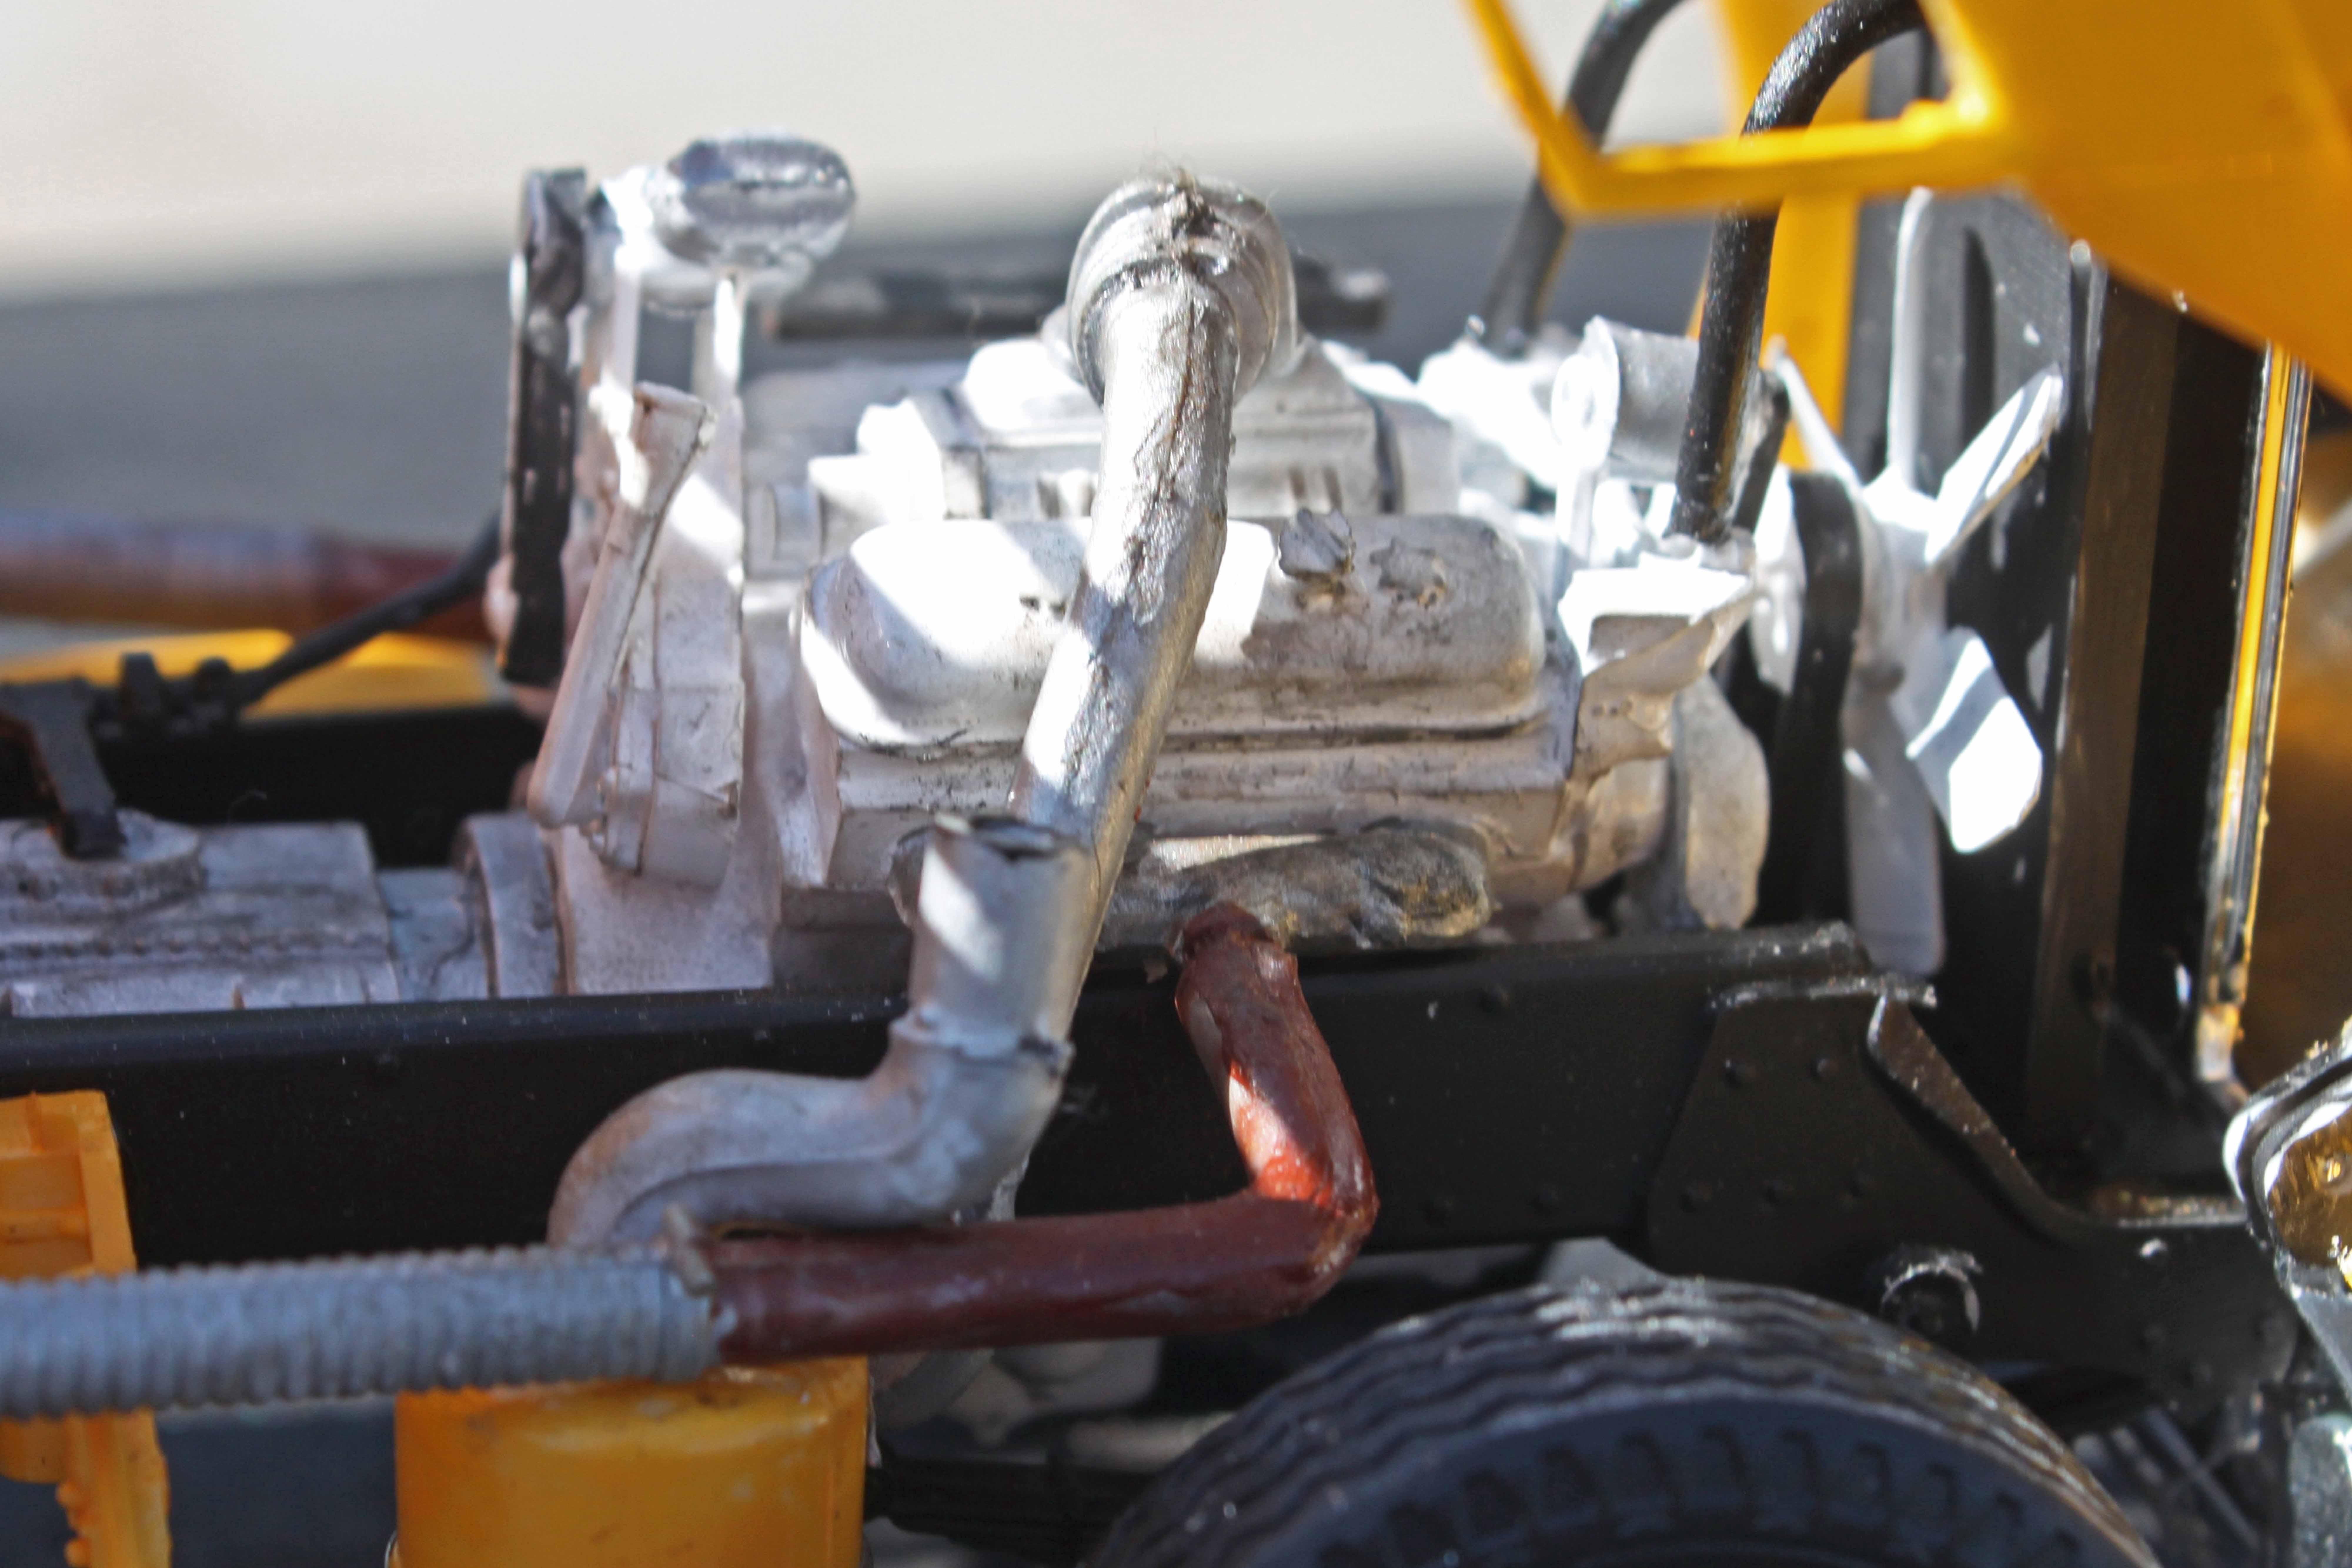
Being the truck nerd that I am, I’ve been a member of the American Truck Historical Society (ATHS) for a number of years. One of the best parts of membership, for me, is their publication “Wheels of Time;” it’s been a great resource for my model truck builds as well as a fascinating source of information about old trucks. So, I was looking through the March/April 2025 edition and came upon an in-depth article on Heins wreckers, which were manufactured by Union Body Works, located in Bakersfield, California in the 1960s and 70s. They were a leading manufacturer of “big stick” style heavy duty wreckers, which utilized a single telescoping boom, very popular at the time on the West Coast. When I looked closely at the photos in the article, I realized that these wreckers looked familiar- they clearly were the inspiration for AMT’s Peterbilt wrecker kit of the 70s and later. I’ve bought a dozen or so over the years, typically as donors for resin kits of various sorts. The AMT kit originally used their “California Hauler” 359, and was later re-issued with the post-1972 “1100” cab, but the wrecker stayed the same. However, the article mentioned the fact that Don Heins, the builder of those wreckers, preferred COE chassis because “they allowed the boom pivot and winches to be mounted further forward, providing greater leverage without sacrificing maneuverability.” Indeed, most of the photos accompanying the article were of COEs, including a 1974 Peterbilt 352. It was a light-bulb moment: Why not pair an AMT Pete 352 with an AMT wrecker body to come up with something similar? So, I picked up a 352 kit, and I knew I had plenty of wrecker parts left over from all those donor kits to pull it off. It wasn’t too difficult, although if I’m given a chance to screw something up I always seem to take it; this build is far from perfect. It took a little work- I had to stretch the frame to accommodate the longer wheelbase required for the wrecker body, and I dressed it up a little with CTM photo-etched parts and Modeltruckers.com decals- I had explained to them what I had in mind, and they added stripes for the wrecker to one of their standard Peterbilt stripe designs at nominal cost. I added a little light weathering to the engine, but basically this build is box stock from the two different AMT kits. So, here you go: A Heins 30 ton big stick wrecker from Union Body Works, on a Peterbilt 352 COE chassis. I signed it for a fictitious towing and recovery outfit in Delano, California, just up Highway 99 from Bakersfield. It’s not unlike something you might have seen in that part of California fifty years ago!

-
1/25 AMT Chevy Titan 90
RoninUtah replied to cifenet's topic in Model Trucks: Big Rigs and Heavy Equipment
Superb build of a problematic kit, very well done. Even if this is your first big rig build, you've got some serious modeling chops and it shows! Great work! -
Carolina Autocar DC 100
RoninUtah replied to DRIPTROIT 71's topic in Model Trucks: Big Rigs and Heavy Equipment
That's one beautiful truck, Brian! I'm drooling! I love those old sleepers from the 40s! Fantastic build, my hat's off to you! -
Very nice build, well done! You are correct that AMT based this on the initial 1967 model, which had a 2-bar grille. Peterbilt changed it to 3 vertical bars late in 1967 and it's been that way through various iterations and subsequent models to the present day.
-
1970 Ford C 600
RoninUtah replied to Biggu's topic in WIP: Model Trucks: Big Rigs and Heavy Equipment
And a couple of rollers! -
1970 Ford C 600
RoninUtah replied to Biggu's topic in WIP: Model Trucks: Big Rigs and Heavy Equipment
I've never seen a tack truck that didn't have black goo all over the place! -
Kenworth W-925
RoninUtah replied to Brenton's topic in WIP: Model Trucks: Big Rigs and Heavy Equipment
I built my first one when it first came out- 1970 I believe- and then another one within the last couple of years. Both turned out really nice, and I still have them on the shelf. Like the California Hauler Pete 359, it will turn out well if you take your time and keep it straight and clean. It looks like you’re doing just that- I’m looking forward to the results! Good luck! -
I have the one from A&N; it’s to Australian specs with right hand drive, stone guard, giant bull bar, front mud flaps, the lot! I’ll be starting on it soon, I think, unless something else gets in the way!
-
It needs 3 53’ trailers with 3-axle dollies! Maybe I’ll but build the tractor…
-
It does, thanks! You’re right, that’s one heckuva long model!!
-
Hey, Jürgen, just out of curiosity, what did you use for trailers for your road train? I'm planning on building an Aussie Kenworth K200 one of these days, but I'm not sure whether I want to build the tractor only or the whole road train. I don't have a lot of reference material on Aussie trailers.
-
That looks amazing! Hard to believe that exhaust manifold isn't actually metal!
-
Day cab astro 95
RoninUtah replied to 53gmc's topic in WIP: Model Trucks: Big Rigs and Heavy Equipment
Nice work! That looks really clean! I remember those Astro daycabs used by Safeway Stores for local hauls to their supermarkets in Northern California back in the 70s -
Thanks, Gary!
-
Thanks, Jürgen! It does take up a LOT of space!
-
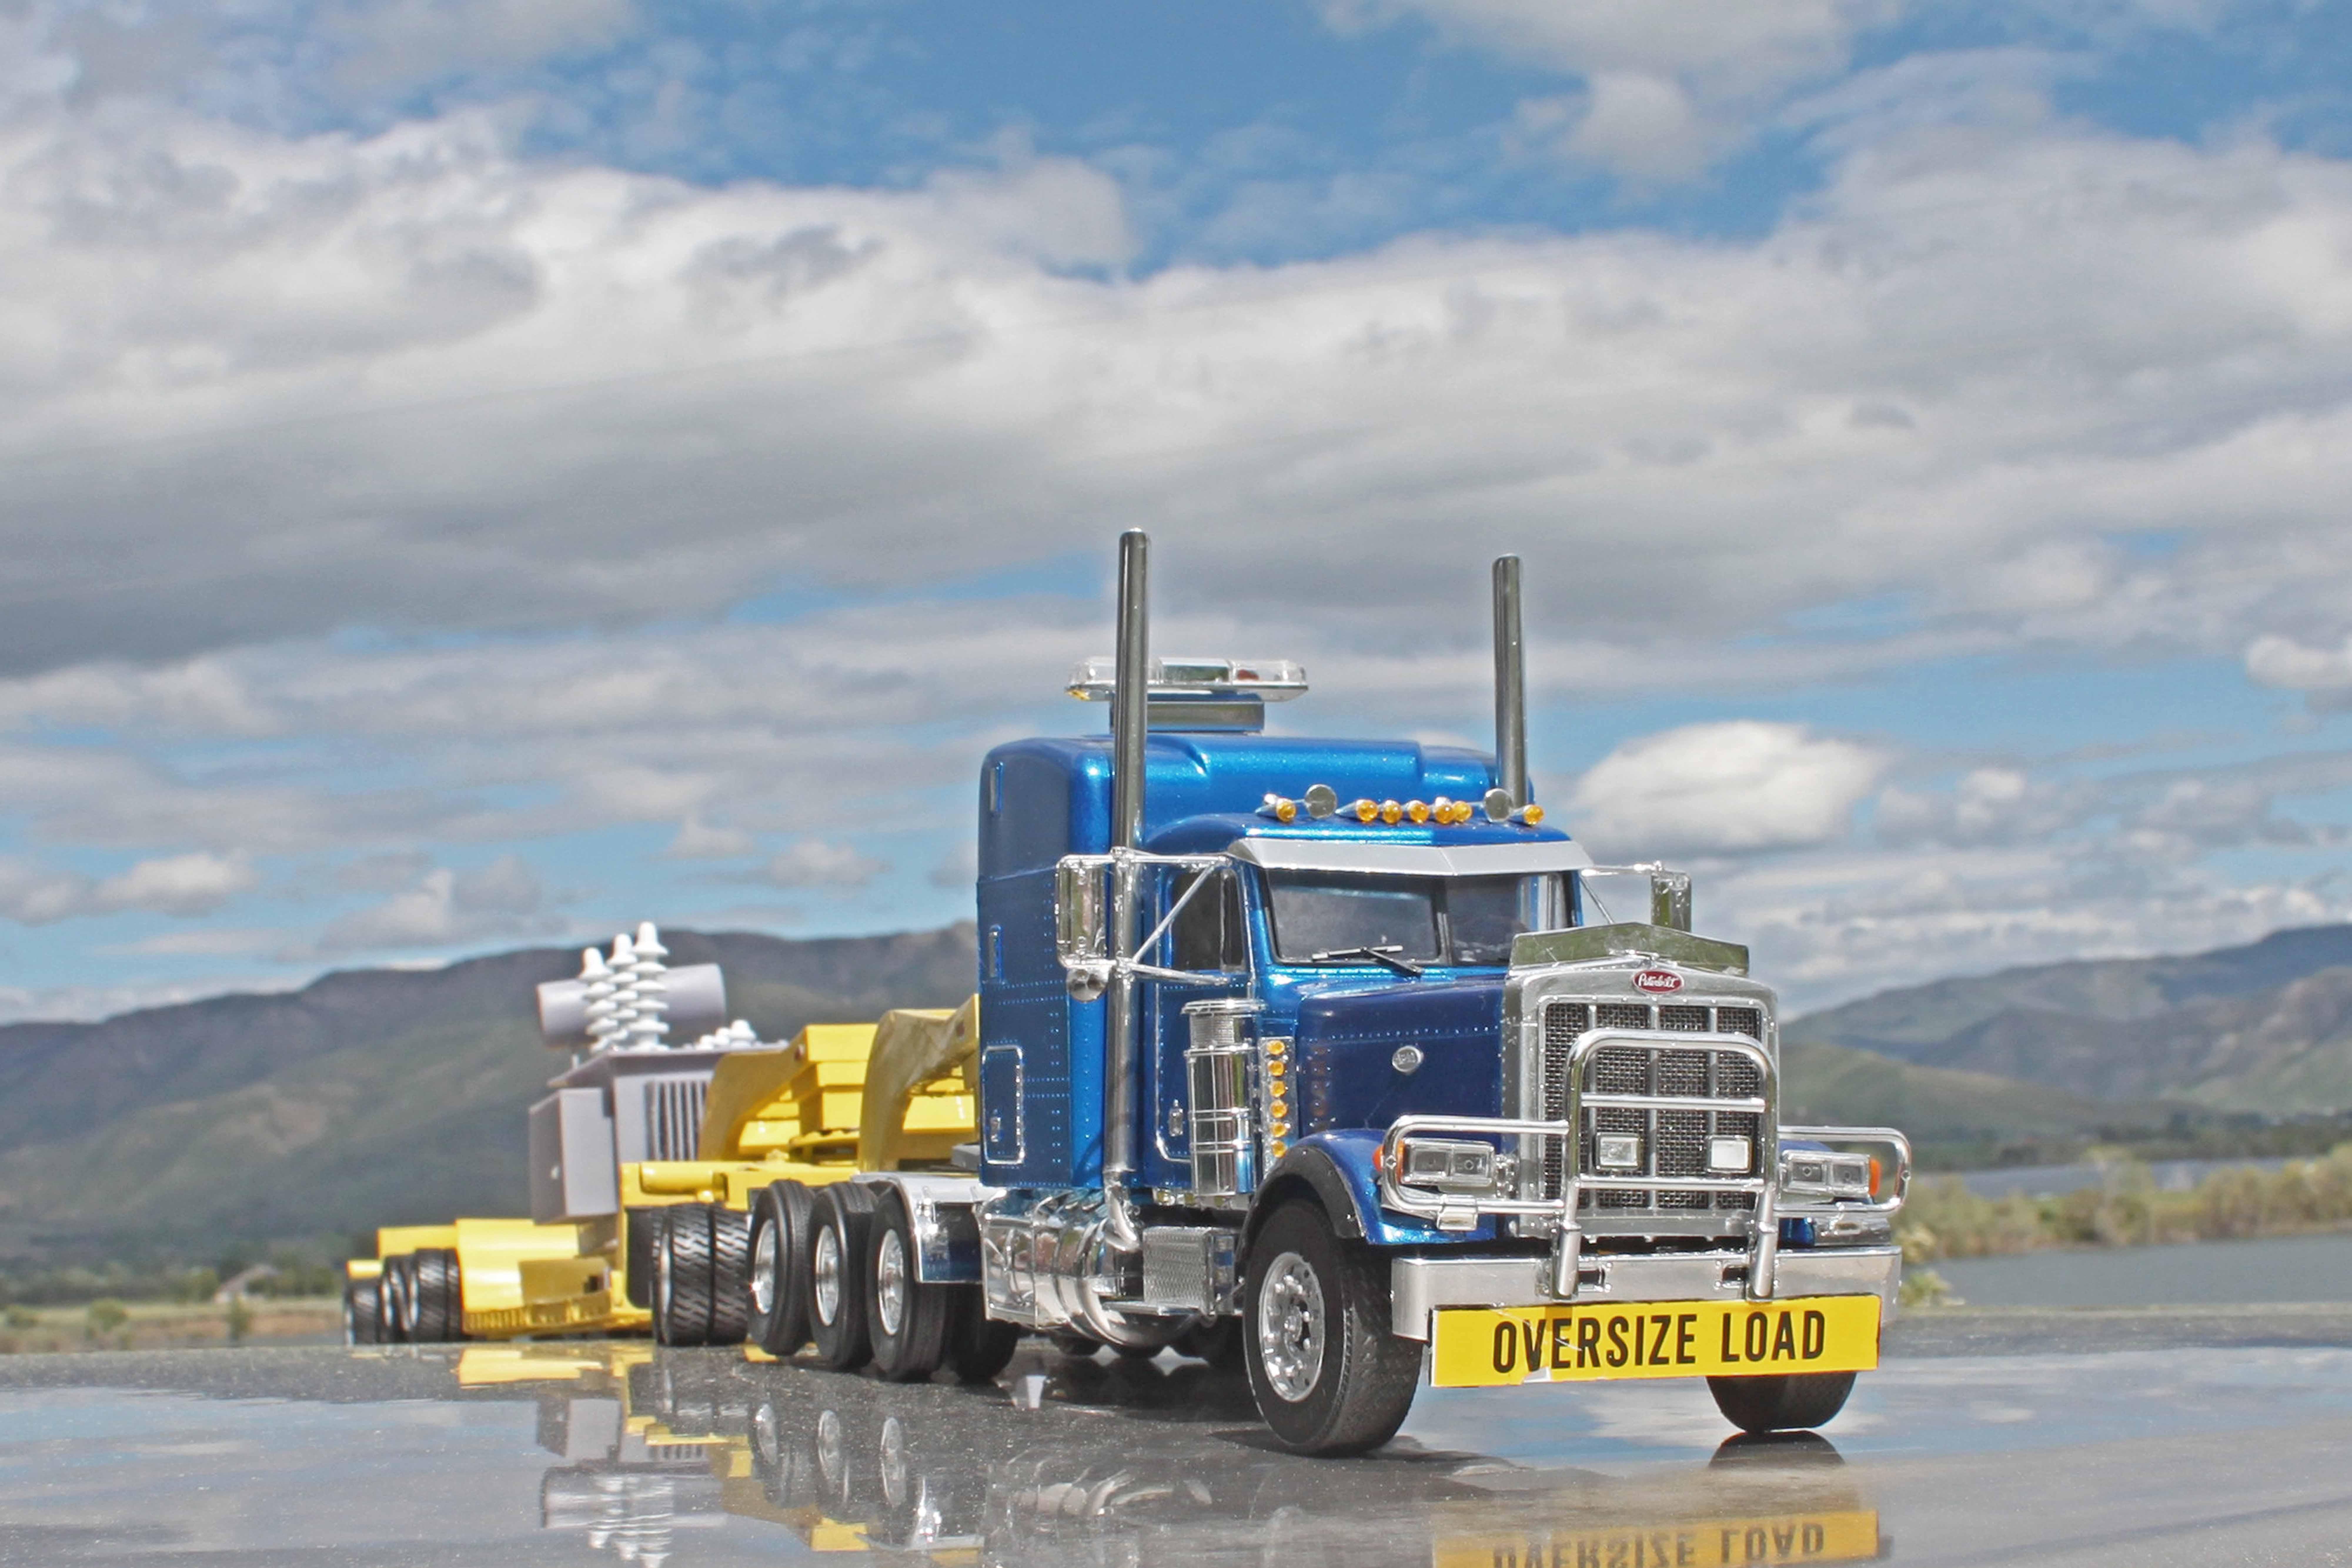
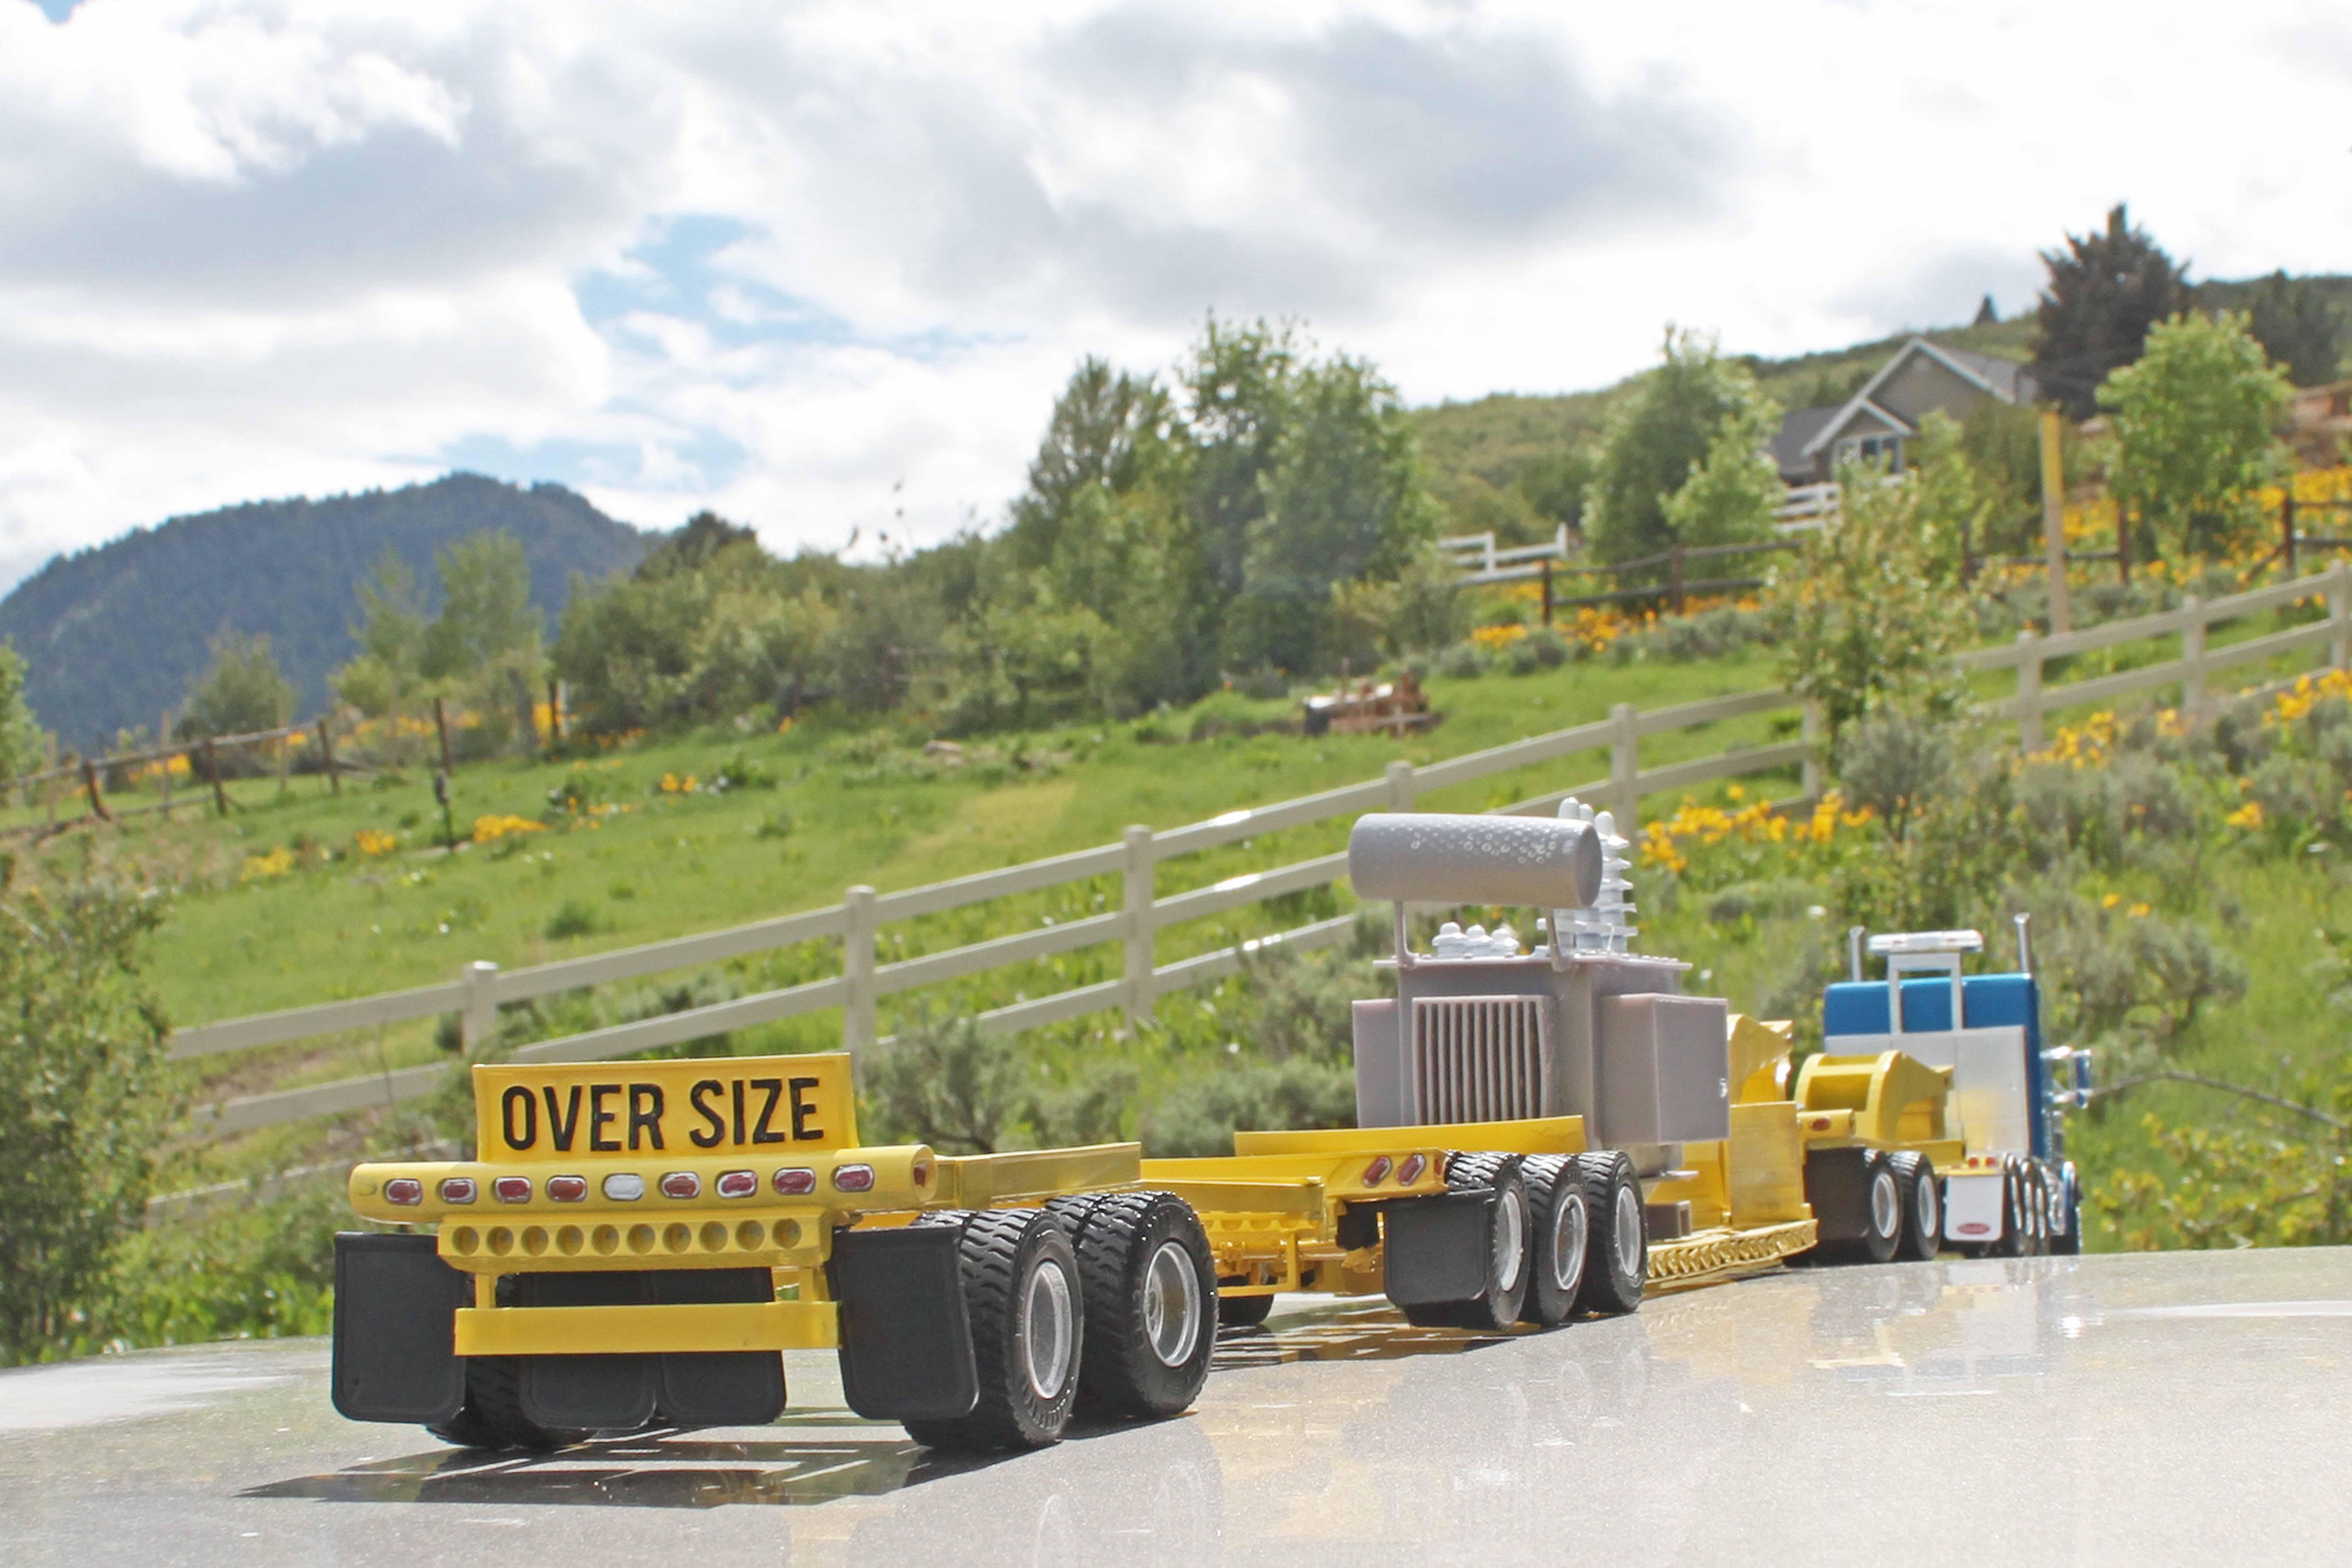
Thanks, Jeff! I knew this trailer would be more appropriate for this rig than anything by AMT!🤣😆 Yeah, the transformer is 3D printed too. 3D opens up so many possibilities that just aren't there in the world of the Big Plastic model manufacturers!
-
Thanks, Brian! Yeah, 46 tires and wheels- most of them going in the same direction!
-
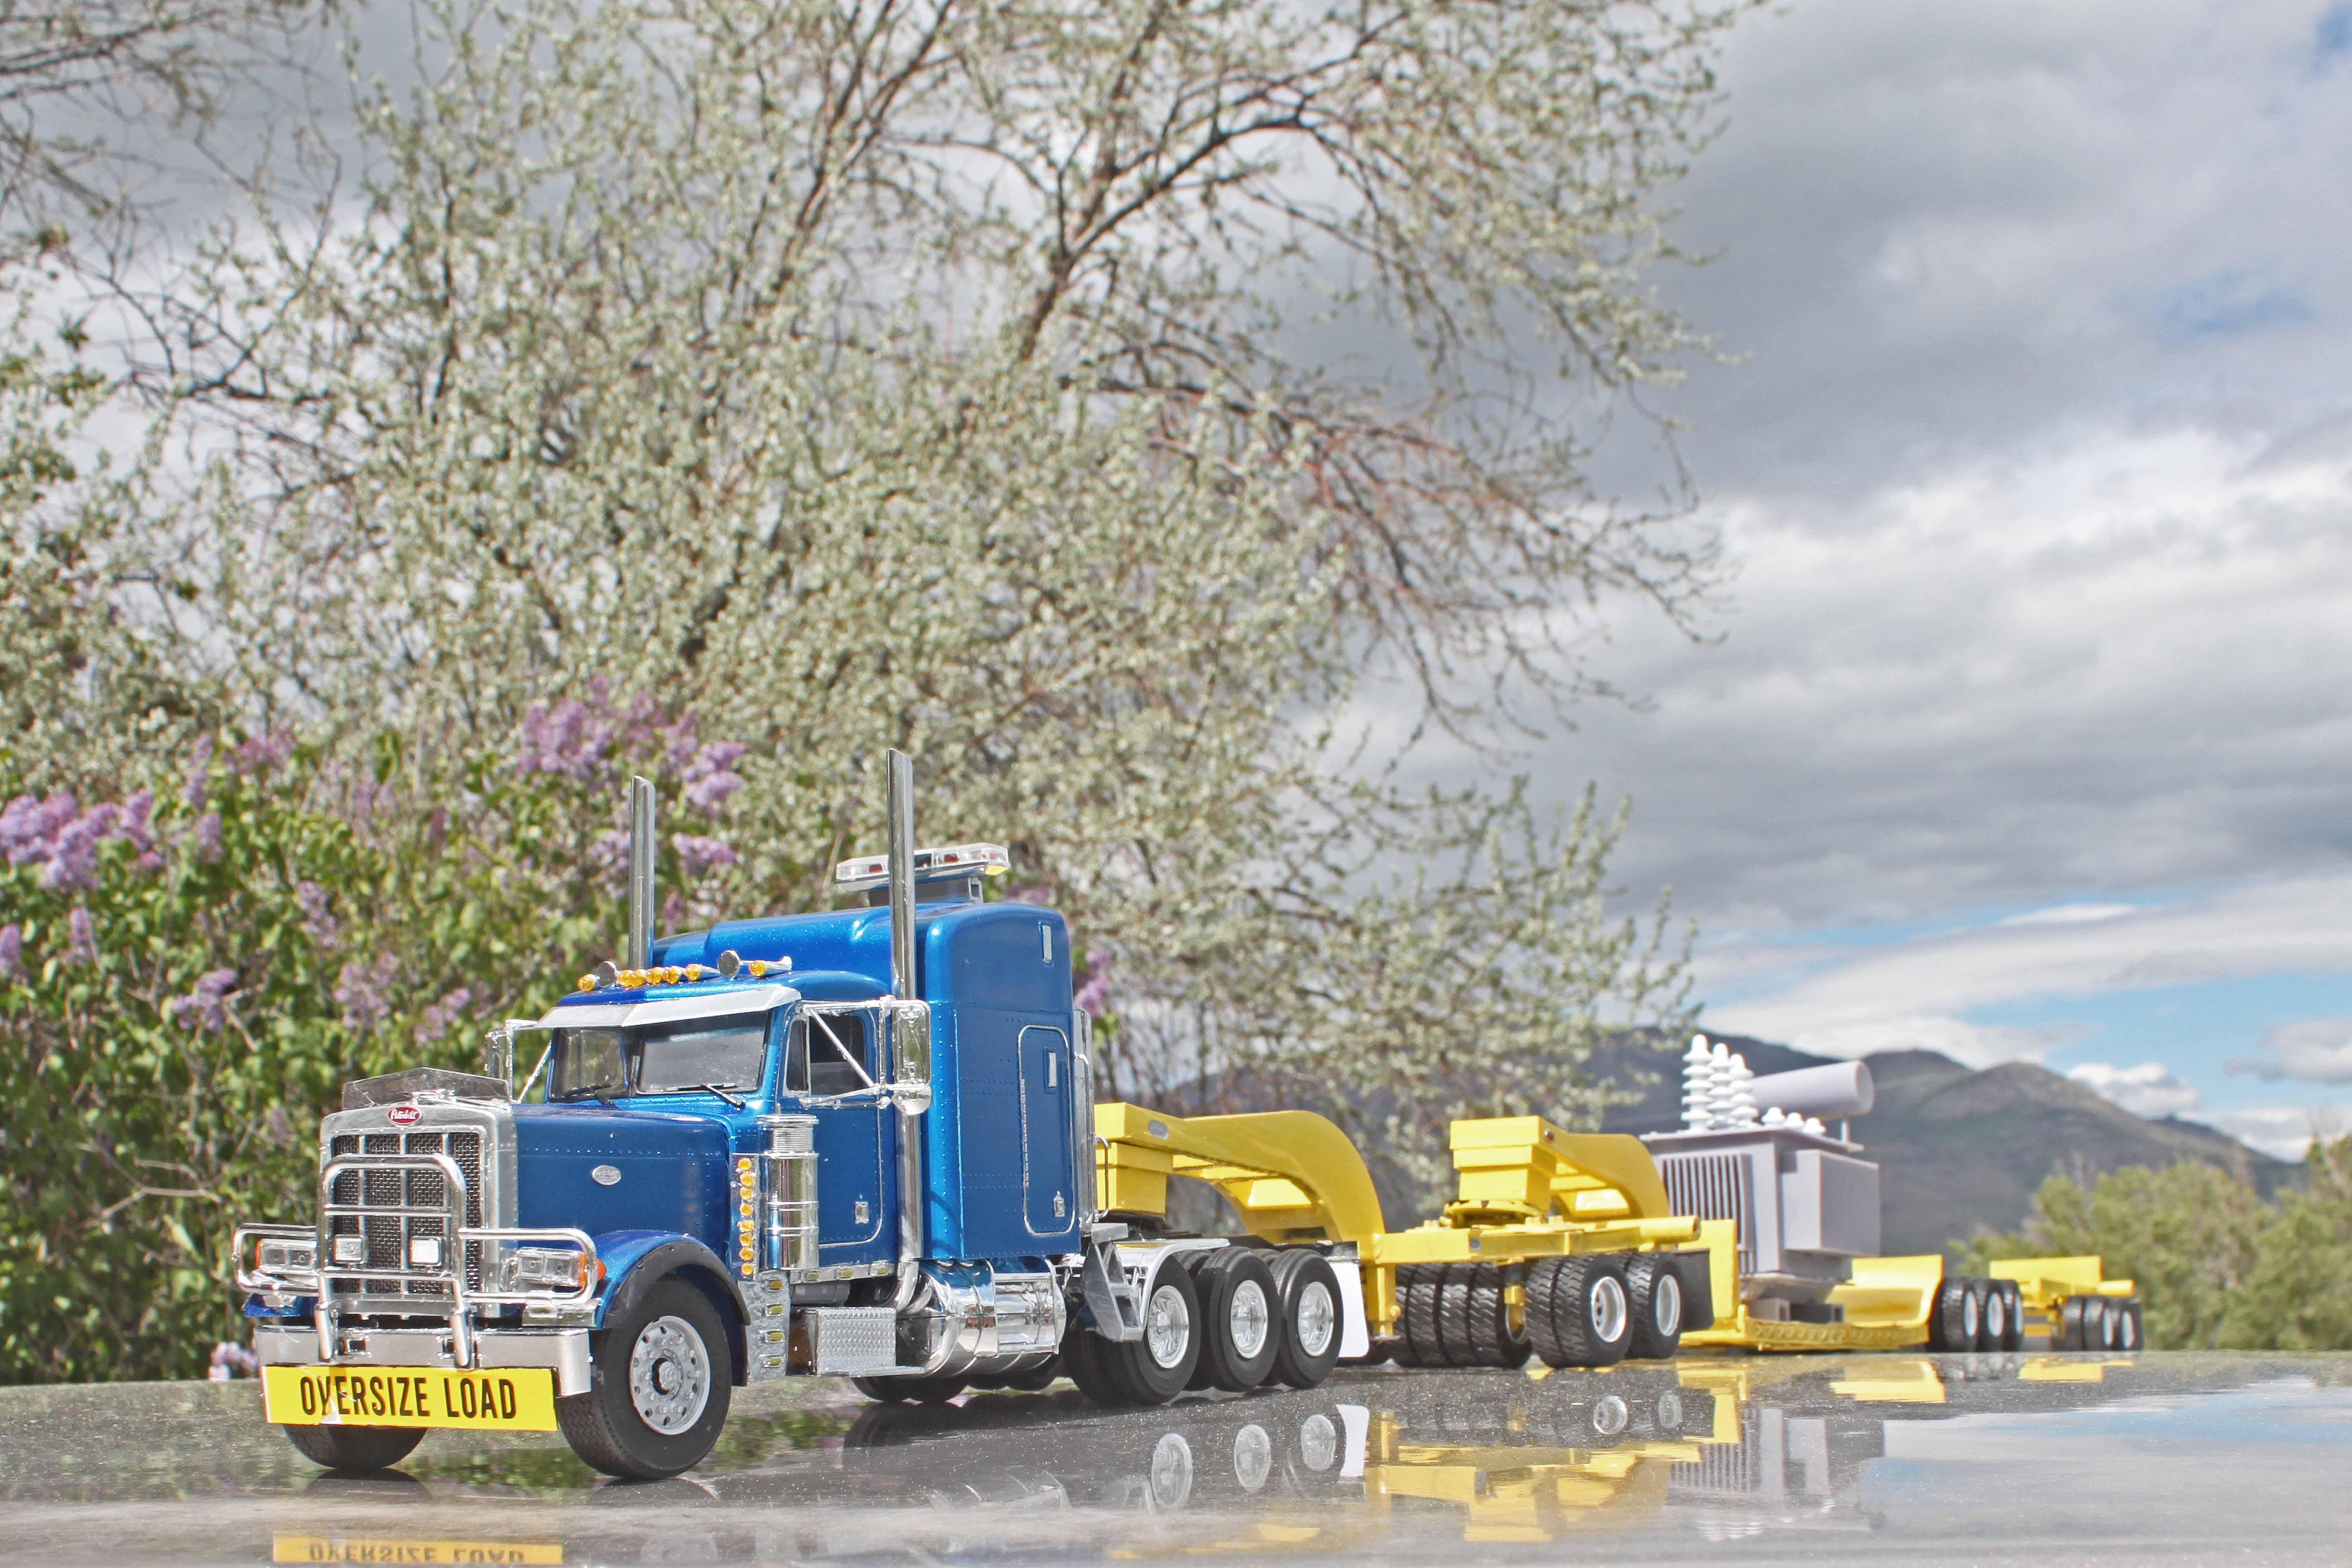
Here it is with the trailer- 3D printed from a design by Night_Stone_ on Cults; the transformer payload is 3D printed from a design by Freezuu, also on Cults. The trailer came with the jeep but no stinger, so I printed another jeep and modified it with styrene to include a pivot. It's sort of a generic heavy haul rig, probably missing some details but close enough for me! This thing is enormous- the finished model including the tractor is 5 feet long! Overall length is about 123 feet in scale; 46 wheels and tires (including the tractor)! Now I need to build a pilot car... When the jeep and stinger are loaded for the trip back to the yard, the trailer is about as long as a typical 53 footer. Wider, of course, so it still needs permits.
-
I think she's done- added lights and did some light weathering. Here are a few shots, I'll add more to the Under Glass thread for the Pete tractor. Thanks for following, everyone, this was a fun build- definitely a stretch!