

Scott Eriksen
-
Posts
1,185 -
Joined
-
Last visited
Content Type
Profiles
Forums
Events
Gallery
Posts posted by Scott Eriksen
-
-
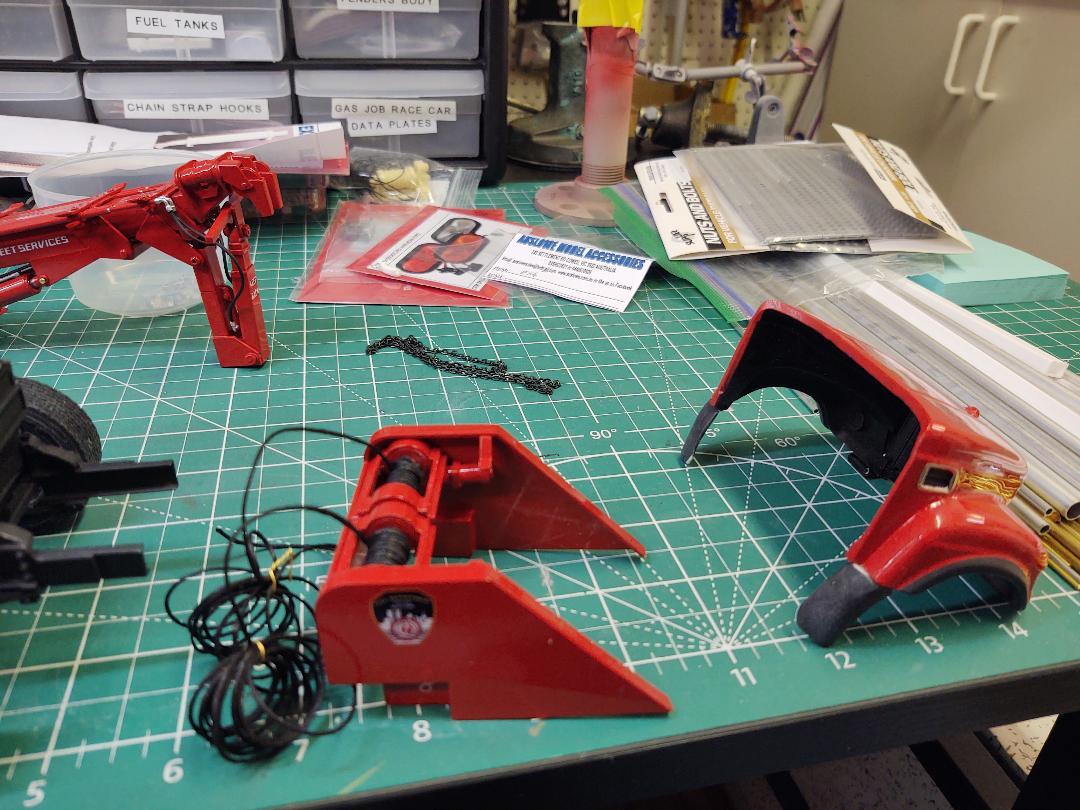
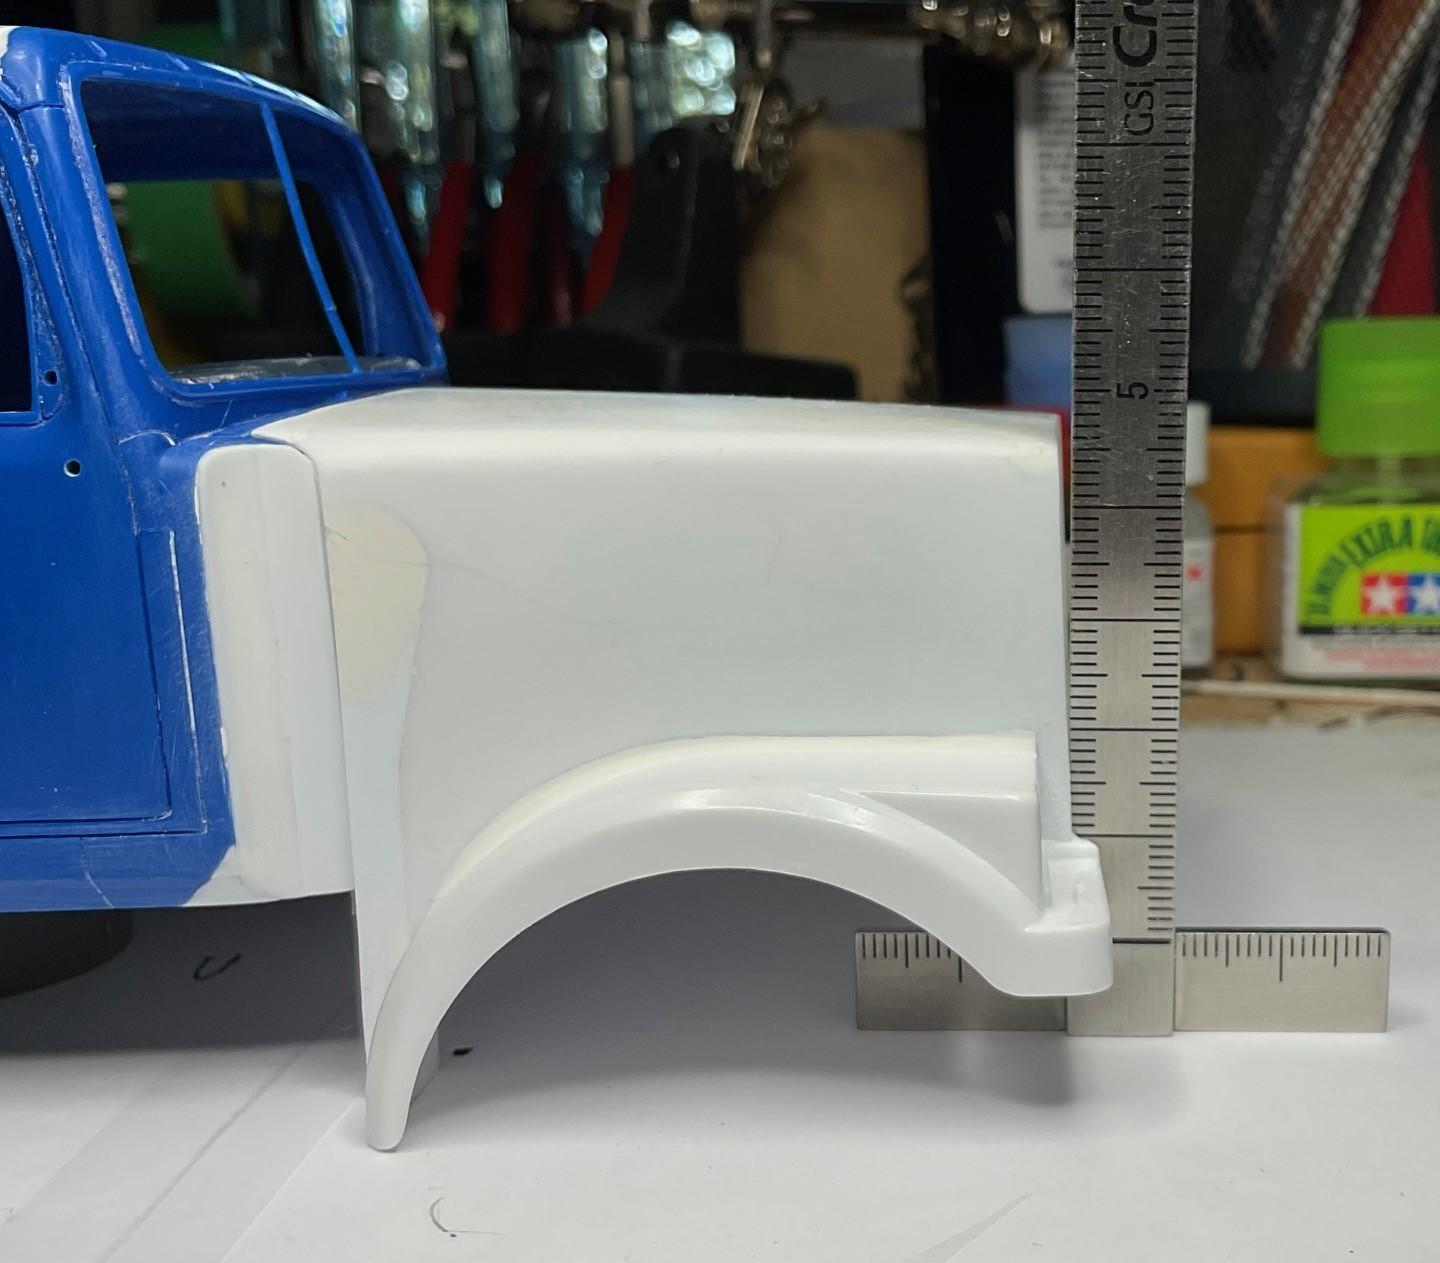
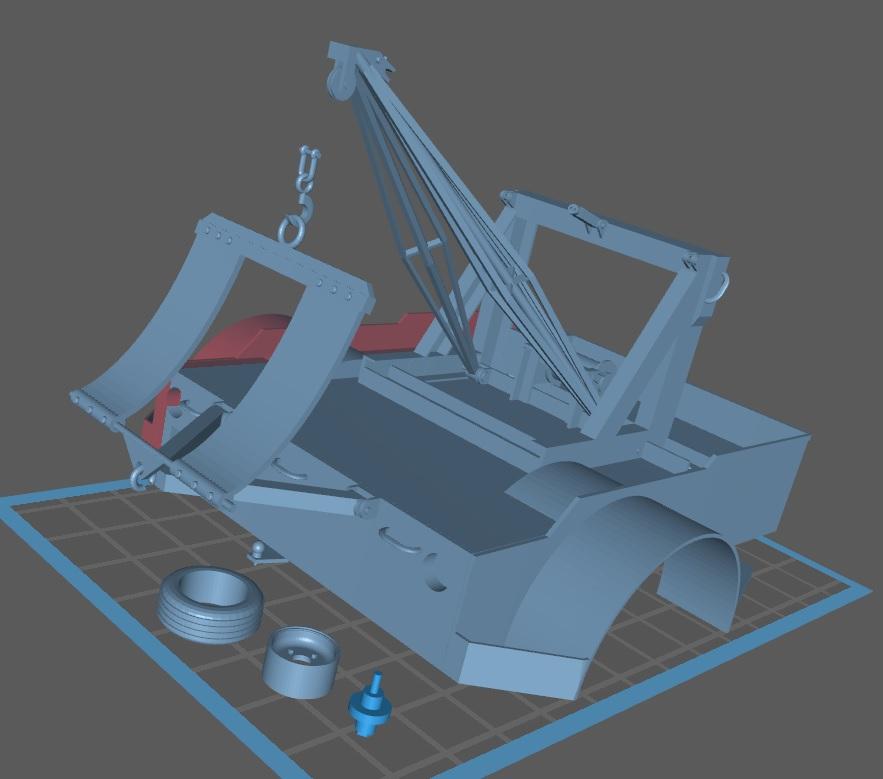
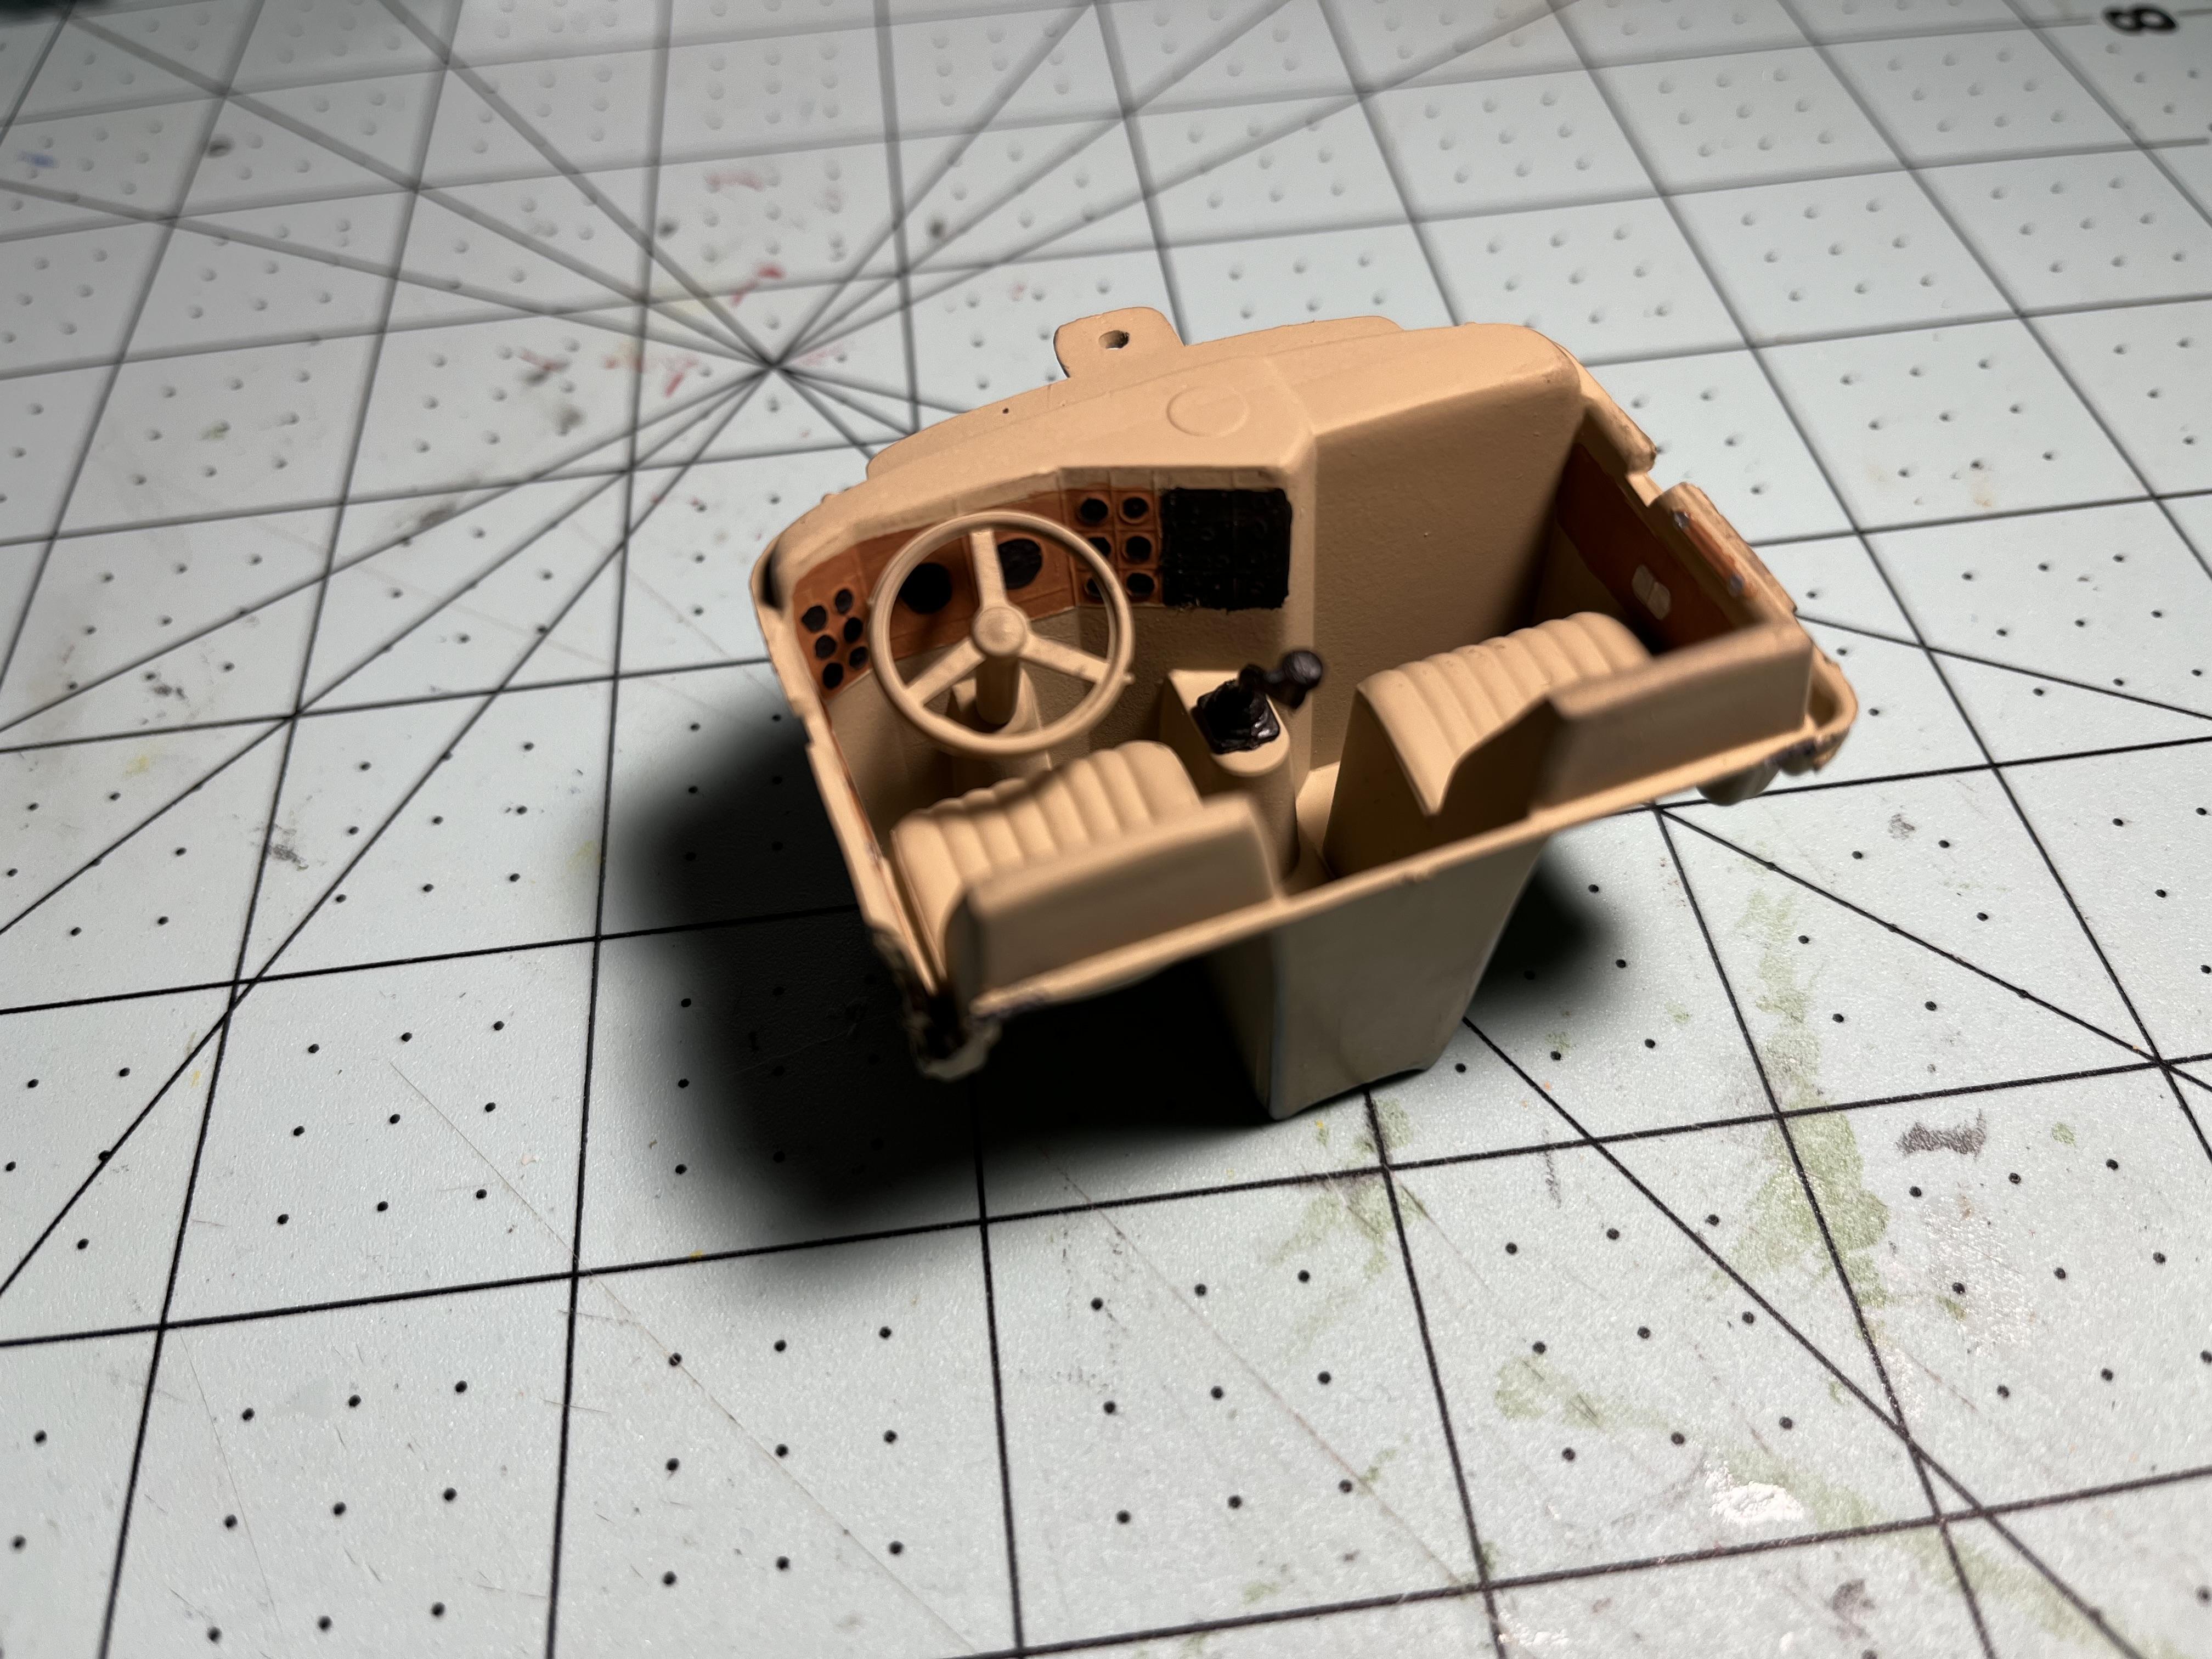
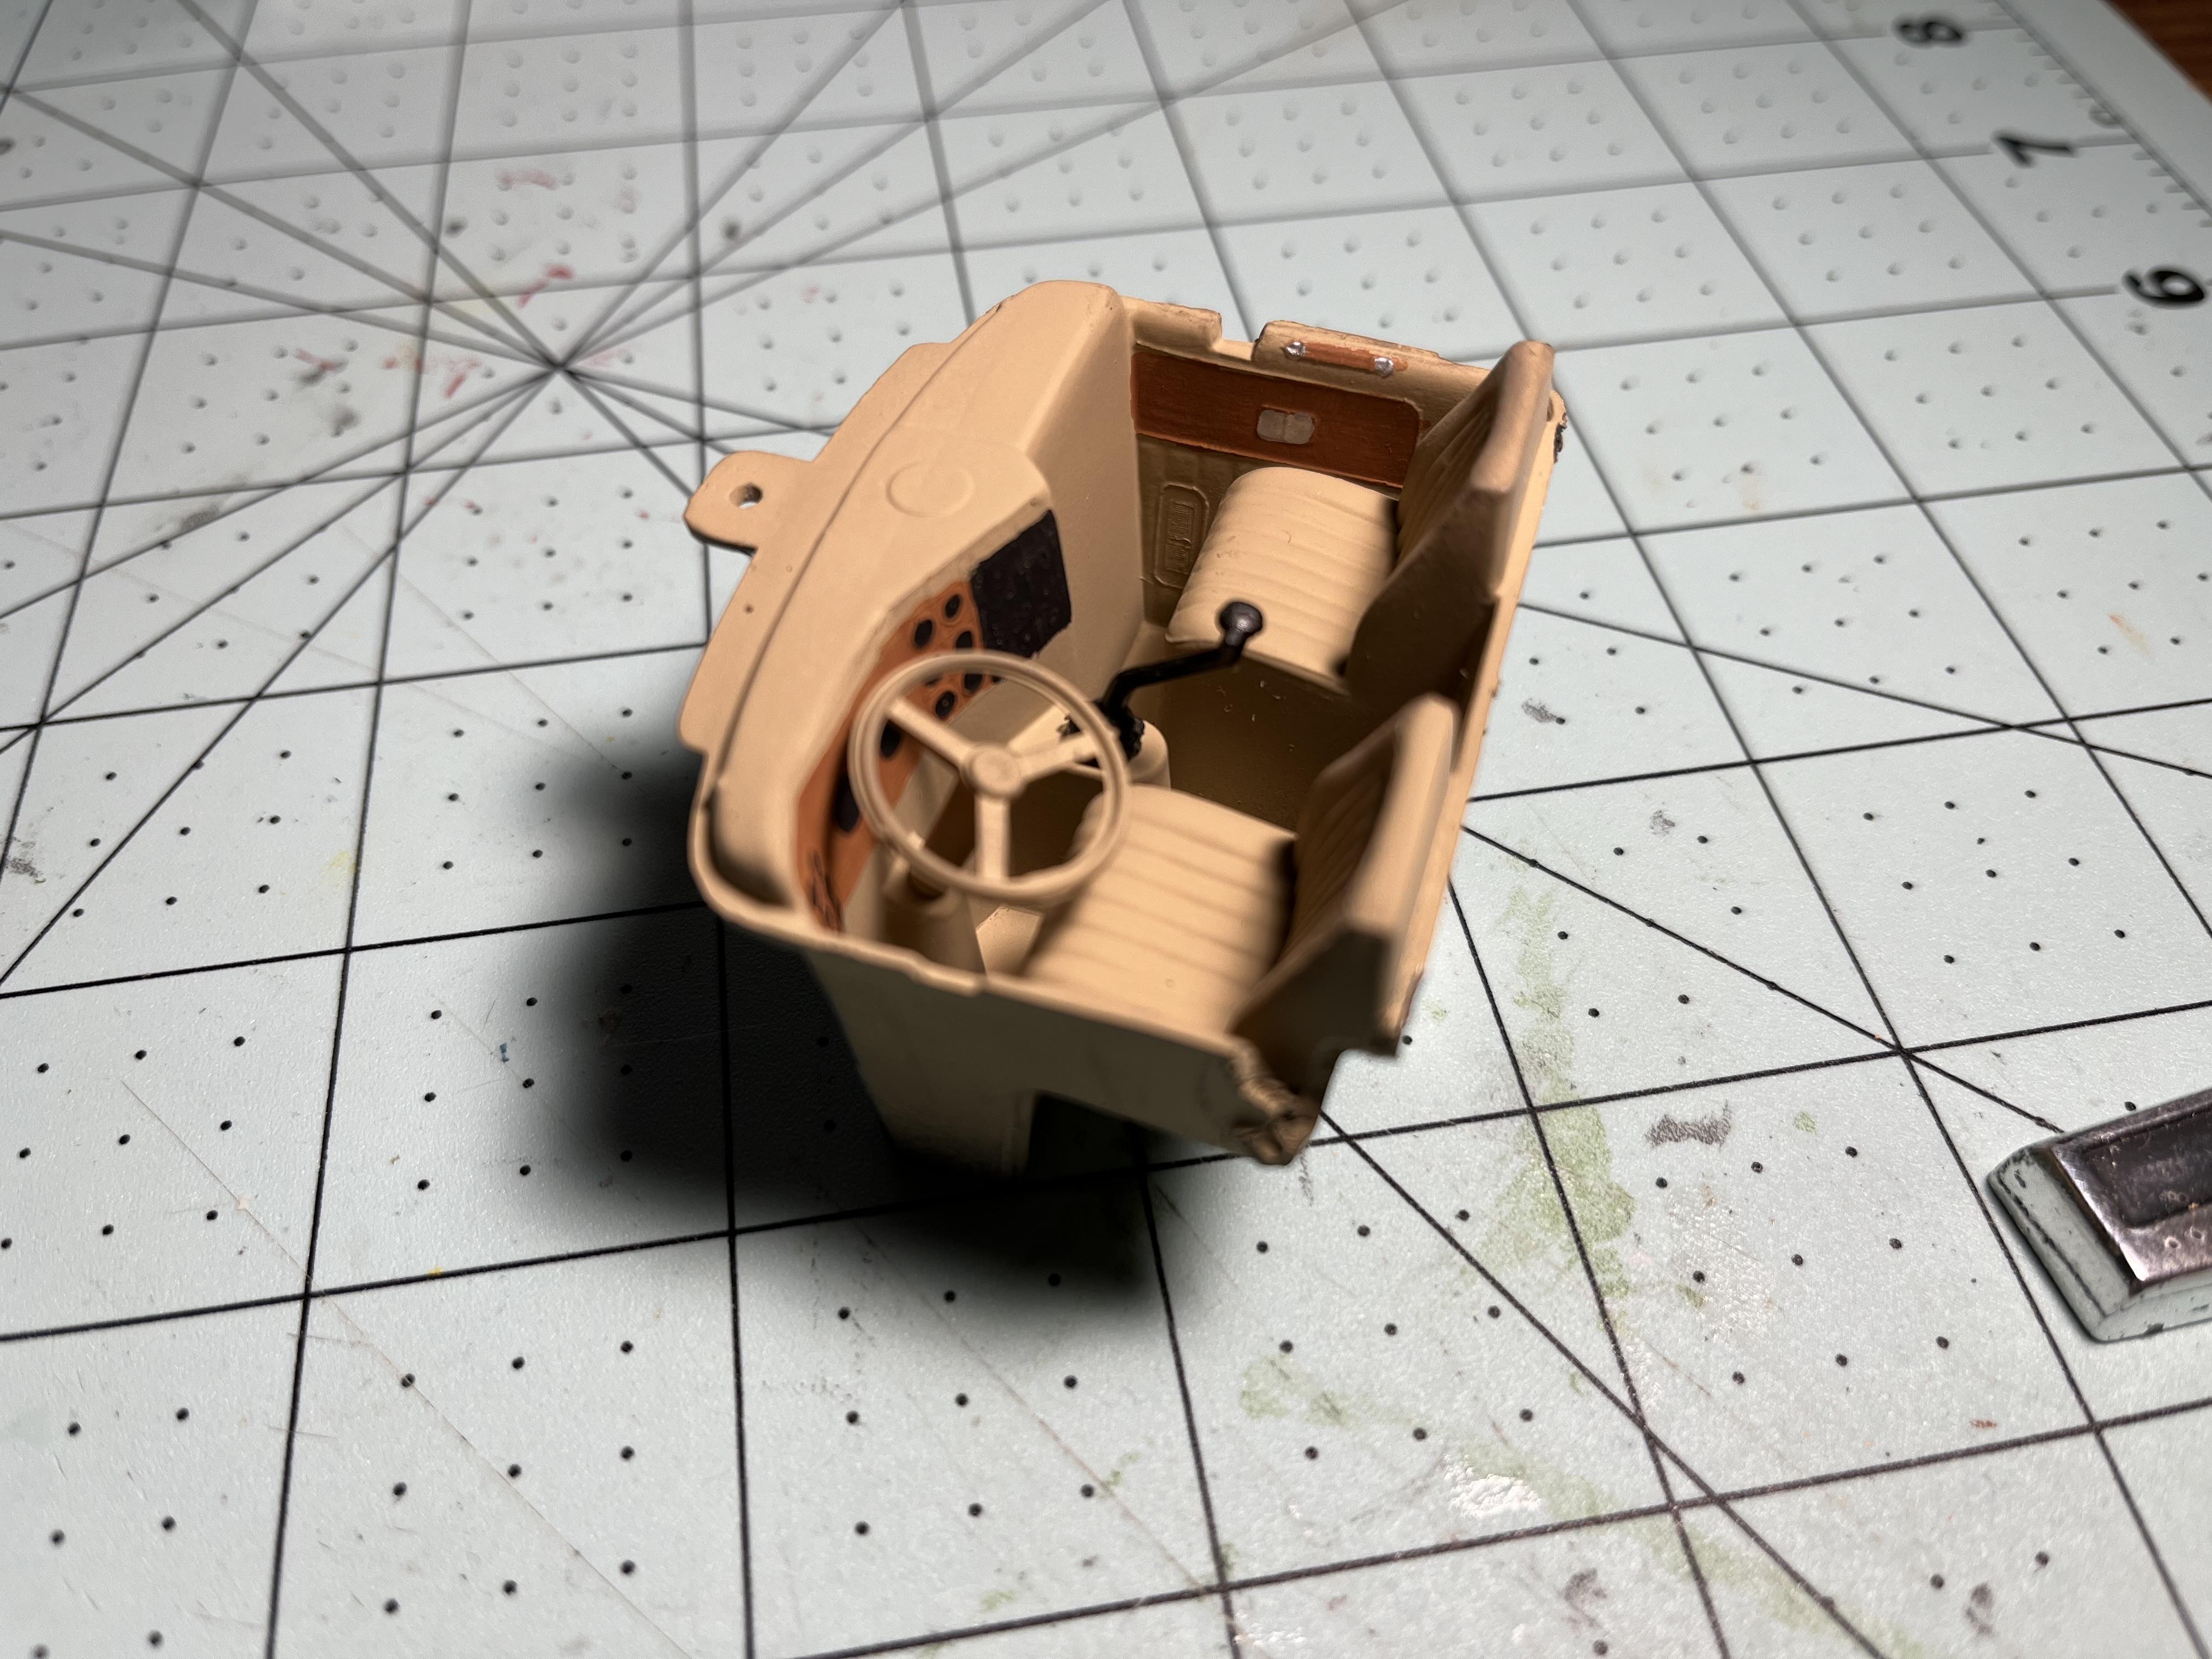
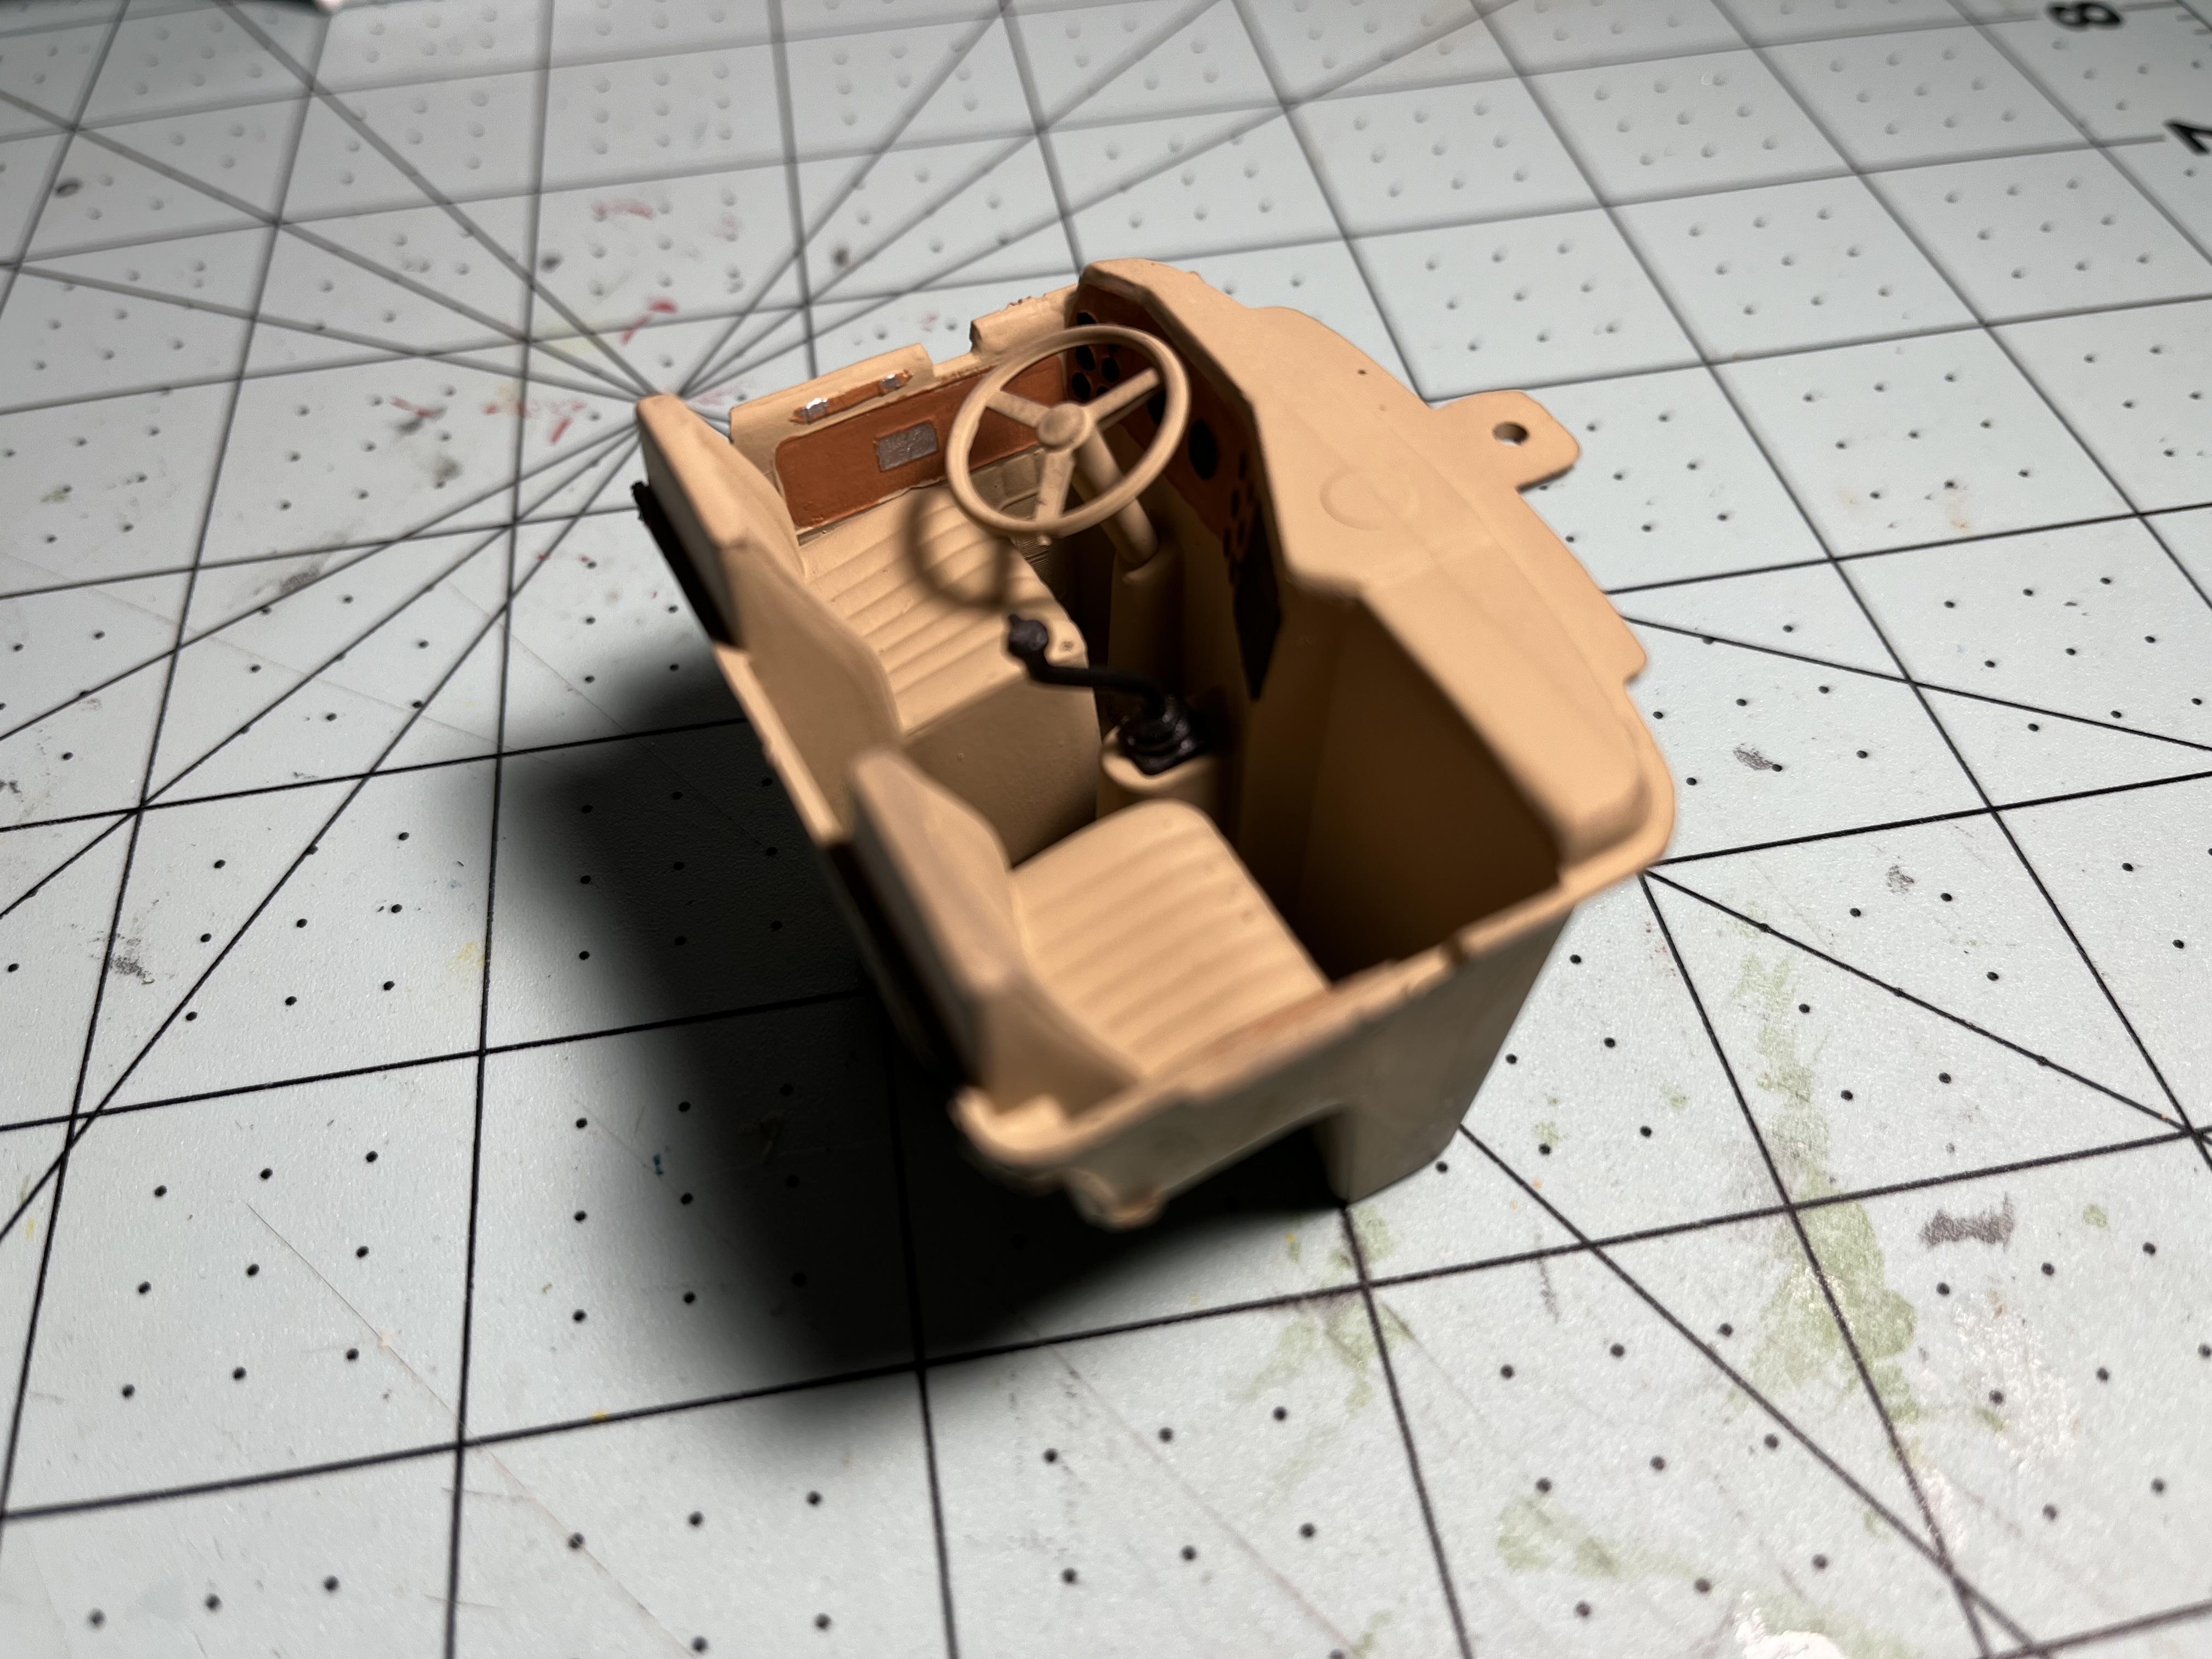
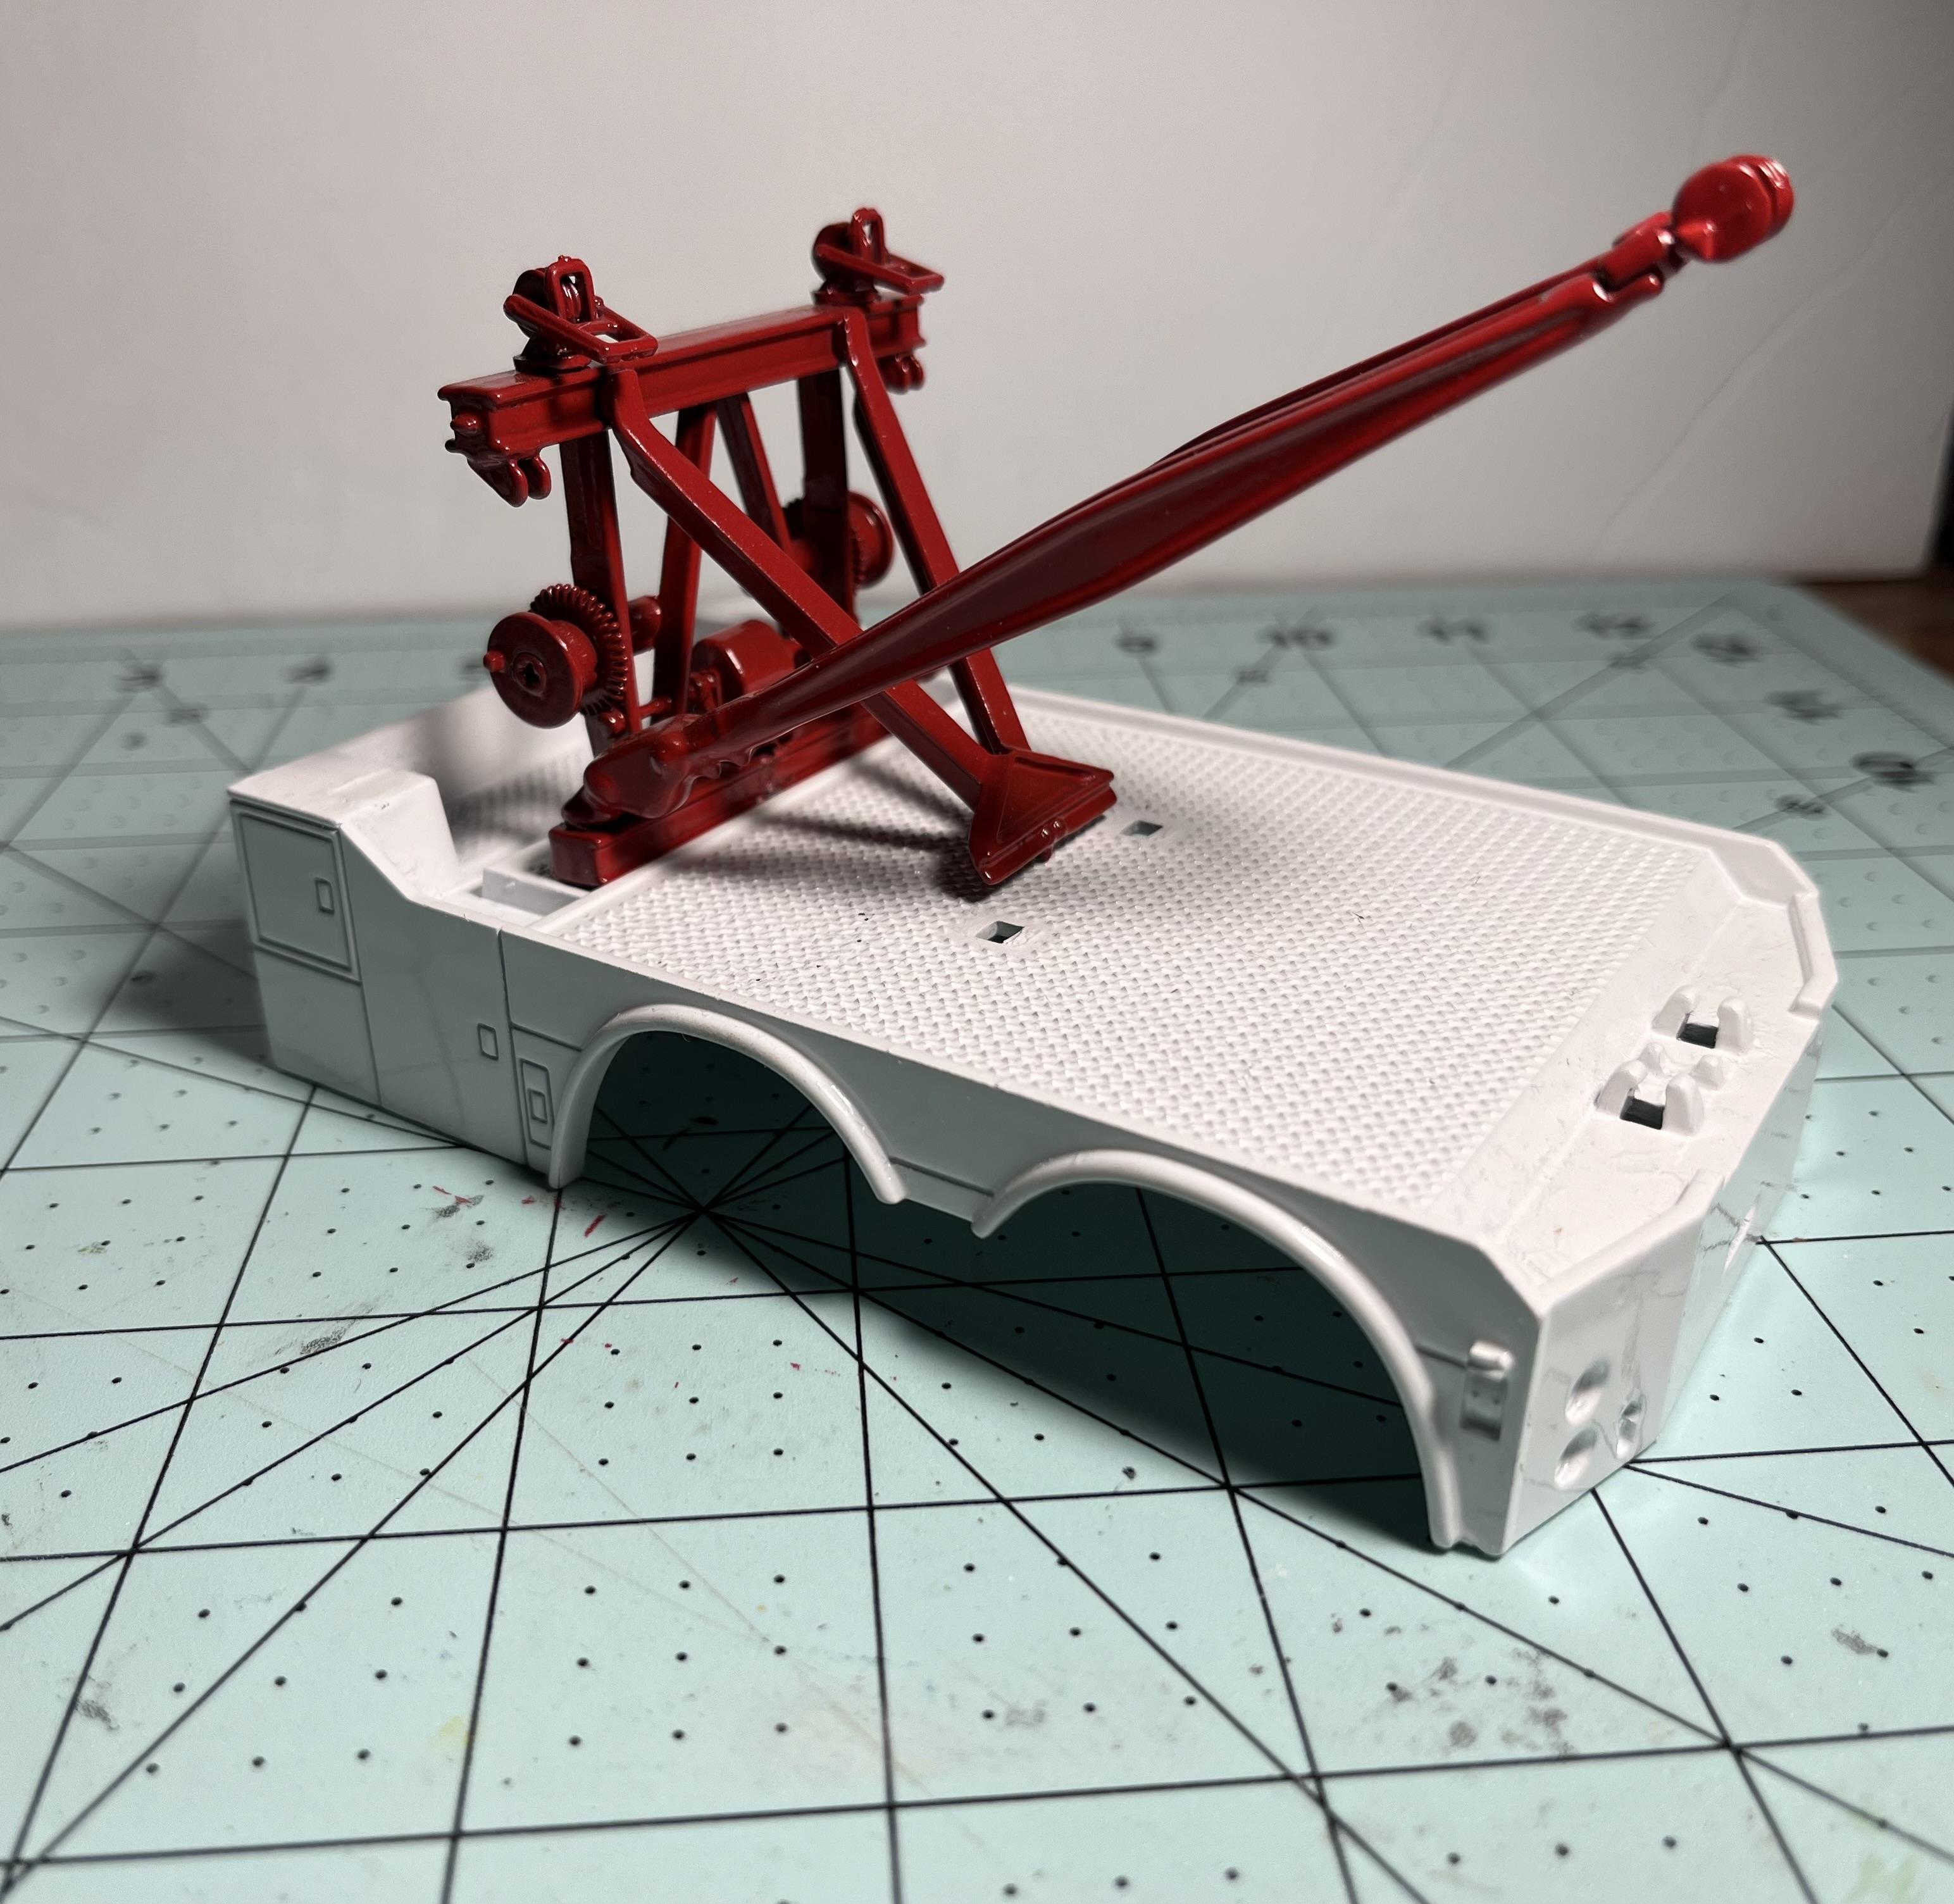
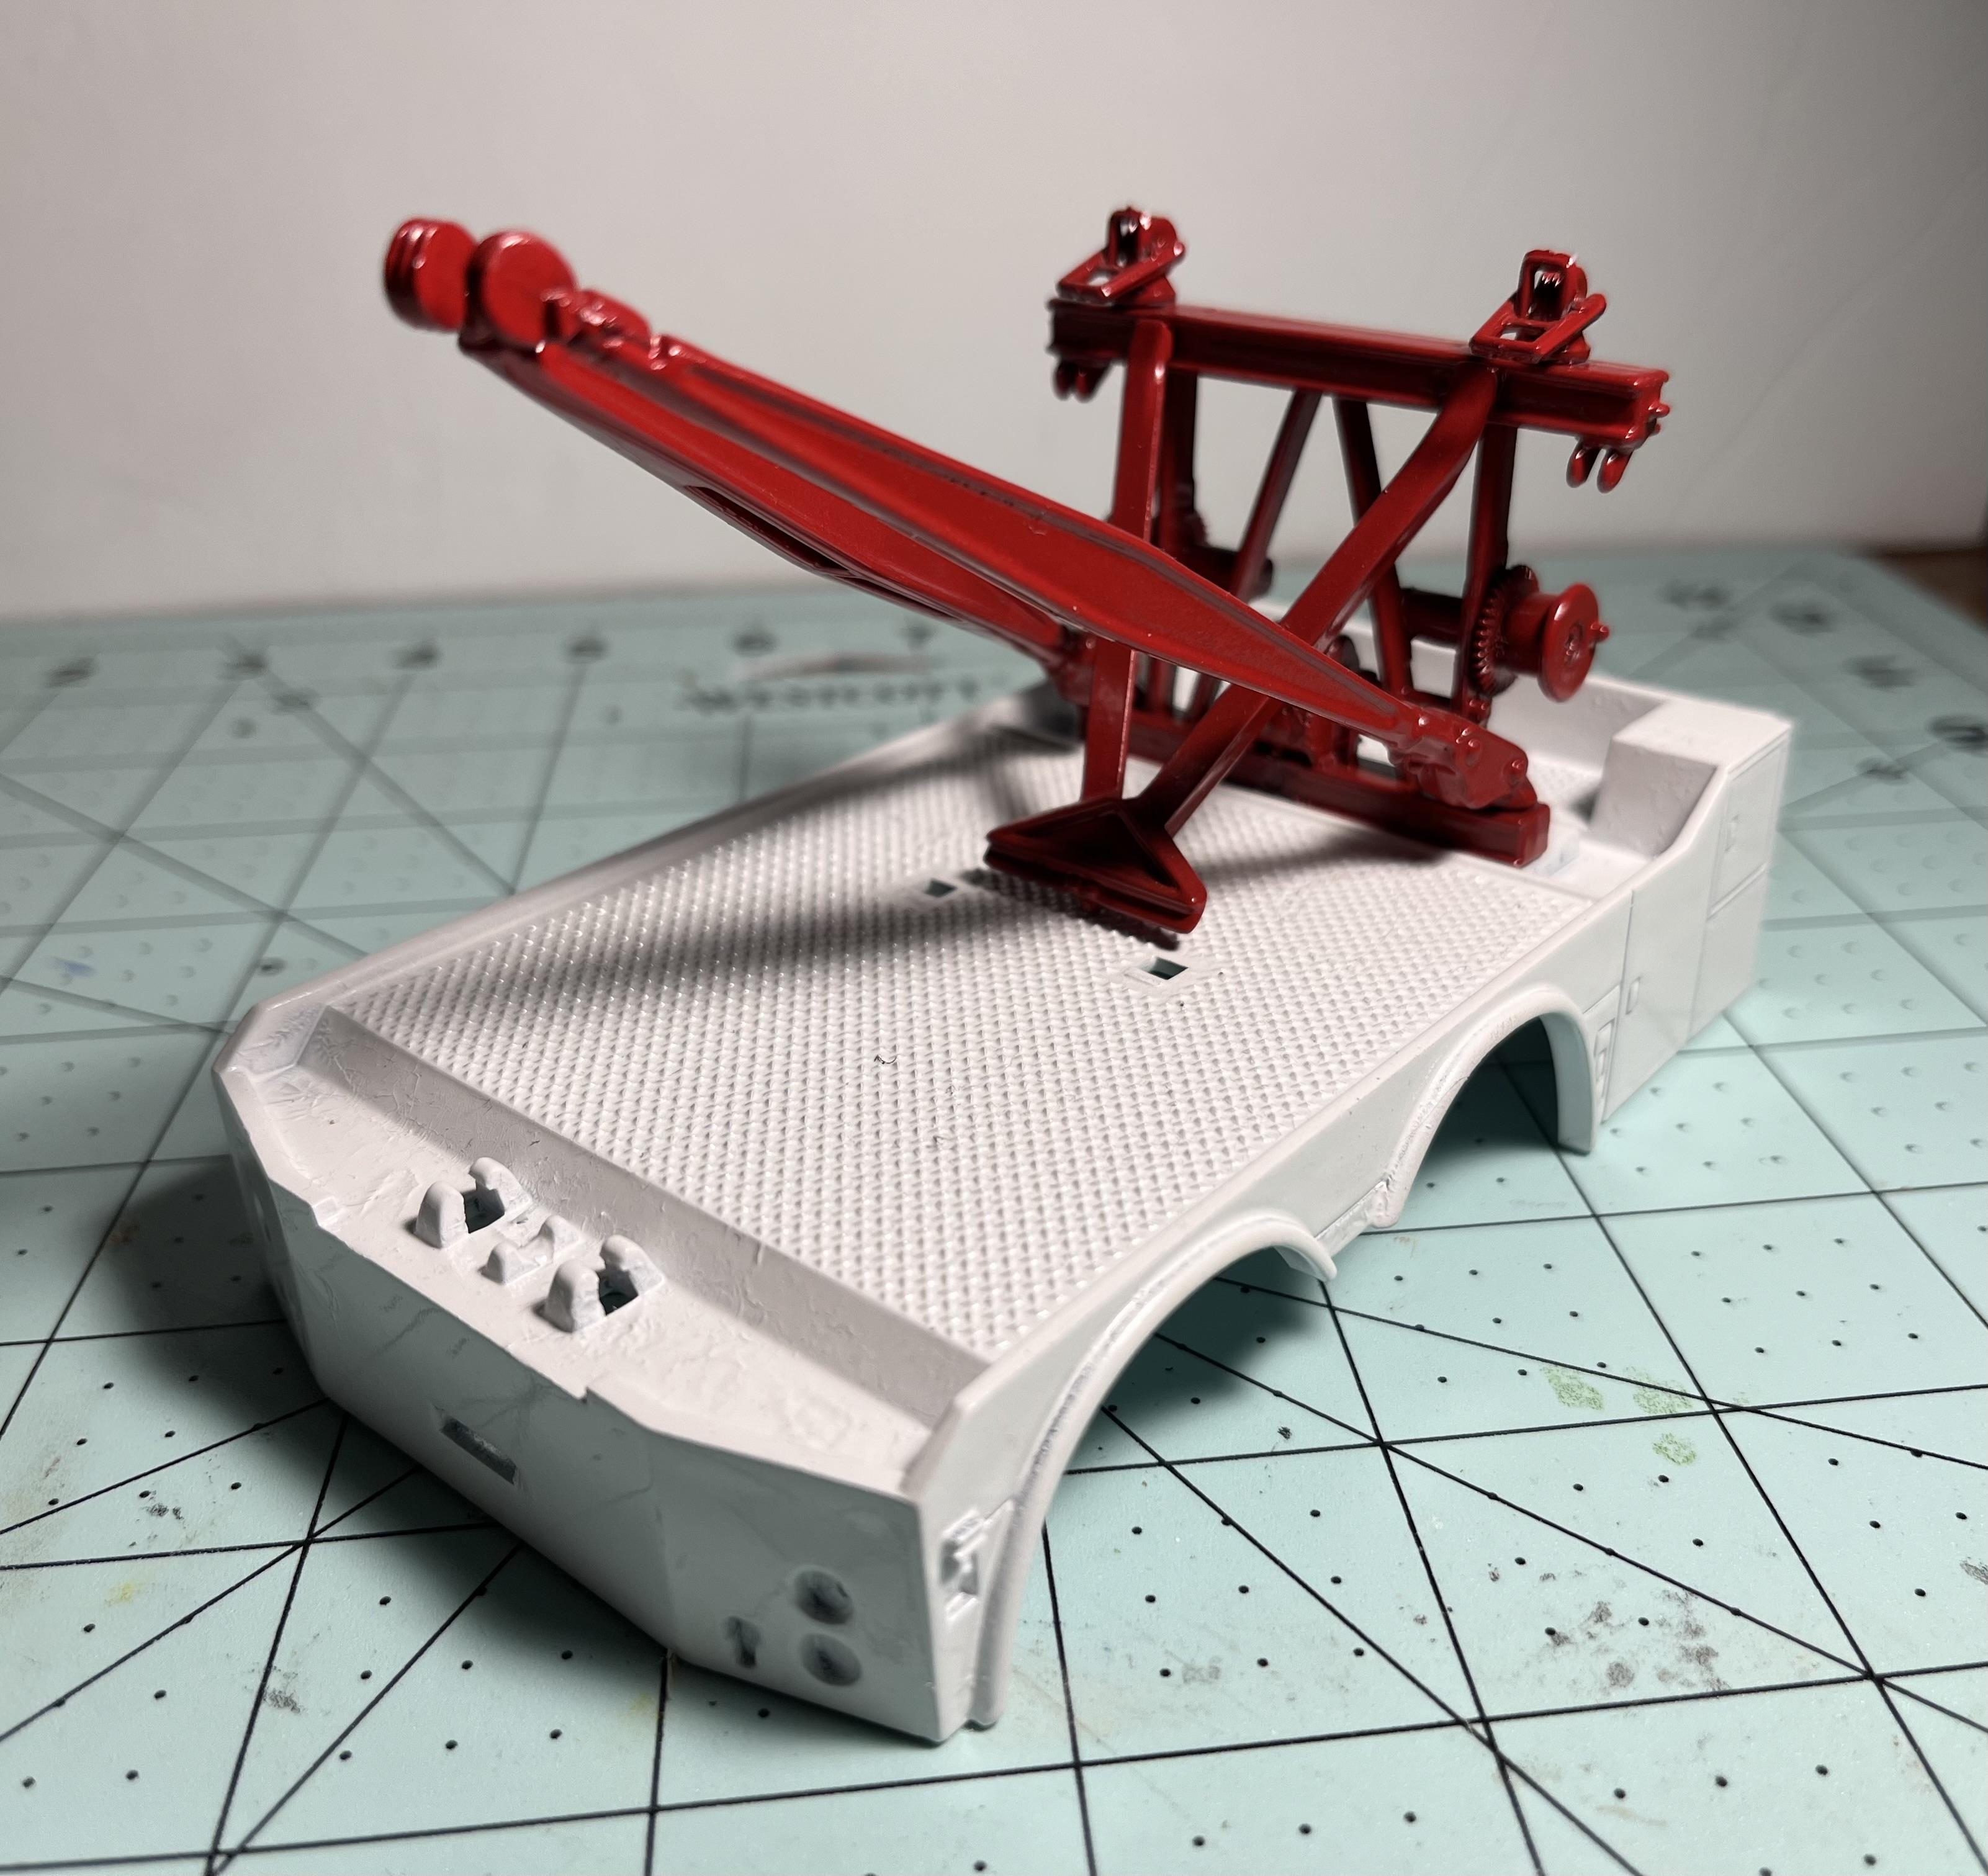
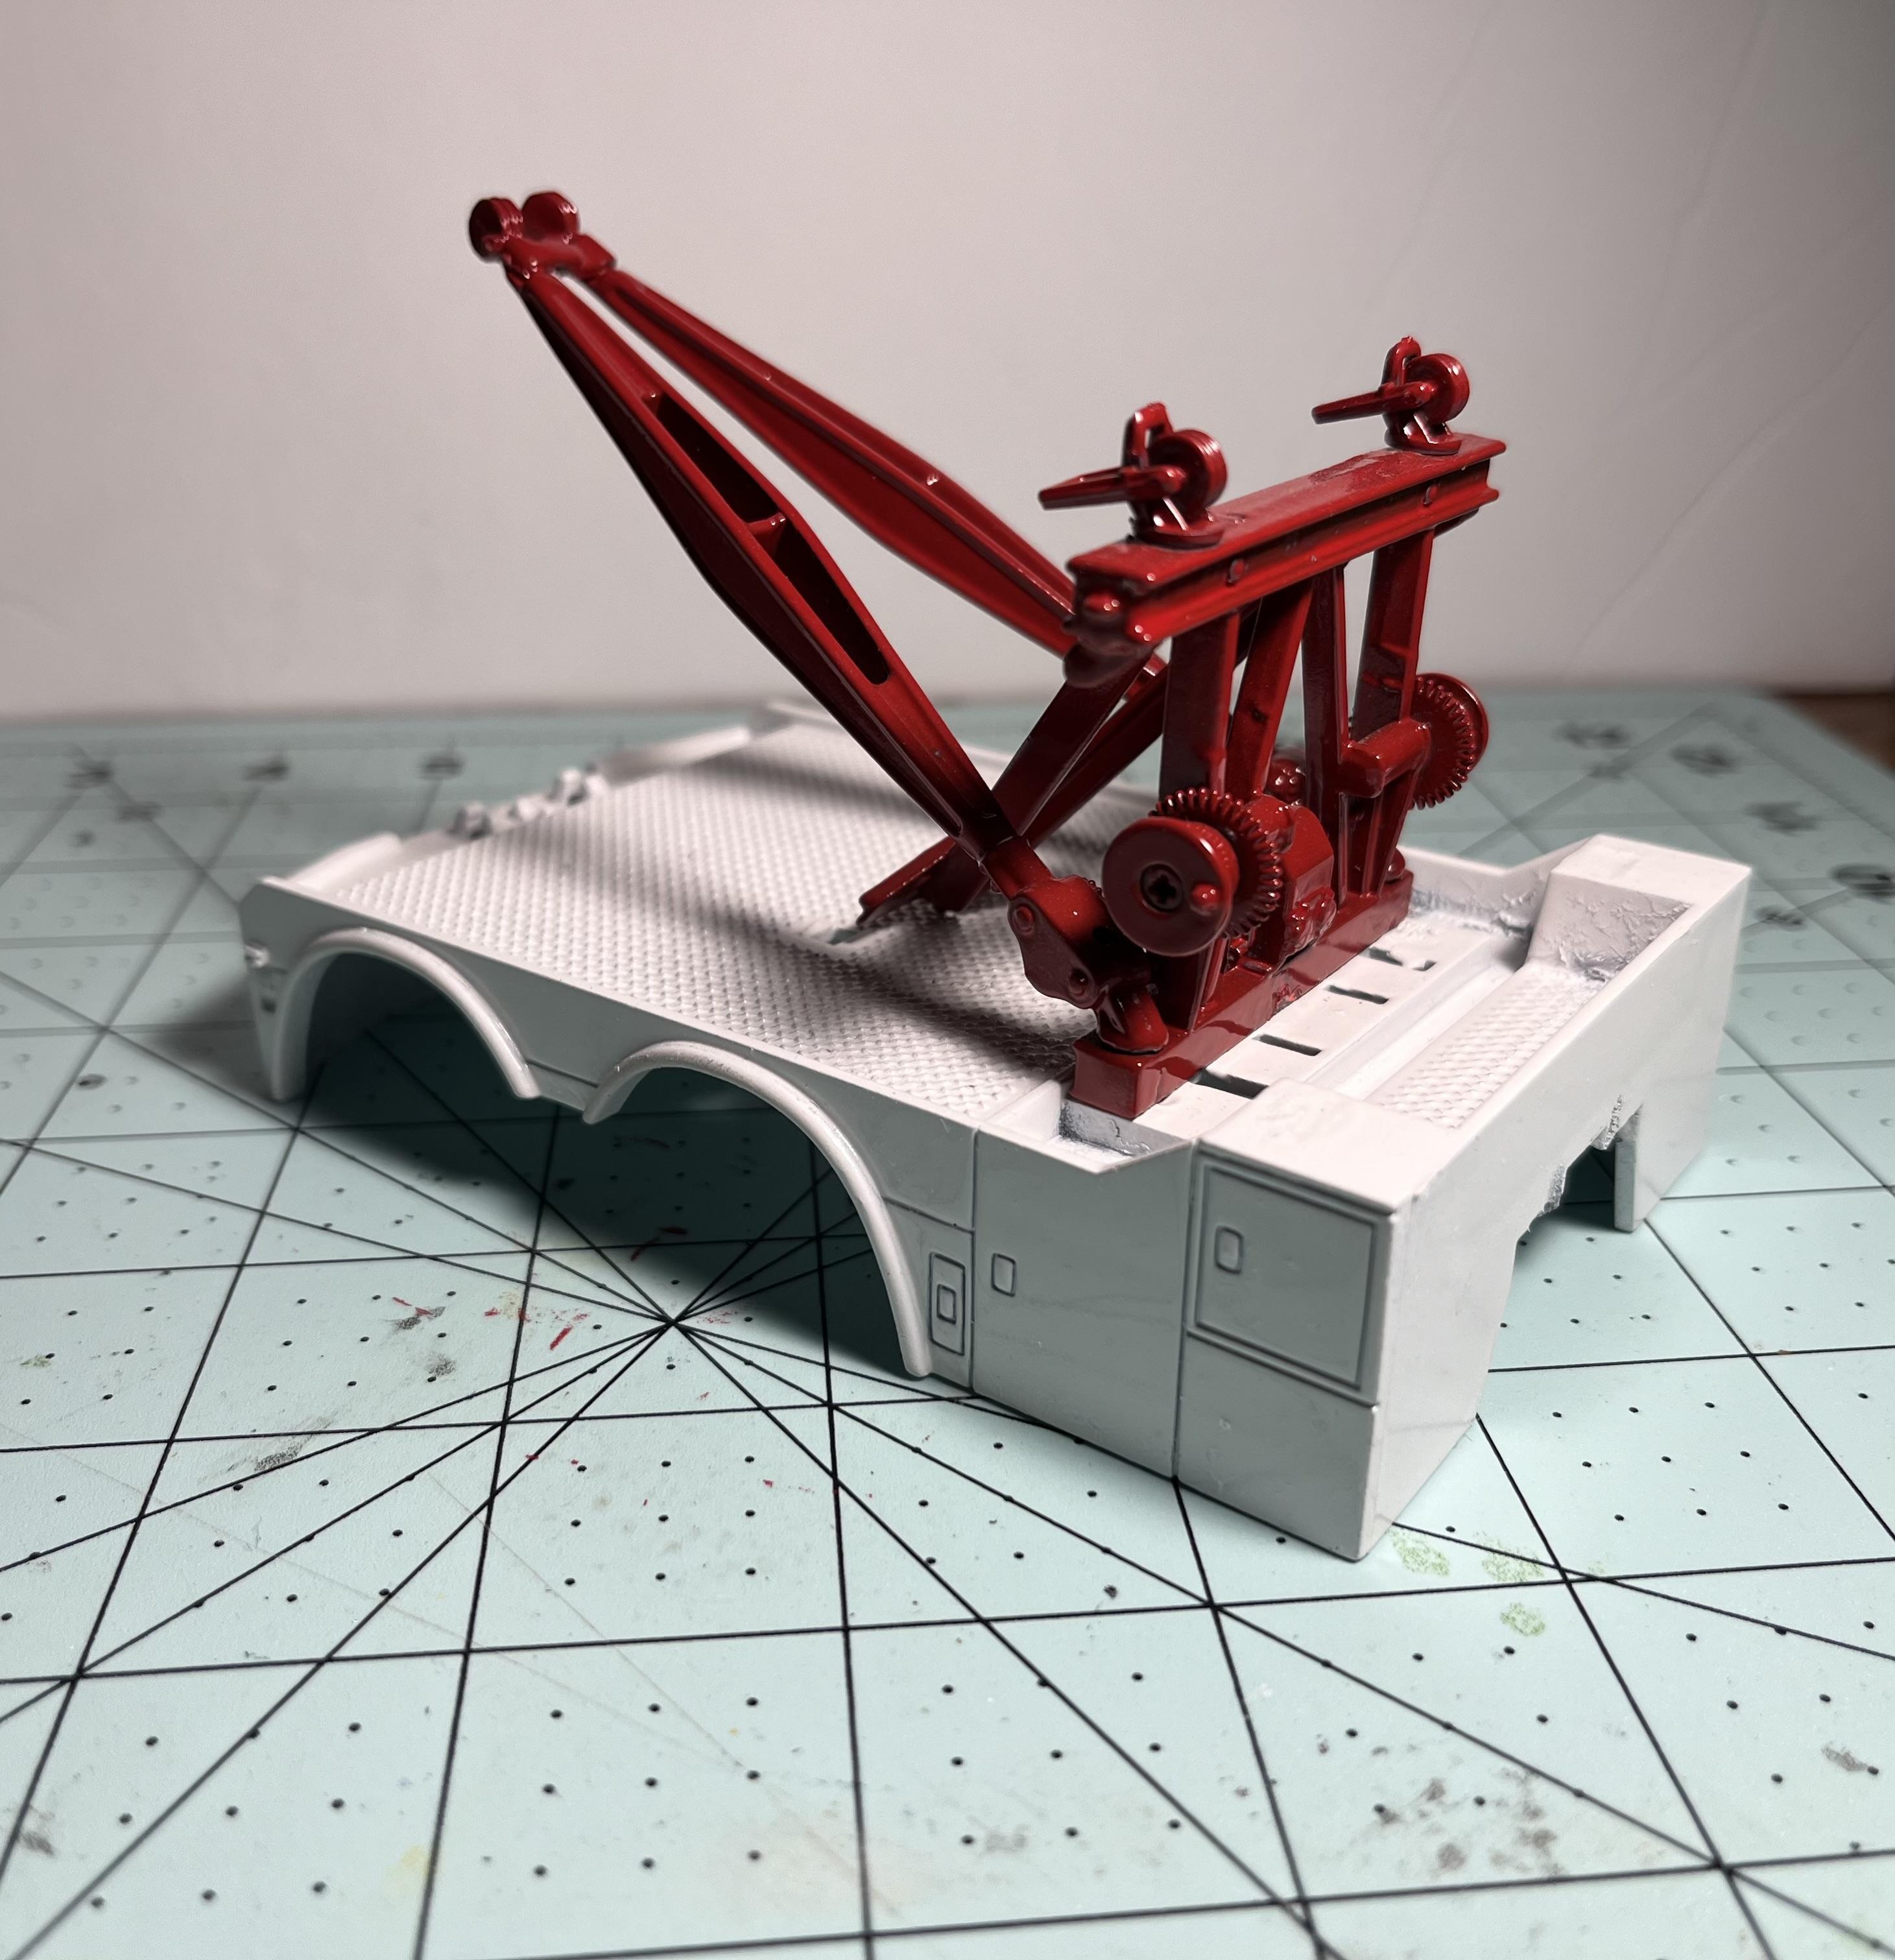
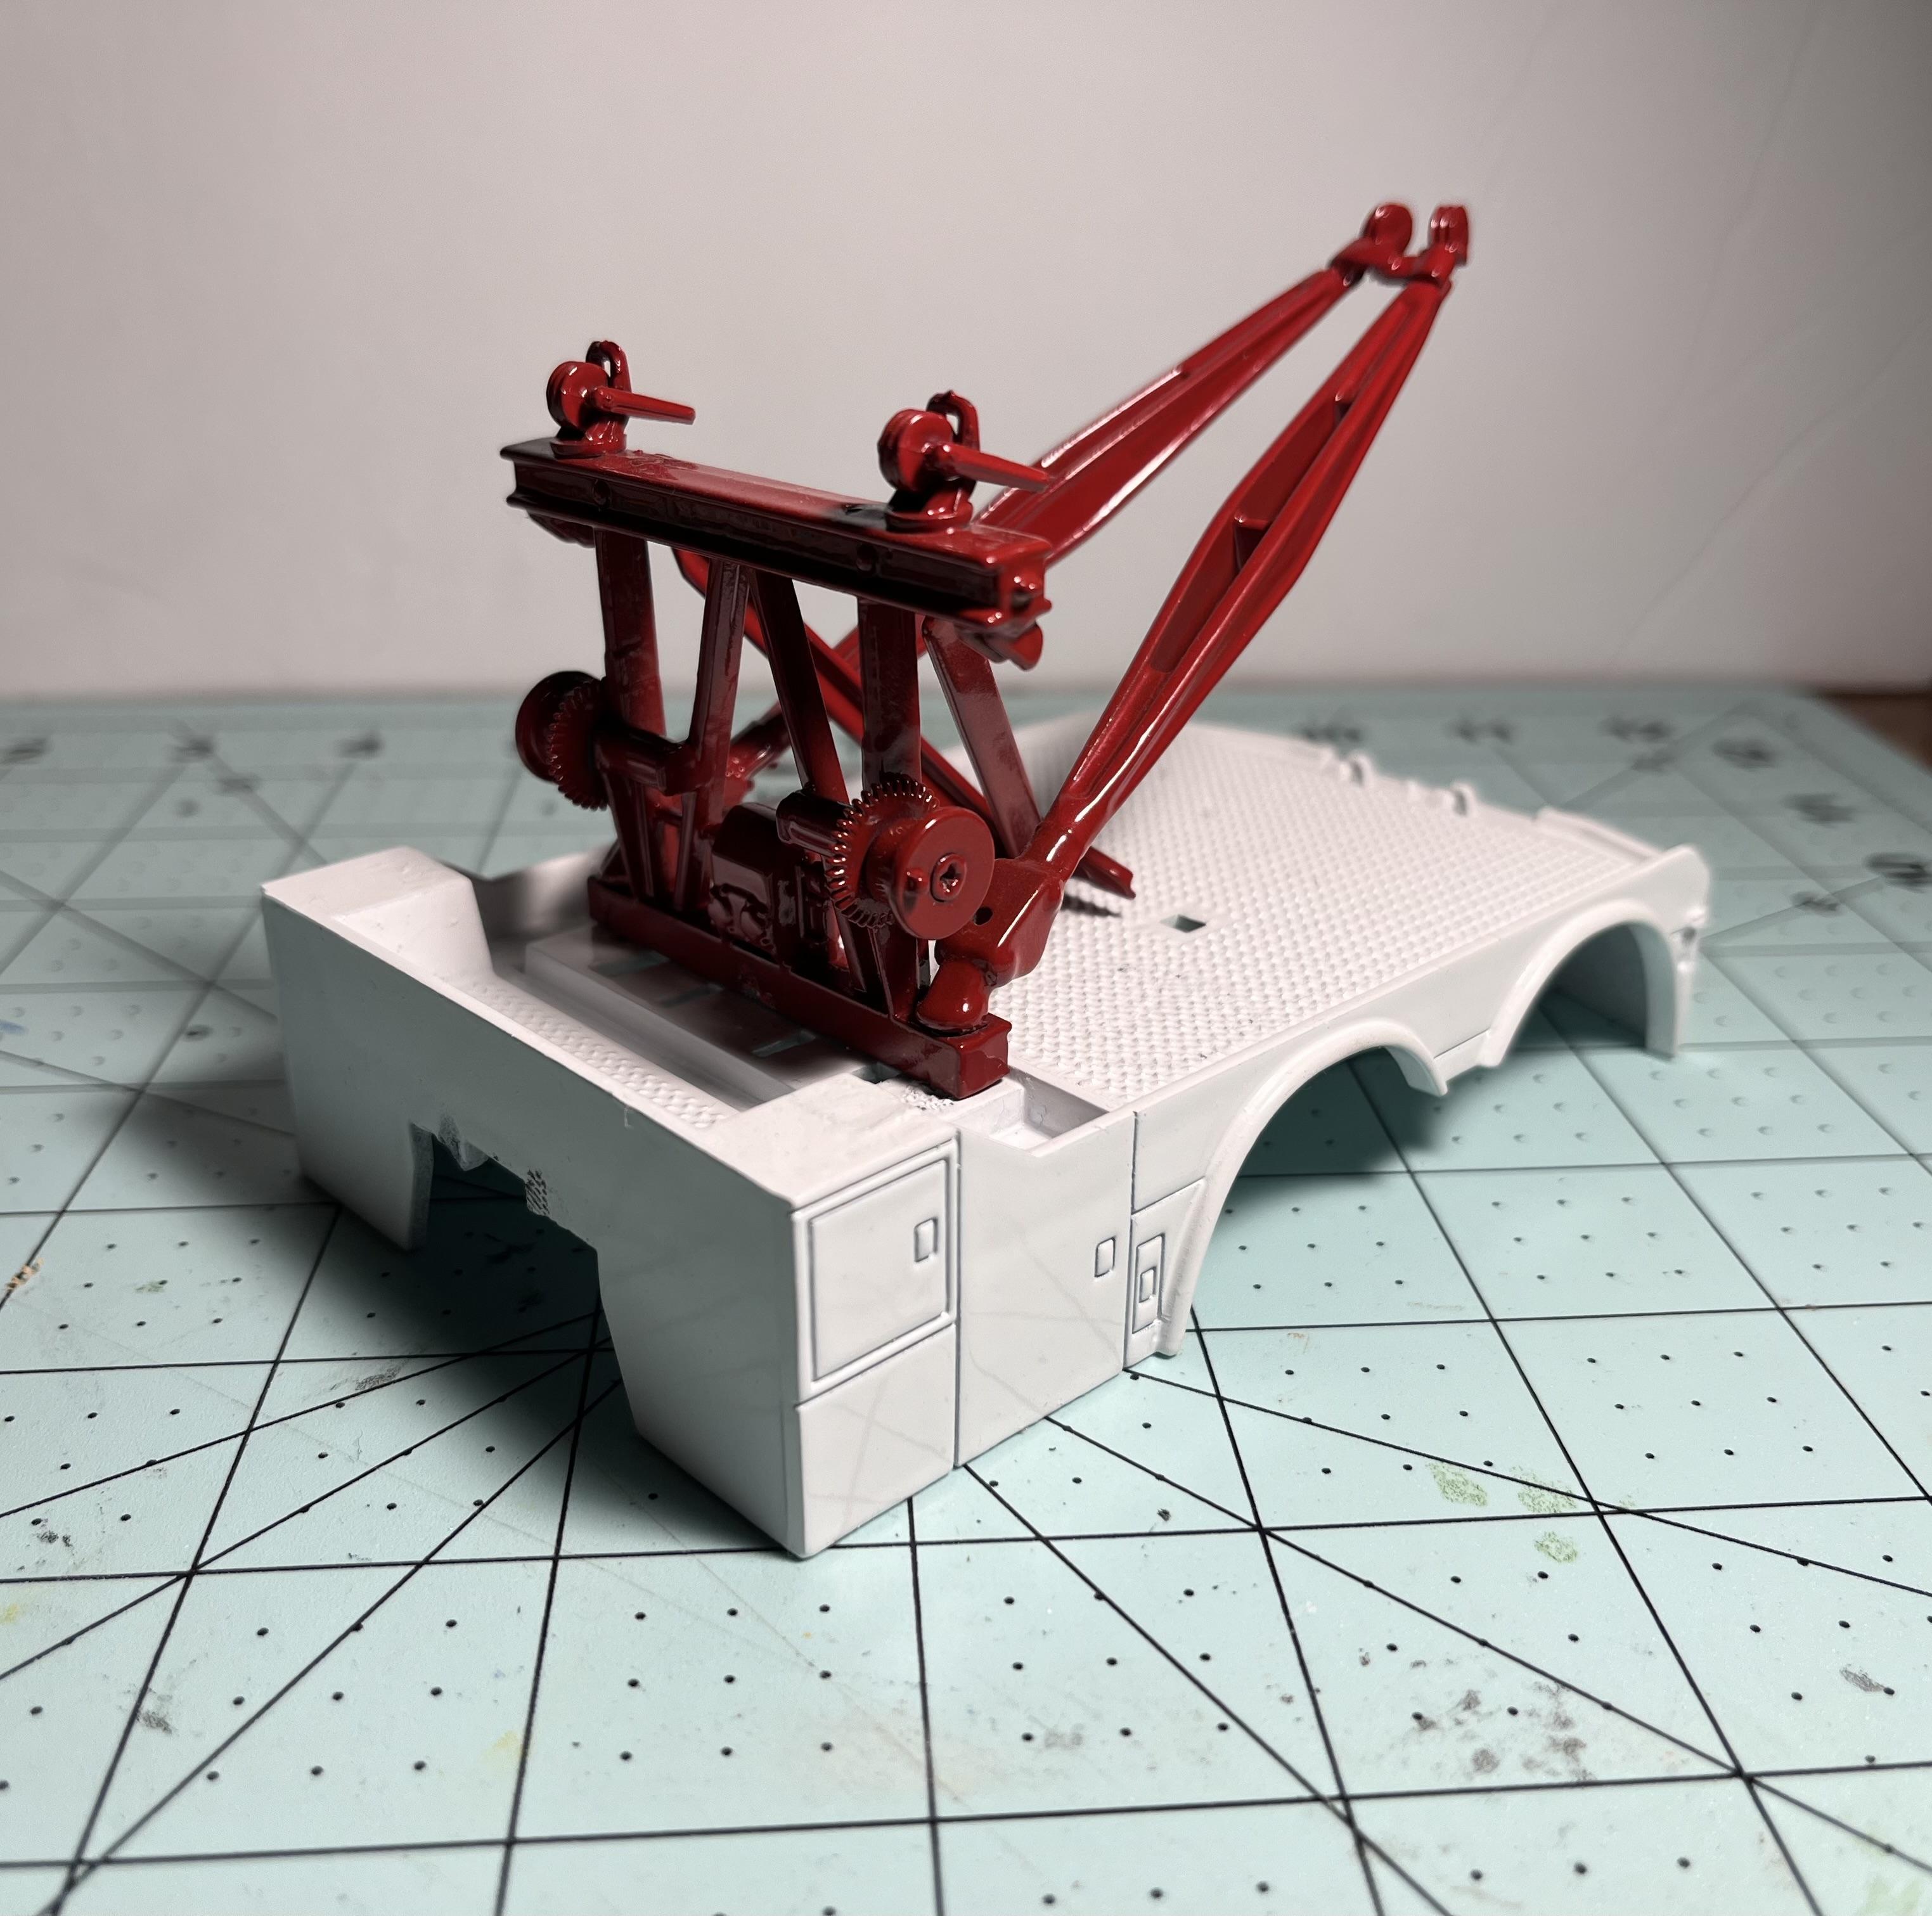
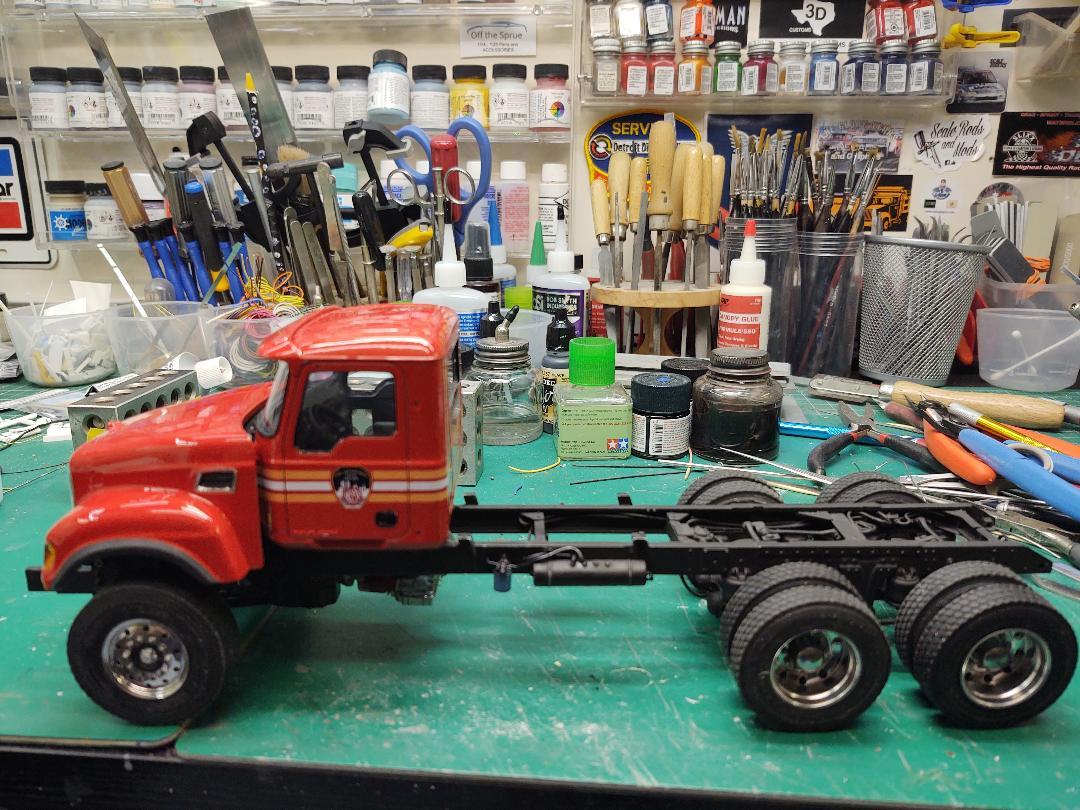
.................no work today,,,so I took a nap ,,and watched The Sand Pebbles with Steve McQueen,,,,for the umpteenth time,,,never gets old .....did some bench time too,,,,, fitted the fender extensions,need a little massage with the sanding stick yet as they justtttt rub the fuel tanks a bit,,no biggie .Installed the winches and cable...installed the boom/winch/outrigger controls,,,BMF on the compartment handles and scuff plates....fabbed up a light bar pylon with brass and Plastruct diamond plate-that will get hit with Revell chrome and attached to Plastruct diamond plate and that will go on top of the compartments ........see what tomorrow brings

-
 1
1
-
-
53 minutes ago, BK9300 said:
Do you have a link to that set of machine screws on Amazon? Not sure my searches showed what you are talking about…
That’s quite a garage full of new plow trucks! I wish there was a 1/24, WS 4700 cab/hood out there - good looking truck. The truck in the foreground must be for freeway - two wings! And, looks like it might have two tag axles? Must be quite the dump box on there - big load for fewer trips back to re-load!
I have a couple ,,,I use an eyeglass repair kit ,,I used those screws for my mirror brackets > Amazon.com: Upgrade Version Magnetic Eye Glass Repairing Kit, Eyeglass Repair Tool Kit with Compact Screw Box Include Nose Pads, Precision Screwdriver Set, Screws, Tweezer for Eyeglass, Sunglass, Spectacles Watch : Health & Household / Another kit that I've used for many things > Amazon.com: 600pcs Screws and Nuts, Stainless Steel Nut and Bolt Assortment Kit M1 M1.2 M1.4 M1.6 for Watches Glassess : Industrial & Scientific / A miniature spring kit > Dianrui 300PCS Compression Springs Assortment Kit 23 Different Sizes Mini Spring Stainless Steel Mechanical Small Springs for DIY Repair Project: Amazon.com: Industrial & Scientific / And this kit which I use the most and has the flat washers > HELIFOUNER 420 Pieces M2 x 6mm /8mm /10mm /12mm /16mm /20mm, Phillips Pan Head Machine Screws, Metric Screws Bolts Washers Nuts Kit, 304 Stainless Steel: Amazon.com: Industrial & Scientific
-
 1
1
-
-
-
1 hour ago, BK9300 said:
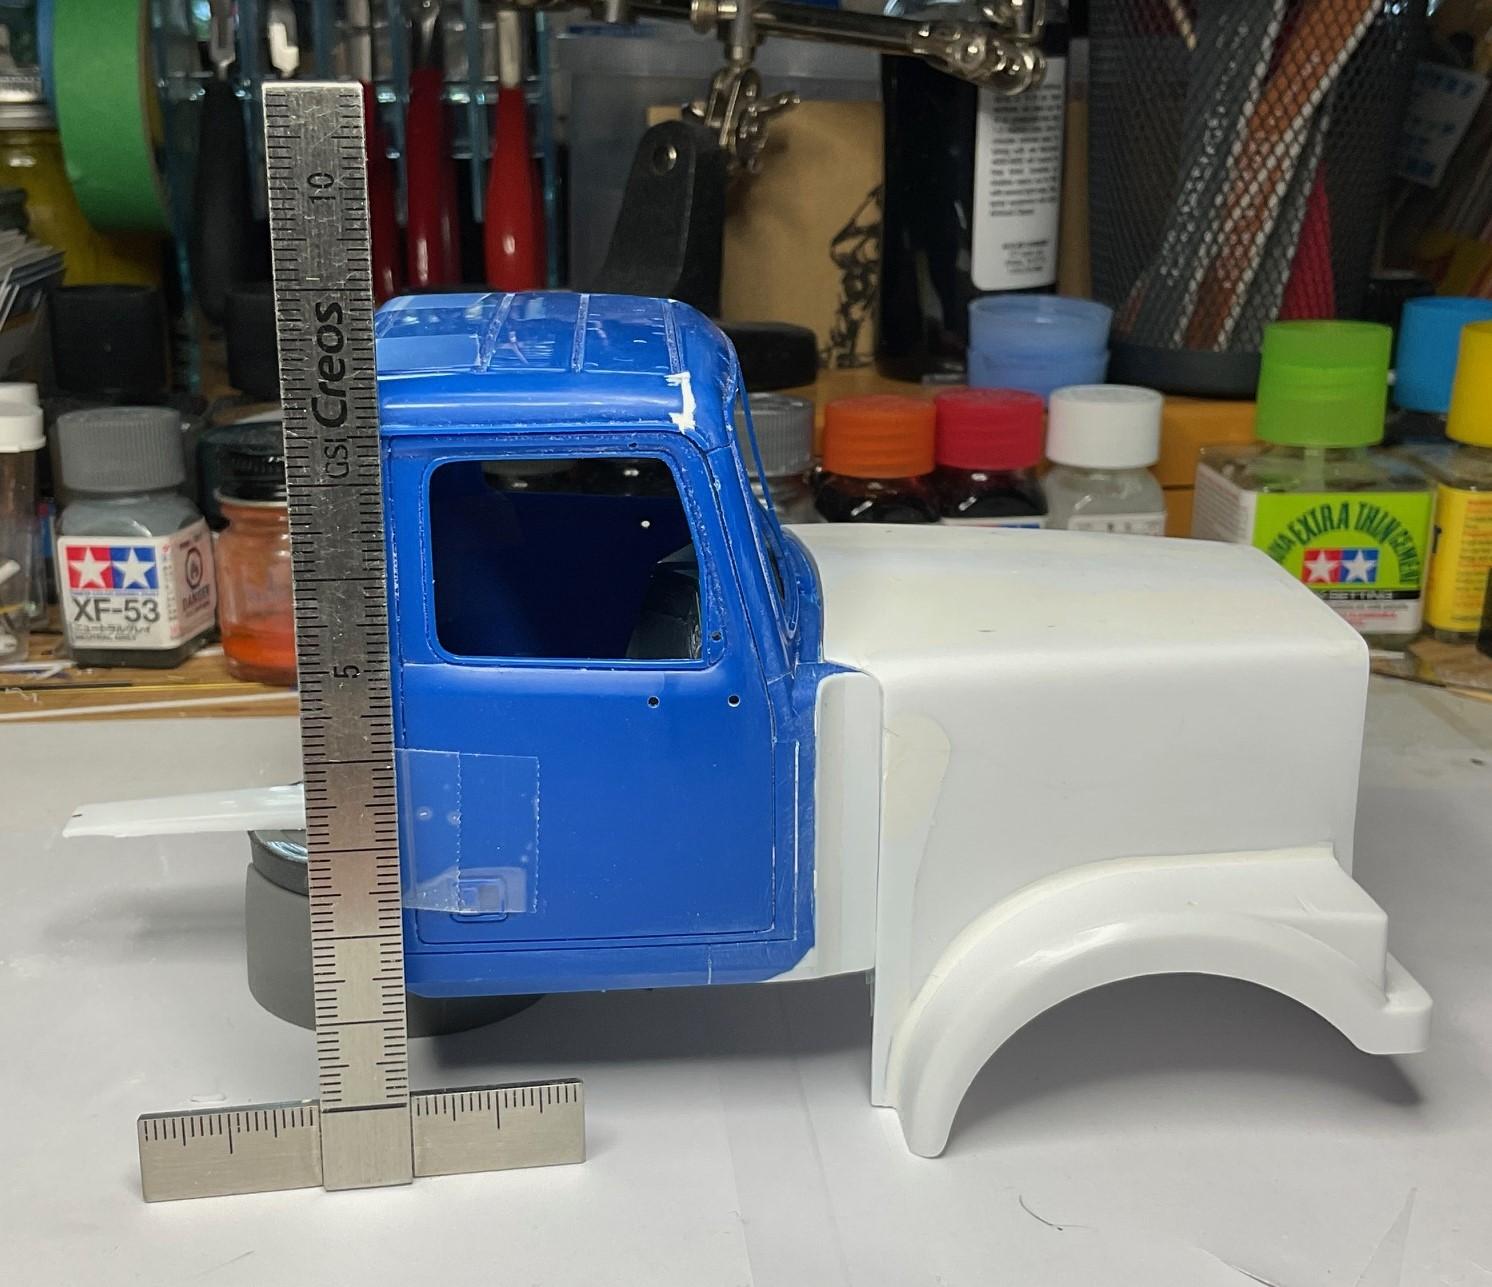
Some progress on the hood has been happening; have done an initial sanding on first go round of putty (needs a bit more). Been doing some test fittings of cab/hood together to see about any height adjustments that may be needed - back on page 1, I made a rear cab air bag/shock suspension and I can still set the cab forward or backward as needed to make the front of the hood locate properly. I will need to make a slight height adjustment to the cab suspension as I finalize where I need to attach front hood hinges. The front cab support will need work as well. Lots of going back and forth from the model, to pictures I took today, to get it straight in my head about what's needed next!
Hood sanded after first bit of puttying

When I test fit the hood to cab again, thought I better check some alignment, front of hood to door line on cab. Cab positioned so door line vertically correct, but..
front of hood needs to drop down slightly - will have to do that by shaving a wedge off of the back edge of hood.
With the hood alignment corrected I set cab/hood on frame to check for height and to also start the determination of where the WS style hood hinges need to mount. The blue arrow indicates the hood hinge point provided by the kit, but its too low for the hood to tilt properly - I need to fashion hood hinges that mount to the frame, approximately, where red arrow is pointing. I have a couple of rod ends from RB Motion that I hope to make work, that will connect the bottom of the grill surround with the hinge support. Hood/cab will need to come up about 1.5 mm to allow hood to hinge properly using the new hinges.
Rear cab support will also need a 1.5mm shim added on top of it - bottom of cab will still be at a height above the frame rails similar to that in my pics of real truck
While cab/hood were roughly in place, I needed to check out the clearance for the inner fender and rubber flap that are on real truck - that flap was riveted to the inner fender molding, and extended just slightly below the top of the frame rail
I was worried about interference with the flap, by power steering hoses and brake pot air line - the photo is kind of grainy, but, given that the flap only extends downwards to just below top of frame rail, it shouldn't interfere with any hoses.
While taking the fender clearance photos, it became clear that the modifications to move the firewall back made problems for me with the front cab mount. This mount was made a long time ago, not knowing about any future work to cab/hood I might do. So, now I need to shim the support piece because it sits right at the junction where the footwell starts to slope up.
Seems like I keep creating more work for myself! But, I really think that, once the hinge problem is solved, the rest of this is going to go reasonably quickly. Going out to the shed to apply a bit more putty to hood. In a few days, after the inner fenders are shaped and in place, and the hood re-sanded, should be able to give it a shot of primer and see what that reveals for any more work! As always, take care, and I welcome your questions and comments!
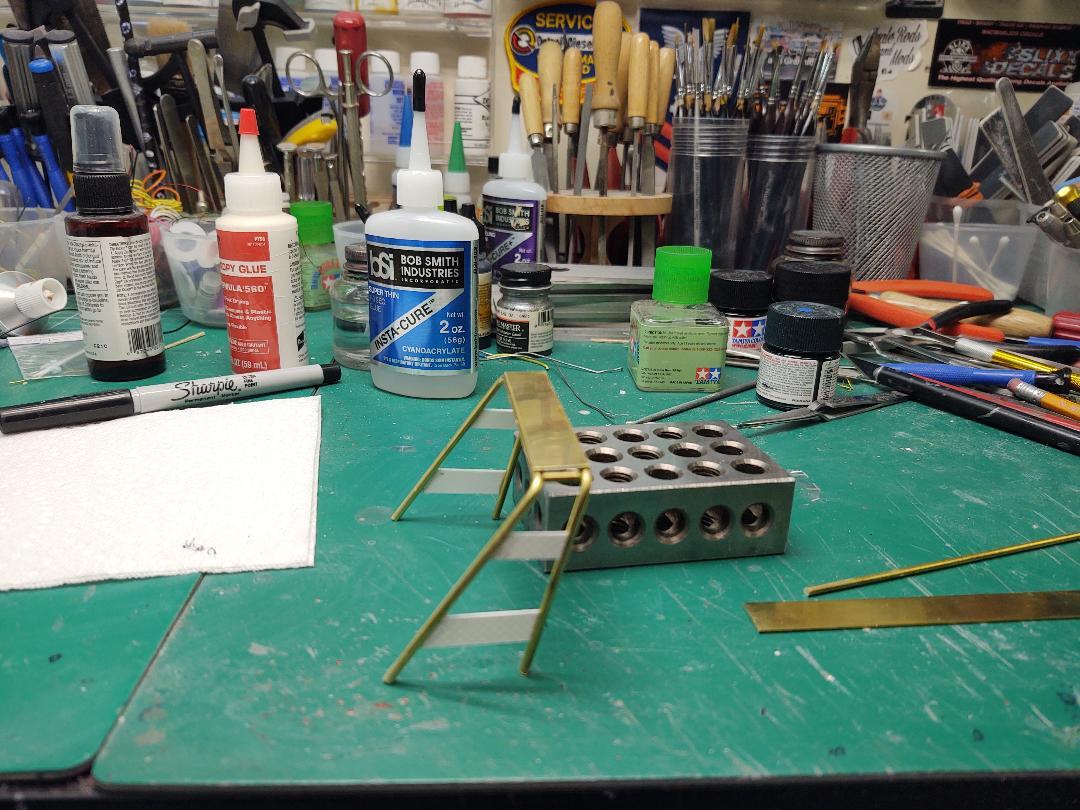
I got a miniature machine screw assortment on Amazon that has assorted flat washers,,they are perfect for "dialing in" cab mounts-height
-
23 hours ago, BK9300 said:
Slow progress with the body work, but it’s coming along! In the meantime. . .
Many years ago, a video was made by Rob Bryce, showcasing the work of some of the road crews of YRB as well as those of the City of Prince George. All the solid yellow trucks belong to YRB while the white cab/yellow dump body trucks, and other equipment, were the City of PG. Now, the music for the video is not everyone’s cup of tea, but Rob sure got some great Go-Pro and drone action shots of the plow trucks, like the one I’m modelling. He dedicated the video to these road maintenance workers - a fitting tribute to an often thankless job!
I guess when you gotta break out the D9 the snow is pretty deep ,,,lol !
-
 2
2
-
-
1 hour ago, Gary Chastain said:
Scott, this build is progressing so well, looking good.
Thanks Gary ! While it won't be 100% prototypical it should turn out pretty good considering or at least look the part! lol
-
Sweet truck! The shop diorama during your build is a nice touch !
-
Paul's a good guy,never had a problem ..I've bought lots of stuff from him
-
3 hours ago, ShakyCraftsman said:
Looking good Scott
Ron G
Thanks Ron!
-
No work today.....got the pass side tank on,heater hoses and wiper arms-blades . Finessing the hood fender extensions with some putty right now,,,once thats done I'll paint them rubber black and attach to the hood...get the hood back on then we go and tackle wrecker body assembly
-
1
-
-
I was going to use the KFS winch I have for the front mount but ,, I ordered these 2 from 3D Concepts a Tulsa and a Braden ,,I'll see what works/looks best when I get 'em
-
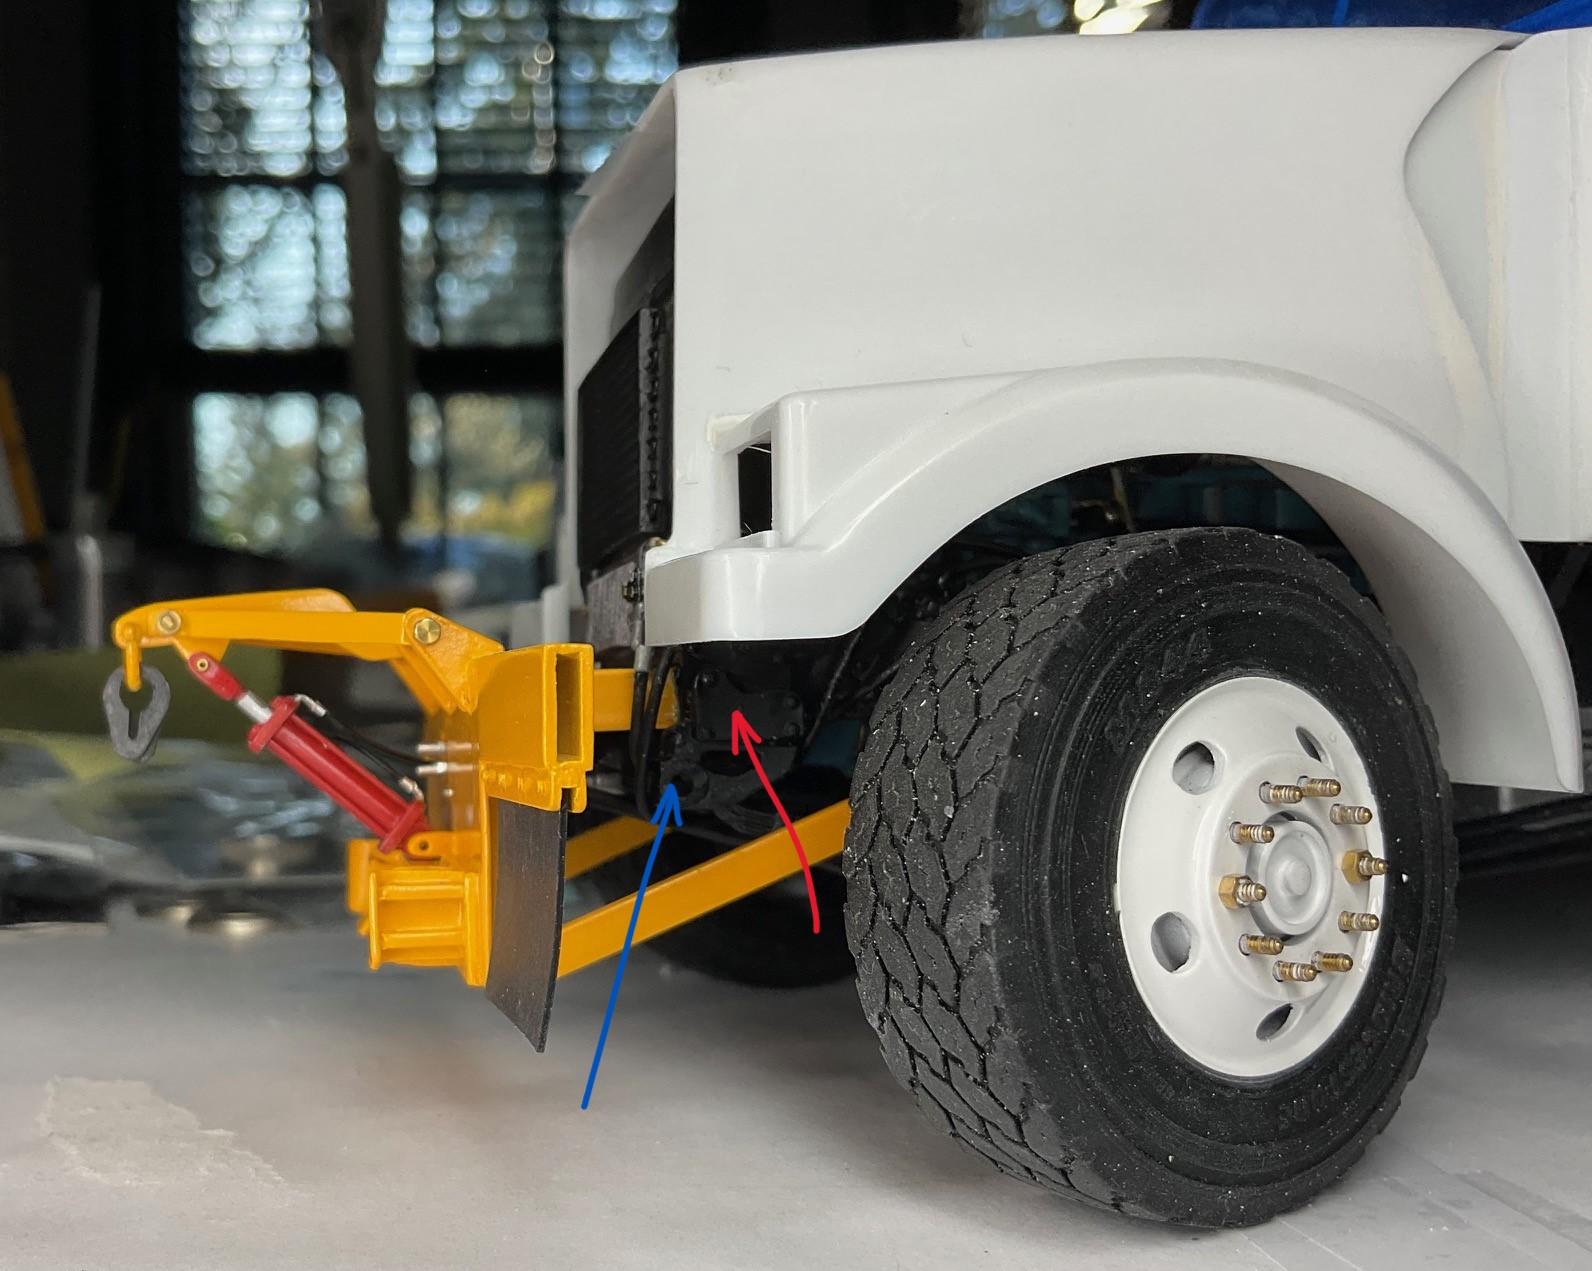
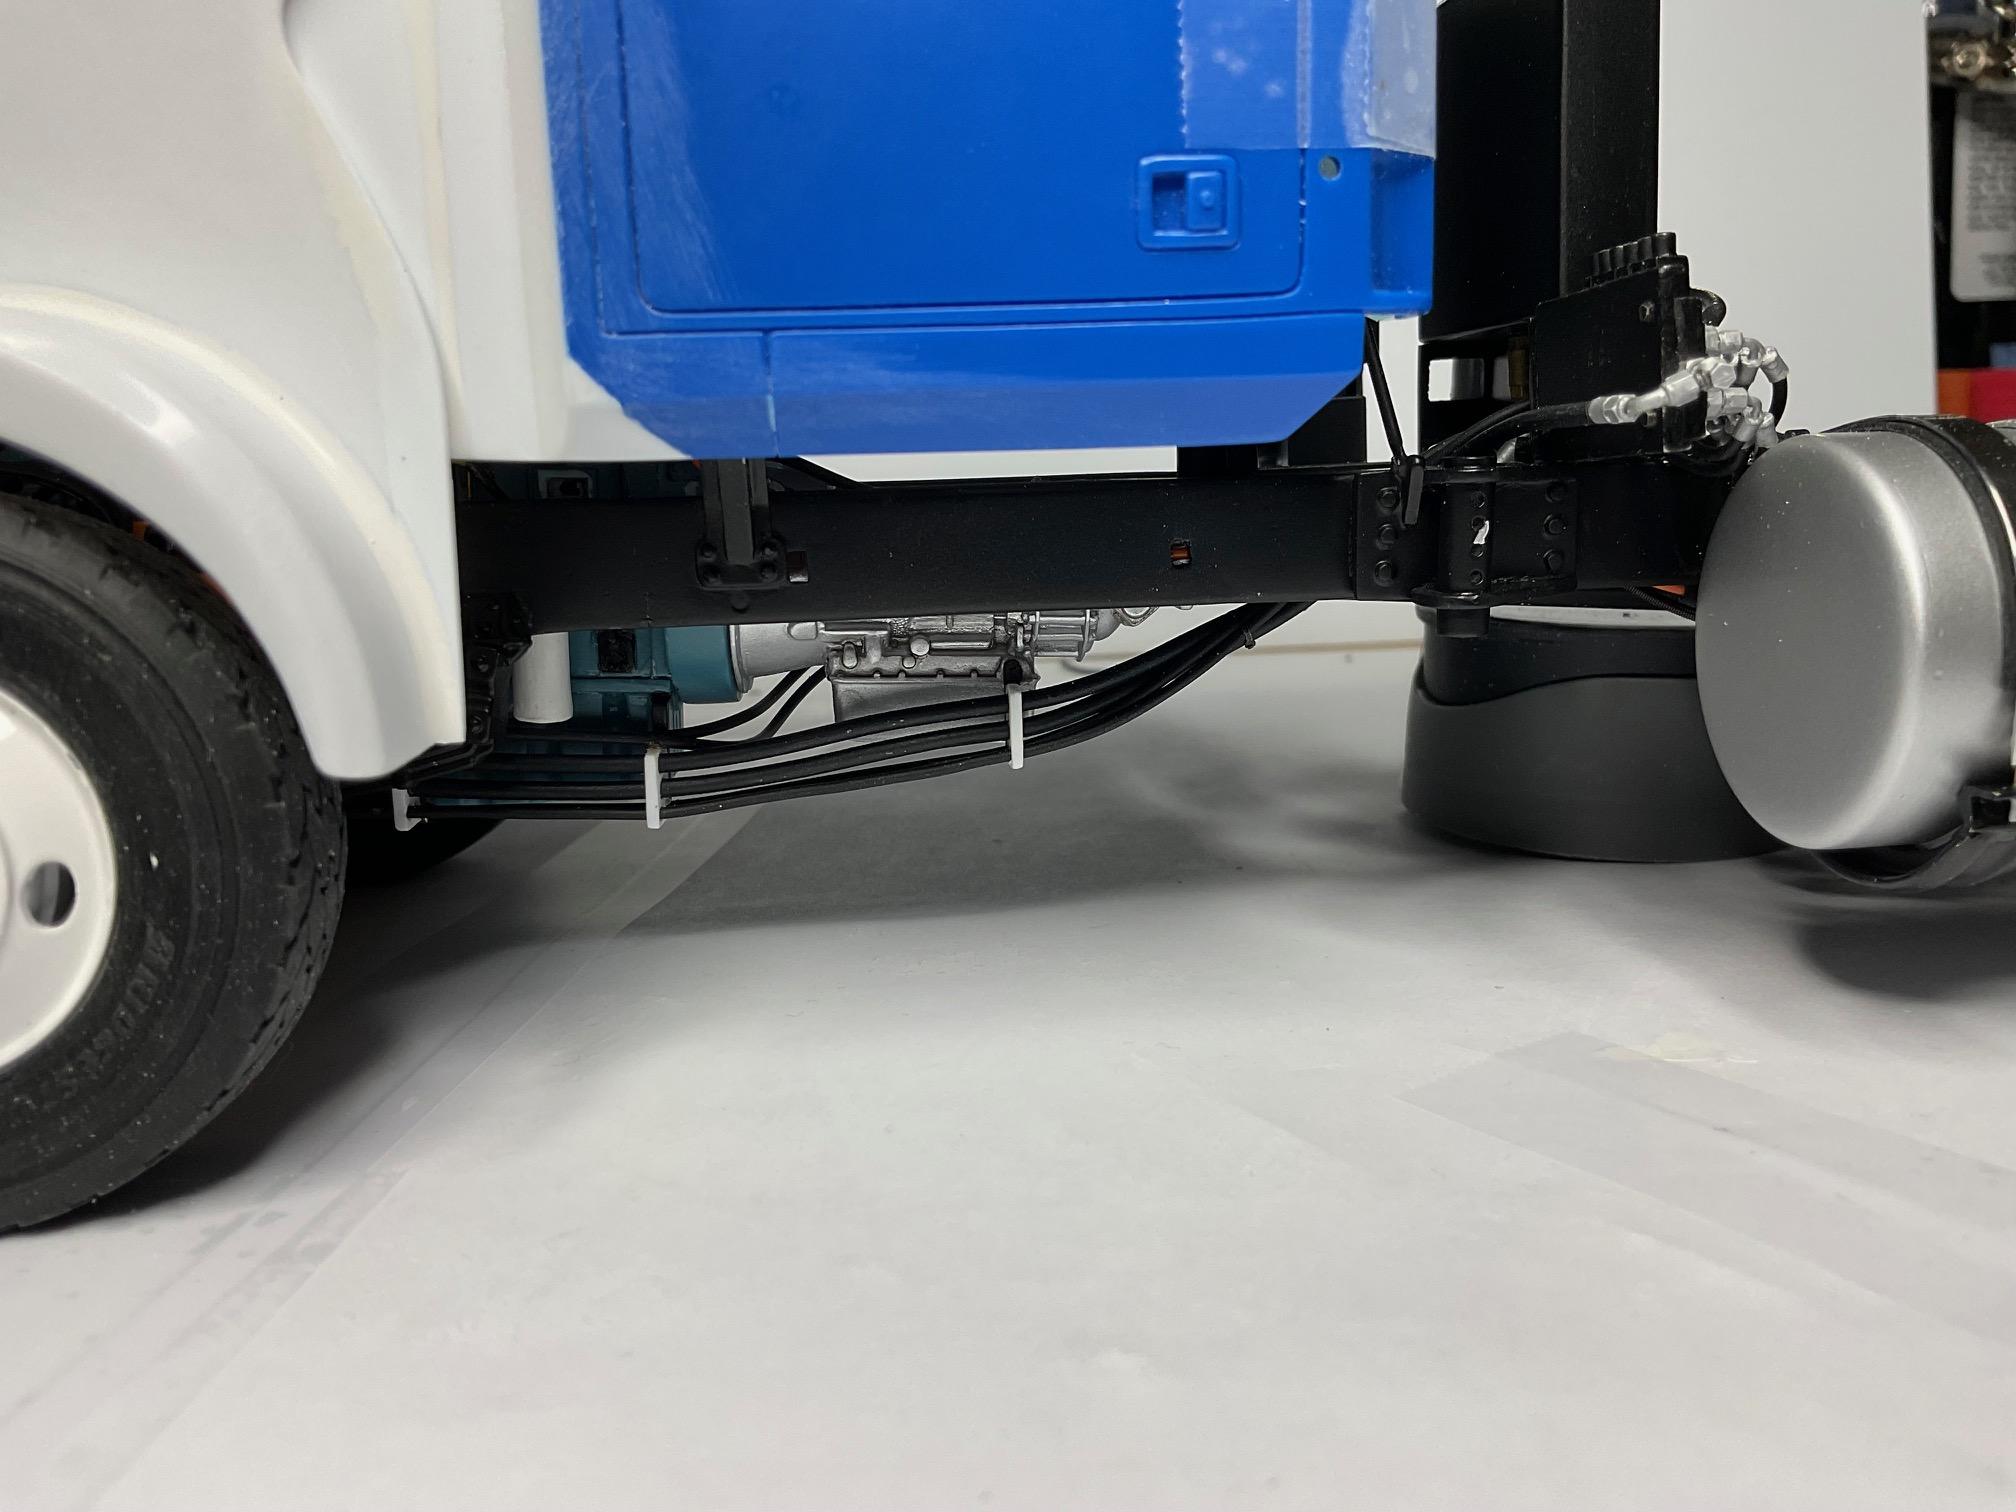
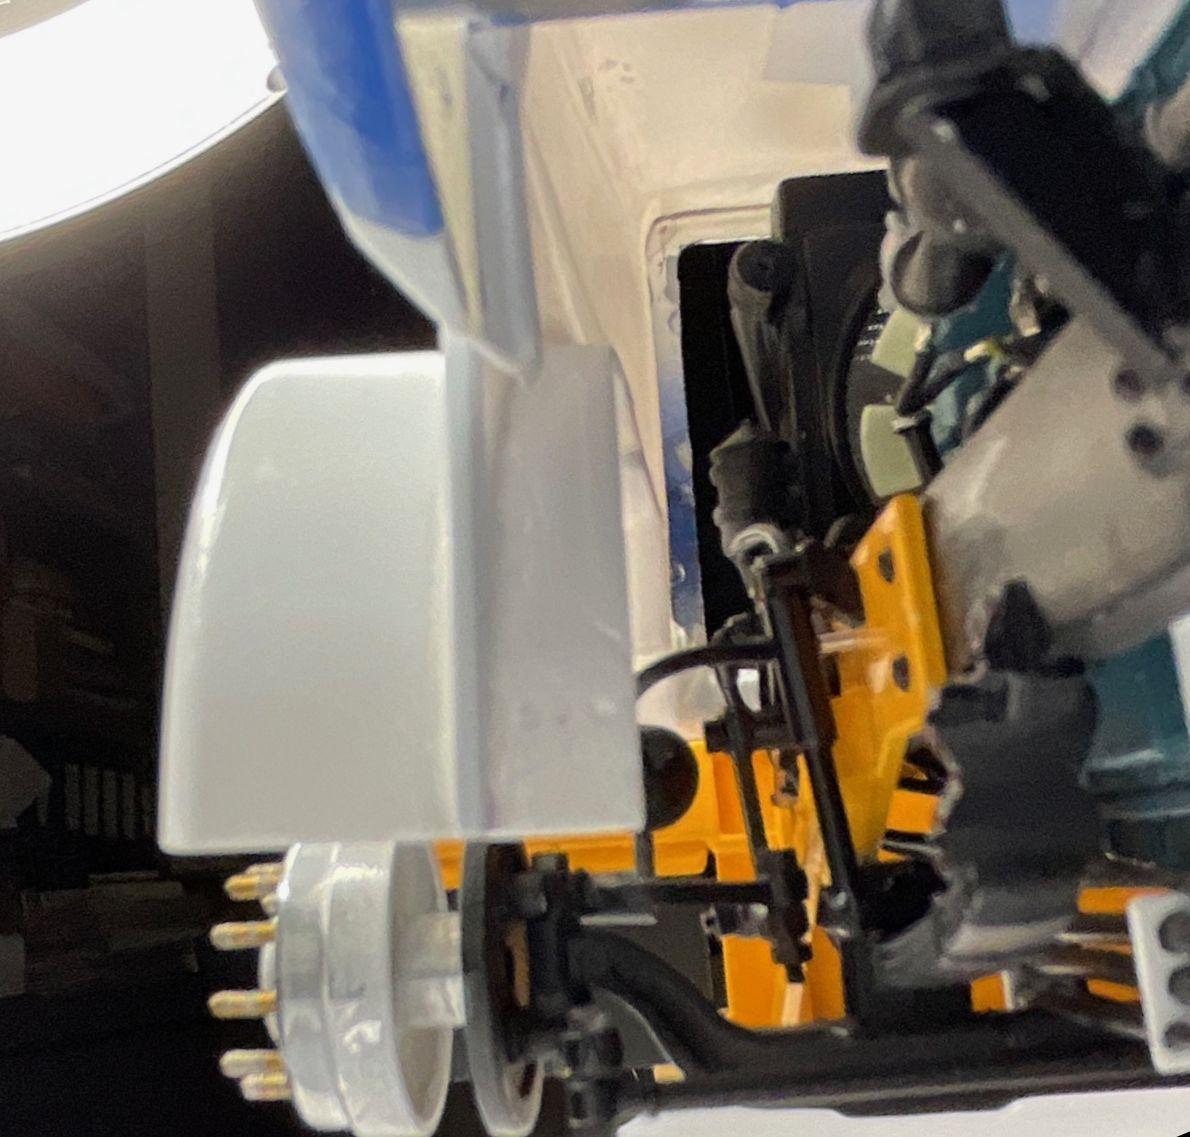
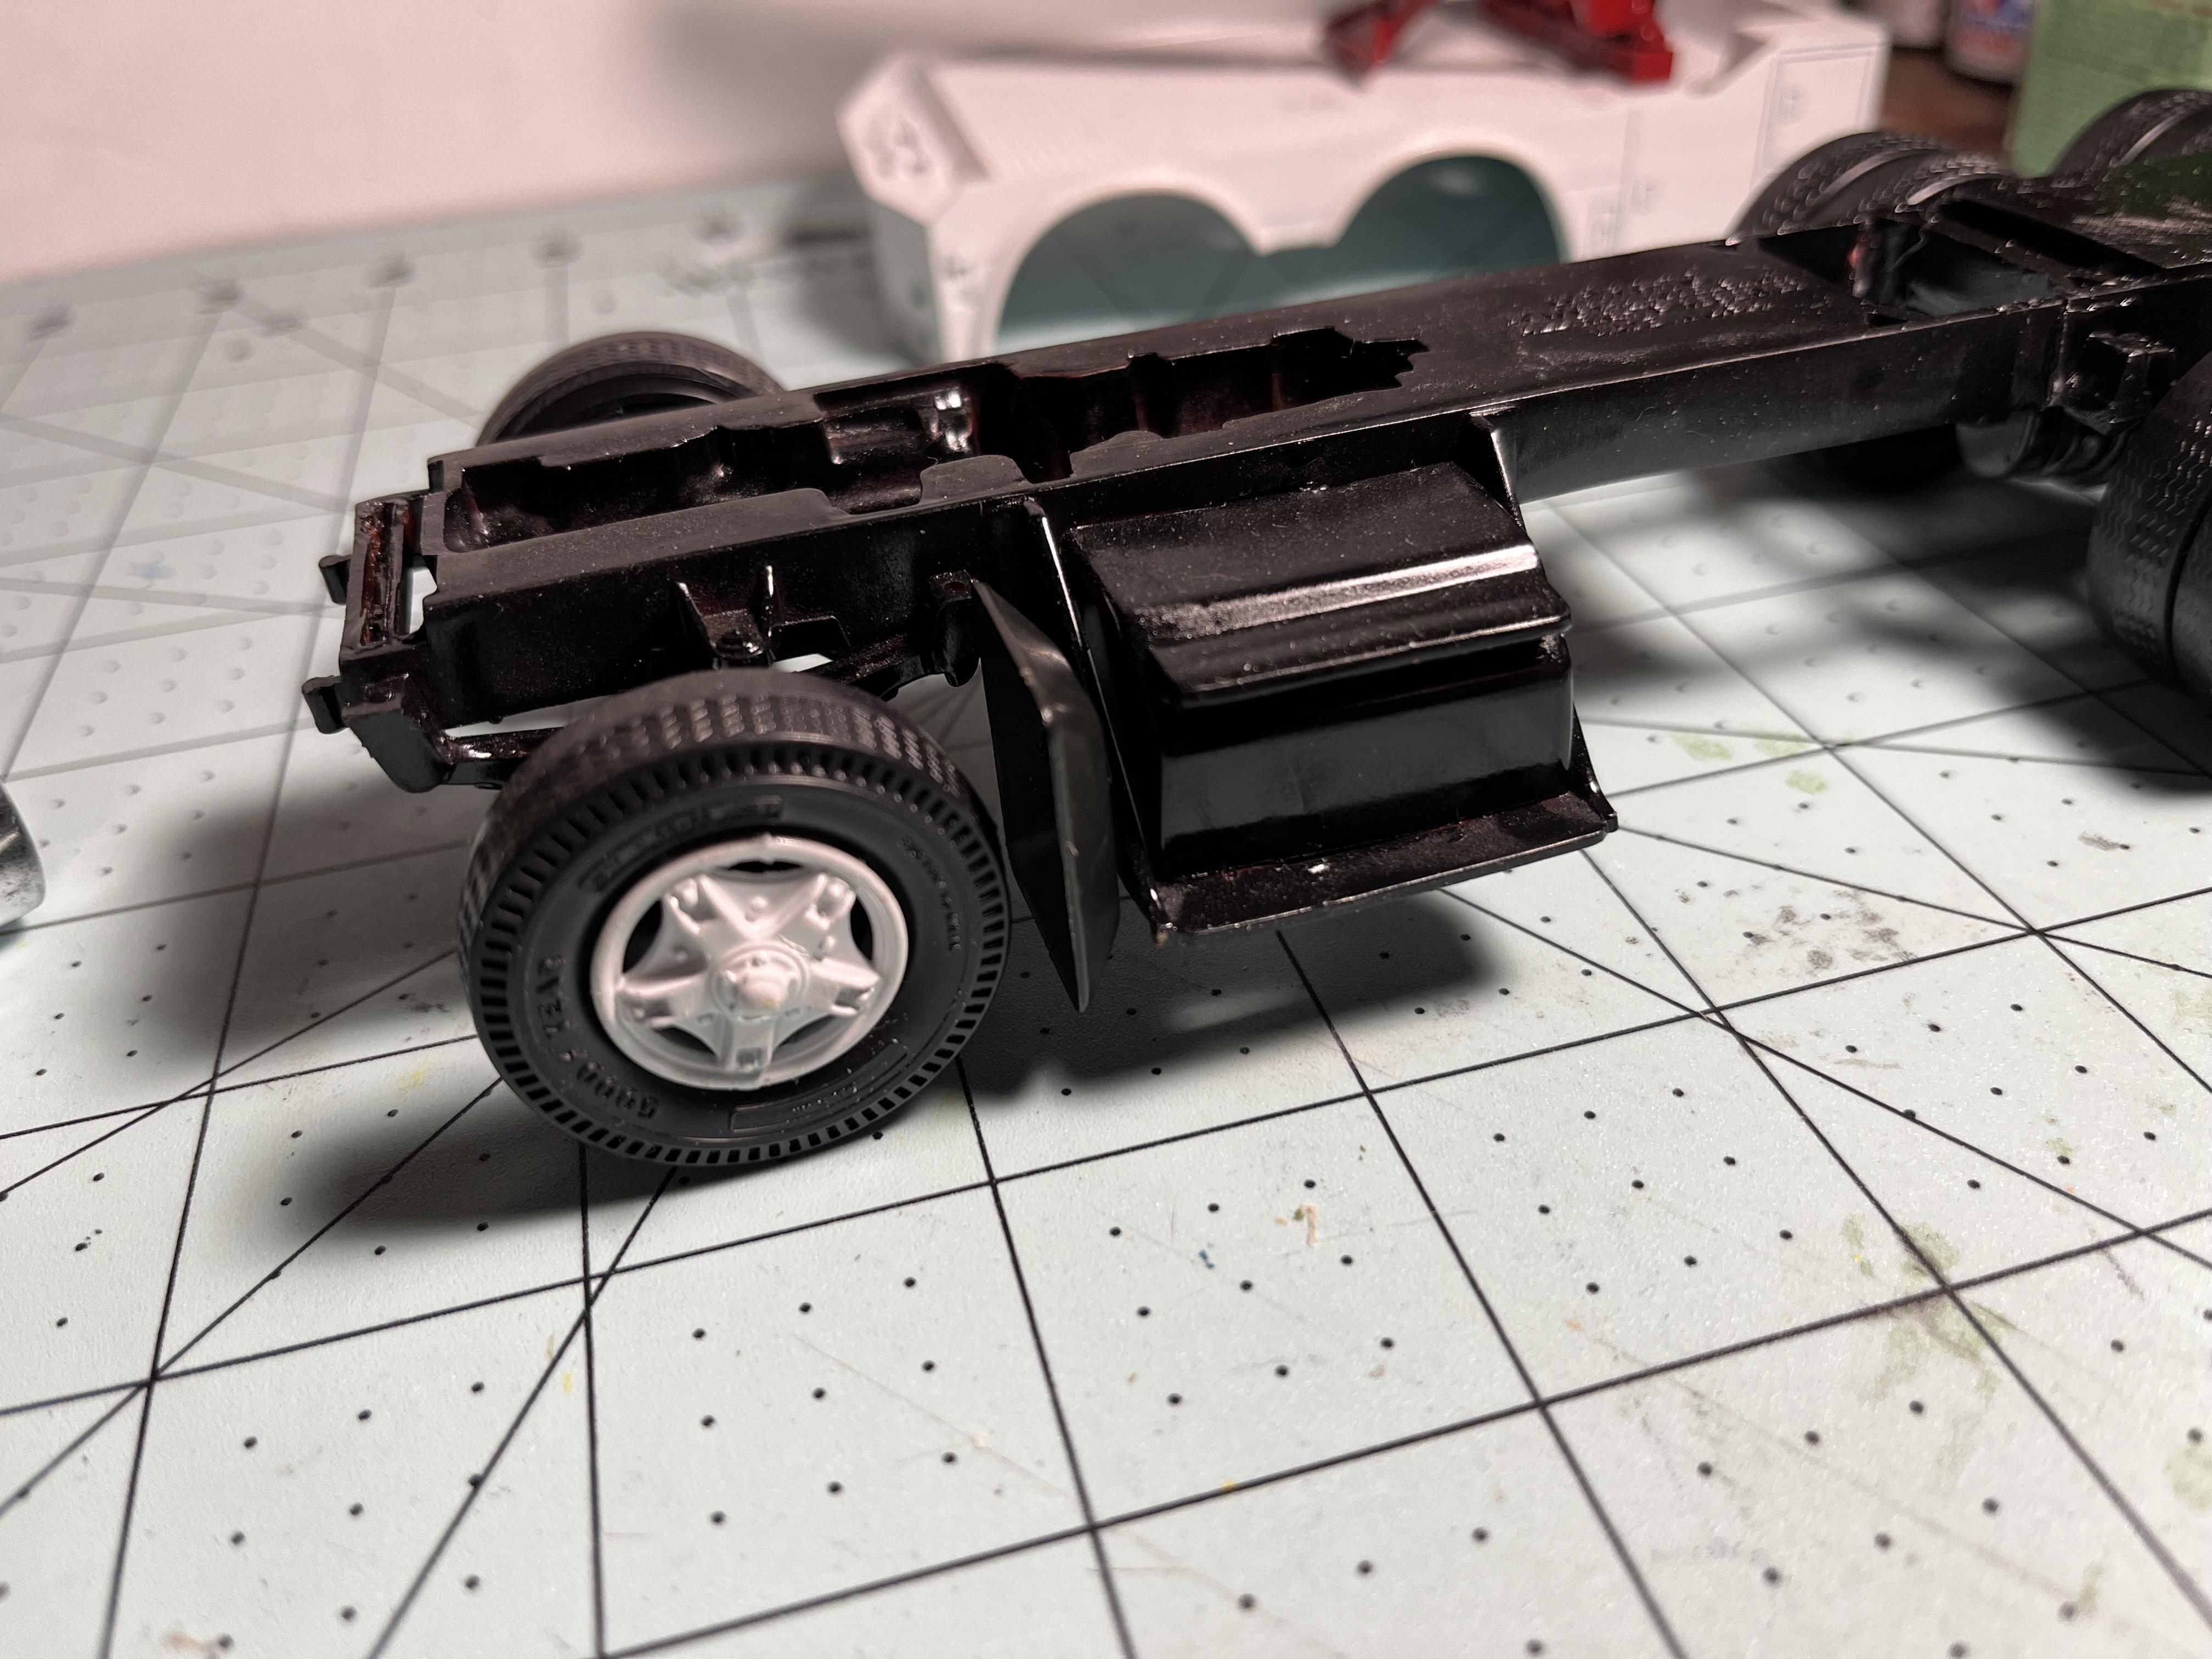
More progress........got the exhaust on ,,went with a short stack and a raincap ,, I guess I always liked that annoying rattle from them,,,lol .Got the drivers side fuel tank on with the steps and ran the fuel lines to the engine ,engine end still has to be terminated,,I also have to run heater hoses yet,,so I pulled the hood pins and took it off. Also put the cab grabs on ,you cant see the pass side its behind the muffler.The drivers side tank has the combo fuel/DEF . I also ran 1/16th spacer strips on the wrecker body to raise it up a scooch ,,,,looks better I think.Had to shorten the pass side tank,,,that's been painted with Alclad aluminum and is in the dehydrator.Depending if I have to work tomorrow I'll get that nailed in and finish the fuel lines and heater hoses.I also have hood fender extensions that have to be worked in order to get them to fit
-
2
-
-
2 hours ago, Bren said:
Hey Scott - sorry I’m not up on my wrecker types. Would either of these function for your needs? Holmes 550 I believe. They could be printed in 1/32.
I guess I confused ya ,,I meant a 1/25th version of the old AMT 1/32ND Holmes 750 wrecker
-
1
-
-
9 hours ago, Pete68 said:
Decided to put this back on the bench and get it finished. Done some work to get it caught up. Shorten the fuel tank, installed all the glass, finished the interior, added the left mudflap, and painted the wrecker mass. The mass came out a little darker than the stripe but that’s ok kinda looks like Holmes red to me.
Super job Lee!
-
1
-
-
1 hour ago, Pete68 said:
Nice updates Scott. Looking good
Thanks Lee! Getting closer,,still lots to do
-
1
-
-
23 minutes ago, BK9300 said:
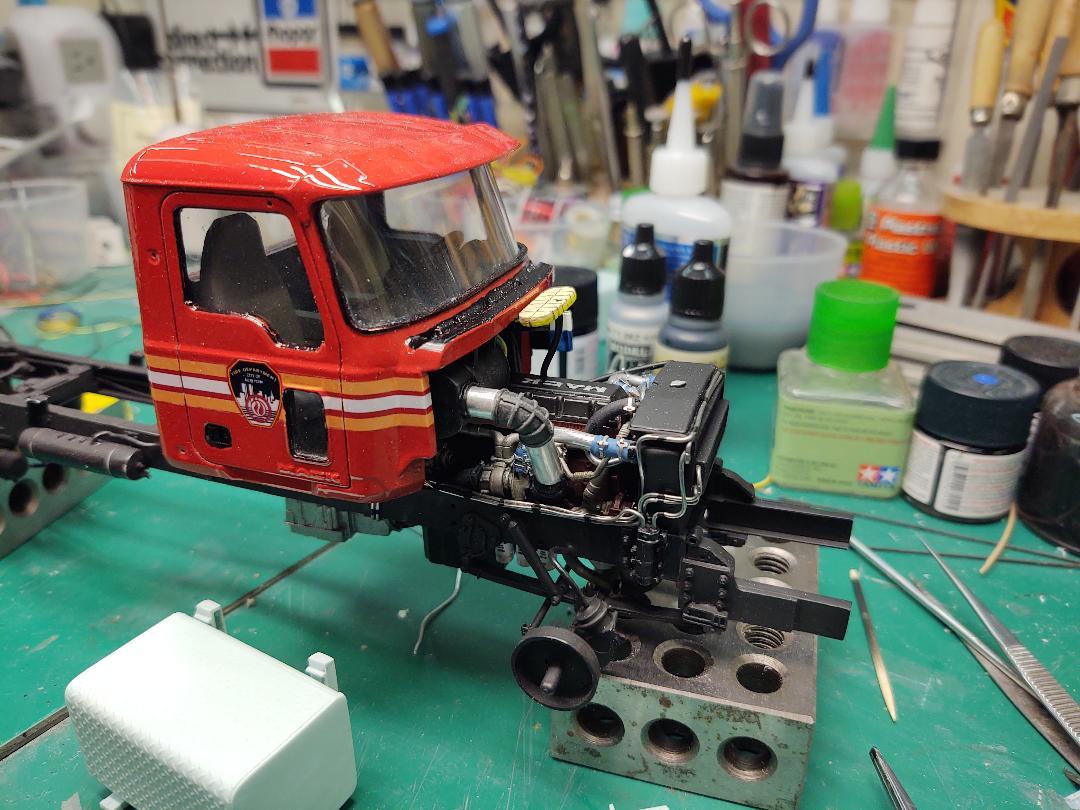
Scott, your engine detailing is getting very intricate - complicated as looking under the hood of the real thing! Good to see the truck up its rubber, too.
Thanks Brian,I appreciate that,,your stuff is top tier buddy,,,I could only hope to get to your level!
-
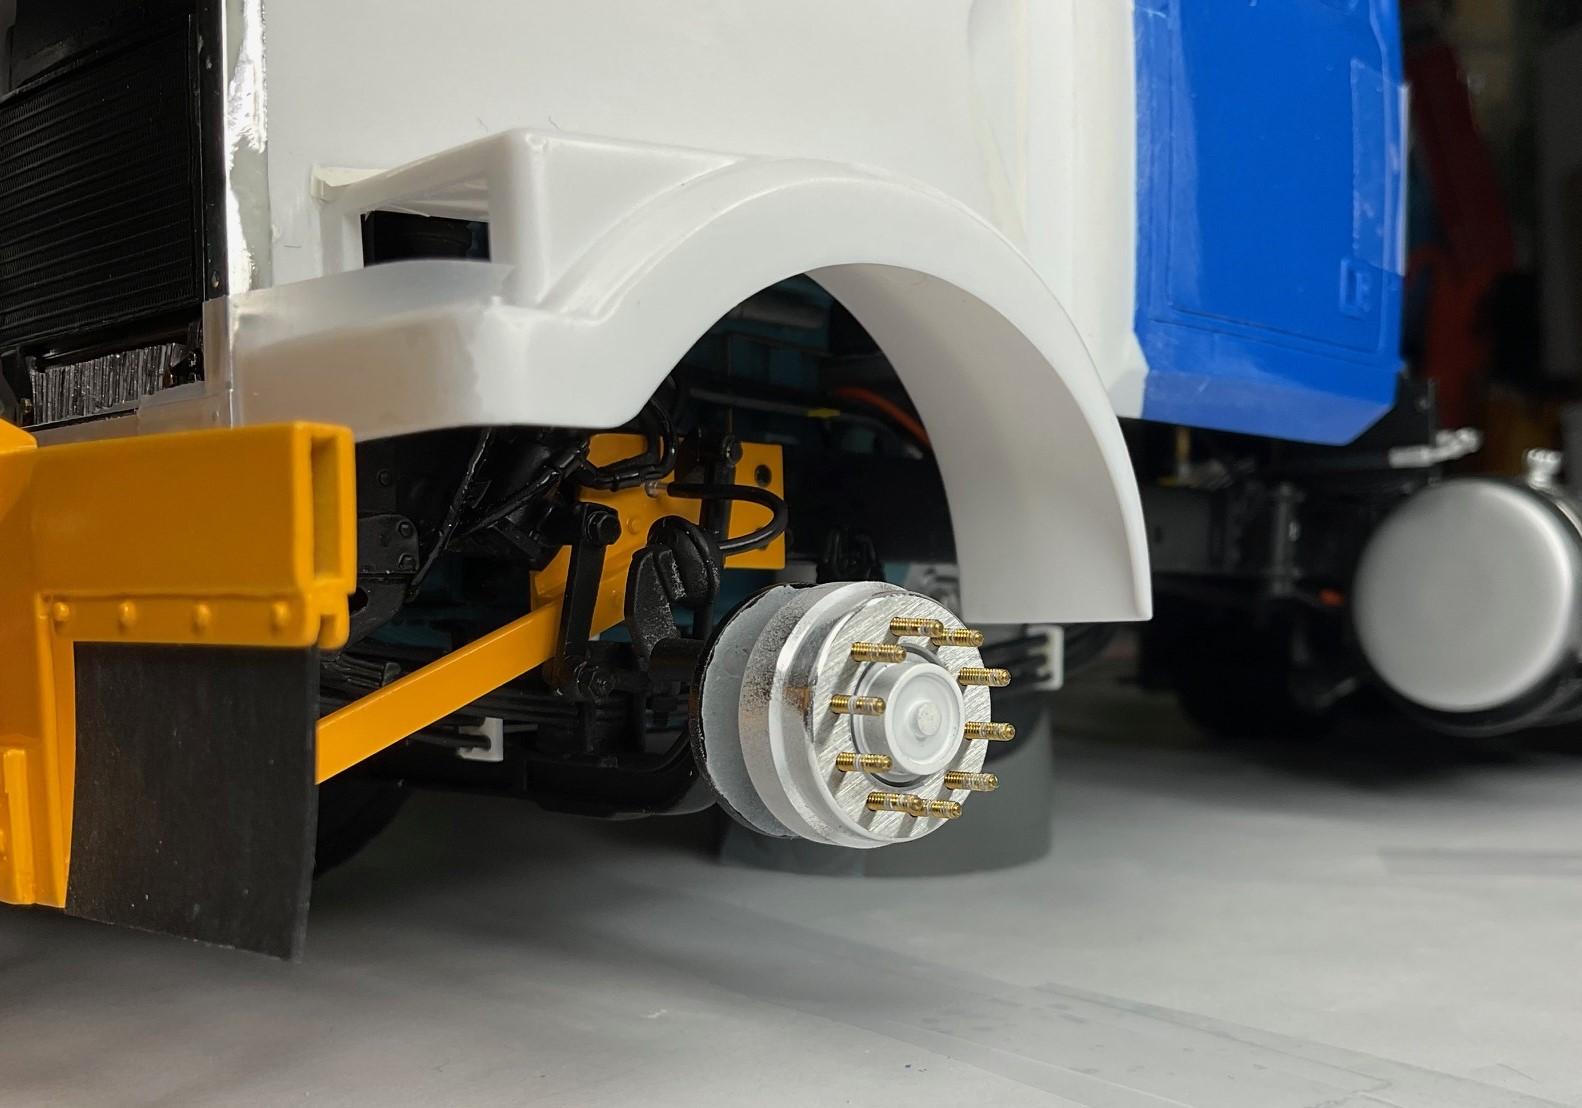
Did a bit more after dinner.........we have rubber ,,,,,,I may have to shorten the fuel tanks a bit,,,figured I should get the exhaust on 1st though
-
1
-
-
9 minutes ago, Biggu said:
Wow , Scott. Thats incredible ! You have nailed that. It looks so real. Even to the tie downs. Just excellent. Take a bow
Thanks Jeff
-
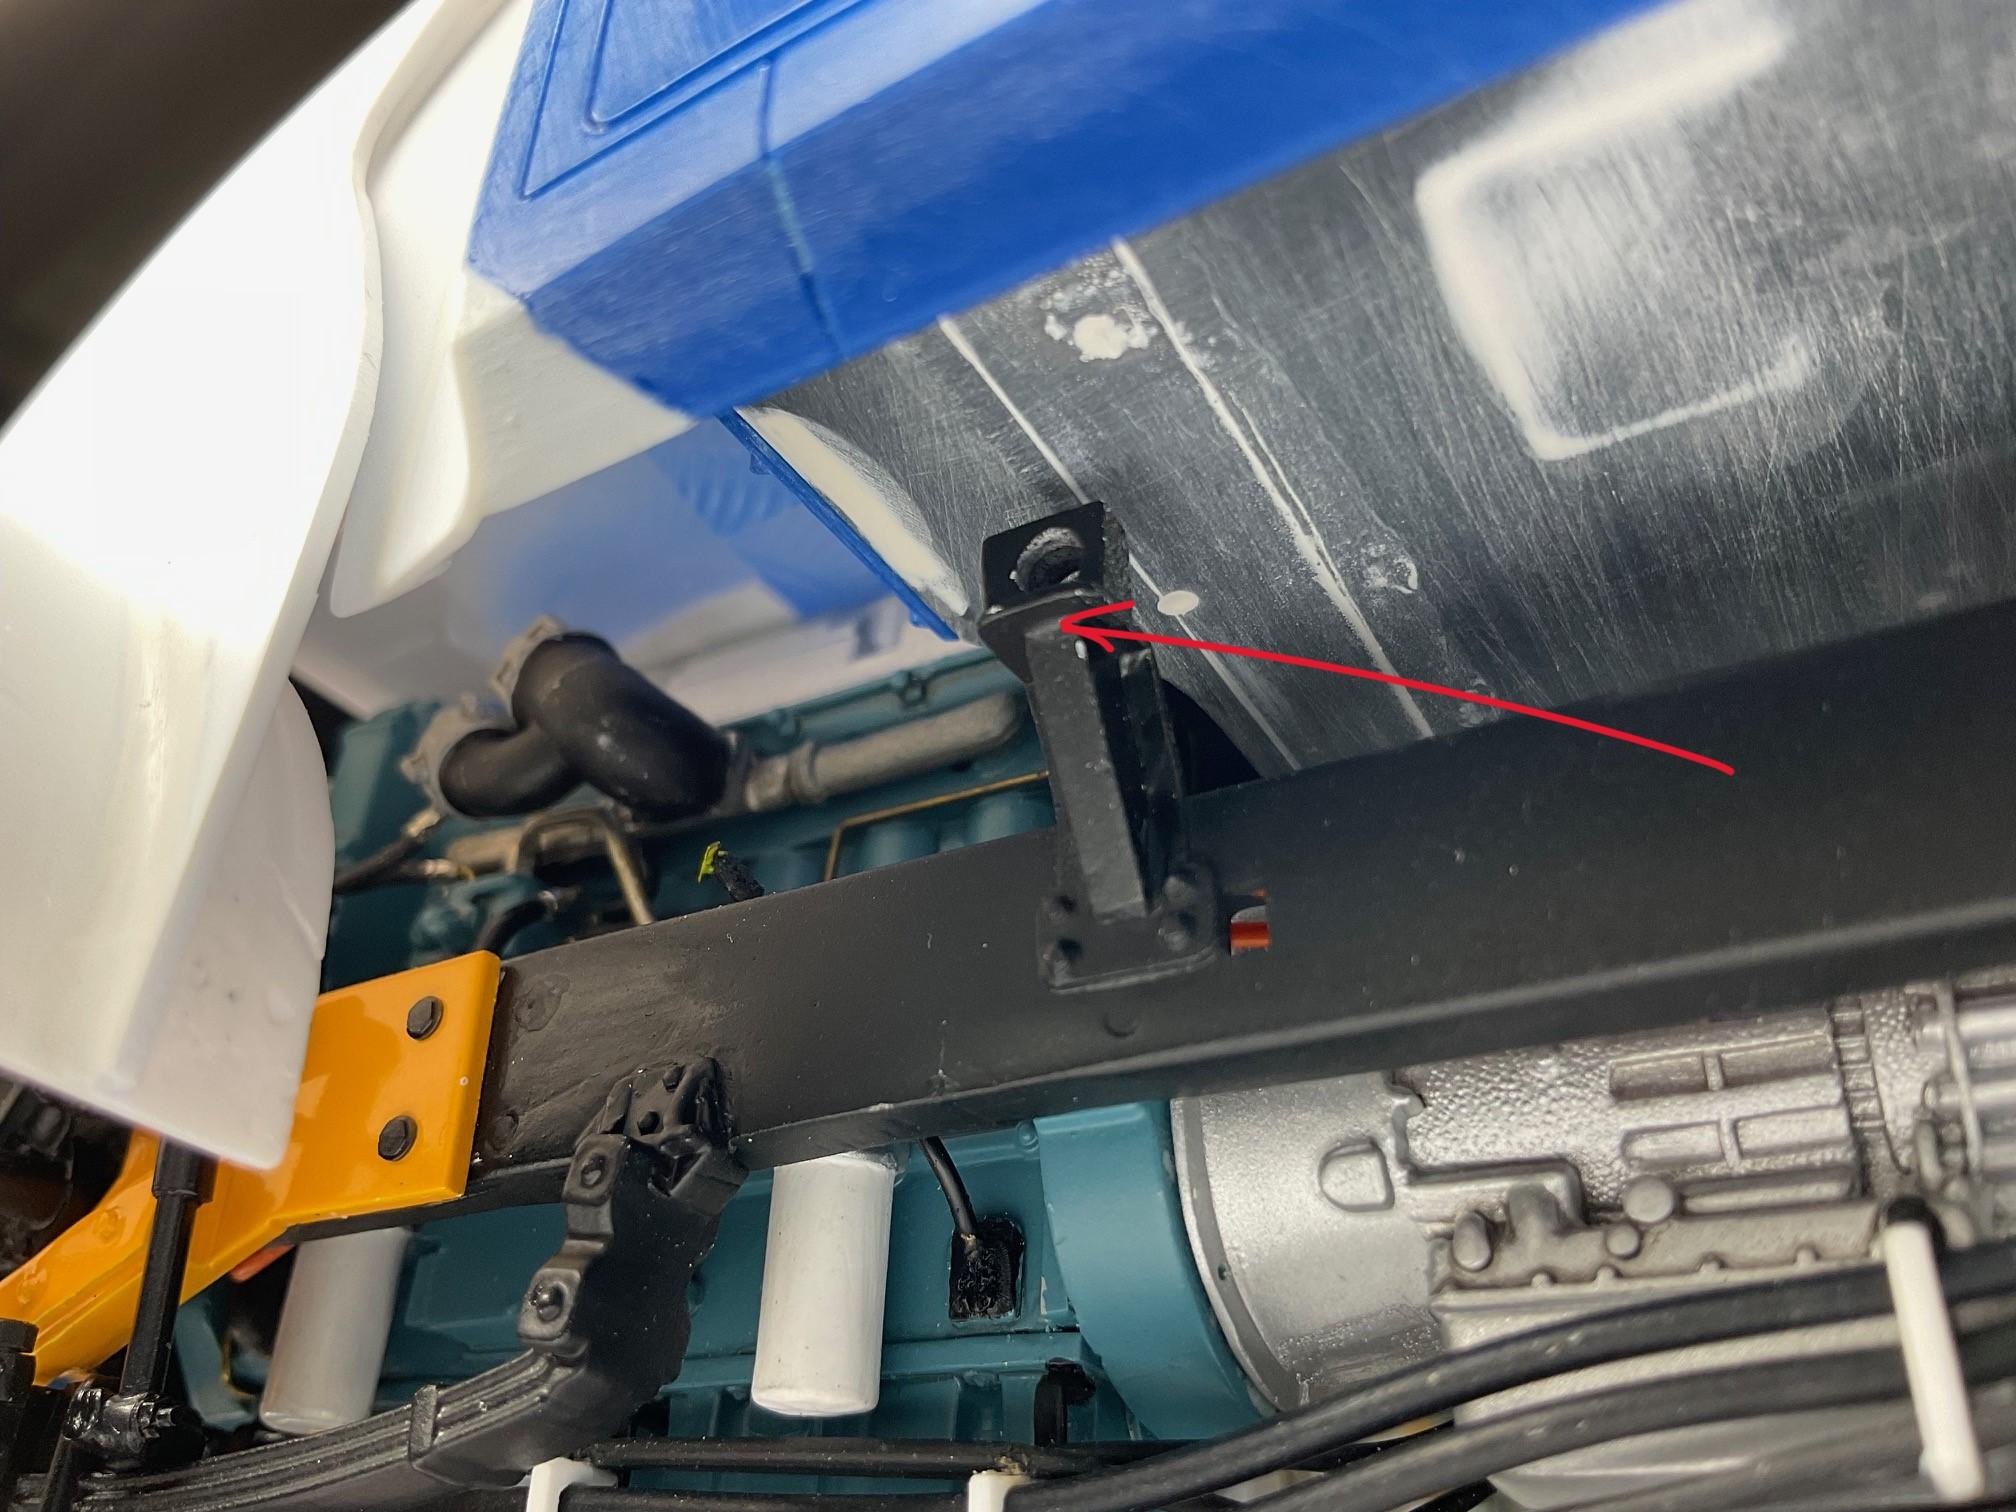
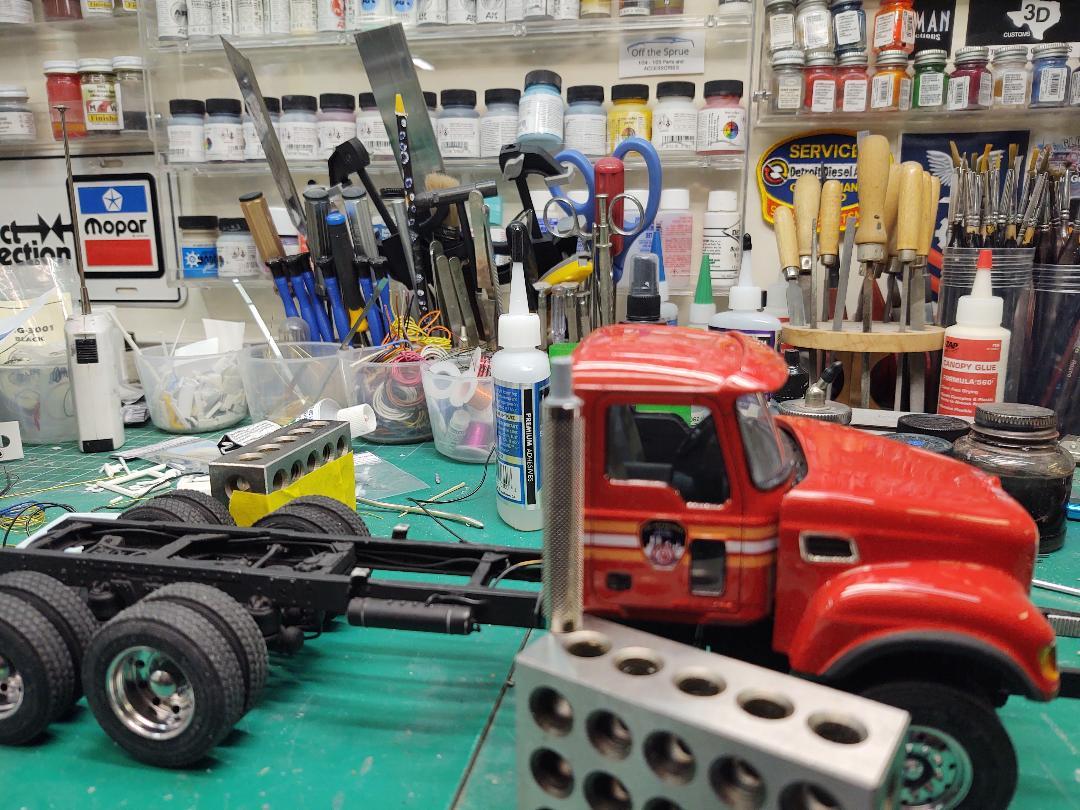
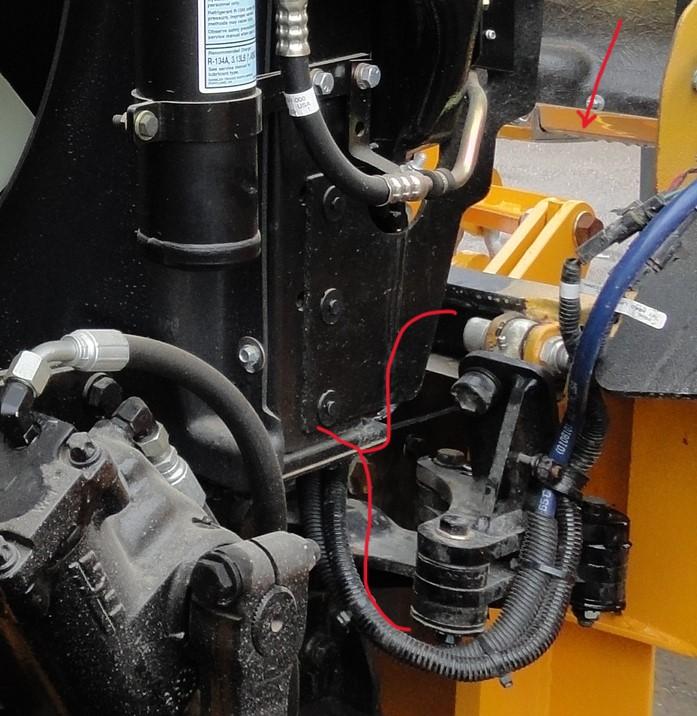
Well,I did have to work a few hours today,had to run down to Allenhurst Fire Dept and pick up a truck,,,but I did do some this afternoon,,,ran all the A/C lines and trans cooler lines,attached the coolant and washer reservoir and now doing the tanks .
-
2
-
-
10 hours ago, BK9300 said:
I agree - looks great to have the cab set in and lots of your plumbing finished - each time I look it seems like you've added more plumbing along the frame, too. When do you hope to have the truck on its wheels and tires?
I think within the next few days I should be able to get the wheels on,,,I still have to get the tanks and stack mounted yet
-
2 minutes ago, ShakyCraftsman said:
She's looking real good Scott.
Ron G
Thanks Ron!
-
lol !!!! true in the real world too! don't ask me how I know!!! lmao
-
1 minute ago, BK9300 said:
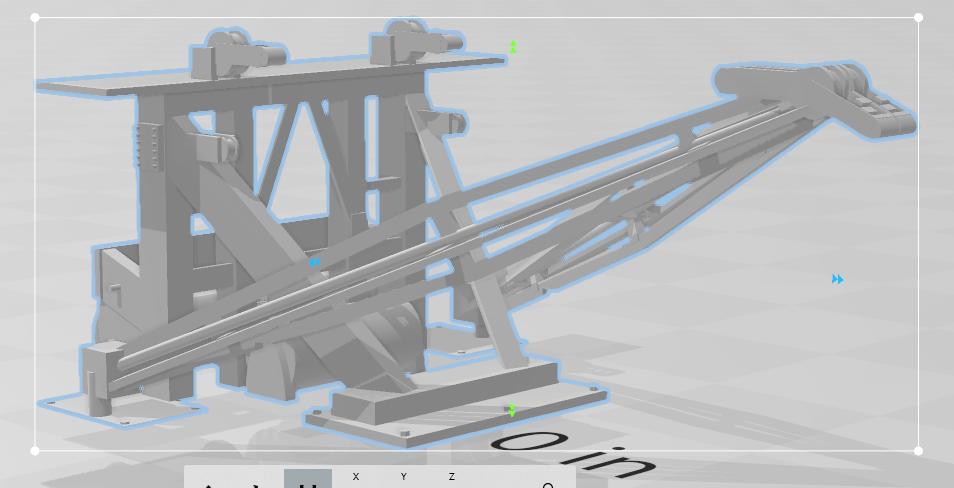
Hey, Scott - maybe you can do something similar as well! I've attached a pick of the WS hinge set up - I hope to make something that at least works with the same hinge point. I had the hood open for this pic and in the background and you can see the right see of ears for the lift arm support bar and other parts of the front plow lift through the grill surround opening. If the angle of the pic was taken a bit more to the right, you would see the lift arm itself sticking up through the opening. Should be fun to try and get all that lined up and have the hood close ok!
I had enough trouble getting my hood square to the cab,,,I'll let the mechanics worry about getting it tilted far enough......lol!!!!
-
1
-
-


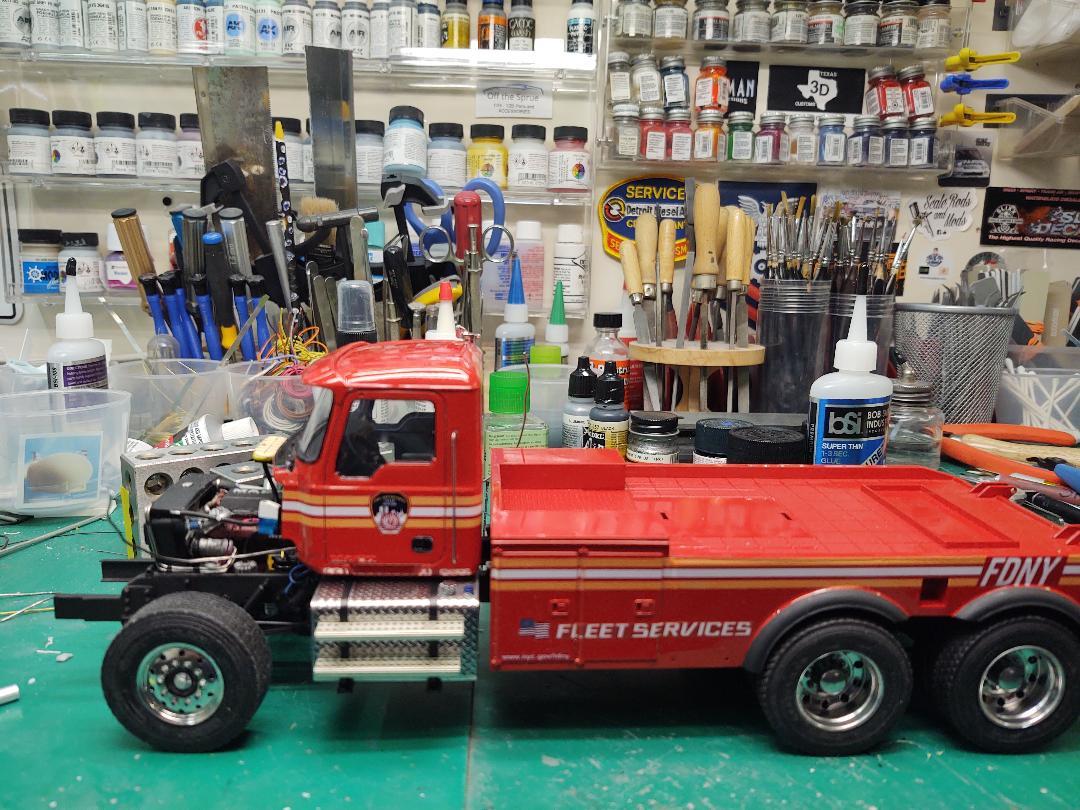
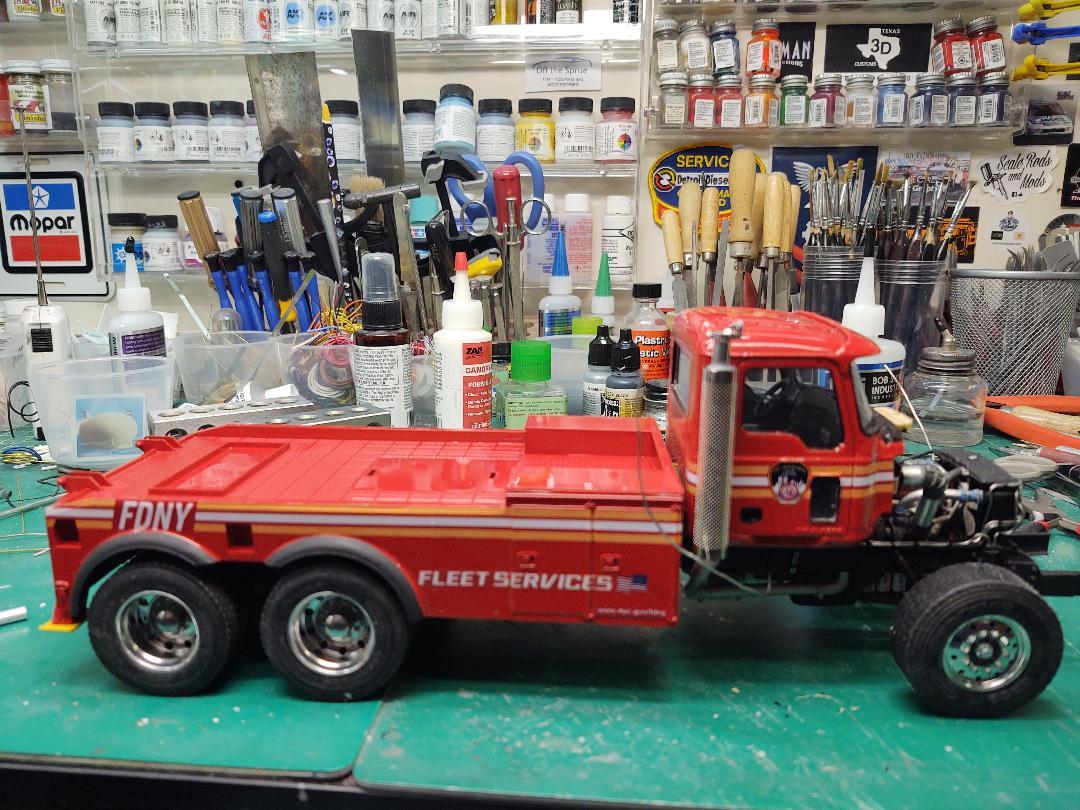


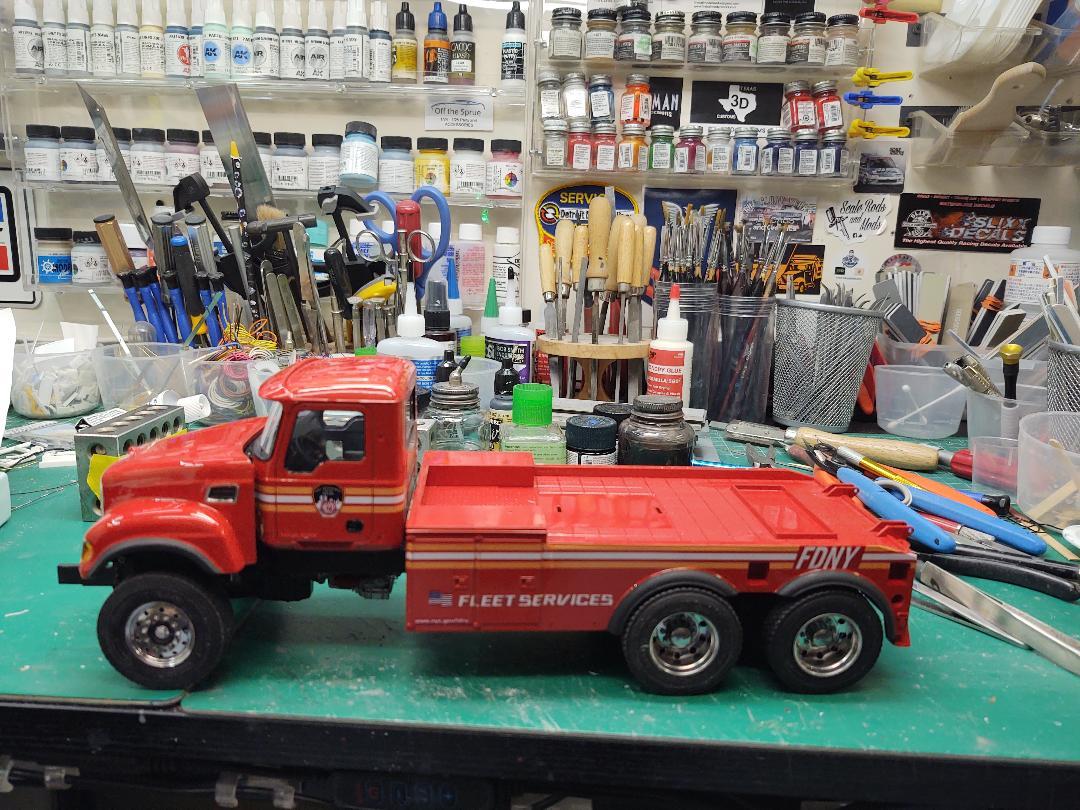

FDNY Wrecker
in WIP: Model Trucks: Big Rigs and Heavy Equipment
Posted
Thanks Brian,, I have a Whelen Edge bar in amber coming,,,I was going to use the red and blue one ,but I double checked my pics and the actual one is all amber ,probably put some marker lights on the diamond plate also .The winch(s) for the front are 2 weeks out ,,so I may have this done except for that .I guess a could make up a push bumper though